Vaniman SANDSTORM PRESTIGE I/O User manual

140 N. Brandon P.O. Box 74, Fallbrook, CA, USA 92088 1-800-VANIMAN (826-4626) USA www.vaniman.com
SANDBLASTER SAFETY 7/15Page 1
1. CONDITIONS FOR USE
This micro abrasive blaster may only be operated:
• Indoors;
• Below 6500 ft above sea level altitude;
• Ambient air temperature between 40°-105°F (5-40°C);
• Maximum relative humidity of 80% at 88°F;
• Power supply current fluctuations does not exceed 10% of nominal value;
• Under level 2 contamination conditions;
• Supply cool, dry air only, at a maximum pressure of 150 PSI.
2. SAFETY
• Always disconnect the unit from the compressed air and power sources before beginning any
maintenance.
• When working with the tank wear protective glasses to protect your eyes.
• Any abrasive material on the o-ring may lead to leakage and early wear of the o-ring. After filling, clean the
thread and o-ring before applying the lid.
• Solvents will create cracks in the jar and weaken the jar (danger of explosion!). Clean the lid and tank only
with a dry cloth. Do not write or adhere anything to the jar or lid.
• Check for damages on the lids and tanks regularly and replace them if there is any doubt of the structural
integrity.
• Before operation, check to make certain the lid is secured properly. Using the product without the lid secured
will create a serious explosive hazard.
• Never operate the blasting units without suitable dust extraction and appropriate protective gear. The type
of dust extraction should be based on the type dust generated. Ask the proper authorities.
• Never direct the blasting material towards eyes or unprotected areas of skin. Improper use can result in risk
of eye or skin injuries.
• Never work with the glass door open.
• Caution: Failure to wear eye protection can result in eye injury. Wear proper eye protection to protect your
vision.
• Do not depress the foot switch when only the compressed air supply hose is connected. The loose hose could
wrap around itself and cause serious injury.
• Unplug the unit from the wall before changing out the LED light. Do not squeeze or bend the light tube. Always
wear gloves or use a towel to protect your hands from glass splinters.
• Inspect power cords before beginning operation. The unit may not be used if the power cord is damaged.
2.1 Liability Exclusion - Vaniman Manufacturing shall be absolved from all claims for damages and warranty if:
• The product is used for any purpose other than it was designed for.
• The product is altered in any way other than those described in the operating instructions.
• The product is repaired by any body other than an authorized facility or if any parts other than Vaniman OEM
parts are used.
• The product continues to be employed, despite obvious safety faults.

SANDSTORM PRESTIGE I/O
140 N. Brandon P.O. Box 74, Fallbrook, CA 92088 1-800-VANIMAN (826-4626) www.vaniman.com
SANDSTORM PRESTIGE I/O-I-03/14 Page 1
PACKING LIST
1 - SandStorm Prestige I/O
1 - Instructions
1 - DC Power Supply
INSTALLATION & OPERATION
1. Remove all packing material.
2. Plug DC Power Supply into electrical outlet and into the right side of the light assembly.
3. Unscrew caps on media storage tanks.
4. Fill media storage tanks to fill line with blasting media of the size specified on tank label.
Each tank can hold up to 4 pounds. DO NOT OVERFILL as clogging may result.
Part No. Nozzle Size, Inches (mm) Color Recommended Media
Long Lasting Crystal Tips (2 per package)
97902 Medium, .032” (.8mm) Blue 25/50 μm Al2O3
97903 Large, .048” (1.2mm) Black 50/100 μm Al2O3, 50 μm Glass
97904 Extra Large, .065” (1.6mm) Red 100-250 μm Al2O3, 50/100 μm Glass
Precision Tungsten Carbide Tips (1 per package)
97905 Small, .026” (.65mm) Yellow 25 μm Al2O3
97906 Medium, .036”(.91mm) Green 50/100 μm Al2O3, 50 μm Glass
97907 Large, .059” (1.5mm) Violet 100-250 μm Al2O3, 50/100 μm Glass
5. Wipe off excess abrasive and screw caps securely back into place. Do not over-tighten;
lid will self seal when under pressure.
6. Attach your 1/4” ID (inside diameter) hose air supply line to the quick disconnect fitting on the
back of the unit, on the right of the small valve. If necessary, remove the fitting and replace
with the larger barb fitting for larger hoses. Secure hose with a small screw-type clamp.
NEVER depressurize the system by disconnecting the air supply line while under pressure,
abrasive will be forced into the valve and regulator which causes
damage. Vent the system with the "ON-OFF/FILL" inside the
cabinet as explained in #9.
**For more help visit http://www.vaniman.com/air-supply-connections-blasters/***

SANDSTORM PRESTIGE I/O
140 N. Brandon P.O. Box 74, Fallbrook, CA 92088 1-800-VANIMAN (826-4626) www.vaniman.com
SANDSTORM PRESTIGE I/O-I-03/14 Page 2
7. Inside the unit is the “TANK” selector knob for use of each the tank. The handpieces, tanks,
and valves are all color-coded for easy identification and use. Select the tank of choice by
turning the selector knob completely toward the appropriate position. The right position
will shut off air pressure to the tanks. This “OFF” position should be used when filling the
abrasive storage tanks.
NOTE: When the “TANK” selector knob is turned, the other handpieces (the handpieces
not selected) will expel air and blasting media for up to a minute while the residual
pressure escapes. To prevent this, vent the system by moving the “ON/OFF” selector
to “OFF”, change the “TANK” selector, and then turn back "ON".
8. Also inside the unit is the “ON/OFF” selector knob. This knob must be turned to the ON
position in order for the machine to operate.
NOTE: To fill the tanks or disconnect the unit from the air line, the ON/OFF knob must
be turned to the OFF/VENT position. Failing to do so will cause blasting media to
escape from the unit and/or damage to the unit itself. The ON/OFF selector will cause
the handpieces to expel media and air for a few seconds while the residual pressure
in the system is expelled.
9. Turn on the light by turning the knob on the right side of the unit.
10. There should be no leaking air when the unit is on. If there is, check your air supply connection
and tighten to secure it.
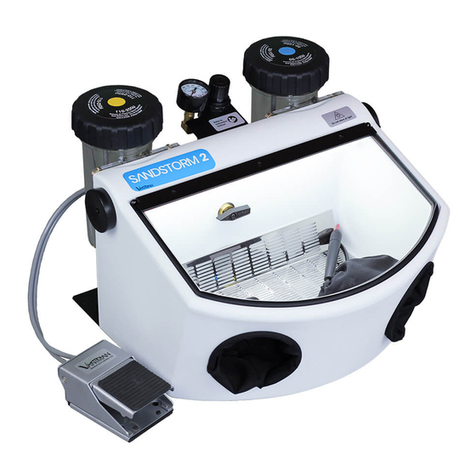
11. Securely attach the optional dust collection system to the hole in the back of the cabinet.
A dust collector is strongly recommended to contain the dust inside the cabinet. Vaniman
recommends the SandVac for single blaster use or the StoneVac II for high volume or multiple
blasting systems.
12. Regulate air pressure by turning the air regulator knob. Pull knob up to unlock before turning.
Pressure will indicate pressure reading. DO NOT adjust above 100 psi (7 BARS).
13. To begin blasting, use the foot pedal to start the flow of air and blasting media. Release the
foot pedal to stop the flow.
MAINTENANCE
Vaniman blasters are designed to be low maintenance. However, as the materials used in a
microblaster are abrasive by design, components do wear out. A few minor areas should be
maintained regularly for a long product life.
Handpieces Hoses:
Check handpiece hoses for wear regularly. When hose feels thin or holes develop, the tubing
should be replaced.
On the rear of the unit, where the handpiece hoses come through the cabinet, there is an
aluminum assembly that is a pinch valve for stopping and starting the media flow for the I/O
option. This will be the point of highest wear on the tubing. The hose can be slid back and
forth in order to "wear" a new section of hose. If a hole develops, replace the tubing.
SANDSTORM PRESTIGE I/O
140 N. Brandon P.O. Box 74, Fallbrook, CA 92088 1-800-VANIMAN (826-4626) www.vaniman.com
SANDSTORM PRESTIGE I/O-I-03/14 Page 3
Handpiece Tip Installation:
It is imperative that the handpiece tip and sealing o-ring be installed correctly and securely to
avoid damage or leaks. Install in the manner shown being sure the tip and o-ring seat evenly
in the assembly. Illustration 1
Illustration 2
INSERT
123456
7Fig. Reorder #
1 2192
2 2191
3 2187
4 2188
5 varies
6 2177
7 97959, #4
& #5 Not
Included
Tanks:
When installing the lids on the tanks, be sure the lid is rid of any blasting material or debris. If
the tank or lid begins to wear, replace immediately. Do not overtighten the lid on the unit. The
fittings on the bottom of the tank are designed for easy maintenance of the hoses. To remove
a handpiece tubing from quick disconnect fitting, push toward the tank on the plastic ring while
pulling the tubing out. Do not remove the hose fittings while tank is full of media and upright;
turn the tank upside down or empty before removing hoses. To replace, be sure the fitting
and hose are free of debris or abrasives and push the hose firmly into the fitting. Be sure it
goes in until you can see it through the clear wall of the tank fitting. Improper installation will
result in leakage and damage to the tanks.
Glass Window:
Included with the unit is a free "Static-Cling PN: 97951" blasting shield for the inside of the
window. These are inexpensive protection for the viewing clarity of the window. To install, pull
off the backing on the shield and adhere to the inside of the window. Replace when necessary.
Moisture
Vaniman blasters include a Filter for small amounts of oil and moisture. If moisture causes the
media to clump or cake in the tanks, improper media flow will result. Be sure the air supply
is relatively oil and moisture free.

SANDSTORM PRESTIGE I/O
140 N. Brandon P.O. Box 74, Fallbrook, CA 92088 1-800-VANIMAN (826-4626) www.vaniman.com
SANDSTORM PRESTIGE I/O-I-03/14 Page 4
REPLACEMENT PARTS
SandVac Dust Collector (VMC part #10211) & StoneVac II Dust Collector (part #10201)
Blasting Media
Part No. Material Size Applications
97921 Aluminum Oxide 25μm Fine surfacing of metal, porcelain and acrylic.
97922 Aluminum Oxide 50μm Removal of oxides. Preparation of porcelain faces before ring.
97923 Aluminum Oxide 100μm Deasking. Alloy preparation for porcelain work.
97924 Aluminum Oxide 250μm Bulk removal of investment and tough oxide layers. Rough surface preparation.
97925 Glass Bead 50μm Smoothing/polishing. Devesting porcelain. Finishing of occlusal surfaces/crown interiors.
1
4
5
2
3
6
7
8
9
10
11
12
14
13
15
Fig. # Description Reorder Part Number
1Pinch Valve Assembly 2234
2Vent Valve Assembly 2283
3Filter Regulator Assembly 2286
4 Sand Jar Assembly 25 micron
Sand Jar Assembly 50-100 micron
Sand Jar Assembly 110-250 micron
97956
97957
97958
5 Thumb Nut 2266
6Selector Valve Assembly 2284
7Air Pressure Gauge 2112
8 Floor Screen 2240
9LED Light Assembly 97969
10 Window Bracket Assembly (with glass) 2282
11 Pin-Hinge Assembly 2290
12 Window 2241
13 Protector Shield 97951
14 Cuff Holder 2260
Not Shown Cuff (Black Cloth) 2033XL
15 Window Gasket Kit 2030B
Not Shown Blow Off Gun 2285
Table of contents
Other Vaniman Dental Equipment manuals

Vaniman
Vaniman StoneVac II User manual

Vaniman
Vaniman SANDSTORM MOBILE User manual

Vaniman
Vaniman VANGUARD MOBILE 2.0 User manual

Vaniman
Vaniman SANDSHELL User manual

Vaniman
Vaniman Flex Hose Plus User manual

Vaniman
Vaniman SandStorm Prestige User manual

Vaniman
Vaniman StoneVac MillSync User manual

Vaniman
Vaniman VANGUARD 1X User manual

Vaniman
Vaniman 10660 User manual

Vaniman
Vaniman VANGUARD GOLD MOBILE User manual