VDO CD 2217 G User manual

?
0
/':\
:
9 I 10
5611 12 13 14
15
16
tu
'f----__-l o
tT-------tt ^
" I InEsET
iM:6#',6 )
,.'-- dffiE
10
5
"l--
= -l o
n I l---L
't t|Eql

@tu
ry

.t:n
-ttl
t_.rlE.F,ru,E!]rtl
"lt.:q4.,!r.:!rl
a I
| [I ri]li-,li:lls
r [.&]L,mll-]l BT
Mic.
/-,\
atu*.rt
oPh
o"''"
oB-*
O*"'
3TMtC.
-3 c2 ci
+
Rlght
l')
t+r*[!r =
tr8t ! !",""1A
t
l=t'.t'"N"!*-
19
t""N".t*.N^*r
".f
_f
{Headunit)

41-:2"

INTRODUCTION
Before
Starting
Thankyou
for
purchasing
thisVDO
Dayton
product,
which
hasbeen
designed
andmanufactured
according
toapplicable
SafetyRegulations,
following
the
higheststandards
and
subjectedtorigor-
oustesting.
Kindlyfamiliarizeyourselfwith
the
product
byreading
thisusermanual
carefully.
uaethe
pfoduct
asintended,
andkeep
thismanual
handyin
your
carforfuture
reference.
Environment
This
bookletisprinted
on
low-chlorine
recyclable
paper.
Preventive
Maintenance
to
gt
E
ul
To
ensure
good
connection
between
the
setandthe
detachablefront,
itisadvisable
tocleanthecon-
nectors
periodically
with
acottonswab
slighflymoistened
with
cleaning
flujdoralcohol.
TECHNICAL
ANDFUNCTION
DATA
cD2217c co2327G cD2537U cD2737B
Power
Supply 12V 12V
lMax.Power
[W] 4x40 4x50
4x20 4x25 4x25
4x40 4x50
Sinus
Power
[W] 4x2O
Quiescent
Current <3mA <3mA <3mA <3mA
lllumination Switchable
(orange
/ green
/
dual)
Programmable
Switchable
(o€nge/ green
/
dual)
Swilchable
(ofange
/ green
/
dual)-
_
Programmable
Switchable
(orange
/ green
/
dual)
Programmable Programmable
SleeringWheel
Remote
Control
SpeedDependent
Volume
Control Needs
calibration Needs
calibration Needs
calibration Needs ca ibfalion
3Bands(including
1
AST
band)
2[rW
Bands
(]nclud-
ing1AST
band),1
LW
Band
3Bands(includlng
i
AST
band)
2 [4W
Bands
(inc]ud-
ing1AST
band),1LW
Band
[,4P3
Format
1q!l'
r!9
ragl
3Bands(including
1 3Bands(including
1
AST
band) AST
band)
2[4W
Bands(]nclud-2[rW
Bands
(inctud-
ing1
ASTbard).1
LWing1AST
band).1
L\.
Band Band
CD(with
ESP)
SD/ MMC Reads
upto2GB Reads
upto2GB
Vl.1
speedireads
up
1d2
GBmemory
V2,O
+ EDR
USB V1.1
speed;reads
up
to2 G€ memory
Bluelooth
BT
Froiles
l,?.p olt
FrontPanel
HSP,
HFP,A2DP
2-Channel(2V) 2-Channel(2V) 2-Channel(2V) 2-Channel(2V)
Flip
down,DetachableFlipdown,
Detachable
Flip
down, Ftip
down,Detachable
Telephone
N,lute Slngleflylead
cable Singleflyleadcable Singte
flylead
cable Singleflytead
cable
178x
50x160
mm 178
x50x160
mm i7BxS0x160mm
Dimensions
(WxHxD) 178
x50x
160mm

CONTENTPAGE Interference
suppression.........................14
LocationoftheBluetooth
l\,4icrophone
Modu|e....................................
............15
sEcuRtTY........_.....................................15
Removing
theFront
(fig.
O
-
O)
..............15
Inserting
theFront
(fig.
R
-
T)..................15
FRONTPANELAND
REMOTE
coNTROL...............................................16
GENERAL
OPERAT|ON.........................18
Switching
On/Ofi....................................18
Selecting
aSource..................................18
AUDIO.....................................................18
Settingthe
Start-upVolume........ .........18
SOUNDMenu..........................................'18
Mute
(silence)..........................................'18
BalancingtheVolume
forDifferent
Sources...................................................18
RAOtO.....................................................18
Region
Settin9.........................................18
ANilBand..................................................19
SelectaWaveband
..................... ....19
SelectaStation
.......................................19
Auto-Seek
Tunin9....................................19
ManualTuning.........................................19
Storing
aStation......................................19
Auto
Store
(AST).....................................19
Manual
Store...........................................'19
RADIODATA
SYSTEM
(RDS)................19
Display
ofStation
Name
(PS)..................
19
AlternateFrequency
(AF)
........................
19
TrafficProgramme(TP)
andTraffic
Announcement(TA)
................................
1
I
Presetting
TAVolume
..............................1
9
TA
Activation/ De-activation
....................
19
lnterrupting
TA.........................................20
Enhancedother
Network
(EON)..............20
Programme
Type
(PTY)
:..........................
20
Searchingfor
aProgramme
Type............20
PTYActivation
/ De-activation
.................20
RDS
Regionalization
...............................20
cDopERAT|ON.....................................20
Loading
CDinto
theHeaijunit.................20
Ejecting
aCD.........................
................_.2O
Playing
a
CD-RorCD-RW......................20
Playing
a"Copy-Protected"
non-,
conforming
audioCD...............................
20
Listening
tol\i]usic......................
...............2'l
l\ilulti-Session
Disc...................................2'l
TA
/NEWSInterruption
...........
................21
Track
Selection........................................21
1NTRODUCT|ON.......................................7
Before
Startin9...........................................7
Environment..............................................7
Preventive
Maintenance............................7
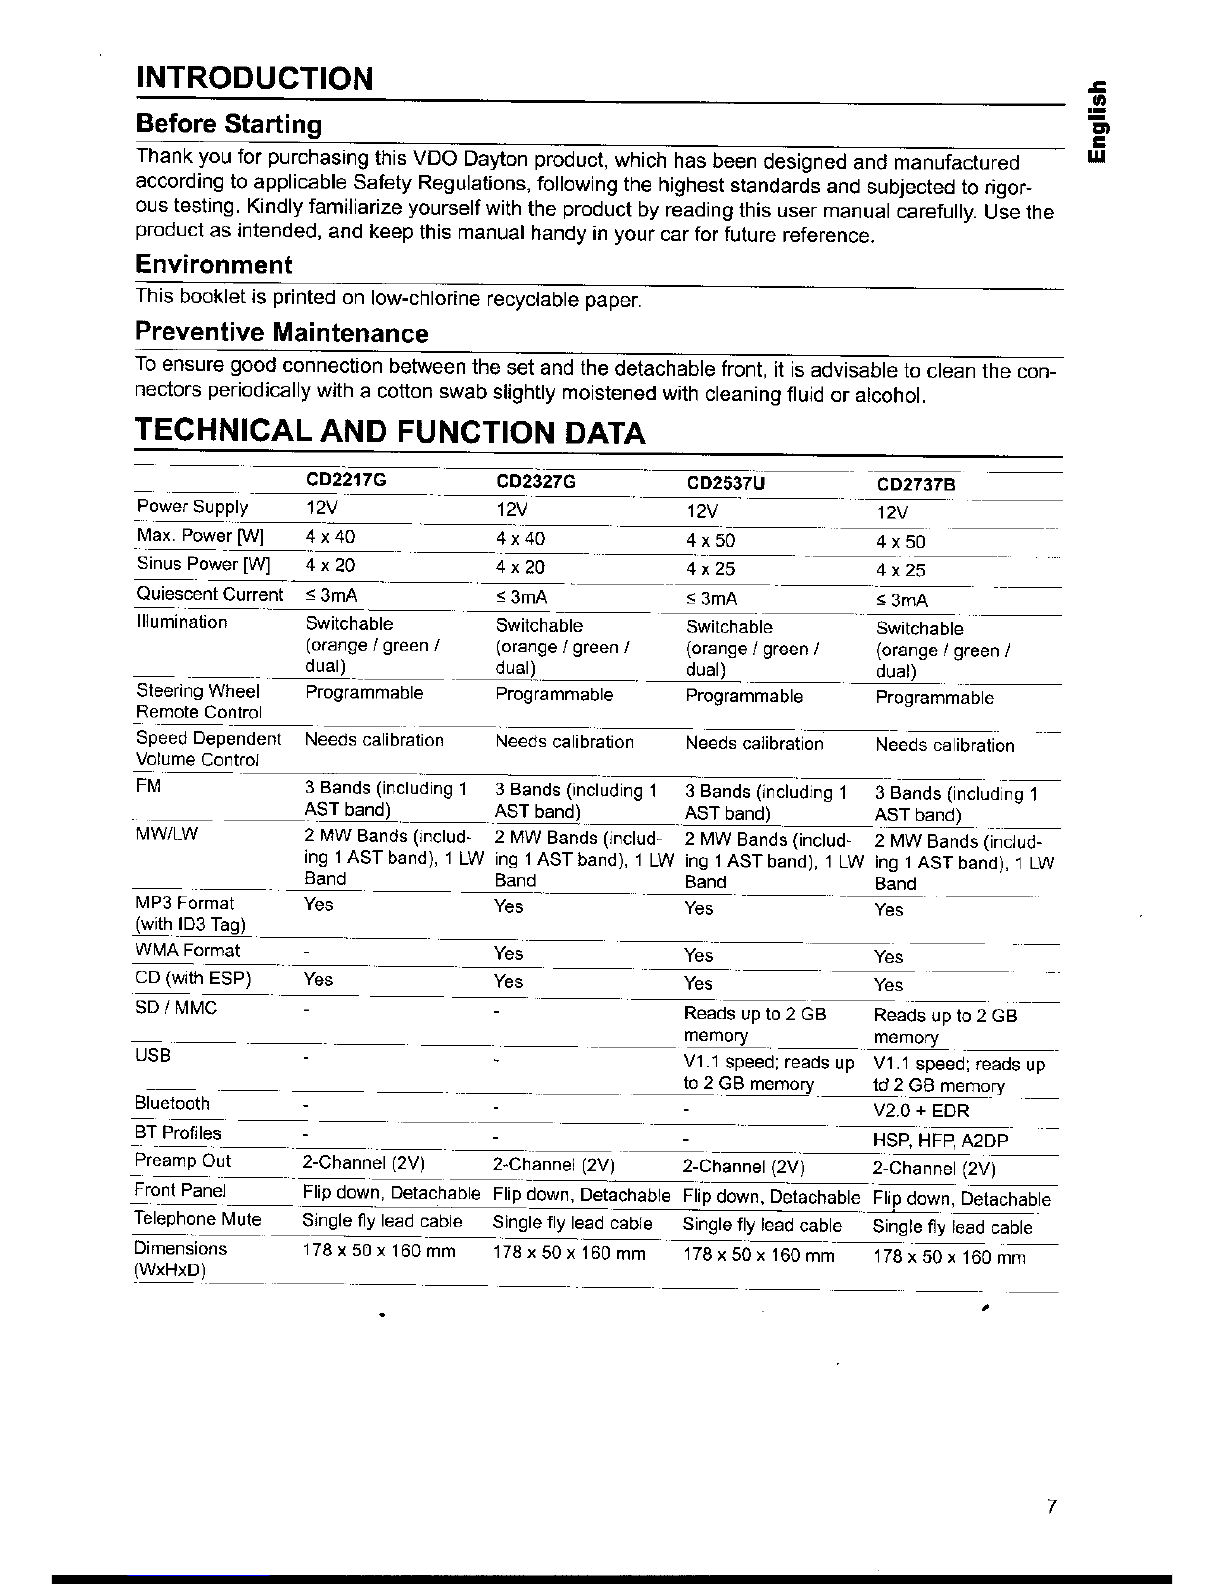
TECHNICAL
ANDFUNCTION
DATA,......7
GONTENT
pAGE............................_.........8
GENERAL
TNFORMATTON.......................9
Disc|aimer..................................................9
Class1
LaserProduct...............................9
Disposal
ofbatteries
andaccumulators
(Directive
2006/66/EC)..............................9
FCC
Compliance.......................................I
CE
Comp|iance..........................................9
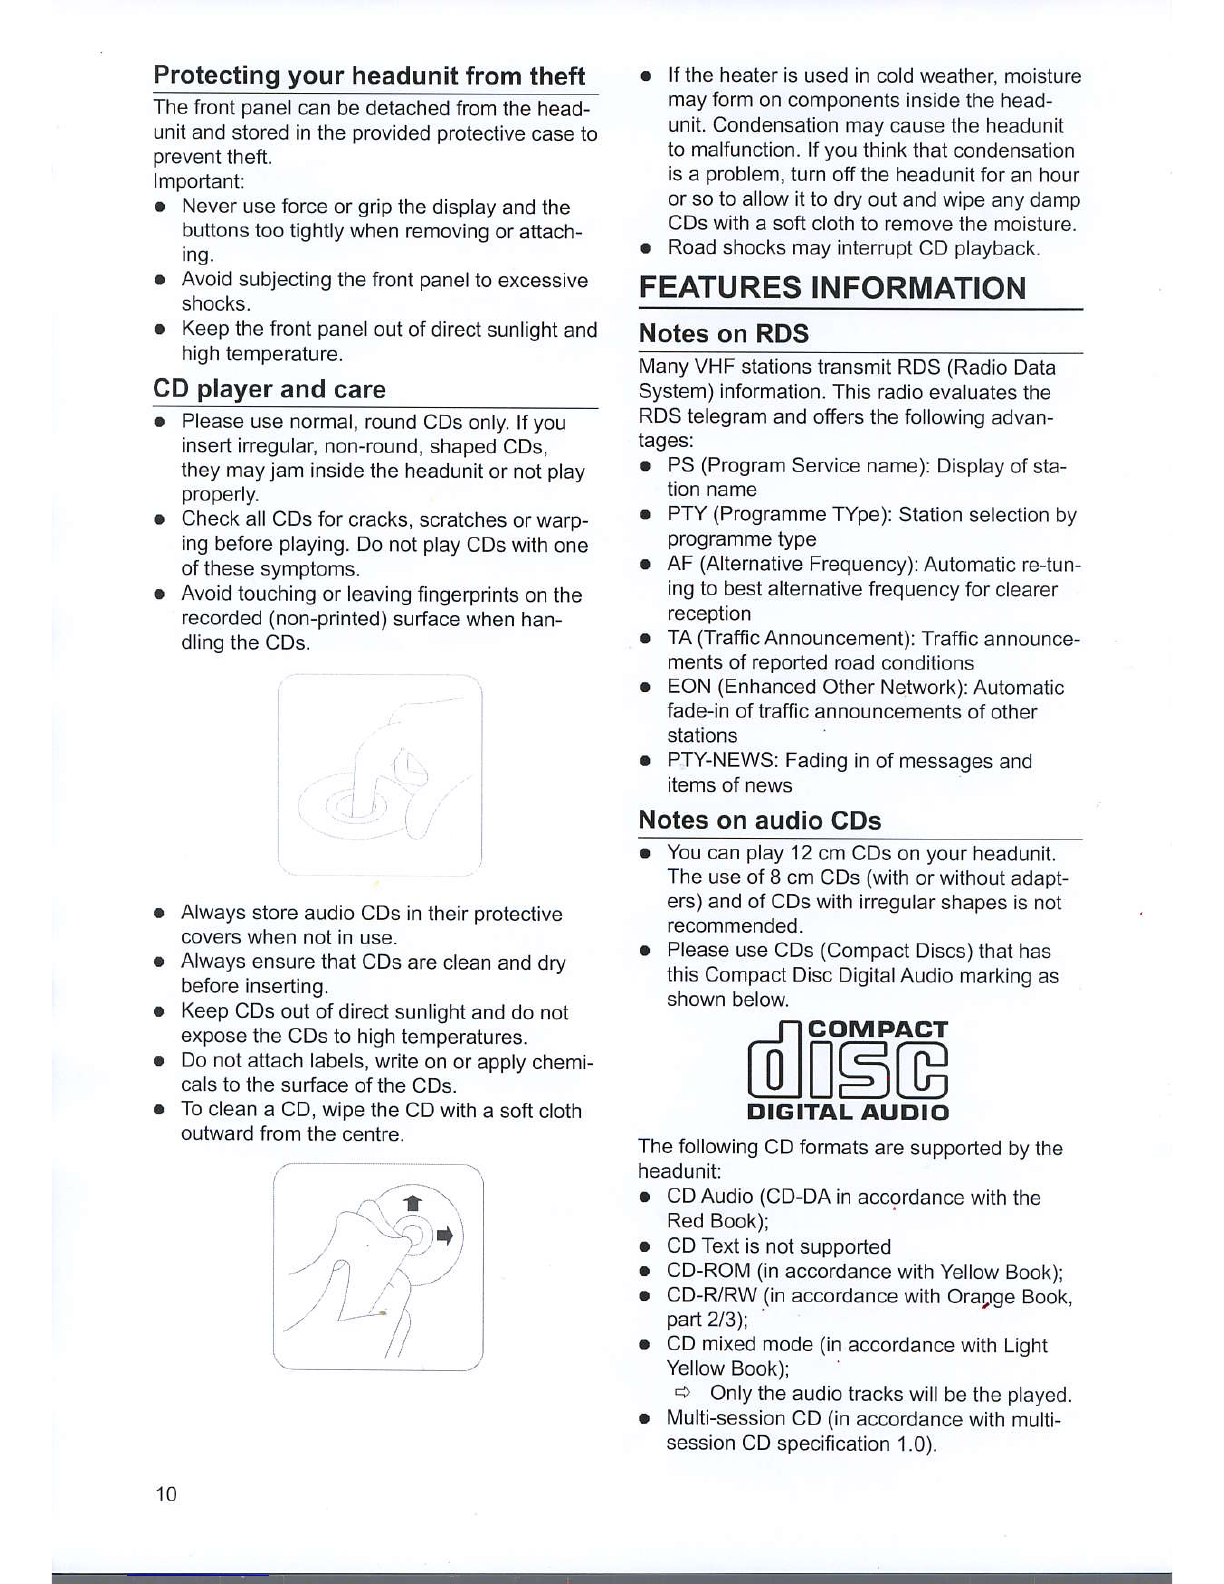
Protecting
your
headunit
fromtheft
.........10
CD
player
andcare..................................10
FEATURES
TNFORMATTON
...................
10
Notes
onRDS..........................................10
Notes
onaudioCDs................................10
Notes
onl\4P3fi1es..................................
11
NotesonWMAfi|es.................................
11
Notes
onfolders......................................
11
Notes
on
SD/l\rMC.................................12
Noteson
USB..........................................12
NotesonBluetooth@
Technology............
12
Notes
onPriority......................................12
tNSTALLAT|ON.......................................13
Connection..............................................13
Connection
invehicles
equipped
with
standardI
SOconnectors.........................
13
Connection
invehicles
without
standardI
SOconnectors.........................
13
Preparation..............................................13
Connectors
(fig.
L,MandN)...................'13
ConnectorA
1
).........................................13
Connector
B1
)........................................13
Preamp
Out.............................................13
Wires
ofSteeringWheel
Remote
Control
(SWRC).......................................13
WireofTelephone
[/ute...........................
14
Wire
ofRemote
Amplifier.........................
14
MOUNTrNG.............................................14
lvletal
Sleeve
(fig.
J&K)..........................14
Connecting
the
Headunit
(fig.
L&lV)......14
l\.4ounting
theHeadunit(fig.
U&V)..........14
Front
Mounting
(DlN
slot)........................
14
Rearl\,4ounting(JlN
slot)..........................
14
Removing
theHeadunit
(fig.
T
&U).........i4
Replacing
theFuse
(fig.
L&M)...............14
8

Fast-Forward
orFaslBackwardaTrack....21
ScanFeature...........................................21
RepeatFeature........................................21
RandomFeature......................................21
USB
ANDSD/MMCOPERATION...........21
Genera|....................................................2'1
Auto-Play.................................................21
OperationsofUSBandSD/N/[/C............21
TA/NEWSlnterruption
...........................21
BLUETOOTH
OPERAT|ON..................'22
Genera|....................................................22
Controls
(fig.
K)........................................22
Pairing.....................................................22
Paired
Devices........................................22
Hands-Free
Ca11......................................22
Answer
aca||...........................................22
Rejecta
call.............................................22
Hang-up
acall.........................................22
lvlusic
Streaming......................................22
AUXOPERAT|ON...................................22
SPECtALFUNCT|ONS...........................22
C|ock........................................................22
Telephone
N4ute.......................................23
BrightnessContro1...................................23
lllumination
Co|our...................................23
SecurityLED............................................23
SpeedDependentVolume
Control
(SDVC)....23
Caiibration...............................................23
SteeringWheel
RemoteControl
(SWRC)
.....23
SoFTWARE
ACCESSMENU
(SAM)
.....25
TROU8LESHOOT|NG............................28
NOPOWER
Verification..........................
28
NOSOUNDVerification...........................
28
SOUNDTROUBLE
Verification...............28
CDERRORSVerification
........................28
USB&SD/ MMCERRORS
Verific€tion.....28
GENERALINFORMATION
Disclaimer
Thedesigns
andspecifications
statedinthis
usermanual
aresubjectedtochangeswithout
pnor
nolce.
VDODayton
acceptsnoresponsibility
fordata
iosson
your
storagecardsand/o.
USBdevicesif
thedata
islostwhileusing
thisheadunit
Class1LaserProduct
Caution:
Anyinappropriaie
useofthedevice
may
exposetheuserto invisiblela-
serrays.Which
exceedthelimitsfor
Class
I laser
products.
Disposal
ofbatteriesand
accumulators
(Directive
2006/66/EC)
Inmanycountriesitisforbidden
todisposeemp-
tybatterieswithnormal
domestic
waste-Please
find
outtheregulationsthatapplyin
your
area
regardingthedisposalofused
batteries.
Please
takecarethatdamaged
orleaked
batterieswill
bedisposedinaprofessional
way.
FCCCompliance
ThisdevicecomDlieswith
oart15oftheFCC
Rules.
Operationissubjecttothefollowing
two
conditions:
(1)
This
devicemaynotcausehafm-
ful
interference,and
(2)this
devicemustaccept
anyinterferencereceived,
includinginterference
thatmaycause
undesiredoperation.
CECompliance
C€
Hereby,SiemensVDO
TradingGmbHdeclares
that
thisdevicecomplieswith
theessenttal
requirements
andotherrelevant
provisidns
of
Directive
1999/5/EC.
TheDeclaration
ofConformityis
availableupon
request
atthe
following
address:
SiemensVDOTrading
cmbH,
KruppstraBe
105,
60388Frankfurt
amlvlain,Germany.
5
o
B
E
ltt
CLASS1
LASERPRODUCT

Protecting
your
headunitfrom
theft
Thefront
panel
canbedetachedfrom
thehead-
unitand
storedinthe
providedprotective
caseto
prevent
theft.
lmportant:
. Neveruseforce
or
grip
thedisplay
andthe
buttonstootightly
whenremovingor
attach-
Ing.
. Avoid
subjectingthefronI
panel
toexcessive
snocKs,
. Keep
thefront
panel
outofdirectsunlight
and
hightemperature.
GD
player
andcare
Pleaseusenormal,
roundCDsonly.
lfyou
insedirregular,non-round,
shaped
CDs,
theymay
jaminside
theheadunit
ornot
play
properly.
CheckallCDsfor
cracks,scratches
orwarp-
ing
before
playing.
Do
not
play
CDswith
one
ofthesesymptoms.
Avoid
touchingorleaving
flngerpnts
onthe
recorded(non-printed)
surfacewhenhan-
dling
theCDs.
Always
storeaudioCDsin
their
protective
coverswhen
notinuse.
Always
ensurethatCDs
arecleananddry
beforeinserting.
KeepCDs
outofdirect
sunlightanddonot
expose
theCDstohigh
temperatures-
Do
notattachlabels,
writeon
orapplychemi-
cals
tothesurface
oftheCDs.
To
cleana CD,wipe
theCDwith
asoftcloth
outward
fromthe
centre.
..'.'i..i
-r
.,'.-,3.rrrl
-t i") .,..,t
.,
...,i. ,-1.,
. lftheheater
isusedincoldweather,moisture
mayform
oncomponentsinsidethehead-
unit.Condensation
maycausetheheadunit
tomalfunction.lfyou
think
thatcondensation
is
aoroblem,
turnofftheheadunit
foranhour
orsotoallowittodryoutandwipeanydamp
CDswithasoftcloth
toremovethemoisture.
. Road
shocksmayinterrupt
CD
playback.
FEATURESINFORMATION
Notes
onRDS
ManyVHF
stationstEnsmitRDS
(Radio
Data
System)information.
Thisradioevaluates
the
RDStelegram
andoffersthefollowing
advan-
tages:
. PS
(Program
Servicename):Display
ofsta-
tionname
Pry {Programme
TYpe):
Stationselectionby
programme
type
AF
(Alternative
Frequency):Automatic
re-tun-
ingtobest
alternativefrequencyfor
clearer
reception
TA
(Traffic
Announcement):Traffic
announce-
ments
ofreportedroadconditions
EON
(Enhanced
OtherNetwork):
Automatic
fade-in
oftrafficannouncements
ofother
stataons
PTY-NEWS:Fading
inofmessagesand
items
ofnews
Notesonaudio
CDs
. Youcan
play
12
cmCDson
your
headunit.
Theuseof8cmCDs
(with
orwithout
adapt-
ers)andofCDswith
irregularshapesisnot
recommended.
. Please
useCDs
(Compact
Discs)thathas
thisCompact
DiscDigitalAudio
markingas
shown
below
ncoMpacT
- lnralE
I-IJIU=JL9
DIGITAL AUDIO
Thefollowing
CDformats
aresupportedbythe
headunit:
. CDAudio
(CD-DA
inaccordance
withthe
Red
Book);
CDTextis
notsupported
CD-ROM(in
accordance
withYellowBook);
CD-RyRW(in
accordance
withOrargeBook,
part
2/3);
CDmixed
mode
(in
accordancewithLight
Yellow
Book);
c) Onlytheaudio
trackswill
bethe
played.
Multi-session
CD
(in
accordancewith
multi-
sessionCD
specification1.0).
10

Noteson MP3files
The
followingMP3files
aresupportedbythe
headunit:
. Filesconformingwith
MPEG
'1i2
or2.5,
Layer-3
Upto65k
titles
in
upto255directories
(each
datanamewithmaximum
of32characters)
Bitrate:Thisheadunit
can
play
recordings
withbitrates
of32kbpsto320kbps,
con-
stant
or
variable
bit|ate
(VBR).
The
sound
quality
ofMP3flles
generally
becomesbetter
withanincreased
bitrate.Toenjoy
soundof
acertain
quality,
werecommend
usingdiscs
recorded
withabit
rate
ofatleast128kbps.
lD3tagdisplayi
lD3tagV1andlD3
tagV2.
MP3tracks
cancontainadditionalinformation
suchas
artist,trackandalbumnames
(lD3
tagswith
maximumof32characters).
Char-
acters
otherthanuppercase
and
lower
case
letters
("Aa
toZz")andunderscore
("_")
may
not
display
properly.
Theheadunitmay
not
play
thetracksin
the
orderthat
you
wrote
themtothe
slorage
medta.
Theheadunit
plays
onthefirctsessionif
the
disccontainsboth
CDaudiotracksandMP3
files.
. When
playing
atrackwithVBR,
theelapsed
playing
timeinthedisplaymay
notbeac-
cufate.
. Make
surethata l\rP3
CD-RyRWisburned
andformatted
asadata
discandNOTasan
audio
disc.
. l\,4P3files
arenotcompatible
with
packet
writedata
transfer.
. Thefeisno
"m3u"
play
list
compatibility.
. There
isnoMP3i
(MP3
interactive)norMP3
PROformats
compatibility.
. TheMP3symbol
onthedisplaywill
beshown
ifa MP3trackisbeing
played.
Notes
onWMAfiles
WMAis
shortforWindows
Media@Audio
and
referstothe
audiocompression
technologythat
is
developed
byMicrosoftCorporation.
Micro-
soft@,Windows
l\,4ediaand
theWindows@logo
aretEdemarks
orregistefedtrademarks
ofMi-
crosoft
Corporationin
theUnitedStates
and/or
othercountries.
. Thisheadunitmay
not
playback
alltypesof
encoded
WlVlAfilescorr€ctly,
depending
on
theapplication
usedtoencodethefiles.
. There
maybe
aslightdelaywhen
starting
playback
of
WMAfiles
encoded
withimage
oala.
. The
headunit
maynotdisplayfolder
name
longer
than32characters
correctly.
. ForfilesrecordedinRomeofile
system,only
thefirst64characterswill
bedisplayed.
. Theheadunit
will
playback
WMAfiles
en-
codedbyWindowsMedia
PlayerversionI
orbefore.
Somefilesencodedbynewerver-
sionsmaynot
playback.
. Bitrate:Thisheadunitcan
play
recordings
with
bit
rates
of32kbpsto320kbps,
con-
stantorvaiable
bitrates
(VBR).
The
sound
quality
of
WMA
files
generally
becomes
bet-
terwithanincreased
bitrate.Toenjoysound
ofacertain
quality,
werecommend
usingon
discsrecordedwith
abitrateofatleast128
KDpS.
. The
headunitdoesnotsupport
WMAfilesen-
coded
in
WMAProfessional,WMALossless,
WIVIAVoiceformatorWMA
withDRI\4.
Notesonfolders
!o
B
E
]U
AnoutlineofaCD-ROMwith
MP3MN4Afilesis
shownbelow
rf?tfff
Sub-foldersareshown
asfolders
intheselected
folder.
. Theheadunitassigns
theorderofthefolders
for
playback
automatically..
Folders
withoutanyMP3ruVMA
fileswill
be
skipped
automatically.
Up
toB-tier
(layer)
offolders
issupported.
However,
theremay
beadelayinthereading
oftableofcontent
(TOC)
ofthediscwith
nu-
merous
tiers.Forthisreason,
werecommend
creatingdiscswithno
morethantwo
tiers.
It
ispossible
toplayback
upto255folders
on
'1
discandupto255
tracksin'1
folder.
11

Notes
onSD/MMC
Theheadunit
cansupport
thefollowingSD
orMl\,4C
cardthathasone
ofthesemarkings
shownbelow
sz^
Theheadunit
cansupportmemory
cardswith
up
to2 GBofmemory
anddoesnotsupport
HC-SD
(4
GBandabove).
The
headunitmaynot
play
SDcardswith
lockfunction.
. The
headunitmaynot
beabletoread
some
miniSD
ormicro-SD
cardswithadapters-
lmportant
Note:Thisheadunit
cannot
guarantee
100%compatibility
andreadabilityfor
allSDor
IVIMCcards.
. Theheadunit
hasbeen
testedwiththefollow-
ing
brands:
+ SDcard
(SanDisk,
Toshiba&Kingston)
+ Mini-SD
(Toshiba
&Kingston)
+ Micro-SD
(Toshiba
&Kingston)
+ MMCMobile
card
(Kingston)
. The
headunitwill
supportmemory
cards
formatted
inFAT8,FAT16
orFAT32
only.
Memory
cardsformatted
inNTFS
fileformat
maynotread
correctly.
. The
headunitwill
automatically
playback
tracksrecorded
inMP3
orWL4Aformats
from
the
memorycards
uponinsertion
ofthecard
into
therightslot.
Notes
onUSB
Theheadunit
can
supportmost
passive
USB
memory
sticksand
battery-operated
USBmusic
players.
. Theheadunit
can
supportUSB
devicewith
upto2GBofmemory
Theheadunit
maynot
beabletoread
some
USB
deviceswithmore
than2cBorsome
battery-operatedtJSB
music
players.
Port-
ablehard
disksaremostly
notsupported
as
theysourcedhigh
current.
Theheadunit
supports
USBspecifications
version
'1.1.
IJSB
devicesconforming
to
USBspecifications
version
2.0orabove
are
mostly
backward
colnpatible.
lmpo.tant
Note:This
headunit
cannot
guarantee
100%
compatibility
andreadability
fora
USB
devices.
. Theheadunithas
beentestedwiththefollow-
ingbrands:
+ Toshiba
+ Kingston
+ lmation
. Theheadunit
willsupport
USBdevicesfor-
matted
inFAT8,FAT16orFAT32
only.USB
devices
fofmattedinNTFSfileformat
may
notread
correctly.
Notes
onBluetooth@
Technology
$ Uuetooth'
Bluetoothis
ashort-fangewirelessradio
con-
nectivity
technologyusedmainly
tormobile
phones,
hand-held
PCsandothef
devices.
. Bluetooth
SIGInc.ownstheBluetooth
word,
marking
andlogos;
andanyuseofsuch
marksis
underlicense.Other
trademarks
andtradenames
arethoseoftheirrespective
owners.
. Bluetooth
operatesin2.4
GHz
frequency
range
andtransmitsvoice
anddataatspeeds
ofupto'1
mbps
withinarange
ofupto10m.
. Theheadunit
supportstheHandset
Pfofile
(HSP),
HandsfreeProfile
(HFP)
andAd-
vanced
AudioDistribution
Profile
(A2DP).
. Theheadunit
hasbeenverified
andcertified
byBluetooth
QualificationProgram
(BQP)for
compliance
totheBluetooth
standards.For
moreinfofmation,
please
checktheBluetooth
website
(http://wwwbluetooth.com/Blue-
tooth/ConnecvProducts/)
fortheBQP
product
listing.
Notes
onPriority
For
you
tounderstand
your
headunit
better,the
priorities
of
eventsandinterruptions
aresum-
marized
inatable.Incoming
eventwith
sameor
higher
priority(than
cur.ent
event)willinterrupt
current
event,
Priority Event
1 User-activatedMule
orincomingTelephone
Ivlule
2' Bluetooth(proflle
isaccordingtothe
SAM
setling,
e.9,HFP
lSt )
TPlostandincoming
TP/TA
Tuner(Fl\,4,
[rW andLW)
andAUX
Volume-0
PTY-News(if
acrivated
inSAIV)
USB,SD/Ml\.lC
andBluetooth
(otherprofites
notnominated
ashigher-prigrityf
12
' Depends
onSAI\,1seitings

INSTALLATION
Usethesuppliedmounting
sleeveandthe
rear
screwtomounttheheadunitfirmly
inthe
dashboard.
Onlyusethesupplied
screws
for
installation.
Keepleftoverinstallationequipment
forfuture
use.lftheinstallationrequires
drilling
ofholes
orothermodificationstothevehicle,
please
contact
your
dealer.Thisheadunitisde-
signedfortheinstallation
intheDIN-sizedradio
spacein
thedashboardof
your
vehicle.
Connection
Connection
invehiclesequippedwith
standardISO
connectors
. Theheadunit
maybeinstalledwithoutmajor
preparation
invehicleswithISOconnec-
tors.However,
somesignalsmayhave
tobe
adapted
orconnectedtotheISOconnectors.
Connectioninvehicles
withoutstandard
ISO
connectors
. Forvehicles
withdifferentconnectionfequire-
ment,
ask
your
dealerfor
anadaptofcable.lf
no
adaptorcableisavailablefor
youf
vehicle,
connect
theheadunitasdescribedin
the
"Connectors"
section.
Preparation
Thedevicemust
beconnectedtoa 12VDC
electricalsystemwith
anegative
terminalto
earth
(car
chassis).
Warning:
Installation
thatdoesnotconform
tothese
requirementsmayresultin
malfunction,
damageorfire!
To
avoidtheriskofshort
circuitdu nginstaF
lation,disconnect
thenegativeterminal
ofthe
battery
untiltheheadunithas
beensecurely
installedand
connected.
Connectors(fig.
L,M
andN)
ConnectorA 1)
. (optional)
A1:ConnecL
lothespeedsignal
ffomthespeedometef
of
your
vehicle-
Some
vehicles
arealready
prepared
forit.Please
consult
your
dealer
. A4:Connect
totheswitched12V
supply
(switched
on/offbythe
carignition)
. 45:Connecttothe
power
supplyfor
anelec-
tronjcantenna
orthecantrolwirefor
therelay
ofanautomaticmotorized
antenna.
Donot
usethisconnection
tordirect
power
supplyto
theantennamotor
(optional)
A6:
Connecttocorresponding
dashboardwiringfor
thelightingcontrolfor
in-vehicleillumination.
A7:
Connecttoapermanent
'12V
supply.This
is
lhe
main
power
supply.Ensurelhatthis
connectioncanhandleacurrentof
upto
15A.
A8:Connecttoearth/ground
(vehicle
chassis
ornegative
terminalofthebattery).
Signal Pin
3
0
t
ua
Signal
IAll splq
IA2]
IA3]
IA5l Antennacontrol
[46] PilotLight
[A7] Battery
lA4l lqnition JAS] Ground
ConnectorB 1)
Connectorforloudspeakers(use
4-ohmloud-
speakersonly)wing.Donotconnectanyof
the
loudspeaker
leadstoearthordirectlyto
abooster/amplifierwithouthigh-levelinput
or
via
anexternalfader!Youcanconnect
the
loudspeakerleads
directlytoanamplifierwith
highlevelinputs.Theconnectionis
shown
in
the
followingtable.
Side& Dol.
Front/colour Pin Rear
/colour Pin
lB5l While lBTl
Left
C) Greer
/ black LB6l
Whire
/ olac( -B8l
Right
(+) Grey lB3l
Blue {qrl
R'ght
G) Grey
/ olach [84] Blue/ back lB2l
1)For
thisaccessory
pease
contact
your
deaer
Prcamp
Out
Youcanconnectapower
amplifierwith2or4
(need
toshare)additionalloudspeakerstothis
headunit
usingtheRCAcable
(refer
topasted
connectionlabel).
. RedRCAtoright
channel
. WhiteRCA
toleftchannel
Wiresof SteeringWheelRemoteControl
(swRc)
Somemainfunctionsofthisheadunit
canbe
operatedfrom
your
existing
id-vehicle
SWRC,if
availableandsuitablefor
usage.lfyour
vehicle's
SWRC
is
basedon2-wireRC-3
compatible
configuration,itcan
bedirectlyconnectedtothe
headunit's
pair
ofSWRCwires.
. Please
program
theheadunit
torecognise
your
vehicle's
SWRCcommandsfirst
before
using.
. YoumayneedtoturnontheSWRCinside
theSAM
after
programming.
Please
check
theSAM.
In
case
you
arenot
sureofthesteps,
please
contact
your
dealerforassistance.

Wireof Telephone
Mute
lfyour
mountedhands-free
cafkit
of
your
mo-
bile
phonepfovides
amute
signalwire,
you
can
connect
thiswiretotheheadunit's
telephone
mute
wiretoenable
automaticinterruption
of
theheadunit
ssoundoutput
duringanincoming
phone
call.
. Please
ensurethatbothwires
aresecured
properly
andnottensioned,
otherwiseany
strong
vibrationinsidethevehicle
willbreak
thecontacts
apart.
. Please
tapeandcover
theconnectionends
toprevent
any
accidentalshort-circuit
tothe
in-vehicle
metalchassis.
Wireof RemoteAmplifier
For
certainmodels,there
isaremoteampli-
flerwire
connectedat
the
rear
oftheheadunit.
Connect
thiswireto
the
"enable"
signal
of
your
remote
power
amplifier,and
connectingthe
Preamp
Outtothe
audioinputtoo.
Otherwise
(if
thereisnoremote
amplifierwire),
you
mighthaveto
sharethe'[A5]Antenna
con-
tfol'signal
with
the
remote
antenna.
Note:
Checkthecurrentrequirements
ofboth
your
remote
amplifierandremote
antenna
and
make
suretheydonot
exceed300mA.
MOUNTING
Metal
Sleeve
(fig.
J &K)
Install
themetal
sleeveinthe
dashboard.For
optimal
performance
oftheheadunit,
themetal
sleeve
shouldbe
positioned
horizontally
(be-
tween
-10'
and
+30").
Fix
themetal
sleeveinto
place
withtheaid
ofascrewdriver
Connecting
theHeadunit(fig.
L&M)
Ensure
thatthebatteryis
disconnected.
Insert
the
power
supplyconnectorA
into
socketA.
Insertloudspeaker
connector
Bintosocket
B.
(Optional)
Connectthe
preamp
outRCA-
pair
totheleads
ofthe
power
amplifier
(if
present)
using
a
pair
ofmale-RCA
cabte
(not
provided).
lnset
the
aerial
plug
into
theaerialsocket
(good
receptionis
only
possible
withagood
aerial).lfanantenna
adaptorisneeded,
please
consult
your
dealer.
a
Mounting
theHeadunit(fig.
U&V)
This
headunitcan
be
properly
installederther
from
theconventionalFront
Mountingand/or
fromRear
Mounting.
Front
Mounting
(DlN
slot)
. Slidetheheadunit
intothemetal
sleeveuntil
the
springsateitherside
oftheheadunit
snapinto
theopeningsofthe
sleeve.
. Finallyreconnect
thenegative
carbattery
terminal.
Rear
Mounting
(JlN
slot)
. Remove
theframefront
ofyour
headunit.
. Inserttheheadunit
throughthebackside
of
thedashboard
untilthebracketsoneither
sideisalignedwith
thescrewholes.
. Screwbothsides
of
your
headunitwith
M5x6mmmax.length
screws
(for
these
items,
please
contact
your
dealer).
. Mounttheframefront,
. Finally,
reconnectthenegative
carbattery
terminal.
Removing
theHeadunit
(fig.
T&U)
Press
theRELbutton
anddetachthefront
panel.
Insert
bothremovalkeys
inlotheholesonthe
front
oftheheadunit
untiltheylock.
Press
(inward)the
two
catchesontheside
untiltheyunlock.
. Pullout
theheadunit.
Replacing
theFuse
(fig.
L& M)
. Replacewitha '15A
blade{ypefuse.
. Thenewfusemust
beofexactvalue
and
type,
otherwisetheheadunit
willnotbe
ad-
equately
protected.
lgnoringthis
procedure
maylead
todamage
oftheheadunit,which
willinvalidate
the
guafantee.
Interference
su
ppression
. I\,4ost
moderncarshave
€ufficientinterference
suppression.
lf
you
experience
interference
generated
bythevehicle,
please
consult
your
oeater.
'14

Locationof
theBluetooth
Microphone
Module
. Thedistance
betweendriverandtheBlue-
toothlvlicrophoneModule
shouldbewithin
700mmwithno
obstaclein-between.The
saidmoduleshouldbe
placed
in
thefront
near
thecentreconsole,for
example.be-
sidestheheadunit.
SECURITY
Removing
theFront
(fig.
O-Q)
'1
. PresstheRELbutton,
toflip-downthefront.
2. Pushthefrontlightly
totheleftsideand
pull
thefronttowards
you.
3. Takethe
detachablefrontwith
you
when
you
leaveyour
vehicle.
4. Keepthefront
inthe
provided
protective
case.
lnserting
theFront
(fig.
R
-
T)
1. Takethefrontfromits
protective
case.
2. Alignthefront
againsttheleft-sidehinge
of
theheadunit.
3. Pushthefront
lightlyagainsttheleft-side
hinge
and
insed
thefrontintotheheadunit
untilitclicksinto
position.
4. Close
thefrontuntilitclicksinto
position.
E
,
tt
c
u

FRONT
PANELANDREMOTE
CONTROL
SeefiguresAandB.
Headunit Remote
Control Action Tuner cD,usB.,sD/
Mltlc.&Aux ,!lifi'.
srr',r,souro
(21
6; SP Mute
LP PowerOn/ Off
(1)
o(1r
)ccw Decrease
(loweri uecrease
{oweflvo
ume
Select
previ-
ousoption
(for
Selectnext
uw Increase
{l^lghe'j lncrease{hiohe
volume opllon
{lol
| + ] " curenl
meru
\-./ rcr,,/
(10)
l2l
@
(2)
ESP Changesource (n.a.)
LP
(3)
@
(3)
r-t
SP
EnlerSAN,4menu In
SAN,4
menu:
SeLectnext
item
lnSOUND
rnenu:Enter
SAM
menu
LP (n.a.J
Activate
AutoSlore lnSAI\,,1menu:
(n.a.) ExitSAlt{
(4)
E
(4)
@SP
EnterSOUNDmenu
lnSAI\,4menu:
EnterSOUND
InSOUND
menu:Selecl
LP lnSOUND
menu:Exit
SOUNDmenu
(5)
@
ply Lp Activate
/deactivatestation
searchbyprogramme
tvpe
(5)
AAND
ESP ChangeTuner
Band ChangetoTuner
rnode (n.a.)
(6)
@.. SP Activale/ DeactivateTraffic
Announcement
LP Activale
/ DeactivateAlternateFreouencv
(71
A(6)
clManualsearch
(PTY
mode:select
type)
Select
(A2DP Selectnext
Trackfasl-fotward
(conlinuouslypress)

Headunit Remote
Conlrol cD,usB.,sD/
IVMC
*&Aux
Action Tuner ,flifi--sau,souroto
SP ttt
C
Ir
(e)
o
(8)
VLP (PTY
mode:
select
gramme
type)
Tfackfasl-rewind
(continuouslypress)
Select
previous Select
previ-
IracK ousmenu
(A2DP iiem
(121 SP
(PTY
mode:
starts Select
previous
track
prog€m
searcn
Select
ITACK
(A2DP
Selectpfevi-
LP
SP
(10) (7)
(>)
lvlanualsearch
ffequency
up
(PTY
mode:
starts
program
searcnupJSelect
next
track
Select
nextlrack Selectnext
(A2DP menutem
(11)
c... SP Select
preset
1
Storecurrentsta'
tioninto
pfesel
1
Toggle
SCANmode
(off/ 10sec
pef
track) (n.a.) (n.a.)
112l
@... SP Select
preset
2ToggleREPEAT
mode
(off/sngle/folder
/all)
LP Storecurrentsta
tioninto
pfeset
2(n.a.)
(13)
@*" SP Select
preset
3ToggleRANDOM
(off
/folder
/all)
LP Storecurrentsta-
tioninto
preset
3(n.a.) (n.a
)
(14)
@," SP Select
presel4 Jump10
tracksback-
(for
CA
playback (n.4.) (n.a.)
Select
previous
folder
LP storecunenLsl"a- :" ":'-"'"'':"" '"'::
(ror
uA
p
ayDacKwrth
tioninto
preset
4
' rotoersl
(15)
@, SP Selecl
presel
5Jump10tracksfoF
fofCA
playback
only) (n.a.)
LP ;j"#:#:t'"*.
i:,i";[::li"ifl
,'.
(16)
@.. SP Select
presel
6
- TooolelD3text
storecurrenlsla- (onji forMP3)
lon nto
preset
b(n.a.)
(17)
@Release
thefront
EjecttheCD(if
a CD
lsinside)
'Depending
onmodel
SP:ShorlPress cA: Compressed
Audio (n.a.):
NoAction
CCW:
Countecclockwise CWr
Cockwise
17

GENERAL
OPERATION
Switching
On/ Off
Option
(</V or>/ )Setting
(turn
theknob)
LOUDNESS loFF,
1,2,
3l
To
switchontheheadunit,
short-pressthe
,19.,
Knoo.
Toswitch
offtheheadunit,long-press
the
:h
button.
SelectingaSource
STYLE UAZZ,
POECLASSIC,
USER,VOCAL,FLAT]
BASS
(only
in'USER'style)[ 7to010
+7]
TREBLE
(only
in USERstyle) [-7
to0lo +7]
Your
headunitis
designedfordifferent
typesof
sources,
dependingon
your
headunit
modet.
. RADIO
.CD
. AUX
. USB
. SD/M|\,4C
. BLUETOOTH
Short-press
theR buttontochangethe
source.lf
theexternalmedia,
e.g.CDorSD
card,isconnected
orinserted,
thecorrespond-
ingsource
willbecome
availableforselection.
AUDIO
Settingthe
Start-upVolume
1. Navigate
theSAM
*toselect
'START'.
' Please
see'SOFTWARE
ACCESSl\rlENU
(SAM)'seclion
lorstepsonnavigaing
lhe menu.
2. Turntheknob
toadjustthe
startingvolumeto
acomfortablelevel.
Note:
lftheheadunit
was
previously
ata higher
volume
levelwhenyou
turnedit
off,after
you
turnon
theheadunit,itwill
usethestarting
vol-
ume.
Otherwise,theheadunit
willremember
the
previous
volumelevel.
SOUND
Menu
You
canselectthe
differentsound
settingsfrom
theSOUND
menu.Tonavigate
the
SOUND
menu:
. Short-press
the
R button
toenterthe
SOUND
menu.
. Short-press
either
or
))> buttontoselect
thenext
SOUNDitem:
orshort-press
lhe
either
V o.<( buttontoselectthe
previous
SOUNDitem
. Turnthe
knobclockwise
orcounter-clockwise
tochoosethe
option.
. Long-press
the
R buttontoexit
themenu.
Note:Theheadunit
will
automatically
exitthe
SOUND
menuafter
6seconds
ofinaction.
FADER lF7
to
0toB7l
Mute
(silence)
When
theheadunitisswitchedon,short-press
the
,:Hknobtomute
thesound.lfameora
(e.9.
CD,USBorSD/MMC)is
playing,
itwillbe
paused.
Short-pressthe
sameknobagainto
un-mulethesoundand
themediawillcontinue
playrng.
Note:Turning
thevolumeknob
to'VOLUIVE
0'willalsomutethe
sound,butifthecurrent
sourceisUSB,SD/ l\,41\,4CorCD,themediawill
continue
playing
inthe
background.
Balancing
theVolume
forDifferent
Sources
You
canadjustthevolume
offsetbetween
your
sources,
withreferencetothetunef,sothatin-
betlveen
switchingfromone
sourcetoanother,
thereislessannoying
suddenchangein
volume
level
and
you
maynot
needtoadjust
thevolume
again.
Youcanadjust
thevolume-offsetlevel
forCD,
compressed
audio,auxiliary
andBluetoothindi-
vidually.For
example,toadjustthevolumeoffset
levelofthe
CD:
1. Navigate
theSAIVI
toselect'CDLEVEL'.
2. Turn
lheknobclockwise
/ anti-clockwiseto
changetheoffsetlevel
(relative
totunervol-
umelevel).
Dothesame
thingforrest
of
thesources/types,
ifnecessarytoyourpreferences.
RADIO
Region
Setting
This
headunitis
customizable
accordingtothe
region
that
you
liveinfor
best-reception.
To
changetheregion:
'1.
Navigate
theSAI\,4to
setect'REG|ON'.
2. Turntheknob
clockwise
/anti-cloc(wise
to
select
your
region.
BALANCE lL7
to010R7l
'18

AMBand
For
easeofoperation,
you
mayturn-offtheAM
bands,totally
orindividuallyforMWorLW,
inthe
case
that
you
donotneedtousethem.Totoggle
the
Al\,4setting:
1. Navigate
theSAMtoselect'Al\.4'.
2. Turntheknob
clockwise/anti-clockwise
to
turnonoroffMW,LW
orboth
(AM).
Note:
Afterturningoffa ce(ain
band
(e.9.
LW
OFF),LWbandisnot
selectablewhen
youpress
the
H button.
Select
aWaveband
Yourheadunitis designedforreception
ofthe
FM,l\,4Wand LWwavebands.
. FMl
. Fl\42
. FM3(AST)
. MW2
(ASr)
1. Short-pressthe
6 buttontochangethe
waveoano.
Select
aStation
Auto-Seek
Tuning
1. Short-press
either
<< (frequency
down)
or
)> (frequency
up)button
toseekfora
station.Theheadunit
willscanforthe
next
strongstataon.
Manual
Tuning
1. Short-press
either
/l\ (frequency
up)or
V
(ffequency
down)
buttontochange
thefadio
frequency.
Continue
pressing
untilthe
de-
siredstationisselected.
Storing
aStation
Auto Store(AST)
Long-press
the
# buttoninanyoftheFl\,4
band
orMW
bandand
theheadunitwill
automatically
search
forthefirst
sixstrongstations
andstore
them
automatically
onFM3
(Flvl
auto-store
while
in
FMband)
orMW2
(MW
auto-storewhilein
l\4Wband);
andunder
the
preset
memory
but-
tons
1to6.
Note:
ASTfunction
willwork
only
in
theTuner
mode,
otherwisenothing
willhappen
inother
modes(toprevent
accidental
activationofAST
when
tryingtoenterSAM).
ManualStore
'1.
Short-pressthe
g button
toselectthede-
siredband
- FM'1,FM2,
Fl/13,MWl
,[,,1W2
orLW.
2. Tunetoadesiredradio
station.
3. Long-press
anyofthesix
preset
buttonsto
storethecurrentradio
station.
Thenumber
(of
a
preset
station)willbedis-
played
nexttotheradiofrequency.
Fofeach
band,
you
canstore
uptosixradiostations.
RAD|O
DATA
SYSTEM
(RDS)
Thisfeatureis
onlyavailableintheFM
band.
lvlany
FMstationsbroadcastRDS
information.
This
headunitusesRDSinformation
tooffer
you
many
advantages,including:
DisplayofStationName
(PS)
Theradio
displaysthename
ofthestationin-
steadofitsfrequency.
AlternateFrequency(AF)
The
headunitremainstuned
tothecurrentsta-
tionbycontinuallysearching
forthebest
possi-
ble
alternatefrequencyforreception.
Note:You
canswitchofftheAFfunction,
ifnot
required.Long-press
the
O,, button
totoggleon
ortoggleofftheAFfunction.
Alternatively,
go
to
SAMandchange
the
'AF'menu
item.
TrafficProgramme(TP)
andTraffic
Announcement
(TA)
You
canactivatetheTAmode
(includes
TP)to
givepriority
tohearannouncements
relatedto
trafficsubjects,
evenif
you
arelistening
tothe
radio.Thisfunction
isonlyavailablewith
RDS
on.
PresettingTA
Volume
Withthis
option,thevolumeforTraffic
An-
nouncements
canbe
preset
totherequired
tevet.
1. Short-press
the
# buttontoenter
SAM.TA
volumesettingis
thefirstmenuitem.
2. Turntheknob
clockwise/anti-clockwise
to
setthe
preferred
TA
volume.
TA
Activation/ De-activation
1. Short-press
qr., buttontoactivale
/de-acti-
vateTA.
Theindication
- l'F- inthedisptay
will
reflecttheavailability
oftheTA.
When
traffic
announcementis
selectedand'infor-
mationisreceived,
'TFJ-appears
onthe
display.
E
g'
||J
19

Interrupting
TA
lf
you
donot
wishtocontinueli$tening
toa par-
ticularTrafficAnnouncement
broadcast,
you
can
interruptitwilhoul
switchingofftheTAmode.
1. Shorl-press
the
el.. button
once.thehea-
dunitwillreturntothe
previous
operating
mode.
Enhanced
otherNetwork
(EON)
EON
informationallows
theupdatingofRDS
informationfor
programme
services
otherthan
the
currentlytunedstation.
Bydefault,thisEON
functionis
enabled.Totoggle
thesettings:
1.NavrgatetheSAMlo
selectlA EON.
2. Turntheknob
clockwise/anti-clockwise
to
togglethemodes
(Off,
LocalorDistant).
Note:
Thereception
ofdistantstations.which
may
beweakerdue
toits
distance,maybe
bad
andtheaudio
outputmaybedistorted
asare-
sutL
Programme
Type
(PTY)
ThisfunctionisavailablewithFM
only.ltenables
you
toselect
stationsby
programme
type.There
is
acodingofup
to28pre-defined
programme
types
- e.g.
(in
Europe):Pry1 News,PTY6
Drama,PTY11
Rockmusic.
Searching
fora Programme
Type
'1.
Long-press
ff buttontoactivate
thePTY
function.
2. Short-press
either
A button
or
V buttonto
select
thedesired
programme
type.
3. Short-press
either
)> buttonor
<< button
tosearchfor
PTYstations.
PTY
Activation / De-activation
To
changetheoperation
modeof
the
PTYyou
needtochange
thesettingin
theSAM.
'1
. Navigate
theSAM
toselect
'PTY'.
2. Turn
theknob
clockwise/ anti-clockwise
to
togglethePTY
setting.
Note:
Setting
'Pry menu
itemto'NEWS
INT'
will
allowPTY-NEWS
tointerrupt
(in
asimilaf
wayasTAinterruption
)
when
thereis
an
incom-
ingNEWS.
RDS
Regionalization
To
changetheway
thisheadunitreacts
to
the
environmental
conditions
affectingthe
quality
of
theradio
stations,
you
canchange
thesetting'n
theSAM.
1. Navigate
theSAIV
toselect
'REG-RDS'.
2. Turn
theknobclockwise
/anti-clockwise
to
toggle
theREG-RDS
setting.
2.
3.
CDOPERATION
Loading
CDintotheHeadunit
1.lfnotalreadyon,
short-pressthe,iY+
button
toturn
ontheheadunit.
Pressthe
tl) buttontoflip
downLhefront.
Insed
theCD
(labelfacing
up)
into
theCD
slot-
4. Closethefront.
5. The
displayshouldshow
"CD
READ"
while
stillreading
thedisc.
Whenadiscisloaded,itwill
start
playing
auto-
matically.
Noter
lfaCDdoesnotautomatically
load,DO
NOTFORCE
itintotheslot.This
coulddamage
theCDandtheheadunit.
Ejecting
aCD
1. Press
the
REL
buttontoflipdownthefront.
2. PresstheEJECT
buttontoejectthedisc.
3. Remove
thedisc.
4. Closethefront.
Playing
aCD-RorCD-RW
Depending
onthetypeofCD-R/CD-RWCD,
surfacecondition
ofthedisc,aswellasthe
per-
formance
andconditionoftheCDwriter,
certain
CD-R/ CD-RW
CDmaynotoperatenormally
on
thisheadunit.
Playinga "Copy.Protected" non-
conformingaudio
CD
Due
lotheuseofcopy
protection
schemesof
some
audioCDs,whicharenon-conforming
to
international
audioCDsstandards
(Red
Book),
these
typesofcopy-protected
disc(s)maynot
play
onthisheadunit.
Inthecase
ofmulti-sessiondiscwith
such
schemes.you
maytry
todisablethemulti-ses-
sionabilitybychanging
theSAI\,4setting
toallow
readingofatleast
thefirstsession.
1. Navigatethe
SAMtoselect
'MULTI-S'.
2. Turntheknob
clockwise/ anti-clockwise
to
togglethemulti-session
support.
Try
playing
the
"copy-protected
discagain.
Note:Remember
[oenable
lhemulti-session
supportagainin
theSAI\,4after
playing
thisdiscl
20

Listening
to Music
function.
RepeatFeature
Short-press
Q- button
(a
fewtimes)
totoggle
theRepeat
function.
. RPTOFF
- Norepeat
. RPTSONG
- Repeatcurrentsong
. RPT
DIR
- Repeat
currentdirectory/ folder
(fof
compressed
audiodiscwithmore
than1
folder
only)
. RPTALL
- Repeatthewhole
disc
RandomFeature
Short-press
Q,^.button
(a
few
times)totoggle
the
Randomfunction.
. RNDOFF
- No
randommode
. RNDDIR
- Random-pleyback
all
songsin
currentdirectory
/folder
(for
compressed
audio
discwithmore
than
'1
folderonly)
. RNDALL-
Random-playback
allsongs
on
thewholedisc
USBANDSD/MMC
OPERATION
Auto-Play
You
canusetheSDorMMCcardoranUSB
2. Insertthecardordeviceinto
their
respective
SD/lVll\,4CcardslotorUSB
port.
Theoperationsofthe
USB
function
andthe
SD/MMCfunctionare
similartotheCDfunction.
Pleaserefertothe
sectionon
'CD
OPEMTION'
forhandlingthesefeatures:
. TrackSelection
aftertheinterruption.
!to
t
E
t|l
Formulti-session
discs,
if
lhe
Iirst
track
isadata
.^^.^.-- ^^-^.^^-^:"--* General
track,
thediscwillbetreatedascompressed
audiodisc.However,ifnocompressed
audio Refertosections
on'Notes
onSD/MMC'and
filewasfound
throughoutthedisc,thenitwill
be on
'Notes
onUSB'formoreinfofmation
onthe
treated
asanaudiodisc. compatibilityand
supportofmultimediacards
lfthefirst
trackisanaudiotrack,thediscwill
be anddevices.
Multi-Session
Disc
treatedasanaudiodisc.
TA/ NEWSInterruption
aftertheinterruption.
TrackSelection
respectively
Scan Feature
lfTA
and/orNEWSaresettoON,incoming
an- devicetoplay
musicfiles.
nouncementswillinterrupt
CD
playback.
Your 1. lfnotalreadyon,short-pressthe
ih button
CDwill
be
paused
anditwillresume
playing toturnontheheadunit.
1-
short-presseither
orV buttontoskipto Note:when
the,cardordeviceisinserteditwill
the
previous
ornexttrackrespectivety. 9l1y-:"i:T:tlcally'
unlesslhe
currentevent
(e
g.
Fasr.Forward
orFasr-Backward
a
rrac- IJ?ffilJHffiffi'}|',".:Ti,l:ij#:,|1
*""
1. Press
andholdeitherthe
<< or
)} h,,'
tontorast-torward
or
tast-oacrwaro
inJirack operations of usB and sD/MMc
1. Short-press
O- buttontotogglethe
Scan
. SCNOFF
- Noscanning
ofsongs . Fast-Forward
orFast_BasKwaro
. SCNON
- Scan
eachsongforbetween5to . Scan
20
seconds.dependingon
SAMsetting . Repeat
To
stopscanning.
short-press
(:).-buttonagain. . Random
Tosetthescan
timeintheSAM:
1. Navigate
thesAMtosetect
'scANT vtE'. TA/ NEws Interruption
2. Turntheknob
clockwise/ anti-clockwise
to lfTA
and/orNEWSaresettoON,incomingan-
togglethescan
time
(5
secs,10secsor20 nouncementswillinterrupt
media
playback
Youf
secs). mediawillbe
paused
anditwillresume
playing
21

BLUETOOTH
OPERATION
General
You
canusetheBluetooth
in
your
cartomake
a
phone
callhands-freeor
streammusiconto
your
in-car
speakers
(via
this
headunit).
Controls
(fig.
K)
Hang-up
acall
1. After
you
have
answeredthe
phone
call,and
vou
wish
tohanq-up.simolv
short-oressthe
@ buttonagatn-. '
MusicStreaming
lfyour
Bluetooth-enabled
music
devrcehasal-
ready
been
paired
withthisheadunI
before,sim-
ply
turnontheBluetooth
lunctionof
your
mus,c
device
andtheheadunitwillreact
accordingly.
. lf
'A2DP
lST'was
selectedin
SAIV,tnenrne
headunitwillautomatically
switchtoBlue-
tooth
sourceandstartsmusic
streaminoonto
thein-carspeakers.
Button Bluetooth
status
Handsfree Music-
Inacrrve (HFPiHsP)
"|ff#lt
(n.a.) Rejecl
phone
(incoming
call)
Pfessmore Answer
phone Answer
than2 secs (incoming
call) phone
*
tostart Hang-up
phone (incom
ng
pairing (callactive) call)
lf
'HFP
1ST'was
selectedinSAM.then
the
headunit
willlighFup
the
I (if
notalready
lighted-up)
only.Youneed
toshort-pressthe
R buttonafew
timestoselectBluetooth.
lf
'ISTDEVlCE'was
selectedinSAM:
" Onlywhen HFPlST' s selectednside
theSAw
Pairing
To
pair
your
Bluetooth-enabled
device
tothis
headunit,make
surethatno
deviceiscurrently
streaming
tothisheadunitfirst.
1. Pressthe
@ buttonformore
than2seconds
toenter
the
pairing
mode.The
headunitwill
enterintoa"Find
Me"
mode.
2. Enable
your
devicetoperform
ascanof
available
devicestofind
theheadunit.
For
moredetails,
please
check
theusermanual
of
your
Bluetooth-enabled
device.
3. Oncefound,
you
shouldsee
"DAYTON"
as
thefounddevice
and
you
can
paif
your
de-
vice
withtheheadunit.
4. The
default4-digit
pin
is
"0000".
Note:Whenever
thereis
atleastone
paired
device
active,theheadunit
willlight-up
theBtue-
toothicon.
PairedDevices
This
headunit
isabletostoreuptoeight
Blue-
tooth-enabled
devices
(consisting
ofamixtureof
mobile
phones
ormusic-players).
lfaninth
de-
vice
starts
pairing,
itwillreplace
thedevice
that
was
usedlongest
ago.
Hands-Free
Call
Answer
acall
Youwill
heartherjng
tonefrom
thein-car
speak-
ers.
1.To
answerthe
call,sinply
short-press
the
@
button.
Reject
acall
1. lf
you
donot
wishtoanswertheincominq
call.
simplyshort-press
the
jh, button.
+ No
Bluetoothconnection
active:-Behav-
iouris
sameas'HFP
'1ST'condition
+ AnexistingBluetooth
connectionisac-
tive:-status
quo
asthecurrentBluetooth
connectionisfirst
connected.
AUX
OPERATION
Thisheadunit
comeswithanAuxiliary
input
(3.5
mm
jack)
onthefrontforease
ofstreaming
your
musicfrom
yourportable
devices.
1. Insertyour
3.5mm
plug
(connected
toyour
portable
device)
intothefrontAux
input.
2. Short-presstheR buttonafewtimes
until
thedisplayshows
"AUX".
3. Play
yourportable
device.
SPECIALFUNCTIONS
Clock
You
canselect
automaticupdate
oftheclock
viatheRDSradio
signalormanually
adjustthe
clock
yourself.
Theclockwill
bedisplayedwhen
theheadunitispowered-off.
In
case
you
need
tosavebatterylife,you
may
turnoffthectock
displaytoo.
'1.
Navigate
theSAMtosetect
CLOCK.
2. Turn
theknobclockwise
/anti-clockwise
to
selectthe
typeofclockfunctions(RDS
clock,
manual
clock
orclockoff).
Note:
lfyou
select
'MAN
CLK',menuitem,
'CLOCKSET',
isselectable
asthenext
menu
item.Refer
tothe
'SorrWene nCCdSS
UeruU
(SAM)'for
adjustingthe
clock.
22
Other manuals for CD 2217 G
2
This manual suits for next models
3
Table of contents
Other VDO Car Receiver manuals

VDO
VDO TR722U-BU User manual

VDO
VDO CR 5206 X User manual

VDO
VDO CD 7326U-OR User manual

VDO
VDO CD 2604 MP3 - User manual

VDO
VDO CD 2304 MP3 User manual

VDO
VDO CD716UB-BU User manual

VDO
VDO MS 4150 RS MP3 Installation instructions

VDO
VDO CD 9303UB-CV - User manual

VDO
VDO CD 1537 X User manual

VDO
VDO CD 413 - User manual