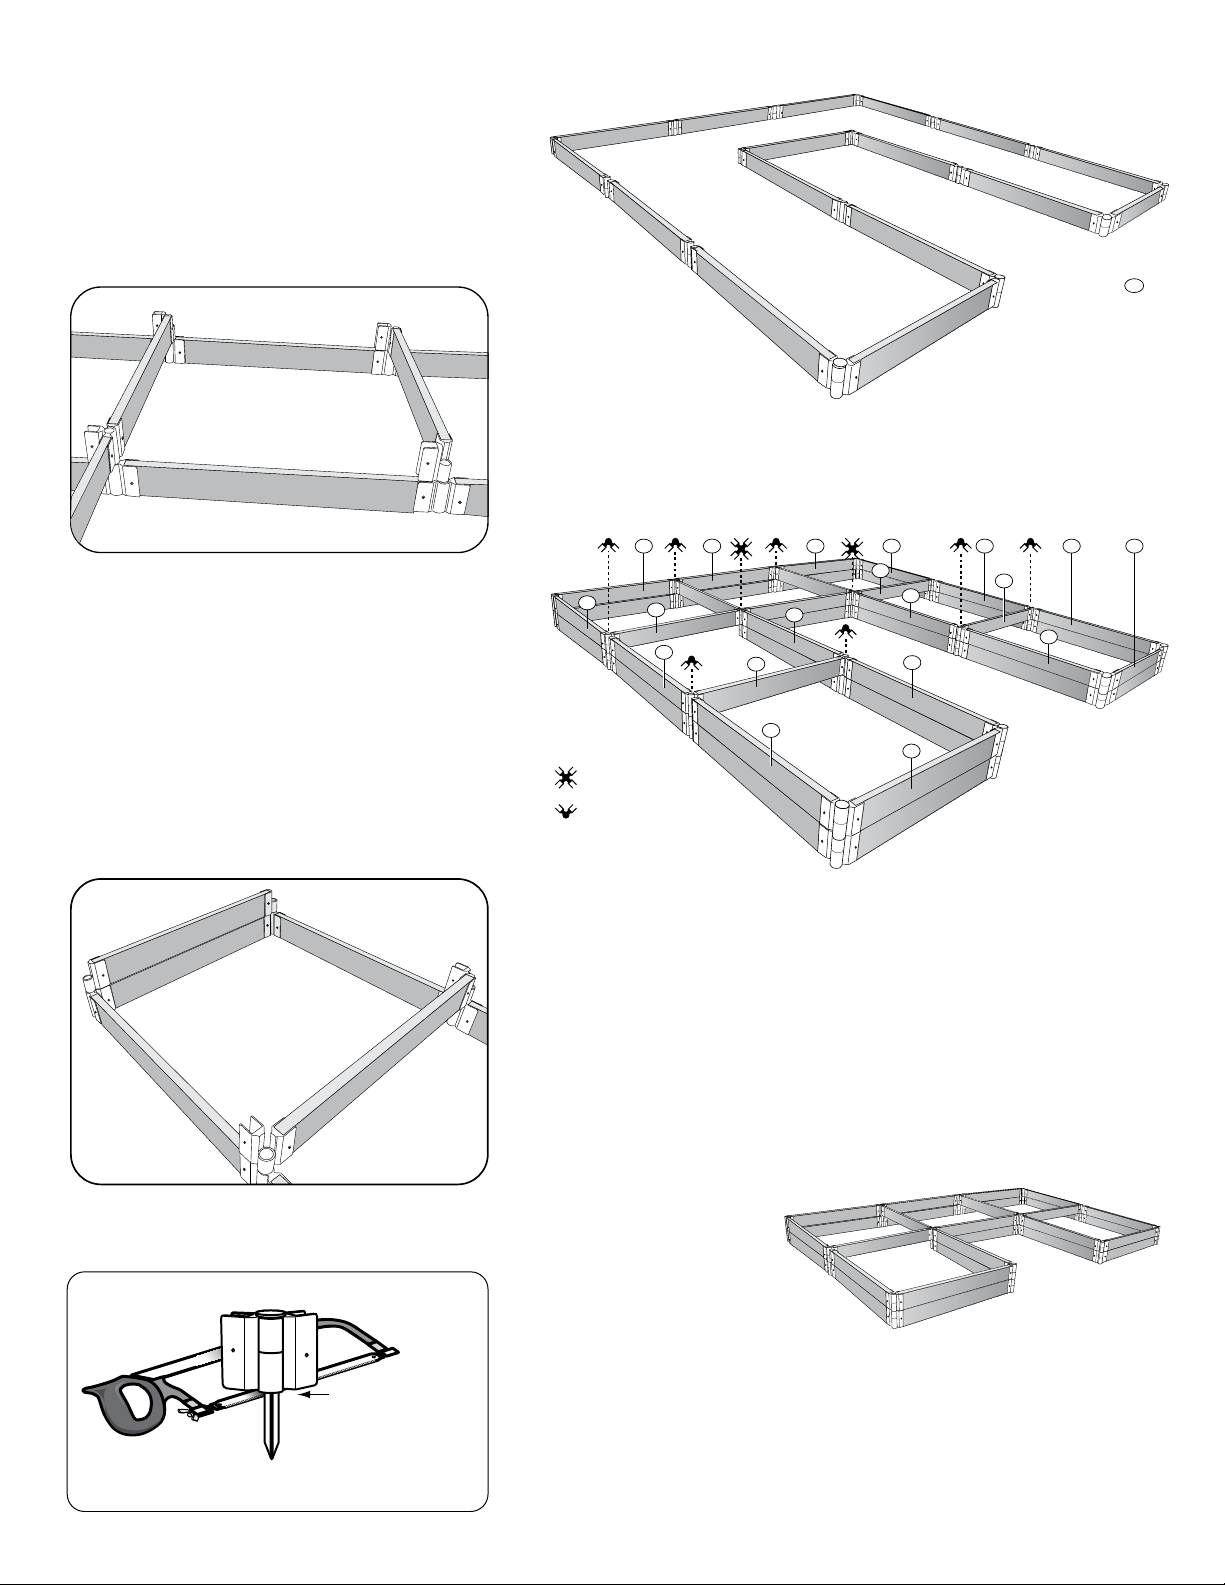
manuals.online logo
Brands
  1. Home
  2. •
  3. Brands
  4. •
  5. VegHerb
  6. •
  7. Lawn And Garden Equipment
  8. •
  9. VegHerb Scenery Solutions Frame-It-All U Raised... User manual

VegHerb Scenery Solutions Frame-It-All U Raised... User manual

This manual suits for next models

3

Popular Lawn And Garden Equipment manuals by other brands

Sunforce SOLAR user manual

Sunforce

Sunforce SOLAR user manual

GARDEN OF EDEN 55627 user manual

GARDEN OF EDEN

GARDEN OF EDEN 55627 user manual

Goizper Group MATABI POLMINOR instruction manual

Goizper Group

Goizper Group MATABI POLMINOR instruction manual

Rain Bird 11000 Series Operation & maintenance manual

Rain Bird

Rain Bird 11000 Series Operation & maintenance manual

Cub Cadet BB 230 brochure

Cub Cadet

Cub Cadet BB 230 brochure

EXTOL PREMIUM 8891590 Translation of the original user manual

EXTOL PREMIUM

EXTOL PREMIUM 8891590 Translation of the original user manual

Snapper 690179 installation instructions

Snapper

Snapper 690179 installation instructions

Exmark SAR481KA30 Operator's manual

Exmark

Exmark SAR481KA30 Operator's manual

Yazoo/Kees Z12 Operator's manual

Yazoo/Kees

Yazoo/Kees Z12 Operator's manual

Makita EM408MP Original instruction manual

Makita

Makita EM408MP Original instruction manual

Exmark Quest Bagger Setup instructions

Exmark

Exmark Quest Bagger Setup instructions

Manitou Systems AS960 Operator's manual

Manitou Systems

Manitou Systems AS960 Operator's manual

Vertex 1/3 HP Maintenance instructions

Vertex

Vertex 1/3 HP Maintenance instructions

GHE AeroFlo 80 manual

GHE

GHE AeroFlo 80 manual

Land Pride Post Hole Diggers HD25 Operator's manual

Land Pride

Land Pride Post Hole Diggers HD25 Operator's manual

Yazoo/Kees Z9 Commercial Collection System Z9A Operator's & parts manual

Yazoo/Kees

Yazoo/Kees Z9 Commercial Collection System Z9A Operator's & parts manual

Premier designs WindGarden 26829 Assembly instructions

Premier designs

Premier designs WindGarden 26829 Assembly instructions

Snapper 1691351 installation instructions

Snapper

Snapper 1691351 installation instructions

manuals.online logo
manuals.online logoBrands
  • About & Mission
  • Contact us
  • Privacy Policy
  • Terms and Conditions

Copyright 2025 Manuals.Online. All Rights Reserved.

Manufactured and Distributed by
Scenery Solutions, Inc., 222 Grace Church Street, Suite 302
Port Chester, NY 10573
Questions call: 800-914-9835 admin@frameitall.com
©2009 Frameitall All rights reserved
U Raised Garden
The U Raised Garden
Kit contains:
• 38 timbers
• 16 2-packs of stacking joints
• 6 4-way joints
Introducing the ‘Frame-It-All’ U Raised Garden
ECO-friendly
The framework utilizes our Composite Plastic Timbers. Manufactured from 40% wood fiber and 60% recycled polyethylene,
the Eco-friendly durable composite wood grain plastic timbers never rot, warp or splinter. The cut to size timbers connect to
brackets with our patented Stacking Joints stakes.
Dimensions: 12’ x 12’ X 12”
Installation Notes:
Before starting to assemble the U Raised Garden, refer to the parts diagram to understand how to screw the brackets onto the
timbers. Remove the Stacking joints from the plastic bags and lay out the parts. Each of the joints comprises a stake and two
brackets plus screws needed.
Tools Needed:
• Phillips head screwdriver
(electrical or battery operated preferred)
• Hammer
With a screwdriver, (a power driver would be
helpful) attach one bracket to each end of each of
the Composite Timbers as shown below.
Screw bracket onto
composite timber
Two screws are
required per bracket
(1 on each side).
Use a Finishing
Cap to complete
the top level.
Use an Anchor
or Stacking Joint
for ground level
frames or borders.
Use only Stacking
Joints when
creating additional
levels.
When creating a
multi-level frame
use a Stacking
Joint.
Stacking Joints fit into
the tops of Anchor
Joints and other
Stacking
Joints
How the Joints Work
Special Instruction for bracketing timbers:
Connect brackets on the following quantity of
timbers like the diagram above.
22 PB bracketed timbers
10 SB bracketed timbers
6 FW bracketed timbers
Kind and amount of bracketed timbers for
each level:
1st level
16 PB bracketed timbers
2nd level
6 PB bracketed timbers
6 FW bracketed timbers
10 SB bracketed timbers
Stacking Joint
AB
Parts identification & Four-Way Joint:
The Four-Way Joint is comprised of two pieces (A), which when
stacked, form the complete bracket (B).
Timber shortened for
illustrative purposes
PB
SB
FW
Joint requires both
pieces of 4-way bracket
Joint requires one piece
of 4-way bracket
SB
FW
FW
FW
FW
SB
SB
PB
PB
SB
PB
SB
SB SB
PB
SB
SB PB PB
Assembly Instructions
Trim stake spike
with hacksaw for
use indoor or on
hard surfaces
Note:
If you plan to assemble the Kit for use indoors or on a hard surface,
remove (with a hacksaw) the spike of each stake where indicated
on the diagram to the left. Use these cut down stakes for the base
level of your raised garden.
Do not do this if you are locating the Planter outdoors on soil.
Diagram 1
Diagram 4
4) Insert one Stake through the brackets into the aperture on the top of
the stake beneath it to lock the second level in place.
5) Add the Caps to each of the top corner joints to finish off the raised
garden. You can also locate Solar Lights (#SL-1025, sold separately)
as an added beauty feature, or frame-it-all’s cold greenhouses, veggie
wall or animal barriers.
Garden can also be
assembled with fewer
sections, such as in the
diagram at right.
1) Layout the base level of your raised garden in a
straight recangular shape, using 16 (PB) bracket-
ed timbers, insert one Stake through the brackets
and into each of the corners to lock all sides in
place (Diagram 1, at right).
Diagram 2
Diagram 3
2) For the second level, place six 4-way
bracketed timbers (FW) on top of the 1st level
(see diagram 2), then add parallel-bracketed (PB)
timbers as marked on diagram 4.
3) To complete the second level, place the (SB)
bracketed timbers with one bracket to complete
the rest of the sides and screw the unbrack-
eted timber sides into the channel of the 4-way
bracket (see diagram 4).
All timbers in
Diagram 1 are PB