Veloce LP-1 User manual

1 | P a g e
OWNERS MANUAL
LP-1 Phono Module
2011
OWNERS MANUAL
Platino LP-1 Phono Module

2 | P a g e
Table of Contents
GENERAL INFORMATION
3
SAFETY INSTRUCTIONS
4
TRANSPORTING AND UNPACKING
5
AUDIO CONNECTIONS- The Back Panel
6
CONTROLS/DISPLAY –The Front Panel
7
TUBES
8
BATTERIES
9
CARE AND MAINTENANCE
9
SPECIFICATIONS
10
WARRANTY
11
CONTACT US
12

3 | P a g e
GENERAL INFORMATION
Thank you for selecting the Veloce LP-1 Phono Module. Our relentless pursuit of the best in
all elements of the design and manufacture of the LP-1 has only one goal –to provide you,
the serious audiophile and music lover, with the best and most natural musical reproduction
possible.
We recognize that you had many choices of equipment and appreciate the confidence you
showed by investing in a USA based atelier like Veloce Audio. We look forward to meeting
and exceeding all your expectations as far as sound reproduction and support are concerned.
Making your ownership experience a positive one is a corporate “first principle” for everyone
at Veloce Audio.
*****
The balance of this owner’s manual provides information that will allow you to realize all the
potential of the Platino Series LP-1 Phono Module. Please read all sections carefully. Should
you have any questions during the installation of the Veloce LP-1 do not hesitate to contact
your dealer or Veloce Audio directly. Either will be glad to assist you.

4 | P a g e
SAFETY INSTRUCTIONS
Read the following instructions and precautions carefully before using your Veloce LP-1
Linestage.
1. Always disconnect your entire system from the AC mains before installing any piece of
equipment or testing or cleaning any piece of equipment or any connection
2. This product is shipped with a 5 conductor XLR umbilical cord for connection to the
LS-1 Linestage. To avoid electric shocks the LS-1 Linestage/SmartSupply must always
be grounded. If your electrical outlets will not accept this type of plug an adapter may
be needed. In this case, make sure that this adapter conforms to all local safety
regulations and includes a ground prong (or wire). If you are not sure of the integrity
of your home electrical service, contact a licensed electrician for assistance.
3. AC extension cords are not recommended for use with this product. If an extension
cord must be used, ensure that it is an approved type and is sufficient for the load.
4. Never use flammable or combustible chemicals to clean this unit
5. Never operate this product with any covers removed. Unplug the unit prior to
removing any exterior covers.
6. Never pour, spill or in any way allow liquids of any kind to enter the unit.
7. Never insert any objects into the cooling slots at the rear of the unit or into any other
openings.
8. Never replace any fuse with a type or value other than those specified.
9. Never attempt to repair this product. If a problem occurs contact your deal or Veloce
Audio directly.
10.Never expose this product to extremely high or low temperatures.
11.Always keep electrical equipment out of the reach of children.

5 | P a g e
TRANSPORTING AND UNPACKING
The packing materials for the Veloce Audio LP-1 Linestage have been designed to protect
your investment to the maximum during shipping. The unit is shipped in a single box. This
box contains the LP-1 and its protective packing material as well as the umbilical connector
cable, manuals and loading plugs.
Shipping Box LP-1 Unit with accessories 12 LBS
Open the box and remove the LP-1 unit and place in a convenient location near the LS-1
Linestage. This unit can be placed on a shelf in your equipment rack or on the floor behind
your equipment. Take care that the supplied 1meter umbilical connection cable can reach the
unit. At this point, several cautions must be observed. First, be sure the unit IS NOT placed
close to transformers or other sources of hum or interference. The low levels involved in
Phono Sources are delicate and susceptible to electrical noise and other interference.
Secondly, be sure that the LP-1 has adequate ventilation.
Once set up, you will not need access to the LP-1 on a regular basis. An umbilical cord is
included for attachment of the LP-1 to the LS-1. We will address the connection of this
umbilical cable in the next section.
When you have completed these steps, you are ready to begin the hook up process. Keep the
loading plugs handy as you may need these to set up the LP-1 to properly mate with your
cartridge.

6 | P a g e
AUDIO CONNECTIONS –The Back Panel
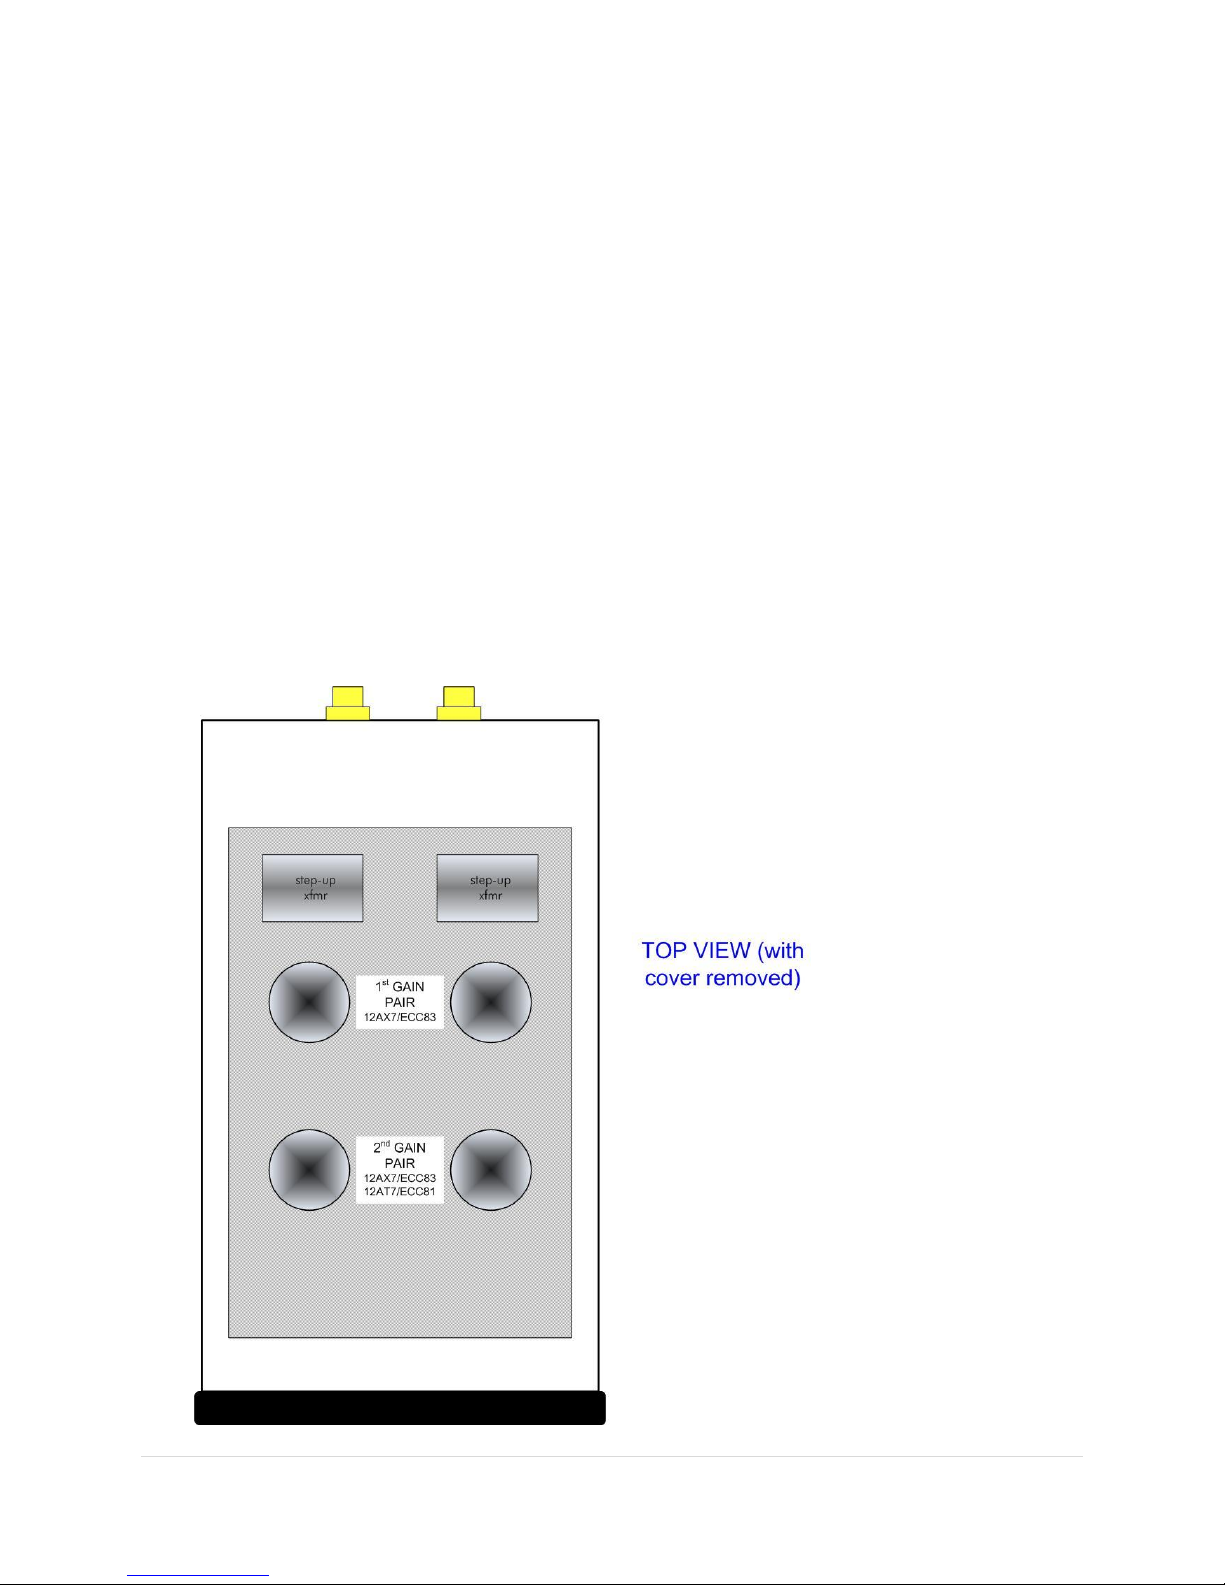
At this point we are ready to make connections to the LP-1. Before making any connections to
your systems make sure that all power is disconnected. The rear panel is laid out logically to
facilitate connection to the rest of your system. Refer to the picture below for a close up view
of the rear panel.
With the LS-1 off attach the umbilical cable to the connector marked DC IN on the LP-1. Next
plug the other end into the DC OUT on the LS-1. You have now made the power connection
between the units. Note that the LP-1 gets all its operating power from the LS-1 and cannot
work separately from that unit. We are now ready to make other connections. Connect the
lead from your tonearm first. Use the MC IN connection. If your Phono cable has a ground
lead connect this to the GND binding post on the rear. Next plug RCA cables into the jacks
marked OUTPUT and then connect to one of the LS-1 RCA inputs (1 –5).
Note: The DC OUT jack on the rear of the LP-1 is there to provide power to a second LP-1
Phono Module or other Veloce Audio accessory.
Finally, review the specifications of the cartridge you are using with the LP-1 for
“recommended loading”. Once you have this value the process is simple. Select the most
appropriate of the supplied loading plugs (none is also a valid choice) and plug it in. The LP-
1 is supplied with single XLR type loading plugs in several common values. These plugs are
inserted into the MC LOAD jack on the rear of the unit to provide cartridge loading. One
plug loads BOTH L & R channels.
You are now ready to turn on the LP-1 by switching on the master switch on the rear panel on
this unit (if you have not already done so). This switch can be used to turn the LP-1 ON or
OFF independently of the LS-1 main unit. If you are not going to be listening to vinyl, switch
the LP-1 OFF in order to save tube life and increase runtime of the LS-1. At this point turn
ON the LS-1 main unit via remote or the UP button on the front panel. The blue LED on the
front panel of the LP-1 will light if it is switched ON. This is normal and shows that the unit is
working properly. When the LS-1 is turned OFF, the blue LED on the LP-1 will turn off too,
and the LS-1 go into charge mode, if required, or standby mode.

7 | P a g e
CONTROL/DISPLAY –The Front Panel
The front panel of the LP-1 is simple and all business. The black anodized faceplate has a
blue LED inset which shows that the unit is powered up. Besides that there are no controls on
the front panel.

8 | P a g e
TUBES
The LS-1 is shipped with the tubes pre-installed, saving the purchaser extra work. The tube
types are listed in the SPECIFICATION section of this manual. The location of the tubes is
shown in the sketch below. Please note that tube rolling is possible and provides the user
with an opportunity to tailor the sound of the system to match ones tastes. Changing tubes
requires removing 12 screws to take off the top cover (hex size 2mm).
Note: NEVER take the cover off without first unplugging it from the LS-1 linestage.
Also - small adhesive pad is placed between tube and socket to prevent
microphonics. A little extra effort will be required to remove the stock tubes.
Additional adhesive pads can be supplied by Veloce Audio upon request.
When rolling different tubes into the LP-1, please note that the greatest effects can be noticed
by switching the 1st GAIN PAIR first. These are the tubes located closest to the jacks. In the
2nd GAIN PAIR you have the option of using tubes from the 12AX7/ECC83 family as well as
the 12AT7/ECC81 family which will provide for a bit less
gain.

9 | P a g e
BATTERIES
All of the LP-1’s audio circuits are powered by battery, but it has no batteries in it to
maintain. This unit is an option for the LS-1 line stage and can only be used with that unit. It
“borrows” all the DC power it needs from the batteries in the LS-1 along with all the attendant
advantages of that supply. Use of the LP-1 reduces the play time (battery life) of the LS-1 by
25% –still excellent. The LP-1 can be turned on and off with the LS-1 or separately via the
rear switch–if you want to conserve battery life.
CARE AND MAINTENANCE
Very little care and feeding is required to keep the LP-1 in top condition. If the unit gets finger
printed or dirty, first wipe it off with a soft dry cloth. If the dirt is more stubborn, use a cloth
dampened with a little water. Never get moisture inside the unit. Take particular care when
cleaning near the ventilating holes located on the side of the unit. No liquid should enter
those ventilating holes. When you are changing tubes, use cotton gloves or a soft cotton
cloth. This will prevent fingerprinting the tubes and will extend tube life.

10 | P a g e
SPECIFICATIONS LP-1
Phono Inputs
MC pair single-ended RCA connections
Phono Output
1 pair RCA connections
Vacuum Tube Compliment
(4) 12AX7 dual triode tubes
Gain
64 dB
Input Impedance
47 kOhms (adjustable via cartridge loading plugs)
470 Ohm (native xfmr impedance)
Output Impedance
500 Ohms
THD+N
<0.03%
Frequency Response
+0.5 dB from 20 Hz to 50 kHz RIAA eq
Residual Noise
< -90 dB
Power Input
240 V DC + 12V DC (supplied by LS-1 linestage)
Finish
Aluminum - black anodized & hi-polish
Weight
6 lbs
Dimensions
4.5" H x 6" W x 10" D

11 | P a g e
WARRANTY
This Veloce Audio Product is covered by a 90-day limited warranty. At no additional charge,
you can obtain an EXTENDED FIVE-YEAR LIMITED WARRANTY by completing and submitting
the enclosed warranty registration along with a copy of your bill of sale within 30 days of
purchase.
This Veloce Audio product is warranted to be free from defects in materials and construction
subject to the following conditions, for 90 days after purchase by the original owner. This
warranty is subject to the following conditions and limitations:
*has not been used in accordance with the instructions contained in the Owner's
Manual
* been subjected to misuse or abuse,
* been modified, repaired, or tampered with by anyone not specifically authorized in
writing by Veloce Audio
* been damaged by accident, neglect, or during transportation.
Should a problem covered by our limited 90-day warranty occur, please take these steps:
1. Contact your Veloce Dealer for verification and validation that a problem exists.
2. Have your Veloce Dealer contact us for a Return Authorization Number.
3. Pack your unit in the original packing materials (if these are not available, Veloce
Audio will supply them at a nominal charge) and include your Return Authorization
Number along with proof of the date of purchase.
4. Ship freight prepaid to Veloce Audio LLC at the address below via insured freight.
We will repair the problem and return it to your Veloce Audio dealer via surface freight
without any charge for parts, labor, or return shipping. Any implied warranties relating to
Veloce Audio products shall be limited to the duration of this warranty. This warranty does not
extend to any incidental or consequential costs or damages to the purchaser. Some states do
not allow limitations on how long an implied warranty lasts or provide for an exclusion or
limitation of incidental or consequential damages, so the above limitation or exclusions may
not apply. This warranty gives you specified legal rights. You also may have other rights in
your State. Veloce Audio LLC reserves the right to modify the design of any products without
any obligation to previous purchasers and to change the prices or specifications with notice
or obligation to anyone.

12 | P a g e
CONTACT US
Veloce Audio is committed to selling products through authorized dealers. We encourage
you to maintain good contact with the dealer you purchased this unit from. They will do the
same, as we have only chosen the best of the best as far as high end audio retailers are
concerned.
Your dealer will be your first line of contact for any questions you have regarding your Veloce
Audio product. The will, of course, give you the highest level of support and will work to
make your ownership experience first rate.
We at Veloce Audio also look forward to hearing from you. Without our customers, we
would not exist! In the event that you did not purchase your unit from a factory authorized
dealer or need to contact us directly, please feel free to do so. Our contact information
follows and can also be found on our website.
www.veloceaudio.us
vytas@veloceaudio.us
215.913.1990
Veloce Audio LLC
329 Francis Avenue
Ambler, PA 19002
USA
©Veloce Audio LLC, 2010
Table of contents
Popular Music Equipment manuals by other brands

Marshall Amplification
Marshall Amplification Haze MHZ15 owner's manual

KV2 Audio
KV2 Audio EPAK2500R user guide

Harley Benton
Harley Benton Spaceship Power 60XL-B quick start guide

Warwick
Warwick Alien Acoustic Bass manual

Carl Martin
Carl Martin Bass Chorus manual

ALLEN & HEATH
ALLEN & HEATH ICE-16 user guide