Veloretti Headgear User manual

Headgear
Manual
Nederlands I English

#myvelorei

Velorei Brandstore
Van Woustraat 72
1073LN Amsterdam
The Netherlands
Velorei Headquarters
Moermanskade 401
1013 BC Amsterdam
The Netherlands
info@velorei.com

Introductie
Gefeliciteerd! Met aankoop van deze helm ben j of jouw kind helemaal klaar om veilig
op avontuur te gaan. Bedankt dat je hebt gekozen voor Velorei Headgear. Deze helm is
vervaardigd volgens de strengste prestatie- en veiligheidsnormen. B de juiste afstelling,
verzorging en onderhoud zal deze helm jou en/of je kind helpen veilig te rden. Lees deze
handleiding door voordat je gebruik maakt van je nieuwe helm!
Een juiste afstelling en gebruik van de helm zn van essentieel belang voor de veiligheid.
Deze handleiding is geschreven voor de ouder of voogd van een kind. De uitleg over het
gebruik van de helm b jezelf is ook van toepassing over het gebruik b jouw kind. We willen
je vragen de informatie in deze handleiding uit te leggen aan de kinderen of ieder ander die
deze niet kan begrpen. Mocht je na het lezen van de manual nog vragen hebben, neem dan
contact op met onze klantenservice.
NL
Belangrke informatie
Over de helm
Deze helm is conform de Europese richtlnen ontworpen en gekeurd (EN 1078) voor gebruik
b etsen, skateboarden en rolschaatsen. Een helm kan belangrke bescherming bieden als
deze goed past en op de juiste manier gedragen wordt. De volgende aanwzingen moeten
daarom zorgvuldig doorgelezen en opgevolgd worden. Incorrect gebruik of onderhoud van
je helm kan ernstige verwondingen of zelfs de dood tot gevolg hebben.
Rd veilig
Geen enkele helm kan de drager van de helm tegen alle mogelke klappen beschermen.
Een zware botsing, scherp voorwerp, oneigenlk gebruik of onjuiste afstelling kan gevolgen
hebben waartegen de helm geen bescherming kan bieden.
Controleer de afstelling voor elke rit
Een helm is alleen eectief als h goed past en op de juiste manier gedragen wordt. De helm
is erop gemaakt om vastgehouden te worden onder de onderkaak met behulp van het
bandje. Plaats ter controle van de juiste passing de helm op het hoofd en stel hem af zoals
aangegeven. Zet het verstelsysteem stevig vast. Pak de helm vast en probeer hem naar
voren en achteren te bewegen. Een goed ziende helm moet comfortabel zn. De helm
mag niet naar voren bewegen waardoor het zicht kan worden belemmerd of naar achteren
bewegen waardoor het voorhoofd kan worden blootgelegd. Lukt het niet om de helm
correct af te stellen? Neem dan contact op met de Velorei klantenservice.

Vermd grote warmte
Stel je helm niet bloot aan de hie, bvoorbeeld in een auto op een zonnige dag. Overmatige
warmte kan de voering of schaal beschadigen of deze van elkaar los doen komen.
Vermd chemicaliën
De helm kan worden aangetast en zn eectiviteit verliezen door aardolie en
aardolieproducten, schoonmaakmiddelen, lakken, kleefmiddelen en vergelkbare
producten, zonder dat de schade zichtbaar is voor de gebruiker van de helm.
Vervang een oude of beschadigde helm
Een helm absorbeert de eerste klap b een val, wat ernstig letsel kan voorkomen. De helm
is erop gemaakt om schokken te absorberen via de schaal en de voering van de helm, die
daarb gedeeltelk worden gedempt. Deze schade is niet altd zichtbaar. Daarom moet een
helm die een zware klap hee gehad worden vervangen, zelfs als deze onbeschadigd lkt te
zn. Een helm hee een beperkte gebruiksduur en moet worden vervangen wanneer deze
duidelke tekenen van sltage begint te vertonen.
We willen je adviseren de helm na drie jaar te vervangen, zelfs als de helm geen klappen
hee opgelopen of beschadigd is.
Wil je stunts en trucs uitvoeren, o road rden of op hoge snelheid etsen? Kies dan een
helm die meer bescherming biedt. Alles tussen je hoofd en helm kan zorgen voor minder
bescherming. Een pet, sjaal of zelfs een zeer volumineuze haarstl kan ervoor zorgen dat
de helm verschui tdens een klap. Een haarklem, koptelefoon of iets anders onder je helm
kan je verwonden als de helm een klap te verwerken krgt. Bevestig niets aan de helm, tenz
dit wordt aanbevolen door de helmfabrikant. Dit geldt ook voor stickers en kleefetikeen.
Voorkom verstikking door kinderen deze helm niet te laten dragen b het verrichten van
andere activiteiten waarb risico bestaat op verhanging of wurging als het kind vast komt
te zien terwl het de helm draagt. Houd je helm schoon, was hem indien nodig met een
mengsel van milde zeep en koud water. De voering van de helm kan b lage temperatuur in
de wasmachine worden gewassen. Plaats vullingen niet in de droger. Voorwerpen kunnen
binnendringen via de luchtgaten. Voorwerpen zoals takjes, steentjes of insecten kunnen via
de gaten de binnenzde van de helm bereiken.

6
5
87
12
4
3

Afstellen helm
Plaatsing
Controleer de maat van jouw helm door deze in de juiste positie op het hoofd te plaatsen
zonder de gesp vast te maken. De helm past goed als deze nauw om het hoofd sluit, maar
niet te strak zit. Alle richtingen (links, rechts, boven,onder) hebben betrekking op de helm
zoals deze op het hoofd zit.
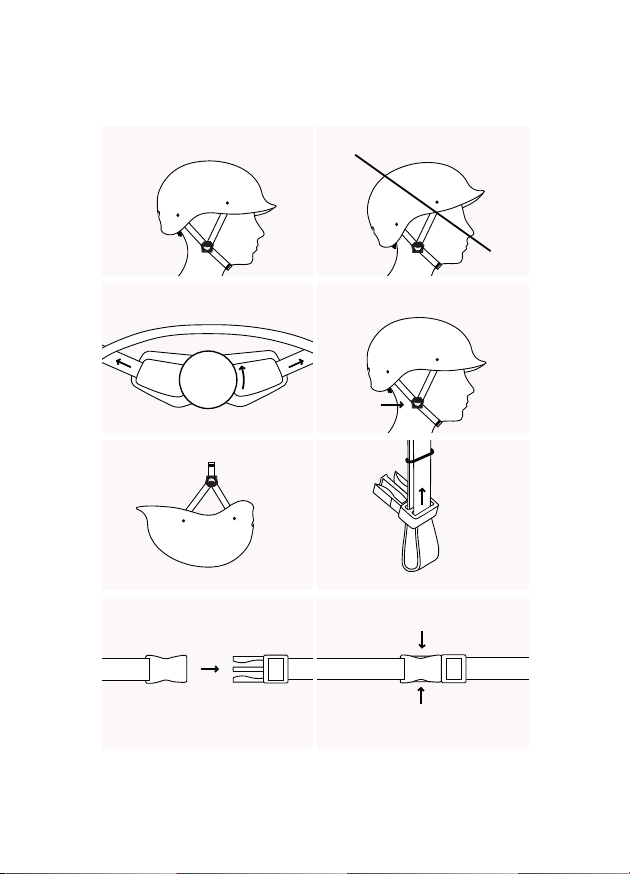
Stap 1
Zet de helm op de juiste manier op het hoofd.
(Fig 1). Wanneer de helm onjuist op het hoofd
wordt geplaatst kan de helm geen veiligheid
garanderen. (Fig 2)
Stap 2
Draai aan de knop van het automatische
verstelsysteem totdat de helm comfortabel
en net strak genoeg op het hoofd van jou en/
of het kind aansluit. (Fig 3)
Stap 3
Stel het linker zriempje af door de
riemversteller open te klikken en te
verschuiven tot de riemversteller net onder
de rechter oorlel zit. (Fig 4)
Stap 4
Verwder de helm van het hoofd en schuif
de linker riemversteller over het nekriempje
totdat het linker nekriempje op dezelfde
hoogte zit als het rechter nekriempje.
Controleer of de ruimte tussen de zriempjes
aan de linker en rechter kant gelk aan elkaar
zn en beide verstellers tdens het dragen
onder de oorlellen zien. Stel de riempjes
indien nodig opnieuw af. (Fig 5)
Stap 5
De twee bandjes onder de zriempjes
welke onder de kaak doorlopen worden
het kinbandje genoemd. Pas de lengte
van het kindbandje aan door de gesp te
verschuiven. (Fig 6)
Het kinbandje moet dicht tegen de
onderkant van de kin worden geplaatst,
plaats eventueel een vinger tussen de
kin en het bandje om genoeg ruimte over
te houden.
Stap 6
Sluit de helm door de rechter gesp in de
linker gesp van het kinbandje te steken.
Luister vervolgens goed of je een klik
hoort als de gesphelen gekoppeld
worden. (Fig 7) Probeer de gesp uit elkaar
te trekken met het kindbandje, dit zou niet
moeten kunnen. Duw het kinbandje door
de rubberen o-ring om te voorkomen
dat deze gaat apperen. Wanneer het
kinbandje weer geopend moet worden,
druk je beide zden van de gesp in en
trek je de helen van elkaar af. (Fig 8)
Testen
Test voor het gebruik van de helm de afstellingen uit door het hoofd van links naar rechts
te schudden, de helm mag niet heen en weer bewegen op het hoofd. Probeer ook de helm
over het hoofd naar voren en achteren te duwen. Beweegt de helm naar achteren, zet dan
de zriempjes strakker vast. Beweegt de helm naar voren, zet dan de nekriempjes strakker
vast. Wanneer het niet lukt om de helm correct af te stellen, dan kan het zn dat je een
andere maat nodig hebt.

Introduction
Congratulations! Now you or your kid is nally ready to go on an adventure with the right
protection. Thank you for choosing Velorei Headgear. This helmet is designed and
constructed to meet the highest standards for safety and performance. With the correct
adjustment, care and maintenance, this helmet will help you and your kid ride safely. Read
this manual before sending your kid out to ride with this new helmet!
The correct adjustment and use of this helmet are critical for safety. Parents should explain
the information in this manual to their children or anyone else who is not able to understand.
When we talk about ‘your helmet’, we are talking about the helmet in general, so also the
child that is wearing it. If you have any questions aer reading the manual, contact our
customer service.
EN
Important information
About the helmet
This helmet meets the requirements for the EN 1078 standard and is designed for cycling,
skateboarding and roller skating. A helmet must be worn and maintained correctly to
provide the right protection. Therefor it is necessary to carefully read and follow these
instructions. Incorrect use or maintenance of your helmet could lead to serious injuries or
even death.
Ride safely
No helmet can protect the wearer against all possible impacts. A severe impact, sharp
object, improper use or incorrect adjustment could cause conditions beyond the protection
of the helmet.
Check the adjustment before every ride
To be most eective, a helmet must t and be worn correctly. To check for the correct t,
place the helmet on the head and make any adjustment as indicated. Securely fasten the
retention system. Grasp the helmet and try to rotate it to the front and rear. A correctly
ed helmet should be comfortable and not move forward to obscure vision or rearward
to expose the forehead. If you cannot correctly adjust your helmet, please contact our
customer service.
Avoid the heat
Do no expose your helmet to heat, such as inside a car on a sunny day. Excessive heat can
damage the liner or shell, or make them separate. This makes the helmet loses its integrity
and therefore the strength to protect you.

Avoid chemicals
The helmet may be damaged and rendered ineective by petroleum and petroleum
products, cleaning agents, paints, adhesives and the like, without the damage being
visible to the user. Do not clean the helmet with chemicals or other liquids that can
harm the integrity of the helmet.
Replace an old helmet or helmet with damage
A helmet absorbs the rst blow in the event of a fall, which can prevent serious
injury. The helmet is designed to absorb shock by partial destruction of the shell
and liner. This damage may not be visible. Therefore, if subjected to a severe blow,
the helmet should be replaced. In any situation if subjected to a severe blow, the
helmets construction will be aected and should not be worn again, but destroyed
and replaced even if it appears undamaged. Helmet parts lose strength over time, so
even if the helmet has not been impacted or damaged, replace it aer three years.
If you choose to do stunts or tricks, you should choose a helmet with more protection.
Anything between your head and helmet can reduce the protection. A cap, scarf or
even some high-volume hairstyles might allow the helmet to move during an impact.
Barrees, headphones, or anything else under your helmet can injure you if the
helmet is impacted. No aachments should be made to the helmet except those
recommended by the helmet manufacturer. This includes stickers or adhesive labels.
Avoid choking by not using this helmet by children while climbing or doing other
activities where there is a risk of hanging or strangulation if the child gets trapped
whilst wearing the helmet. Keep your helmet clean, wash it with a solution of mild soap
and water. The t pads are machine washable in cold temperature. Do not put t pad
sets in the dryer. The ventilation holes may allow penetration. Objects such as sticks,
stones or insects can pass through the holes to the interior of the helmet.

6
5
87
12
4
3

Adjusting the helmet
Placement
To check the shell size of your helmet, put it on your head in the correct position but not
fasten the buckle (Fig 1). A good t is snug, but not tight. Note: all directions (le, right, top,
boom) are in reference to the helmet as worn on the head.
Step 1
Place the helmet on the head correctly.
(Fig 1) When the helmet is placed incorrect
on the head it cannot guarantee safety.
(Fig 2)
Step 2
Turn the automatic dial t system till
the helmet is tight enough, but still
comfortable. (Fig 3)
Step 3
Adjust the le strap by clicking the strap
adjustor open and slide until it is just
beneath the right earlob. (Fig 4)
Step 4
With the helmet o, slide the le strap
adjustor on the nape strap until the le
nape strap is the same length as the right
nape strap. Check if the space between
the le and right nape straps are equal
and both adjustors are just below the ear
lobes when positioned on the head. If
necessary, re-adjust the straps. (Fig 5)
Step 5
The ‘chinstrap’ are the two straps hanging
under the lower jaw. You can adjust
the length of the chinstrap by sliding it
through the buckle (Fig 6). The chinstrap
should t snugly against the boom of the
chin. If necessary, you should be able to
measure this by placing a nger between
the chin and the strap, which indicates the
right amount of space.
Step 6
Insert the le-hand buckle into the right-
hand buckle. Make sure the buckle is
correctly secured by listening for a click as
the buckle engages. (Fig 7) Give a gentle
tug to aempt to pull the buckle apart with
the chinstrap. It should not come apart.
To keep the excess of the chinstrap from
apping, tuck it through the rubber O-ring.
To undo the buckle again, press on both
of the recessed tabs of the buckle to open
it. (Fig 8)
Testing
To test the adjustments before using, shake the head gently from le to the right side. The
helmet should not move on the head. Also try to push the helmet forward and backward
on the head. If the helmet moves back, tighten the temple straps. If the helmet moves
forward, tighten the nape straps. If the helmet cannot be adjusted correctly, you may
need a smaller shell size.

Table of contents
Languages:
Popular Motorcycle Accessories manuals by other brands

Big Bike Parts
Big Bike Parts 41-164 installation instructions

Memphis Shades
Memphis Shades 2321-0068 Mounting instructions

Metra Electronics
Metra Electronics 82-9600 installation instructions

Sealey
Sealey MS065.V2 instructions

LUIMOTO
LUIMOTO DL5 installation instructions

Memphis Shades
Memphis Shades MEB8919 Mounting instructions