Vemer Tempo User manual

User Manual
PDF
Digital time/astronomical switch
Tempo


English
- 1 -
User manual Tempo
Index
QTechnical features page 3
QSafety warnings page 3
QDimensions page 4
QWiring diagrams page 4
QInstallation page 5
QDisplay and keyboard description page 7
QInitial operation page 8
QMenu description page 9
QSettings menu page 10
Language setting menu page 11
Date setting menu page 12
Time setting menu page 13
Daylight saving time (DST)/winter time (CET)
change setting menu page 14
Astronomical coordinates setting menu page 16
Random switchings setting menu page 18
Protection PIN setting menu page 19
QProgram menu page 20
Program menu: new page 25
Program menu: new daily timed page 26
Program menu: new weekly timed page 27
Program menu: new holiday timed page 28
Program menu: new astro night page 30
Program menu: new astro daily page 34
Program menu: new astro weekly page 35
Program menu: new astro holiday page 36
Program menu: check page 38
Program menu: modify page 40
Program menu: delete page 42
QHour couter menu page 43
QReset menu page 44
QFirmware menu page 46
QError signals page 47
QReference standards page 48

English
- 2 -
User manual Tempo
USER MANUAL
The digital switch Tempo is an electronic device for the management of the electrical utilities over time. It allows the time programming
(periodicity: daily or weekly) or astronomical.
Tempo is a device of electronic type that performs actions of 1B type, intended to operate in environments with III overvoltage category and
pollution degree 2 in accordance with EN 60730-1 standard.
Code Model Description
VE787500 Tempo Astronomical/time switch 1 relay
VE787501 Tempo-INT Astronomical/time switch 2 relays for round flush-mounting boxes

English
- 3 -
User manual Tempo
TECHNICAL FEATURES
• Power supply: 230 Vac (-15% ÷ +10%) 50/60 Hz
• Power consumption: 4 VA (0.3 W)
• Charge reserve in case of blackout: 72 hours
• Output: 1 bistable relay with maximum switchable load
of 5A / 250V
• Terminal block for cables with maximum cables section
of 1.5 mm2
• Display LCD with backlighting (active with power supply
from mains)
• Storable programs: 120 events
• Actions type: 1B
• Operating temperature: 0 °C ÷ +50°C
• Operating humidity: 20% ÷ 90% non condensing
• Storage temperature: -10°C ÷ +65°C
• Protection degree: IP40
• Insulation: reinforced between accessible parts (front)
and all the other terminals
SAFETY WARNINGS
During product installation and operation it is necessary
to observe the following instructions:
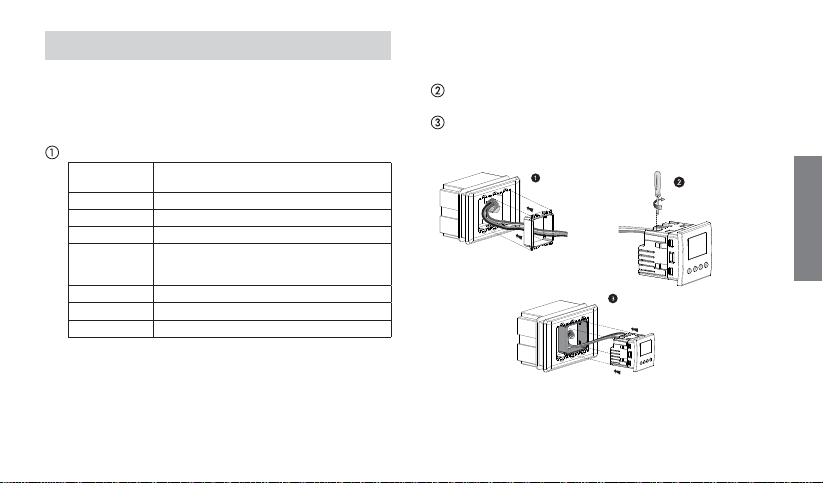
1) The product must be installed by a qualified person,
strictly in observance of the connection diagrams
shown in this manual.
2) After installation inaccessibility to the terminals
without using dedicated tools must be guaranteed.
3) Before accessing the connection terminals, make sure
that the leads are not live.
4) Do not connect or feed the product if any part of it is
damaged.
5) The product must be installed and activated in
compliance with current electric systems standards.
6) Do not use the product for anything other than the
indicated purpose.
7) In the electrical system upstream of the device must be
installed a protection device against the overcurrents
8) The product can be used in environments with
Measurement Category III and Pollution degree 2,
according to the Standard EN 60730-1

English
- 4 -
User manual Tempo
DIMENSIONS WIRING DIAGRAM
40 42
40
L
N
5
A
/
2
50
V
~

English
- 5 -
User manual Tempo
INSTALLATION TEMPO (cod. VE787500)
For information on the possibility of adapting the device
with plates different from those shown, contact
the Technical Assistance Service.
Adapter Plates
AM ABB series: Mylos
A4 AVE series: S44
BA BTICINO series: Axolute, Axolute AIR
BL BTICINO series: Light, Living International,
LivingLight, LivingLight AIR
GC GEWISS series: Chorus
VE VIMAR series: Arké, Eikon, Eikon Evo
VP VIMAR series: Plana
Mount the white or anthracite grey frame according to your
preferences by hooking it to the special teeth on the device.
Mount the appropriate adapter for the supplied plate
Make connections respecting the diagram shown on page 4
in this user manual
Insert the device into the adapter

English
- 6 -
User manual Tempo
INSTALLATION TEMPO-INT (cod. VE787501)
The device can be adapted to the cover plates of Berker, Busch-Jaeger, Gira, Jung and Merten.
The complete list of compatible cover plates is available on the website www.vemer.it on the product page.
Connect the load and power supply (see connection diagram).
Fasten the device with the metal frame to the flush-mounting box
Apply the cover plate and the 50x50mm intermediate panel
Finally insert the closing frame
Device with metallic frame
Flush-mounting box Cover
(White/Grey)
Cover plate
Intermediate panel
(for hole 50x50)
Device closing
frame
(colour White / Grey)

English
- 7 -
User manual Tempo
DISPLAY AND KEYBOARD DESCRIPTION
27/04/2021
2
2
7
7
/0
/0
04
04
4/
4/
/2
/2
20
20
02
02
21
21
1
1
12:11
1
1
1
1
1
1
1
1
1
1
1
1
2
2
2
2
2
2
2
2
2:
2:
2:
2
:
:
:
1
1
1
1
1
1
1
1
1
1
1
1
1
1
1
1
Field “date”
Field “time”
Relay status indication
relay status*
blocked switchings
active random switchings
active holiday program
active pulse program
Field “day of the week”
*if flashing: relay switching
occurred after pressing the key
(see “Manual relay switching”).
Access the menu ESC (1 level back))
Key “ ”: decreases data / menu back
Key “”: increases data / menu forward
Confirm selection
Manual relay switchings
• Key “”: ON/OFF manual relay switching.
In this case the indication of the display status flashes.
This condition persists until the achievement of the
subsequent programmed switching.
• Key “”(3 sec): blocking (or unblocking) of relay
switchings. When the switchings are blocked, the display
shows the symbol on.
• Key “”+ “”(3 sec): activation (or deactivation)
of random relay switching.
When the random switchings are active, the display
shows the symbol on.

English
- 8 -
User manual Tempo
INITIAL OPERATION
• Power the device: the fields “date” and “time” flash on
the display. Press any key to activate the menu for entering
the values.
• Use the keys and to select the correct value and
the key to confirm and pass to the next parameter.
The insertion sequence is: day-month-year-hours-minutes
• The language set is Italian. To change it, press the key
for at least 3 seconds until the display shows the modify menu.
5 languages are available: Italian, English, Spanish, French
and German. The other factory settings are shown in the table
on the right.
Date format: DD/MM/YY, Monday first day of the week
Astronomical coordinates: Agrigento (Italy)
Daylight Saving time (DST) change: active
Start of daylight saving time (DST): last Sunday of March
at 02:00 o’clock
End of daylight saving time (DST): last Sunday of October
at 03:00 o’clock
Correction of calculated sunrise and sunset times: 0:00
Time zone: +1:00 UTC
Time between two random switchings:
minimum: 1 minute
massimo: 5 minutes
Keyboard lock with pin: disabled (---)
• From main screen it’s possible to manually acton
the relay output (see page 7) or access the menu to perform
the programming or change the operating settings
27/04/2021
12:11
Main screen
Factory settings:

English
- 9 -
User manual Tempo
MENU DESCRIPTION
“Hour counter” menu allows you to check the operation
hours (relay on) of the loads connected to the relay.
“Reset” menu allows you to reset settings,
carried programming, operating hour counter.
“Ver FW” menu allows you to check the firmware version
installed on the device.
“Settings” menu allows you to change: language, date, time, daylight saving time (DST),
astronomical coordinates, minimum and maximum duration of the interval between two
switchings with random program, PIN for keyboard lock.
“Programming” menu allows you to set a new program or to check,
to modify or to delete a set program
27/04/2021
12:11
SETTINGS
PROGRAM
HOUR COUNTER
FIRMWARE VERSION
185-23

English
- 10 -
User manual Tempo
SETTINGS MENU
“Settings” menu allows you to view and eventually to modify
the general operation settings:
language
date
time
automatic daylight saving time (DST) change
position (astronomical coordinates)
interval duration between two random switchings
key lock with PIN protection
SETTINGS
LANGUAGE
SETTINGS
DATE
SETTINGS
TIME
SETTINGS
DAYL SAV. TIME
SETTINGS
SETTINGS
RANDOM
SETTINGS

English
- 11 -
User manual Tempo
Language setting menu
Available languages:
Italian, English, Spanish, French, German.
Quick access: from the main page it’s possible to access the
language setting by pressing the key for at least 3 seconds.
27/04/2021
12:11
SETTINGS SETTINGS
LANGUAGE
LANGUAGE
ITALIANO
LANGUAGE
ENGLISH
LANGUAGE
LANGUAGE
LANGUAGE

English
- 12 -
User manual Tempo
Date setting menu
Parameters modification
1Possible date formats: day-month-year ( DD/MM/YY ), year-month-day ( YY/MM/DD ),
month-day-year ( MM/DD/YY ).
2Choose, by convention, the first day of the week. In Italy, for example, the first day
of the week is Monday, in the UK it’s Sunday.
3Enter the date: day, month, year.
27/04/2021
12:11
SETTINGS
SETTINGS
DATE Parameters
modification
1
3
DAY 1
DATE FORMAT
DD/MM/YY
MONDAY
DATE
18/03/21
2

English
- 13 -
User manual Tempo
Time setting menu
Parameters
modification
1
Parameters modification
1Set the time: hours, minutes.
2Set the time zone. Range: -14:00 ÷ +14:00 at 15 minutes steps.
For Italy set +1:00.
27/04/2021
12:11
SETTINGS
SETTINGS
TIME
TIME ZONE
13:56
1:00
TIME

English
- 14 -
User manual Tempo
Daylight saving time (DST)/winter time (CET) change setting menu
Daylight saving time (DST)/winter time(CET) change and vice versa can occur in an automatic way. In this case, the device:
- increases by an hour in the passage from winter time (CET) to daylight saving time (DST) ( )
- decreases by an hour in the passage from daylight saving time (DST) to winter time (CET) ( )
For every time change it’s necessary to specify:
the week of the month during
which the time change occurs
(first, second, third, fourth, last)
the day of the week
(Monday: 1, Tuesday: 2, ...)
the month hour and minutes
In Italy, for example, daylight saving time (DST) begins the last ( LAST ) Sunday ( ) of March ( 03 )at 02:00 o’clock,
and ends the last ( LAST ) Sunday ( ) of October (10) at 03:00 o’clock.
LAST LAST LAST LAST

English
- 15 -
User manual Tempo
Parameters
modification
1
27/04/2021
12:11
SETTINGS
SETTINGS
DAYL SAV. TIME
Parameters modification
1Choose to activate ( AUTO ON) or to disable ( AUTO OFF) the automatic time change.
2Set date and time of the winter time (CET)-daylight saving time (DST) change.
3Set date and time of the daylight saving time (DST)-winter time (CET) change.
DAYL SAV. TIME
LAST
LAST

English
- 16 -
User manual Tempo
Astronomical coordinates setting menu
The setting of the geographical coordinates of the installation place allows the device to calculate, for each day of the year, sunrise and
sunset times. To simplify the procedure, in the device are stored the coordinates of the locations listed below; if your location is among them
you can select it from the menu , otherwise it’s necessary to enter the coordinates of latitude and longitude (menù ).
Note: the display on point shows “---------” if the coordinates have been entered.
Stored location: Italy: all provinces. United Kingdom: Cardiff, Belfast, Edinburgh, London. Spain: Barcelona, Madrid, Seville, Valencia
France: Lyon, Marseille, Paris, Toulouse. Germany: Berlin, Hamburg, Cologne, Monaco
The correction of sunrise and sunset times is useful for applications that require the turning on of lights in particular localities. It’s possible, in
fact, that the presence of disturbing elements, such as the mountains, can influence actual times of sunrise and sunset, making it necessary
to advance or delay of a few minutes the calculated times.
The twilight is the time interval before sunrise, or after sunset, characterized by the permanence of the light due to the spread by the
atmosphere of the Sun light. During these time intervals it’s possible to distinguish clearly objects and conduct outdoor activities without
using additional lighting. Therefore, in some applications it is more interesting to take as times of switching on and off the twilight (civil)in
place of sunrise and sunset. With the switch Tempo it’s possible to choose to turn on/off the loads depending on the times of sunrise
and sunset or the civil twilight. The calculated time correction also applies to the times of twilight.
To view the calculated switching on time (sunset) and switching off time (sunrise), from the main screen press the key .
The times displayed take into account any corrections entered.
If the display shows it means that the calculated sunrise time is after the sunset time. If the display shows it means that
the calculated sunrise time is before 00:00 or that the calculated sunset time is after 23:59.

English
- 17 -
User manual Tempo
27/04/2021
12:11
SETTINGS
SETTINGS Parameters
modification
1
3
AG-AGRIGENTO
NORTH
13° 34' 12"
CITY
LATITUDE
37° 19' 12"
LONGITUDE EAST
OFFSET SUNSET
OFFSET SUNRISE
0:00
0:00
TWILIGHT
CIVIL SI
2
Parameters modification
Choose the installation location. If it’s not present, proceed with steps and .
Set the latitude of installation place.
Set the longitude of installation location.
Set a possible correction of the calculated sunrise time. Positive values to delay, negative
values to anticipate.
Set a possible correction of the calculated sunset time. Positive values to delay, negative
values to anticipate.
Choose as switching times the civil twilight (CIVIL S) in place of sunrise
and sunset (CIVIL N) times.

English
- 18 -
User manual Tempo
Random switchings setting menu
The “random switching ” function (which can be activated by pressing the keys and simultaneously for more than 3 seconds)
allows the relay to switch automatically and at random time intervals.
In this menu it’s possible to define the minimum and maximum duration of the time interval between two random switchings. Default mini-
mum duration is 1 minute, maximum duration is 5 minutes.
Parameters modification
1Set the minimum duration. It’s possible to set values between 1 minute and the maximum duration.
2Set the maximum duration. It’s possible to set values between the minimum duration and 23:59 hours.
Note: setting the minimum duration equal to the maximum, the switchings will occur at fixed time intervals.
27/04/2021
12:11
SETTINGS
SETTINGS
RANDOM Parameters
modification
MAXIMUM DURATION
MINIMUM DURATION
00:01
00:05
This manual suits for next models
3
Table of contents
Other Vemer Relay manuals