manuals.online logo
Brands
  1. Home
  2. •
  3. Brands
  4. •
  5. Verderflex
  6. •
  7. Water Pump
  8. •
  9. Verderflex VP-PH Series Installation manual

Verderflex VP-PH Series Installation manual

I MANUALE DI PROGRAMMAZIONE
UK PROGRAMMING INSTRUCTIONS
F MANUEL DE RÉGLAGE
E MANUAL DE REGULATIÓN
POMPE / PUMPS
POMPES / BOMBAS
VP - pH
Rev 1.0 Cod. 00.008.644
2
I PROGRAMMAZIONE UK PROGRAMMING F PROGRAMMATION E REGULATIÓN
A RICHIESTA/ UPON REQUEST/ SUR
DEMANDE/ A PETICION :
I
Premere il tasto SET per 3 secondi. Il led SET inizia a lampeggiare ed il
display mostra lamp
eggiante il valore del setpoint precedentemente
memorizzato. (Valore di default 7.3pH). Premere i tasti + o –
per modificare
tale valore Premere ENTER per confermare la scelta e memorizzare il dato .
Sul display appare la scritta lampeggiante: ACd oppure
bAS precedentemente
memorizzata (default ACd). Si passa dall’una all’altra scritta premendo i tasti +
e - -ACd 
la pompa dosa per valori della misura di pH superiori al
setpoint
-bASla pompa dosa per valori della misura di pH inferiori al setpoint
Premere ENTER per confermare la scelta, memorizzare il dato
ed uscire dalla
programmazione.
Se la pompa ha il contatore di allarme temporale incorporato (venduto
su richiesta) :
Appare alternativamente la scritta “tAL” ed il valore del tempo di allarme
precedentemente memorizzato (default: 0 =disabilitato).
Premere i tasti + e – per modificare il valore da (0-999 minuti)
. Premere
ENTER per confermare la scelta, memorizzare il dato
ed uscire dalla
programmazione. Il led SET si spegne ed il display torna in misura.
UK
Push and hold the SET button for 3 seconds. The led SET will start
blinking and the display will blink showing the value of the setpoint stored in
the last programming (default 7.3pH). Modify this value by pushing the + or –
buttons. Push ENTER to confirm your choice and store the values.
The display will showa the blinking message Acd or bAS stored in the last
programming (default Acd). You can select one reading or the other one
pushing the buttons + or -.
-ACd the pump doses when the measurement is
greater than the
setpoint.
-bAS
l the pump doses when the measurement is smaller than the
setpoint.
Push ENTER to confirm your choice, store it and exit programming.
If the pump has the counter alarm time embedded (sold on request):
The display will differently show “tAL” and the value o
f the previously stored
minutes to alarm (default 0=disabled). Use the + and - buttons to modify it (0-
999 minutes). Push ENTER to confirm your choice, store it
and exit
programming. The SET led will turn off and the displ
ay will return to pH
measurement.
F
Presser la touche SET pendant 3 secondes. Le led SET commence à
clignoter et le display montre en clignotant la valeur du setpoint
précédemment mémorisée (Valeur de défaut 7.3pH). Presser les touches +
ou - pour mo
difier telle valeur. Presser ENTER pour confirmer le choix et
mémoriser la donnée. Sur le display apparaît l'inscription clignotante: ACd
ou bAS précédemment mémorisée (réglage d’usine
: ACd). Passer d'une à
l'autre inscription en pressant les touches + et -.
- ACd
la pompe dose par valeurs de mesure de pH supérieures au
setpoint
- bAS
la pompe dose par valeurs de la mesure de pH inférieures au
setpoint
Presser ENTER pour confirmer le choix, mémoriser la donnée
et sortir du
plan.
Si la pompe a le compteur d'alarme embarqués temps (vendue sur
demande):
Apparaît alternativement l'inscription "tAL" et la valeur du minutes pour alarme
précédemment mémorisée (réglage d’usine: 0= Désactive
). Presser les
touches + et - pour modifier la valeur. Presser
ENTER pour confirmer le
choix, mémoriser la donnée
et sortir du plan. Le led SET s'éteint et le display
revient en mesure.
Rev 1.0 Cod. 00.008.644
3
E
Comprimir la tecla SET por 3 segundos. El led SET inicia a relampaguear y el display enseña intermitente el valor del
setpoint anteriormente memorizado (Valor de estándard 7.3pH) Comprimir las teclas + o -
para modificar tal valor.
Comprimir ENTER para confirmar la elección y memorizar el dato. Sobre el display aparece la inscripción intermitente:
ACd o bien bAS anteriormente
memorizada (estándard ACd). Se da de la una a la otra inscripción comprimiendo las
teclas + y -
- ACd la bomba dosifica por valores de la medida de pH superiores al setpoint
- bAS la bomba dosifica por valores de la medida de pH inferiores al setpoint
Comprimir ENTER para confirmar la elección, memorizar el dato y salir de la programación.
Si la bomba ha contrarrestar la hora de alarma incrustado (que se vende bajo pedido):
Aparece alternativamente la inscripción "tAL" y el valor de los minuitos de alarma
anteriormente memorizado (estándard:
0= Desactivato). Comprimir las teclas + y - para modificar el valor. Comprimir ENTER para confirmar la elección
,
memorizar el dato y salir de la programación. El led SET se apaga y el display vuelve en medida.
I In qualsiasi punto di programmazione del setpoint se non viene premuto alcun tasto (+,-, Enter)
durante 60 secondi, la pompa esce dalla programmazione con i parametri nuovi fino a quel momento
memorizzati.
UK During the setpoint programming if you do not push any button (+,-, Enter) for more than 60
seconds, the pump will get out of programming with the values stored until that moment.
F En n'importe quel point de règlage du setpoint si aucune touche n’est pressée (+, -, Enter) pendant 60 secondes, la
pompe sort du reglage avec les nouveaux paramétres jusqu'à ce moment mémorisés
E En cualquier punto de programación del setpoint si no es comprimido ninguna tecla (+, -, Enter) durante 60
segundos, la bomba sale de la programación con los parámetros nuevos hasta aquel momento memorizados.
I CALIBRAZIONE UK CALIBRATION F CALIBRAGE E CALIBRATIÓN
I Attenzione,
(1) la procedura di calibrazione della sonda può richiedere alcuni minuti, per una maggiore precisione di lettura;
è indispensabile rispettare la sequenza delle operazioni indicate qui di seguito.
(2) Assicurarsi che le soluzioni tampone usate nella calibrazione corrispondano sempre al valore indicato e che non siano
inquinate.
UK Attention,
(1) the electrode calibration procedure can require some minutes, for a very accurate reading;
it’s very important to follow the operation sequence indicated here below.
(2) Be sure that the buffer solution used in calibration matches always the indicated value, and that they're not polluted.
F Attention,
(1) Le procédé de calibrage d'électrode peut avoir besoin de quelques minutes , pour une lecture très précise ;
il est très importante pour suivre l'ordre d'opération indiqué ici ci-dessous.
(2) Être sûr que la solution tampon utilisée pour le calibrage, correspond toujours a la valeur indiquée, et qu'ils n’est pas
pollués.
E Atención,
(1) El procedimiento de la calibración del electrodo puede requerir algunos minutos, para una lectura muy exacta;
él es muy importante seguir la secuencia de la operación indicada aquí abajo.
(2) Ser seguro que la solución tapón usada en la calibración empareja siempre el valor indicado, y que no están
contaminados.
Rev 1.0 Cod. 00.008.644
4
(1)
I Inserire la sonda di pH nella soluzione tampone a pH 7.
UK Dip the probe in the pH7 buffer solution.
F Insérer la sonde de pH dans la solution tampon au pH 7.
E Insertar la sonda de pH en la solución a pH 7.
(2)
I
Premere il tasto CAL per 3 secondi , il display mostra 7.0 lampeggiante ed il
led CAL inizia a lampeggiare. La calibrazione del 7
è automatica e si conclude
appena la scritta 7.0 cessa di lampeggiare e resta fissa su display.
UK Push the CAL but
ton for 3 seconds, the display will show 7.0 blinking and
the CAL led will start blinking. The calibration of the 7
is automatic and it ends
when the reading 7.0 stops blinking on the display and remains fixed
F Presser la touche CAL pendant 3 secon
des, le display montre 7.0
clignotant et le led CAL commence à clignoter. Le calibrage de 7
est
automatique et il se termine dès que l'inscription 7.0 cesse de clignoter et elle
reste fixe sur display
E Mantener presionada la tecla CAL (3 segundos aproximadamente ),
el
display enseña 7.0 intermitente y el led CAL inicia a relampaguear.
Insertar la
sonda de pH en la solución a pH 7. La calibración del 7
es automática y se
concluye en cuanto la inscripción 7.0 deja de relampaguear y esta fija en el
display,
(3)
I
Pulire la sonda con acqua e spostarla nella nuova soluzione scelta (pH9 o
pH4).
UK Clean the probe with water and put it in the new solution (pH9 or pH4).
F Nettoyer la sonde avec de l'eau et la mettre dans la
nouvelle solution (pH9
ou pH4).
E Limpiar la sonda con aqua y ponerla en la nueva solución (pH9 o pH4).
(4)
I Selezionare con i la pressione dei tasti + e - il nuovo pH scelto (pH9 o pH4)
Il valore selezionato incomincerà a lampeggiare fino a calibrazione avvenuta,
dopodiché diventerà fisso
UK By pressing the + or – buttons choose the new selected pH (pH9 or pH4)
The indicated value will start blinking till calibration complete,
Once calibrated it will stay fixed.
F Presser les boutons + ou - choisissent le nouveau pH (pH9 ou pH4)
La valeur indiquée commencera à clignoter jusqu'au calibrage complet,
une fois que calibré lui restera fixe.
E Comprimir la tecla + o – para seleccionar el nuevo pH (pH9 o pH4
El valor indicado comenzará a centelleo hasta la calibración completa,
una vez que esta calibrado permanezca fijo.
Rev 1.0 Cod. 00.008.644
5
(5)
I
Il display a questo punto mostra la scritta YES oppure nO. YES indica che
la sonda è in buona salute e nO indica che
la sonda non è in buona salute e va
sostituita.
UK
The display will show the message YES or nO. YES means that the probe
is good and nO means that it is old and must be changed.
F Le display à ce point montre l'inscription YES ou nO. YES indique que
la
sonde est en bonne santé et nO indique que la sonde n'est pas en bonne santé
et elle doit être remplacée.
E
El display a este punto enseña la inscripción YES o bien nO. YES indica
que la sonda está en buena salud y no indica que la sonda no está en
buena
salud y debe ser reemplazada.
(6)
I
Premere ENTER per memorizzare i nuovi parametri di calibrazione e
tornare in misura. (Se il tasto ENTER non viene premuto nel termine di 180
secondi, i nuovi parametri di calibrazione non
vengono memorizzati). Il led CAL
si spegne ed il display torna in misura.
UK
Push ENTER button to confirm the new calibration and to go back in
measurement mode. (If you do not push the ENTER button during the next 180
seconds, the new calibration value
s will not be stored by the pump) The led
CAL turns off and the display will return to measure.
F
Presser ENTER pour mémoriser le nouveaux calibrage et revenir en mesure. , Si la touche ENTER n'est pas
pressée dans les 180 secondes, le nouveaux calibr
age n'est pas mémorisé. Le led CAL s'éteint et le display revient en
mesure.
E Comprimir ENTER para memorizar los nuevos parámetros de calibración y volver en medida. , Si la tecla ENTER
no es comprimido en el plazo de 180 segundos, los nuevos parámetros de calibración no son memorizados. El led CAL
se apaga y el display vuelve en medida.
I MESSAGGI DELLA POMPA UK MESSAGES FROM THE PUMP
F MESSAGES DE LA POMPE E MENSAJES DE LA BOMBA
I
INDICA LA NECESSITA’ DI RIPETERE LA CALIBRAZIONE.
PREMERE ENTER E TORNARE IN MISURA ED ESEGUIRE DI NUOVO LA
CALIBRAZIONE.
Se dopo aver ripetuto la calibrazione appare nuovamente il messaggio:
a) Controllare che la soluzione tampone non sia inquinata (e
ventualmente
sostituirla).
b) Controllare che la soluzione tampone scelta sul display durante la
calibrazione sia quella effettivamente usata.
c) La sonda di pH potrebbe essere invecchiata (sostituirla).
UK THIS MESSAGE MEANS THAT THE CALIBRATION HA
S TO BE DONE AGAIN. PUSH ENTER BUTTON TO GO
BACK IN MEASURE AND DO AGAIN THE CALIBRATION.
If after repeating the calibration the display will show this message again:
a) Check that the buffer solution is not polluted (eventually replace it).
b) Check that the buffer solution selected on the display during the calibration is the value of the one really used.
c) The pH probe could not be working well (replace it)
Rev 1.0 Cod. 00.008.644
6
F
INDIQUE LA NECESSITE DE RÉPÉTER LE CALIBRAGE. PRESSER ENTER ET REVENIR EN MESURE ET
EXÉCUTER LE CALIBRAGE DE NOUVEAU.
Si après avoir répété le calibrage le message apparaît de nouveau:
a) Contrôler que la solution tampon ne soit pas polluée, éventuellement la remplacer.
b) Contrôler que la solution tampon choisie sur le display pendant le calibrage soit celle effectivement utilisée.
c) le sonde de pH pourrait être usée (la remplacer).
E
INDICA LA NECESITA' DE REPETIR LA CALIBRACIÓN. COMPRIMIR ENTER Y VOLVER EN MEDIDA Y
EJECUTAR DE NUEVO LA CALIBRACIÓN.
Si después de haber repetido la calibración aparece de nuevo el mensaje:
a) Controlar que la solución no sea contaminada, eventualmente reemplazarla.
b) Controlar que la solución elegida sobre el display durante la calibración sea aquel efectivamente usada.
c) la sonda de pH podría ser envejecida (reemplazarla).
I FUNZIONAMENTI E VISUALIZZAZIONI UK FUNCTIONINGS AND VISUALIZATION
F FONCTIONNEMENTS ET VISUALISATIONS E FUNCIONAMIENTOS Y VISUALIZACIONES
I Per visu
alizzare il valore dei parametri settati (setpoint, ACd / bAS) premere brevemente il tasto
SET. Il led SET inizia a lampeggiare ed il display mostra per 3 secondi il valore del setpoint
precedentemente memorizzato, poi mostra per 3 secondi il valore ACd oppure bAS memorizzato
Il led SET si spegne ed il display torna in misura.
UK
To read the values of the setpoint data (setpoint, ACd / bAS) push shortly the SET button. The
SET led will start blinking and the display will show for 3 seconds the value of th
e previously stored
setpoint, then the display will show for 3 seconds the stored Acd or bAS values. The SET led will turn
off and the display will go back to measurement.
F Pour visualiser la valeur des modèles du règlage (setpoint, ACd / bAS) brièvem
ent presser la touche SET. Le led
SET commence à clignoter et le display montre pendant 3 secondes la valeur du setpoint précédemment mémorisée,
puis le display montre pendant 3 secondes la valeur Acd ou bAS précédemment mémorisée.
Le led SET s'éteint et le display revient en mesure.
E Para visualizar el valor de los parámetros (setpoint, ACd / bAS)
comprimir brevemente la tecla SET. El led SET
inicia a relampaguear y el display enseña por 3 segundos el valor del setpoint anteriormente memorizado,
luego el
display enseña por 3 segundos el valor Acd o bien bAS anteriormente memorizado. El led SET se apaga y el display
vuelve en medida.
STAND BY
I La pressione del tasto ENTER durante il funzionamento pone la pompa in stato di stand by:
1) CESSA IL DOSAGGIO
2) LED verde di on acceso
3) LED verde PAUSE /STAND BY acceso.
4) IL DISPLAY visualizza:
“SbY” che si alterna alla visualizzazione corrente (misura di pH attuale )
La nuova pressione del tasto ENTER fa tornare la pompa nello stato di funzionamento iniziale.
UK By pushing the ENTER button while the pump is working, the pump will go in stand by
mode:
1) Stops dosing
2) Green ON Led is lit
3) Green Pause/ Stand by led turns on
4) The display will show alternatively the message “SbY” and the actual visualization (pH
measurement)
Pushing again the ENTER button you can turn the pump to its initial state.
Rev 1.0 Cod. 00.008.644
7
F La pression de la touche ENTER pendant le fonctionnement met la pompe en état de stand by:
1) LE DOSAGE CESSE
2) LED vert de on allumé
3) LED vert PAUSE / STAND BY allumé.
4) LE DISPLAY visualise:
"SbY" qui s’alterne avec la visualisation actuelle (mesure de pH actuelle).
La nouvelle pression de la touche ENTER fait revenir la pompe dans l'état de fonctionnement initial.
E La presión de la tecla ENTER durante el funcionamiento pone la bomba en estado de stand by:
1) DEJA LA DOSIFICACIÓN
2) LED verde de on encendido
3) LED verde PAUSE / STAND BY encendido.
4) EL DISPLAY visualiza:
"SbY" que se alterna a la visualización actual (medida de pH actual).
La nueva presión de la tecla ENTER hace volver la bomba en el estado de funcionamiento inicial.
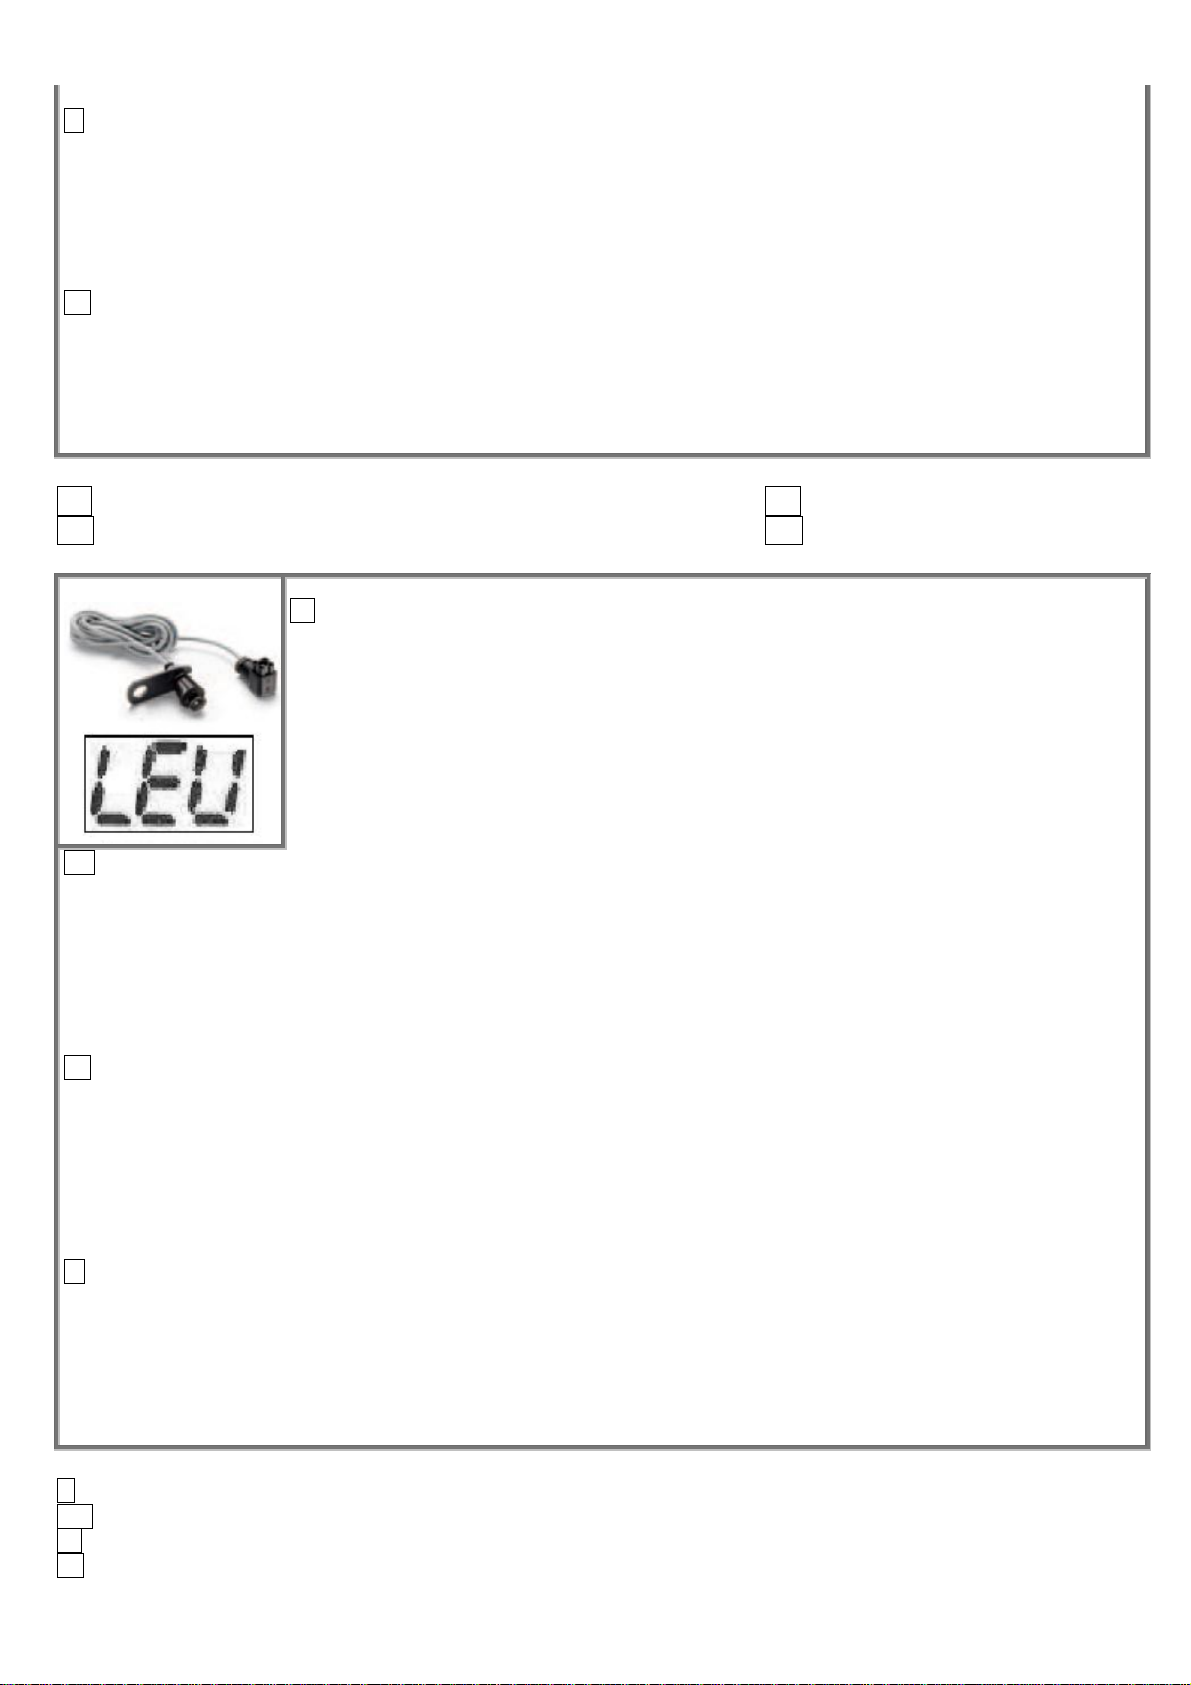
I **SEGNALAZIONE DI LIVELLO UK **LEVEL ALARM
F **ALARME DE FIN NIVEAU E **ALARMA DE FIN NIVEL
I
La chiusura del contatto di livello, libero da tensione, durante il funzionamento della pompa,
in qualsiasi modalità essa si trovi, provoca, con un ritardo di 3-4 secondi:
1) la cessazione dell’attività di dosaggio
2) l’accensione fissa del led ARANCIONE level.
3) Il led verde on resta acceso.
4) Il display visualizza la scritta “LEU” che si alterna alla visualizzazione corrente.
La riapertura del contatto di livello fa tornare la pompa , con un ritardo di 3-
4 secondi, nello stato
di FUNZIONAMENTO precedente alla chiusura del contatto di livello e congruente con gli
ingressi attuali della pompa.
UK The closing of the level input contacts, free of tension, while the pump is working causes, with a delay of 3-
4
seconds:
1) the stop of dosing
2) the fixed lighting of the orange level led
3) the green ON led will continue to be turned on
4) the display will show “LEU” alternatively with the actual visualization
When the level contact get connected again, the pump returns, with a delay of 3-
4 seconds, to WORKING mode, as it
was before the level alarm, compatible with the actual inputs.
F La fermeture du contact de niveau, libre de tension, pendant le fonctionnement de la pompe, en n'importe qu
elles
modalités elle se trouve, provoque, avec un retard de 3-4 secondes:
1) la cessation de l'activité de dosage
2) l'allumage fixe du led level ORANGE.
3) le led on vert reste allumé.
4) le display visualise l'inscription "LEU" qui s’alterne avec la visualisation courante.
La rentrée du contact de niveau fait revenir la pompe, avec un retard de 3-
4 secondes, dans l'état de
FONCTIONNEMENT précédent à la fermeture du contact de niveau et congruant avec les entrées actuelles de la pompe
E
El cierre del contacto de nivel, libre de tensión, durante el funcionamiento de la bomba, en cualquiera modalidades
ella se encuentra, provoca, con un retraso de 3-4 segundos:
1) el cese de la actividad de dosificación
2) el encendido fijo del led ANARANJADO level.
3) el led verde on queda encendido.
4) el display visualiza la inscripción "LEU" que se alterna a la visualización corriente.
La reapertura del contacto de nivel hace volver la bomba, con un retraso de 3-
4 segundos, en el estado de
FUNCIONAMIENTO anterior al cierre del contacto de nivel y congruente con las entradas actuales de la bomba
I ** Nel caso in cui sia stata richiesta l’opzione di allarme temporale la sonda di livello non viene fornita
UK ** With time alarm embedded,
the level probe is not provided
F ** Avec l’alarme a temps embarqués, la sonde de niveau n’est pas fournie
E ** Con l’alarma de tiempo, la sonda de nivel no está prevista
Rev 1.0 Cod. 00.008.644
8
I ALLARME TEMPORALE (OPZIONALE) UK TIME ALARM (UPON REQUEST)
F ALARME À TEMPS(SUR DEMANDE) E ALARMA A TEMPO (A PETICION)
I STATO DI Allarme conteggio
Il tempo impostato in tAL è in minuti e indica il tempo in cui la pompa dosa. Il conteggio di tale
tempo parte da 0 all’istante in cui la pompa inizia il dosaggio dopo l’accensione, si incrementa
durante il dosaggio, si resetta durante la
pausa di lavoro (stand by), se manca l’alimentazione
elettrica, se la misura raggiunge il setpoint. Quando il conteggio raggiunge il valore del
parametro memorizzato in tAL la pompa entra in stato di allarme temporale:
1) CESSA IL DOSAGGIO (nessuna tensione al motore)
2) LED verde di on acceso
3) LED verde PAUSE /STAND BY acceso.
4) IL DISPLAY visualizza:“tAL” che si alterna alla visualizzazione della misura corrente.
La pressione del tasto di ENTER
fa tornare la pompa nello stato di FUNZIONAMENTO ed
azzera il conteggio che riparte immediatamente quando la pompa ricomincia a dosare.
UK The
number memorized in tAL represents the minutes of working of the pump. The counting starts from 0 when
the pump begins the dosing after the start up, it increases during th
e dosing, it is reset during the stand by, if the
power supply is off and if the measure rises the setpoint.
When the counting becomes equal to the value memorized in tAL, the pump enters in time alarm state:
5) the dosing stops
6) the green ON led continues to be turned on
7) the green PAUSE /STAND BY led is on
8) the display shows “tAL” alternatively with the actual visualization
Push ENTER button to esc from alarm, to go in working mode and reset the counting.
F Le numéro mémorisé dans tAL représente les minut
es de travail de la pompe. Le comptage commence à 0 lors
de la pompe doseuse l'commence après le démarrage, il augmente au cours du traitement, il est à zéro pendant le
stand by, si l'alimentation est coupée et que si cette mesure augmente le point de cons
igne.
Lorsque le devient égal à la valeur mémorisée dans tAL, la pompe d'alarme entrée dans le temps:
1) CESSE LE DOSAGE
2) LED vert de on allumé
3) LED vert PAUSE / STAND BY allumé.
4) LE DISPLAY visualise: "tAL" qui s’alterne avec la visualisation actuelle ( mesure de pH actuel).
La nouvelle pression de la touche ENTER remettre le comptage et fait revenir la pompe dans l'état de fonctionnement
initial.
E El número memorizado en tAL representa el acta de trabajo de la bomba. El recuento co
mienza desde 0 cuando
la bomba inicia la dosificación después de la puesta en marcha, que aumenta durante la dosificación, es cero durante
el permanecer, si la fuente de alimentación está apagado y si la medida se eleva el punto de ajuste.
Cuando el recuento se hace igual al valor memorizado en tAL, la bomba entra en estado de alarma en el tiempo:
1) DEJA LA DOSIFICACIÓN
2) LED verde de on encendido
3) LED verde PAUSE / STAND BY encendido.
4) EL DISPLAY visualiza: "tAL" que se alterna a la visualización actual ( medida de pH actual).
La nueva presión de la tecla ENTER hace volver la bomba en el estado de funcionamiento inicial y reinicie el conteo.
I CALCOLO DI tAL (OPZIONALE) UK tAL CALCULATION (UPON REQUEST)
F CALCUL DE tAL (SUR DEMANDE) E CÁLCULO DE tAL (A PETICION)
I ESEMPIO di calcolo del tAL se si vogliono iniettare 2 litri (=2000cc) di prodotto chimico a scarico libero.
UK EXAMPLE for the calculation of tAL to dose 2 liters (=2000cc) of chemical without pressure in the plant.
F EXEMPLE pour le calcul de tAL pour le dosage de 2 litres (=2000cc) de produits chimiques sans pression
dans la plante.
E EJEMPLO para el cálculo de tAL para la dosificación de 2 litros (=2000cc) de químicos sin presión en la planta.
Rev 1.0 Cod. 00.008.644
9
I VALORI DI DEFAULT UK DEFAULT SETTINGS
F PARÁMETROS ESTÁNDARD E RÉGLAGE D’USINE
I REGOLAZIONI DELLA CASA:
SETPOINT: Set = 7.3 pH
VERSO DEL DOSAGGIO: Acd
TEMPO DI ALLARME (OPZIONALE): tAL=0 (disabilitato)
Per resettare la pompa e reinserire i parametri di default premere contemporaneamente i tasti :+, -, SET per 4 secondi
UK DEFAULT SETTINGS:
SETPOINT: Set = 7.3 pH
DIRECTION OF DOSING: Acd
TIME ALARM (UPON REQUEST) : tAL=0 (disabled)
To reset the pump and store the default settings push contemporarly the buttons: +, -, SET for 4 seconds
F REGLAGE D’USINE :
SETPOINT: Set = 7.3 pH
DOSAGE : Acd
ALARME À TEMPS (SUR DEMANDE) : tAL=0 (Désactive)
Pour rétablir le reglage d’usine presser en même temps les touches : +, -, SET pour 4 secondes
E PARÁMETROS ESTÁNDARD:
SETPOINT: Set = 7.3 pH
DOSAJE: Acd
ALARMA A TEMPO (A PETICION) : : tAL=0 (Desactivato)
Por reinstaurar los parámetros de estándard comprimir al mismo tiempo las teclas: +, -, SET por 4 segundos
I A RICHIESTA UK UPON REQUEST F OPTIONNEL E OPCIONAL
I Il cavo di aliment
azione della pompa esce dal pressacavo A di
figura. Questo va collegato con la rete di alimentazione elettrica
230 V, 50Hz.
A richiesta è possibile avere un secondo cavo di
alimentazione in posizione B.
Questo secondo cavo
rappresenta un ingresso di consenso al dosaggio (230 V-
50 Hz).
Molto usato nel settore della piscina è collegato in parallelo alla
alimentazione elettrica della pompa di ricircolo dell’impianto.
Quando la pompa di ricircolo è in funzione e quindi il secondo
ingresso di consenso al dosag
gio è sotto tensione, la pompa
dosatrice MP-
PH è abilitata al dosaggio. Quando la pompa di
ricircolo è spenta, la pompa dosatrice MP-
PH va in PAUSE
ovvero tutte le funzioni sono abilitate (inclusa la misura di pH, la
calibrazione, la programmazione….) tranne il dosaggio
( se
presente il tAL si resetta).
UK The power cable comes out from the pump through the cable clamp A. This cable has to be connected to the 230V-
50 Hz electric power.
Upon request it is possible to have a second power cable in position B of the figure. This second cable (230V-
50
Hz) enables the pump to dose.
This second cable is very used in swimming pool applications and it is connected in parallel to the power supply of the
filtration pump of the plant. When the filtration pump is o
n and then the second power cable of the dosing pump is under
tension, the MP-
PH pump will be enabled to dose. When the filtration pump is off, the second cable of the dosing pump is
not under tension and the MP-PH pump goes to PAUSE mode. In this mode the
pump can do all its functions
(measurement, calibration, programming….) but it can’t dose (tAL is reset if it is embedded) .
MOD l/h cc/min tAL=
2000cc :(cc/min)
VP1-PH 2,4/01 2,4 40 50
VP2-PH 04/01 4 66,5 30
Rev 1.0 Cod. 00.008.644
10
F Le câble d'alimentation de la pompe sort de la position À d'illustration. Celui-
ci va relié avec le réseau d'alimentation
électrique 230 V, 50Hz.
Sur demande il est possible avoir un second câble d'alimentation en position B
. Ce second câble représente une
entrée de consentement au dosage, 230 V - 50 Hz. Très utilisé dans le secteur de la piscine il est rélié en parallèle
à la
pompe de recirculation de l'installation.
Quand la pompe de recirculation est en marche et la seconde entrée de consentement au dosage est en tension, la
pompe MP-PH est abilitée au dosage. Quand la pompe de recirculation est éteinte, la pompe MP-PH va en PAUSE c'est-
à-dire que toutes les fonctions sont abilitees ( incluse la mesure de pH, le calibrage, le plan….) mis à part le dosage (
TAL
est réinitialisé si elle est ancrée).
EEl cable de alimentación de la bomba sale de la posición A. de fi
gura. Ésto debe ser conectado con la red de
alimentación eléctrica 230 V, 50Hz.
A solicitud es posible tener uno según cable de alimentación en posición B.
Este según cable representa una
entrada de consentimiento a la dosificación, 230 V - 50 Hz. Muy us
ado en el sector de la piscina es conectado en
paralelo a la bomba de filtración de la instalación.
Cuando la bomba de filtración está en función y por lo tanto la segunda entrada de consentimiento a la dosificación está
en tensión, la bomba dosificadora MP-
PH es habilitada a la dosificación. Cuando la bomba de filtración es apagada, la
bomba dosificadora MP-
PH va en PAUSAS o bien todas las funciones son habilitadas (incluida la medida de pH, la
calibración, la programación….) excepto la dosificación (TAL se reinicia, si es presente).
Rev 1.0 Cod. 00.008.644
11
Rev 1.0 Cod. 00.008.644
12
Verder Ltd
Unit 3 California Drive Castleford, WF10 5QH
Please go to www.verderflex.com for your local distributor.

This manual suits for next models

2

Other Verderflex Water Pump manuals

Verderflex Dura 15 User manual

Verderflex

Verderflex Dura 15 User manual

Verderflex Ds500 User manual

Verderflex

Verderflex Ds500 User manual

Verderflex iDura 5 Technical manual

Verderflex

Verderflex iDura 5 Technical manual

Verderflex Dura 45 User manual

Verderflex

Verderflex Dura 45 User manual

Verderflex iDura 5 Technical manual

Verderflex

Verderflex iDura 5 Technical manual

Verderflex Vantage 3000 P User manual

Verderflex

Verderflex Vantage 3000 P User manual

Verderflex Dura 65 Installation instructions

Verderflex

Verderflex Dura 65 Installation instructions

Verderflex Dura 7 User manual

Verderflex

Verderflex Dura 7 User manual

Verderflex Vantage 3000 B User manual

Verderflex

Verderflex Vantage 3000 B User manual

Verderflex Vantage 5000 Quick start guide

Verderflex

Verderflex Vantage 5000 Quick start guide

Verderflex DURA Series User guide

Verderflex

Verderflex DURA Series User guide

Verderflex Vantage 5000 Manual

Verderflex

Verderflex Vantage 5000 Manual

Verderflex Dura MK IV 05 User manual

Verderflex

Verderflex Dura MK IV 05 User manual

Verderflex Dura 55 User manual

Verderflex

Verderflex Dura 55 User manual

Popular Water Pump manuals by other brands

Power-flo PFC4NC Series Installation, service & parts manual

Power-flo

Power-flo PFC4NC Series Installation, service & parts manual

GORMAN-RUPP 03H3-GR Installation, operation and maintenance manual

GORMAN-RUPP

GORMAN-RUPP 03H3-GR Installation, operation and maintenance manual

ASM A Series instructions

ASM

ASM A Series instructions

Varian 919-1115 instruction manual

Varian

Varian 919-1115 instruction manual

Grundfos ALPHA1 L Series Installation and operating instructions

Grundfos

Grundfos ALPHA1 L Series Installation and operating instructions

Watson-Marlow MasoSine SPS 600 Manual - Technical Documentation

Watson-Marlow

Watson-Marlow MasoSine SPS 600 Manual - Technical Documentation

EINHELL GP JET 1201 INOX operating instructions

EINHELL

EINHELL GP JET 1201 INOX operating instructions

Alcatel I series user manual

Alcatel

Alcatel I series user manual

Pfeiffer Vacuum MVP 030-3 DC operating instructions

Pfeiffer Vacuum

Pfeiffer Vacuum MVP 030-3 DC operating instructions

Pentair Jung Pumpen US 73 E, Ex instruction manual

Pentair

Pentair Jung Pumpen US 73 E, Ex instruction manual

Einhell Royal TMP 255/1-S operating instructions

Einhell Royal

Einhell Royal TMP 255/1-S operating instructions

salmson EXPANSON COMFORT Installation and starting instructions

salmson

salmson EXPANSON COMFORT Installation and starting instructions

Johnson Pump SPX Flow CombiLineBloc instruction manual

Johnson Pump

Johnson Pump SPX Flow CombiLineBloc instruction manual

Stoelting 219 owner's manual

Stoelting

Stoelting 219 owner's manual

AquaMark AM-15V Installation, operation & maintenance manual

AquaMark

AquaMark AM-15V Installation, operation & maintenance manual

Keene P180 quick start guide

Keene

Keene P180 quick start guide

baxter Flo-Gard 6201 Service manual

baxter

baxter Flo-Gard 6201 Service manual

ITT FLOJET R3521 Series INSTALLATION & SERVICE INFORMATION

ITT

ITT FLOJET R3521 Series INSTALLATION & SERVICE INFORMATION

manuals.online logo
manuals.online logoBrands
  • About & Mission
  • Contact us
  • Privacy Policy
  • Terms and Conditions

Copyright 2025 Manuals.Online. All Rights Reserved.