Verizon 200AM User manual

User Guide
VERIZON DIGITAL CORDLESS PHONE 200AM
with DUAL KEYPAD and DIGITAL ANSWERING MACHINE
DECT 6.0 DIGITAL TECHNOLOGY
© 2008 Verizon
© 2008 Verizon. All rights reserved.
Verizon and the Verizon logos are trademarks of Verizon Trademark Services LLC.
All other trademarks are the trademarks of their respective owners.
Product photo may dier from actual product, however functionality remains
as stated above.
Specications are subject to change without notice.
UCZZ01953ZZ(0)
black Pantone 1795 C Liebreich Medienproduktion
User Guide V200 AM.indd 1User Guide V200 AM.indd 1 03.06.2008 9:34:26 Uhr03.06.2008 9:34:26 Uhr

1
The handset at a glance
Verizon 200 / USA EN / A31008-M1929-R301-2-6019 / kombi_overview.fm / 9.6.08
The handset at a glance 1Display in idle status
2Charge status of the batteries
= e U (empty to full)
=flashes: batteries almost empty
= U flashes: batteries charging
3Display keys (page 11)
4Control key
tAccess to Call Log list.
sAccess to directory.
5Mute key
Mute/unmute microphone.
6End Call key, On/Off key
End call, cancel function, return to idle sta-
tus, activate/deactivate handset (press and
hold in idle status).
72.5-mm socket (mono) for headset
8Pound (#) key
Enter symbol #.
Keypad lock on/off (press and hold in idle
status).
Switch between uppercase/lowercase let-
ters for text entry.
9Redial/Pause key
Open redial list (in idle status) or insert a
dialing pause (when editing a number).
10 Microphone
11 Intercom/Hold/Conference key
Set up an internal call.
Switch between external call and internal
party (handset/base station), or transfer a
call during external call.
Set up a conference call between an exter-
nal line and an internal party (handset/base
station). Press and hold the key in hold-
intercom mode.
12 Star (*) key
Ring tone on/off (press and hold).
Switch temporarily to tone dialing (DTMF).
Switch between AM and PM when setting
time.
Change Call list display format.
13 Talk/Flash key
Answer or start a call.
Key flashes: Incoming call.
Add a flash (in the directory).
Send FLASH (when off hook).
14 Handsfree:key
Answer or place a call in speaker mode.
Switch between speaker on and speaker off
(in off-hook mode).
15 Voice mail
Connect to your voice mailbox.
16 Signal strength
ÄHandset is linked with the base station.
ÄFlashes: out of range.
Note:
Pictures in this user manual may differ from
the actual product.
ÄÕ e
INT 1
01/31 09:45
1
2
3
4
5
6
7
8
911
13
14
15
16
10
§§§§Menu§§§§
12

2
The base station at a glance
Verizon 200 / USA EN / A31008-M1929-R301-2-6019 / kombi_overview.fm / 9.6.08
The base station at a glance
1Numeric key pad
2Control key
tAccess to Call Log list.
sAccess to directory.
3Display keys (page 11)
4Display in idle status
5Answering machine icon
Is on when the answering machine is on.
6Memory Full icon
Answering machine's message memory is
full.
7Remote control icon
Is on when the answering machine is con-
trolled by a handset.
8Ringer off icon
Is on when the ring tone volume of the base
station is turned off.
9Answering machine On/Off key
Activate/deactivate answering machine.
10 Volume keys
– In idle mode: change the ring tone vol-
ume of the base station.
– During message playback: change vol-
ume of playback.
– During call: change volume of loud-
speaker.
– During call screening: change volume of
call screening.
11 Start/Stop key with integrated LED
Start/stop playback.
LED status indicator:
– Is on when playing messages.
– Flashes slowly when there is at least one
new message on the answering
machine.
– Flashes rapidly when the message mem-
ory is full.
12 Erase key
Erase current message during playback.
Erase all old messages (press and hold in idle
mode).
13 Redial/Pause key
Open redial list (in idle status) or insert a
dialing pause (when editing a number).
14 Page key
Page handsets (press briefly).
Start the registration procedure (press and
hold in idle mode). You will hear a beep.
15 Mute key
Mute/unmute microphone.
16 Intercom/Hold/Conference key
Set up an internal call.
ÕÉ×Å
SUN 09:23 AM 01/31
§§§§§§§§§Menu§§§§§§§§§
1
2
3
5678 9
10
11
12
13
14
15
16
17
18
4

3
The base station at a glance
Verizon 200 / USA EN / A31008-M1929-R301-2-6019 / kombi_overview.fm / 9.6.08
Switch between an external call and internal
party (handset/base station), or transfer a
call during an external call.
Set up a conference call between an exter-
nal line and an internal party (handset/base
station). Press and hold the key in hold-
intercom mode.
17 End Call key
End call, cancel function, return to idle sta-
tus.
18 Talk/Flash key
Answer or make a call.
Add a flash (in the directory).
Send FLASH (when off hook).
Please remember:
uIf the answer machine is being oper-
ated from a handset, or if it is recording
a message, you cannot operate it from
the base station.
uIf the start/stop key flashes although
the answer machine is switched off, it
means that there is still at least one
new message that has not been played
back.

4
Contents
Verizon 200 / USA EN / A31008-M1929-R301-2-6019 / V200_kombi_IVZ.fm / 9.6.08
Contents
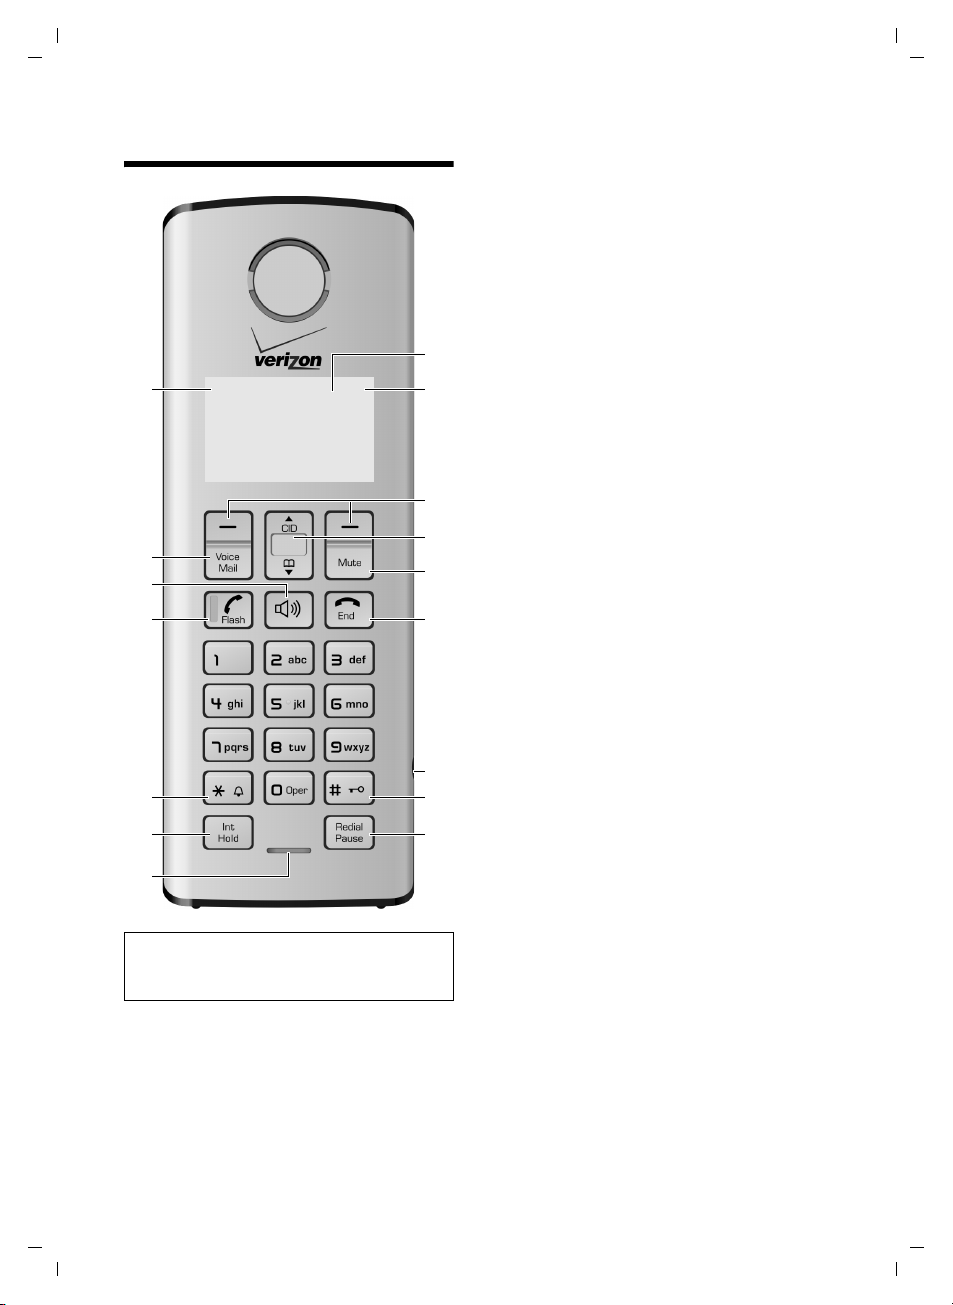
The handset at a glance . . . . . . . . 1
The base station at a glance . . . . 2
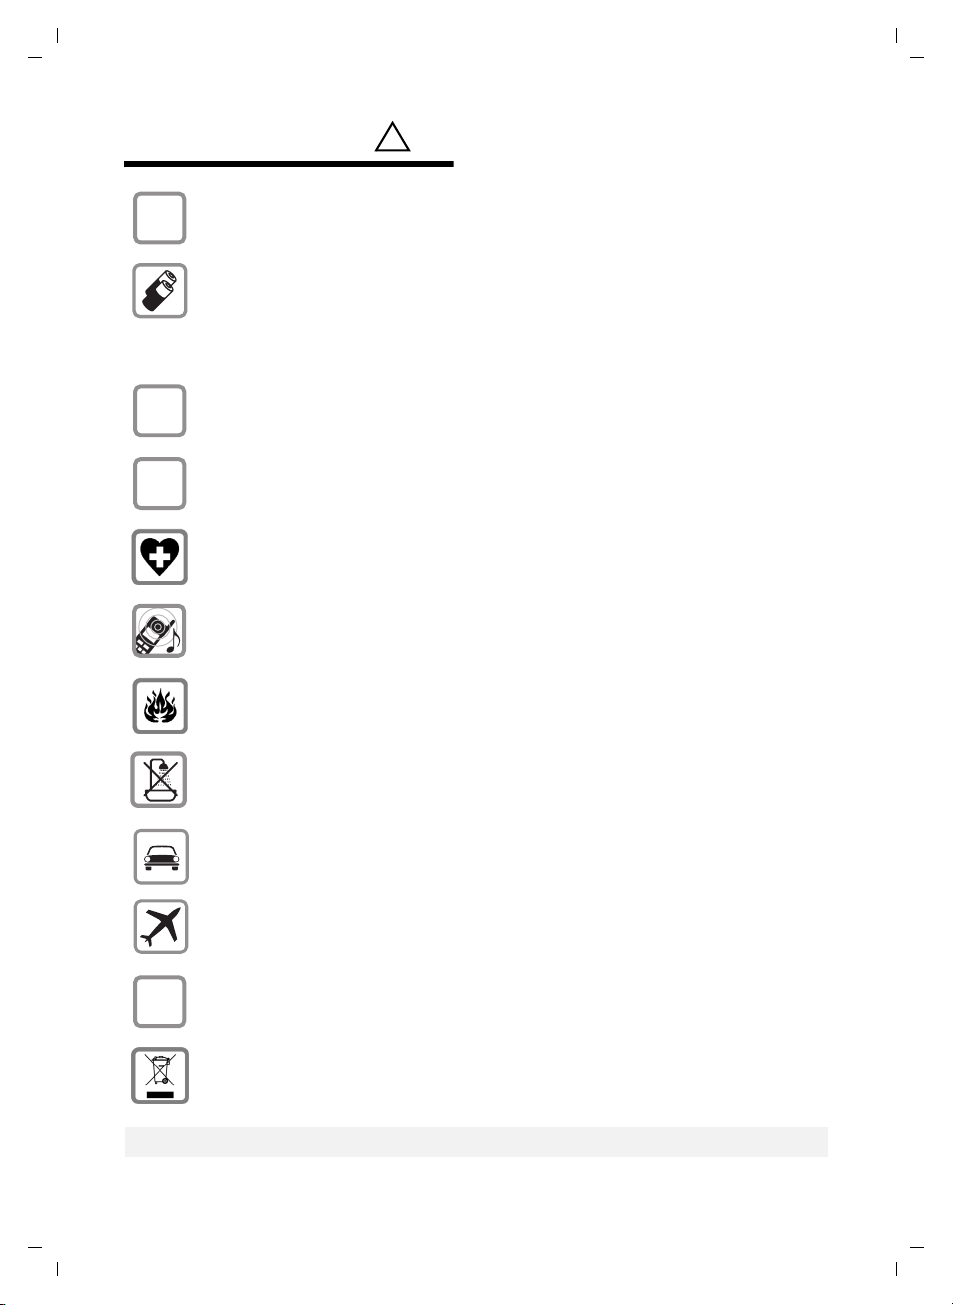
Safety precautions . . . . . . . . . . . 5
Notes on the operating
instructions . . . . . . . . . . . . . . . . . . 6
Symbols used . . . . . . . . . . . . . . . . . . . . 6
Example: menu input . . . . . . . . . . . . . . 6
Verizon 200AM –
more than just a telephone . . . . . 7
First Steps . . . . . . . . . . . . . . . . . . . 7
Pack contents . . . . . . . . . . . . . . . . . . . . 7
Installing the base station . . . . . . . . . . 7
Setting up the handset for use . . . . . . . 8
Area codes . . . . . . . . . . . . . . . . . . . . . . 9
Making calls . . . . . . . . . . . . . . . . 10
Making an external call . . . . . . . . . . . 10
Putting an external call on hold . . . . . 10
Ending a call . . . . . . . . . . . . . . . . . . . . 10
Answering a call . . . . . . . . . . . . . . . . . 10
Caller ID . . . . . . . . . . . . . . . . . . . . . . . 10
Handsfree operation . . . . . . . . . . . . . 10
Operating the handset . . . . . . . . 11
Control key . . . . . . . . . . . . . . . . . . . . . 11
Display keys . . . . . . . . . . . . . . . . . . . . 11
Returning to idle status . . . . . . . . . . . 12
Menu guidance . . . . . . . . . . . . . . . . . 12
Writing, editing, and correcting
entries . . . . . . . . . . . . . . . . . . . . . . . . 12
Using the directory and lists . . . 13
Directory . . . . . . . . . . . . . . . . . . . . . . . 13
Last number redial list . . . . . . . . . . . . 14
Calls list . . . . . . . . . . . . . . . . . . . . . . . 14
Operating the answer
machine . . . . . . . . . . . . . . . . . . . . 16
Operation using the base station
keys . . . . . . . . . . . . . . . . . . . . . . . . . . . 16
Operation using the handset . . . . . . . 16
Setting up the answer machine . . . . . 19
Operating when on the move
(remote operation) . . . . . . . . . . . . . . . 20
Using the network mailbox . . . . 21
Configuring the network mailbox
for fast access . . . . . . . . . . . . . . . . . . . 21
Using several handsets . . . . . . . 22
Registering and de-registering
handsets . . . . . . . . . . . . . . . . . . . . . . . 22
Locating a handset ("paging") . . . . . . 22
Changing the base station . . . . . . . . . 22
Making internal calls . . . . . . . . . . . . . . 22
Accepting/rejecting call waiting . . . . . 23
Linking internal callers to
an external call . . . . . . . . . . . . . . . . . . 23
Handset settings . . . . . . . . . . . . . 24
Changing the name of a handset . . . . 24
Changing the display language . . . . . 24
Setting the display contrast . . . . . . . . 24
Activating/deactivating auto answer . 25
Adjusting the loudspeaker and
earpiece volume . . . . . . . . . . . . . . . . . 25
Changing ring tones . . . . . . . . . . . . . . 25
Activating/deactivating the
key-touch tone . . . . . . . . . . . . . . . . . . 25
Base station settings . . . . . . . . . 26
System settings . . . . . . . . . . . . . . 26
Restoring the default settings . . 27
Appendix . . . . . . . . . . . . . . . . . . . 28
Care . . . . . . . . . . . . . . . . . . . . . . . . . . . 28
Contact with liquid . . . . . . . . . . . . . . . 28
Questions and answers . . . . . . . . . . . . 28
Troubleshooting . . . . . . . . . . . . . . . . . 28
Specifications . . . . . . . . . . . . . . . . . . . 29
FCC / ACTA Information . . . . . . . . . . . . 30
Safety precautions . . . . . . . . . . . . . . . 31
Service (Customer Care) . . . . . . . . . . . 33
End-user limited warranty . . . . . . . . . 33
Index . . . . . . . . . . . . . . . . . . . . . . 37

5
Safety precautions
Verizon 200 / USA EN / A31008-M1929-R301-2-6019 / security.fm / 9.6.08
Safety precautions*)
*) also see page 31
!
Only use the power supply unit supplied as indicated on the bottom of the
device.
Only insert approved rechargeable batteries of the same type.
Never use ordinary (non-rechargeable) batteries, as they may pose a health
hazard or cause injury.
Do not charge the handset in the charging cradle or base station while the head-
set is connected.
Make sure the rechargeable battery is inserted in the correct direction.
Use the battery specified in these operating instructions.
The phone may affect medical equipment, so always turn your phone off before
entering a hospital or doctor's office.
Notice to Hearing Aid Wearers:
This phone system is compatible with inductively coupled hearing aids.
Do not operate the phone in places where there is a risk of explosion
(such as paint workshops).
Do not install the base station in the bathroom. The handset and base station
are not splash-proof (see page 28).
Drivers must not use the phone while driving.
The phone must be turned off at all times in aircraft. Make sure the phone can-
not be switched on accidentally.
If you give your telephone to someone else, you should also provide the operat-
ing instructions.
Dispose of batteries and the phone carefully. Do not pollute the environment.
Emergency numbers cannot be dialed if the keypad lock is activated!
$
‹
Œ
ƒ

6
Notes on the operating instructions
Verizon 200 / USA EN / A31008-M1929-R301-2-6019 / notes-on-instructions.fm / 4.6.08
Notes on the operating
instructions
This section explains the meaning of cer-
tain symbols and typographical conven-
tions used in this user guide.
Symbols used
On/Off (example)
Select one of the two menu
functions specified.
~Enter digits or letters.
§Back§ The display keys' current func-
tions are shown in reverse and
are highlighted in the bottom
display line. Press the display
key below to launch the func-
tion.
qPress the top or the bottom of
the control key: scroll up or
down.
c/ Q/ *etc.
Press the corresponding key
on the handset.
Example: menu input
In the user guides, the steps you need to
perform are shown in abbreviated form.
This is illustrated below using "Changing
the display language" as an example.
What you need to do is explained in the
box.
§Menu§ ¢Settings ¢Handset ¢Language
¢English/ Español/ Français
¤With the handset in idle status, press
the right display key to open the main
menu.
¤Select Settings using the control key q
– press the control key at the top or
bottom.
¤Press the §OK§ display key to confirm the
function Settings.
The Settings submenu is displayed.
¤Press the bottom of the control key s
repeatedly until Handset is selected.
¤Press the §OK§ display key to confirm the
function.
The Handset submenu is displayed.
¤Press the bottom of the control key s
repeatedly until Language is selected.
¤Press the §OK§ display key to confirm the
function.
The Language submenu is displayed.
¤Select the language you want using
the control key q– press the control
key at the top or bottom.
¤Press the §OK§ display key to confirm the
selected language.
The language is now changed for all text.

7
Verizon 200AM – more than just a telephone
Verizon 200 / USA EN / A31008-M1929-R301-2-6019 / starting.fm / 9.6.08
Verizon 200AM –
more than just a telephone
Your phone not only lets you store up to
50 phone numbers (page 13), it can do a
whole lot more:
uPhone directly using the base station:
Your base station has the same keys as
your handset. So nearly all functions
you usually use on the handset are also
available directly on the base station.
uView missed calls on your phone
(page 14).
uECO DECT uses a power supply with
low power consumption. Your handset
reduces the transmission power
depending on its distance from the
base station (close-up range).
Headset socket
Which headsets are compatible?
Please call Verizon Service at
1-866-374-3864, or contact us at
www.verizon.com for more information.
Have fun using your new phone!
First Steps
Pack contents
uOne Verizon 200AM base station
uOne telephone line cord
uOne AC adapter for the base station
uOne User Guide
For Verizon 200AM-1
uOne Verizon 100H handset with bat-
tery cover
uTwo batteries
uOne belt clip
For Verizon 200AM-2
uTwo Verizon 100H handsets with bat-
tery cover
uOne Verizon 100C charging cradle
uOne AC adapter for the charging cradle
uFour batteries
uTwo belt clips
Installing the base station
The base station is designed for use in
closed, dry rooms in a temperature range
of +41°F to +113°F.
Set up the base station at a central point
on the premises.
Please note:
uNever expose the phone to heat
sources, direct sunlight, or other elec-
trical appliances.
uProtect your phone from moisture,
dust, corrosive liquids, and vapors.
Range and reception strength
Range:
uUp to 984 feet in the open
uUp to 165 feet in buildings
Reception strength:
The display shows if the handset is linked
to the base station:
uÄis on: handset is linked to the base
station.
uÄflashes: no reception; handset is out
of range or not registered.
Note:
The transmission power of the base station is
lowered to its minimum level when the hand-
set is placed in the base station and only one
handset is registered on the base station.
Caution:
Do not charge the handset in a charging cradle
or base station while the headset is connected.

8
First Steps
Verizon 200 / USA EN / A31008-M1929-R301-2-6019 / starting.fm / 9.6.08
Connecting the base station
¤First connect the power adapter and
then the phone jack as shown below.
1 110-V power adapter
2 Back of the base station
3 Phone jack with phone cord
Please note:
uThe power adapter must always be
connected, as the phone will not oper-
ate without an electrical supply.
uYour answer machine is set to give a
standard announcement.
Setting up the handset for use
Inserting the batteries
¤Open the battery cover.
¤Insert the batteries according to the
correct polarity (see diagram).
¤Close the cover, and press the top so
that it clicks into place.
Attaching the belt clip
There are notches for attaching the belt
clip on the side of the handset at the same
height as the display.
¤Press the belt clip onto the back of the
handset so that the protrusions on the
belt clip engage the notches.
Placing the handset in the base station
¤Place the handset in the base station
with the handset's display facing out-
wards.
Charging the batteries for the first time
¤To charge the batteries, leave the hand-
set in the base station or charging cra-
dle continuously for ten hours.
The alternately flashing battery icons =
Uon the upper right side of the display
screen indicate that the batteries are
being charged.
Caution:
Use only rechargeable UL-approved AAA bat-
teries. Never use a conventional (non-
rechargeable) battery or other battery types as
this could result in significant health risks and
personal injury. For example, the batteries
could explode. The phone could also malfunc-
tion or be damaged as a result of using batter-
ies that are not of the recommended type.
Note:
If attached, remove the belt clip before open-
ing the battery cover.
1
2
3

9
First Steps
Verizon 200 / USA EN / A31008-M1929-R301-2-6019 / starting.fm / 9.6.08
For questions and troubleshooting,
see page 28.
Setting the date and time
You should set the date and time, for
example, to ensure the correct time of
incoming calls is recorded.
To change the time and date, open the
input field using:
§Menu§ ¢s¢Settings ¢Date/Time
¢Set Date/Time
~Enter the time and date with
10 digits, for example, Q
M 1 5 Q 1 1
5 Q N for January 15,
2008, 07:15 am. If the 12-
hour time format is set, use
the *key to switch between
am and pm.
To correct an incorrect entry,
overwrite the character by typ-
ing the correct one.
§OK§ Press the display key to save
changes.
You can change the date and time format:
§Menu§ ¢s¢Settings ¢Date/Time
¢Set Format
¤Choose between day/month and
month/day date formats:
s¢Date Format ¢DD/MM/MM/DD
¤Choose between 12- and 24-hour time
formats:
s¢Time Format ¢12 Hours/24 Hours
Area codes
To make a call using the Incoming Calls list
(page 14), your phone's area code must
be stored.
§Menu§ ¢s¢Settings ¢System ¢Area
Code
~Enter your area code and press
§OK§.
Display in idle status
Once the phone is registered and the time
set, the idle display looks as shown here
(example). If the answer machine is acti-
vated, the header will also display the ans-
wer machine symbol Õ.
Your phone is now ready to use.
Note:
– If the handset has turned itself off because
its batteries are empty, and you then place
the handset into the base station, it will
turn on automatically.
– Only place the handset into the base sta-
tion or charging cradle specifically
intended for it.
– During handset operation, the battery icon
eindicates the charge status of the bat-
teries (page 1).
– The batteries may feel warm when they are
charging. This is not dangerous.
ÄÕ e
INT 1
01/31 09:45
§§§§Menu§§§§

10
Making calls
Verizon 200 / USA EN / A31008-M1929-R301-2-6019 / telefony.fm / 9.6.08
Making calls
Making an external call
External calls are calls using the outside
telephone network.
~c Enter the number and press
the Talk key c or Handsfree
key d.
To cancel the dialing operation, press the
End Call key a.
You are shown the duration of the call
while the call is in progress.
Putting an external call on hold
jPress the Int/Hold key.
The external call is put on hold.
Ending a call
aPress the End Call key.
Answering a call
The handset indicates an incoming call in
three ways: by ringing, by a display on the
screen, and by the flashing Talk key c.
You can accept the call by:
¤Pressing the Talk key c.
¤Pressing the Handsfree key d.
If the handset is in the base station or
charger and the Auto Answer function is
activated (page 25), the call will be
answered automatically when you lift the
handset from the base station or charger.
You can press the §Quiet§ display key to mute
the ring tone without answering the call.
You can answer the call as long as the call
is shown on the display.
Caller ID
Caller ID (CID) is an optional subscription
service provided by your telephone serv-
ice provider. This feature supplies incom-
ing caller identification information that
will be displayed on your handset.
Call display with Caller ID/Name
If the number of the caller is stored in your
directory, you will see the caller's name.
The following is displayed in place of the
number:
uExternal, if no number is transmitted or
the caller has not subscribed to Caller
ID.
uWithheld, if the caller has withheld
Caller ID.
Handsfree operation
You can activate the speakerphone at any
time to provide handsfree operation dur-
ing a call.
Activating/deactivating handsfree
Activating while dialing
~d Enter the number and press
the Handsfree key.
¤You should inform your caller before
you use the handsfree function so that
the caller knows someone else is listen-
ing.
Switching between the earpiece and the
handsfree mode
dPress the Handsfree key.
During a call and when listening to the
answer machine, turn handsfree on or off.
To adjust the volume, see page 25.
Note:
Dialing using the directory (page 13) or Calls
list (page 14) saves time re-entering numbers.

11
Operating the handset
Verizon 200 / USA EN / A31008-M1929-R301-2-6019 / telefony.fm / 9.6.08
Operating the handset
Activating/deactivating the handset
aPress and hold the End Call
key.
Activating/deactivating the keypad
lock
#Press and hold the pound key.
Keypad Locked appears in the display when
the keypad lock is activated.
The keypad lock is deactivated automati-
cally if someone calls you. It is re-activated
when the call is finished.
Control key
1Controlkey
In the description below, the side of the
Control key (up, down), which you must
press depending on the operating
situation, is marked in black, for example,
tfor "press up on the Control key".
The Control key has different functions:
When the handset is in idle status
sOpen the directory
tOpen call log list (page 14)
In input fields
You can use the Control key to move the
cursor backwards tor sforwards.
In the main menu, lists and submenus
t/ sScroll up/down line by line.
When the handset is off the hook or when
the answer machine is playing
t/ sIncrease/decrease volume
Display keys
The function of the display keys changes
depending on the particular operating sit-
uation. Example:
1 The display keys' current functions are
shown on the bottom display line.
2 Display keys
The most important display symbols are:
§§§§§Menu§§§§ Open the main menu (in idle
mode) or the context-depend-
ent menu.
§§§§§Back§§§§ Go back one menu level.
§§§§§§§OK§§§§§§§ Confirm your choice or save
edited characters.
§§§§Clear§§§§§ Clear key: deletes one charac-
ter at a time from right to left
(press briefly), or deletes all
characters (hold).
1
§§§§§Back§§§§§†§§§§Menu§§§§§1
2

12
Operating the handset
Verizon 200 / USA EN / A31008-M1929-R301-2-6019 / telefony.fm / 9.6.08
Returning to idle status
You can return to idle status from any-
where in the menu as follows:
¤Press the End Call key a.
Or:
¤Do not press any key: after 2 minutes,
the display will automatically return to
idle status.
Changes that you have not confirmed or
saved by pressing §OK§ will not be saved.
An example of the display in idle status is
shown on page 9.
Menu guidance
Your phone's functions are accessed using
a menu that has a number of levels.
Main menu (first menu level)
¤Press the display key §Menu§ with the
handset in idle status to open the main
menu.
The main menu functions are shown on
the screen in a list.
To access a function, open the corre-
sponding submenu (next menu level):
¤Navigate to the function using the con-
trol key q.
¤Press the §OK§ display key.
Submenus
The functions in the submenus are dis-
played as lists.
To access a function:
¤Scroll to the function with the control
key qand press §OK§.
Pressing the §Back§ display key returns you
to the previous menu level. acancels
the operation.
Writing, editing, and correcting
entries
Correcting incorrect entries
You can correct incorrect characters in text
by navigating to the incorrect entry using
the Control key. You can then:
uPress §§§§Clear§§§§§ to delete the character to
the left of the cursor.
uInsert characters by typing.
Writing and editing names
The following rules apply when creating
an entry:
uControl the cursor with q.
uPress the pound key #to switch
between uppercase and lowercase.
Entering special characters
You can enter special characters using the
Qor 1key
Q.0,/:;"’!?*+-%\^~|
1SPACE1@_#=<>
()&$[]{}

13
Using the directory and lists
Verizon 200 / USA EN / A31008-M1929-R301-2-6019 / direct_charges.fm / 9.6.08
Using the directory and lists
The options are:
uDirectory
uLast Number Redial list
uCalls list
You can store a maximum of 50 entries in
the directory. Each entry must consist of a
name and a number.
The directory is stored in the base station
and is shared by all registered handsets.
Directory
In the directory, you can store phone
numbers and the names associated with
them.
¤With the handset in idle status, open
the directory by pressing the skey.
Length of entries
Number: max. 24 digits
Name: max. 16 characters
Storing a number in the directory
Saving the first entry in the directory
While your handset is in idle mode:
~Enter the number and press
§Save§.
~Enter the name and press §OK§.
~Correct the number, if neces-
sary, and press §OK§.
Saving additional entries in the directory
s¢§Menu§ ¢New Entry
~Enter the name and press §OK§.
~Enter the number and press
§OK§.
You can use the Clear key to delete one
character at a time from right to left (press
briefly) or all characters (press and hold).
Selecting a directory entry
sOpen the directory.
You have the following options:
uUse qto scroll to the entry until the
desired name is selected.
uEnter the first character of the name, or
scroll to the entry with s, if necessary.
Dialing with the directory
s¢q(Select entry)
cPress the Talk key. The number
is dialed.
Managing entries in the directory
s ¢q(Select entry)
Viewing an entry
§Menu§ ¢View
The entry is displayed.
Go back with §Back§.
Editing entries
§Menu§ ¢Edit Entry
~Edit the name and press §OK§.
~Edit the number and press §OK§.
You can use the Clear key to delete one
character at a time from right to left (press
briefly) or all characters (press and hold).
Deleting entries
§Menu§ ¢Delete
Delete the displayed entry.
Or:
§Menu§ ¢Delete List
¤Confirm question Delete? by pressing
§OK§.
All entries in your directory will be deleted.

14
Using the directory and lists
Verizon 200 / USA EN / A31008-M1929-R301-2-6019 / direct_charges.fm / 9.6.08
Adding a displayed number to the
directory
Numbers that appear in a list, such as the
Calls list or the Last Number Redial list ,
can be added to the directory. If you have
Caller ID and the name is transmitted, the
first 16 characters of the transmitted
name are copied to the name line.
A number is displayed:
§Menu§ ¢Copy To Dir.
¤Complete the entry as described in the
section "Storing a number in the direc-
tory" (see page 13).
Last number redial list
The Last Number Redial list contains the
ten numbers last dialed with the handset
(max. 32 digits). If one of the numbers is
in the directory, then the corresponding
name will be displayed.
Manual last number redial
kPress the key.
qSelect the entry.
c/d Press the Talk key or the
Handsfree key.
The number is dialed.
When displaying a name, you can have the
respective phone number displayed:
§Menu§ ¢View
Managing entries in the Last Number
Redial list
kPress the key.
qSelect the entry.
§Menu§§ Open menu.
The following functions can be selected
with q:
View (as in the directory, page 13)
Copy To Dir.
Copy an entry to the directory
(page 14)
Delete (as in the directory, page 13)
Delete List (as in the directory, page 13)
Calls list
Requirement: Caller ID Presentation (CIP,
see page 10)
The numbers of the last 10 incoming calls
are stored.
¤With the handset in idle status, open
the directory by pressing the t(CID)
key.
Dialing with the Calls list
t¢q(Select entry)
If necessary, press the *key
to change the number format
for dialing.
c/dPress the Talk key or the
Handsfree key.
The number is dialed.
Viewing an entry
t¢q(Select entry)
§Menu§ ¢View
The entry is displayed.
Go back with §Back§.

15
Using the directory and lists
Verizon 200 / USA EN / A31008-M1929-R301-2-6019 / direct_charges.fm / 9.6.08
List entry
New messages are at the top. A list entry
contains the following information:
uList type (in header)
uStatus of entry (new entries are marked
with a star in the header)
uName of caller, if name is transmitted
through CID or stored in the directory
Caller's phone number, if only the num-
ber is transmitted
External, if no number is transmitted,
or the caller has not subscribed to
Caller ID
Withheld, if the caller has withheld
Caller ID
You can add the number of the caller to
the directory (page 14).
uDate and time of call (if set, page 9)
You can manage the entries in the same
way as the entries in the Last Number
Redial list (see page 14).

16
Operating the answer machine
Verizon 200 / USA EN / A31008-M1929-R301-2-6019 / answering_m+network-mailbox.fm / 9.6.08
Operating the answer
machine
You can operate the base station's answer
machine using the handset, using the key-
pad of the base station (page 2), or using
remote operation (from another phone/
cell phone).
Announcement mode
You can use the answer machine in two
different modes.
uIn Answer & Rec. mode, the caller hears
your announcement and can then
leave a message.
uIn Answer Only mode, the caller hears
your announcement but cannot leave a
message.
Operation using the base station
keys
You can use the base station keys for the
most commonly used functions of your
answer machine. For more information,
see page 2.
Status of the answer machine
The LED in the Start/Stop key and the sym-
bols in the display of the base station indi-
cate the status of the answer machine.
The LED in the Start/Stop key
uIs on when playing messages.
uFlashes slowly when there is at least
one new message on the answering
machine.
uFlashes rapidly when the message
memory is full.
The display of the base station may show
the symbols shown here:
Operation using the handset
Most of the functions described are also
available using the keys and the display of
your base station.
Call screening
While recording a message, you can auto-
matically listen through the loudspeakers
of the base station, if you have activated
call screening (see page 19).
You can also listen through the loudspeak-
ers of registered handsets:
§Screen§ Press the display key.
The handset loudspeaker is activated. You
can switch it off with the handsfree key
d.
Éflashes The message memory is
full.
Õis on The answer machine is on.
×flashes The answer machine is con-
trolled by a handset.
Åis on The ring tone volume of
the base station is set to
zero (see page 26).
ÕÉ×Å
SUN 09:23 AM 01/31
§§§§§§§§§Menu§§§§§§§§§

17
Operating the answer machine
Verizon 200 / USA EN / A31008-M1929-R301-2-6019 / answering_m+network-mailbox.fm / 9.6.08
Switching the answer machine on/off
§Menu§ ¢Answer Machine ¢Ans On/Off
¢On/Off
§OK§ Press the display key to acti-
vate/deactivate the answer
machine.
The ×icon is displayed on the screen.
The phone includes a prerecorded
announcement for the answer and record
mode and announce-only mode. If a per-
sonal announcement has not been
recorded, the corresponding prerecorded
announcement is used.
Recording a personal announcement/
announce only
§Menu§ ¢Answer Machine ¢Record OGM
Answer & Rec./Answer Only §OK§
Select the mode in which you
want to record the personal
announcement.
Record §OK§ Press the display key to start
recording.
You will hear the ready tone (short tone).
¤Now record your announcement (must
be at least 3 seconds long).
§OK§ Press the display key to end
the recording.
The recorded announcement will be
played back automatically. You can record
the announcement again by repeating
these steps.
Please note:
uRecording ends automatically if the
maximum recording time of 60 sec-
onds has been reached.
uIf you cancel the recording, the prere-
corded announcement will be used.
uThe recording is canceled if the answer
machine memory is full.
¤If necessary, delete old messages
and repeat the recording.
Playing back announcements
§Menu§ ¢Answer Machine ¢Record OGM
Answer & Rec./Answer Only §OK§
Play §OK§ Press the display key to start
playback.
If a personal announcement has not been
recorded, the corresponding prerecorded
announcement is used.
Deleting announcements
§Menu§ ¢Answer Machine ¢Record OGM
Answer & Rec./Answer Only §OK§
Delete §OK§ Press the display key to delete
the personal announcement.
If no personal announcement
exists, you will hear an error
tone.
After deletion, the corresponding prere-
corded announcement will be used.
Selecting an announcement mode
You can choose between Answer & Rec.
and Answer Only.
§Menu§ ¢Answer Machine ¢Answer Mode
Answer & Rec./Answer Only §OK§
The selected mode is saved even after the
answer machine is deactivated.
Note:
When recording your announcement, speak
directly into the handset's microphone, as if
talking on the phone. You can also use the
base station to record announcements or
memos.
Note:
If the message memory is full when in Answer
& Rec. mode, the selection is interrupted and
you will receive instructions to delete old mes-
sages.
¥Delete old messages.
The answer machine automatically switches
back to the mode set once deletion is com-
plete, or you can select another recording
mode.

18
Operating the answer machine
Verizon 200 / USA EN / A31008-M1929-R301-2-6019 / answering_m+network-mailbox.fm / 9.6.08
Playing back messages
The date and time of each message is
logged (provided this has been set,
page 9) and displayed during playback.
Playing back new messages
New messages you have not yet listened
to are indicated by the slowly flashing LED
in the Start/Stop key (see page 2).
§Play§ Press the display key to start
playback.
The following example shows a display of
a handset when playing back new mes-
sages:
1 Date when message was recorded.
2New:you have not yet listened to the mes-
sage.
301/02: The first of two messages is played.
4 Time when message was recorded.
If you have...
uNew messages:
New (2) is displayed. The number of
messages (3) indicates only the
number of new messages: actually, the
first of two new messages is played
back.
uMessages that you have already lis-
tened to:
New (2) is not displayed. The number of
messages (3) only indicates the
number of old messages: 01/02 means
that the first of two old messages is dis-
played.
uNo messages:
No Messages appears on the display
screen.
An announcement tells you if there are
any new messages, just old messages, or
no messages.
If there are new messages, playback
begins with the first new message. After
the last new message, you will be
returned to the Play menu.
After a new message has been played
completely, its status becomes "old".
If the message concerned has been saved
with the date and time, you will hear an
appropriate announcement before play-
back begins.
Playing back old messages
You can listen to old messages if there are
no more new messages.
Menu§ ¢Answer Machine ¢Play
§OK§ Press the display key to start
playback.
Controlling playback
During message playback:
§Menu§ Press the display key to enter
the Options menu.
uRepeat
Repeat playback of actual message.
uNext/Previous
Jump to playback of the following or
previous message.
uDelete
Delete current message.
Play
New 01/02
01/31 09:45 AM
2
1
3
4
§§§§§Back§§§§§ U§§§§Menu§§§§
Play
01/02
01/31 09:45 AM
§§§§§Back§§§§§ U§§§§Menu§§§§
Play
No Messages

19
Operating the answer machine
Verizon 200 / USA EN / A31008-M1929-R301-2-6019 / answering_m+network-mailbox.fm / 9.6.08
Deleting messages
You can delete old messages all at once or
individually.
Deleting all old messages
§Menu§ ¢Answer Machine ¢Delete Old
Msgs
Delete? §OK§ Press the display key to con-
firm you want to delete all old
messages.
If you have no old messages, you will hear
an error tone and No Messages will display
on the screen.
Deleting individual old messages
During playback:
§Menu§ ¢Delete
§OK§ Press the display key to delete
the current message.
Picking up a call from the answer
machine
You can pick up a call while the answer
machine is recording a message or being
operated remotely:
cPress the Talk key.
Recording stops and you can speak to the
caller.
If two seconds of the call have already
been recorded when you pick it up, the
call will be displayed as a new message.
You can accept the call on any handset. If
you use call screening on a handset, only
that handset can pick up the call.
Recording a memo
You can record a memo on your answer
machine (e.g., to leave a message for
other members of your family). It will be
signaled like a new message on your
answer machine.
§Menu§ ¢Answer Machine
Record Memo §OK§
Press the display key to start
playback.
You will hear the ready tone (short tone).
¤Now record your memo (it must be at
least 3 seconds long).
§OK§ Press the display key to end
the recording.
Recording ends automatically if the maxi-
mum recording time of 3 minutes has
been exceeded.
Setting up the answer machine
The answer machine has already been
preconfigured at the factory. Change indi-
vidual settings using the handset or the
corresponding keys on the base station.
Activating/deactivating call screening
While recording a message, you can listen
through the loudspeakers of registered
handsets and the base station.
§Menu§ ¢Answer Machine ¢Settings
¢Call Screening
If you use the handset for this setting:
Base/Handset
Select if you want to make the
setting for the handset or the
base station.
On/Off Press the §OK§ display key to
confirm your selection.
The default setting for the base station is
On; the default setting for the handset is
Off.
For call screening on the handset:
§Screen§ Press the display key to start
call screening.
This manual suits for next models
1
Table of contents
Other Verizon Cordless Telephone manuals