Vernier LabQuest 3 User manual

LabQuest
®
3UserManual
Version 3.0.2
November 2020

LabQuest®3 User Manual
ii Vernier Software & Technology
ABOUT THIS GUIDE
LabQuest 3, first shipped in September 2020, comes with a Quick-Start Guide to get you started
with basic data collection and analysis. The LabQuest 3 User Manual is an extended guide
detailing the hardware and software features of LabQuest 3.
This document represents features available in the 3.0.2 version of LabQuest 3 software released
in November 2020.

LabQuest®3 User Manual
www.vernier.com/labq3 iii
SAFETY INFORMATION
Federal Communication Commission Interference Statement
This equipment has been tested and found to comply with the limits for a Class B digital device,
pursuant to Part 15 of the FCC rules. These limits are designed to provide reasonable protection
against harmful interference in a residential installation. This equipment generates, uses and can
radiate radio frequency energy and, if not installed and used in accordance with the instructions,
may cause harmful interference to radio communications. However, there is no guarantee that
interference will not occur in a particular installation. If this equipment does cause harmful
interference to radio or television reception, which can be determined by turning the equipment
off and on, the user is encouraged to try to correct the interference by one or more of the
following measures:
Reorient or relocate the receiving antenna.
Increase the separation between the equipment and receiver.
Connect the equipment into an outlet on a circuit different from that to which the receiver is
connected.
Consult the dealer or an experienced radio/TV technician for help.
FCC Caution
This device complies with Part 15 of the FCC Rules. Operation is subject to the following two
conditions:
(1) this device may not cause harmful interference and
(2) this device must accept any interference received, including interference that may cause
undesired operation
RF Exposure Warning
The equipment complies with RF exposure limits set forth for an uncontrolled environment. The
antenna(s) used for this transmitter must not be co-located or operating in conjunction with any
other antenna or transmitter.
You are cautioned that changes or modifications not expressly approved by the party responsible
for compliance could void your authority to operate the equipment.

LabQuest®3 User Manual
iv Vernier Software & Technology
IC Statement
This device contains licence-exempt transmitter(s)/receiver(s) that comply with Innovation,
Science and Economic Development Canada’s licence-exempt RSS(s). Operation is subject to
the following two conditions:
1. This device may not cause interference.
2. This device must accept any interference, including interference that may cause undesired
operation of the device.
Industry Canada - Class B This digital apparatus does not exceed the Class B limits for radio
noise emissions from digital apparatus as set out in the interference-causing equipment standard
entitled “Digital Apparatus,” ICES-003 of Industry Canada. Operation is subject to the following
two conditions: (1) this device may not cause interference, and (2) this device must accept any
interference, including interference that may cause undesired operation of the device. To reduce
potential radio interference to other users, the antenna type and its gain should be so chosen that
the equivalent isotropically radiated power (e.i.r.p.) is not more than that permitted for successful
communication.
RF exposure warning: The equipment complies with RF exposure limits set forth for an
uncontrolled environment. The antenna(s) used for this transmitter must not be co-located or
operating in conjunction with any other antenna or transmitter.
L’émetteur/récepteur exempt de licence contenu dans le présent appareil est conforme aux CNR
d’Innovation, Sciences et Développement économique Canada applicables aux appareils radio
exempts de licence. L’exploitation est autorisée aux deux conditions suivantes:
1. L’appareil ne doit pas produire de brouillage;
2. L’appareil doit accepter tout brouillage radioélectrique subi, même si le brouillage est
susceptible d’en compromettre le fonctionnement.
Cet appareil numérique respecte les limites de bruits radioélectriques applicables aux appareils
numériques de Classe B prescrites dans la norme sur le matériel interférant-brouilleur:
“Appareils Numériques,” NMB-003 édictée par industrie Canada. L’utilisation est soumise aux
deux conditions suivantes: (1) cet appareil ne peut causer d’interférences, et (2) cet appareil doit
accepter toutes interférences, y comprises celles susceptibles de provoquer un disfonctionnement
du dispositif. Afin de réduire les interférences radio potentielles pour les autres utilisateurs, le
type d’antenne et son gain doivent être choisie de telle façon que l’équivalent de puissance
isotrope émis (e.i.r.p) n’est pas plus grand que celui permis pour une communication établie.
Avertissement d’exposition RF: L’équipement est conforme aux limites d’exposition aux RF
établies pour un environnement non supervisé. L’antenne (s) utilisée pour ce transmetteur ne
doit pas être jumelés ou fonctionner en conjonction avec toute autre antenne ou transmetteur.

LabQuest
®
3 User Manual
www.vernier.com/labq3 v
CONTENTS
I. GETTING STARTED.................................................................................................................................. 1
What’s Included ..................................................................................................................1
Preparing for First-Time Use ..............................................................................................2
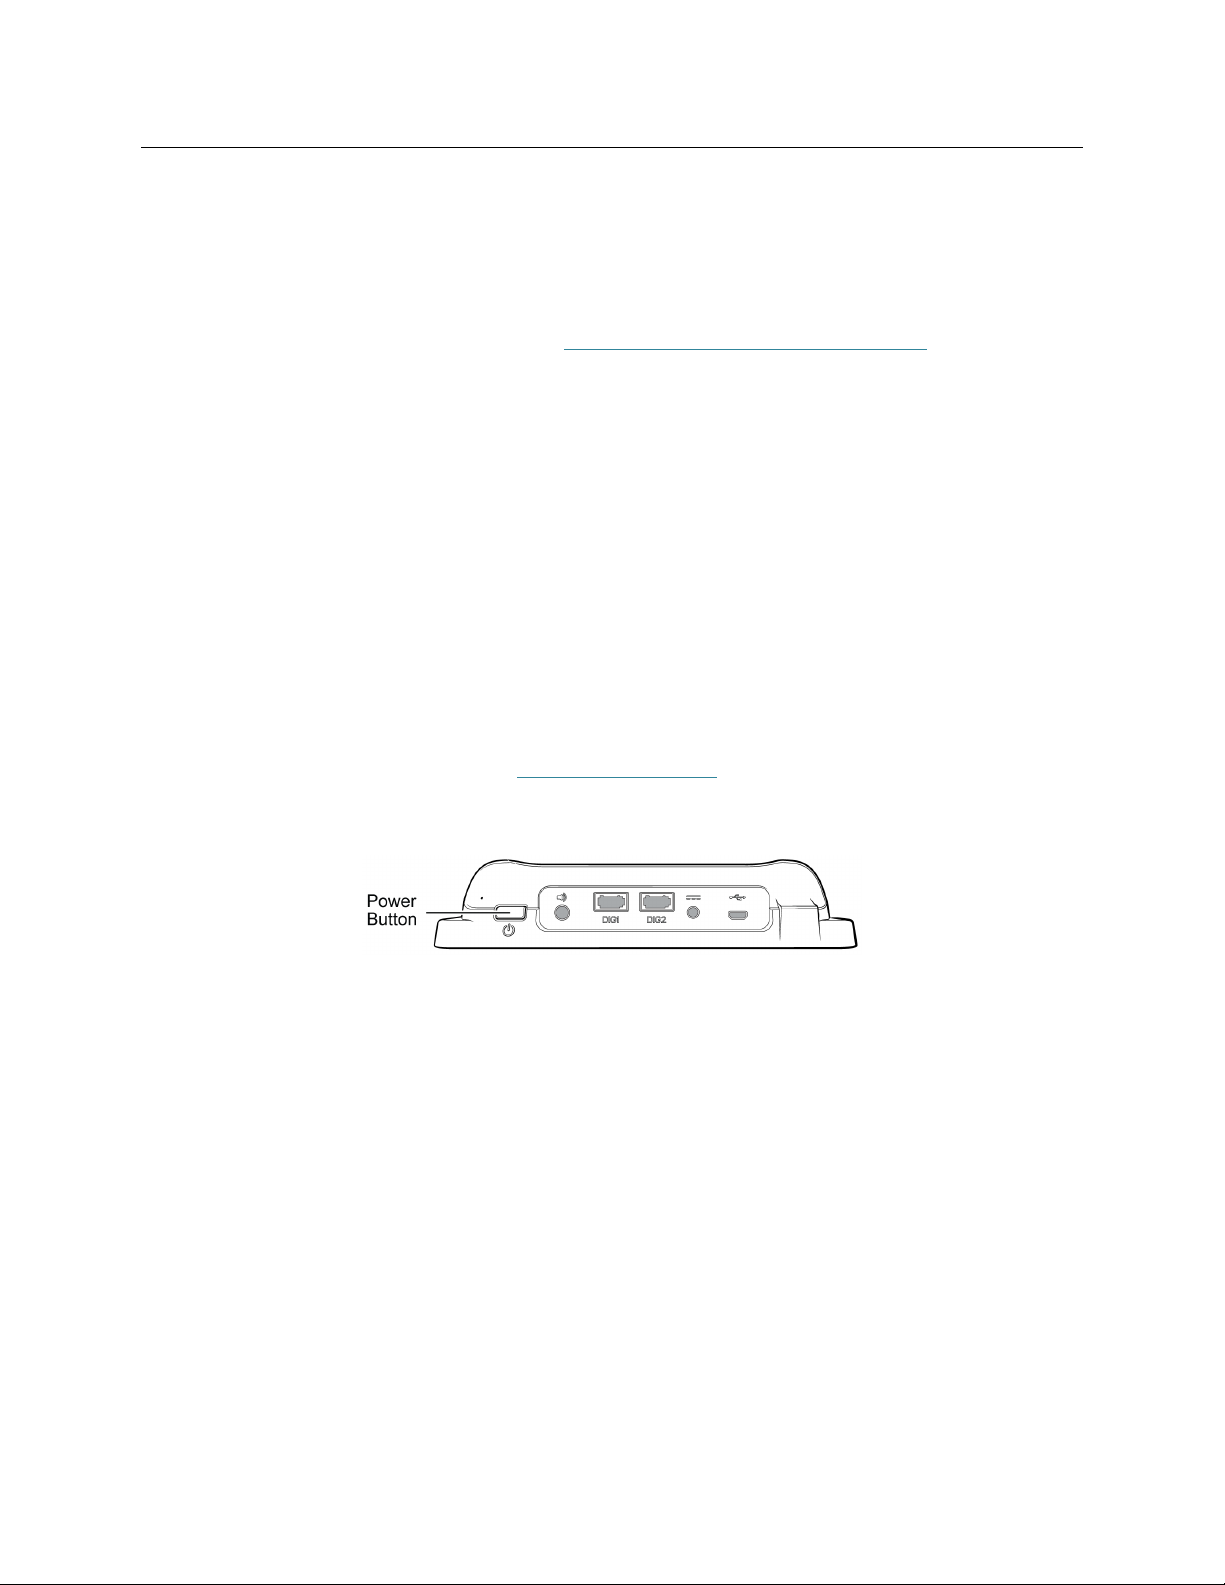
Powering on LabQuest .......................................................................................................2
Reading the Notification Bar ..............................................................................................3
II. USING THE TOUCH SCREEN ................................................................................................................. 4
Common Gestures ..............................................................................................................4
Accessing Home ..........................................................................................................4
Accessing Settings .......................................................................................................5
Switching Between Running Apps .....................................................................................5
Navigating the LabQuest App Screens ...............................................................................5
Data-Collection Controls ....................................................................................................6
III. CONNECTING SENSORS ....................................................................................................................... 7
Wired Sensors .....................................................................................................................7
Wireless Sensors .................................................................................................................8
Internal Sensors ..................................................................................................................9
IV. QUICK START TO DATA COLLECTION AND ANALYSIS ................................................................. 10
V. USING THE LABQUEST APP ............................................................................................................... 13
Preparing for Data Collection ...........................................................................................13
Modifying the Data-Collection Settings ...........................................................................14
Configuring Sensors .........................................................................................................19
Setting up Graphs .............................................................................................................22
Drawing Predictions .........................................................................................................25
Motion Matching ..............................................................................................................26
Collecting Data .................................................................................................................26
Manually Entering Data ...................................................................................................27
Analyzing Your Data ........................................................................................................30
Viewing Vernier Experiments ..........................................................................................38
Adding Notes to Your Experiment ...................................................................................38
Managing LabQuest App Files .........................................................................................38
VI. USING LABQUEST 3 AS A DATA SHARING SOURCE ..................................................................... 40
How Data Sharing Works .................................................................................................40
Connecting to a Wi-Fi Network .......................................................................................40
Enabling Data Sharing on LabQuest 3 .............................................................................42
Connecting to LabQuest 3 from Your Device ..................................................................44
Restricting Access to the Connections Setup ...................................................................45

LabQuest
®
3 User Manual
vi Vernier Software & Technology
VII. USING LABQUEST 3 WITH A COMPUTER OR CHROMEBOOK ..................................................... 46
VIII. EMAILING DATA FILES AND SCREENSHOTS ................................................................................ 48
IX. USING PRINT TO FILE ......................................................................................................................... 49
X. PROJECTING AND MONITORING LABQUEST 3 DEVICES .............................................................. 50
XI. USING OTHER APPS ........................................................................................................................... 52
Audio Function Generator .........................................................................................52
Calculator ..................................................................................................................52
Camera App ...............................................................................................................53
Experiment Viewer .....................................................................................................53
Periodic Table ...........................................................................................................53
Power Amplifier ........................................................................................................54
Sound Recorder .........................................................................................................54
Stopwatch ...................................................................................................................54
XII. CUSTOMIZING THE SETTINGS .......................................................................................................... 55
Connections—Wi-Fi, Data Sharing, and Email ........................................................55
Advanced Preferences ...............................................................................................55
Audio ..........................................................................................................................56
Language ...................................................................................................................56
Light & Power ...........................................................................................................56
Time & Date ..............................................................................................................56
Update ........................................................................................................................57
LabQuest App Settings..............................................................................................57
XIII. APPENDIX 58
Technical Specifications ...................................................................................................58
Battery Maintenance .........................................................................................................59
Replacing the Battery .......................................................................................................60
Troubleshooting Battery Issues ........................................................................................61
Case and Screen Maintenance ..........................................................................................61
Software Updates ..............................................................................................................62
Getting Additional Help ...................................................................................................64
License Information ..........................................................................................................64
Warranty ...........................................................................................................................64
Disposal ............................................................................................................................65
Replacement Parts ............................................................................................................65
Accessories .......................................................................................................................66

LabQuest®3 User Manual
www.vernier.com/labq3 1
I. GETTING STARTED
What’s Included
LabQuest 3 unit
Rechargeable battery (in unit)
AC power adapter
Micro-USB computer connection cable
Quick-Start Guide

Getting Started
2 Vernier Software & Technology
Preparing for First-Time Use
Remove the Protective Battery Tab
LabQuest ships with the battery in place; however, there is a protective tab covering the battery
contacts that must be removed. Remove the battery and discard the tab before using LabQuest.
For assistance on removing the battery, see Replacing the Battery in the appendix.
Remove the Protective Screen Covering
Remove and discard the protective screen cover that comes on the unit. This cover is intended to
prevent damage to the screen during shipping. It is not intended as a protective cover for
everyday use.
Charge Overnight
We recommend charging the battery for at least 12 hours prior to using LabQuest for the first
time on battery power. To do this, connect the included power adapter to LabQuest and an AC
power source.
LabQuest uses a high-quality lithium-ion battery. There is never a need to condition the battery
by regular full discharge/charge cycles and it is safe to leave the battery charging indefinitely.
For more details about the battery, see Battery Maintenance in the appendix
Powering on LabQuest
Press the power button located on the top edge of the unit. LabQuest completes its booting
procedure and automatically launches the LabQuest App. This can take 45 seconds to complete.
If the screen momentarily shows a charge battery icon or does not light after a moment, check to
be sure you have removed the protective battery tab and properly replaced the battery. Connect
the power adapter to LabQuest and to an AC power source, and then try the power button again.
Power Button Behavior
Power on/resume
—If the screen is off for any reason (LabQuest is shutdown, suspended, or the
screen is off to conserve battery power), press and release the power button to turn LabQuest on.
If only the screen is powered off, pressing the power button turns the screen on.
If LabQuest is suspended, it takes a few seconds for the LabQuest App to start up.
If LabQuest is shut down, it needs to fully boot, taking about 45 seconds.

LabQuest
®
3 User Manual
www.vernier.com/labq3 3
Suspend
—When LabQuest is on, press and release the power button once to put LabQuest into a
suspend mode. In this mode, all running apps are closed. While suspended, LabQuest uses less
power but the battery can still drain.
Shut down
—To shut down LabQuest, press and hold the power button for about five seconds
and release it when the shutdown message appears. Wait for LabQuest to shut down. To cancel
the shutdown procedure, tap Cancel before the countdown is complete. This is the lowest energy
state of the device; however, even when shutdown, the battery still drains very slowly.
Forced shutdown
—Holding the power button down for more than eight seconds powers off
LabQuest uncleanly. This should be avoided as you are likely to lose your data and potentially
cause file system corruption. Only do this if you have no other way to power off the unit.
Reading the Notification Bar
The left side of the Notification bar shows the apps that are currently running in the order they
were launched. The white underline indicates the application you are currently viewing.
The current time is shown in the middle of the notification bar. The time is set using the Time &
Date app accessed from the Settings screen.
The right side of the Notification bar shows battery level and charging status as well as Wi-Fi
and GPS signal strength. GPS signal strength is only shown when the GPS sensor is being used.
See Internal Sensors for more details.
95%—Running on battery power (95% battery life remaining)
95%—Battery is charging (95% charged)
—Battery Fault or No Battery (If you see this icon when you power your LabQuest for the
first time, the protective battery tab may not have been removed.)
—Wi-Fi signal strength (If all bars are grayed out, Wi-Fi may be off.)
3—GPS is on (signals acquired from 3 satellites)

Using the Touch Screen
4 Vernier Software & Technology
II. USING THE TOUCH SCREEN
LabQuest 3 has a capacitive touch screen like those found on tablets and smart phones. LabQuest
is controlled by touching the screen. Instead of using your finger, you can use a stylus designed
for capacitive touch screens (not included) if desired.
Common Gestures
Single tap
—Use a single tap to interact with most objects on the device.
Touch and drag
—Use touch and drag to select regions on a graph or to scroll through menus.
Long press
—Use the long press to activate special functionality on some objects such as
holding down the keyboard shift key to enable shift lock or beginning a table selection.
Two-finger pinch/zoom/pan
—Use this gesture to manually scale graphs or pan the data table.
Double-tap
—Double-tap to scale the graph to fit the data or to edit elements of the data table
such as cell data (when allowed), column name, or dataset name.
Single-finger swipe (from edges)
—Use this gesture to change which app is displayed.
Accessing Home
Tap or swipe down from the left side of the
Notification bar to view the Home screen.
Tap to select an application you want to use. See
Additional Apps on LabQuest 3 for more details.

LabQuest
®
3 User Manual
www.vernier.com/labq3 5
Accessing Settings
Tap or swipe down from the left side of the
Notification bar to view the Settings screen.
Tap to select the setting you want to modify. See
Customizing the Settings for more details.
Switching Between Running Apps
Swipe left or right from the edge of the screen to switch between running apps. The app order is
represented by the icons on the left side of the notification bar. The order that the icons appear
relates to the order in which the apps are launched.
Navigating the LabQuest App Screens
The LabQuest App Meter, Graph, Table, and Notes screens are accessed by tapping the
associated tab icons.
Meter screen
—Use the Meter screen to view live
sensor readouts, configure sensors, and set data-
collection parameters.
For a detailed description of how the Meter screen
is used, see Configuring Sensors and Modifying
the Data Collection Settings.
Graph screen
—From the Graph screen you can
view a graph of your data and perform analyses,
including curve fits.
For a detailed description of how the Graph screen
is used, see Setting Up Graphs and Analyzing
Your Data.

Using the Touch Screen
6 Vernier Software & Technology
Table screen
—Use the Table screen to view a
tabular representation of your data, create
calculated columns, and manually enter data.
For a detailed description of how the Table screen
is used, see Manually Entering Data and
Analyzing Your Data.
Notes screen
—From the Notes screen you can
record observations about your experiment.
For more information, see Adding Notes to Your
Experiment.
Data-Collection Controls
To start data collection from any LabQuest App screen, tap Collect, . As data are collected,
the graph and table are updated live. You can tap Stop, , to end data collection early or wait
until the collection completes.
In event-based data-collection modes (e.g., Events with Entry), a Keep button, , appears to
the right of the Stop button. In this mode, you must tap to record the data point. For more
information, see Events with Entry.
The Data Mark button, , appears to the right of the stop button when the data mark option is
enabled for time-based collections. As data are collected, tap to mark a particular point of
interest. See Enable Data Marking for more information.
Collecting Multiple Runs
To collect more data, overwriting your existing data,
tap Collect, , again.
To collect additional data without overwriting your
previous collection, tap Store Run, , before starting
a new data collection.
To display multiple runs of data on the same graph,
tap the run indicator button, , and select All
Runs.

LabQuest
®
3 User Manual
www.vernier.com/labq3 7
III. CONNECTING SENSORS
See www.vernier.com/lq3-sensors for a list of sensors compatible with LabQuest 3.
Wired Sensors
Connect your wired sensor to the appropriate sensor
port. LabQuest App displays a meter and sets the
default collection rate for the sensor.
TIP! If connecting a Go Direct
®
sensor that includes
multiple sensor channels, you may need to modify the
Sensor Channel configuration to use some of the built-
in sensors. See Go Direct Sensor Channel
Configuration.
Manual Sensor Setup
If your wired analog (BTA) or digital (BTD) sensor is
not automatically identified by the LabQuest App, you
can set up the sensor manually.
Choose Sensor Setup from the Sensors menu. Tap the
field displaying No Sensor for the channel to which
your sensor is connected. Choose the appropriate
sensor from the list and tap OK.

Connecting Sensors
8 Vernier Software & Technology
Wireless Sensors
Follow these steps to connect to a wireless sensor.
1. Choose New from the File menu. Power on the
sensor, tap Sensors ►Wireless Device Setup, and
choose the matching sensor type, Go Direct,
Go Wireless, or WDSS.
2. Select your sensor from the list of available sensors
and tap OK.
3. Some Go Direct sensors have multiple sensor
channels. These sensors have default configurations
that do not typically use all available sensor
channels.
Tap the sensor meter and select Sensor Channels to
access the configuration screen. Select the
applicable sensor channels and tap OK.
When connecting a Wireless Dynamic Sensor
System (WDSS), you may need to rescan for
devices if your device does not show up on the
initial scan. Once you are connected to your device,
select the sensors you want to use.

LabQuest
®
3 User Manual
www.vernier.com/labq3 9
4. LabQuest App automatically sets the default
collection rate for the sensor.
TIP! At most, three Go Direct sensors and three
Go Wireless
®
sensors can be connected at the same
time.
Internal Sensors
LabQuest also has two built-in sensors: GPS and
microphone. To enable an internal sensor, choose
Sensor Setup from the Sensors menu. Within the
Sensor Setup dialog box, select the check box to enable
the associated sensor. Tap OK to return to the Meter
screen.
LabQuest automatically sets the default data-collection
rate for the sensor.
GPS
—The internal Global Positioning Sensor
(GPS) collects latitude, longitude, and altitude
readings, and can be used with other sensors. You
can choose units of decimal degrees, degree
minutes, or UTM.
TIP! It may take 15 minutes or more to acquire
signals from enough GPS satellites to report your
position. This is especially true the first time you
use the sensor or after not using the sensor for a
while. We do not recommend using GPS indoors.
Microphone
—The internal Microphone is located
on the back of LabQuest, near the power button as
shown below. The sensor is used to show
waveforms of the sound inputs. It does not measure
sound level (i.e., decibels).

Quick Start to Data Collection and Analysis
10 Vernier Software & Technology
IV. QUICK START TO DATA COLLECTION AND ANALYSIS
Follow these steps to quickly get started with basic data
collection. For more detailed instructions, see Using the
LabQuest App.
1. Press and release the power button located on the
top edge of LabQuest to turn on the unit.
LabQuest App launches automatically.
2. Choose New from the File menu, and then connect
your sensor as described in the Connecting Sensors
section.
LabQuest App will auto-ID the sensor, display a
meter, and automatically set the default collection
rate for that sensor.
3. Tap Collect, . LabQuest App switches to the
Graph Screen and data collection begins. Collected
data are displayed in real time for most sensors.
You can stop collection early by tapping
Stop, . Once data collection is complete, the
graph automatically scales to fit the data.
4. Tap the graph to examine a point of interest. The
coordinates of the point are shown in the panel to
the right of the graph. Tap another point or tap the
Examine buttons to move the cursor left, , or
right, .
TIP! You can pan and zoom the graph as desired
using a two-finger pinch gesture. Double- tap the
graph to rescale the graph to fit the data.

LabQuest
®
3 User Manual
www.vernier.com/labq3 11
5. For data analysis, you can select to analyze all data
or just a portion of your data. To select a region of
data for analysis, touch-and-drag across the graph
to highlight the desired region.
Statistics
To view statistics for the selected data, choose
Statistics from the Analyze menu. Tap the check
box to select a data column.
The statistics information is then displayed in the
panel to the right of the graph.
To remove the displayed statistics, tap Analyze on
the Graph screen, choose Statistics, and then tap the
checked box to clear the selection.
Curve Fit
To fit a curve to the selected data, choose Curve Fit
from the Analyze menu. Tap the check box to
select a data column (the Linear fit is shown by
default). Tap the Fit Equation dropdown and
choose the desired equation.
LabQuest automatically determines and displays
the fit coefficients and displays a preview of the
curve fit on the graph. Tap OK to apply the fit and
return to the Graph screen.
To remove the fit, choose Curve Fit from the Analyze Menu, and then select the checked box
to clear the selection.

Quick Start to Data Collection and Analysis
12 Vernier Software & Technology
TIP! The Curve Fit coefficients cannot be manually adjusted. To enter your own parameters,
see Model in the Analyzing Your Data section.
6. Collect additional data.
To collect more data, overwriting your existing data, tap Collect, , again.
To collect additional data without overwriting your previous collection, tap Store Run, ,
before starting data collection.
When you have multiple runs, tap to select the run you want to show on the graph.
You can also choose to display all runs. For more information, see Changing What is
Plotted on a Graph.
To clear your data and start over, choose New from the File menu. If you have unsaved
data, you are prompted to Save or Discard your data. You can save the data on the
LabQuest unit or to a connected USB flash drive. For more information, see Managing
LabQuest App Files.

LabQuest
®
3 User Manual
www.vernier.com/labq3 13
V. USING THE LABQUEST APP
The data-collection and analysis software, LabQuest App, is the heart of LabQuest 3. When you
turn on LabQuest, the LabQuest App starts automatically. If the LabQuest App is not displayed
on your screen, launch LabQuest App from the Home screen. See Accessing Home.
Preparing for Data Collection
Data collection with LabQuest starts from the Meter screen, which is the default screen for
LabQuest App. From this screen, you can view real-time sensor readings as well as a summary
of the data-collection settings. Additionally, you can access tools to modify and customize these
settings for your particular experiment.
Starting a New File
Choose New from the File menu to reset all data-
collection parameters and sensor calibrations back to
default values. If you have unsaved data, you are
prompted to either save or discard the data before
continuing.
TIP! Start a new file before you connect wireless
sensors or manually set up internal sensors. These
sensors are disconnected when you start a new file.
Data-Collection Summary
A summary of the data-collection settings (e.g., Mode,
Rate, and Duration) is shown in the panel to the right
of the sensor meters.
If the settings are not appropriate for your experiment,
tap the summary box to access the Data Collection
Setting dialog.

Using the LabQuest
®
App
14 Vernier Software & Technology
Modifying the Data-Collection Settings
For most sensors, the default data-collection mode is
Time Based. The default collection rate for the
connected sensor is automatically set up when
LabQuest identifies the sensor. To modify the data-
collection settings, tap the summary box, or choose
Data Collection from the Sensors menu.
The parameters listed in the Data Collection dialog
depend on the mode selected.
Data-collection modes include Time Based, Events
with Entry, Selected Events, Photogate Timing, Full
Spectrum, Gas Chromatograph, Drop Counting, and
Data Matrix.
Mode: Time Based
Time-based data collection is the default data-
collection mode for most sensors. In this mode, sensor
readings are recorded at regular time intervals.
Adjustable parameters for this mode include the rate
(or interval) and duration of data collection. The total
number of samples to be collected based on these
parameters is displayed.
Warning Messages—
Under some circumstances, the
Rate, Interval, and Duration fields may be orange or
red. The orange highlight indicates that the rate has
been set to a value slower or faster than what is
recommended for the connected sensor or that the
number of samples could lead to performance issues.
You can still collect data using these settings;
however, you may have undesirable results.
Table of contents
Other Vernier Recording Equipment manuals