VESPA S 150 2008 User manual

Vespa would like to thank you
for choosing one of its products. We have prepared this manual to help you to get the very best from your vehicle. Please read it carefully before riding
the vehicle for the first time. It contains information, tips and precautions for using your vehicle. It also describes features, details and devices to assure
you that you have made the right choice. We believe that if you follow our suggestions, you will soon get to know your new scooter and it will serve you
well for a long time to come. This booklet forms an integral part of the vehicle; should the vehicle be sold, it must be transferred to the new owner.
Vespa S 150
Ed. 01_02/2013

The instructions given in this manual are intended to provide a clear, simple guide to using your vehicle; this booklet also details routine maintenance
procedures and regular checks that should be carried out on the vehicle at an authorised Dealer or Service Centre. The booklet also contains
instructions for simple repairs. Any operations not specifically described in this booklet require the use of special tools and/or particular technical
knowledge: to carry out these operations, refer to any authorised Dealer or Service Centres.
2

Personal safety
Failure to completely observe these instructions will result in serious risk of personal
injury.
Safeguarding the environment
Sections marked with this symbol indicate the correct use of the vehicle to prevent dam-
aging the environment.
Vehicle intactness
The incomplete or non-observance of these regulations leads to the risk of serious
damage to the vehicle and sometimes even the invalidity of the guarantee.
The signs that you see on this page are very important. They are used to highlight parts
of the booklet that should be read with particular care. The different symbols are used
to make each topic in the manual simple and quick to locate.
3

4

INDEX
VEHICLE...................................................................................... 7
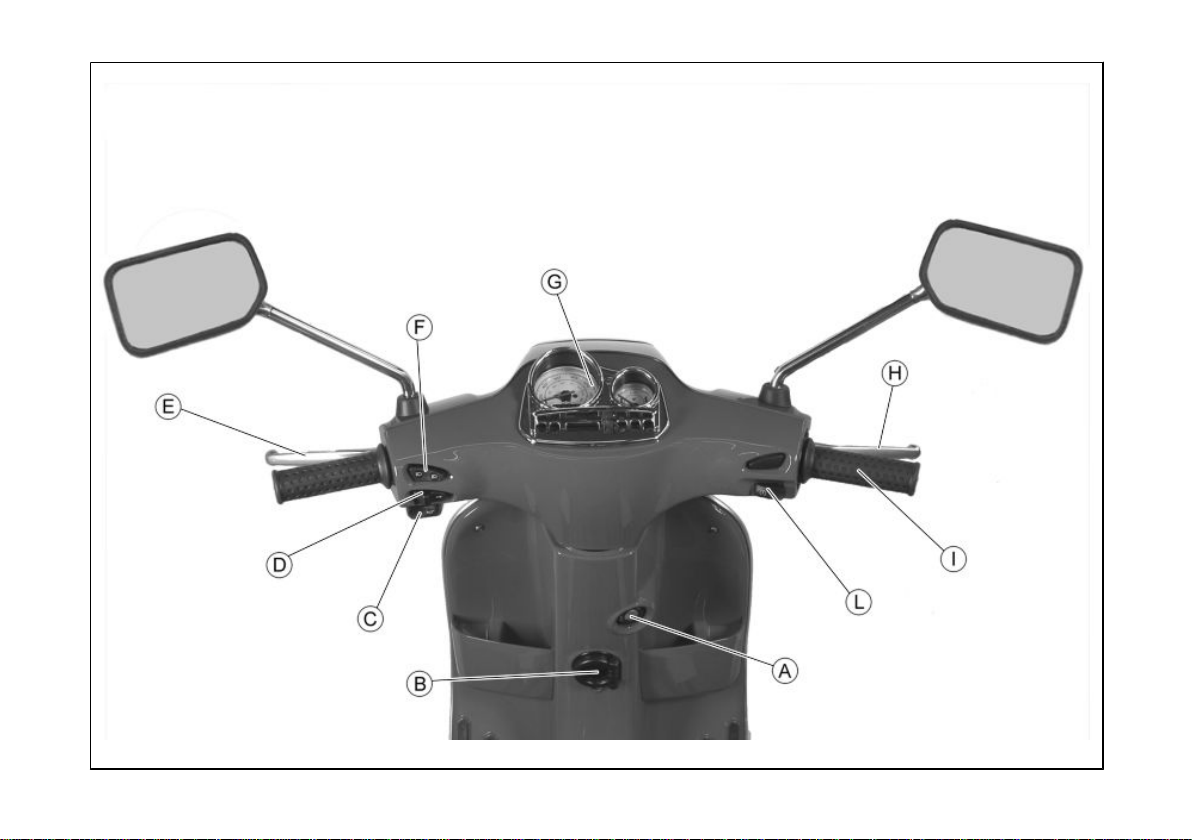
Dashboard................................................................................ 9
Analogue instrument panel....................................................... 11
Clock......................................................................................... 11
Keyswitch.................................................................................. 12
Locking the steering wheel.................................................... 13
Releasing the steering wheel................................................ 13
Switch direction indicators........................................................ 13
Horn button............................................................................... 14
Light switch............................................................................... 14
Start-up button.......................................................................... 15
Fuel tank................................................................................... 15
Opening the saddle............................................................... 16
Keys.......................................................................................... 16
Identification.............................................................................. 16
Bag clip..................................................................................... 18
USE.............................................................................................. 19
Checks...................................................................................... 20
Refuelling.................................................................................. 20
Tyre pressure............................................................................ 21
Shock absorbers adjustment.................................................... 22
Running in................................................................................. 23
Starting up the engine............................................................... 23
Precautions........................................................................... 25
Difficult start up......................................................................... 25
Stopping the engine.................................................................. 26
Anti-theft ring............................................................................. 27
Catalytic silencer....................................................................... 27
Stand......................................................................................... 28
Automatic transmission............................................................. 29
Safe driving............................................................................... 29
MAINTENANCE........................................................................... 33
Engine oil level.......................................................................... 34
Engine oil level check............................................................ 34
Engine oil top-up................................................................... 35
Warning light (insufficient oil pressure)................................. 35
Engine oil change.................................................................. 35
Hub oil level.............................................................................. 37
Tyres......................................................................................... 38
Spark plug dismantlement........................................................ 39
Removing the air filter............................................................... 41
Air filter cleaning....................................................................... 41
Secondary air system............................................................... 42
Checking the brake oil level...................................................... 43
Braking system fluid top up................................................... 43
Battery....................................................................................... 45
Use of a new battery............................................................. 45
Long periods of inactivity.......................................................... 46
Fuses........................................................................................ 48
Lamps....................................................................................... 50
Front light group........................................................................ 52
Head light adjustment............................................................ 53
Front direction indicators........................................................... 54
Rear optical unit........................................................................ 55
Rear turn indicators................................................................... 55
Number plate light..................................................................... 56
Rear-view mirrors...................................................................... 56
Idle adjustment.......................................................................... 57
Front disc brake........................................................................ 58
Rear drum brake....................................................................... 59
Puncture.................................................................................... 59
Inactivity of the vehicle.............................................................. 60
Cleaning the vehicle.................................................................. 61
Troubleshooting........................................................................ 63
TECHNICAL DATA...................................................................... 67
Tool kit...................................................................................... 72
5

SPARE PARTS AND ACCESSORIES........................................ 73
Warnings................................................................................... 74
SCHEDULED MAINTENANCE.................................................... 75
Scheduled servicing table......................................................... 76
6

Vespa S 150
Chap. 01
Vehicle
7

01_01
8
1 Vehicle

Dashboard (01_01)
A= Ignition key-switch
B= Bag hook
C= Horn button
D= Turn indicator switch
E= Rear brake lever
F= Headlight switch
G= Analogue instrument panel
H= Front brake lever
I= Throttle grip
L= Starter button
9
1 Vehicle

01_02
10
1 Vehicle

Analogue instrument panel (01_02)
A= Odometer
B= Speedometer
C= Fuel gauge
D= High-beam warning light
E= Low oil pressure warning light
F= Fuel level warning light
G= Digital clock
H= Turn indicator warning light
I= Headlight warning light
Clock (01_03)
Located in the instrument panel, it displays hours and minutes with 1 to 12-hour time,
AM or PM.
Operate the function selection button «B» and month, day and seconds are also dis-
played besides hours and minutes.
Toadjustthedifferentfunctions,selectthedesiredfunctionwithbutton«A»andadjust
with button «B». The time counter can be reset by pressing button «A» with the clock
in the seconds function.
11
1 Vehicle

01_03
The digital clock is powered by a battery (battery life is about 2 years); lift the whole
instrument panel to replace the battery. It is advisable to take your vehicle to an
Authorised Service Centre for this operation.
WARNING
DEAD BATTERIES ARE HARMFUL TO THE ENVIRONMENT. THEY MUST DIS-
POSED OF IN SUITABLE CONTAINERS AS PRESCRIBED BY THE REGULA-
TIONS IN FORCE.
Keyswitch (01_04)
Ignition key «A» is located on the front leg shield back plate near the bag hook.
01_04
SWITCH POSITIONS
ON«1»: Ready to start position, non-extractable key, mechanical antitheft device dis-
abled.
OFF «2»: Ignition disabled, extractable key, mechanical antitheft device disabled.
LOCK «3»: Ignition disabled, extractable key, mechanical antitheft device enabled.
12
1 Vehicle

01_05
Locking the steering wheel (01_05)
Turn the handlebar to the left as far as it will go; turn the key «B» to «LOCK » and
remove it.
CAUTION
NEVER TURN THE KEY TO «LOCK» OR «OFF» WHILE RIDING.
Releasing the steering wheel
Reinsert the key «B» and turn it to «KEY OFF».
CAUTION
NEVER TURN THE KEY TO «LOCK» OR «OFF» WHILE RIDING.
01_06
Switch direction indicators (01_06)
Lever «D» towards «1» = left turn indicators switched on;
Lever «D» towards «2» = right turn indicators switched on;
The lever «D» automatically goes back to «0» and the turn indicators remain on; push
the lever «D» to turn them off.
13
1 Vehicle

01_07
Horn button (01_07)
Push the «C» button to sound the horn.
01_08
Light switch (01_08)
When the light switch «F» is set to «0», the low-beam light is on. When set to «1», the
high-beam light is activated.
14
1 Vehicle

01_09
Start-up button (01_09)
To start the engine, pull either of the two brake levers and then push the button «L».
01_10
Fuel tank (01_10)
The fuel tank cap «B» is under the saddle. To reach it, insert the key into lock «A»,
turn it anticlockwise and tip the saddle forwards.
15
1 Vehicle

01_11
Opening the saddle (01_11)
Insertthe key intothe saddle lock«A», turn itanticlockwise and tipthe saddle forward.
01_12
Keys (01_12)
The vehicle is supplied with two keys (one spare) which serve to start the engine and
unlock the saddle compartment. The keys are accompanied by a tag marked with the
identification code to be quoted when ordering duplicates.
WARNING
WE RECOMMEND KEEPING THE DUPLICATE KEY TOGETHER WITH ITS CODE
IN A SAFE PLACE AND NOT ON THE VEHICLE
Identification (01_13, 01_14)
Identification registration numbers are made up of a prefix and a number, stamped on
the chassis and on the engine. These numbers must always be quoted when ordering
spare parts. We recommend checking that the chassis registration number stamped
on the vehicle corresponds with that on the vehicle documentation.
16
1 Vehicle

CAUTION
BE REMINDED THAT ALTERING IDENTIFICATION REGISTRATION NUMBERS
CAN LEAD TO SERIOUS PENAL SANCTIONS (IMPOUNDING OF THE VEHICLE,
ETC.).
01_13
Chassis number
The number «A» is stamped near the battery compartment. Remove the helmet com-
partment to read it.
01_14
Engine number
The engine number «B» is stamped near the rear left shock absorber lower support.
17
1 Vehicle

01_15
Bag clip (01_15)
To use the retractable bag hook «B» mounted on the leg shield back plate, pull it
slightly towards the back of the vehicle.
18
1 Vehicle

Vespa S 150
Chap. 02
Use
19

02_01
Checks (02_01)
Before using the vehicle, check:
1. That the fuel tank is full.
2. Rear hub oil level.
3. The engine oil level.
4. That the tyres are properly inflated.
5. The correct functioning of the headlights, tail light, turn indicators, stop light and
license plate light.
6. The correct functioning of front and rear brakes.
7. That the front brake fluid level is correct.
02_02
Refuelling (02_02)
Reach the fuel tank and unscrew the cap «A».
Use premium unleaded petrol, with minimum octane rating of 95.
A specific gauge on the instrument panel indicates the fuel level.
WARNING
SWITCH OFF THE ENGINE BEFORE REFUELLING WITH PETROL.
PETROL IS HIGHLY INFLAMMABLE.
DO NOT SMOKE AND KEEP NAKED FLAMES AT A DISTANCE:FIRE HAZARD.
DO NOT INHALE FUEL FUMES.
20
2 Use
Table of contents
Other VESPA Motorcycle manuals