Vesticam V2C22021 User manual

Version V2C22021 Vesticam™User Manual Page | 2
Table of Contents
1. Introduction
1.1 Intended Use……………………………………………………………………………………………………………………..…...3
1.2 Product Description…………………………………………………………………………………………………..…..……..3
(a) System Configuration……………………………………………………………………………………………….…….3
(b) Minimum Requirements for Monocular Viewing and Recording
(c) Minimum Requirements for Binocular Viewing and Recording……………………………….….….4
(d) Included and Optional parts…………………………………………………………………………………….…....5
1.3 Warnings and Precautions……………………………………………………………………………………………….….6
2. Vesticam2 Monocular IR video goggles
2.1 Clinical
2.1.1 Setting Up and Using Vesticam2 Monocular IR Video Goggles and Android Recorder or
Tablet……………………………………………………………………………………………………………………..…….…7
2.1.2 Recording Using the Vesticam App for Android Phones (Monocular Use Only) ..……….…....8
2.1.3 Vesticam - Tips for Working with Video Recordings………………………………………………………….9
2.2 Technical
2.2.1 Installing/Reinstalling the Vesticam App……………………………………………………………..……………9
2.2.2 Organising Eye Movement Video Recordings into Folders on your Android
Recorder.............................................................................................................................11
2.2.3 Transferring Videos (mp4 files) from your Android Recorder to Other Storage to Share/
Backup/ Archive …………………………………………………………………………………………………….….…..11
2.2.4 Recording using your PC or MAC…………………………………………………………………………………...16
2.2.5 Screen Casting your Android Recorder to a Larger Screen .…………………………………….…..…17
3. Vesticam2 Binocular IR video goggles
3.1 Clinical
3.1.1 Setting Up and Using Vesticam2 Binocular IR Video Goggles and Recording Device..….….19
3.1.2 Recording using OBS Software……………………………………………………………………………………….21
3.1.3 OBS - Tips for Working with Video Recordings……………………………………………….………………21
3.2 Technical
3.2.1 Customizing OBS for use with Vesticam …………………………………………………………………………21
4. Maintenance/General
4.1 How to Care for your Vesticam2 Unit…………………………………………………………………..………..22
4.1.1 General Care……………………………………………………………………………………………………….………...22
4.1.2 Cleaning and Avoiding Contamination…………………………………………………………………………...22
4.2 Features and Specifications……………………………………………………………………………………………….23
4.3 Legal, Safety and Regulatory Information…………………………………………………………….……….24
4.4 Contacting Support ……………………………………………………………………………………………………………..25
Appendix 1: Effective Cleaning of Vesticam2 goggles………………………………………………………………..……..….26
Appendix 2: Vesticam2 Binocular Reference Manual …………………………………………………separate document

Version V2C22021 Vesticam™User Manual Page | 3
1.Introduction
This user manual is valid for Vesticam2 IR video googles, monocular (V2C22021) and binocular (V2C2C22021)
Manufactured by:
Vesticam Pty Ltd
ABN: 22 625 062 295 (registered for GST)
p: 1300 141 488
f: 02 6638 9618
e: info@vesticam.com
w: www.vesticam.com
Registered office: 29 Endeavour Drive, Bellingen NSW 2454
1.1 Intended Use
Vesticam IR video goggles are intended for use by qualified health care professionals/ medical specialists/
trained clinicians working with patients who have various degrees of dizziness or vertigo (vestibular conditions), and
for research and education purposes. The standard and accepted assessment of vestibular conditions involves
general history taking, a thorough and detailed vestibular specific subjective assessment, testing for differential
diagnoses, and the clinician’s choice of over 15 standard and clinically proven bedside tests. Some of these tests are
performed in complete darkness or require patient head movement, making the rapid and often fleeting eye
movements even more difficult to observe clearly.
Vesticam IR video goggles are an active medical device intended by the manufacturer to be used for the
specific purpose of improving observation of eye movement during some of the currently accepted and used 15
clinical bedside tests. The user/clinician remains entirely responsible for their choice of specific bedside tests, any
clinical interpretation of the eye movement, and any further subjective or objective assessment. The intended
outcome of providing eye movement recordings is that the user/ clinician can more confidently support their own
clinical judgement with regard to the need for more detailed assessment.
Vesticam IR video goggles are not intended by their manufacturer to replace the clinical judgement of a
health professional in relation to making a clinical diagnosis or decision about the treatment of patients. Vesticam IR
video goggles do not have a measuring function and are not intended by the manufacturer to measure quantitatively
a physiological or anatomical parameter.
Vesticam IR video goggles are powered by connection to the clinician’s recording device: android phone,
tablet or computer. Any of these devices can allow viewing and recording using the clinician’s or organization’s own
software. Clinicians must follow their own, or their organization’s normal Electronic Medical Record pathways in the
recording, storage and transfer of eye movement videos taken using Vesticam IR video goggles.
1.2 Product Description
(a) System Configuration

Version V2C22021 Vesticam™User Manual Page | 4
Vesticam IR video goggles are available as monocular with fixation light, and can be upgraded to binocular with 2X
fixation light cameras.
A separate viewing and recording device is required for use.
(b) Minimum IT Requirements for Monocular Viewing and Recording
Vesticam2 Monocular can be used with a smartphone, tablet or a PC/laptop/Mac.
Phones and ipads are not currently able to work directly with Vesticam IR video goggles.
The Vesticam App is not required for viewing or recording eye movement. Any software for viewing videos via a USB
camera will function with Vesticam2 IR video goggles. It is not the responsibility or intention of the manufacturer to
recommend or approve software for viewing eye movement.
The Vesticam App is designed to make viewing using an android phone or tablet easier for clinicians, and is
supported and made freely available by Vesticam Pty Ltd.
OTG software is supported and customised by Vesticam Pty Ltd to make viewing using a PC/laptop/Mac easier for
clinicians.
1. Supplied Android Recorder (Android smartphone, no SIM card)
Android Recorders supplied by Vesticam have proven durability, rapid charging capacity, and an optional easy
fingerprint reader option to unlock. A supplied Android Recorder also comes with the Vesticam App pre-installed,
and has been tested for speed, quality screen image, and good quality sound for audio recording. A SIM card is not
included and is not required for use with Vesticam2 IR video goggles.
Or clinicians may choose to view and record from Vesticam2 IR Goggles using their own device.
2. Android Phone or Tablet
System requirements:
Android Recorder (Phone/Tablet) *
Application
Monocular / Single camera
Software
Vesticam App v5.0
Operating System
Android 10+ with OTG **
Processor
Octa-core 2.0 GHz or faster
RAM
3GB +
USB Ports
USB Type-C or USB Micro B
Storage
32GB + (1000 x mp4 video recordings of 2min each)
Microphone
Built in
Speaker
Built in
External Room Camera
N/A
Internet Connectivity
Not required
* Compatibility includes a video recording with frames per second >= 26. Please contact
3. PC/Laptop/Mac (see 2.2.3)
An extension lead with adaptors (for use as needed) is included for connecting to PC/Laptop/Mac.
System requirements:

Version V2C22021 Vesticam™User Manual Page | 5
PC / Laptop / MacBook, Mac Pro
Application
Monocular / Single camera or,
Binocular / Dual Camera
Software
OBS Studio (free download) https://www.gnu.org/licenses/old-
licenses/gpl-2.0.html
Simple alternatives: Windows “Camera” or Mac “Photobooth
Operating System
Windows 10+, macOS Sierra 10.12+
Processor
Core i5, i7, equivalent or higher
RAM
4GB+
USB Ports
USB Type-C or USB-A
Binocular recording requires two dedicated USB-A and/or USB
Type C Ports (USB 2.0 or USB 3.0).
Use Bluetooth compatible mouse to free up a USB port if needed.
Storage
32GB + (1000 x mp4 video recordings of 2min each)
Microphone
Built in
Speaker
Built in
External Room Camera
A Room Camera is optional. The room camera can be added by
using your laptop’s built in camera, or by purchasing an External
USB Camera & Tripod from Vesticam.
Internet Connectivity
Not required
(c) Minimum Requirements for Binocular Viewing and Recording
Vesticam2 Binocular requires a PC/laptop/Mac.
Hardware Requirements for Using Binocular IR Video Goggles:
•Two camera units (with fixation light)
•Additional Dual Micro-B Extension 2.0m Lead
•Adapters connection to PC/Laptop/Mac
The Binocular package can be purchased outright as a monocular unit plus additional camera and dual cables, or by
upgrading an existing Vesticam Monocular solution.
Vesticam can source and provide a suitable Laptop for the Binocular solution. Please contact [email protected]om for
more information.
A Room Camera is optional. The room camera can be added by using your laptops built in camera or by purchasing
an External USB Camera & Tripod from Vesticam.
Binocular Software Recommendations:
Vesticam recommend OBS Studio software for binocular recording with and without a room camera.
OBS is freeware provided under a General Public Licence. More information about freeware General Public
Licence can be found here https://www.gnu.org/licenses/old-licenses/gpl-2.0.html
Vesticam provides the necessary support and guidance for configuring their software so that it is relevant for
monocular and binocular vestibular testing. The OBS source code is unchanged. OBS is provided at no cost, and is
freely available. Customers may be invoiced for assistance provided in the physical act of transferring a copy of OBS
with suggested modifications.
The Vesticam Support Team can assist by email, phone or screensharing to ensure the setup is complete and the
equipment works to its specifications. Please check with your organization’s IT department that OBS meets its
security requirements.

Version V2C22021 Vesticam™User Manual Page | 6
(d) Included and Optional Parts
Vesticam2 IR video goggles are supplied with:
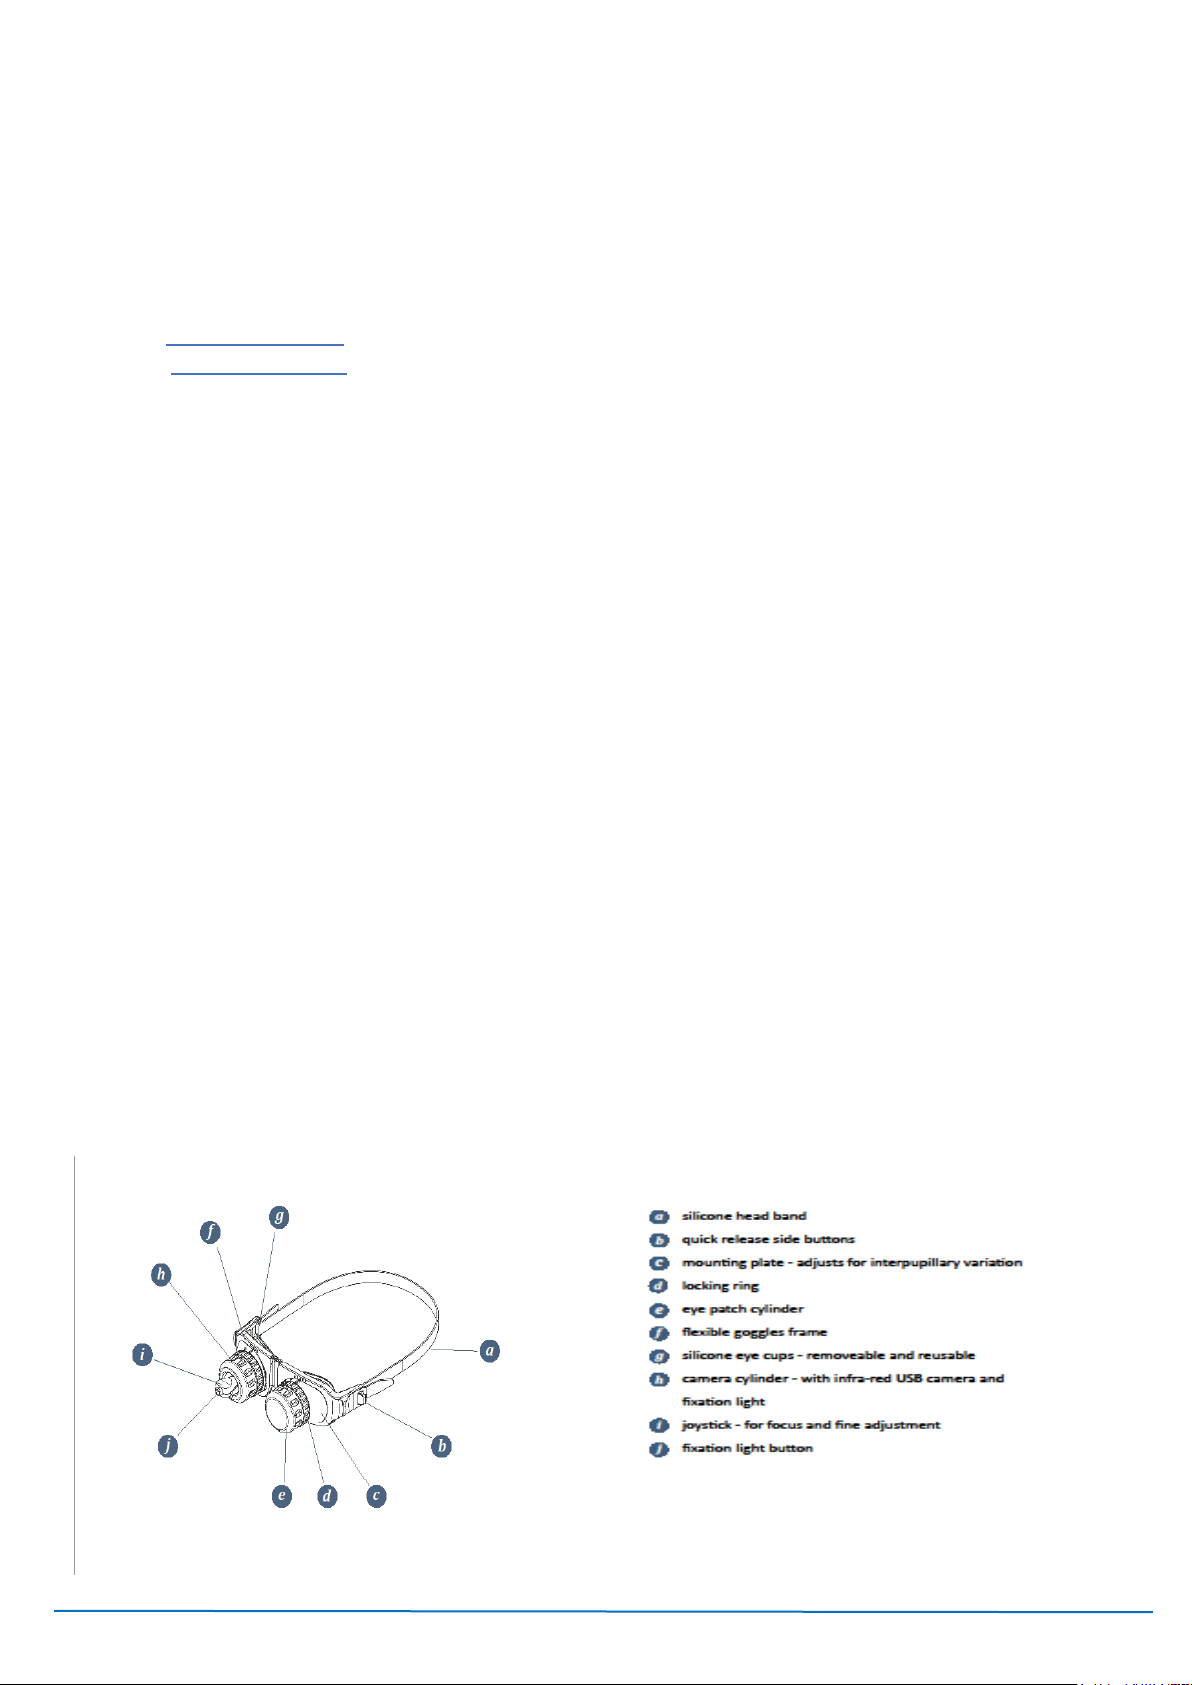
1. Goggles flexible face plate and mounting plate: comfortable, hypo-allergic face frame and quick release
buttons.
2. Camera cylinder with internal fixation light. Light tight and reversible for use on either eye. Easily adjusted
in all planes while in situ to suit most inter-pupillary distances and corneal depths. The camera comes with a
light weight, resilient 90mm cable, which can be extended to 2.9 m with supplied extension lead.
3. Eye cover cylinder. Can be slipped into place without removing goggles to provide light tight seal for tests
requiring fixation removed.
4. USB adaptors
5. 2m extension lead (USB C to C)
6. Compact Portable Case
Optional extras:
7. camera unit and dual extension lead (to allow for binocular viewing)
8. extra silicone eye cups
9. android recording device (smart phone), with pre-installed Vesticam App, and lanyard.
Please note, if you have purchased an android recorder from Vesticam :
•Use the cable and charger supplied to fully charge your supplied phone before use.
•There is no SIM card supplied with this phone, nor is it required.
•You can operate the Vesticam Unit without connecting to WiFi
•To set up a security PIN (if you wish), go to settings/security and location/ screen lock PIN and add your
own PIN.
•The Vesticam app is pre-installed and ready to use. It can be uninstalled by the user at any time.
•Vesticam Pty Ltd does not take any responsibility for the functioning of the android recorder / phone
including the Vesticam app if the user installs any other software or uses the android recorder for other
purposes
For pricing and replacement parts please access www.vesticam.com or email info@vesticam.com
1.3 Warnings and Precautions
Interpretation of eye movement videos recorded on Vesticam2 IR video goggles will be affected in patients with very
poor vision or abnormal/defective blink. Please consult a specialist in these circumstances.
Use of Vesticam2 IR video goggles may be contraindicated in patients with recent facial trauma, broken skin, eye
surgery, or blindness, and in patients who are infectious.
Persons proposing to use Vesticam2 IR video goggles for a medical purpose must rely on their own medical, clinical
and legal judgment, and such persons shall be solely responsible for the suitability of Vesticam2 IR video goggles in
any situation and for any medically related diagnosis or applications.
The purchasing party and/or practicing clinician agrees to indemnify, defend, and hold harmless Vesticam2 Pty Ltd
from and against any loss, cost, or damage of any kind, including loss or damage which may arise from non-
performance or defective performance; damage to real or personal property of purchasing parties or third parties;
injuries suffered by employees, subcontractors or the general public.
Do not use if the Vesticam2 IR goggle unit is showing any signs of damage. If you are unsure, please contact
Vesticam support (support@vesticam.com). See also section 3.1 Care and Maintenance.

Version V2C22021 Vesticam™User Manual Page | 7
2. Vesticam2 Monocular IR Video Goggles
2.1 Clinical
2.1.1 Setting Up and Using Vesticam2 Monocular IR Video Goggles and Android Recorder
or Tablet
Vesticam IR video goggles are easy to set up and use.
SETTING UP VESTICAM IR GOGGLES ON YOUR PATIENT
1. Start with the camera cylinder and eye patch cylinder off…not attached to the goggles
2. Follow your normal patient hygiene pathways when applying the goggles. Use effective alcohol/anti-microbial
wipes to clean goggles face plate, silicone eye cups and head band before and after each patient. Do not use
on patients with infective disorders. (see also 3.1.2 “Cleaning and avoiding contamination” and Appendix 1 full
instruction manual)
3.
4. Help your patient to position the goggles for comfort. Most patients can do this themselves, like swimming
goggles.
5.
To adjust for interpupillary distance, loosen the
locking rings at the front of the mounting plate by
turning anti-clockwise. Allow the mounting plates to
slide into a comfortable position on your patient’s
face. Your patient should be able to see out of both
viewing holes.
6. Pull rubber tags at each side of goggles to tighten gently, and then lock the mounting plates into place by
firmly tightening the locking rings in a clockwise direction.
7. Hold the camera cylinder so that the lead is exiting the cylinder at “5 o’clock”. Insert the camera cylinder into
the mounting plate, and rotate it clockwise until the camera cylinder “clicks” and locks into place (lead should
be at “6 o’clock” when locked).
The goggles are comfortable, high quality and
flexible enough to fit most face shapes and
sizes. Loosen the head strap by squeezing the
quick release buttons and the goggles flange
together

Version V2C22021 Vesticam™User Manual Page | 8
8.
If you cannot see your patient’s eye completely on the
viewing screen, simply loosen the locking ring, realign the
camera, and retighten the locking ring.
9.
TO FOCUS and fine tune eye position use one hand to
stabilize the camera cylinder and the other hand to move
the camera joystick up / down and side / side until the eye
image is central on screen. Firmly pull camera joystick in /
out to focus the image of the iris and edge of the pupil. The
camera cannot be pushed into the eye as there is an end
stop. It is important to focus the eye to ensure that possible
torsion is visible
10. To deny vision, slip the eye patch cylinder (e) into the remaining mounting plate. Twist the cylinder clockwise
and “click” to lock into place.
TO ALLOW FIXATION:
11. Press the small button (10) at the end of the joystick to activate the fixation light. When the button is IN, the
fixation light is ON. When the button is OUT, the fixation light is OFF.
NOTE: the fixation light will only work when the camera is plugged in to the external recording device (phone,
tablet or computer).
Vesticam2 goggles are designed to be light tight. Adjust the goggles with your patient so they are comfortable,
secure, light tight, and firm.
If you have further questions or concerns please check www.vesticam.com/support or email
TO CONNECT TO THE RECORDING DEVICE:
1. Switch recorder ON (press and hold on/off button at right side of recorder/phone), swipe up to go to home
screen.
2. Open Vesticam App (touch screen)
3. Open “view from camera”
4. If you want extra cable length, connect the camera cable to the extension lead now.
5. Connect the lead with camera attached to the phone via the USB socket.
6. “Allow the app Vesticam to access the USB device”….. Press “OK” Your screen should now show the
Vesticam camera image.
NOTE: To increase battery life, we recommend that you DISCONNECT YOUR CAMERA BETWEEN PATIENTS.
You will also need to disconnect your camera when you recharge your android recorder.

Version V2C22021 Vesticam™User Manual Page | 9
2.1.2 Recording using the Vesticam App for Android Recorders (Monocular Use Only)
PRE-NAMING RECORDINGS
Files can be renamed at any stage. To pre-name the eye movement video BEFORE recording press the pencil icon
and tap on information box. The keyboard will appear. Press “next” then “done” then “save”.
RECORDING WITH THE VESTICAM APP
Once the view from camera is visible and the patient’s eye is well positioned and in focus:
1. Press the red circle to RECORD. It will become a red square, and app will read “started the video
recording”. The phones microphone records audio so that you can speak and record an audio of your session
as you simultaneously record eye movement. Ensure the audio is set to maximum. Audio can be muted and
unmuted at any time throughout the recording if needed.
2. If this is the first time you are connecting the camera, permission may be requested. Press “OK”, and
“Allow” Vesticam to directly access the microphone to record audio.
3. Press the red square to STOP
You will be prompted to save or delete the recorded video. Note: for added efficiency the last file label saved
always auto-fills the boxes.
4. Choosing to “SAVE”
Touch each box to label your patient video file with: patient ID, Test information (eg: HST, DHT etc), and
Clinician info (this could be location or name).
Clinicians can label files at any time, including before recording, by pressing the “pencil” / EDIT icon.
5. If you choose to “DELETE”, you will be asked to confirm.
You can switch the internal fixation light on or off at any time throughout recording, and record on the audio
that you have done this.
You can also use the pre-installed metronome during recording if required.
REVIEWING VIDEOS
1. To review Video press “mountains” image at top right of screen which takes you to the image library, or use
the arrow at top left to go back to home page, then press image library. Videos are stored automatically,
with the most recent at the top. The date and time are the file name.
2. The SEARCH button allows clinicians to search by patient ID, test info, clinician or date.
3. Press on the file to open.
4. Press “PLAY” (arrow) to review the video.
5. Options on left of screen (top to bottom): Back to home page; Slow mode (½ speed viewing); rename
video.
6. Options on right of screen: “Share” (top icon) and “delete” (bin icon)
7. You can view any part of the video by manually dragging the progress bar.
2.1.3 Vesticam App - Tips for Working with Video Recordings
Speaking while recording can assist you with identifying your patient’s subjective responses to different tests,
recording verbal consent if required, and naming vestibular tests.
Consider:
•starting recordings with: “(patient’s name), are you happy for me to record this test” for verbal consent
•providing a commentary of test performed, movement direction or starting position
•clearly stating your patient’s vertigo/dizziness self-rating during testing.

Version V2C22021 Vesticam™User Manual Page | 10
2.2 Technical
2.2.1 Installing / Reinstalling the Vesticam App
If you have purchased an Android Recorder with your Vesticam goggles unit, the Vesticam App will be already
installed and tested.
You can install the Vesticam App if:
•you want to upgrade to a newer version of the Vesticam App
•you want to run the Vesticam App on your own smart phone. Note: Not all smart phones are compatible
with Vesticam (see p4)
•your Android Device is not recognising the camera and is disconnecting. Reinstalling the Vesticam App might
resolve this issue.
Installing from the shared folder (required for android 9.0 devices)
If you are using your own android smart phone or tablet as an android recorder, please contact
1. Turn on the Android Recorder and unlock the screen.
2. Ensure the Android Recorder has internet access ….. ie. WiFi is enabled (refer below)
3. Uninstall your existing Vesticam App first by holding your finger down on the Vesticam App icon. When
“Uninstall bin” appears at the top of the screen, drag the Vesticam Icon up to the Uninstall bin.
Note: Your existing Videos will not be lost when you Uninstall or Install the Vesticam App.
4. To install, go to Home Screen, then tap on the “Vesticam Info.” folder at the bottom-left hand side of the
screen. Tap on “vesticamlogin” (this will open a shared folder on the Google Drive). Select “Vesticam Setup”.
Select the apk install file eg. Vesticam App (v0.0).apk.
“For your security, your phone is not allowed to install unknown apps from this source” Select “SETTINGS” >
“Allow app installs” turn “ON” then go back and “INSTALL”
5. Locate the Vesticam Icon (just added) on the second home screen by swiping left. Press down on the
Vesticam icon and drag it to the left and place it on the home screen.
Enabling WiFi >Turn on Android Recorder >unlock screen >swipe down >select COG >Wireless
& networks” >Wi-Fi >Select the Network you want to use >enter the WiFi password…. Connected !
Other Android Apps already installed on a supplied Android Recorder:
Vesticam.com official website
Vesticamlogin shared folder - Contains resources for clinicians.
This includes \Vesticam Setup\Vesticam App.apk .. for installing
the App
Google Photos provides a feature to automatically sync your
Vesticam mp4 videos to your Gmail account. Also, you can preview
videos in Google Photos.

Version V2C22021 Vesticam™User Manual Page | 11
Simple Metronome - to assist with patient tests
Video Info Viewer shows you the Frames per second (FPS) of
your Vesticam mp4 videos
“Files” or “File Manager” or similar App enables you to copy,
move, or rename Vesticam mp4 videos. Also use this App to copy
Videos to the DUAL USB 16GB Memory Drive.
Vesticam Patient recordings are stored ….
Android Internal storage \ Vesticam \ Videos \ *.mp4
Useful Android Apps not pre-installed (can be added)
Use ”Reflector” to screen mirror to your PC/Laptop/Mac Screen for
Rotary Chair testing or for presentations with others to a larger
screen.
Not “pre” installed with your Vesticam Android Android Recorder.
Enables wireless file transfer of patient videos from Android to
PC/Laptop/Mac [Not Free]
Not “pre” installed with your Vesticam Android Android Recorder.
Notes regarding android apps:
•Uninstall any app by selecting the icon and dragging it to the “uninstall” Rubbish bin
•You can also use the Vesticam Login Folder to access the APK to install the Vesticam App
2.2.2 Organising and finding Eye Movement Video Recordings into Folders on your
Android Recorder
Vesticam videos can be found in the Vesticam app “Video Library”. You can search for patient files names by patient
ID, test, clinician, or date using the search button in the app.
Video files are also saved to internal storage on your Android Recorder in “\Internal storage\Vesticam\videos”.
2.2.3 Transferring Videos (mp4 files) from your Android Recorder to Other Storage
to Share/ Backup/Archive
To ensure the security of your Patient Video recordings, always follow your usual patient EMR pathways and
transfer/copy the Patient Video files saved on the Android Recorder/smart phone/tablet to your organization’s
required location.

Version V2C22021 Vesticam™User Manual Page | 12
4 ways to transfer Patient videos (mp4 files) from your Android Recorder or tablet:
OPTION 1: USING SUPPLIED CABLE
Supplied Cable CABLE file copy
Use the supplied power
cable and File Explorer (PC)
or Find (Mac) to copy files
A: Using PC Windows Computer (Windows 10)
STEP 1
Hold the button at the side of your device and press “Restart” on your Android Recorder –This is important to
update the file system and file naming.
Ensure your Android Recorder is ON and the screen is unlocked
STEP 2
Connect the USB cable/charging cable (provided) from the Android Recorder microUSB (charging port) to your PC
USB port (for USB C ports, use the supplied adaptor).
Your successful connection is usually confirmed with a “beep” on PC and Phone and/or the automatic opening of
Windows Explorer on the PC.
Note: Ignore any popup window eg. “Camera Upload …. Keep your memories safe” when connecting devices.
STEP 3
A notification box may pop up on your Android Recorder screen. Select “Transfer files”
If no notification box appears:
iSwipe down from the very top of the device screen,
ii “USB charging this device” appears. Tap screen for more options.

Version V2C22021 Vesticam™User Manual Page | 13
iii Select “Transfer files”
STEP 4
On your Laptop/PC open “File Explorer”
Open “This PC” then “Devices & Drives”
Click on the “Android Recorder”or other “<ANDROID PHONE NAME>”
Next, click on “Internal storage”… then “Vesticam” … then “Videos”
The location for your Vesticam Videos is:
MyPC\\Vesticam Android Recorder\Internal storage\Vesticam\Videos
STEP 5
Still on your Laptop/PC, Select and “Copy” the “Videos” folder on the Android Recorder then Paste in a folder on
your PC (eg. a folder called “Vesticam Archives”).
Once you have successfully copied the video/image files to the PC you can delete them from the Android Recorder.
B: Using Apple Mac (macOS 10)
PREPARATION –Download and Install the Android File Transfer utility on you Mac
https://www.android.com/filetransfer/
Follow STEPS 1-4 as for PC Windows, above.
STEP 5
Still on your Mac … Select and “Copy” the “Videos” folder on the Android Recorder then Paste in a folder on your PC
(eg. a folder called “Vesticam Archives”).
Once you have successfully copied the video/image files to the PC you can delete them from the Android Recorder.

Version V2C22021 Vesticam™User Manual Page | 14
OPTION 2: WITH MICRO-B USB MEMORY STICK /FLASH DRIVE
Dual Drive file
USB Drive "DUAL"
(Micro B / USB-A)
copy
Use a USB Dual Drive and the
Files App to copy files
Examples of flash drives: Verbatim 32GB Store N Go USB3.0/Micro USB Flash Drive, San disk Ultra Dual drive, or
Kingston Micro Duo)
STEP 1
Insert the micro-USB memory stick into the Android Recorder
STEP 2
Open the Files App on the Android Recorder and navigate to the Vesticam folder - “Internal storage”… then
“Vesticam” … then “Videos”. Copy the Videos folder
STEP 3
Paste the Folder into the USB memory stick directory
STEP 4
“Eject” the memory stick in software before removing the memory stick from the phone
STEP 5
Insert the other side of the USB stick into a PC or Mac, copy files as usual. Remember to “Eject” before removal
OPTION 3: WITH WIFI CONNECTED, USING THE VESTICAM APP
WiFi Share
Use "Share" in the Vesticam
App to send individual files
You can upload individual Video files to Cloud Storage service (e.g. email, Dropbox, Google Drive) using “share”.
STEP 1:
Connect your Android Recorder to WiFi
Access Android Settings Cog (hint from the top swipe down twice), select WiFi and enter locate the SSID and enter
the password.
STEP 2:
On your phone use Google Play to install the cloud storage service you want to use (eg. Dropbox or Google drive).

Version V2C22021 Vesticam™User Manual Page | 15
Note: If you can access your cloud storage on the Android Recorder then you can upload videos/images to that
service.
STEP 3:
On the Android Recorder, Open Vesticam App > Image Library. Select the Video, select Send, select the destination
…. eg. Dropbox or Google drive or Gmail/email.
Note: Video files exceeding 25MB cannot to emailed.
OPTION 4: WITH WIFI SYNC COPYING TO CLOUD STORAGE/ GOOGLE PHOTOS
WiFi Sync
Enable Syncing on your phone to
copy files to cloud storage
Patient Videos can be set up to automatically upload to the Google photos library in your Google Cloud Drive.
To enable this service, you need to turn Back up & Sync ON in the Photos App on your Android Recorder.
STEP 1
Access “synced” videos …. On your computer, sign into https://photos.google.com/ using your
temp345abcd <<EXAMPLE!
STEP 2
Once logged into “Google Photos”, you can play, rename, organise and download your videos.
Sync. Warning: The Back up and sync is TWO WAY…. Deleting Patient videos on either the Android
Recorder OR in Google Photos (via your Google Account) WILL DELETE THE PATIENT VIDEOS
PERMANENTLY.
Turn “Back up & Sync” ON - for automatic upload of Vesticam Videos on your Android Phone to
Google Photos/Cloud Storage. You only need to set this once.
Open Photos App on the Android Device/Phone
Select Menu (top left hand corner)
Select “Device folders”
Select “Videos” …. ie. where Vesticam Videos are saved
Note: If this folder does not appear, you will need to open the Vesticam App and
record one test video.
Turn ON “Back up & sync”
With Back up & sync ON, and WiFi connected, your saved Vesticam Videos will now be automatically
uploaded to Google Photos in the cloud (via the Google Account that has been pre-setup on the
Android Device/Phone).

Version V2C22021 Vesticam™User Manual Page | 16
Method 5: Installing an App to copy files wirelessly to your PC/Mac
WiFi file copy
Install an App on your phone to
copy files to wirelessly to your
PC/Mac
2.2.4 Recording Using your PC or MAC
You can view and record by connecting your Vesticam monocular goggles directly to your PC Laptop or Mac.
Standard “Camera” or “PhotoBooth”software, which comes preinstalled on most PC /MAC computers, will a allow
viewing and recording from Vesticam IR video goggles. This is a simple technique and does not require extra
software (see below)
As an option, you can choose to install other software and configure it to meet your specific requirements eg: adding
a room camera, extra labelling options, toggling between cameras (see appendix 2 for set up details).
Micro-USB to Type A USB, and micro USB to C adaptors for connecting the camera to the computer are supplied with
all Vesticam IR video goggles.
If you choose to use your PC Laptop or Mac for recording, we recommend using the supplied high-speed extension
cable. This allows you to have your laptop on a nearby desk or chair when your patient is on a treatment couch. Not
all extension cables are suitable to transmitting data at the required speed and quality. Cables must be OTG
compatible.
Before you start, check that the PC Laptop or Mac meets the requirement of having a built-in camera and being
able to record and play sound and video.
RECORDING/ PLAYBACK PC (Windows 10)
Connect the Vesticam camera lead directly to your computer USB port (adaptors provided if needed). Do not use a
USB hub to connect. Open “Camera” software (Windows 10).
Use “Change Camera” to switch to the USB camera (ie. not “Main Camera” and not “Front-facing Camera” but “USB
2 HD Camera”). Once you have switched to USB camera, you are able to preview and record from the Vesticam
camera. Recordings are saved in “Camera Roll” (Usually found at C:\Users\\Pictures\Camera Roll). Saved MP4
videos can be played, renamed, shared, backed up.
Regarding STEP 1. above…
Each Vesticam Unit is shipped with a unique Google Account Login (gmail email address) & Temporary. Your
Google Account Login/email address & Temporary password are…
•provided via email (For Vesticam Unit Serials numbers from #100001 to 100100)
•stored on the Android Recorder in the bottom left hand corner of the home screen, in the “Vesticam
Info.” folder. Select “Notes” refer “Google Account Temporary Password” (For Vesticam Unit Serials
numbers 100101 and beyond)
•Available on email request to [email protected]om
**** GOOGLE ACCOUNT PASSWORD CHANGE****
Change the temporary password supplied to your own “new” confidential password.
To do this
1) login into your Google Account via https://accounts.google.com/servicelogin
2) Go to Personal Info, then select PASSWORD.
3) Setup your own “new” confidential password.
4) Also update other personal info and account recovery email & mobile.
Note: Your “new” password will also need to be entered on your Android Recorder.

Version V2C22021 Vesticam™User Manual Page | 17
RECORDING/ PLAYBACK MAC
From Launch Pad open “Photo Booth” software (MacOS 10.x). In “Photo Booth”select the “Film” icon to “Record a
movie clip” (located in the bottom left of screen). You will see the preview from the inbuilt face camera.
Connect the USB convertor plug (provided) to the micro USB plug at the end of the Vesticam camera lead.
NOW connect the USB convertor to your PC/Mac USB port.
The Vesticam camera should now be previewing. Record from the Vesticam camera by selecting the Red Video icon.
Recordings are saved in “Photo Booth”. Saved images (mp4) can be played, shared, or use File> Export to rename
or copy to another folder.
2.2.5 Screen casting your android device to a larger screen
You can easily “cast” your android screen to other devices (PC/Mac) wirelessly when they share the same WiFi
connection.
This might be useful when using your Android Recorder for:
1. Presentations (eg. conference or education setting) - you can project to a chosen larger screen, or share
screens in different areas real time whilst testing, without use of cables.
2. Modified Emory Rotatory Chair testing –allows real time viewing and recording of eye movements while the
chair is spinning.
Android App: “AirMore”
AirMore is a web-based application that features the reflector function to display your Android screen in real time.
Using AirMore, you do not need USB cables to build the connection. All you need is your web browser and a stable
and shared WiFi connection.
To use the “Reflector Function” of AirMore, follow the steps below.
Steps for screen casting using the Airmore App.
1. On your Android Recorder install the App: “AirMore: File Transfer” from Google Play.
2. On your PC/Mac browser open web.airmore.com
3. On your Android Recorder scan the QR code shown on the PC/Mac screen.
4. Once connected, click on the “Reflector” icon on the main interface of the browser on PC/Mac.
5. Click “START NOW” on your mobile device.
6. SUCCESS …. The Vesticam App (on the Android Recorder) is also displayed (mirrored) on the PC/Mac.
Pros: ✔Easy to use
✔AirMore is a free android app.
✔Works for all popular browsers such as Google Chrome, Firefox, Safari, etc.
✔No extra software installed on Windows and Mac operating system.

Version V2C22021 Vesticam™User Manual Page | 18

Version V2C22021 Vesticam™User Manual Page | 19
3. Vesticam2 Binocular IR Video Goggles
3.1 Clinical
3.1.1 Setting up and using Vesticam2 Binocular IR video goggles with OBS
The following section is for clinicians wanting to use Vesticam2 for binocular viewing and recording. With a
PC/Laptop/Mac that meets the minimum requirements, OBS Studio software and the Vesticam binocular equipment,
clinicians can preview & record both patient’s eyes at the same time.
The Binocular Vesticam equipment requires additional components (2nd Camera, Dual cable, Laptop) that can be added
to existing Vesticam monocular equipment. This means you can purchase and use different components to meet your
clinical testing needs.
This Vesticam designed setup (using OBS Studio software) provides vestibular clinicians with a feature rich solution
for binocular recording. Initial setup of OBS is explained in the separate document “Appendix 2: Vesticam Binocular
Reference Manual”. Installation is usually only required once, in the initial phase of setting up your computer, and
should be carried out without patients present.
OBS is freeware provided under a General Public Licence. More information about freeware General Public
Licence can be found here https://www.gnu.org/licenses/old-licenses/gpl-2.0.html
Once suitable software is installed correctly, you can proceed with clinical use of Vesticam Binocular IR video
goggles.
CONNECTING THE VESTICAM CAMERAS TO YOUR COMPUTER
1. Switch computer ON
2. Connect the camera leads to the supplied cables
Connect the first camera to the black (right eye) cable connector. Connect the second camera to the blue
(left eye) cable connector.
3. Use the supplied adaptors to connect the cables to the computer ports (Blue for left and black for right
eye). There should be an audible beep which confirms that each camera is connected.
We recommend that you keep the adaptors connected to the cables to reduce risk of damage to computer
ports.
4. Open OBS studio by double clicking on the icon
5. Both eyes (and room camera if in use) should now be visible on the screen and respond to motion.
If the images are frozen and do not respond, simply exit OBS studio and reopen it.
If there is still no response exit OBS studio, remove and reinsert adaptors. There should be an audible beep
which indicates that the camera is connected.
6. Once the cameras are connected go to Sources box (lower centre of screen). Double click on PATIENT ID to
open and edit the patient ID/name in the text box. OK to close. The updated name will appear in the
bottom left corner of the screen.
Double click on TEST/DATE, open and edit, OK to close.
Double click on CLINICIAN, open and edit, OK to close.
NOTE: this records patient and test details on the video, but will NOT change the file name.

Version V2C22021 Vesticam™User Manual Page | 20
SETTING UP THE BINOCULAR IR GOGGLES ON YOUR PATIENT
1. Start with the camera cylinders off…not attached to the goggles
2. Follow your normal patient hygiene pathways when applying the goggles. Use effective alcohol/anti-
microbial wipes to clean goggles face plate, silicone eye cups and head band before and after each patient.
Do not use on patients with infective disorders. (see also 3.1.2 “Cleaning and avoiding contamination” and
Appendix 1 full instruction manual)
3. The goggles are comfortable, high quality and flexible enough to fit most face shapes and sizes. Loosen the
head strap by squeezing the quick release buttons and the goggles flange together
4. Help your patient to position the goggles for comfort. Most patients can do this themselves, like swimming
goggles.
5. To adjust for interpupillary distance, loosen the locking rings at the front of the mounting plate by turning
anti-clockwise. Allow the mounting plates to slide into a comfortable position on your patient’s face. Your
patient should be able to see out of both viewing holes.
6. Pull rubber tags at each side of goggles to tighten gently, and then lock the mounting plates into place by
firmly tightening the locking rings in a clockwise direction.
7. Hold the first (right) camera cylinder so that the lead is exiting the cylinder at “5 o’clock”. Insert the camera
cylinder into the mounting plate, and rotate it clockwise until the camera cylinder “clicks” and locks into
place (lead should be at “6 o’clock” when locked).
8. If you cannot see your patient’s eye completely on the viewing screen, simply loosen the locking ring, realign
the camera, and retighten the locking ring.
9. TO FOCUS and fine tune eye position use one hand to stabilize the camera cylinder and the other hand to
move the camera joystick up / down and side / side until the eye image is central on screen. Firmly pull
camera joystick in / out to focus the image of the iris and edge of the pupil. The camera cannot be pushed
into the eye as there is an end stop. It is important to focus the eye to ensure that possible torsion is visible.
10. Repeat the instructions above (7 -9) to position the second (left) camera.
TO ALLOW FIXATION:
11. Press the small button at the end of the joystick to activate the fixation light. When the button is IN, the
fixation light is ON. When the button is OUT, the fixation light is OFF.
NOTE: the fixation light will only work when the camera is plugged in to the external recording device
(phone, tablet or computer).
12. If you wish to use “room view”, position the room camera (optional extra) or computer external camera to
view your patient.
Vesticam2 goggles are designed to be light tight. Adjust the goggles with your patient so they are comfortable,
secure, light tight, and firm.
If you have further questions or concerns please check www.vesticam.com/support or email
This manual suits for next models
1
Table of contents
Other Vesticam Accessories manuals