Vibrafit MINI WALK 3 User manual

User Manual
MINI WALK 3


MINI WALK 3 by Vibra Fit User Manual
Congratulations on choosing the MINI WALK 3 by Vibra Fit.
Read this user manual carefully before starting
your . This manual provides important tips about operating the . In addition, it
provides information that is useful for the safety of the machine.
The is made of high-strength aluminum alloy without a welding process. The patented automatic
speed control mode combines fitness, entertainment, and safety. Enjoy walking at home and in the office.
MINI WALK 3 MINI WALK 3
MINI WALK 3
5 SAFETY INFORMATION
7 SUPPORT
8 SET UP YOUR
8 Unpacking
10 Unfold the Handrail
12 Fold the Handrail
14 Move the
15 POWER SUPPLY
15 Grounding Instructions
15 Power Requirements
15 Power the On and Off
16 Use The
18 Handrail Buttons
19 Display Window
20 Remote Control(optional)
21 Manual Control Mode
22 Remote Control Mode(optional)
23 Automatic Control Mode
25 Sleep and Wakeup
26 BLUETOOTH SPEAKER
MINI WALK 3
MINI WALK 3
MINI WALK 3
MINI WALK 3
27 MAINTENANCE
27 Centering the walking belt
28 Add Lubricant
28 Storage
28 Cleaning
29 TROUBLESHOOTING
Table of Contents


Safety Information
Overview
Read, understand, and carefully follow all warnings,
instructions, and procedures on the treadmill and in
the owners/users manual before using the treadmill.
Important safety instructions
When using an electrical appliance, basic precautions
should always be followed, including the following:
DANGER – To reduce the risk of electric shock:
Always unplug this appliance from the electrical
outlet immediately after using and before cleaning.
WARNING – To reduce the risk of burns, fire, electric
shock, or injury to persons:
An appliance should never be left unattended when
plugged in. Unplug from outlet when not in use, and
before putting on or taking off parts or before cleaning
or servicing.
Do not operate under blanket or pillow. Excessive
heating can occur and cause fire, electric shock, or
injury to persons.
Close supervision is necessary when this appliance
is used by, on, or near children, invalids, or disabled
persons.
Use this appliance only for its intended use as
described in this manual. Do not use attachments not
recommended by the manufacturer.
Never operate this appliance if it has a damaged
cord or plug, if it is not working properly, if it has
been dropped or damaged, or dropped into water.
Return the appliance to a service center for examination
and repair.
Do not carry this appliance by supply cord or use cord
as a handle.
Keep the cord away from heated surfaces.
Never operate the appliance with the air openings
blocked. Keep the air openings free of lint, hair, and
the like.
Never drop or insert any object into any opening.
Do not use outdoors.
Do not operate where aerosol spray products are
being used or where oxygen is being administered.
To disconnect, turn all controls to the off position,
then remove plug from outlet.
To Avoid Injury, use extreme caution when stepping
onto or off of a moving belt.
The product must be used at the specified rated voltage
/rated power supply and the power socket must be
grounded.
Obtain a medical exam before beginning any exercise
program.
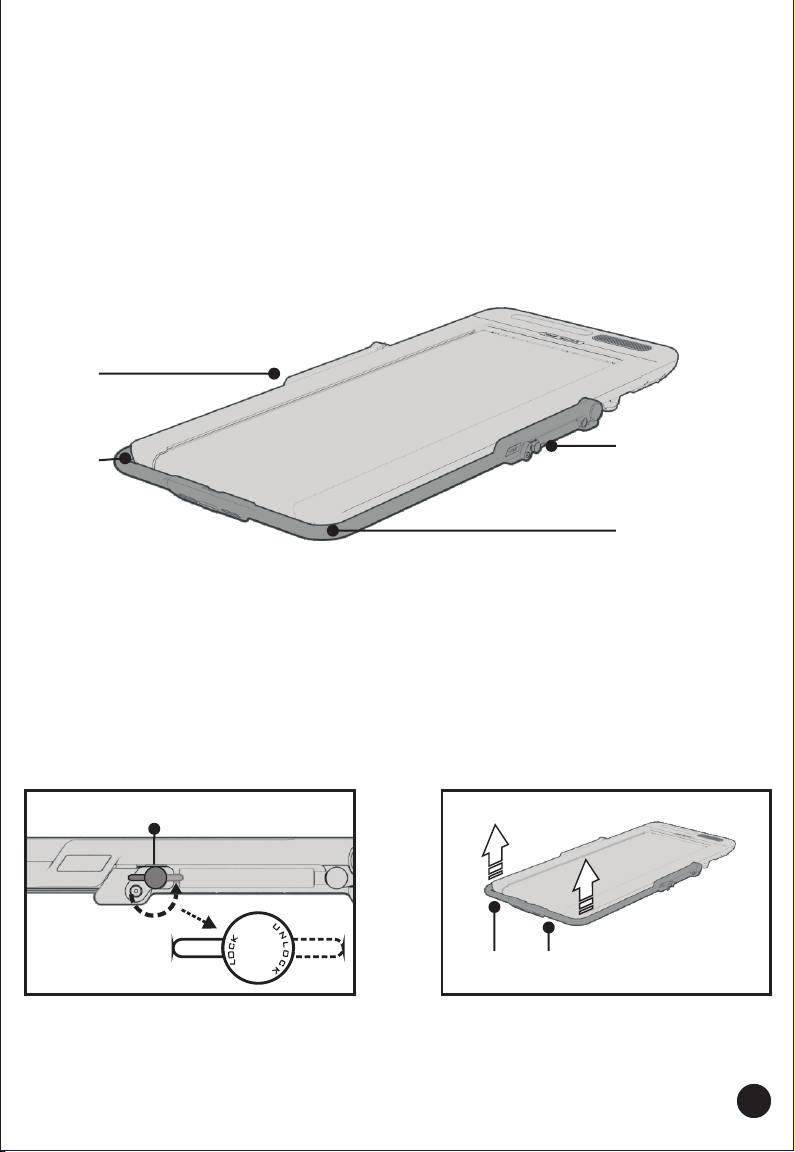
Inspect the treadmill for incorrect, worn, or loose
components and then correct, replace, or tighten prior to
use.
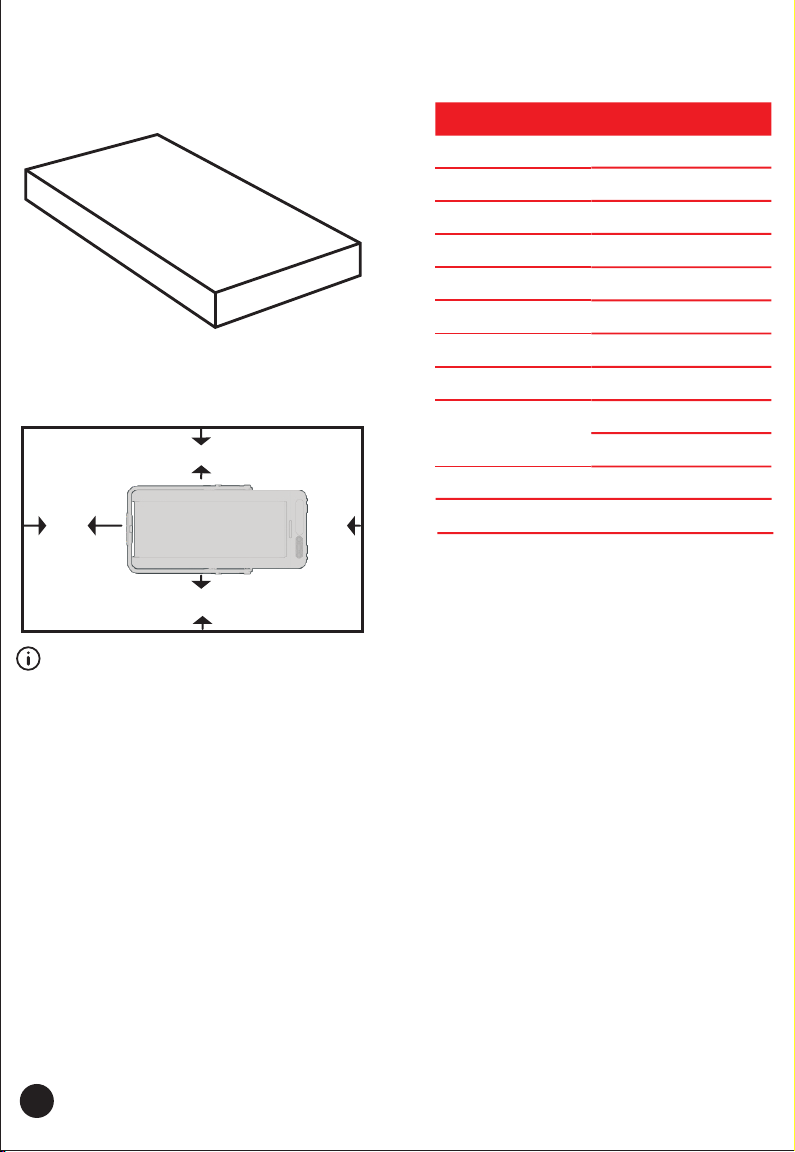
Place the on a flat surface, do not
place it on a too soft mat or too thick carpet, make
sure that the walking machine have a safe area of
2m*1m.
Keep all conductive devices away from liquids.
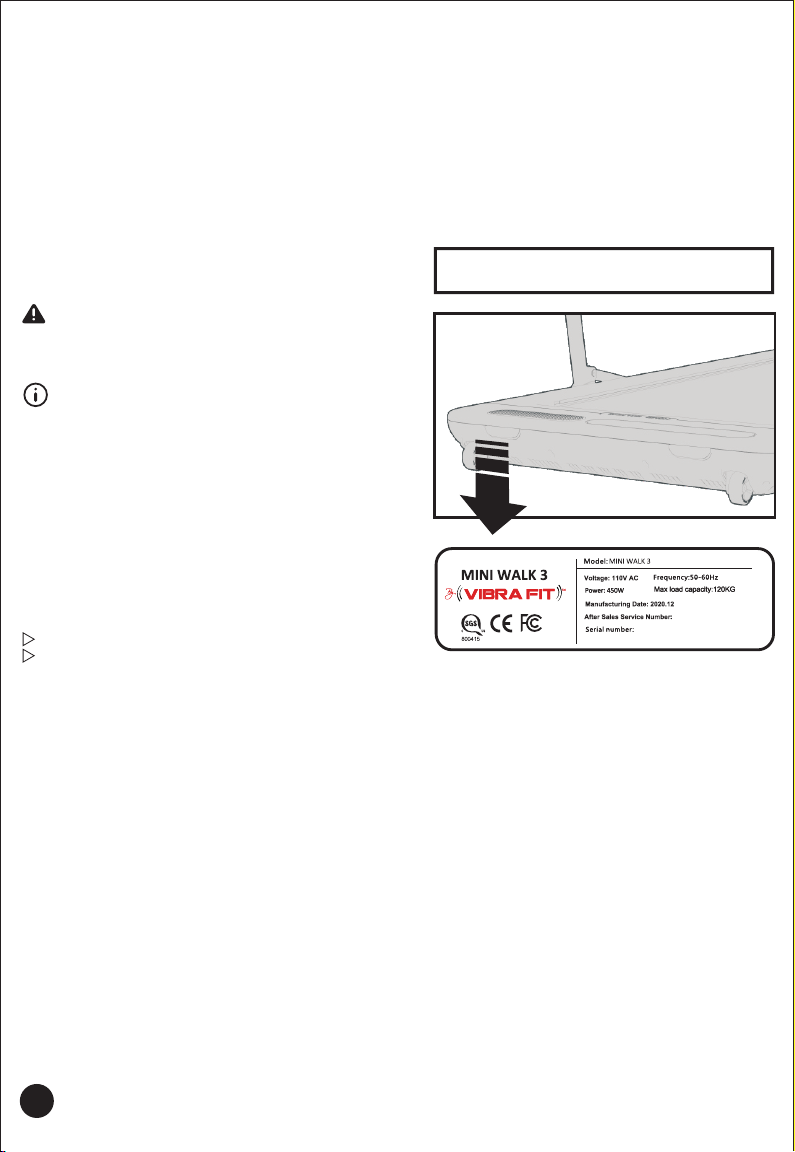
MINI WALK 3
5
Do not place anything on the running platform of
.MINI WALK 3
Don't wear clothes that can hook up to the MINI
WALK 3.
Do not allow ventilation port on the motor cover
blocked by debris when using the operation.
Check regularly and lock each part, do not put
your hands on rotatable joints.
In the power-on state, do not let child or pet get
close whether you use it or not.MINI WALK 3
Do not put your fingers or any foreign objects in
the gap to avoid causing danger.
This product is not intended for use by children or
those with reduced mobility.
Please remove the power plug from the socket
after use or before cleaning the product.
Do not touch the power cord and power switch
with wet hands.
When a part of the , such as
walking belt or rotating scroll bar roll in stuff,
turn off the power and clean it.
MINI WALK 3
When the walking belt is running, don't try to
turn around.
Keep your position facing front at all times.
It is forbidden to have two or more people on the
at the same time.MINI WALK 3
It is forbidden to shake the at any
time.
MINI WALK 3
Do not press on the handrails with hands to support
the body hanging in the air.
In case of emergency, please pat the emergency
stop switch and the will stop quickly. MINI WALK 3
When the handrail is unfolded, in the event of an
emergency, hold the handrail of the
with both hands, and step on the non-slip side pedal
(side rail) on both sides of the walking belt or on
the ground to avoid losing balance and causing a
fall.
MINI WALK 3
Do not use this product when the following
conditions occur:
The power cord or power plug is damaged; the
operation is not normal; the product drops on the
ground or is damaged.
In addition to professionals, it is strictly forbidden to
adjust the electrical control part of the MINI WALK 3.
Keep children under the age of 13 away from machine.
Connect this appliance to a properly grounded outlet
only. See Grounding Instructions.
Care should be used when mounting or dismounting
the treadmill.
Disconnect all power before servicing the treadmill.
Do not exceed maximum specified user weight.

Usage environment
This product is not suitable for the following people:
Operational safety
WARNING
Excessive exercise can cause serious injury
or death. Do not exercise too much. If you feel dizzy,
stop exercising immediately.
Do not use this product in humid or excessive dusty
environment so as to avoid product failure.
Do not use this product at room temperature above
40 °C.
Do not place the product outdoors or near water
source.
Do not place the product near electric heaters, stoves
or areas with direct sunlight.
Do not place blankets or soft cloth cushions under
this product. The heat generated during the
operation of the product
of burning or electric
shock..
may cause the blanket or
soft cloth pad to be in danger
Do not use it by those who doctors tell not to exercise,
so as to avoid accidents or physical discomfort such
as thrombosis, severe aneurysms, acute venous tumors,
various dermatitis, skin infections, etc.
It is forbidden to use together with the following
medical equipment: Cardiac adjuster implantable
medical electronic instruments; medical electronic
instruments used to sustain life such as
artificial heart.
SAVE THESE INSTRUCTIONS
6

The purpose is to quickly know about the walking
machine and understand the meaning of the serial
number and symbol of the user manual. It is important
to keep this user manual, especially when lending or
reselling this machine.
Support
Overview
Icon in the user manual
This symbol represents a safety alert that it must
Steps
Strictly observe the sequence and follow the steps with
serial numbers.
2. The second step of the operation.
1.The first step of the operation.
List
No mandatory sequential operations are displayed as
lists with enumerated items.
The first step
The second step
Timeliness of this user manual
Copy the walking machine serial number (located
around the power switch) to the serial number field
below and then save this user manual.
Walking machine serial number
7
be read and followed carefully for the safety of
yourself and others and to avoid damaging your
walking machine.
This symbol represents the points for attention.
Please read them carefully and observe them to
get correct operation and better experience of
this walking machine.
We continue to further develop to ensure that the
walking machine has a high level of safety and quality.
Therefore, this walking machine may occasionally
differ from the description. (Note: The cover is the
regular color matching of the walking machine, the
specific color is subject to the color of the purchased
model)

Be sure to place the walking machine carton on a flat
surface. Please be careful to carry it. Never unpack
from the side of the carton.
Set Up Your MINI WALK 3
Overview
Packing carton specifications
Item Specifications
Carton size (mm)
Gross Weight(kg)
1515x756x120
40
Carton inner packaging
Unpacking
1.Make sure the top cover of the carton is facing up
and open the top cover.
2.Two people are required to remove the walking
machine from the box.
8
3.Place the walking machine on a flat surface. Do not
put it on a soft mat or a thick carpet when using it.
Carton cover
Carton lower cover
Packing filter
Accessories
Walking machine

4.Put the filter back into the box, fasten the upper
and lower covers of the box and store them.
5.We recommend leaving at least 0.5 m of space
on both sides of the walking machine and a 2 m safe
area behind the walking machine.
0.5M
0.5M
0.5M2M
9
Keep the original box and packing material after
unpacking. During the warranty period any MINI WALK
3 exchanges or returns should be returned to the
original factory in the original packaging.
No. Description
(km/h)
Speed range
Specifications
Handrail unfolded: 1.0-8.0
Handrail folded: 1.0-6.0
Display Specifications White Matrix Digital Display
Motion parameters speed, steps, time, distance
Running area (mm)
Unfloding dimension(mm) 1430x735x1030
Folding dimension(mm) 1475x735x93
Net Weight 35
Max load(kg) 120
1200x460
Applicable ages(year) 14-60
Lifting slope(%)
Fixed
Motor power (W) 450

Unfold the Handrail
1. To adjust the handrail to unlock mode, move the
two-way lock mechanism switch A_1 /A_2 on the
left and right sides of the armrest from the LOCK
position to the UNLOCK position.
Unfolding steps
A_1
A_2
MINI WALK 3’s handrail uses gas-liquid buffer technology and will automatically unfold when the handrail unfolds
and reaches a particular angle.
Use the following steps to unfold the ’s handrail.MINI WALK 3
Overview
8
2.Raise the armrest A_3/A_4 up to a certain angle
with both hands and the armrest will automatically
rise to the appropriate height.
A_4
A_3
A_4A_3
10
A A_1/_2

3.When it is finished unfolding, move the bi-directional
locking mechanism A_1/A_2 switch from the UNLOCK
position to the LOCK position to fix the handrail.
11
You can adjust the angle of the handrail according
to your preferences. Adjust the unfold angle and
change the two-way lock mechanism switch to the
locked position.
When the handrail is folded, the maximum speed
of is 6km/h; when the handrail is in
unfolded mode, the maximum speed of
is automatically adjusted to 8km/h.
MINI WALK 3
MINI WALK 3
A_1/A_2

This is fully foldable and requires no installation tools. MINI WALK 3 The handrail uses a gas-liquid cushioning
technique when you fold the handrail.
Follow the steps below to fold the walking machine. The thickest section is no more than 10cm when the walking
machine is fully folded, it can accommodate any space that meets this size, such as under the sofa or under the bed
(where the space permits).
Overview
1.To adjust the handrail to unlock mode, rotate the
bi-directional locking mechanism switch B_1/B_2
switch on the left and right sides of the handrail from
the LOCK position to the UNLOCK position.
Folding step
12
B_4
B_3
B_1
B_2
B_3/B_4
B B_1/_2
Fold the Handrail
2.Press the armrest B_3/B_4 to the main body of
. Hold the handrail with both hands
while pressing until it’s completely folded.
MINI WALK 3

3.After folding is completed, move the bi-directional
locking mechanism B_1/B_2 switch to the UNLOCK
position to the LOCK position to lock the handrail.
13
After folding is completed, move the bi-directional
locking mechanism to the locked position so that the
handrail and the MINI WALK 3 are fixed tightly
together to facilitate moving your .
When the handrail is in the folded state, the
maximum speed of is 6km/h; when the
handrail is unfolded, the maximum speed of
is automatically adjusted to 8km/h.
MINI WALK 3
MINI WALK 3
MINI WALK
3

Move the MINI WALK 3
1. Lift from the handrail C_1 with
both hands.
MINI WALK 3
Moving step
The net weight of the machine is 35kg. Use the two-way
locking mechanism to fasten the body when the handrail
is folded to facilitate moving. Please follow the steps
below to move .
MINI WALK 3
Overview
C_1
14
2.Move to the desired position with
the two moving pulleys C_2 that under the motor
cover.
MINI WALK 3
C_2
C_1 C_2
Before moving , remove the
power cord plug from the socket and make sure that
the handrail lock mechanism switch is in the locked
mode.
MINI WALK 3
WARNING

Grounding instructions
This product must be grounded. If the product fails,
grounding provides a minimum resistance path for the
current and thus reduces the risk of electric shock. The
original plug of this product is equipped with a grounding
conductor. For safety reasons, the grounding plug must
be plugged into the appropriate socket and the socket
must be properly installed and grounded in accordance
with all local codes and regulations.
Power MINI WALK 3 on and off
Category Description
D_1 Power cord
Power switchD_2
= , =
Power switch icon meaning
on off
Power on
1.Power on .
2.Press the icon on the power switch D_2.
MINI WALK 3
Power off
1. Press the icon on the power switch D_2.
2.Pull the power plug out of the
socket.
MINI WALK 3
D_2D_1
MINI WALK 3 comes with a power cord and a power
switch. The power cord and the power switch are
located on the right side of the motor cover.
Overview
Failure to follow the instructions may result
in electrical failure.
Never touch the power cord and power switch with
wet hands.
Do not remove the motor cover otherwise there is a
danger of electric shock.
WARNING
Power requirement
The normal use voltage of this product is 110(USA/
Canada) / 220(Europe) volts.
The voltage required for can be found on
the manufacturer sticker(around the front of the motor
cover). It needs to be used according to the specific
voltage requirements.
MINI WALK 3
Refer to the following grounding diagram.
Power Supply
15

Overview
By introducing parts, buttons, remote control (optional) and movement parameters window,
you can get familiar with the working principle of different workout modes quickly. has three
control modes, namely manual control mode, automatic control mode and remote control mode (optional).
MINI WALK 3
MINI WALK 3
Use the MINI WALK 3
The emergency stop switch is located at E_1.
E_1
E_3
E_4
Emergency stop switch disconnected
Press
Close the emergency stop switch
E_2
E_5
Emergency stop switch
E_6
The long red button is located in the middle of the
handrail. When is running if you
encounter an emergency, press the emergency stop
switch and the will stop quickly.
MINI WALK 3
MINI WALK 3
To restart the , turn off the emergency
stop switch and then press the START button on the
handrail to start it.
MINI WALK 3
16

The walking belt is located at E_2.
Warm up before the exercise, check the walking belt’s
condition prior to use, adjust the tightness and perform
the lubrication maintenance of the on
time.
MINI WALK 3
The side rails are located at E_3/E_4.
The side rails are fixed on both sides of the walking
belt allowing you to safely straddle the
during start-up or an emergency.
MINI WALK 3
The motor cover is located at E_5.
Do not cover the motor cover to avoid the motor
overheating and causing malfunction or damage. Do
not step on or jump on the motor cover.
Walking belt
Side rail
Motor cover
The Bluetooth speaker is located at E_6.
Bluetooth Speaker
Note: Close the emergency stop switch after
power on . If the emergency stop
switch is not closed, it will not start normally.
The emergency stop switch button 'EMERGENCY
STOP' will continue to flash.
MINI WALK 3
Connect the speaker to a phone using the Bluetooth
function on the phone, then control the speaker from
your phone.
17

F_1
Handrail Buttons
EMERGENCY
STOP
SPEED SWITCH START STOP PAUSE SPEED
The function button panel is at F_1.
Deceleration button
Press this button to decrease the speed
in increments of 0.1km/h.
Long press this button to rapidly
reduce the speed.
SPEED
Mode Switch button
manual control mode
and automatic control mode.
Switch between
SWITCH
Start button
Start and enters a
manual control mode.
MINI WALK 3
START
Pause button
Pause , clears the speed
value and retains the display parameters.
MINI WALK 3
PAUSE
Stop button
MINI WALK 3 gradually decelerates
to stop and the display is cleared.
STOP
Acceleration button
Press this button to increase the speed
in increments of 0.1km/h
Long press this button to rapidly
increase the speed.
SPEED
The handrail buttons are used to control: start, pause, stop, acceleration, deceleration, and switch motion modes.
18

G_1
Display Window
The sports parameter display window
Displays the current speed value;
Pauses or stops , and the
value is cleared.
STEPS
Displays the cumulative number of steps in a
single exercise;
Pause , the value remains,
if you restart , and it does not enter
sleep mode, the display continues to accumulate.
The value is cleared after stopping .
TIME
Shows the duration of a single exercise;
If you pauses the , the parameters
remain, if you restart , and it does
not enter sleep mode, the display continues to
accumulate.
The parameters are cleared after stopping the
DIST
Displays the accumulated mileage of a single
exercise;
If you pause the , the parameters
remain, if you restart , and it does
not enter sleep mode, the display continues to
accumulate.
SPEED
MINI WALK 3
MINI WALK 3
MINI WALK 3
MINI WALK 3
MINI WALK 3
MINI WALK 3
MINI WALK 3.
MINI WALK 3
MINI WALK 3
Power on , turn on the power switch, and the display will illuminate. The display window uses
white matrix numbers to display the speed, number of steps, time, and mileage motion parameters, and
simultaneously displays the two operational modes.
MINI WALK 3
19
Speed ( unfold status)handrail
Display range
1.0km/h-8.0km/h
SPEED
0-99999steps
Number of steps
Display Range
00:00-99:59
Time
Display range
0km-99.99
Distance
Display range
km
STEPS
TIME
DIST
AAutomatic control mode
MManual control mode
Name Description
1.0km/h-6.0km/h
Speed (handrail folding state)
Display range
Remote control mode(optional)

Remote Control(Optional)
H_1
H_2
H_3
H_4
H_5 M
H_6/H_7
H_8
Status indicator light
Acceleration button
Deceleration button
Start/stop composite button
ode switch button
Wireless transmission indicator
Battery cover
Name Description
Front of the remote control Back of the remote control
H_1
H_2
H_4
H_3
H_5
H_6
H_8
H_7
Key Function
The remote control optional. Use it to control: start, stop, acceleration, deceleration and switch motion modes.
Battery cover
Status indicator light
Press the remote control button and the indicator
light turns on.
Acceleration button
Press the acceleration button, the speed value is first
rounded up by a multiple of 0.5km/h and when you
press it again the speed is incremented by 0.5km/h.
Deceleration button
Press the acceleration button, the speed value is first
rounded up by a multiple of 0.5km/h and when you
press it again the speed is decremented by 0.5km/h.
Mode switch button
Used to switch between manual control mode and
automatic control mode.
MINI WALK 3’s remote control uses two batteries
(1.5V NO.7 AAA alkaline battery).Replacing the
remote control’s batteries is the same as replacing
a normal TV remote control’s batteries.
Remote control matching steps
You will need to match the remote control with the
the first time you use it, the
matching operations are as follows:
1. Power off the ;
2. Power on the and turn on the
power switch, at the same time, press and hold any
button on the remote control for more than 5
seconds;
3. will react and show the following
figure on the display window:
MINI WALK 3
MINI WALK 3
MINI WALK 3
MINI WALK 3
’s display window. If it is not successful,
repeat these steps.
4.Wait until the figure above appears on the MINI
WALK 3
20
Table of contents
Popular Treadmill manuals by other brands

Horizon Fitness
Horizon Fitness ELITE 1.1T user guide

York Fitness
York Fitness MARATHON DELUXE owner's guide

Weslo
Weslo Cadence 85 Manuale d'istruzioni

Horizon Fitness
Horizon Fitness ELITE 407 owner's guide

Weslo
Weslo Cadence 150 Treadmill Manuel de l'utilisateur

Landice
Landice Rehabilitation Treadmill owner's manual