Victure VD300 User manual

Video Doorbell
(with hardwired installation kit)
VD300
User Manual


2
Warranty
Prefer Video?
Explore More
Send us your Order Screenshot with email
Lifetime professional tech support is provided by Victure.
Visit our YouTube Channel ‘Victure Video Doorbell’for the
instructional videos. You could also visit the link below for our YouTube
Channel:
https://bit.ly/2U19RXQ

3
Package Content
Meet the Doorbell
Preparation
In-app Setup
Hardwired Installation
How it works
Wiring the Chime Kit
Mark the install location
Install the mounting bracket
Using your Doorbell
Troubleshooting
Need Help?
FCC Certification Information
4
6
7
10
14
14
15
17
18
21
25
26
27
Contents

Package Content
4
①VD300 Doorbell
② Mounting Bracket
③ Hardwired Installation Kit
④ USB Cable
⑤ Batteries
⑥ Double-sided Tape
⑦ Reset Pin & Security Screw
⑧ Screws
⑨ Screwdriver
⑩ User Manual
① ② ③ ④
⑤ ⑥ ⑦ ⑧ ⑨ ⑩
Hardwired
Installation
Kit
Video Doorbell
(withhardwired installation kit)

Details for Hardwired Installation Kit
5
① ② ③
①
②
③
④
④
⑤
⑤
Wire Nut
2 Metal Parts and 2 Screws
Chime Kit
Wire Extensions
Double-sided Tape

Meet the Doorbell
6
①Camera
② PIR motion Sensor
③ Speakers
④ Status Indicator
⑤ Doorbell Button
⑥ Microphone
⑦ Charging Indicator
⑧ Micro USB Port
⑨ Reset Hole
⑩ Hard-wired Power Port
SD Card Slot
Battery Compartment
11
12
⑩
11
12
⑥
①
②
③
④
⑤
⑨
⑦
⑧

7
2. Unscrew the battery compartment lid with the supplied screwdriver.
3. Insert the Micro SD card to the SD card slot.
Tip: Doorbell supports class 10 micro SD card from 8G to 128G. Please format
the SD card with ‘FAT32’ format before use. Insert the SD card without powering
the camera.
Preparation
Insert the SD card
1. Take out the mounting bracket by pushing from the back of the door-
bell.
SD
SD
① ②

8
Insert the battery
Place the new battery in the battery compartment with correct polarity,
and tighten the lid of the battery compartment securely with screws.
Tip: Please make sure the lid of the battery compartment is tightened
with screws, so that there won't be any water leakage issue.
SD

9
Charge your Victure doorbell
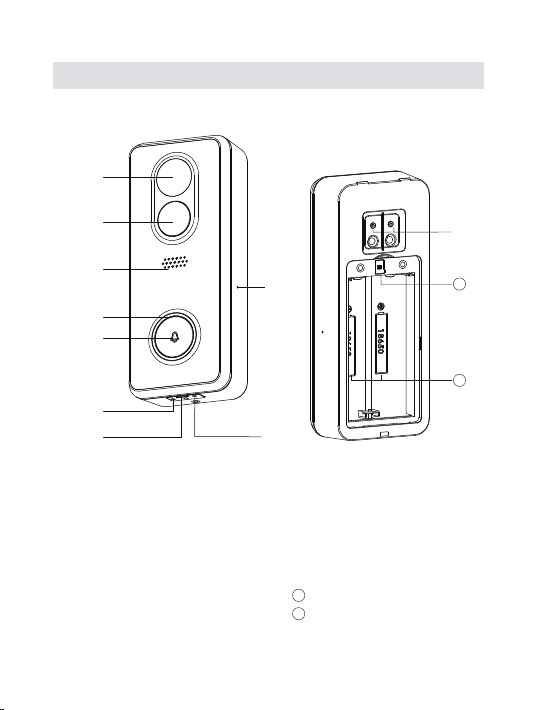
Charge the doorbell before installation using the provided USB cable.
The small charging indicator next to the USB port will glow blue once
fully charged.
If you can’ t wait to play with your doorbell, go ahead and set it up. But,
we recommend fully charging it for about 8-10 hours before installation.
Tip: The battery life of a doorbell system is affected by the amount of
activation (such as traffic or population density of the neighborhood) .
Charging
Indicator
Reset
Hole

10
In-app Setup
Download the App
The CloudEdge app will walk you through setting up and manage your
Victure Video Doorbell. Please search ‘CloudEdge’ in the Apple Store
or Google Play. You could also download the app by scanning the QR
code to download the app.
Set up your VD300 near your router
Tip:
1). Doorbell currently supports 2.4 GHz Wi-Fi network only ( 5G is not
supported).
2). Wi-Fi password does not include special characters such as @% and
Grab Your Wi-Fi Password for 2.4GHz Network,
Your Wi-Fi password
It’s required for the in-app setup. Write it
down below so it’s handy when you need it.
ios Android
CloudEdge

11
3). Please move your Wi-Fi router closer to your door or invest in a Wi-Fi
extender for stronger Wi-Fi signal and better video quality.
1. Register or Log in with Existing Account.
In the CloudEdge app, please register a new account with your email
address or log in with an existing account.
Tip: You will need the verification code for your email address during
the account registration process. If you could not find the code in your
email inbox, please check your spam folder or another tab of your email.
You could also try to use a new email.
2. Add doorbell
Please tap the ‘+’ icon to add the device.
When prompted, select ‘doorbell’ and choose VD300 doorbell.
Tap ‘+’ Add
Devices

12
3. Reset the doorbell and tear off the protective film:
When switching or connecting to a new network for the doorbell,
please perform a hard reset on your doorbell by inserting the reset pin
into the Reset Hole of the doorbell and hold for 5 seconds to reset the
doorbell and pair with the cell phone. You will hear a sound, and the
status indicator turns to be flash red when the reset is done.
Tear off the protective film from the doorbell’ s shell and follow the in-app instruc-
tion to pair the doorbell with the app.
4. Doorbell status indicator guide
Tip:
1. Please adjust the angle and the distance between the doorbell and
the cell phone slowly to make sure the doorbell is paired successfully.
Action
Pairing mode
Connecting to Wi-Fi
Doorbell Error or Network Error
Doorbell Wi-Fi connected and
function properly
Light Ring
Slow blinking red
Fast blinking red
Solid red
Solid Blue

13
Tip:
1. The camera should be connected with your phone via Wi-Fi for the first time.
After that, you could see the video in the app with the cellular data.
2. If video quality is not as good outdoors as it was indoors, you may need to
move your router closer to your door or invest in a Wi-Fi extender.
Email our warranty team to learn more about it.
Try it out!
After setup, push the button on the front of your Victure Doorbell to
see video from the camera in the CloudEdge app.
2. If you could not pair the doorbell with your app, please check whether
your network is 2.4GHz and the make sure the network signal is strong.

14
Transformer
Internal doorbell
Chime Kit
Video Doorbell
Perform the in-app setup for your Victure's video doorbell
For more details, please check the user manual or follow the in-app
instruction for your Victure's video doorbell about pairing the doorbell
with the app.
Note: Please choose ‘No’ in the app for the mechanical doorbell option if
you do NOT connect the doorbell with the mechanical doorbell system. The
wrong selection in the app for the mechanical doorbell may cause damage to
the doorbell.
How it works
Hardwired Installation

15
1. Turn off the circuit breaker for your internal doorbell.
Wiring your doorbell to an internal doorbell is optional. If you do so,
make sure your existing doorbell wires are working, then shut off power
at the breaker before connecting your existing doorbell wires to the
small wire terminals inside the mounting bracket. Ring your doorbell
again to confirm it is now off.
2. Remove the cover from your internal doorbell.
Wiring the Chime Kit
ON
OFF
ON
OFF
ON
OFF
ON
OFF
ON
OFF
ON
OFF
ON
OFF
ON
OFF
ON
OFF
ON
OFF
ON
OFF
ON
OFF
ON
OFF
ON
OFF
ON
OFF
ON
OFF
ON
OFF
ON
OFF
ON
OFF
ON
OFF
ON
OFF

16
4. Position the Chime Kit within your internal doorbell, away from any
moving parts. Use the double-sided tape to fix the Chime Kit in place, if
desired.
3. Loosen the internal doorbell's front terminal (usually labeled as
"FRONT", "F", "1", or "C1") and transformer (usually labeled as
"TRANS", "T", "AC", or "0") terminal screws on your internal doorbell.
Connect one wire from the Chime Kit to the "Front" terminal, and the
other wire to the "Transformer" terminal, leaving the existing doorbell
wires in place. Then, re-tighten the screws. It doesn't matter which
Chime Kit wire goes to each terminal.
TIP:Wire of the chime kit
can connect to either "Trans" or
"Front" terminal as the electric
current is alternating current.

17
5. Replace the cover on your internal doorbell.

18
If you already have a junction box at the place where you're installing
your Victure's video doorbell, skip the next couple of steps and screw it
directly into that junction box. If you don't have a junction box, trace
the outline of the supplied template, then cut a rectangular hole in your
wall to make room for the mounting bracket.
Note: Please turn OFF the circuitbreaker for your internal doorbell!
4 feet(120 cm)
Tips: If you are installing your Victure doorbell in a house with siding or in a
house where the door is atop a set of stairs, please purchase the additional
wedge mount to angle your doorbell down.
Mark the install location

19
Install the mounting bracket
Accessories shown in these steps will be included in the doorbell
package, if not labeled.
1. Take out the mounting bracket by pushing the doorbell from its back.
2. Mark the place to install the screws.
3. Insert anchors (optional)
Tip: If you're installing on the hard surface such as stucco, brick, or concrete,
mark the drill holes. Use the bit to drill holes in your wall and insert the anchors.
If you're installing on wood, skip this step and throw the anchors in that drawer
of stuff you never use.
Table of contents
Popular Accessories manuals by other brands

Siemens
Siemens SIWAREX WP241 manual

VWR
VWR INCU-Line IL 23R Cool Short instruction manual

Omron
Omron ZFV-SC90 Series instruction sheet

Sunbeam
Sunbeam Sleep warm. Sleep well. user manual

CMA Dishmachines
CMA Dishmachines DIFFERENTIALVOLTAGE SENSOR 0210I user guide

SABINE
SABINE PHANTOM MIC RIDER PMR-GP1 operating guide