VideoHome XTV2.0 User manual

TV2.0
Best solution for USB 2.0 TV box
User’s Manual

_______________________________________________________________________________
FEDERAL COMMUNICATIONS COMMISSION
This device complies with Part 15 of the FCC Rules Operation is subject to
the following two conditions: this device may not cause harmful interference,
and (2) this device must accept any interference received, including
interference that may cause undesired operation.
This equipment has been tested and found to comply with the limits for a
Class B Digital Device, pursuant to part 15 of the FCC Rules. These limits
are designed to provide reasonable protection against harmful interference in
a residential installation. This equipment generates, uses and can radiated
radio frequency energy and, if not installed and used in accordance with the
instruction, may cause harmful interference to radio communication.
However, there is no grantee that interference will not occur in a particular
installation. If this equipment does cause harmful interference to radio or
television reception, which can be determined by tuning the equipment off
and on, the user is encouraged to try to correct the interference by one or
more of the following measures:
-Reorient or relocate the receiving antenna.
-Increase the separation between the equipment and receiver.
-Connect the equipment into an outlet on a circuit different from that to
which the receiver is connected.
-Consult the dealer or an experienced radio/TV technician for help.
Notice: Changes or modifications not expressly approved by the party
responsible for compliance could void the user’s authority to operate the
equipment.
CE DECLARATION
This device complies with CE . These limits are designed to provide
reasonable protection against harmful interface in a residential installation.
Printed in TAIWAN R.O.C No.01021406
All contents are subject to change without notice.
All trademarks are the property of their respective owner
I

TableofContents
Chapter 1. Overview ----------------------------------------------------------- 1
1.1. Introduction ------------------------------------------------------------------
1.2. Features ----------------------------------------------------------------------
1.3. Specifications ---------------------------------------------------------------
1.4. Minimal System Requirements -----------------------------------------
2
2
2
1
1
3
3
4
4
5
1.5. Package Contents ---------------------------------------------------------
Chapter 2. Installation --------------------------------------------------------
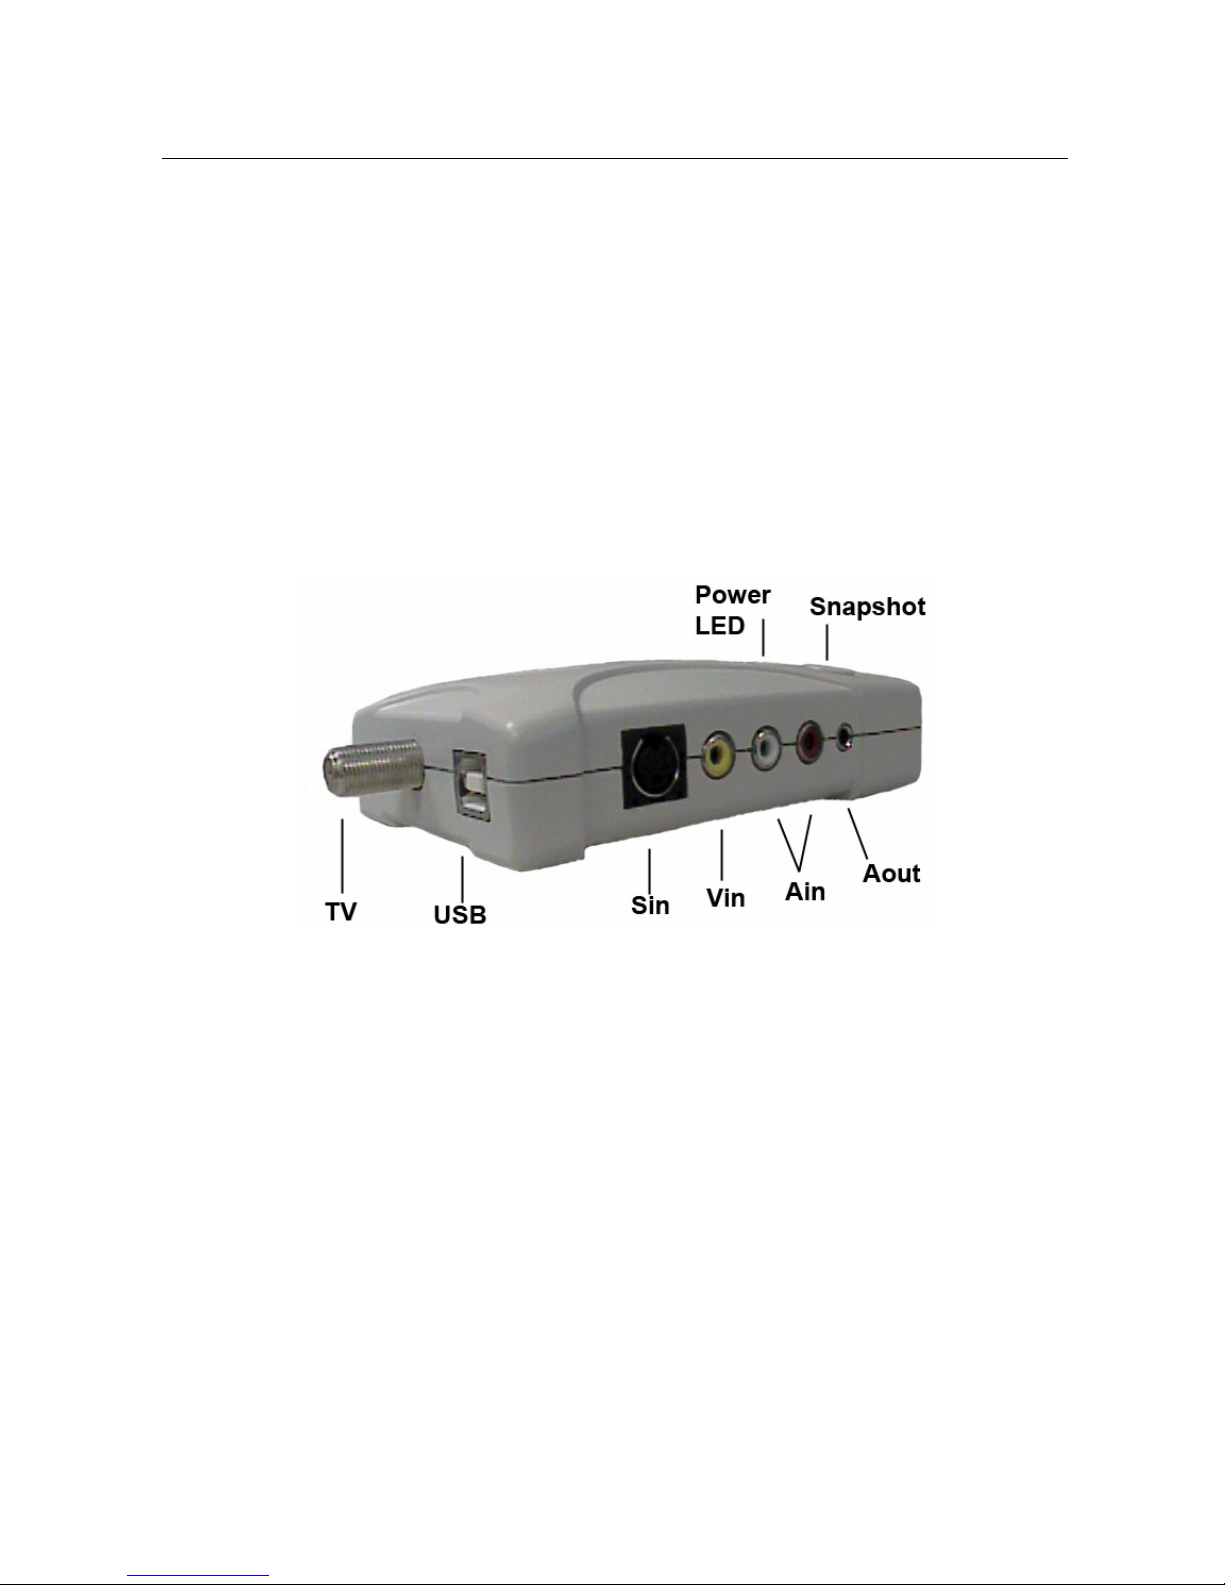
2.1. Hardware Device Description ------------------------------------------
2.2. Driver Installation ----------------------------------------------------------
2.3. Application Software Installation ---------------------------------------
2.4. Hardware Installation -----------------------------------------------------
Chapter 3. Operation ---------------------------------------------------------- 7
3.1. Starting -----------------------------------------------------------------------
3.2. Video Window --------------------------------------------------------------
3.3. Channel Input --------------------------------------------------------------
3.4. Auto Scan -------------------------------------------------------------------
3.5. Time Shifting ----------------------------------------------------------------
3.6. Snapshot ---------------------------------------------------------------------
3.7. Video Source Select ------------------------------------------------------
3.8. Schedule Capture ----------------------------------------------------------
3.9. Channel Preview -----------------------------------------------------------
3.10. Options -----------------------------------------------------------------------
3.11. +/- Favorite Channel ------------------------------------------------------
3.12. Favorite Channel Switch -------------------------------------------------
3.13. Record/Stop ----------------------------------------------------------------
3.14. Pause Playback ------------------------------------------------------------
3.15. Continue Playback ---------------------------------------------------------
3.16. Forward ----------------------------------------------------------------------
3.17. Backward --------------------------------------------------------------------
7
7
7
8
8
8
8
8
8
8
9
9
9
9
9
9
9
Chapter 4. Remote Controller --------------------------------------------
10
Chapter 5. Trouble Shooting ----------------------------------------------
11
_______________________________________________________________________________
II

Chapter1.Overview
1.1 Introduction
Congratulations on your purchase of “XTV2.0”. The “XTV20” bring a
home entertainment system and video-editing studio to your PC and
Notebook. Using the latest USB2.0 technology, you can now watch and
record TV/Video in DVD quality.
XTV20 with both video and audio captured through USB, there is no
need to use audio cable connect audio card in XP environment.
Also no need to use external power adapter, especially suitable for
laptop/notebook user.
Featured ergonomic functions includes remote control, timeshifting,
schedule recording, snapshot, channel preview….
1.2 Features
zUSB2.0 high speed TV device support real-time TV, S-video and
composite video input
zBoth audio and video go through USB( XP OS), audio no need though
audio card
zSnapshot push button support
zNo need to use external power adapter
zFull screen display
zPIP(Picture-in-Picture) function
zTime-shifting function
zRemote controller function
zTV input
- Support full TV frequency function
- 25 Channel preview
- Auto channel scan
- Fine tune
- Last channel return
- Favorite Channel selection
- Scaling TV windows display (full screen support)
zAnalog video(S-video, Composite) input, multi-system support
zRecord/Capture
- Real-time MPEG1/2/4 recording and playback
- Schedule recording for TV program
- Snapshot BMP/JPG function support
_____________________________________________________________
1

Chapter 1. Overview
- Playback pause function
zPowerful video editing function include Motion Video Special Effects/
Title Effects/ Picture-in-Picture Effects/ Slow & Fast Motion Video
Effects/ background music/ color background/ Transitional Effects
zPlug-and-play support for quick connection and easy capture
1.3 Specifications
zTV : 75 ohm coaxial TV Antenna/Cable input
zAnalog video : One S-video and one composite video input port,
zAudio in :Two L/R RCA audio input port
zAudio output : in XP audio go through USB, in Win2000 audio though
Sound card,
zVideo system : NTSC, PAL, SECAM multi system support
zMotion capture : MPG1/2/4 format support
zStill image capture : BMP and JPG file support
zPerformance : Up to 30 fps at 720x480 for NTSC; 25 fps at 720x576 for
PAL
zPower Source : 5VDC, 450mA(max) through USB port, no need power
adapter
1.4 Minimum System Requirements
zUSB 2.0 equipped computer
zPentium-4,1G or above CPU
z128MB of RAM
zWin2000 SP3 or WinXP SP1 or above
zCD-ROM drive
zSound card
1.5 Package Contents
zXTV20 USB2.0 TV box
zOne 3.5mm stereo to 3.5mm stereo audio cable
zUSB cable
zRemote controller
zXTV capture Software CD
zVideoWorks editing software CD
zManual
_____________________________________________________________
2

Chapter 2. Installation
Please make sure your computer has USB2.0 port correctly installed
and functioning !! ( We strongly recommend updating your WinXP to
SP1 or Win2000 to SP4 or above and updating USB2.0 host driver
before installation to make sure computer’s USB2.0 port is correctly
functioning )
Steps: (1) Install Driver
(2) Install AP software
(3) Plug XTV device
2.1 Hardware device description
TV : Connect to TV antenna/cable
USB : Connect use bundled USB cable connect to USB 2.0 port of
your computer
Sin : S-Video input from external A/V device(e.g.VCR)
Vin:Composite video input from external A/V device(e.g.VCR)
Ain:Audio L/R input from external A/V device(e.g.VCR)
Aout : In WinXP, not required
In Win2000, please connect bundled stereo cable to line-in
of Sound card
Snapshot : Instantaneous still image capture
Power LED : Power on indicator
_____________________________________________________________
3

Chapter 2. Installation
2.2. Driver Installation
※ Do not connect XTV to computer USB port before software
installation
2.2.1. Please insert "Multimedia Installation Kit" CD into your CD-ROM
drive; Run " E:\XTV20\Driver\SETUP.EXE "; (assuming CD-ROM
drive in E drive)
2.2.2. InstallShield Wizard, Click "Next"
2.2.3. Complete Setup Wizard; Click "Finish"
2.3. Application Software Installation
2.3.1. Please run "E:\XTV20\AP software\Setup.exe "; (suppose
CD-ROM drive in Edrive)
2.3.2. Select Country; Please choose the country you located; Click “Set“
2.3.3. Choose Destination Location; Click “Next “
2.3.4. Install Windows Media Format 9 Series Runtime Setup;
Click “Yes”
2.3.5. License agreement; Click “Yes”
2.3.6. Finished Windows Media Format 9 Series Runtime installation;
Click “Ok”
2.3.7. License for Windows Media Tools Setup; Click “Yes”
2.3.8. Windows Media Tools Setup; Click “Next”
2.3.9. Installation Options; Click “Next”
2.3.10. Installation Directory; Click “Finish”
2.3.11. Setup Complete; Click “OK”
2.3.12. InstallShield Wizard Complete; Click "Finish"
2.3.13. Remove "Multimedia Installation Kit" CD from CD-ROM drive
2.3.14. Please restart computer; Click “Ok“
After AP software install, You can find two icons show on screen
_____________________________________________________________
4

Chapter 2. Installation
2.4. Hardware Installation
2.4.1. Plug the XTV device into computer’s USB2.0 port; System detect
new device and ask “Can Windows connect to Windows Update to
search for software ? Please choose “No, not this time”,
click ”Next”
2.4.2. Install XTV driver, Choose “Install the software automatically
(Recommended)” and click “Next”
2.3.3. When Windows XP show message “The software… has not
passed Windows Logo….”, please click “Continue Anyway”
(though XTV driver did not apply for windows logo approval, it is
thoroughly tested by engineers, and it will not cause harm to your
system)
2.4.4. Complete the XTV driver installation, click “Finish”
2.4.5. System detect new Audio device and ask “Can Windows connect
to Windows Update to search for software ? Please choose “No,
not this time”, click ”Next”
2.4.6. Install USB EMPAudio Device; Choose “Install the software
automatically (Recommended)” and click “Next”
2.4.7. When Windows XP show message “The software… has not
passed Windows Logo….”, please click “Continue Anyway”
(though XTV driver did not apply for windows logo approval, it is
thoroughly tested by engineers, and it will not cause harm to your
system)
2.4.8. Complete USB EMPAudio Device driver installation
Click “Finish”
2.4.9. Please check XTV driver was install successful in your computer;
(Go to My Computer->Control Panel->System->Hardware->
Device manager as below)
_____________________________________________________________
5

Chapter 2. Installation
There are XTV2.0 and USB EMP Audio Device show on
Device Manager
_____________________________________________________________
6

Chapter 3. Operation
3.1. Starting : Please click the ”XTV2.0” icon; after executed , you can
see screen as below
3.2. Video Window :(a) you can drag and drop to make video scaling
(b) you can move the mouse to the video window
and right-click to get the setup 320x240,
640x480, 720x480, 720x576 and full screen,
also “Always On Top” selection to make the
video on the top of any application
(c) You can double click the Video Window to switch
full screen, during full screen, you can click once
to get control panel showing
3.3. Channel Input : After you click channel number, you have to click
“Enter” to confirm the Channel input
_____________________________________________________________
7

Chapter 3. Operation
3.4. Auto Scan : Scan all TV Channel you located
3.5. Time Shifting : Click to pause the display, but it will keep recording,
when you click “Continue Playback” button, it will
playback from the pause time point; and stop by click
“Stop” button
3.6. Snapshot : (a)After you capture, right-click the picture you can save
as to BMP/JPG file or Delete or preview or print
(b) File name “mddhhmmssn” was saved automatically
m: Month (Jan->1, Feb->2…..Oct->O, Nov->N,
Dec->D)
dd : Date ; hh : Hour; mm : Minute; ss : Second;
n: number
3.7. Video Source Select : TV Tuner/Composite video/S-Video selection
3.8. Schedule Capture : You can choose “One Time”, “Several Days” or
“Every Week” schedule recording.
After you edit the schedule, please click “Add”
put into your list, and “Save” before you quit.
3.9. Channel Preview : Preview the Channels, if you want to watch the
channel, please click the channel window, this
function active in TV mode only.
3.10. Options :
3.10.1. General Settings
3.10.1.1. Channel Preview Windows : there are 9/16/25 channels
preview selection.
3.10.1.2. Channel Preview Time : Input to keep the channel display
3.10.1.3. TimeShift setting : Save the time shifting file
3.10.1.4. Work Directory : Directory for Recording files
3.10.1.5. Schedule Capture : Setup the recording time length
3.10.2. Encoder Property
3.10.2.1. Video Setting : There are MPEG1/MPEG2/VCD-NTSC
/SVCD-NTSC /DVD-NTSC/WMV for recording format
selection (VCD-PAL/SVCD-PAL/DVD-PAL in Pal mode)
3.10.2.2. Profile (a) Video size : 320x240, 640x480, 720x480
_____________________________________________________________
8

Chapter 3. Operation
(b)Frame Rate : Setup the recording frame rate
(c)Video Quality : Recording quality setup
(d) Video Bitrate : Setup the recording bit rate
3.10.3. Color : Brightness/Contrast/Hue/Saturation/Sharpness setup
3.10.4. TV Tuner
3.10.4.1. TV System : TV system setup
3.10.4.2. Video System : S-video & Composite video system setup
3.10.4.3. TV Type : Cable & Antenna selection
3.10.4.4. Fine Tune : Fine tune for unclear TV Channel signal
3.11. +/- Favorite Channel : Add/Remove current channel in favorite list
3.12. Favorite Channel Switch : Switch favorite channels
3.13. Record/Stop : (a) During recording, you can click “Stop” to stop
recording
(b) File name “mddhhmmss” was saved automatically
m: Month (Jan->1, Feb->2…..Oct->O, Nov->N,
Dec->D)
dd : Date ; hh : Hour; mm : Minute; ss : Second
3.14. Pause Playback : Pause the video during playback
3.15. Continue Playback : After “Pause Playback”, click this button to
playback continue;
After “Time Shifting”, click this button to
playback continue;
3.16. Forward : Fast forward video playback
3.17. Backward : Fast backward video playback
_____________________________________________________________
9

Chapter 4. Remote controller
※ Program on/off : Start or exit the software
※ If you input two digits channel, please do not delay too long,
or will change to first digit channel
_____________________________________________________________
10

Chapter 5. Trouble Shooting
Q1 : Why my system can not detect XTV
A1 : (a) Mightbe the other related driver already exist in your system. please
go to My Computer->Control Panel->System->Hardware-> Device
Manager, make sure your XTV drivers were all installed completely.
(see 2.4.9.) if there shows other related driver, please use manual
installation to install XTV driver
(b) Make sure you enable USB2.0 in motherboard BIOS setup
(c) Please make sure that your system has the latest USB2.0 host driver.
For Win XP, please upgrade to Service Pack 1.
For Win2000, please upgrade to Service Pack 4.
Q2 : Why can not see video display
A2 : (a) Maybe your video system setup is incorrect, please check your
hardware connection (see 2.1) and Choose the correct video
system (see 3.10.4.)
(b) Please make sure your system got latest USB2.0 host driver.
For Win XP, please upgrade to Service Pack 1.
For Win2000, please upgrade to Service Pack 4
Q3 : Why is the resolution always 320x240 in preview mode
A3 : Because you plug XTV in USB1.1 port, or though your USB port is 2.0,
but didn’t upgrade USB2.0 driver, please make sure USB port is USB2.0
and upgrade the USB2.0 host driver from Microsoft Website
Q4 : Why does the system show “High Speed device plug into Full speed
USB port…”
A4 : (a) Please make sure your system support USB2.0 hardware port.
(b) Please make sure that your system install USB2.0 Host driver
already
Q5 : Why do I get unstable video during preview and recording ?
A5 : If you are using Ultra DMA hard disk, please updated latest driver of IDE
ATA/ATAPI controller.
Some motherboard bundled driver is not the latest version, we suggest that
you use XP system bundled driver.
_____________________________________________________________
11

Chapter 5. Trouble Shooting
Q6 : Why I can not hear anything during preview mode?
A6 : In WinXP, Audio go through XTV,
In Win2000, the audio go through sound card’s Line-in, please check
your sound card function.
Q7 : How can I get minimum number of dropped frames during video
capture ?
A7 : The best recording performance depends on your computer system
performance, but you can also take some steps as below to improve
performance
(a) Try lowering the resolution format you record.
(b) Enable hard disk drive DMA; Go to My Computer->Control Panel
-> System->Hardware->Device Manager->Disk drives to setup
(c) Keep Hardisk free space larger.
(d) Use speed more than 7200 Rotation hardisk drive
(e) Disable Power Management in BIOS
(f) Disable Power Saving mode of monitor
(g) Close some resident programs of your system
(h) Defrag your hardisk
(i) Do not run other program during recording
Q8 : I can preview video but when recording, the system crashed/hanged
A8 : (a) Please install DirectX 9.0 or above from driver CD.
(b) Maybe your VGA card driver is not compatible with direct draw very
well, please update new VGA driver
(c) Your system resident too many programs which occupies the memory,
please close unnecessary programs
(d) Please lower the hardware accelerator, you can go to
My Computer->Control Panel->Display->Settings->Advanced->
Performanceto adjust it.
Q9 : When I start the GrabBee software, program close
A9 : Please check the sound card driver was installed successful
_____________________________________________________________
12
Other manuals for XTV2.0
1
Table of contents
Other VideoHome Set-top Box manuals