FCC ID: ******
IC ID:******
MADE IN CHINA
INPUT: DC6V 600mA
Use only power adapters listed in the
user instructions.
Li-ion Battery 3.7V,950mAh
Baby Monitor Model:J20PU
S/N:150800001PU
Shenzhen Vid eotim es Techno logy
o
2.4'' Digital Wireless Vi de o Ba by M on it or
HB 24 User manual
The features described in user ’s manual
are subject to modifications without prior
notice.
WARNING:
Keep the small parts from away children
http://www.Videotime s.com.h k
Thank you for purchasing the baby monitor of HelloBaby.
We will try to give you the best products and service .
Congratulaon!
Now you can take care of your babies any where and
any me ! Please read the use manual before you use !
Please retain your original dated sale s rece ipt for your
records . For warranty servi ce of your Videomes product,
you will need to provide a copy of your dated sales receipt
to confirm warranty status. Registraon i s not required for
warranty coverage.
Before you use the produc t, we recommend you insert and
fully charge the baery in the p arent unit, so that it
connues to work if you disconnect it from the power
supply to carry it to another locaon. Please read the
Safety in stru cons.
Please make sure you have the following in th is packing.
1. Parent unit x 1;
2. Baby unit x 1;
3. Adapter x 2;
4. User manual x 1;
1. S A F E T Y INST R U C T I O I N S:
CAU T I O N : Keep sma ll p arts away from children.
Stran gulao n Hazard: Children can become entangled in
cords.
Power cords should be ke pt m ore than 3 feet away from the
crib and
baby's reach at all mes. Baby monitors and cameras with
power cords s ho uld neve r be hung on or near the crib.
This product is not a toy and should be kept out of c hildre n' s
reach.
This product contains small parts. Exercise care when
unpacking and assembli ng the produ ct.
Read and keep instrucons: All th e safety and opera ng
instrucons should be read before t he v ideo baby monitor
is operated.
This product cannot replace responsible adult supervision.
Water and moisture : This produ ct is designed for indoor
use only.
The unit should not be exposed to rain, moisture, dripping
or splashing. No obj ects filled with liquid should be pl aced
on top of, or beside the product, such as a glass or vase.
This item should not be used n ea r water.
DO N OT: Use the appliance if the cord or plug is damaged .
If your baby monitor is not operang prop er ly or has suffered
any damage, contact “ Videomes” service center to request
inspecon and repair of the ap pliance in order to avoid any
possible risk.
DO N OT: Aempt to rep air or adjust any of the e lectrical or
mechanical funcons of t he unit since, if you do, th e
guarantee will be mad e void .
Venlao n: This baby monitor should not be used on a be d,
sofa, rug or similar surface that may blo ck the venlaon
openings, or be plac ed i n an enclosed area, such as a
bookcas e or d rawer that may im pede air flow.
Kee p away from sourc es of heat : This unit should not be
exposed to dire ct h eat so urces su ch a s a ca nd le, repl ace,
rad iator, heat register, stove or other appl ia nce that emits
heat. The unit should not be l e in direct sunli ght.
Power sou rce: This un it should only be used with the AC
power adapters incl uded in this package ( rated 6V 600mA).
Damage requiring service: This u nit should be serviced by
qualified personnel only when :
1. Objects have fall en or liquid has been spilled into the
product;
2. The units have been exposed to rain;
3. The units do not a ppear to o perate normally or exhibits a
disnct change in performance;
4. The units have been dropped or the enclosure damaged;
FCC STATEMENTS:
This device complies with part 15 of t he FCC Rules.
Operaon is s ub ject to th e following two condion s:
(1) This device may not cause harmful interference.
(2) This device must accept any interference received,
including interfe rence that may cause undesired opera on.
NOT E 1: This equipment has been tested and found to comply
with the limits for a Class
B digital device, pursuant to p art 15 of the F C C Rul es. These
limits are designed to provide re asonable protec on against
harmful interference in a residenal installaon.
This equipment generates, use s and ca n radiate rad io
frequency energy and, if not installed and used in accordance
with the instrucons, may cause harmful interference to
rad io com municao ns . However, there is no guarantee that
interference will not occur in a pa rcular instal laon. I f this
equipment does cause harmful interference to radio or
television recepon, which can be determined by turning the
equipment off and on, the use r is e ncou raged to try to correct
the interference by one or more of the following measures:
- Reorient or relocate the receiving antenna.
- Increase the separaon betwee n the equipment and receiver.
-Connect the equip ment i nto an outlet on a circuit different
from that to wh ic h the rece iver is connec ted.
-Consult the deale r or an experi en ced radio/ T V technicia n
for h elp.
NOT E 2: Any changes or mod ificaons to this uni t not
express ly approved by the party responsib le for compliance
could void the user's authority to operate the equipment.
FCC WA R N I N G
This equipment has been tested and fo und to compl y with
the limits for a Class B digital device, pursuant to Part 15 of
the FCC Rules. These limits are designed to provide
reasonable protecon against harmful interferenc e in a
residenal installaon.
This equipment generates, use s and ca n radiate rad io
frequency energy and, if not installed and used in accordance
with the instrucons, may cause harmful interference to
rad io com municao ns .
However, there is n o gu arantee that inte rference will not
occur in a parcular i nstallaon. If this equi pment does
cause harmful interference to ra dio or tel ev is ion rece p on,
which can be determined by turning the equip ment o f an d on,
the user is encouraged to t ry to correct the interference by
one or more of the fo llowing measures:
*Reorient or relo cate the receiving antenna.
*Increase the separaon betwe en the equipment and the
receiver.
*Connect the equip ment i nto an outlet different from that to
which the receiver is connected.
*Consult the deale r or an experi en ced radio/ T V technician
for h elp.
IC STAT E M E NTS:
This Class A digital apparatus complies with I CES-003.
The manufacturer is not responsible for any radio or TV
interference caused by unauthorized modificaons to this
equipment. Such modificaons could void the user' s au thority
to operate the equipment.
2. WARRANTY T E R N S
We take quality very ser iously. This is why all of our products
come with a one year warranty from the original purchase
date against defec ts in wo rkmanship and materials. If you
have warranty or support issues pleas e contact the store
where you purchas ed the produ ct or co ntact us directly
through below website:
hp://www.videomes.com.hk
3. Important guidelines for insta lling yo ur baby monito r.
*To use your parent unit and baby unit together, you must
be able to esta blish a radio link b et ween the m, and the range
will be affected by environmental condi ons.
*Any large metal object, like a refrigerator, a mir ror, a fillin g
cabinet, metallic doors o r reinforced co ncrete between the
baby and parent unit may block the radi o si gnal.
*The signal strength may also be reduced by oth er s olid
structures, like walls, or by radio or electrical equipment,
such as T V, computers, co rdless o r mobile phones,
fluorescent lights or dimmer switches.
*Use of other 2.4GHz product, such as wi reless networks
(Wi-Fi routers), Bl uetooth syste ms , or microwave ovens,
may cau se i nterferen ce with this product, so keep the baby
monitor away at least 5(1.5m) from these types of products,
or turn them off if they appear to be causing interferen ce .
*If the signal is weak, try movi ng the parent or the b aby unit
to different posions in the rooms.
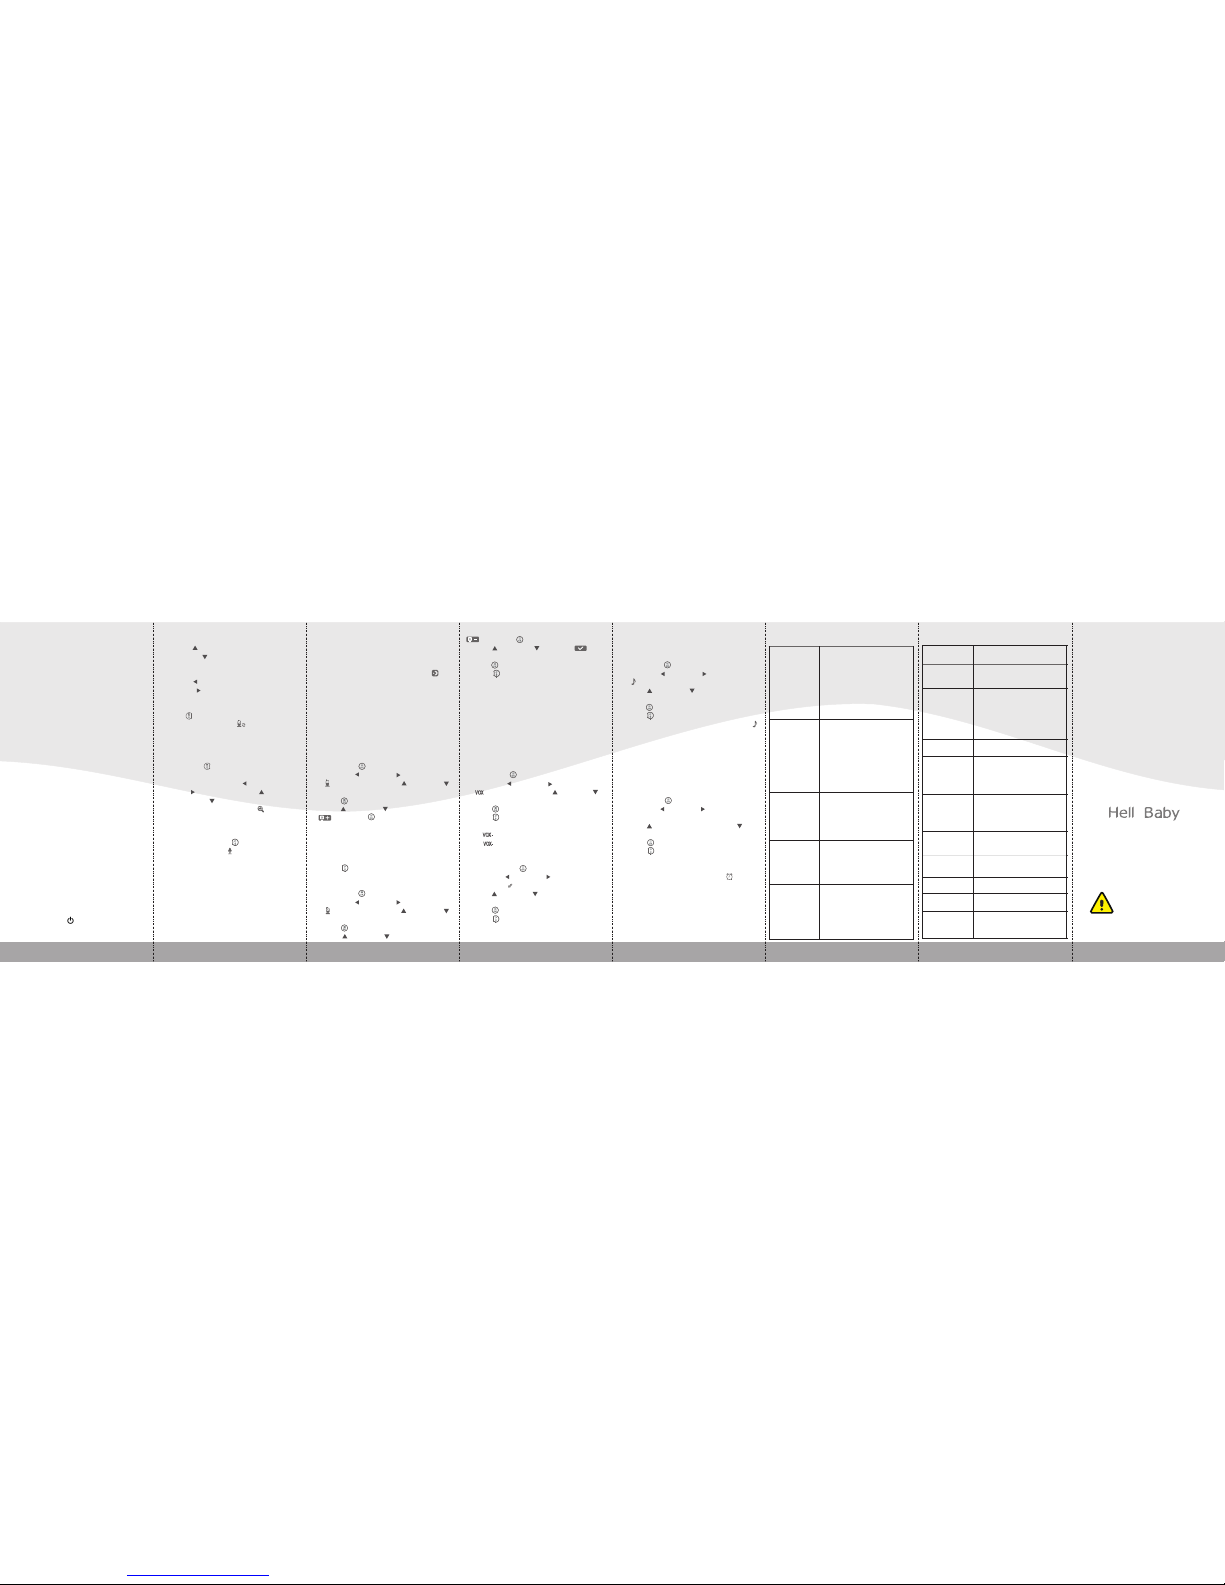
4. P R O D U C T OV E R V I E W
4.1 Parent unit overview:
4.2 Baby unit overview:
4.3 ICONS O VERVIEW:
------- Signal ------- Volume
------ Brightness
------ Alarm
------ Lullaby
-------- Night vision
--------- VOX
------ Camera
----- Zoom ------- Temperature
-------- Baery
----- Talk to baby
—1— —2— —3— —4— —5—
—6—
26℃
5. P L A C E M E N T OF THE B A BY M O N I TOR:
This camera can b e placed on a ta bletop o r hung on the
wall ;
Place the baby monitor in a place wh ere the air can
circulate freely;
Do not place on so qu il ts or blankets or in the corners
of cupboards, shelves, etc;
Place the baby monitor away f rom heat sources such as
rad iators, chimneys, cookers and direct sunlight;
Place the baby unit away from TV sets, microwave oven
and radios. The intense radio sig na ls gen erated by these
elements could cause noise or even sounds and images to
appear on the monitor. If this occurs, move the camera to
another locaon;
*Place the camera within 15 feet of t he a rea bein g
monitored for best picture result.
* Baby monitors and cameras with power cords should
never be hung on or near the crib as it is a strangulaon
hazard. Power cord s should be kept no less than 3 feet
away from the crib and the baby's reach at all mes.
6. Using the baby monitor
6.1 TURN O N THE B ABY UNIT:
*Only use the A/C adapter includ ed in this packa ge
(6V, 600mA);
1. Locate the co nnector socket on the back of the ba by u ni t;
2. Connect the ad ap ter cable to the baby unit;
3. Plug the A/C adapter into the wall outlet.
4. Once the adapter connected , the power L ED will light up.
6.2 TURN O N THE PA R E N T UNIT:
*Only use the A/C adapter includ ed in this packa ge
(6V, 600mA);
*The parent unit is supplied with a buil t-in rechargeab le
—7—
Antenna
Charg in g LED
Power L ED
Volume L ED
Power k ey
LCD
Menu/ OK
Volume + / U p ke y
Exit/ Talk t o baby
Volume - / D ow n key
Brigh tn ess + / Rig ht k ey
Zoom / Vi ew / Scan
MIC
Brigh tn ess - / Lef t ke y
Speak er
DC-ja ck
Stand
INPUT: DC6V 600mA
FCC ID: ******
IC ID:******
MADE IN CHINA
Baby Monitor Model:J20BU
S/N:150800001BU
Shenzhen V ideot imes Techn ology
Antenna
Light s en sor
Infra re d LEDS
CMOS se ns or
Power L ED
MIC
Pair ke y
DC-Ja ck
Tempera tu re
senso r
Speaker
Reset k ey