VIETA VMD600 User manual


1
Table of Contents
Before Connection ...................................................................................................................... 2
For your safety ..............................................................................................................................2
Precautions ...................................................................................................................................2
Connection ................................................................................................................................. 4
Connecting the TV ........................................................................................................................4
Connecting the Antenna ............................................................................................................... 4
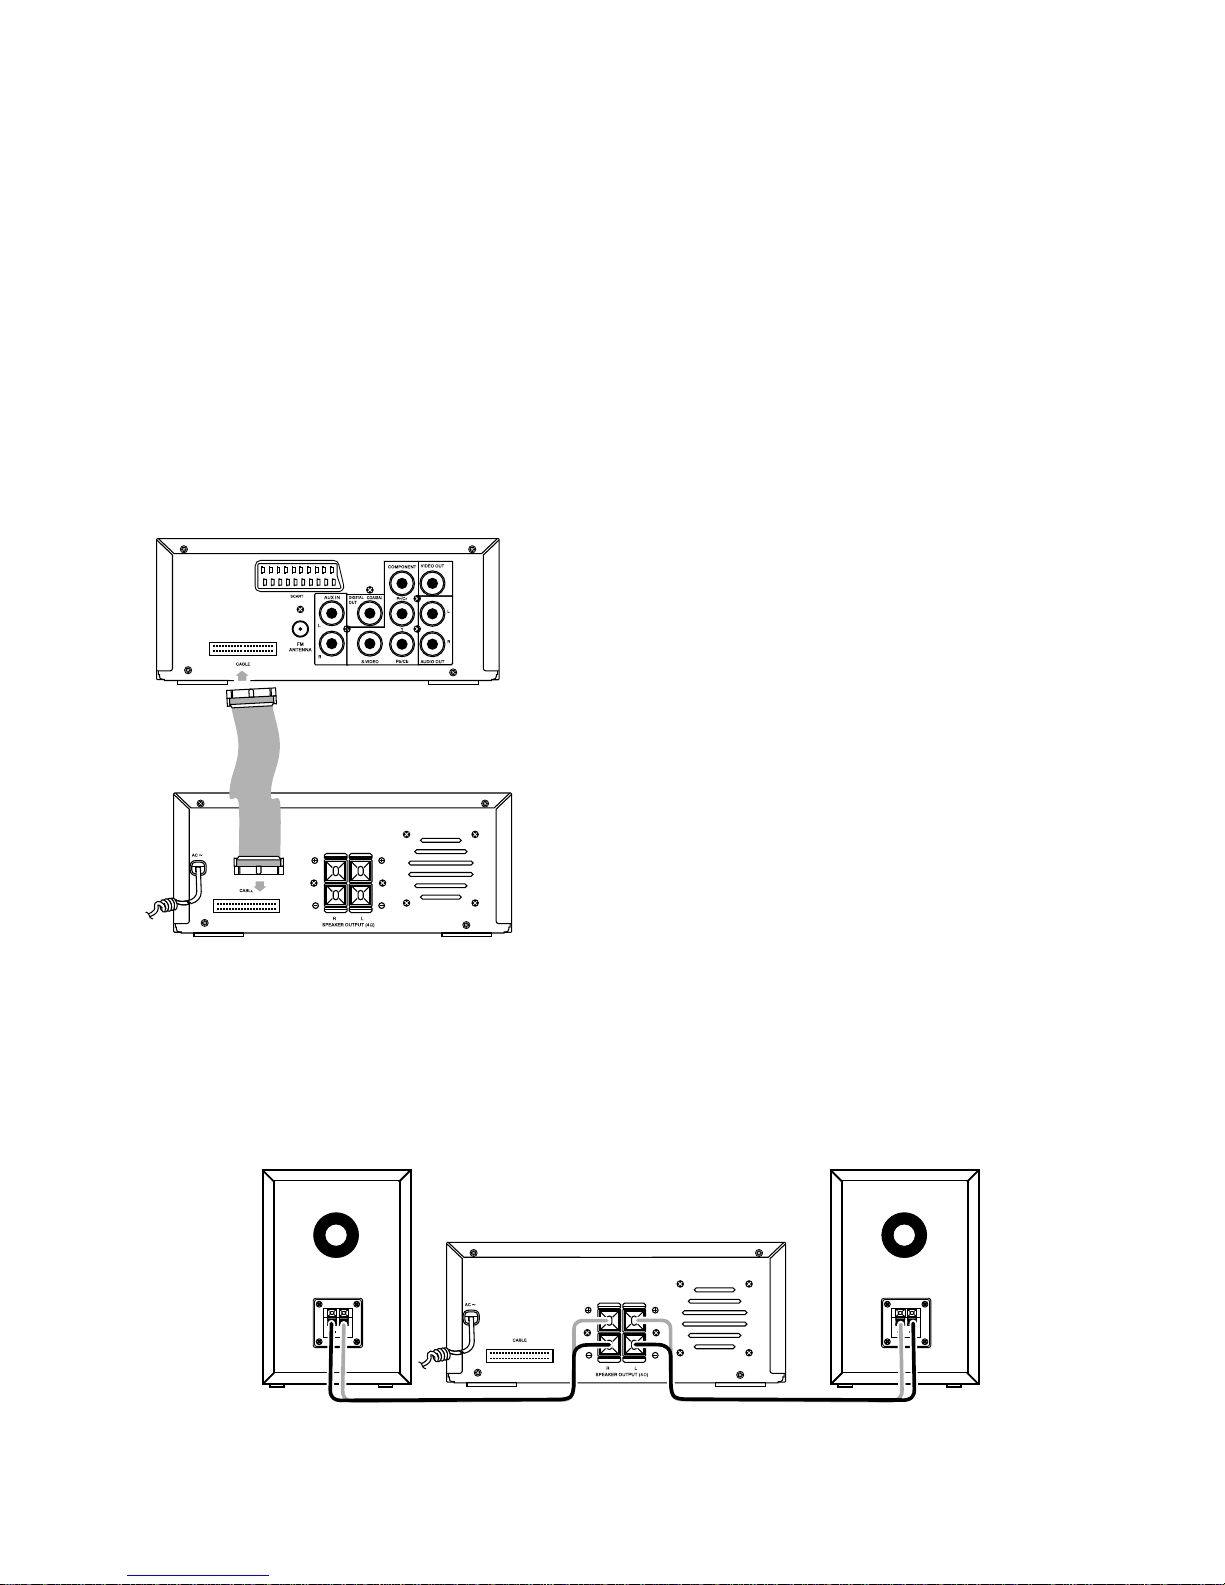
Connecting Control Cable ............................................................................................................ 5
Connecting the Speakers .............................................................................................................5
Connecting Assistance Equipment ..............................................................................................6
Connecting Coaxial ...................................................................................................................... 6
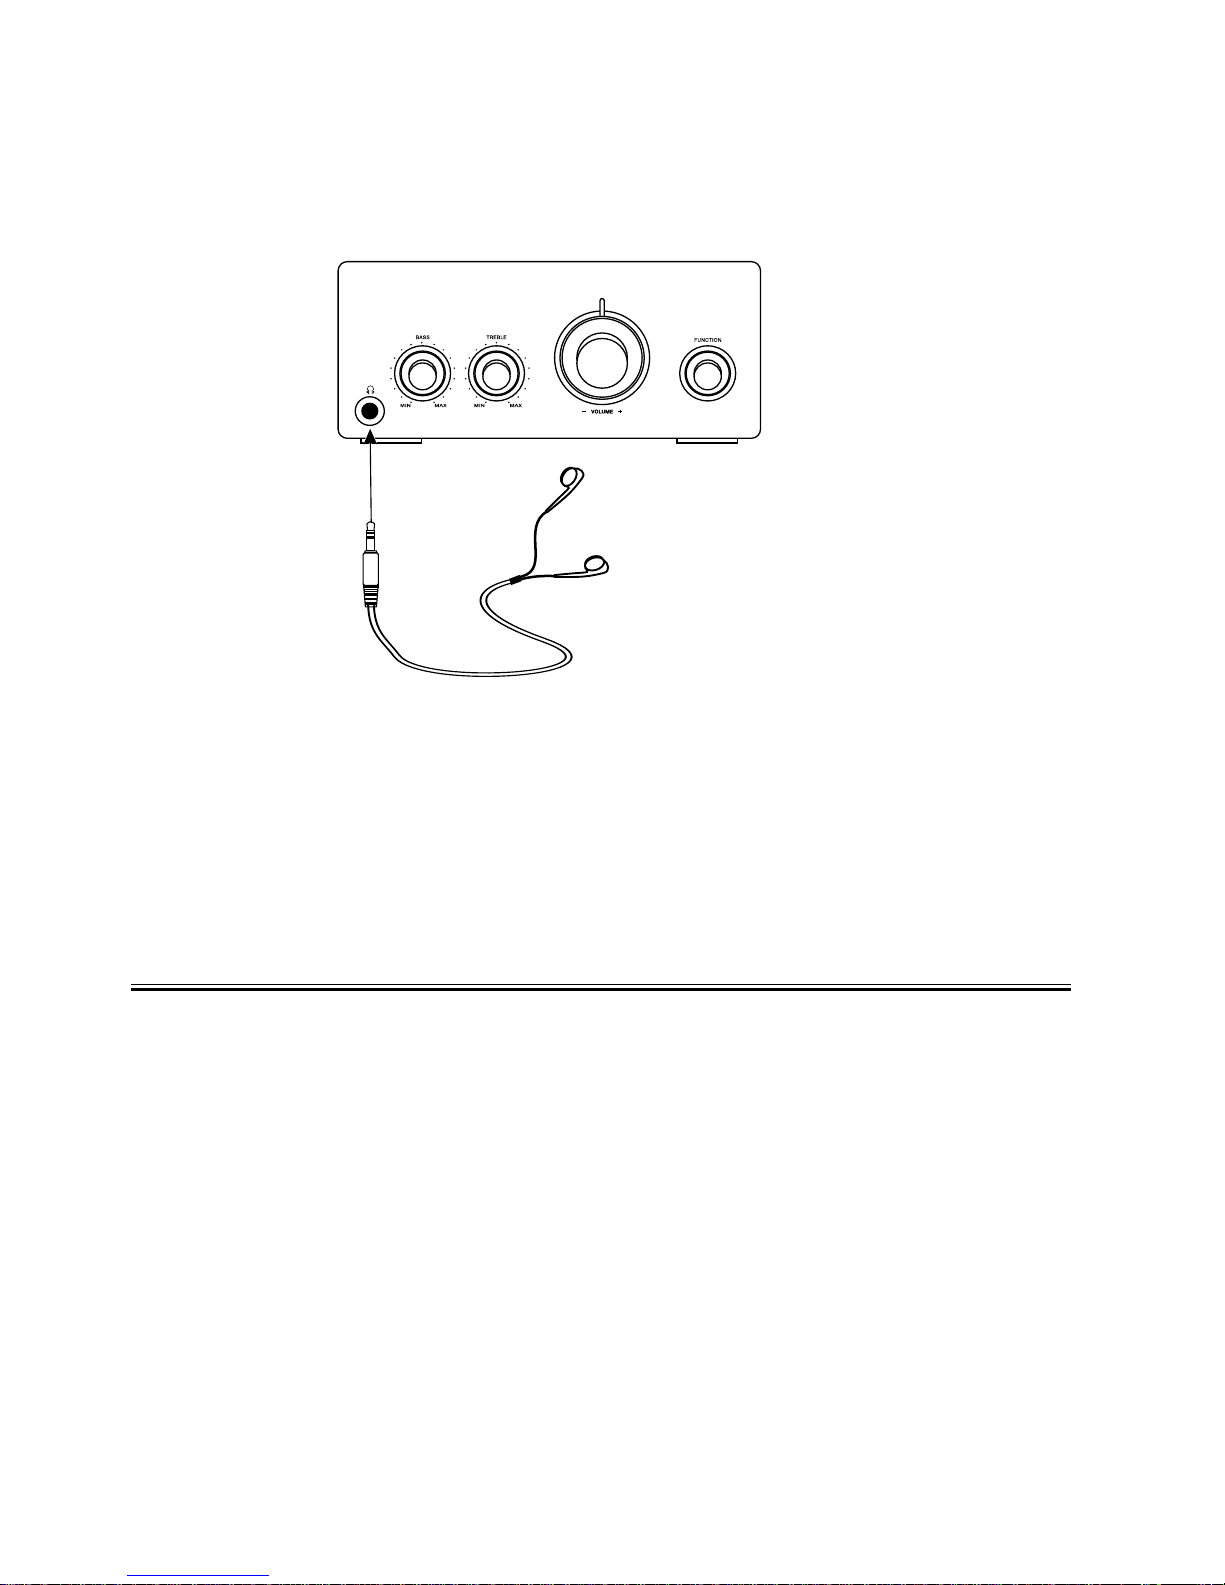
Connecting the Headphone ......................................................................................................... 7
Connecting the AC Power Cord ................................................................................................... 7
Installation of Batteries in the Remote Control .......................................................................... 7
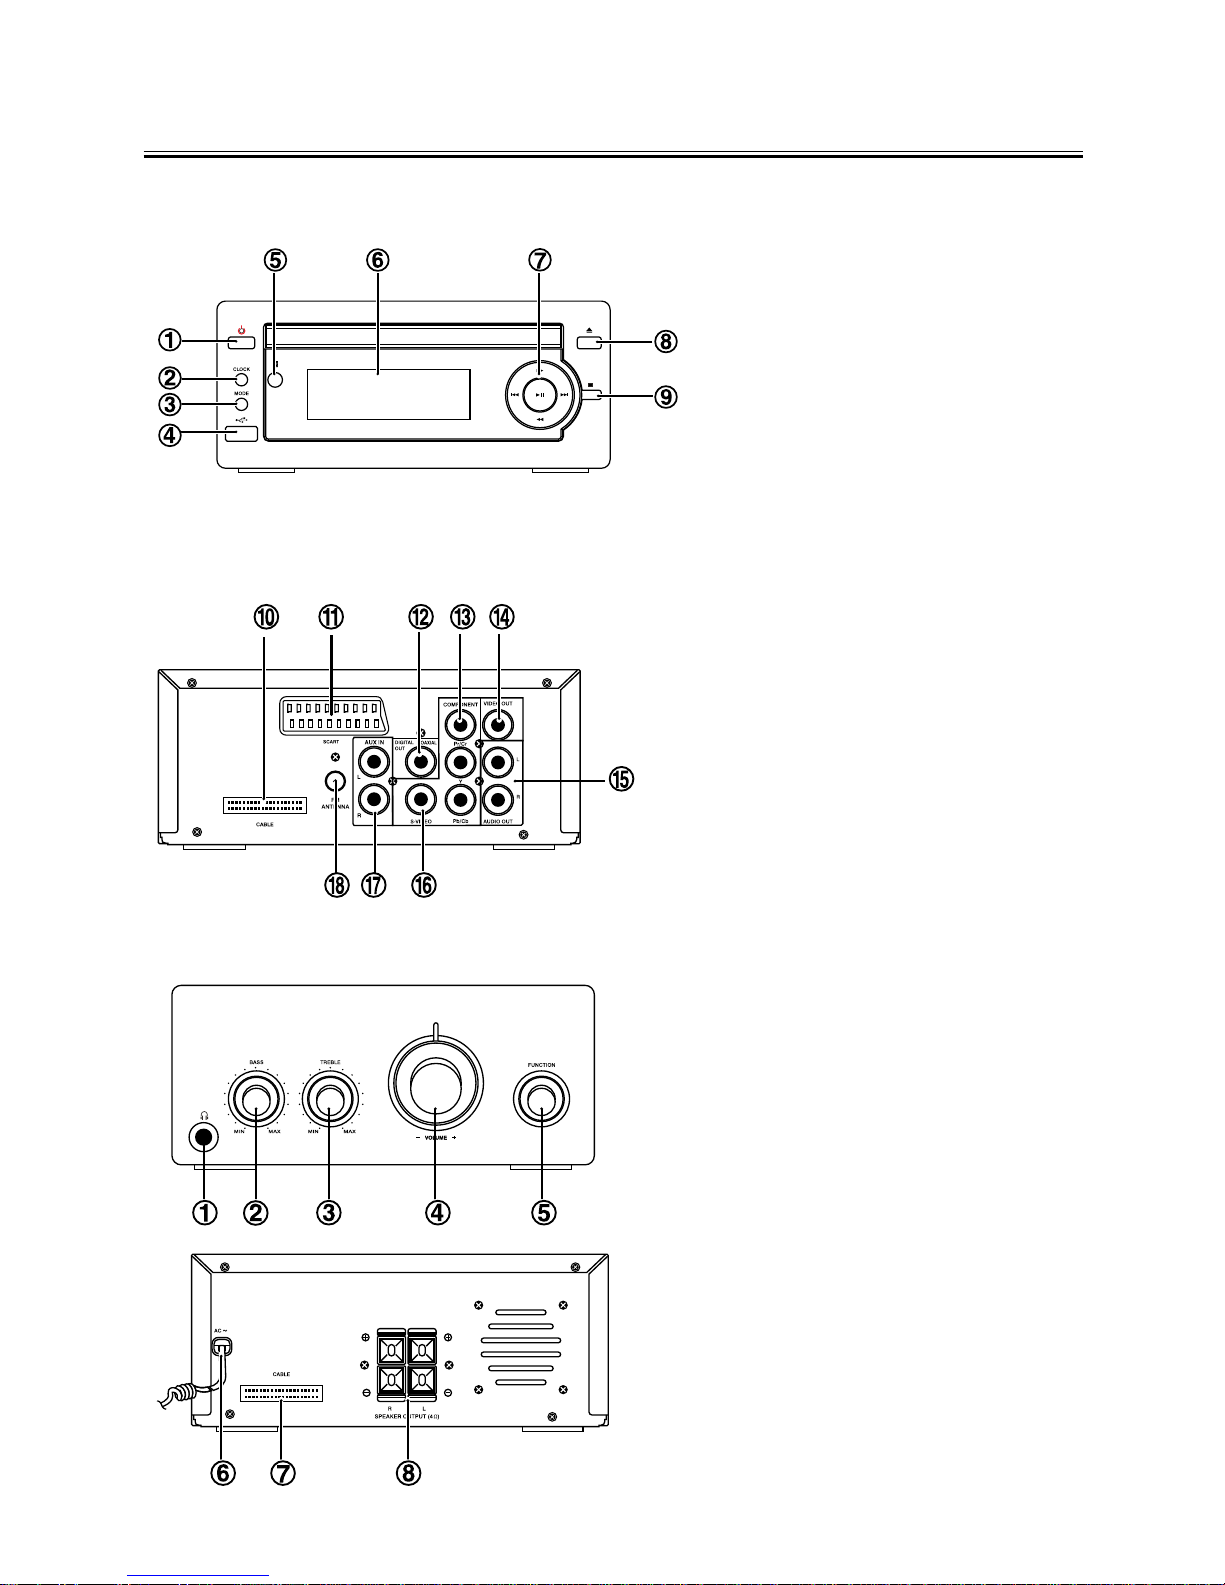
Control Section ........................................................................................................................... 8
DVD Player ................................................................................................................................... 8
Amplifier ........................................................................................................................................ 8
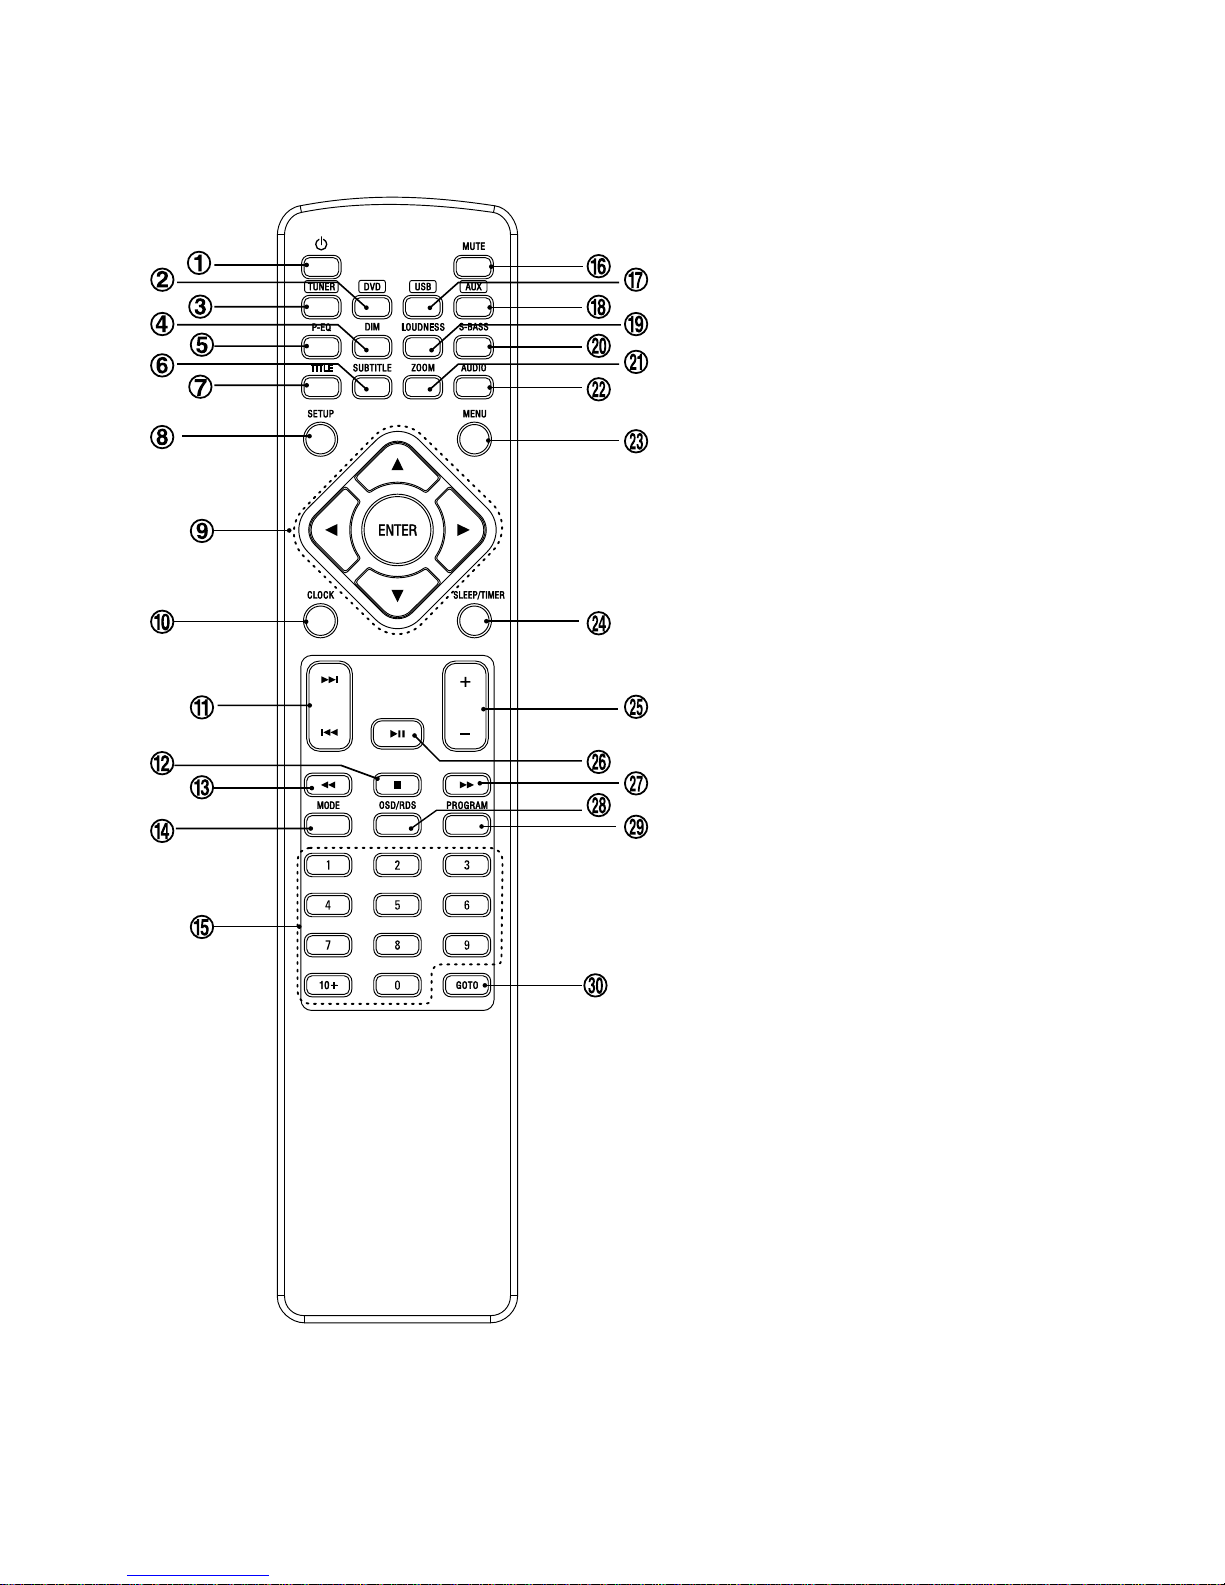
Remote Control ............................................................................................................................. 9
Normal playing ......................................................................................................................... 10
Use the Discs ............................................................................................................................. 10
Playing Picture CD disc ............................................................................................................. 15
Use the USB .............................................................................................................................. 16
Listening to Radio Broadcasts ................................................................................................. 16
RDS (Radio Data System) Reception ....................................................................................... 17
Clock/Timer Functions ............................................................................................................. 18
Setting the Clock ...................................................................................................................... 18
Setting the Daily Timer .............................................................................................................. 18
Setting the Sleep Timer ............................................................................................................. 19
DVD Menu Options .................................................................................................................. 20
Menu function setup .................................................................................................................. 20
General Setup Page .................................................................................................................. 20
Audio Setup Page ...................................................................................................................... 21
Video Setup Page ...................................................................................................................... 21
Preference Page ........................................................................................................................ 23
Password Setup Page ............................................................................................................... 24
Protect the Disc ....................................................................................................................... 25
Troubleshooting ........................................................................................................................ 25
Specification ............................................................................................................................ 26

2
Before ConnectionBefore Connection
Before Connection
Thank you for purchasing this DVD 2.0 channel component system, in order to fully utilize this
system, please read this instruction book carefully before use it.
For your safetyFor your safety
For your safety
Laser ProductLaser Product
Laser Product
This product is equipped with low power laser equipment inside. For your safety, don’t take
apart any covers or try to take apart the product inside. Please contact an authorized service
person for repairing.
This symbol indicates that there are
important operating and maintenance
instructions in the literature accom-
panying this unit.
This symbol indicates that danger-
ous voltage constituting a risk of elec-
tric shock is present within this unit.
Caution:Caution:
Caution:Caution:
Caution:
To prevent fire or shock hazard, do not expose this equipment to rain or moisture.
Power RequirementPower Requirement
Power Requirement
Because the power requirement of electrical products is different in various places, before you
use this product, make sure that the power requirement of the product matches your household
power.
CAUTION:
TO REDUCE THE RISK OF ELECTRIC SHOCK, DO
NOT REMOVE COVER. NO USER SERVICEABLE
PARTS INSIDE, REFER SERVICING TO QUALIFIED
SERVICE PERSONNEL.
CAUTION
RISK OF ELECTRIC SHOCK
DO NOT OPEN
PrecautionsPrecautions
Precautions
1. Before operating this system, check the voltage of this system to see if it is identical with
the voltage of your local power supply.
2. Unplug the system from the wall outlet if it is not used for a long time. To disconnect
the cord, pull it out by grasping the plug.
3. To avoid electric shock, do not open the cabinet.
4. There is no user serviceable parts inside. In case of system failure, unplug the power
cord and consult your dealer.
5. Do not place this unit on an unstable cart or sloping surface. Ensure good ventilation
surrounding the product. To prevent fire, do not cover the ventilation of the apparatus
with news papers, tablecloths, curtains, etc.
Caution:Caution:
Caution:Caution:
Caution:
This product is equipped with low power
laser equipment inside, for your safety, do
not open the laser radiation protective
equipment. Don’t look at the laser radiation
when the equipment is operating.

3
6. To prevent fire or shock hazard, do not place objects filled with liquids, such as vases, on
the apparatus. And don’t place lighted candles on the apparatus.
7. To prevent fire or shock hazard, do not expose this equipment to hot places, rain,
moisture or dust.
8. Do not use this product near water, for example near a bath tub, wash bowl, kitchen sink, or
laundry tub; in a wet basement; or near a swimming pool and the like.
9. Do not place this unit close to strong magnetic field.
10.Do not place this unit close to dampness, or the moisture will affect the life of the
laser head.
11. If the unit is brought directly from a cold to a warm location, or is placed in a very damp
room, moisture may condense on the lens inside the player. Should this occur, the unit will
not operate properly. Remove the disc and leave the unit turned on for about an hour until
the moisture evaporates.
12.Should any solid object or liquid fall into the unit, unplug the system and have it checked
by qualified personnel before operating it again.
13.Unplug this product from the wall outlet before cleaning. Do not use liquid cleaners or aerosol
cleaners. Use a damp cloth for cleaning.
14.Do not use attachments not recommended by the product manufacturer as they may cause
hazards.
15.Batteries shall not be exposed to excessive heat such as sunshine, fire or the like.
16.Where the mains plug or a appliance coupler is used as the disconnect device, the disconnect
device shall remain readily operable.

4
ConnectionConnection
Connection
Caution:Caution:
Caution:Caution:
Caution: Please turn off all the equipment power before connecting.
Connecting the TVConnecting the TV
Connecting the TV
1. This DVD player has video output mode, you can choose it to connect with the TV terminal.
2. If your TV has component input terminal, then you can use the signal connecting cable to
connect with the DVD player’s component output terminal. By doing so, the picture will be
more clear.
3. Use a S-Video cable to connect the unit to the S-Video input of a suitably equipped television.
Use this connection in preference to a composite.
4. Use a SCART cable to connect the unit to a SCART compatible television.
Caution: To avoid affecting the picture output, do not connect video, component, SCART and
S-Video at the same time.
Connecting the AntennaConnecting the Antenna
Connecting the Antenna
Terminal board for the DVD player
TV
!@#$
! @ #

5
1. Using the supplied wire Antenna.
2. Using the coaxial type connector .
A 75Ohm antenna with coaxial type connector should be connected to the FM 75 ohm coaxial
terminal.
3. If reception is poor, connect the outside antenna.
Note:Note:
Note:Note:
Note: Before attaching a 75 ohm coaxial lead (the kind with a round wire going to an outside
antenna), disconnect the supplied FM wire antenna.
Caution:Caution:
Caution:Caution:
Caution: To avoid noise, keep antennas away from the system, the connecting cord and the AC
cord.
Connecting Control CableConnecting Control Cable
Connecting Control Cable
Connect signal line between the DVD Player and
the Amplifier back board.
Connecting the SpeakersConnecting the Speakers
Connecting the Speakers
Connect the speaker cords between the terminals as shown below.
Connect the cords with a gold line to the (+) (L) (R) terminals and cords with a silver line to the (-)
terminals.
Right Speaker Box Back View Left Speaker Box Back View
Terminal board for the DVD player
Terminal board for the Amplifier

6
Connection precautionsConnection precautions
Connection precautions
1. This unit has a high power output and wide dynamic range. If speakers other than those
supplied are used, they must be chosen according to speaker specification, or the speakers
can be damaged.
2. Before connecting or removing mains power, please turn off the power on the unit and turn
the volume to minimum or it may damage the speakers.
Connecting Assistance EquipmentConnecting Assistance Equipment
Connecting Assistance Equipment
1. This unit has one groups of AUX IN terminal, you can use signal line to connect this unit’s
AUX IN terminal and assistance equipment’s audio output terminals respectively, then you
can hear the sound sources.
2. This unit also has one group of audio output terminals, you can use signal line to connect this
unit’s audio output terminal and assistance equipment’s audio input terminal respectively,
then you can output the outer sound sauces to other assistance equipment.
Caution:Caution:
Caution:Caution:
Caution: Press the function select button FUNCTIONFUNCTION
FUNCTIONFUNCTION
FUNCTION on the Amplifier or the button AUXAUX
AUXAUX
AUX on the
remote control to select AUX function. When you are connecting AUX audio terminals,
please press this function button.
Connecting CoaxialConnecting Coaxial
Connecting Coaxial
Use coaxial fibre cable to connect the DVD player's coaxial fibre output jack with other amplifier's
coaxial fibre input jack, for superior digital sound effects .
Terminal board for the DVD player
Auxiliary Equipment
Terminal board for the DVD player
Auxiliary Equipment Auxiliary Equipment

7
Connecting the HeadphoneConnecting the Headphone
Connecting the Headphone
Connect a pair of headphones to the phone jack. No sound comes out of the speakers.
Note:Note:
Note:Note:
Note: Be sure to turn down the volume before connecting or putting on headphones.
Connecting the AC Power CordConnecting the AC Power Cord
Connecting the AC Power Cord
Insert the AC power cord into a wall outlet, and your system is at your command!
Caution:Caution:
Caution:Caution:
Caution: Be sure to unplug the power cord from the outlet when going away or the system is
not in use for an extended period of time.
Installation of Batteries in the Remote ControlInstallation of Batteries in the Remote Control
Installation of Batteries in the Remote Control
1. Remove the battery compartment cover.
2. Insert two batteries (size AAA) correctly, so that the + and - polarities match the polarity
diagrams in the battery compartment.
* About half a year of normal operation can be expected when using normal batteries.
* When the batteries are exhausted, the commander can no longer operate the system.
Replace both batteries at the same time with new ones.
* Do not use an old battery with a new one.
* Do not use different types of batteries together.
* When the unit is not used for a long period of time, remove the batteries to avoid damage
caused by battery leakage and corrosion.
Amplifier
Headphone

8
CC
CC
Control Sectionontrol Section
ontrol Sectionontrol Section
ontrol Section
DVD PlayerDVD Player
DVD Player
1..
..
. Standby Button
2. Clock Button
3. Mode Button
4. USB Jack
5. IR Sensor
6. VFD Display Lens
7. Fast Forward Button (C)
Fast Backward Button (D)
Next Button( GG
GG
G)
Previous Button(HH
HH
H)
Play/Pause Button (BF)
8. Eject Button(K)
9. Stop Button(LL
LL
L)
10. Power Control Cable Socket
11. SCART Output Terminal
12. Coaxial Fibre Output Terminal
13. Component Output Terminal
14. Video Output Terminal
15. Audio Output Terminal
16. S-Video Output Terminal
17. AUX Input Terminal
18. FM Antenna
AmplifierAmplifier
AmplifierAmplifier
Amplifier
1. Headphone Terminal
2. Bass Control Knob
3. Treble Control Knob
4. Volume Control Knob
5. Function Select Button
6. AC Power Cord
7. Power Control Cable Socket
8. L&R Speaker Output Terminals

9
Remote ControlRemote Control
Remote Control
1. Standby Button
2. DVD Function Button
3. Tuner Function Button
4. Dim Button
5. Preset Equalizer Button
6. Subtitle Button
7. Title Button
8. Setup Button
9. Direction Button (p,q,t,u)
Enter Button
10. Clock Button
11. Next Button (G)
Previous Button (H)
12. Stop Button (L)
13. Fast Backward Button (D)
14. Mode Button
15. Number Button
16. Mute Button
17. USB Function Button
18. AUX Function Button
19. Loudness Button
20. Super Bass Button
21. Zoom Button
22. Audio Button
23. Menu Button
24. Sleep Button
Timer Button
25. Volume Up Button
Volume Down Button
26. Play/Pause Button (BF )
27. Fast Forward Button (C)
28. OSD Button
RDS Button
29. Program Button
30. Goto Button

10
Normal playingNormal playing
Normal playing
Use the DiscsUse the Discs
Use the Discs
Operate the keys on the unitOperate the keys on the unit
Operate the keys on the unit
Press the open/close button (K) on the DVD Player to open the disc tray and place
the disc on the disc tray (with the printed side up). Press this button again to close
the disc tray, the unit will read the disc and the disc type will display on the TV
screen then play it automatically.
Rotate the BASS knob clockwise or counter clockwise on the Amplifier to adjust the
intensity of the bass output sound.
Rotate the TREBLE knob clockwise or counter clockwise on the Amplifier to adjust
the intensity of the treble output sound.
Operate the keys on the remote controlOperate the keys on the remote control
Operate the keys on the remote control
1. You can use all the functions on the panel of the DVD Player or the remote control
after turning the system power on.
TT
TT
Turning the System Onurning the System On
urning the System Onurning the System On
urning the System On
Press the standby button ((
((
(STST
STST
STANDBYANDBY
ANDBYANDBY
ANDBY))
))
) to turn the system on from standby mode.
Caution:Caution:
Caution:Caution:
Caution: When turning the system on, the system will continue in the mode it
was in when it was turned off last time.
TT
TT
Turning the System Ofurning the System Of
urning the System Ofurning the System Of
urning the System Offf
ff
f
Press the standby button ((
((
(STST
STST
STANDBYANDBY
ANDBYANDBY
ANDBY))
))
) again to turn the system off (called
Standby Mode), the clock will display on the VFD.
Caution:Caution:
Caution:Caution:
Caution: Be sure to unplug the power cord from the outlet when going away or
the system is not in use for an extended period of time.
2. In power on mode, press the disc function button (DVDDVD
DVDDVD
DVD) on the remote control or
the function button (FUNCTIONFUNCTION
FUNCTIONFUNCTION
FUNCTION) on the panel of Amplifier to select DVD function.
3. In power on mode, press the tuner function button (TUNERTUNER
TUNERTUNER
TUNER) on the remote control
or the function button (FUNCTIONFUNCTION
FUNCTIONFUNCTION
FUNCTION) on the panel of Amplifier to select FM function.
4. This unit has several brightness levels for you to adjust the VFD screen to light
or dark. Press the VFD darkness select button (DIMDIM
DIMDIM
DIM), then you can choose the
lighting level you desire.
5. You can adjust the sound reproduced simply by choosing from different preset
equalizations. Each press of the preset equalizer button (P-EQP-EQ
P-EQP-EQ
P-EQ) will select one
of the following different preset equalizations:

11
6. When you are playing the DVD disc, you can repeatedly press the subtitle button
(SUBTITLESUBTITLE
SUBTITLESUBTITLE
SUBTITLE) to select the subtitle language to display on the TV screen if available.
7. In play mode, press the title button (TITLETITLE
TITLETITLE
TITLE) to go back to the title menu.
8. Press the setup button (SETUPSETUP
SETUPSETUP
SETUP) to set the function of this unit.
9. Press the direction buttons (p,q,t,u) to move the cursor to illuminate the
desired selection.
Press the confirmation button (ENTERENTER
ENTERENTER
ENTER) to confirm the menu selection.
10.In standby mode, press the clock button (CLOCKCLOCK
CLOCKCLOCK
CLOCK ) to set the clock.
(You can also operate the key CLOCKCLOCK
CLOCKCLOCK
CLOCK on the panel of the DVD Player.)
11. When playing a DVD disc, press the next button (G) to skip to the next chapter
or title.
When playing a Video CD disc, press the next button (G) to skip to the next
track.
(You can also operate the key “G” on the panel of the DVD Player.)
When playing DVD disc, press the previous button (H) to skip to the previous
chapter or title.
When playing Video CD disc, press the previous button (H) to skip to the
previous track.
(You can also operate the key “H” on the panel of the DVD Player.)
12. Press the stop button (L) to stop playing, the unit will store the last playing time
in the memory automatically, then press the play/pause button (BF ), the unit
will resume to last memory time and continue playback automatically.
If you press the stop button (L) twice to stop the disc playing.
(You can also operate the key “L” on the panel of the DVD Player.)
USER : Normal sound
ROCK : For rock
CLASSIC : For classic
JAZZ : For jazz
POPS : Vocal sound is intensified

12
13. Press the fast backward button (D)once by once to select one of the variety of
different speeds to fast backward play or select normal speed to play. Each time
you press the button, the screen shows.
Note:Note:
Note:Note:
Note: Press the BFbutton to resume normal playback.
(You can also operate the key “D” on the panel of the DVD Player.)
14. One title, one chapter, one track or all the disc repeat play can be set by pressing
the mode button. (You can also operate the key “MODEMODE
MODEMODE
MODE” on the panel of the DVD
Player.)
When playing a DVD disc, this function can be used to play a title, chapter or disc
repeatedly. Repeatedly press the mode button, the screen shows orderly:
When playing a CD disc, this function can be used to play a track or folder
repeatedly. Repeatedly press the mode button, the screen shows orderly:
When playing MP3 disc, this function can be used to play a track or folder
repeatedly. Repeatedly press the mode button, the screen shows orderly:
15. Load a Video CD disc in PBC ON mode (the MENU button turns the PBC
function ON/OFF). You can select tracks or chapters with the number buttons (
0-9,10+).
If the track or chapter number is less than 10, press the number buttons 0-9.
If the track or chapter number is over 10, press 10+ button and press the one
of the number buttons 0-9.
Note:Note:
Note:Note:
Note: If the track or chapter number over 20, press 10+ button twice and press
the one of the number buttons 0-9.
16. Press the mute button inplay mode, all sound will be muted, press the button
again or increase/decrease the volume to resume sound.
17. In power mode, press the USB function button (USBUSB
USBUSB
USB) to select USB function.
(You can also operate the key “FUNCTIONFUNCTION
FUNCTIONFUNCTION
FUNCTION” on the panel of the Amplifier.)
18. In power mode, press the AUX function button (AUXAUX
AUXAUX
AUX) to select AUX function.
(You can also operate the key “FUNCTIONFUNCTION
FUNCTIONFUNCTION
FUNCTION” on the panel of the Amplifier.)

13
19. This unit has a loudness function, it can automatically increase the bass sound
at low volume (the higher the volume, the smaller bass increase), which improves
the output sound. You only need to press the loudness button ( LOUDNESSLOUDNESS
LOUDNESSLOUDNESS
LOUDNESS ) to
obtain the loudness function when it is playing.
20. Press the super bass button to reinforce the bass sound to maintain rich, full
bass at low volume, press this button again to cancel the effect.
21. This function can be used while playing a film or a still picture.
Press the zoom button (ZOOMZOOM
ZOOMZOOM
ZOOM) repeatedly when playing, the screen shows :
Use the p,q,t,ubuttons to move around the enlarged picture.
Note:Note:
Note:Note:
Note: This function is not available for CD ,WMA or MP3 playback.
22. When playing a the Video CD, you can choose MONO (LEFT MONO, RIGHT
Mono), “STEREO” audio output by pressing vocal mode select button (AUDIOAUDIO
AUDIOAUDIO
AUDIO).
When playing DVD disc recorded with several languages, you can repeatedly
press the language select button (AUDIOAUDIO
AUDIOAUDIO
AUDIO) to select one of languages to play.
23. If the Video CD has a menu, you can set the playback control function to “PBC
ON” mode by pressing the menu button (MENUMENU
MENUMENU
MENU). The unit reads the disc and the
menu will display on the TV screen, then use the number buttons to select the
desired track.
When playing DVD disc, press the root button (MENUMENU
MENUMENU
MENU) to return to the root menu
for previous layer.
24. If you want to set the daily timer or the sleep timer, press the sleep/timer button
(SLEEP/TIMERSLEEP/TIMER
SLEEP/TIMERSLEEP/TIMER
SLEEP/TIMER).
25. Press the volume up button to increase the volume. Press the volume down
button to decrease the volume.
(You can also operate the keys “- VOLUME +- VOLUME +
- VOLUME +- VOLUME +
- VOLUME +” on the panel of the Amplifier.)
26. In stop mode, press the play/pause button (BF) to start playing the disc.
When playing disc, press the play/pause button (BF) to temporarily stop the
playing, press the button again, it will continue to play.
(You can also operate the key “BF” on the panel of the DVD Player.)
27. Press the fast forward button (C) repeatedly to select one of the variety of
different speeds to fast forward play or select normal speed to play. Each time
you press the button, the screen shows.
Audio 1/4 Audio 2/4 Audio 3/4 Audio 4/4
g g g
h

14
Note:Note:
Note:Note:
Note: Press the BFbutton to resume normal playback.
(You can also operate the key “C” on the panel of the DVD Player.)
28. Press the OSD button to display the playing information of the disc on the TV
screen.
When tuned to an FM station, use this button to alter the RDS display.
29. If your DVD disc has one or more music chapters or titles, you can setup playing
order for the disc using this button. Press the program button (PROGRAMPROGRAM
PROGRAMPROGRAM
PROGRAM), TV
display will be as follows:
Note:Note:
Note:Note:
Note: Use the 1-9,10+ buttons to input the sequence number which you want
to program playing (the first selection is title and the second selection is
chapter of the programs menu.). After finishing program, Press the
p,q,
t,u
buttons to select “START” then press the ENTER button to start
programmed play or select “STOP” and “EXIT” to exit the program. (If
you setup disc playing order over 10, press the “ ” to setup.)
If you are playing the CD disc, the TV display is as follows:
Note:Note:
Note:Note:
Note: Use the 1-9,10+ buttons to input the sequence number you want to
program playing. After the program has been entered, Press the
p,q,t,
ubuttons
to select “Start” then press the ENTERENTER
ENTERENTER
ENTER button to start
programmed play or select “EXIT” to exit the program. (If you setup a disc
playing order over 10, press the “ ”to continue to the next program
screen.)
If you are playing the MP3 disc, when Filelist is on the screen, select the files
and press program button (PROGRAMPROGRAM
PROGRAMPROGRAM
PROGRAM) to add the files to the program list.
Press menu button (MENUMENU
MENUMENU
MENU) to display the program list then press program
button (PROGRAMPROGRAM
PROGRAMPROGRAM
PROGRAM) to delete unwanted files from the program list.
30. Press the goto button until the time or chapter/track edit box appears. Enter
hours, minutes and seconds from left to right in the time edit box using remote
control numerical keypad. Or enter your desired chapter/track number in the
chapter/track edit box using remote control numerical keypad.
Note: TT: Title
CH:Chapter

15
Playing Picture CD discPlaying Picture CD disc
Playing Picture CD disc
Place the picture CD on the disc tray correctly, the unit will read the disc and play it automatically,
if the disc can not play automatically, press the button BFto play.
When the picture is displayed on the TV screen, you can press the 10+, 0-910+, 0-9
10+, 0-910+, 0-9
10+, 0-9
buttons on the
remote control to select the desired picture on the disc then press the ENTERENTER
ENTERENTER
ENTER button to start
playing.
Note:Note:
Note:Note:
Note: Play will continue until the final picture or when the selected pictures have been played.
When playing, use the MENUMENU
MENUMENU
MENU button or Lbutton to select different play mode. These play modes
list as the following:
Note:Note:
Note:Note:
Note: When playing a picture CD, press the Lbutton to enter the “THUMBNAIL MODE”, use the
p,q,t,u
buttons to move the cursor to illuminate the “MENU” then press the ENTERENTER
ENTERENTER
ENTER
button to enter the “REMODE KEY FUNCTION” list.
PROGRAM : Transition Effect
STOP : Thumbnail Mode
G:Next Picture
H:Previous Picture
PLAY :Picture Mode
p:Invert
q:Mirror
t:Contrarotate
u:Rotate Clockwise
ZOOM :Switch Zoom Mode
p,q,t,u: PAN IN ZOOM MODE
Note:Note:
Note:Note:
Note:
Slide Show : Selections played in a random order
Menu : Display “Remote Key Function” list
Prev : Display previous 12 pictures of disc
Next : Display next 12 pictures of disc
You may need use the Kbutton on the unit to stop playing and open the disc tray.
Slide Show Menu tPrevNextu

16
Use the USBUse the USB
Use the USB
You can connect the USB flash to the USB jack at the side panel of unit. The unit will play MP3
music or pictures from the flash directly.
1. Plug the USB flash into the USB jack.
2. Press the FUNCTIONFUNCTION
FUNCTIONFUNCTION
FUNCTION button on the panel of the Amplifier or the USBUSB
USBUSB
USB button on remote
control to select the USB function.
3. Display shows the word “USB” .
4. MP3 music or the pictures will be played automatically.
USB Storage Device Data ProtectionUSB Storage Device Data Protection
USB Storage Device Data Protection
--
--
- Always insert the USB device in the correct direction. Failure to do so may result in damage
to the USB device and this product.
- Do not remove the USB device while it is being accessed.
- Electrical interference and electrostatic discharges may cause the USB device to
malfunction and suffer damage, resulting in data loss.
It is strongly recommended that any important data is backed up on a PC to protect against
corruption, data loss or device malfunction. Please note that our company shall not accept any
liability for damage or loss of stored data.
Note:Note:
Note:Note:
Note: USB connection is not compatible with all hard drive models.
Listening to Radio BroadcastsListening to Radio Broadcasts
Listening to Radio Broadcasts
Caution:Caution:
Caution:Caution:
Caution: Before listening to the radio, please check if FM antenna is correctly connected.
Press the function select button (FUNCTIONFUNCTION
FUNCTIONFUNCTION
FUNCTION) on the panel of the Amplifier or the
TUNERTUNER
TUNERTUNER
TUNER button on the remote control to select FM function.
Press the button (C) repeatedly to move from frequency to frequency until the next
station is found.
Press and hold the button (C) for one second or more, the frequency will change
up automatically until a right station is found.
(You can also operate the key “C” on the panel of the DVD Player.)
Press the button (D) repeatedly to move from frequency to frequency until the
next station is found.
Press and hold the button (D) for one second or more, the frequency will change
down automatically until a right station is found.
(You can also operate the key “D” on the panel of the DVD Player.)
You can store the well tuned station by pressing the program button (PROGRAMPROGRAM
PROGRAMPROGRAM
PROGRAM ) on
the remote. (You can preset up to 16 FM stations .)
Tune in the desired station, then press the program button (PROGRAMPROGRAM
PROGRAMPROGRAM
PROGRAM).

17
Use the buttons (H
,
G) on the remote control or on the panel of DVD Player once
by once to select the preset number.
Press the program button (PROGRAMPROGRAM
PROGRAMPROGRAM
PROGRAM ) to store the station.
Note:Note:
Note:Note:
Note: If the system is unplugged or if a power failure occurs, the preset stations will
remain stored in the memory.
Press the button (G) once by once to select preset number after preset
presetting station. Its band and frequency are displayed on the VFD.
Press the button (G) once by once to select the preset number when in store the
station.
(You can also operate the key “G” on the panel of DVD Player.)
Press the button (H) on the remote once by once to select preset number before
presetting station. Its band and frequency are displayed on the VFD.
Press the button (H) once by once to select the preset number when in store the
station.
(You can also operate the key “H”on the panel of DVD Player.)
Press the mode button (MODEMODE
MODEMODE
MODE) to select the Stereo or MONO channel to receive the
FM radio mode, it can get the best effect.
(You can also operate the key “MODEMODE
MODEMODE
MODE” on the panel of the DVD Player.)
RDS (Radio Data System) ReceptionRDS (Radio Data System) Reception
RDS (Radio Data System) Reception
Many FM stations are broadcasting added data compatible with RDS. This radio set offers
convenient functions using such data.
ww
ww
wPS (Program Service Name)PS (Program Service Name)
PS (Program Service Name)PS (Program Service Name)
PS (Program Service Name)
When an RDS station is received, the RDS indicator lights and automatically displays the
name of that station instead of the frequency. When RDS display button (RDS)(RDS)
(RDS)(RDS)
(RDS) on the remote
control is pressed during PS display, the CT is displayed for 3 seconds, then PS display
returns.
ww
ww
wPTYPTY
PTYPTY
PTY (Program T(Program T
(Program T(Program T
(Program Type)ype)
ype)ype)
ype)
Program type identification signal. (Example: News, Rock, Classical music.)
ww
ww
wCTCT
CTCT
CT (Clock T(Clock T
(Clock T(Clock T
(Clock Time System)ime System)
ime System)ime System)
ime System)
The CT system may not properly operate in areas where RDS CT service is not available.
Once CT service is received, the CT system keeps operating. “RDS CLOCK” is displayed in
areas where no CT services are available.
ww
ww
wChanging DisplayChanging Display
Changing DisplayChanging Display
Changing Display
During PS display, press the RDS display button ((
((
(RDSRDS
RDSRDS
RDS))
))
) on the remote control repeatedly to
select the CT, PTY or Frequency. They will be displayed for 3 seconds, then the PS display
returns.

18
Clock/TClock/T
Clock/TClock/T
Clock/Timer Functionsimer Functions
imer Functionsimer Functions
imer Functions
Setting the Clock
The built-in clock shows the correct time in the display.
- In standby mode, press the clock button (CLOCKCLOCK
CLOCKCLOCK
CLOCK ) on the remote control or on the
panel of the DVD Player , the hour indicator will blink.
- Set the hour with the ++
++
+button or --
--
- button.
- Press the clock button (CLOCKCLOCK
CLOCKCLOCK
CLOCK ), the minute indicator will blink.
- Set the minute with the ++
++
+button or --
--
-button.
- Press the clock button (CLOCKCLOCK
CLOCKCLOCK
CLOCK ), the built-in clock starts operating and the
seconds start counting from 0.
Note:Note:
Note:Note:
Note:
wIf you tune to a station that has RDS, (CT) clock time will be set
automatically.
wYou can only set the clock in standby mode.
wThe operating time of every step shouldn’t be longer than 10 seconds or it will
return to the original display.
wIf there is a power failure or the power system is turned off, the clock will lose its
setting.
TT
TT
To confirm the clock timeo confirm the clock time
o confirm the clock timeo confirm the clock time
o confirm the clock time
When you press the clock button (CLOCKCLOCK
CLOCKCLOCK
CLOCK ), the clock time is displayed. Wait for a few
seconds until the display returns to the original display.
Setting the Daily TSetting the Daily T
Setting the Daily Timerimer
imerimer
imer
In standby mode with the clock time having been set, you can use the daily timer
setting to turn the unit on automatically at a certain time everyday under standby
mode. When the setting timer is on, the timer indictor “ ” will display on the VFD,
however the clock must be set correctly for the timer function to work.
- In standby mode, press the timer button (TIMERTIMER
TIMERTIMER
TIMER), the hour indicator will blink.
- Set the hour with the ++
++
+button or --
--
-button.
- Press the timer button (TIMERTIMER
TIMERTIMER
TIMER), the minute indicator will blink.
- Set the minute with the ++
++
+button or --
--
-button.
- Press the timer button (TIMERTIMER
TIMERTIMER
TIMER), the selected time is set. Then set the daily timer
to “ON” (daily timer set is in effect) or “OFF” (daily timer set is to cancel) by
pressing the ++
++
+button or --
--
-button.
Note:Note:
Note:Note:
Note:
wYou can only set the daily timer only in standby mode and the clock timer had been
set.

19
wThe operating time of every step shouldn’t be longer than 10 seconds or it will
return to time display.
wThe sound source of the “timer on” mode is the same as the sound source when
the unit was turned off by the standby switch.
TT
TT
To confirm the daily timeo confirm the daily time
o confirm the daily timeo confirm the daily time
o confirm the daily time
Press the timer button (TIMERTIMER
TIMERTIMER
TIMER) in standby mode, the daily time is displayed. Wait for
a moment until the display returns to the time display.
TT
TT
To cancel the daily timer settingo cancel the daily timer setting
o cancel the daily timer settingo cancel the daily timer setting
o cancel the daily timer setting
In standby mode, repeatedly press the timer button (TIMERTIMER
TIMERTIMER
TIMER) until the “ON” display on
the VFD, then you can set the daily timer to “OFF” by pressing the ++
++
+button or --
--
-
button (the daily timer will be cancelled).
If the system is unplugged or there is a power failure, the daily timer will be cancelled.
Setting the Sleep TSetting the Sleep T
Setting the Sleep Timerimer
imerimer
imer
Use the sleep timer button to turn the system off after some time when playing. By
setting the sleep timer, you can fall asleep and know that your system will turn off by
itself rather than playing all night.
- Play a disc or tune in to the desired station.
- If you set the sleep timer first, each time you press the sleep button (SLEEPSLEEP
SLEEPSLEEP
SLEEP), it
changes the number of minutes shown on the VFD in this sequence:
- If you change the sleep timer, each time you press the sleep button (SLEEPSLEEP
SLEEPSLEEP
SLEEP), it
changes the number of minutes shown on the VFD in this sequence:
After setting the number of minutes for the sleep timer, the display will return to the
display as before setting the sleep timer.
The system is now set to turn off after the number of minutes you set.
TT
TT
To confirm the sleep timeo confirm the sleep time
o confirm the sleep timeo confirm the sleep time
o confirm the sleep time
When pressing the sleep button (SLEEPSLEEP
SLEEPSLEEP
SLEEP), the remaining sleep time is displayed.
After a few seconds the display returns to the original display.
TT
TT
To cancel the sleep timer settingo cancel the sleep timer setting
o cancel the sleep timer settingo cancel the sleep timer setting
o cancel the sleep timer setting
Repeatedly press the sleep button (SLEEPSLEEP
SLEEPSLEEP
SLEEP) until the “00” displays on the VFD.
You can cancel the sleep timer by resetting the clock or turning off the unit.
- - 10 20 ... 80 90 00
g g g g g g
h
- - 10 20 ... 80 90 00
g g g g g g
h
This manual suits for next models
1
Table of contents
Other VIETA Home Theater System manuals