Vimar ELVOX TVCC 46NVR.64 User manual
46NVR.64
Viale Vicenza, 14
36063 Marostica VI - Italy
www.vimar.com
49401504A0 02 2103
Introduction
64 channel IP NVR, able to manage and record cameras up to 8Mpx in H.264
and H.265 compression.
HDD not included.
1 Hardware Installation
Check the unit and the accessories after getting the device. Please don’t power
up the unit till the physical installation is complete.
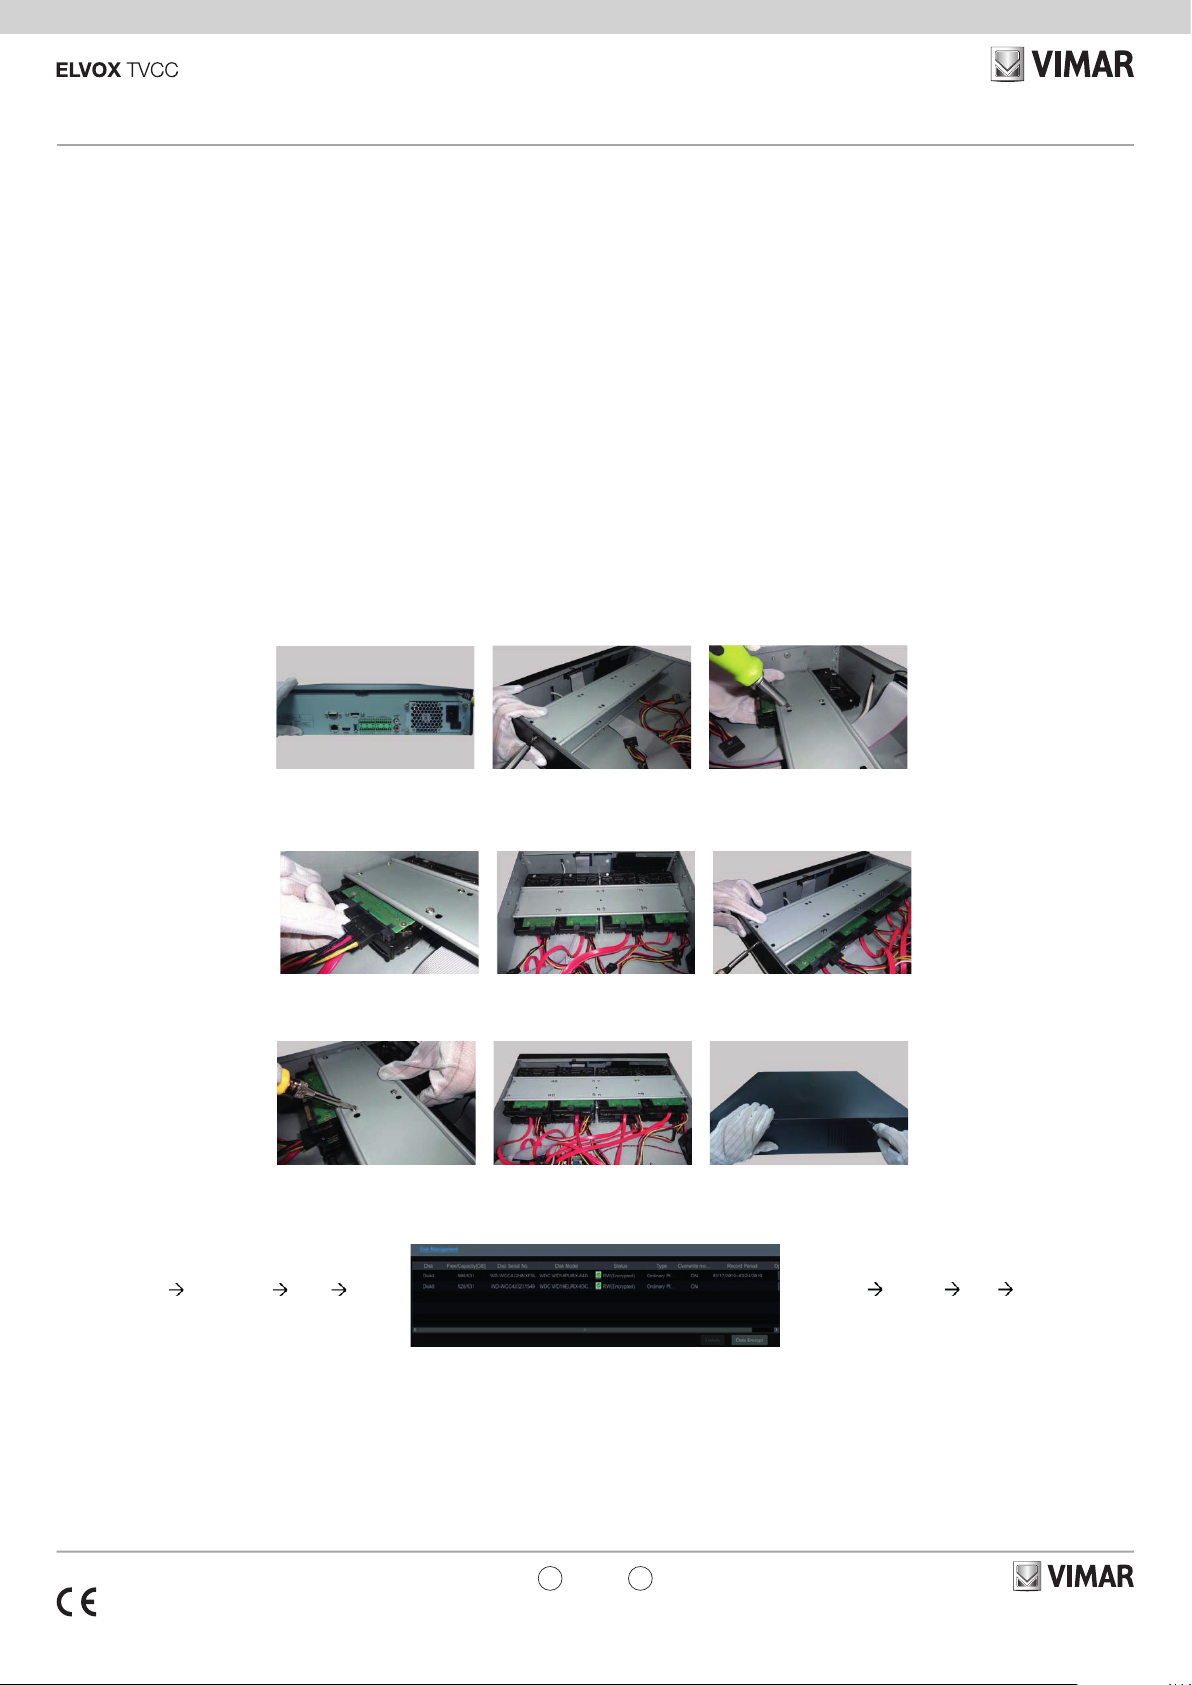
1.1 Install Hard Drive
Please use the hard drive the manufacturers recommend specially for security
and safe eld. Please calculate HDD capacity according to the recording setting.
Calculate Recording Capacity”. This series of the product support to install 8
SATA HDDs.
Refer to the complete manual in Appendix B and Appendix C, downloadable
from the Vimar website.
1 - Open the cover and loosen the screws to take out the upper mounting bar,
and then install the lower HDD.
Introduzione
NVR IP 64 canali in grado di gestire e registrare telecamere fino a 8Mpx in
compressione H.264 e H.265.
Dispositivo fornito senza HDD.
1 Installazione dell’hardware
Al ricevimento dell’apparecchiatura controllare l’unità e gli accessori. Non accen-
dere l’apparecchiatura no al completamento dell’installazione dei componenti
sici.
1.1 Installazione del disco rigido
Si prega di utilizzare i modelli di disco rigido raccomandati, per garantire la sicu-
rezza. Calcolare la capacità dell’HDD in base alle impostazioni di registrazione.
Calcolo della capacità di registrazione”. Questa serie di prodotti supporta l’instal-
lazione di 8 HDD SATA.
Fare riferimento al manuale completo in Appendice B e Appendice C, scaricabile
dal sito Vimar.
1 - Aprire il coperchio e allentare le viti per estrarre la barra di montaggio superio-
re, quindi installare l’HDD inferiore.
2 - Collegare i cavi di alimentazione e dati e installare gli altri HDD seguendo il
metodo sopra citato e reinstallare la barra di montaggio superiore.
3 - Installare i quattro HDD superiori e reinstallare il coperchio.
2 - Connect the power and data cables and install the other three HDDs accord-
ing to above-mentioned method and install back the upper mounting bar.
3 - Install the upper four HDDs and install back the cover.
IT
EN
1.2 - Gestione Disco
Fare clic su Start Impostazioni Disco Gestio-
ne disco per accedere all'interfaccia di congurazio-
ne. E' possibile visualizzare il numero e lo stato dei di-
schi. Far clic su Formattazione per formattare l'HDD.
1.2 - Disk Management
Click Start Settings Disk Disk Management
to go to disk management interface. You can view the
NVR s disk number and disk status and so on in the
interface. Click Formatting to format theHDD.
Crittograa dei dati:
1 - Fare clic su "Crittograa dati"
2 - Inserire il nome utente e la password utilizzati per accedere all'NVR. L'utente
deve avere l'autorizzazione alla gestione del disco.
3 - Selezionare il disco da crittografare e inserire la password.
Dopo aver crittografato i dati di un disco, questo disco non può essere letto da
altri NVR a meno che non sia sbloccato.
Data Encryption:
1 - Click Data Encrypt
2 - Enter the username and password used to log in the NVR. This username and
password shall have the permission of diskmanagement.
3 - Check the disk you want to encrypt and then enter thepassword.
After you encrypt the data of a disk, this disk cannot be read by other NVRs
unless it is unlocked.

46NVR.64
Viale Vicenza, 14
36063 Marostica VI - Italy
www.vimar.com
49401504A0 02 2103
C
a
b
Decodica dei dati:
1-Fare clic su "Modica crittograa"
2-Inserire il nome utente e la password utilizzati per accedere all'NVR. L'utente
deve avere l'autorizzazione alla gestione del disco.
3 - Selezionare il disco da decrittografare e quindi togliere la password.
4 - Cliccare su Chiudi.
Sblocco disco: quando un disco crittografato viene trasferito da un altro NVR a
questo NVR, sarà nello stato bloccato. Per sbloccarlo, selezionare questo disco
e fare clic su Sblocca. Dopo aver inserito la password di crittograa dei dati, il
suo stato sarà di sola lettura. Sarà ora possibile leggere i dati ma non scriverli.
1.3 - Raid
1 - Abilitare RAID (Vai a Start Impostazioni
Disco Modo Disco)
d. Seleziona il disco sico.
Se sono presenti 8 dischi, selezionare 7 dischi.
Il restante dovrebbe essere impostato su un hot
spare.
Se serve una maggiore sicurezza dei dati, è pos-
sibile ridurre i dischi sici e aumentare i dischi hot
spare.
Si prega di impostarli come necessario.
Data Decryption:
1 - Click "Data Encrypt"
2 - Enter the username and password used to log in the NVR. This user shall
have the permission of disk management.
3 - Check the disk you want to decrypt and then empty thepassword.
4 - Click Close Encrypt.
Unlock the disk: when one encrypted disk is transferred from another NVR to this
NVR, it will be in locked status. Then you can select this locked disk and click Un-
lock . After you enter the password of its data encryption, its status will be Read
Only . Now you can read the data of this disk but it cannot be writtenanything.
1.3 - Raid
1 - Enable RAID
(Go to Start Settings Disk Disk Mode)
d. Select physical disk.
If you have 8 disks, please check 7 disks. The
remaining one should be set to a hot spare.
If higher data security is needed, you can de-
crease physic disks and increase hot spare
disks. Please set them as needed.
2 - Creare un array. (Vai a Start Impostazioni
Disco Disco sico)
a. Fare clic su "Disco sico" e fare clic su "Crea
un array"
b. Immettere un nome utente e password con
l'autorizzazione di Gestione disco.
Si può utilizzare il nome utente e la password
con cui si accede al sistema (utente predeni-
to: admin; password predenita: 123456).
c. Immettere il nome dell'array e selezionare il
tipo di array (esempio RAID5).
2 - Create an array. (Go to Start Settings
Disk Physical Disk)
a. Click "Physical Disk" tab and then click "Create
an array".
b. Enter the user name and password which has
the authority of DiskManagement. If you don't
have one, you use the user name and pass-
word that you login system (the default user-
name: admin; the default password: 123456).
c. Enter array name and select array type (li-
keRAID5).
e. Selezionare un hot spare. Nell'interfaccia del
disco sico, selezionare il disco che non si trova
nell'array e fare clic come mostrato nelle
immagini seguenti.
Ricostruzione RAID
Se uno dei dischi è rotto, l'indicatore del disco sul
pannello anteriore diventerà rosso.
Naturalmente, verrà visualizzato un avviso se
è impostato il relativo allarme di eccezione del-
l'HDD.
Sarà necessario ricostruire il RAID dopo aver so-
stituito il disco rotto con uno nuovo.
Fai clic sull'icona cerchiata e selezionare il disco
sico da ricostruire.
e. Select a hot spare. In the physical disk inter-
face, select the disk that is not in the array and
click as shown in the following pictures.
RAID Rebuilding
If one of your disks is broken, the disk indicator on
the front panel will turn red. Of course, a warning
tip will pop up if the relevant HDD exception alarm
is set. You need to rebuild the RAID after you re-
place the broken disk with a new one.
Click the above circled icon and then select the
physical disk to rebuild.
46NVR.64
Viale Vicenza, 14
36063 Marostica VI - Italy
www.vimar.com
49401504A0 02 2103
3 Guida all’utilizzo di base
3.1 Avvio e spegnimento
Prima di collegare l’unità all’alimentazione, vericare che tutti i collegamenti
siano stati eseguiti correttamente. Un corretto avvio e arresto è estremamente
importante per la durata del dispositivo.
3.1.1 Avvio
1 - Collegare il dispositivo di visualizzazione in uscita all’interfaccia VGA/HDMI
del NVR.
2 - Collegare il mouse e accendere. Il dispositivo si avvia e il LED di
alimentazione diventa blu.
3 - Comparirà una procedura guidata (selezionare la lingua del display la
prima volta che si utilizza il NVR). Per ulteriori dettagli, fare riferimento a 4.1
Procedura guidata per l’avvio.
3.1.2 Spegnimento
1 - Fare clic su Start Shutdown (arresto) e comparirà la nestra di arresto.
Selezionare “Shutdown” (“Arresto”) all’interno della nestra. Dopo un
momento di attesa, l’unità si spegnerà facendo clic sul pulsante “OK”.
2 - Scollegare l’alimentazione.
3 Basic Operation Guide
3.1 Startup & Shutdown
Please make sure all the connections are done properly before you power on the
unit. Proper startup and shutdown are crucial to expending the life of your device.
3.1.1 Startup
1 - Connect the output display device to the VGA/HDMI interface of the NVR.
2 - Connect with the mouse and power. The device will boot and the power LED
would turn blue.
3 - A WIZARD window will pop up (you should select the display language the rst
time you use the NVR). Refer to 4.1 Startup Wizard for details.
3.1.2 Shutdown
You can power o the device by using remote controller or mouse.
By remote controller:
1 - Press Power button. This will take you to a shutdown window. The unit will
power o after a while by clicking “OK” button.
2 - Disconnect the power.
Modello / Type 46NVR.64
Sistema / Sistem Compressione / Compression Standard H.265
OS Linux
Video
Ingressi / Input 64 CH IPC
Access/Transfer
Bandwidth 320 Mbps
Telecamere IP / IP camera 8MP/6MP/5MP/4MP/3MP/1080P/960P/720P @25/30 fps
Uscita Monitor / Monitor Output
HDMI x 1: 3840 x 2160 1920 x 1080 / 1280 x 1024
HDMI x 1: 1920 x 1080 / 1280 x 1024
VGA x 1: 1920 x 1080 / 1280 x 1024
Audio
Network Input 64 CH IPC audio input
Ingressi / Input RCA x 1
Uscite / Output RCA x 1
Registrazione / Record
Flusso di registrazione / Record Stream Doppio Stream di registrazione / Dual Stream recording
Risoluzione / Resolution 8MP/6MP/5MP/4MP/3MP/1080P/960P/720P @25/30 fps
Mode Manual, timer, motion, sensor
Play Back
Riproduzione / Playback Max 16 CH
Ricerca / Search Fascia oraria,tempo evento ricerca girnaliera / Time slice/time/event/tag search
Ricerca intelligente / Smart Search
Registrazioni su periodo di tempo dierenziate da colori diversi per tipo di
evento / Highlighted color to display the camera record in a certain period of
time, dierent colors refers to dierent record events
Funzioni /Function Play, pause, FF, FB, digital zoom, etc.
Allarmi / Alarm
Modalità / Mode Manuale,sensore,movimento,eccezione / Manual, sensor, motion, exception
Ingressi / Input 8 CH local alarm input, support IPC alarm input
Uscite /Output 4 CH
Triggering Record, snap, preset, e-mail, etc.
Rete / Network
Interfaccia / Interface RJ45 10 / 100 / 1000 Mbps × 2
Protocollo / Protocol TCP / IP, PPPoE, DHCP, DNS, DDNS, UPnP, NTP, SMTP
Web Client Max 10 users online
Dispositivo mobile / Mobile Device OS iOS, Android
Memoria / Storage HDD SATA × 8, e-SATA × 2, up to 8TB per HDD
Disk Array RAID0, RAID1, RAID5, RAID6, RAID10
Porte / Port
Remote control Si / Yes
USB USB 2.0 × 2 ( one in the front panel and the other in the
rear panel ), USB 3.0 × 1 ( rear panel )
Backup Locale / Local Backup Supporto USB, Disco USB rimovibile / U disk, USB mobile HDD
In Rete / Network backup Si / Yes
Altro / Others
Alimentazione / Power Supply ATX 100-240 50/60Hz 250W
Consumo / Consumption ≤ 15W ( senza HDD / without HDD )
Dimensioni / Dimensions 445 × 436 × 100 ( W × D × H )
Ambiente di esercizio / Work Environment - 10 °C ~ 50 °C, 10 % ~ 90 % umidità / humidity
Speciche / Specications
IT
EN

46NVR.64
Viale Vicenza, 14
36063 Marostica VI - Italy
www.vimar.com
49401504A0 02 2103
IT
EN
3 - Impostazioni di rete. Selezionare “Obtain an
IP address automatically” (Ottenere un indirizzo IP
automaticamente) e “Obtain DNS automatically”
(Ottenere DNS automaticamente) per ottenere
l’indirizzo IP e DNS automaticamente, o immettere
manualmente l’indirizzo IP, maschera di sottorete,
gateway, DNS preferito e DNS alternativi. Immettere
la porta HTTP, la porta RTSP e la porta Server. Fare
clic su “Next” (Avanti) per continuare.
3 - Network Settings. Check “Obtain an IP address
automatically” and “Obtain DNS automatically” to get
the IP address and DNS automatically, or manually
input IP address, subnet mask, gateway, preferred
DNS and alternate DNS. Input the HTTP port, RTSP
port and Server port. Click “Next” to continue.
4 Procedura guidata e interfaccia
principale
4.1 Procedura guidata per l’avvio
Le icone del disco verranno visualizzate in alto
nell’interfaccia di avvio. È possibile visualizzare il
numero e lo stato di ciascun disco in maniera veloce
e intuitiva attraverso queste icone ( : disco assente;
: disco non disponibile; : disco RW disponibile).
È possibile congurare rapidamente l’NVR tramite la
procedura guidata d’impostazione per far funzionare
l’NVR normalmente. È necessario congurare la
procedura guidata quando l’NVR viene avviato per
la prima volta (oppure fare clic su “Skip” (Salta) per
annullare la procedura guidata la volta successiva).
Fare clic su “Wizard Setup” (Procedura Guidata
Impostazione) per iniziare la procedura guidata. Le
fasi di impostazione sono le seguenti.
1 - Accesso al sistema. Impostare la propria
password o utilizzare quella predenita quando viene
utilizzata la procedura guidata per la prima volta (il
nome utente predenito del sistema è admin; la
password predenita di admin è 123456); selezionare
il nome utente di accesso e inserire la password
corrispondente la volta successiva.
Fare clic su “Edita Security Question” (Modica
domanda di sicurezza) per impostare le domande e
le risposte di sicurezza per la password dell’admin.
Fare clic su “Next” (Avanti) per continuare oppure fare
clic su “Cancel” (Annulla) per uscire dalla procedura
guidata.
2 - Congurazione di data e ora La data e l’ora del
sistema devono essere impostate se la procedura
guidata viene utilizzata per la prima volta. Fare
riferimento alla gura seguente. Impostare il fuso
orario, l’ora del sistema, il formato della data e il
formato dell’ora. Il DST sarà abilitato per impostazione
predenita se il fuso orario selezionato comprende
DST. Fare clic su “Next” (Avanti) per continuare.
4 Wizard & Main Interface
4.1 Startup Wizard
The disk icons will be shown on the top of the startup
interface. You can view the number and status of each
disk quickly and conveniently through these icons (
: no disk; : unavailable disk; : RW available
disk).
You can quickly congure the NVR by wizard setup to
make the NVR work normally. You must congure the
wizard if you start the NVR for the rst time (or click
“Skip” to cancel the wizard next time).
Click “Wizard Setup” to start wizard. The setting steps
are as follows.
1 - System Login. Set your own password or use
the default when you use the wizard for the rst time
(the default username of the system is admin and the
default password of admin is 123456); select the login
username and enter the corresponding password
next time.
Click “Edit Security Question” to set questions and
answers for password security of admin.
Click “Next” to continue or click “Cancel” to exit the
wizard.
2 - Date and Time Conguration. The date and time
of the system need to be set up if you use the wizard
for the rst time. Refer to the following gure. Set the
time zone, system time, date format and time format.
The DST will be enabled by default if the time zone
selected includes DST. Click “Next” to continue.
4 - QRCode. È possibile scansionare il QRCode
attraverso l’applicativo client installato nel telefono
cellulare o nel PAD per accedere istantaneamente.
Per maggiori dettagli vedere il paragrafo 5.2
Sorveglianza Client Mobile.
4- QRCode. You can scan the QRCode through
mobile client which is installed in the mobile phone or
PAD to log in the mobile client instantly. Please refer
to 5.2 Mobile Client Surveillance for details.

46NVR.64
Viale Vicenza, 14
36063 Marostica VI - Italy
www.vimar.com
49401504A0 02 2103
5 - Aggiunta Telecamera. Fare clic su “Refresh”
(Aggiorna) per aggiornare l’elenco delle telecamere IP
online che si trovano nella stessa rete locale dell’NVR
e fare clic per aggiungere la telecamera cercata.
Fare clic su “Add All” (Aggiungi Tutto) per aggiungere
le telecamere nell’elenco. Fare clic per eliminare
la telecamera aggiunta. Fare clic su “Delete All”
(Elimina tutto) per eliminare tutte le telecamere
aggiunte.
Fare clic su per modicare la telecamera IP
cercata come mostrato in basso a sinistra. Immettere
il nuovo indirizzo IP, la subnet mask, il gateway, il
nome utente e la password della telecamera. Fare clic
sul pulsante “OK” per salvare le impostazioni.
5- Add Camera. Click “Refresh” to refresh the list of
online IP cameras which are in the same local network
with NVR and then click to add the searched
camera. Click “Add All” to add all the cameras in the
list. Click to delete the added camera. Click
“Delete All” to delete all the added cameras.
Click to edit the searched IP camera as shown
on the below left. Input the new IP address, subnet
mask, gateway, username and the password of the
camera. Click “OK” to save the settings.
IT
EN
7 - Impostazioni registrazione. Sono disponibili
due modalità di registrazione: automatica e manuale.
Automatica: Selezionare una modalità automatica
nell’interfaccia come indicato di seguito, quindi fare
clic sul pulsante “OK” per salvare le impostazioni.
Manuale: Impostare “Sensor Record” (Registrazione
Sensore), “Motion Record” (Registrazione
Movimento) e “Schedule Record” (Registrazione
Programmazione) di ciascuna telecamera. Fare clic
sul pulsante “OK” per salvare le impostazioni.
7- Record Settings. Two record modes are available:
auto and manual.
Auto: Select one auto mode in the interface as shown
below and then click “OK” button to save the settings.
Manual: Set the “Sensor Record”, “Motion Record”
and “Schedule Record” of each camera. Click “OK” to
save the settings.
Fare clic su per modicare la telecamera
aggiunta come mostrato in alto a destra. Immettere
il nuovo nome della telecamera, l’indirizzo IP, la
porta, il nome utente e la password della telecamera.
È possibile fare clic sul pulsante “Test” (Prova) per
vericare l’esattezza delle informazioni immesse. Fare
clic sul pulsante “OK” per salvare le impostazioni. È
possibile modicare il nome della telecamera IP solo
quando la telecamera aggiunta è online. Fare clic su
“Next” (Avanti) per continuare.
6 - Impostazioni disco. È possibile visualizzare
il numero disco, la capacità disco dell’NVR e il
numero di serie, lo stato R&W del disco. Fare clic su
“Formatting” (Formattazione) per formattare il disco.
Fare clic su “Next” (Avanti) per continuare.
Click to edit the added camera as shown on the
above right. Input the new camera name, IP address,
port, username and the password of the camera. You
can click “Test” to test the eectiveness of the input
information. Click “OK” to save the settings. You can
change the IP camera name only when the added
camera is online. Click “Next” to continue.
6 - Disk Settings. You can view the disk number, disk
capacity of the NVR and serial number, R&W status
of the disk. Click “Formatting” to format the disk. Click
“Next” to continue.

46NVR.64
Viale Vicenza, 14
36063 Marostica VI - Italy
www.vimar.com
49401504A0 02 2103
IT
EN
5.2 Sorveglianza remota
Sorveglianza Client Mobile
1 - Attivare la funzione NAT nell'NVR.
2 - Scaricare e installare l'App By-Camera in un
dispositivo mobile con sistema operativo Android o
iOS.
3 - Eseguire il client mobile, andare all'interfaccia
"Add Device" (Aggiungi dispositivo), quindi fare clic su
per scansionare il QRCode dell'NVR (Andare al
percorso StartSettingsSystemInformationB
asic (Start/Impostazioni/Sistema/Informazioni/Base)
per visualizzare il QRCode dell'NVR).
4 - Dopo aver scansionato il QRCode con successo,
immettere la password di login nel client mobile.
Nota: i manuali completi e i software CVM.exe, Ip-
tool.exe e Diskcalculator.exe sono disponibili nella
scheda prodotto consultabile nel sito:
www.vimar.com
5.2 Remote Surveillance
Mobile Client Surveillance
1 - Enable NAT in the NVR.
2 - Download and install By-Camera app into the
mobile device with the Android or iOS system.
3- Run themobileclient,goto the “AddDevice”interface
and then click to scan the QRCode of the NVR
(Go to StartSettingsSystemInformationBasic
to view the QRCode of the NVR).
4 - After scanning the QRCode successfully, input the
login password to log in mobile client.
Note: the complete manual of instructions and CVM.
exe, Iptool.exe and Diskcalculator.exe software are
available in the online Product info on: www.vimar.
com
Cautions
- Before operation, we strongly advise users to read this manual and keep it properly for using later.
- Please use the specied power supply to connect.
- Avoid from in correct operation, shock vibration, heavy pressing which can cause damage to product.
- Keep away from heat sources such as radiators, heat registers, stove., etc.
- This is product instructions not quality warranty. We may reserve the rights of amending the typographical
errors, inconsistencies with the latest version, software upgrades and product improvements, interpreta-
tion and modication. These changes will be published in the latest version without special notication.
- When this product is in use, the relevant contents of Microsoft, Apple and Google will be involved in. The
pictures and screenshots in this manual are only used to explain the usage of our product. The owner-
ships of trademarks, logos and other intellectual properties related to Microsoft, Apple and Google belong
to the above-mentioned companies.
Installation rules
Installation should be carried out by qualied personnel in compliance with the current regulations regarding
the installation of electrical equipment in the country where the products are installed.
Conformity to Standards
BT Directive. EMC Directive. RoHS Directive.
Standards EN 62368-1, EN 55032, EN 55035, EN 61000-3-2, EN 61000-3-3, EN 50581
REACH (EU) Regulation no. 1907/2006 – Art.33. The product may contain traces of lead.
WEEE - User information
The crossed bin symbol on the appliance or on its packaging indicates that the product at the end of
its life must be collected separately from other waste. The user must therefore hand the equipment
at the end of its life cycle over to the appropriate municipal centres for the differentiated collection of
electrical and electronic waste. As an alternative to independent management, you can deliver the
equipment you want to dispose of to the dealer when purchasing a new appliance of an equivalent type. You
can also deliver electronic products to be disposed of that are smaller than 25 cm for free, with no obligation
to purchase, to electronics retailers with a sales area of at least 400 m2. Proper sorted waste collection for
subsequent recycling, processing and environmentally conscious disposal of the old equipment helps to
prevent any possible negative impact on the environment and human health while promoting the practice of
reusing and/or recycling materials used in manufacture.
Avvertenze
- Prima di utilizzare il prodotto si raccomanda vivamente di leggere il manuale e di conservarlo in un luogo
sicuro per consultazione futura.
- Utilizzare l'alimentazione specicata per il collegamento.
- Evitare di azionare il prodotto in modo improprio, sottoporlo a urti o vibrazioni, forti pressioni che possono
danneggiarlo.
- Tenere lontano da fonti di calore quali radiatori, bocchette dell'aria calda, stufe e simili.
- Il presente documento contiene le istruzioni per l'uso del prodotto. Non è la garanzia di qualità. Ci riser-
viamo il diritto di correggere errori di stampa, incongruenze con la versione più recente, aggiornamenti
del software e miglioramenti, interpretazione e modiche al prodotto. Tali cambiamenti saranno pubblicati
nella versione più recente senza previa notica.
- Quando il prodotto è in uso, sono applicabili i contenuti di Microsoft, Apple e Google. Le immagini e le
schermate di questo manuale hanno lo scopo di spiegare l'utilizzo del prodotto. La proprietà dei marchi
commerciali, dei logo e altre proprietà intellettuali relative a Microsoft, Apple e Google appartengono alle
suddette aziende.
Regole di installazione
L’installazione deve essere eettuata da personale qualicato con l’osservanza delle disposizioni regolanti
l’installazione del materiale elettrico in vigore nel paese dove i prodotti sono installati.
Conformità normativa
Direttiva BT. Direttiva EMC. Direttiva RoHS.
Norme EN 62368-1, EN 55032, EN 55035, EN 61000-3-2, EN 61000-3-3, EN 50581
Regolamento REACh (UE) n. 1907/2006 – art.33. Il prodotto potrebbe contenere tracce di piombo.
RAEE - Informazioni agli utilizzatori
Il simbolo del cassonetto barrato riportato sull’apparecchiatura o sulla sua confezione indica che
il prodottto alla ne della propria vita utile deve essere raccolto separatamente dagli altri riuti.
L'utente dovrà , pertanto, conferire l'apparecchiatura giunta a ne vita gli idonei centri comunali
di raccolta dierenziata dei riuti elettrotecnici ed elettronici. In alternativa alla gestione autonoma
è possibile consegnare l'apparecchiatura che si desidera smaltire al rivenditore, al momento dell'acquisto
di una nuova apparecchiatura di tipo equivalente. Pressso i rivenditori di prodotti elettronici con supercie
di vendita di almeno 400 m2è inoltre possobile consegnare gratuitamente, senza obbligo di acquisto, i
prodotti elettronico da smaltire con dimensioni inferiori a 25 cm. L'adeguata raccolta dierenziata per l'avvio
successivo dell'apparecchiatura dismesssa al riciclaggio, al trattamento e allo smaltimento ambientalmente
compartibile contribuisce ad evitare possibili eetti negativi sull'ambiente e sulla salute e favorisce il reim-
piego e/o riciclo dei materiali di cui è composta l'apparecchiatura.
5.1 Visualizzazione dello stato di rete
Fare clic su StartSettingsNetworkNetwork Status (Start/Settings/Rete/
Stato rete) per visualizzare lo stato di rete o fare clic sull’icona sulla barra
degli strumenti in fondo all’interfaccia di anteprima live per visualizzare facilmente
lo stato di rete.
5.1 View Network Status
Click StartSettingsNetworkNetwork Status to view the network status or
click on the tool bar at the bottom of the live preview interface to view network
status conveniently.
5 - Congurazione NAT
Fare clic su Start Settings Network NAT (Start/Impostazioni/Rete/
NAT) per passare all’interfaccia per la congurazione NAT.
Selezionare il pulsante “Enable” (Abilita), quindi selezionare l’indirizzo server NAT.
Tipo di accesso: è possibile selezionare NAT1.0 o NAT2.0.
Nota: per poter utilizzare l'aggiornamento FW da cloud, assicurarsi che NAT2.0 sia abilitato
(impostazione predenita).
Fare clic sul pulsante “Apply” (Applica) per salvare le impostazioni.
5 - NAT Conguration
Click Start Settings Network NAT to go to the interface for NAT
conguration.
Check “Enable” and then select the NAT server address.
Access Type: NAT1.0 or NAT2.0 can be selected.
Note: in order to use cloud FW update, please make sure NAT2.0 is enabled (default).
Click “Apply” to save the settings.
NAT2.0
This manual suits for next models
1
Table of contents
Other Vimar DVR manuals


