Vintage Vibe TINE PIANO 73 User manual

OWNER MANUAL
TINE PIANO

IntroductIon
Decades ago, electric pianos presented musicians with many advantages over traditional acoustic pianos. In
addition to being easily amplied and providing improved tuning stability, the electric piano was smaller and
lighter, thereby offering portability. The electric alternative also created a new sound in music. Just as a tradi-
tional piano cannot truly be duplicated synthetically in terms of sound and feel, the electric piano has made its
place in the musician’s arsenal.
While the weight of these pianos was an enormous improvement over moving an acoustic piano, such weight is
not a viable option for many of today’s musicians. The Vintage Vibe Tine Piano has been thoroughly designed
to provide classic tone and a naturally weighted feel, with superior ease of portability.
Thank you for your purchase of the Vintage Vibe Tine Piano.
Sincerely,
The Vintage Vibe Team
1

SpecIfIcatIonS
Base....................................................................................................................................
Spruce/Poplar
Keybed............................................................................................................................................
Linden
Action Rail.......................................................................................................................
Hardrock Maple
Hammers.............................................
Cycolac Flange, Hardwood Butt and Graduated Neoprene Tips
Tone Source...............................................
Asymmetrical Tuning Fork with Electromagnetic Pickups
Harp...................................................................................................................................................
Birch
Electronics.........................................
Passive Tone Controls or Optional Stereo-Tremolo Preamplier
Lid..................................................................
Fiberglass Construction with Extruded Aluminum Banding
High Gloss Gel Coat Solid and Sparkle nishes available
(64 Classic Series Lid Features ABS Plastic Construction)
64 tIne Model
HEIGHT: 7 7/8” (without legs)
34 1/8” (with legs)
WIDTH: 37 5/8”
DEPTH: 21 5/8”
WEIGHT: 53 lbs (without legs)
KEY COMPASS: A13 - C76
44 tIne Model
HEIGHT: 7 7/8” (without legs)
34 1/8” (with legs)
WIDTH: 28 1/2”
DEPTH: 21 5/8”
WEIGHT: 37 lbs (without legs)
KEY COMPASS: F21 - C64
44 Bass Models available upon request
KEY COMPASS: C4 - G46
73 tIne Model
HEIGHT: 7 7/8”(without legs)
34 1/8”(with legs)
WIDTH: 44 3/8”
DEPTH: 21 5/8”
WEIGHT: 60 lbs (without legs)
KEY COMPASS: E8 - E80
2 3

afterMarket Stand
Any Platform, Z or X-Stand is suitable to support a Vintage Vibe Piano. When selecting a stand, care should
be taken to ensure that it provides solid footing and does not interfere with access to the jack plate nor
proper function of the sustain pedal.
legS
The optional chrome-plated steel legs provide a classic appearance and solidly support the piano at the ap-
proximate height of a conventional acoustic piano. To install, carefully lay the piano on its back and screw
the legs clockwise into the leg anges.
For pianos purchased without legs, an upgrade kit is available that includes legs, anges, screws and instal-
lation instructions.
SuStaIn pedal
The optional sustain pedal is manufactured of lightweight plastic and aluminum. It features four easily
adjustable feet that allow for solid placement on most any surface. The included sustain rod connects the
pedal to the piano’s internal sustain rail and its telescopic construction provides exibility of placement and
piano height.
To set up the sustain pedal, place it under the piano and insert the open end of the larger diameter rod over
the sustain pedal’s pin. Loosen the wing nut and extend the telescopic rod through the hole located on the
bottom of the piano at the rear. The end of the rod should make contact with the sustain plunger and ensure
the plunger contacts the sustain rail.
note: When inserting the telescopic rod into the base of the piano, take care to achieve a light contact.
Over-extending the rod into the insert hole will result in un-damped or partially damped notes upon release
of the sustain pedal.
VIntage VIbe paSSIVe pIano controlS
Passive models include Volume, Bass and Treble controls and a 1/4” output jack for interface with the am-
plier of your choosing.
VIntage VIbe actIVe Model poWer reQuIreMentS
The Active Stereo model requires 110 - 240 volts AC. The piano should only be plugged into a grounded
power outlet of the required voltage and only done so with a grounded power cord. The power switch is lo-
cated on the underside of the piano to the rear of the jack plate.
VIntage VIbe actIVe Model pre-aMp controlS
note
:The preamp is active and therefore the controls will only function when the piano is plugged into an
appropriate AC power source and the power switch on the underside of the base is engaged.
4
note: Passive models are easily upgradable to house our active Stereo-Vibe preamplier.
Stereo VIbe: dIp SWItcH SettIngS
claSSIc Mode:
fet Mode:
1 = doWn
2 = up
3 = doWn
4 = doWn
1 = up
2 = doWn
3 = up
4 = up
Identical to the tonality of the classic Fender Rhodes Peterson preamp
known and revered by players the world over.
Introduces a FET input stage which is characteristically tube-like due to
its high impedance.
note: Settings all the switches in the UP position will engage the FET input stage in parallel with Classic
Mode. Some players may nd this combination to be desirable. Experiment and see what setting you nd
to be the most appealing.
5

VoluMe
tIMbre
2. To increase volume: Slide the pickup toward the tine.
To decrease volume: Slide the pickup away from the tine.
3. Tighten the screw securing the pickup to the harp in the desired location.
Tone is adjusted by changing the pickup’s vertical distance from the tine.
1. Adjust the tone bar’s escapement screw (the one closest to the keys) to provide a 3/8” gap
between the top of the harp and the bottom of the tone bar.
2. Adjust the tone bar’s tone adjustment screw (the one closest to the tine) to achieve the desired
tonality.
Counterclockwise adjustment will raise the end of the tine and produce a strong fundamental tone.
Clockwise adjustment will lower the end of the tine and introduce overtone.
6
VIntage VIbe actIVe pIano Jack plateS
44 note Jack plate
64 & 73 note Jack plate fX loop: In/out
Provided for the insertion of EFFECTS UNITS. It is located before
the preamplier. Utilize standard 1/4” instrument cables to connect
the FX LOOP “OUT / SEND” to the EFFECT’S INPUT and the FX
LOOP “IN / RETURN” to the EFFECT’S OUTPUT.
The FX LOOP “OUT / SEND” may also be utilized to obtain a passive
output signal directly from the piano harp.
note: As the FX LOOP is before the preamplier, the preamplier
controls will not function in this scenario.
HeadpHone:
A pair of STEREO HEADPHONES may be plugged into this jack.
The OUTPUT jacks will continue to output signal while headphones
are connected.
output: left / rIgHt
Utilize standard 1/4” instrument cables to connect preamplier
OUTPUT(S) to the amplier(s) of your choice. “For true stereo trem-
olo, either connect each of the OUTPUTS to separate ampliers
7
VoluMe & tone
The Vintage Vibe Piano is carefully voiced in our shop for even timbre and volume across the key compass.
Shipping, atmospheric conditions, amplication methods, and personal tastes may necessitate additional
voicing of your piano upon delivery.
The volume and tone of every note in your Vintage Vibe Piano are individually adjustable.
Volume is adjusted by changing the pickup’s horizontal distance from the tine.
1. Loosen the screw securing the pickup to the harp.
aMplIfIcatIon
The Vintage Vibe Piano is voiced for a strong fundamental tone under a light touch, with overtones present
upon heavier playing. These characteristics may be more pronounced by a tube amplier as opposed to a
solid state model. The technicians at Vintage Vibe prefer and voice all pianos with tube amplication and
reccomend the Fender Hot Rod series ampliers. However, as each player has individual tastes, it is recom-
mended to try your piano through a variety of ampliers to arrive at your desired tone.
note: To avoid ground loops between an Active Model piano and an amplier, always try and plug both
into the same outlet.
or both to one stereo amplier. For monaural use, connection to OUTPUT LEFT is recommended, but either
jack is functional.
The OUTPUTS may also be connected directly to a mixing console or PA system.”

tunIng
The Vintage Vibe Piano will rarely require tuning. When it becomes necessary to tune a note:
1. Remove the three screws found under the front lip of the piano that secure the lid to the base.
note: Do not use a power drill as this may strip the screws.
2. Lift the lid upward and remove it from the base. To replace lid, Place the lid back onto the base of
the piano. Align the breakaway hinges on the rear of the lid to those on the base. carefully lower the
front of the lid and be sure no wires or cables are pinched between the lid and base. Ensure the lid is
seated properly behind the name rail (it may be necessary to pull the name rail forward to allow the
lid to be lowered properly).
For Single Note / Spot Tuning:
3. Strike the key in question and utilize the tuning tool (it ts easily in-between the tone bars and
provides access to the springs) to slide the spring forward or backward along the tine in order to
achieve proper pitch.
To raise the pitch: Slide the spring toward the keys.
To lower the pitch: Slide the spring away from the keys.
For Extensive / Full Piano Tuning:
4. Remove the screws securing the harp to the harp support. There are two on the left side of the
harp and one on the right side.
5. Lift and raise the harp so that it is standing vertically and seated on the harp supports. (Fig. 1)
note: It is advisable to hold the harp with one hand during the tuning process in order to prevent
mishaps.
6. Pluck the tine by hand and utilize the tuning tool or your ngers (Fig. 2), to move the spring
forward or backward along the tine in order to achieve proper pitch.
When tuning is completed:
1. If the harp has been raised, lower it and reinstall the screws to secure it to the harp supports.
2. Place the lid back onto the base of the piano.
3. Ensure that the three screw holes under the front lip of the piano’s base line up with the
corresponding holes in the lid. By shifting the lid slightly to the left or right you can ensure you are
on center.
4. By hand, install the three screws securing the lid to the base and then tighten with a hand held
screwdriver.
note: Do not cross-thread screws.
8
tIne replaceMent
Vintage Vibe tines are swaged from the nest quality of steel and should last indenitely under normal use.
However, continuous heavy playing can stress the tines past their elastic limit and may eventually cause break-
age. In the event a tine needs to be replaced, it can be changed quickly and easily.
*If you purchased a pre-cut replacement tine, skip to 5.
1. To ensure the proper length of the replacement tine, hold it against the needed tine
number on the cutting chart and mark the length with a marker.
2. With the tine cutting tool or a strong pair of wire cutters cut the tine along the marked line.
3. File the cut edge of the tine at in order to ensure proper voicing.
4. Slide the included tuning spring onto the tine (using a pair of pliers may help relieve the
crimp in the tuning spring.)
5. Use a 5/16” socket or nut driver to loosen the tone generator mounting screw and remove
the original generator block and tine from the tone bar.
6. Mount the replacement generator block and tine to the tone bar with the screwv removed
from the original. Ensure that the screw is tight and that the tine is in-line with the tone bar.
7. Slide the tuning spring forward and back to achieve proper pitch. Volume and tone
adjustments may be needed to voice the new tine to the rest of the piano.
note: It is advisable to locate and remove the broken end of the tine from the piano to ensure it does not
short the pickups or interfere with any action components.
fIgure 1 fIgure 2
9

troubleSHootIng
electronIcS
If the piano is not producing any sound check that it is properly plugged into an appropriate outlet, ensure
that the grounded cable is not defective, and with the piano unplugged from an outlet, check the piano’s
internal line fuse for a fault.
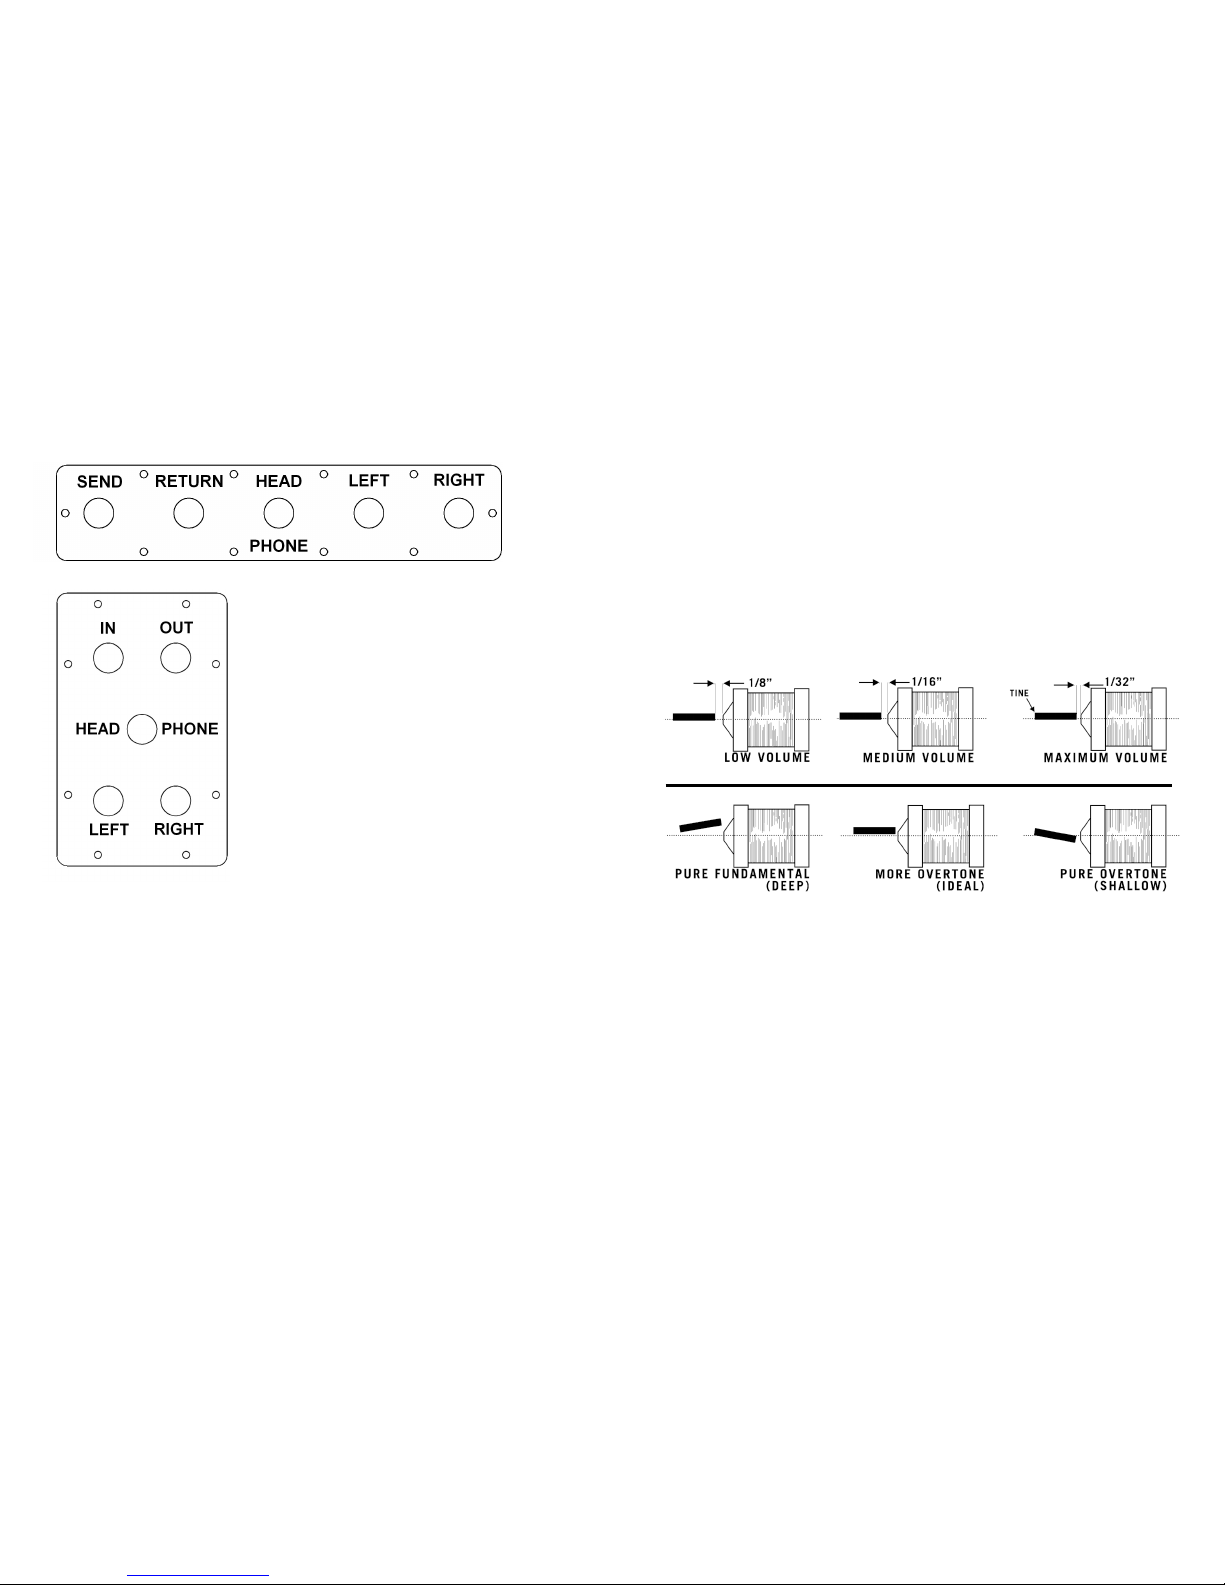
If the piano has power, but isn’t producing sound, plug a 1/4” cable from the OUT (Send) JACK to your
amplier. If the piano can be heard through the amplier, there may be an electronics issue or faulty con-
nection. Check that any 1/4” cables being plugged into the piano are functional and properly inserted.
Remove any effects pedals from the signal chain to ensure they are not at fault. Check that the RCA cable
connecting the harp to the jackboard (Active Model) or name rail (Passive Model) is rmly seated in the
RCA jack. Check that the harp is not at fault by plugging a 1/4” cable with RCA adapter between the harp
and an amplier. If the piano can be heard through the amplier, the harp is not the issue.
StIckIng keyS
If a key becomes sluggish or remains in a depressed position, one or more of the key bushings may have
swelled due to changing atmospheric conditions. First, check for left to right movement of the offending key.
A very slight amount of side-to-side movement should be present. If the front of the key feels tight, rock the
key back and forth over the key pin to free it.
If the key still sticks, the pin hole or balance rail bushings may be at fault, or the front key bushing may need
further spreading. Disconnect the piano from AC and all amplication. Remove the lid. On active models,
disconnect all jacks connecting the pre-amp to the jack plate. Remove two screws to unfasten the name rail
assembly and lift it out of the piano.
Lift the offending key out of the piano. Use a wedge such as a at head screwdriver to spread the key bush-
ings located under the key front, and on top of the key at the balance point. Do not twist the wedge, as split-
ting of the key may result. Use an awl to slightly spread the balance rail pin hole on the underside of the key.
Lift the hammer assembly to replace the key in the piano.
A key is properly eased when it falls to the depressed position upon lifting the hammer upwards.
10
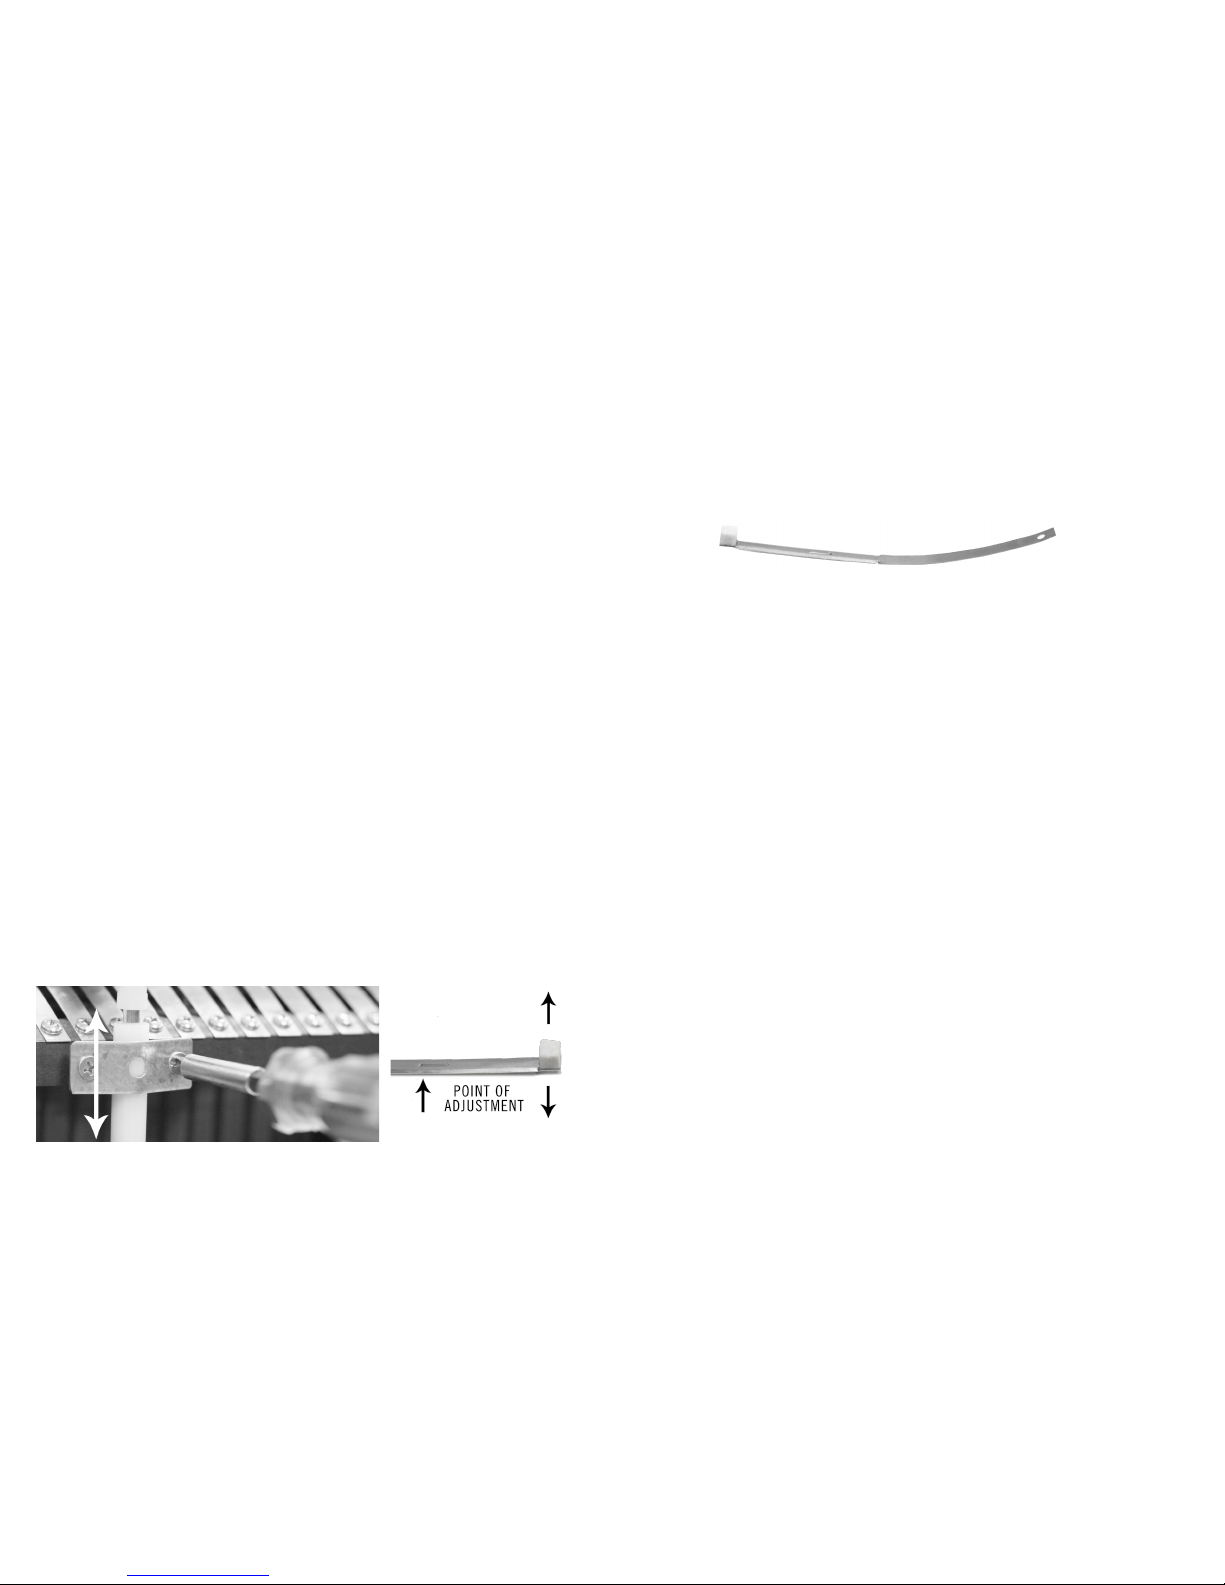
If some notes still sustain, it may be necessary to re-adjust the damper arm of the offending notes. First,
check that all action components (key, hammer, and damper arm) are returning to a proper “at rest” posi-
tion upon key release. Remove the three screws that fasten the harp to the support blocks and lift the harp
to the upright position. The damper arm is adjusted by slightly bending the arm just ahead of the bridle strap
(Fig. 4). If the damper displays insufcient tension to damp the note, or excess slack in the bridle strap,
remove the damper arm from the action rail and add a slight reverse bend to the arm (Fig. 5).
SuStaIn pedal MakeS “noISe”
It must rst be understood that depressing the Sustain Pedal on an electro-mechanical instrument will
generate some amount of noise. In this case, a sympathetic vibration is produced as all of the dampers are
suddenly removed from the tines. If additional noises are encountered…
1. Check that both Sustain Bar Hinge Pins are correctly seated in their Plastic Bushings located in
the Harp Supports.
2. Check that all Hinge Pin Mounting Screws are properly tightened.
3. Check that all Bridle Straps appear straight and tight.
note: On Seventy-Three note models, it may be necessary to periodically check the relation of the Damper
Bar and the Center Pin. At rest, the Center Pin should make solid contact with the Damper Bar WITHOUT
pushing any of the damper arms down. To check Center Pin tension, unscrew the three Harp Mounting
Screws and raise the Harp.
fIgure 5
SoMe noteS SuStaIn, eVen WItH SuStaIn pedal releaSed
See Sustain Pedal Installation. If problem persists with Sustain Pedal removed:
Remove piano lid. With Sustain Bar Arm raised by hand (thus disengaging dampers from tines), check that
Sustain Plunger moves freely through the Nylon Bushing. It may be necessary to loosen one of the two Strap
Screws slightly to ensure proper bind-free movement of the Plunger (Fig. 3)
fIgure 3 fIgure 4
11

12
noteS
13
This manual suits for next models
2
Table of contents
Other Vintage Vibe Musical Instrument manuals