Visara 5350 User manual

5350 Monochrome Laser Printer
Quick Start Guide
This device fulfils the European standards requirements by complying with the Direc-
tive of the Commission dated May 3, 1989 (89/336/EEC) relating to electromagnetic
compatibility and the Directive dated February 19, 1973 (73/23/EEC) relating to low-
voltage electricalequipment.Conformitywiththeabovementioned Directives isindicated bythe
CE symbol attached to the device.
Note: Conformity may be affected by:
■using interface cables not complying with the specifications
■non-observance of important instructions in the operator's manual
■installing components not approved for this device by the manufacturer
■unauthorized manipulation
Important Information
This equipment generates and uses radio frequency energy
and if not installed and used properly, that is, in accordance
with the manufacturer's instructions, may cause interference
in radio and television reception. It has been type tested and
found to comply with the limits for class B computing devices
in accordance with the specification in subpart J of part 15 of
FCC rules, which are designed to provide reasonable protec-
tion against such interference in a residential installation.
However, there is no guarantee that interference will not oc-
cur in a partial installation. If this equipment doescause inter-
ference to radio or television reception, which can be
determined by turning the equipment off and on, the user is
encouraged to try to correct the interference by one or more
of the following measures:
■Reorient the receiving antenna,
■Relocate the peripheral away from the receiver,
■Move the peripheral away from the receiver
■Plug the peripheral into a different outlet, so that the peri-
pheral and receiver are on different branch circuits
If necessary, the user should consult the dealer or an experi-
enced radio/television technician for additional suggestions.
The user may find the following booklet, prepared by the Fe-
deral Communications Commission, helpful: “How to Identify
and Resolve Radio-TV Interference Problems”.
This booklet is available from the U.S. Government Printing
Office, Washington DC 20402 Stock No. 004.000.00345.4.
WARNING: To comply with FCC regulations on electroma-
gneticinterferencefor aclassBcomputingdevice,theprinter
cable must be shielded. To assure compliance with FCC re-
gulations for a computing device, use a shielded interface ca-
ble with a metal shell connector. The use of cables not
properly shielded may result in violating FCC regulations.
This digital apparatus does not exceed the class B limits for
radio noise emissions from digital apparatus as set out in the
radio interference regulations of the Canadian department of
communications.
This unit complies with DOC standard C108.8-M 1983
ATTENTION: Leprésent appareil numérique n'ement pas de
bruitsradioélectriquesdéspassantleslimitesapplicablesaux
appareils numériques de la classe B prescrites dans lerègle-
ment sur le brouillage radio-électrique édicté par le minstère
des communications du Canada.
The paper used is made of raw materials treated
with a chlorine-free bleaching process.
WARNING For continued protection against risk of fire, replace only with same type and rating of fuse. Only trained and qualified
personnel may open covers or remove parts that are not explicitly shown and described in the User Guide as being
accessible to the operator.

Quick Start Guide Table of contents
i
ENGLISH
Table of contents
Chapter 1 Introduction . . . . . . . . . . . . . . . . . . . . . . . . . . . . . . . . . . . . . . . . . . . . . . . . 1
About this manual . . . . . . . . . . . . . . . . . . . . . . . . . . . . . . . . . . . . . . . . . . . . . 1
Conventions . . . . . . . . . . . . . . . . . . . . . . . . . . . . . . . . . . . . . . . . . . . . . 1
General Safety Guidelines. . . . . . . . . . . . . . . . . . . . . . . . . . . . . . . . . . . . . . . 2
Safety Precautions . . . . . . . . . . . . . . . . . . . . . . . . . . . . . . . . . . . . . . . . 2
Handling the Printer. . . . . . . . . . . . . . . . . . . . . . . . . . . . . . . . . . . 2
Printer Components. . . . . . . . . . . . . . . . . . . . . . . . . . . . . . . . . . . . . . . . . . . . 3
Chapter 2 Setting Up Your Printer . . . . . . . . . . . . . . . . . . . . . . . . . . . . . . . . . . . . 6
Checking Your Package. . . . . . . . . . . . . . . . . . . . . . . . . . . . . . . . . . . . . . . . . 6
Preparing a Location for the Printer. . . . . . . . . . . . . . . . . . . . . . . . . . . . . . . . 7
Dimensions. . . . . . . . . . . . . . . . . . . . . . . . . . . . . . . . . . . . . . . . . . . . . . 7
Installation Precautions. . . . . . . . . . . . . . . . . . . . . . . . . . . . . . . . . . . . . 7
Space Requirements . . . . . . . . . . . . . . . . . . . . . . . . . . . . . . . . . . . . . . 8
Installation procedure. . . . . . . . . . . . . . . . . . . . . . . . . . . . . . . . . . . . . . . . . . . 9
Removing the Tape . . . . . . . . . . . . . . . . . . . . . . . . . . . . . . . . . . . . . . . 9
Installing Options . . . . . . . . . . . . . . . . . . . . . . . . . . . . . . . . . . . . 9
Installing the Toner Cartridge . . . . . . . . . . . . . . . . . . . . . . . . . . . . . . . 10
Loading Paper . . . . . . . . . . . . . . . . . . . . . . . . . . . . . . . . . . . . . . . . . . 13
Connecting the Power Cord . . . . . . . . . . . . . . . . . . . . . . . . . . . . . . . . 16
Turning the Printer On . . . . . . . . . . . . . . . . . . . . . . . . . . . . . . . . . . . . 16
Printing a Configuration Summary . . . . . . . . . . . . . . . . . . . . . . . . . . . 18
Example of a Configuration Summary. . . . . . . . . . . . . . . . . . . . 19
Setting an IP address manually . . . . . . . . . . . . . . . . . . . . . . . . . . . . . . . . . . 20
9035
Quick
Start
Guide
-
en
.
book
Seite
i
Donnerstag
,
9
.
November
2006
3:12
15

Table of contents Quick Start Guide
ii
Chapter 3 Installing Printer Drivers. . . . . . . . . . . . . . . . . . . . . . . . . . . . . . . . . . . 23
Driver Installation. . . . . . . . . . . . . . . . . . . . . . . . . . . . . . . . . . . . . . . . . . . . . 23
TGNet Admin administration program . . . . . . . . . . . . . . . . . . . . . . . . . . . . . 25
Chapter 4 Specifications. . . . . . . . . . . . . . . . . . . . . . . . . . . . . . . . . . . . . . . . . . . . . 27
Chapter 5 Options and supplies . . . . . . . . . . . . . . . . . . . . . . . . . . . . . . . . . . . . . . 28
9035
Quick
Start
Guide
-
en
.
book
Seite
ii
Donnerstag
,
9
.
November
2006
3:12
15
Quick Start Guide Chapter 1 Introduction
1
ENGLISH
Chapter 1
Introduction
About this manual
This quick start guide is intended to provide guidance for the proper installation
of your printer. If you require more information to install your printer, consult
the User Guide located on the CD-ROM. For further help, please contact your
dealer or responsible representative (see addresses at the rear cover page of this
manual).
Conventions
This following conventions are used throughout this manual to emphasize
certain procedures or information:
NOTE: A note is a tip or extra information that may be helpful in installing or using the
printer.
CAUTION: A caution message provides information that may help you avoid equipment
damage, process failure, or inconvenience. Read all caution messages carefully.
WARNING! A warning message indicates the possibility of personal injury if a specific
procedure is not performed exactly as described in the guide. Pay close attention to these sections
and read them fully to prevent possible injury.
STOP
9035
Quick
Start
Guide
-
en
.
book
Seite
1
Donnerstag
,
9
.
November
2006
3:12
15
Chapter 1 Introduction Quick Start Guide
2
General Safety Guidelines
Before operating the printer, read the following instructions carefully:
zFollow all the operating procedures provided in this manual.
zFollow all the hazard warnings on the printer and in the manual. Failure to do
so can cause injury to yourself or damage to the printer.
zDo not make perform any operation or action in any way other than provided
in this manual. When in doubt, contact your dealer or service company.
zKeep in mind that hazard warnings in this manual or on the printer cannot
cover every possible case, as it is impossible to predict and evaluate all circum-
stances beforehand. Be alert and use your common sense.
For detailed informations informations on Safety Guidelines please refer to the User Guide on
the CD-ROM.
Safety
Precautions
This printer is available in the power specifications 110 V and 230 V. The
specifications that apply to your printer depend on your machine configuration.
To prevent fire or shock hazards, connect the power plug only to a properly rated
power outlet.
Handling the
Printer
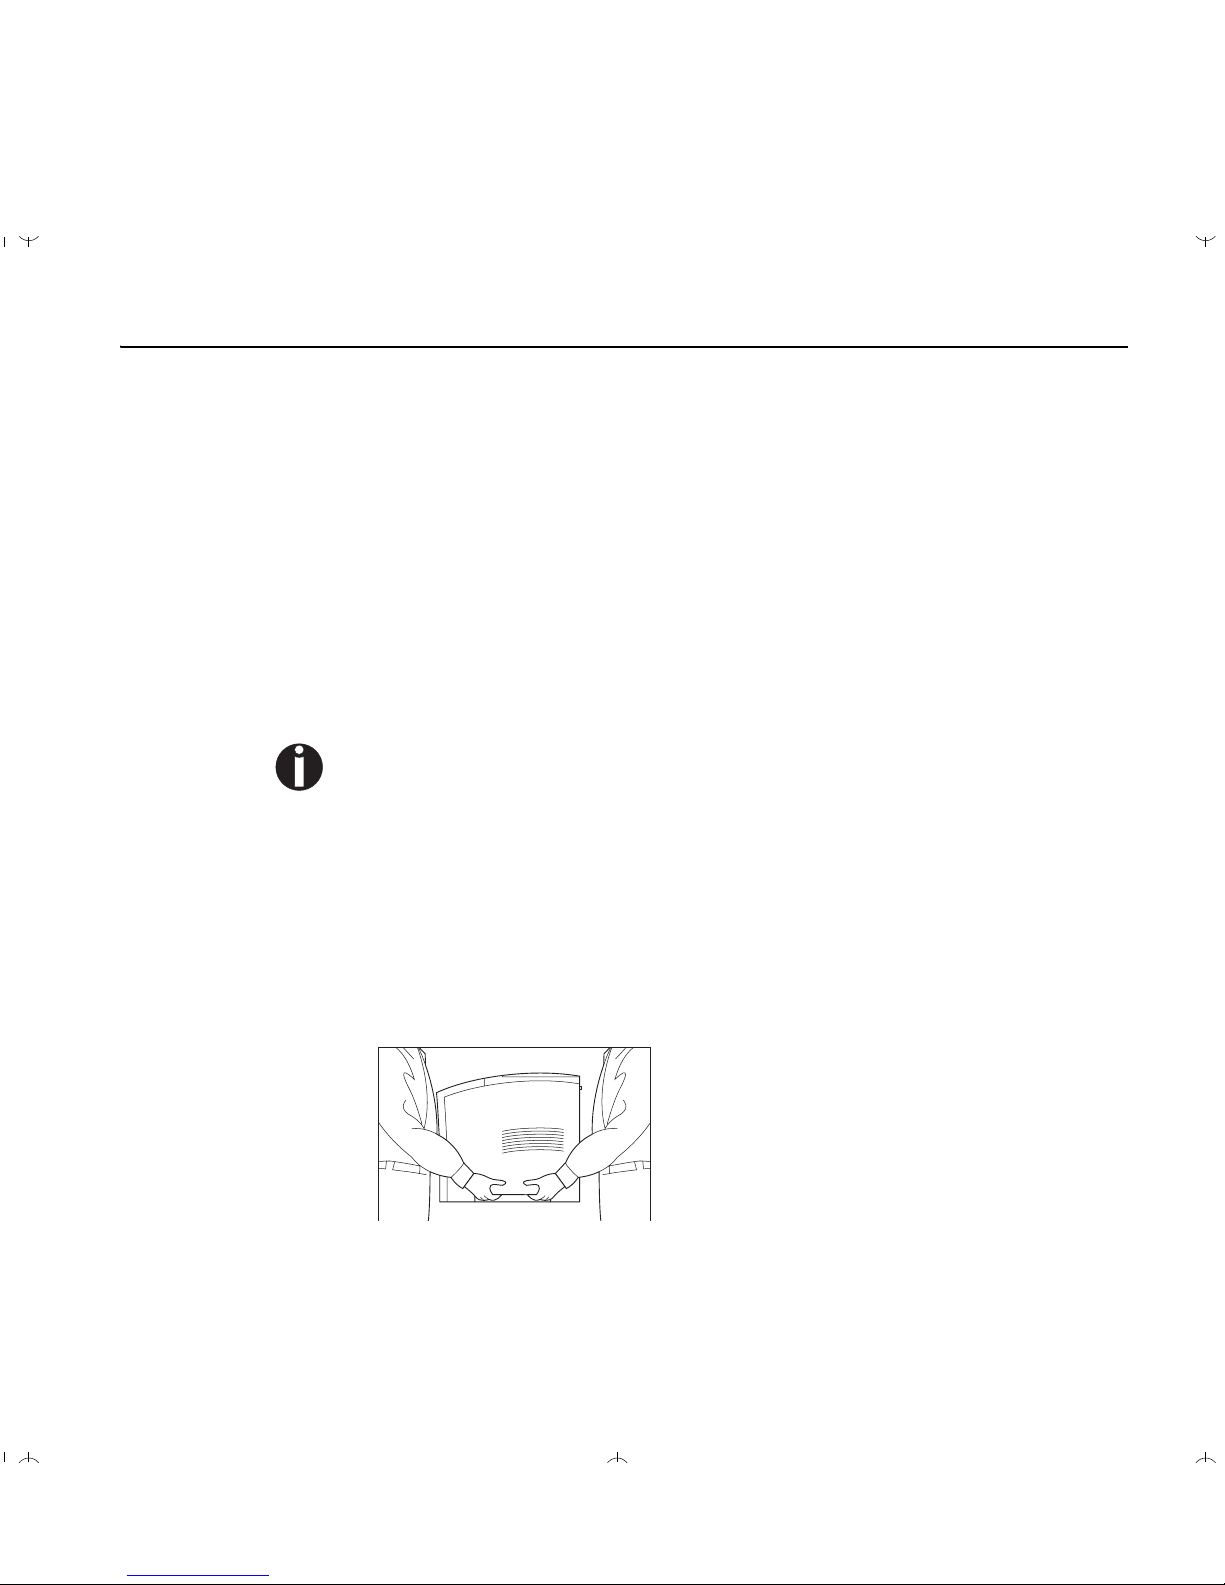
zThe weight of the printer without paper tray, toner cartridge, and paper is
about 21 kg (46 lbs). Never attempt to lift the printer alone.
zTo lift the printer, have two individuals facing each other from the front and
the rear of the printer grasp the recessed areas on each side of the printer. Do
not lift the printer by grasping any area other than these recessed areas.
9035
Quick
Start
Guide
-
en
.
book
Seite
2
Donnerstag
,
9
.
November
2006
3:12
15
Quick Start Guide Chapter 1 Introduction
3
ENGLISH
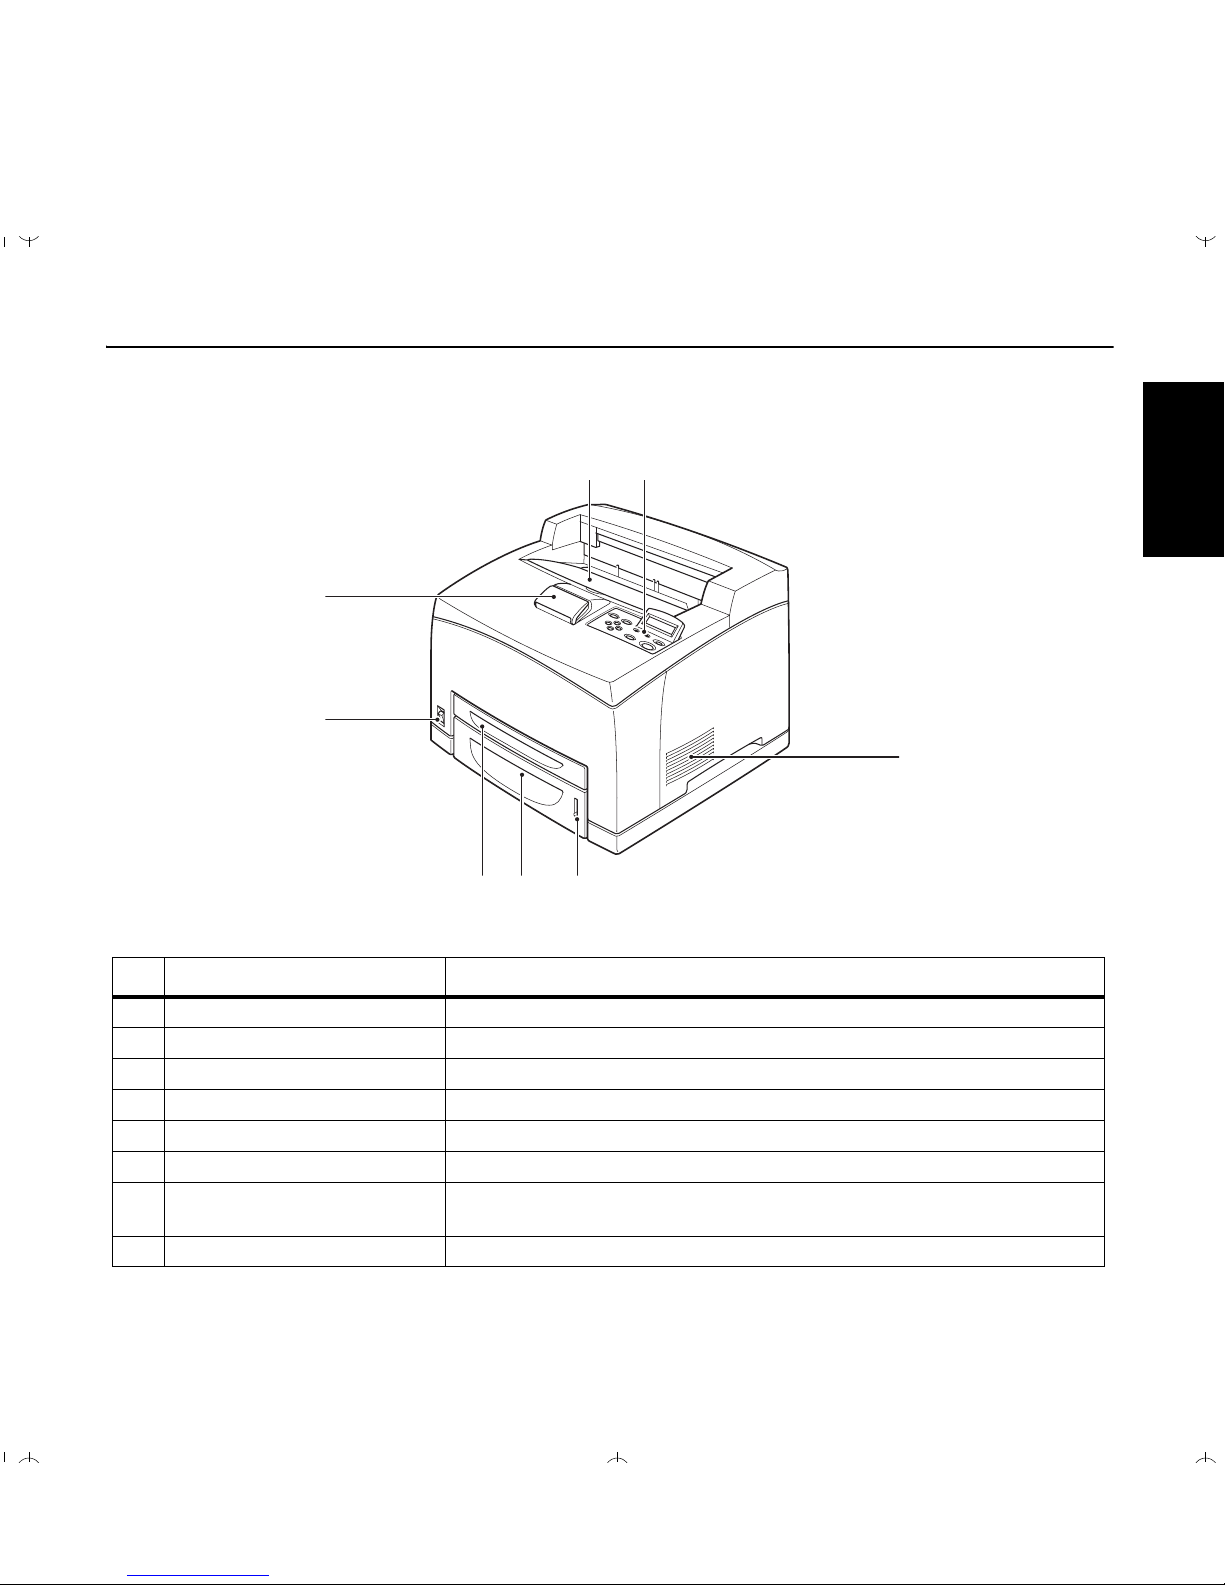
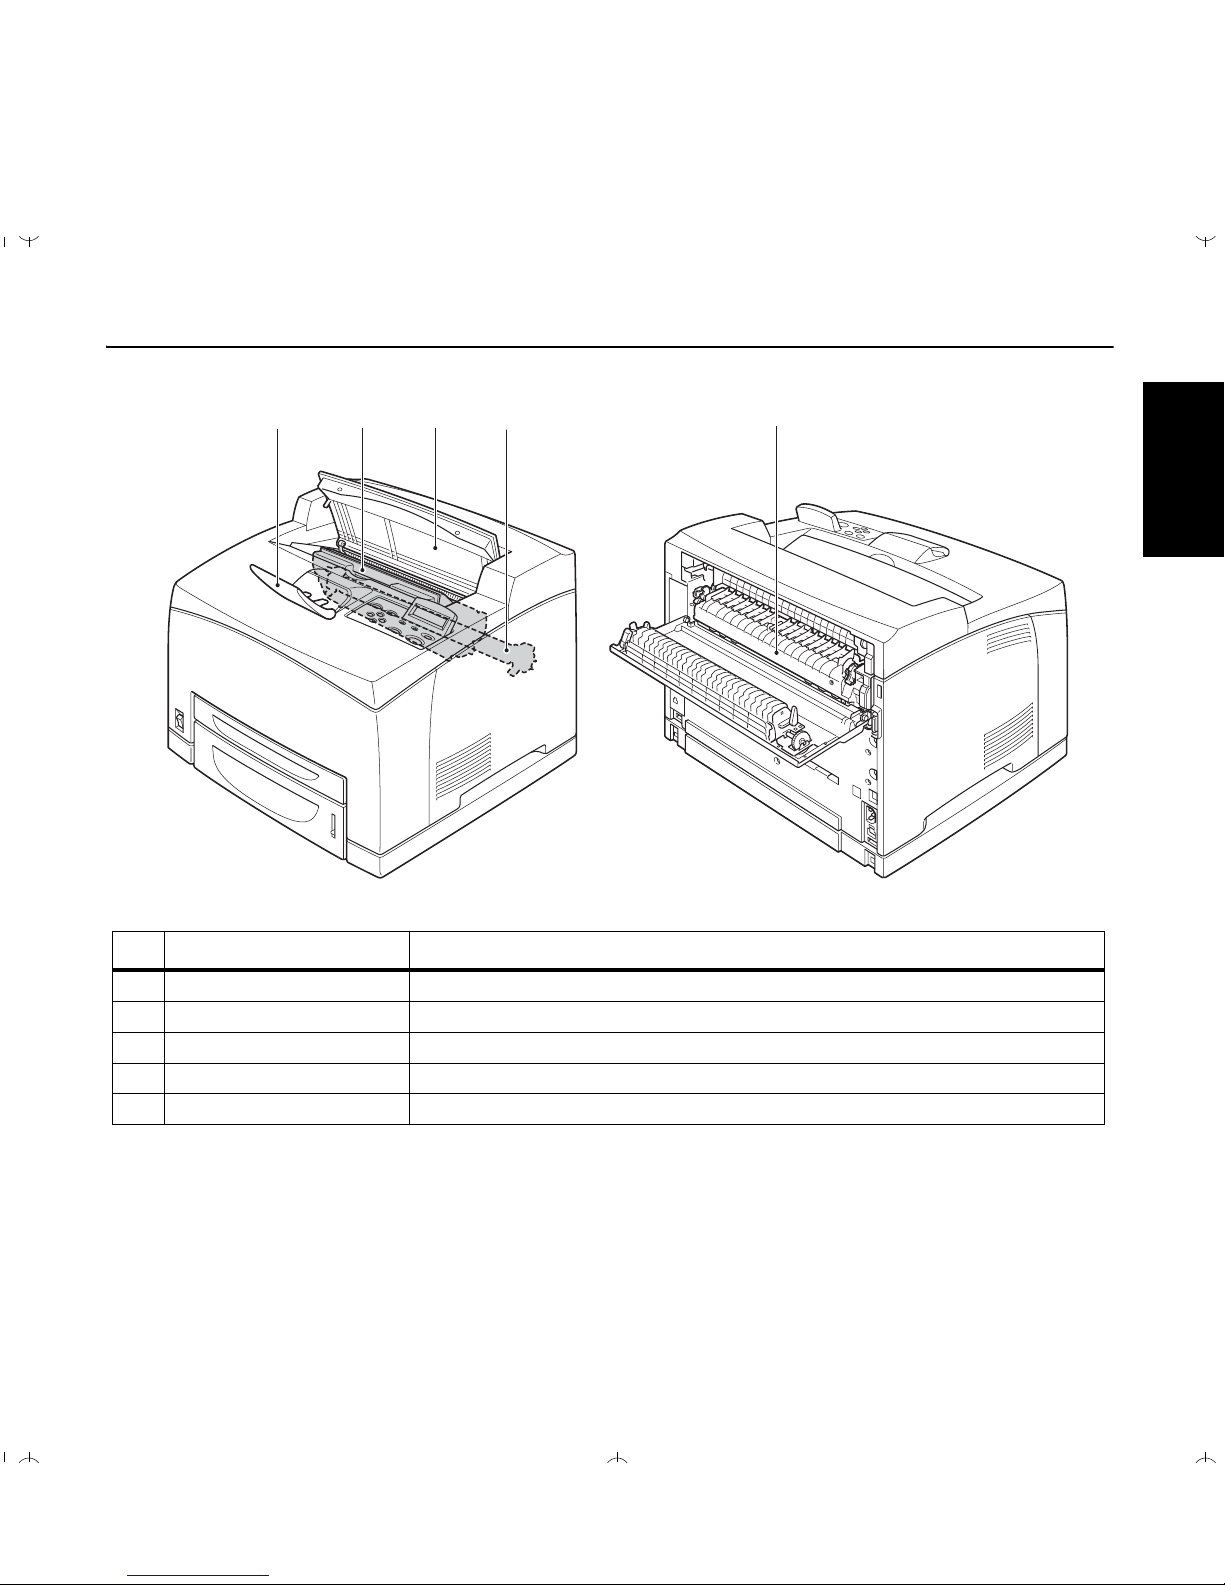
Printer Components
12
3
45
6
7
8
No. Name Description
1 Center output tray Print jobs are output with the printed side facing down.
2 Control panel Consists of operation buttons, indicators, and the display.
3 Ventilation hole Releases heat to prevent the interior of the printer from heating up.
4 Paper meter Indicates the amount of paper remaining.
5 Paper tray (A4/150 sheets) Load paper here.
6 Paper tray (A4/550 sheets) Load paper here.
7 Power switch Switches the power of the printer on and off. Pushing the switch to the <I> side
switches it on and pushing it to the <O> side switches it off.
8 Paper stopper Raise this when printing on paper larger than A4 size.
9035
Quick
Start
Guide
-
en
.
book
Seite
3
Donnerstag
,
9
.
November
2006
3:12
15

Chapter 1 Introduction Quick Start Guide
4
23
4
5
1
1
6
No. Name Description
1 Ventilation hole Releases heat to prevent the interior of the printer from heating up.
2 Duplex module connector Connect the optional duplex module here.
3 Power cord connector Connect the power cord here.
4 USB port Connect the USB cable here.
5 Ethernet 10/100 port Connect the Ethernet cable here.
6 Parallel port Connect the parallel cable here.
9035
Quick
Start
Guide
-
en
.
book
Seite
4
Donnerstag
,
9
.
November
2006
3:12
15
Quick Start Guide Chapter 1 Introduction
5
ENGLISH
1235 4
No. Name Description
1 Paper stopper Raise this when printing on paper larger than A4 size.
2 Toner Cartridge Contains the toner and the photosensitive drum.
3 Top cover Open this when replacing the Toner Cartridge and removing jammed paper.
4 Fuser unit Fixes the toner on the paper. Do not touch this when using the printer as it is hot.
5 Transfer roll cartridge Transfers the toner image on the surface of the photosensitive drum to the paper.
9035
Quick
Start
Guide
-
en
.
book
Seite
5
Donnerstag
,
9
.
November
2006
3:12
15

Chapter 2 Setting Up Your Printer Quick Start Guide
6
Chapter 2
Setting Up Your Printer
Checking Your Package
Before installing the printer, check that all the items are contained in the package.
Should any components be missing or damaged, contact your dealer.
Printer
Toner Cartridge
Power cord
Paper tray (A4/150 sheets), paper tray (A4/550 sheets)
Quick Start Guide
and CD-ROM
9035
Quick
Start
Guide
-
en
.
book
Seite
6
Donnerstag
,
9
.
November
2006
3:12
15
Other manuals for 5350
1
Table of contents
Other Visara Printer manuals


