Sagem PHOTO EASY 160 User manual

S
Date en cours : 21 avril 2005
C:\Documents and Settings\G097447\Bureau\LU AZUR 251985 569A PHOTO EASY 1606 langues\Couvertures\PDG PHOTO EASY 160.fm
User guide
Livret d’utilisation
Bedienungsanleitung
Manual del usuario
Manuale dell'utente
Gebruiksaanwijzing
Manual do utilizador
SAGEM
PHOTO EASY 160
PDG PHOTO EASY 160.fm Page 1 Jeudi, 21. avril 2005 3:30 15

Notes.fm Page 100 Mercredi, 29. septembre 2004 10:40 10

- I -
ENGLISH
DEUTSCH
ESPAÑOL
ITALIANO
NEDERLANDSPORTUGUÊS FRANÇAIS
1WELCOME 1
2DISCOVER YOUR PHOTO PRINTER 3
3USER INTERFACE 4
4PREPARE YOUR PHOTO PRINTER 6
Connect the mains supply 6
First ribbon installation 7
To change the ribbon 8
Loading paper 10
5PRINTING FROM AMEMORY CARD 12
Insert a memory card 12
Print your photographs 14
Rapid printing 14
Example of rapid printing from a memory card 15
Create a contact sheet (index) 17
Prepare a series of photographs for printing
(print basket function) 18
Print in DPOF (Digital Print Order Format) mode 21
6PRINTING FROM ADIGITAL CAMERA (PICTBRIDGE MODE)22
Printing in PictBridge mode 23
7PRINTING FROM AMOBILE PHONE OR
OTHER PERIPHERAL DEVICE 24
Infrared transfer 24
Bluetooth transfer (optional) 26
8FUNCTION CRYSTAL IMAGE 28
Activation/deactivation 28
9PRINTING FROM APC 29
10 PROCESSING THE CONTENT OF THE MEMORY CARD
FROM YOUR PC 31
11 REPLACEMENT OF CONSUMABLES 33
Liasse AZUR_GB.book Page I Jeudi, 21. avril 2005 4:09 16

- II -
12 MAINTENANCE 34
Cleaning the print head 34
Paper jam 35
Problems 36
Error messages 38
Technical data 40
13 ENVIRONMENT 41
14 GUARANTEE 42
Liasse AZUR_GB.book Page II Jeudi, 21. avril 2005 4:09 16

- 1 -
ENGLISH
DEUTSCH
ESPAÑOL
ITALIANO
NEDERLANDSPORTUGUÊS FRANÇAIS
1WELCOME
Thank you for purchasing our new photo printer. With this high quality printer
you can get the most out of your digital photos. In a few simple steps you can
produce photo prints identical to those from a professional developer, for your
personal use or to share with friends and family.
Your photo printer has slots for all types of memory card and hooks up
directly to digital cameras. Its Crystal Image picture optimisation guarantees
perfect printing and reproduction quality for your photos. With Crystal Image,
you can also correct red-eye on photos taken with a flash.
This user guide takes you in easy steps through:
• Setting up your photo printer.
• Printing photos from a flash card.
• Printing from a digital camera.
• Printing photos transferred from a mobile phone or other device.
• Installing the image processing software and print driver on your PC.
• Keeping your photo printer in good working order and solving any
problems.
The CD-ROM included with your kit contains an additional guide with
instructions for using the image processing software and printer driver on
your PC.
You can also find at the www.sagem.com website:
• software upgrades.
• answers to Frequently-Asked Questions (FAQ).
• a list of compatible devices.
Liasse AZUR_GB.book Page 1 Jeudi, 21. avril 2005 4:09 16

- 2 -
Safety instructions and recommendations
• Do not install your photo printer in a humid room (bathroom, laundry,
kitchen, etc.), or within 1.50 m of a tap or water source, or outside. The
printer should be operated within an ambient temperature range of 10 °C to
35 °C. Your printer should be used at an ambient temperature of between
15°C and 35°C for optimum printing results.
• Do not set up your printer in a dusty environment as dust deposits might
adversely affect the print quality of your photos.
• Only the power supply provided with the printer should be used. Connect
this to the mains in accordance with the installation instructions in this user
guide and the information on the identification label affixed to the power
supply (voltage, current, mains frequency). As a precaution, in case of
danger, the mains adapters act as a disconnecting mechanism for the 230V
power supply. They should be placed near the device and should be easily
accessible.
• Never open the cover of the film cartridge compartment during printing.
This could break the film and cause printer malfunction.
• Only use SAGEM consumables, if not you are likely to damage the
equipment and invalidate the guarantee. To obtain the references of the
consumables (Refer to paragraph Replacement of consumables, page -33).
• The CE marking certifies that the product meets the main requirements of
the European Parliament and Council directive 1999/5/CE on
telecommunications terminal equipment, regarding safety and health of
users, and regarding electromagnetic interference.
The declaration of compliance can be consulted on the site www.sagem.com
category "support", or can be requested at the following address:
E- Customer relations department
4 rue du Petit Albi - 95800 Cergy Saint-Christophe - FRANCE
Liasse AZUR_GB.book Page 2 Jeudi, 21. avril 2005 4:09 16

- 3 -
ENGLISH
DEUTSCH
ESPAÑOL
ITALIANO
NEDERLANDSPORTUGUÊS FRANÇAIS
2DISCOVER YOUR PHOTO PRINTER
Place the box in front of you, open the packaging and check that you have
received the items listed below:
1. Photo printer.
2. User manual.
3. CD-ROM.
4. Ink ribbon*(consumable).
5. Photo paper* (consumable).
6. Paper tray.
7. Power supply unit.
8. Mains cable.
*
depending on model
1
6
4
2
7
8
5
*
*
S
Userguide
Livretdutilisation
Bedienungsanleitung
Manualdelusuario
Manualedell'utente
Gebruiksaanwijzing
SA
SA
GEM
GEM
PHO
PHO
TO EASY 155
O EASY 155
Liasse AZUR_GB.book Page 3 Jeudi, 21. avril 2005 4:09 16

- 4 -
3USER INTERFACE
Keypad description
1. On/Off button (press and hold).
2. Last photo selection button.
3. Next photo selection button.
4. Number of copies to print button.
5. Photo format button.
6. Print button.
7. Cancel button (C).
8. Print basket button.
9. Crystal Image button (Automatic print quality enhancement and red-eye
correction).
C
1
2
3
4
5
6
7
8
9
Liasse AZUR_GB.book Page 4 Jeudi, 21. avril 2005 4:09 16

- 5 -
ENGLISH
DEUTSCH
ESPAÑOL
ITALIANO
NEDERLANDSPORTUGUÊS FRANÇAIS
Display description
The following information is available on screen:
1. Number of the selected photo.
2. DPOF mode.
3. Presence of the selected photo in the print basket.
4. Number of copies to be printed.
5. Crystal Image function icon.
6. Print format.
7. Red-eye correction function icon.
8. Ribbon error.
9. Paper error.
10. Consumable card icon (smart card).
11. Timer icon that flashes during printer activity.
12. Print basket function.
13. Number of the sheet to be printed.
12 3
4
5
6
7
8
9
10
11
12
13
Liasse AZUR_GB.book Page 5 Jeudi, 21. avril 2005 4:09 16

- 6 -
4PREPARE YOUR PHOTO PRINTER
CONNECT THE MAINS SUPPLY
Remark : When installing your printer near a wall or some other object, keep an open space of at
least 4 inches at the back of the printer, to make sure the movement of the sheet of paper
being printed is not obstructed.
Please refer to the safety instructions at the beginning of this user guide
before making any connections.
Insert one end of the mains lead into the corresponding socket of the power
supply.
Connect the power supply to the printer as shown in the illustration below.
Plug the other end of the power supply mains lead into a wall socket.
Press and hold the On/Off button [x] on the top panel of the printer until three
dashes appear on screen.
Your printer has two USB connectors:
- a SCSI Mass storage master USB connector (A) for connecting a camera
(PictBridge mode), USB key or Bluetooth adapter...,
- a slave USB connector (B) for connecting to a master terminal (such as a
PC)
Remark : To obtain the list of devices compatible with this USB port (A), visit the site
www.sagem.com.
A
BA
B
Liasse AZUR_GB.book Page 6 Jeudi, 21. avril 2005 4:09 16

- 7 -
ENGLISH
DEUTSCH
ESPAÑOL
ITALIANO
NEDERLANDSPORTUGUÊS FRANÇAIS
FIRST RIBBON INSTALLATION
Remark : Use manufacturer consumables only. These are specially designed to provide opti-
mum print quality (see Chapter 10).
Remark : Smart card validation is not necessary for the use of consumables supplied with the
printer (nature of supplies dependent on the model).
Switch on the printer. Wait 10 seconds for the printhead to lift, then:
1. Open the external flap located on the right-hand side of the printer.
2. Remove the protective foam.
3. Take the new ribbon out of its packaging and make sure that the film is
stretched after removing the card (A).
4. Install the ribbon in the position shown in the illustration below.
5. Insert the ribbon so that it is firmly seated in its housing. The locking catch
must be closed after insertion.
6. Close the external flap.
Warning : Never touch the film cartridge with your fingers. Make sure the cartridge is
completely inserted into the printer. Check that the green locking lever is correctly
lowered.
Remark : In the event of any difficulty, check that there are no foreign objects in the film car-
tridge compartment.
A
6
Liasse AZUR_GB.book Page 7 Jeudi, 21. avril 2005 4:09 16
- 8 -
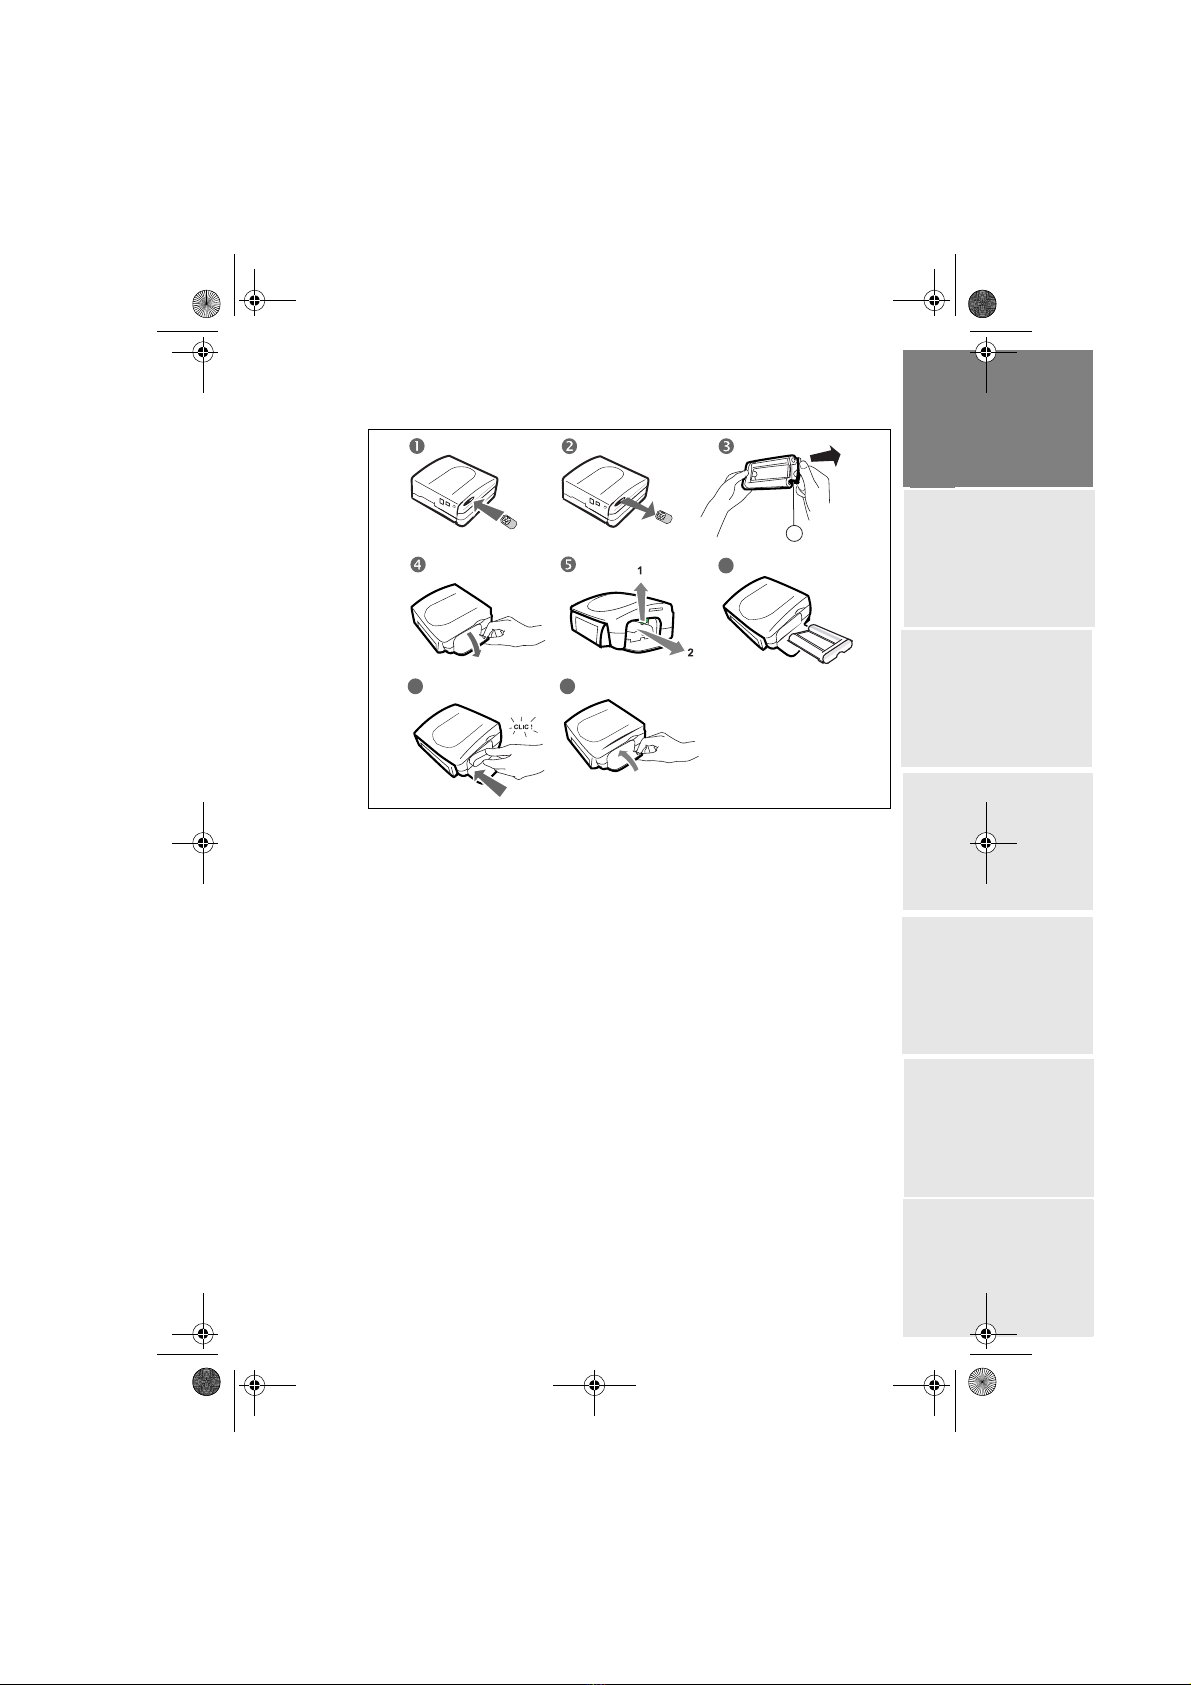
TOCHANGE THE RIBBON
Remark : Use manufacturer consumables only. These are specially designed to provide optimum
print quality.
Switch on the printer. Wait 10 seconds for the printhead to lift, then:
1. Take the smart card supplied with the ribbon and photo paper and insert it in
the reader on the printer's left-hand side. The smart card is recognised and read
by the printer, and once the procedure is complete the wording: "40 End" or
"120 End" appears on screen.
2. Remove the SIM card.
3. Take the new ribbon out of its packaging and make sure that the film is
stretched after removing the card (A).
4. Open the external flap located on the right-hand side of the printer.
5. Lift the locking lever and remove the used ink ribbon.
6. Install the ribbon in the position shown in the illustration below.
7. Lift the locking lever and push in the film cartridge until it touches the back of
the compartment the locking lever must be locked after insertion.
8. Close the external flap.
Remark : If the ribbon is replaced during a print job, you can resume printing where you left off
by pressing the button.
Liasse AZUR_GB.book Page 8 Jeudi, 21. avril 2005 4:09 16
- 9 -
ENGLISH
DEUTSCH
ESPAÑOL
ITALIANO
NEDERLANDSPORTUGUÊS FRANÇAIS
Warning : Never touch the film cartridge with your fingers. Make sure the cartridge is
completely inserted into the printer. Check that the green locking lever is correctly
lowered.
Remark : In the event of any difficulty, check that there are no foreign objects in the film car-
tridge compartment.
A
6
7 8
Liasse AZUR_GB.book Page 9 Jeudi, 21. avril 2005 4:09 16

- 10 -
LOADING PAPER
1. Pull the paper tray out of the printer.
2. Open a pack of paper with the protection sheet on the top, insert it in the
paper tray, making sure the rectangle reserved for postage stamps is on the
outside of the tray, that is, towards you.
3. Remove the protection sheet.
4. Line up the tray with its compartment and push it in slowly until the
locking system clicks.
Your photo printer is now ready to print your digital photographs.
Warning : handle paper sheets by their pre-cut edges, never allow your fingers to come into contact
with the shiny surface before printing.
Protection sheet
Liasse AZUR_GB.book Page 10 Jeudi, 21. avril 2005 4:09 16

- 11 -
ENGLISH
DEUTSCH
ESPAÑOL
ITALIANO
NEDERLANDSPORTUGUÊS FRANÇAIS
Warning : protect consumable items against prolonged exposure to light, humidly, heat and
dust. Respect the operation conditions set out (Refer to paragraph Technical data,
page -40). Use only the manufacturer consumables designed for this printer. The
paper tray should never contain more than 20 sheets at any one time.
Warning : Make sure that a previously printed photograph has not been slipped inadvertently
into a packet of blank pages; this could damage the ribbon of your printer.
Liasse AZUR_GB.book Page 11 Jeudi, 21. avril 2005 4:09 16

- 12 -
5PRINTING FROM AMEMORY CARD
INSERT AMEMORY CARD
Insert your memory card into the corresponding slot, as shown in the illustrations
below.
Warning : SmartMedia, CONTACTS FACING DOWNWARDS.
Warning : The memory cards do not enter fully in the reader slot.
DO NOT USE FORCE UNDER ANY CIRCUMSTANCES.
If a card does not enter properly, remove it and check that you are introducing it in the
correct slot and with the right orientation.
Warning : Printing of picture by ascending order relatively to the date of the pictures on the memory
board will be achieved if parameters "dates and hour" have been set on your camera
before the catch of pictures. Otherwise pictures will be read and printed in a random
order.
Slot compatible
with Compact Flash
format
Slot compatible
with Smart Media (SM),
Carte xD formats
Slot compatible with
Multi Media Card (MMC)
Standard Digital (SD) formats
Slot compatible
with Memory
Stick (MS) format
Liasse AZUR_GB.book Page 12 Jeudi, 21. avril 2005 4:09 16

- 13 -
ENGLISH
DEUTSCH
ESPAÑOL
ITALIANO
NEDERLANDSPORTUGUÊS FRANÇAIS
Card Location
Smart Media
(SM)
Memory Stick
(MS)
Standard
Digital
(SD)
Multi Media
Card
(MMC)
Carte xD
CompactFlash
Liasse AZUR_GB.book Page 13 Jeudi, 21. avril 2005 4:09 16

- 14 -
PRINT YOUR PHOTOGRAPHS
Your printer is switched on, and you have inserted a memory card.
The timer icon flashes while the printer is loading data. After a few seconds, the
number of photographs found on the memory card is displayed on the screen.
Your photos are printed in four stages. The printer first prints the three colours:
yellow, magenta and cyan in that order, then deposits a protective film on the sheet
of paper, and finally ejects the photo.
Remark : To enable you to handle your photographs under the right conditions, the size of the
sheets of paper is greater than the printed surface and the two lateral edges are pre-cut.
After printing, do not tear these edges abruptly, fold along the dotted line several
times and then gently tear off the edges.
Idea : The edges can be removed on a number of photos at a time by superimposing them on
each other.
RAPID PRINTING
Select the number of the photograph required using the
or keys.
Remark : If you press and hold the button, you can advance the photo number in steps
of ten, which can be useful when dealing with a large number of photos.
Press the key to set the number of copies.
Press the key to select print format.
You may select a predefined format to print the photographs:
• Print your photograph in format 10 x 15 cm full page, no border .
• Print your photograph in format 10 x 15 cm with a white border .
• Print your photograph in format 10 x 13 cm .
• Print 2 photographs per page .
Liasse AZUR_GB.book Page 14 Jeudi, 21. avril 2005 4:09 16

- 15 -
ENGLISH
DEUTSCH
ESPAÑOL
ITALIANO
NEDERLANDSPORTUGUÊS FRANÇAIS
• Print 4 photographs per page .
• Print 8 photos per page
• Print 20 photographs per page (contact sheet or index) .
Once the selection is made, press the key to start printing.
If printing is interrupted due to a lack of paper, paper jam or empty film
cartridge, the printing operation may be restarted where it was interrupted by
pressing the key after the necessary replacement or defect correction is
performed.
Idea : Using the pre-printed reverse side postcard you can quickly send your photograph
to friends, family, etc.
Idea : Hold the key down for 3 seconds to reinitialise the printer and return to the
default status, such as when inserting a card.
EXAMPLE OF RAPID PRINTING FROM AMEMORY CARD
The memory card contains 5 photographs. We want to print photograph
number 3, 4 times on the same sheet of paper.
Press and hold the On/Off button until three dashes appear on screen.
Insert the memory card into the correct printer slot.
After an analysis and recognition phase, the validated quantity of photos
appears on screen.
C
Liasse AZUR_GB.book Page 15 Jeudi, 21. avril 2005 4:09 16

- 16 -
Select photograph 3, using the key (press 4 times).
Press the key until the figure 4is displayed (that is 4 copies)
.
Press the key until the 4 images/page graphic is selected.
The figure 1should be displayed as the number of sheets necessary for the printing
operation.
Press the key to start printing.
Liasse AZUR_GB.book Page 16 Jeudi, 21. avril 2005 4:09 16
Table of contents
Languages:
Other Sagem Printer manuals


