ViseeO MBU-3000 User manual

MBU-3000 User Instruction
1
User Manual
Preface
This publication, including all photographs, illustrations and software, is
protected under international copyright laws, with all rights reserved. Neither this
manual, nor any of the material contained herein, may be reproduced without
the express written consent of the manufacturer, September 2012.
Trademarks
Other product names mentioned herein are used for identification purpose only
and may be trademarks and/or registered trademarks of their respective
companies.
Limitation of Liability
While reasonable efforts have been made to ensure the accuracy of this manual,
the manufacturer and distributor assume no liability resulting from errors or
omissions in this manual, or from the use of the information contained herein.

MBU-3000 User Instruction
2
Foreword & Important Note on Safety!! (MUST READ BEFORE
STARTING)
Please read this note before you install and use MBU-3000 Bluetooth Upgrade
Adaptor!
Congratulation on becoming the MBU-3000 owner!
ViseeO MBU-3000 is the latest and one of the simplest Bluetooth Handsfree
System ever designed for your Mercedes Benz. You will be able to connect the
latest mobile phones to the handsfree system, sync phonebook and
dial/answer a call from vehicle's original steering wheel control or head unit
keypads. Moreover, it allows you to manage phonebooks and also activate
voice assistant wirelessly. Although ViseeO MBU-3000 is very easy to install
and operate it is still recommended that you read all chapters in this manual
before using the adaptor.
Road Safety
We strongly advise that full attention is to be paid to the traffic conditions
whenever the vehicle is moving. Distraction of attention can lead to dangerous
traffic situation. Even when using a handsfree car kit driver is always advised to

MBU-3000 User Instruction
3
avoid phone call during a difficult and complex traffic situation.
Warning!!! Do not attempt to press MBU-3000’s button while driving at the same
time!
Use Only Approved Replacement Parts
Please always use official parts for your ViseeO unit as unknown spare or
replacement parts may lead to malfunction.

MBU-3000 User Instruction
4
Table of Content
1. Core Components.................................................................................................................................5
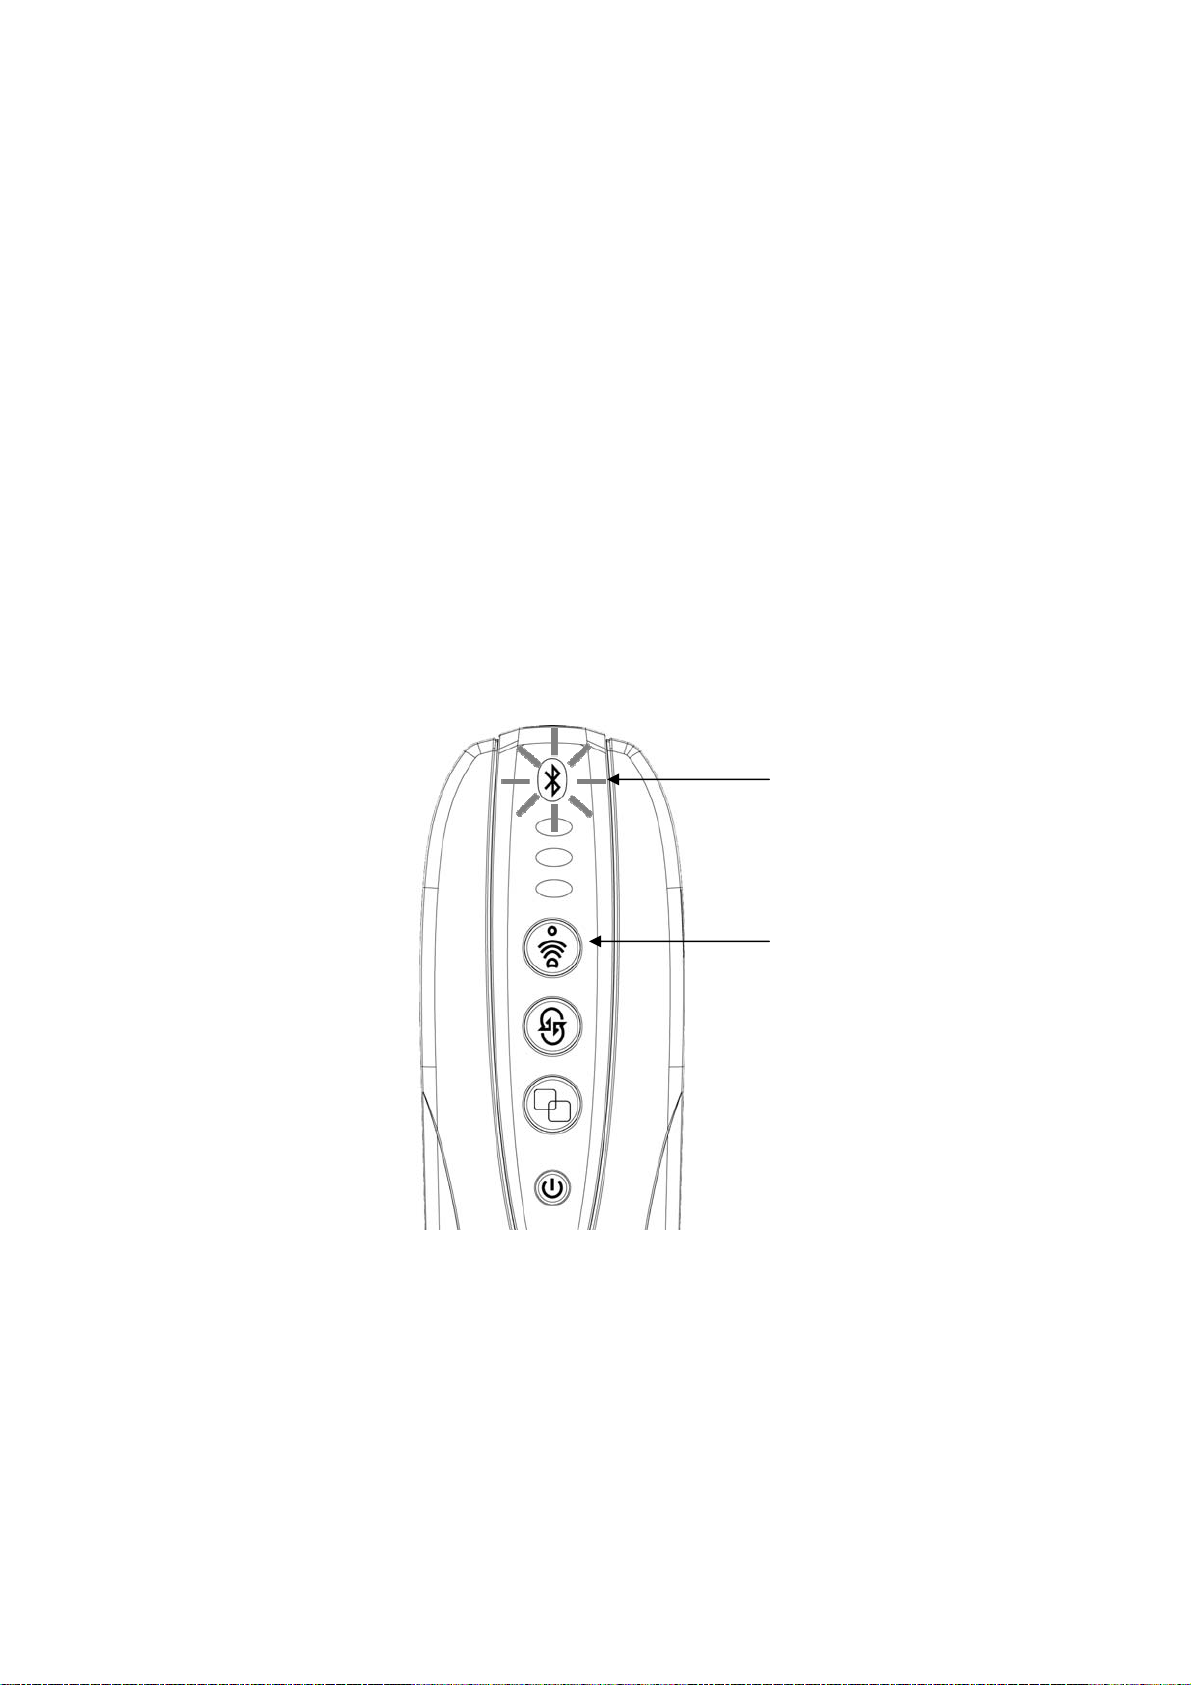
2. Understanding your MBU-3000 buttons and LED indicators ......................................................5
3. Identify your cradle and software settings .......................................................................................6
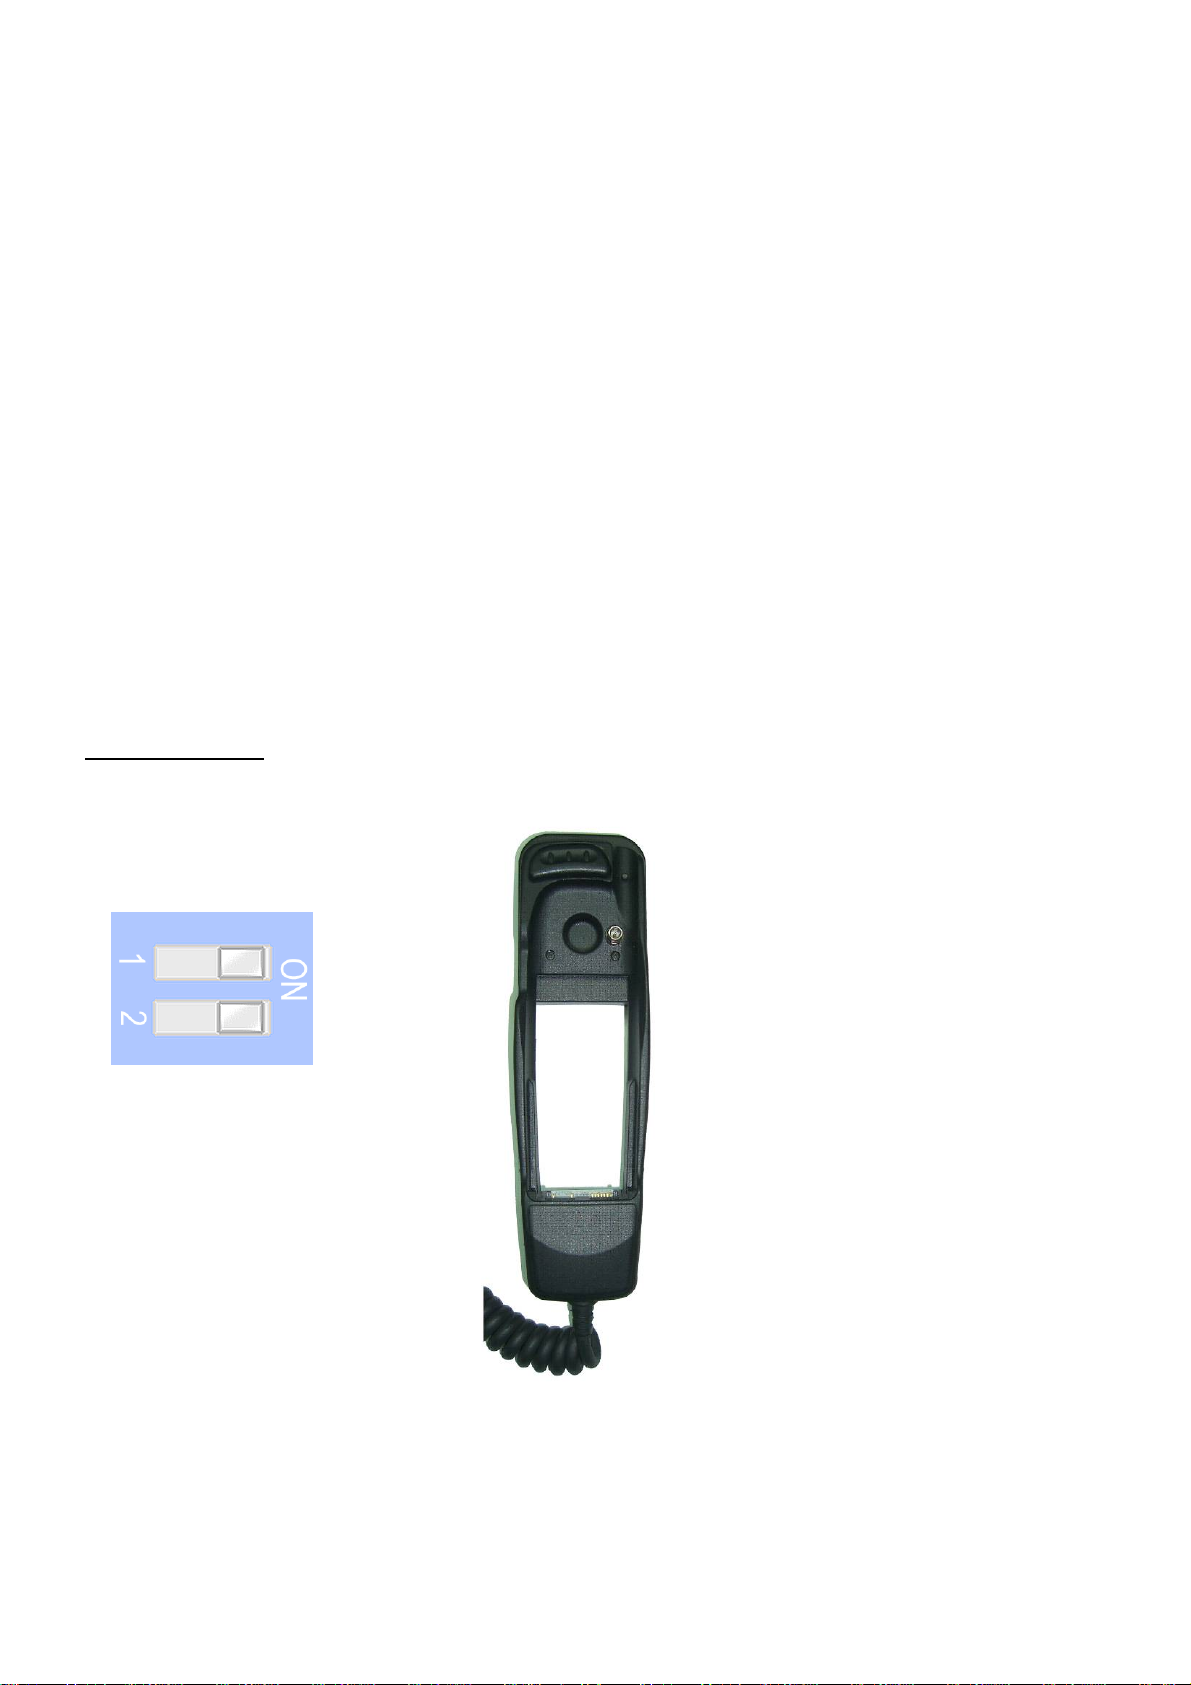
6150 Cradle.........................................................................................................................................6
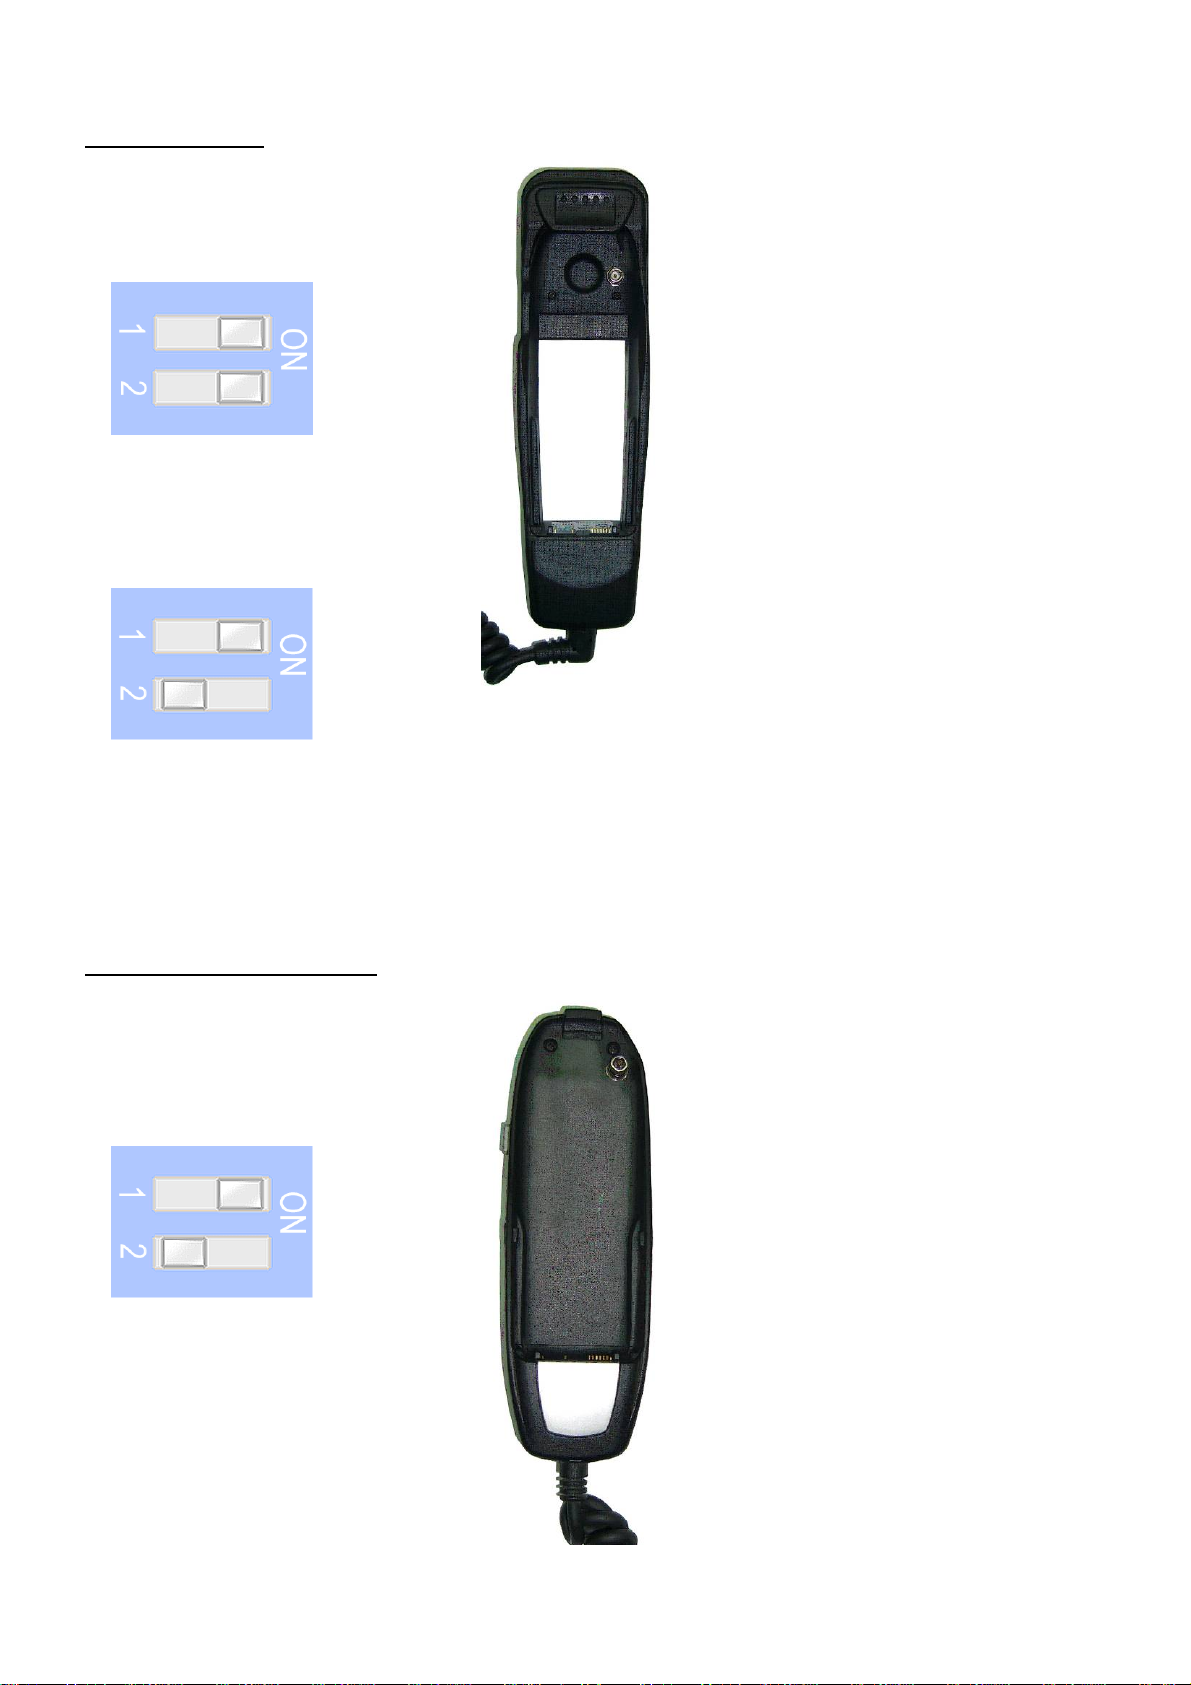
6210 Cradle.........................................................................................................................................7
6310/6310i Type 1 ............................................................................................................................7
6310/6310i Type 2 ............................................................................................................................8
4. Installing the main unit .........................................................................................................................9
5. Microphone volume setting .................................................................................................................9
6. Pairing...................................................................................................................................................10
7. To pair more then one phone...........................................................................................................10
8. Phones Connection Priority ...............................................................................................................11
9. To Quickly Switch Between Paired Phone......................................................................................11
10. Making and Receiving a Phone Call .............................................................................................12
11. Phonebook Synchronization............................................................................................................12
Note on Independent Phonebook:...............................................................................................13
12. Phonebook Type Management ......................................................................................................14
13. Sync On/Off .......................................................................................................................................16
14. Voice Assistant Activation (SIRI function activation).................................................................17
15. Soft Reset...........................................................................................................................................17
16. Master Reset (Factory Default Setting) ........................................................................................18
17. Privacy Call.........................................................................................................................................19
18. Controlling MBU-3000 from the Comand Console...................................................................19
19. Check Software Version...................................................................................................................20
20. Software Upgrade.............................................................................................................................21

MBU-3000 User Instruction
5
1. Core Components
Carefully unpack your MBU-3000 and ensure the following items are
not missing:
♦Main Unit
♦Dummy Antenna
♦CPU Upgrade Cable
2. Understanding your MBU-3000 buttons and LED indicators
1. Pairing/Bluetooth connection indicator
2. Sync and Phonebook Type LED
indicator
3. Pairing mode button
4. Phonebook type & Sync on/off button
5. Quick switch for paired phones
6. Soft Reset & Master Reset button
7. Microphone volume dial
8. Dummy Antenna Port
9. Software Setting Dip Switch
10. CPU Software Upgrade Port
c
d
e
f
h
gi
j
k
l
Dummy antenna is
only required for
Nokia 6150 cradle

MBU-3000 User Instruction
6
3. Identify your cradle and software settings
Your MBU-3000 is designed to work with 4 different types of
Mercedes original cradles:
I. 6150
II. 6210
III. 6310/6310i (Type 1)
IV. 6310/6310i (Type 2)
Once you have determined the cradle type you will need to choose the
right software setting on your MBU-3000 so it can communicate with
your original cradle. The software setting dip switch is located at back
of MBU-3000 (see “
Section 2. Understanding your MBU-3000
buttons and LED indicators”
for further information).
6150 Cradle
Software A Required
For Nokia 6150

MBU-3000 User Instruction
7
6210 Cradle
OR
Note:
If you have a Nokia 6210 cradle on your Mercedes, it is advised that you try both software
first to decide which one is the smoothest setting to use with your Comand console.
6310/6310i Type 1
Software A Required
Software B Required
Software B Required
For Nokia 6210
For Nokia 6310/
6310i Type 1

MBU-3000 User Instruction
8
6310/6310i Type 2
Here is a software summary table below:
Software A Software B
Cradle 6150 6210 6310/6310i
Software Type A A/B B
Software B Required
For Nokia 6310/
6310i Type 2

MBU-3000 User Instruction
9
4. Installing the main unit
Locate your cradle and carefully place the main
unit inside the cradle until the unit is firmly
attached to it. If your cradle is a 6150 type you
will need to plug the dummy antenna on top of
the MBU-3000’s dummy antenna port before
you attach the unit to the cradle.
5. Microphone volume setting
There are mainly two types of original microphone settings that come
with your car. To work at the optimum performance it is required to
identify the type of microphone you have and adjust the microphone
level accordingly.
For single microphone vehicles:
If you have a single microphone you will need to decrease the
microphone volume by turning the knob downwards to the lower end:
For multiple microphone vehicles:
If you have multiple microphones you will probably need to increase
the microphone volume by turning the knob upwards to the top end:
Once you have set up the microphone level you must soft reset
MBU-3000 to allow the setting to become effective (Please refer to
“
Section 15. Soft Reset”
for further information).
Mic Volume Down
Mic Volume Up
Dummy Antenna

MBU-3000 User Instruction
10
6. Pairing
Place MBU-3000 on the original cradle, and turn on audio system to
power up the unit. Press and hold the Pairing Mode button on the
device for 5 seconds or more until the Bluetooth connection indicator
starts flashing to indicate the pairing mode has been activated. Turn
on the Bluetooth function on the mobile and search for available
device nearby. After the unit has been detected, the device name:
ViseeO MBU-3000 should appear on the mobile phone. Select the
device to pair and enter the password “1234” when prompted a
passcode request. Once connected, the Bluetooth connection
indicator turns solid white to indicate the connection has been
established. You will also see the car audio system showing “In
Service” or “ViseeO” which means you are now ready to use
handsfree from your Comand console.
7. To pair more then one phone
MBU-3000 can remember the pairing settings and phonebooks for
up to four phones. To pair another phone with MBU-3000, simply
activate the pairing mode again by pressing the Pairing Mode button
for 5 seconds and follow all the procedures as described in “
Section
6
.
Pairing”
to pair another phone.
Press the Pairing mode
button for 5 seconds to
enter pairing mode
Flash: Pairing Mode
activated
Solid: Connected to a
Bluetooth phone

MBU-3000 User Instruction
11
8. Phones Connection Priority
MBU-3000 can be paired up to 4 mobile phones with the highest
priority always goes to the most recent connected phone and lowest
priority to the earliest connected one. If no more pairing space is
available the fifth paired phone MBU-3000 will erase the pairing that
has the lowest priority and moved other two pairing to the lower
pairing priorities.
9. To Quickly Switch Between Paired Phone
If you have more than one phone paired you can quickly switch
between the paired phones using the Quick Phone Switch button on
MBU-3000. To switch between phones press the button to switch to
the next phone. Please make sure the phone you would like to switch
to is with you and its Bluetooth function is switched on. Alternatively,
you can switch between the paired phones from the Comand console
by dialing 7*0# and pressing the Call button to activate the command.
For further information on this function please refer to “
Section 18.
Controlling MBU-3000 from the Comand Console”
of this manual,
Press the Quick Phone
Switch button to switch
to the next paired
phone
Flash: Disconnected
Solid: Successfully
connected to the next
phone in priority

MBU-3000 User Instruction
12
10. Making and Receiving a Phone Call
Once you have connected your phone with MBU-3000 you will be able
to make or receive a phone call using the Comand console’s keypads
or the keypads on your steering wheel if your vehicle supports it. To
make a phone call, please make sure Comand console displays “In
Service” or “ViseeO” on the original display. Dial the telephone using
the keypads on your Comand console and press down the Rotation
knob or Call button to dial out. Alternatively you can access the
phonebook and select a desired phonebook entry to dial out if you
have already completed phonebook synchronization on MBU-3000.
(Please refer to “
Section 11. Phonebook Synchronization
” for further
information).
11. Phonebook Synchronization
If your phone supports the phonebook sync protocol provided by
MBU-3000 you will be able to take the advantage of the automatic
phonebook upload function. The phonebook sync process is divided
into two stages:
1. From mobile phone to MBU-3000
2. From MBU-3000 to Comand console.
The Rotation
Knob

MBU-3000 User Instruction
13
As soon as your phone is connected with MBU-3000 it will upload
contacts in your phone memory to the MBU-3000’s memory. When
this process is completed MBU-3000 will then transfer the contacts
to the Comand console. This will cause a temporary disconnection
between MBU-3000 and Comand console (you will see a message
such as ‘Please insert telephone’ or ‘TEL Error’, etc. on the screen)
please just wait until the connection comes back. As soon as the
connection is re-established MBU-3000 will begin to transfer the
contacts from its memory to your Comand console and you can
check whether the transfer is done by accessing the phonebook
function on the Mercedes display to see if the contact emerges.
To access your phonebook, simply press TEL button on the Comand
console. Then, select Phonebook to enter TEL Phonebook menu and
Press Read Phonebook to enter the phonebook list. Search the name
using the navigation buttons (or rotation knob) on your Comand
console. To call out, simply press the knob or select the Call button
on the Comand console to call out.
Note on Independent Phonebook:
Each phone has its own phone book profile, which means when
phone A connects user will not be able to access Phone B’s uploaded
contacts and vice versa when Phone B is in connection. Each
individual phonebook can hold up to 256 or 400 telephone numbers
entries depending on the chosen software setting on the MBU-3000
(see note below for further information).
Note:
To access phonebook you must wait for the phonebook sync to be completed. If
Comand console does not allow you to choose the Phonebook option that means
phonebook sync is still in progress.
Some phones may not support automatic phonebook synchronization. If your phone
does not synchronize after establishing the connection with MBU-3000 please always
check if MBU-3000’s Phonebook SYNC function is ON first (see “Section 13 Sync
On/Off” for further information). If this function is already on and you are still unable to
sync it is very likely that your phone does not support MBU-3000’s phonebook sync
protocol. You can check your phone model against MBU-3000’s compatibility list
available at ViseeO’s website.

MBU-3000 User Instruction
14
Phonebook sync speed varies between phone models and size of the phonebook. For
some phones, the synchronization to MBU-3000 is almost instant but for others it may
take longer.
The transfer from MBU-3000 to the Comand console may take a while depending on the
phonebook size. Once transfer is completed you will be able to see the phonebook
entries when accessing the TEL Phonebook screen.
Contacts are sent in the order according to the phone's memory slot distribution via
Bluetooth. Different head units will have different way of sorting the phonebook
nonetheless, you will be able to quickly access the contact entry you desired by
searching through the alphabetic index.
Auto sync will only sync the phonebook entries stored in phone memory. If you wish to
sync the phonebook stored in the SIM card please copy the contact entries to your phone
memory and sync again (by pressing the Soft Reset button).
Depending on the MBU-3000’s software selected, for each paired phone you will be able
to transfer up to 256 (Software A) or 400 (Software B) entries to the Comand console
from MBU-3000. If your phone has more than 256 (or 400) entries Comand console will
randomly pick up 256 (or 400) entries to be displayed on your screen. You can use the
Phonebook Type Management function to filter out the numbers you do not want to view
and select only the most desired telephone numbers to show on the Comand console
display (please see “Section 12 Phonebook Type Management” for further information).
When transferring phonebooks from a Samsung Galaxy Phones (W, R, S2, and etc.) or
some other Android phones you will be asked whether to accept an outside access to
your phonebook (normally this is notified by your phone’s notification bar at the top of
the display). You will need to accept the access to your phonebook on your phone in order
to allow the sync to proceed (This can be done by dragging down the notification bar
when your phone alerts you that an outside device is trying to access your phonebook,
and then select this notification to accept). If you are not sure how to use the notification
bar please refer to your phone manual for further information.
12. Phonebook Type Management
Most phonebook functions on smartphones allow user to organize
contact numbers into various types of telephone numbers. For
instance, home, mobile, fax or work. MBU-3000 allows user to select
the desired types of phonebook to upload into the Comand console.
This function will be particularly useful for user with a large phonebook
in the mobile phone as they can assign a certain phonebook type to
the most essential phone numbers, for instance, Mobile type. On your

MBU-3000 User Instruction
15
MBU-3000 choose “Mobile type” to be the phonebook type for sync
and MBU-3000 will only send the entries that are assigned with
mobile type to be display on the original Comand console screen.
There are 3 combinations of phonebook types you can select from:
1. All type – means to upload all phonebooks regardless of their
type.
2. Mobile type – means to upload Mobile type of telephone
number only.
3. Mobile+Work type – means to upload both Mobile and Work
types of numbers.
To select the phonebook type, simply press the Phonebook Type
button on MBU-3000 to select between three phonebook types. If
Mobile type is chosen the Green LED light will be on. If Mobile + Work
type is chosen the Blue LED light will be on. If All type is chosen both
Green LED and Blue LED will not be on.
Phonebook Type Selected LED Indicator
Mobile Green LED ON Blue LED OFF
Mobile + Work Green LED OFF Blue LED ON
All Type Green LED OFF Blue LED OFF
Note:
Once you have chosen the desired phonebook types MBU-3000 will resend the
Press the Phonebook
Type button for once to
select between different
phonebook types for
sync
Green LED ON: Mobile Type
phonebook selected
Blue LED ON: Mobile+Work
Type phonebook selected
Green and Blue LED Off: All
Type phonebook selected

MBU-3000 User Instruction
16
phonebook into the Comand console this will cause a temporary disconnection between
MBU-3000 and Comand console. After the connection is re-established please wait
until transfer is completed before accessing the phonebook
Tips: If you wish to exclude some contacts from the phonebook displayed on the Mercedes
screen then simply edit these numbers on your mobile phone or outlook program and
categorize them in the phonebook types other than the ones you want to select for auto sync.
As Comand console can only accept up to 256 or 400 entries to load into its system, you can
select the most important numbers to load into Comand console using this feature especially
if you have a large quantity of phonebook entries stored on your phone memory.
13. Sync On/Off
As MBU-3000 will sync your phonebook every time when the
connection with the phone is re-established you may not want
MBU-3000 to perform this function every time you re-enter your
vehicle. You can therefore, switch off the automatic sync function on
your MBU-3000 by pressing the Phonebook Type button for 5 seconds
until you see the white LED light disappears. To switch it on again,
press the Phonebook type button for 5 seconds until you see the white
LED light becomes solid white.
Press the Phonebook
type button for 5 seconds
to switch between Sync
ON or OFF
Flash: Phonebook sync in
progress
Solid: Auto sync has
been turned on
Light Off: Auto sync has
been turned off

MBU-3000 User Instruction
17
14. Voice Assistant Activation (SIRI function activation)
SIRI assistant on your iPhone can be wirelessly activated via
MBU-3000. To activate SIRI wirelessly dial 7*7 and press the Call
button . When hearing the SIRI beep speaks like handsfree to ask
SIRI to send SMS, read a new SMS, jolt down a note or even to call
some one for you. Once activated you have 60 seconds to perform
the function. If you wish to perform another one before the 60
seconds end you will need to press Hang-up button
to end the
activation before you can activate it again.
Note:
This function will work with iPhone 4S or iPhone 5 SIRI and other phones that are
equipped with compatible voice command functions.
Once you activate SIRI using Comand console keypads MBU-3000 will open up the
microphone and speaker for 60 seconds. During this time if SIRI asks you questions
back then you will be able to talk to SIRI without reactivation. If you do not hear the
beeping sound from SIRI or if SIRI has completed the task you have just requested
before the 60 seconds end you will need to press the Hang-up button before you can
use 7*7 command again.
If you make a call via SIRI, in-car speakers and microphone should remain open through
out your call.
It is advised that you try out the SIRI activation function a few times while car is stationed
just to get a feel how to operate it from your Comand console.
SIRI, iPhone 4S and iPhone 5 are the products and registered trademarks of Apple Inc.
Warning! You should pay attention to the road at all time when driving. Do not
attempt to use this function while driving through a complicated traffic area.
15. Soft Reset
To soft reset the device, simply press the Reset button at the bottom
of the device. This will cause a temporary disconnection between
MBU-3000 and your mobile phone. When reconnected, MBU-3000
will restart the sync process (please make sure the sync function of
MBU-3000 is switched on).

MBU-3000 User Instruction
18
16. Master Reset (Factory Default Setting)
To clear all pairing information and phonebook please enter the
master reset mode by pressing and hold the Reset button for 5
seconds or more until all LED lights on MBU-3000 become solid.
Then press the Reset button again to confirm the master reset. If you
have activated the master reset and wish to cancel it please press any
other button to cancel it when master reset mode is activated (i.e. all
LED lights stays on).
Press the Reset button
once to soft reset the
MBU-3000
Press the Reset button for
5 seconds until all LED
lights stay solid to enter
the master reset mode.
Then, press the Reset
button again to confirm
resetting the unit back to
its default settings or
press any other button to
leave the master reset
mode.

MBU-3000 User Instruction
19
17. Privacy Call
To switch between handsfree and handset during a call you will need
to perform the function directly on your mobile phone. Since you will
need to hold a mobile phone at your hand in order to change to
privacy call therefore, it is strongly advised that this should only be
carried out while car is safely parked.
18. Controlling MBU-3000 from the Comand Console
You can perform the following three major functions of MBU-3000
directly from the Comand console keypads:
1. Quick switch between paired phones
2. SIRI (Voice Assistant) activation
3. Sync On/Off
To quickly switch between paired phones press 7*0# on your Comand
console keypads and press the Call button
to activate the switch.
As soon as you activate the function MBU-3000 will disconnect with
the current phone and re-connect with the next phone in priority. If
you wish to perform this function again you must wait for the
connection to be established before the Comand console will allow
you to dial again.

MBU-3000 User Instruction
20
To activate SIRI (voice assistant), you will need to press 7*7 on your
Comand console keypads and press the Call button
to activate.
For further information on SIRI (voice assistant) activation please
refer to “
Section 14. Voice Assistant Activation”
of this manual.
To quickly activate sync, please press 8*0# on your Comand console
keypads and press Call button
to activate. This will force
MBU-3000 to turn the Sync on and immediately activate the Sync.
For further information on Sync On/Off function please refer to
“
Section 13. “Sync On/Off”
of this manual.
19. Check Software Version
To check the current software version on your MBU-3000 power up
your Comand console and MBU-3000. Press and hold the Pairing
Mode button and Phonebook Type button for 5 seconds or more until
you see a set of number appearing on the Comand console display.
Write the number down and check the number against the latest
download from our website.
To leave the software version screen soft reset MBU-3000 by
pressing the Reset button once.
Press and hold the Pairing
Mode button and Phonebook
Type button for 5 seconds
until you see a set of number
appearing on the Comand
console.
Table of contents
Other ViseeO Automobile Accessories manuals