Vision-EL 78390 Operation and maintenance manual

7022
5
Changement aléatoire
Random change
Cambio aleatorio
6
7
8
9
Réglable
Adjustable
Ajustable
Regolabile
Verstellbar
Réglable
Adjustable
Ajustable
Regolabile
Verstellbar
Réglable
Adjustable
Ajustable
Regolabile
Verstellbar
Réglable
Adjustable
Ajustable
Regolabile
Verstellbar
Non Réglable
No Adjustable
No Ajustable
Non Regolabile
Nicht Verstellbar
Non Réglable
No Adjustable
No Ajustable
Non Regolabile
Nicht Verstellbar
1
Changement progressif des couleurs
Gradual change of colors
Cambio gradual de colores
Cambiamento graduale di colori
Schrittweise Änderung der Farben
2
Changement progressif de la lumière blanche
Progressive change of white light
Cambio progresivo de luz blanca
Cambiamento progressivo della luce bianca
ProgressiveVeränderung des weißen Lichts
3
Changement progressif RGB
RGB progressive change
RGB cambio progresivo
Cambiamento progressivo RGB
RGB progressive Änderung
4Sept couleurs au choix
Seven colors to choose
Siete colores para elegir
Changement progressif de la lumière rouge + 3 clignotements
Progressive change of red light + 3 ashes
Cambio progresivo de luz roja + 3 ashes
Cambiamento progressivo della luce rossa + 3 lampeggi
ProgressiverWechsel des roten Lichts + 3 blinkt
Changement progressif de la lumière verte + 3 clignotements
Progressive change of green light + 3 ashes
Cambio progresivo de luz verde + 3 ashes
Cambiamento graduale della luce verde + 3 lampeggi
Schrittweise Änderung des grünen Lichts + 3 blinkt
Changement progressif de la lumière bleue + 3 clignotements
Progressive change of blue light + 3 ashes
Cambio progresivo de luz azul + 3 ashes
Cambiamento graduale della luce blu + 3 lampeggi
Allmähliche Veränderung des blauen Lichts + 3 blinkt
Changement progressif de la lumière blanche + 3 clignotements
Progressive change of white light + 3 ashes
Cambio progresivo de luz blanca + 3 ashes
Cambiamento progressivo della luce bianca + 3 lampeggi
ProgressiveVeränderung des weißen Lichts + 3 blink
Luminosité / Brightness
Brillo / Luminosità
Helligkeit
Saturation / Saturación
Saturazione / Sättigung
Vitesse / Speed
Velocidad /Velocità
Geschwindigkeit
Sette colori da scegliere
Sieben Farben zur Auswahl
Cambio casuale
Zufällige Änderung
Produit équipé de la fonction retransmission des signaux 4 zones de la télécommande à maximum 30m, y compris lorsqu’une zone est éteinte par la télécommande.
Product equipped with the function retransmission of 4-zone signals from the remote control to a maximum of 30m, including when an area is turned o by the remote
control.
Producto equipado con la función de retransmisión de señales de 4 zonas desde el control remoto hasta un máximo de 30 m, incluso cuando el control remoto apaga un
área.
Prodotto dotato della funzione di ritrasmissione dei segnali a 4 zone dal telecomando a un massimo di 30 m, anche quando un'area è disattivata dal telecomando.
Das Produkt ist mit der Funktion zur erneuten Übertragung von 4-Zonen-Signalen von der Fernbedienung auf maximal 30 m ausgestattet, auch wenn ein Bereich von der
Fernbedienung ausgeschaltet wird.
Ce produit est garanti contre tout défaut de fabrication pendant une durée de 2 ans.
/ This product is guaranteed against any manufacturing defect for a period of 2 years. / Este producto está garantizado contra cualquier defecto de fabricación por un período de 2 años.
/ Questo prodotto è garantito contro qualsiasi difetto di fabbricazione per un periodo di 2 anni. / Dieses Produkt wird für einen Zeitraum von 2 Jahren gegen Herstellungsfehler garantiert.
®
NOTICE - INSTRUCTIONS - INSTRUCCIONES - AVVISO - BEKANNTMACHUNG
Ref : 78390 - 78391
MIIDEX LIGHTING - 1 rue Isaac Newton 31830 Plaisance du Touch - www.miidex.com
• Conservez cette notice tant que vous utilisez l’appareil.
• Le montage et l’entretien sont réservés à des personnes
qualiées.
• Avant toute action de montage, coupez l’alimentation
électrique
• En n de vie, ne pas jeter les luminaires LED.
Suivez les instructions sur www.recylum.fr
• Keep this note as long as you use the device.
• The assembly and the maintenance must be done by
qualied.
• Before any assembly, cut the power supply
• Do not throw LED lamps on their end of life.
Follow the instructions on www.recylum.fr
• Conserve esta reseña mientras utiliza el aparato.
• El montaje y el mantenimiento son reservados a personas
cualicadas.
• Antes de empezar el montaje, corte la corriente eléctrica
• No tire la luminaria LED al nal de su vida útil.
Siga las instrucciones en www.recylum.fr
NOTICE DE SECURITE SAFETY NOTE INSTRUCCIONES DE SEGURIDAD
• Conservare questo manuale nché si utilizza il dispositivo.
• L'installazione e la manutenzione sono riservate a persone qualicate.
• Prima di qualsiasi azione di montaggio, spegnere l'alimentazione
• Alla ne della vita, non smaltire gli apparecchi a LED.
Segui le istruzioni su www.recylum.fr
AVVISO DI SICUREZZA
• Bewahren Sie dieses Handbuch so lange auf, wie Sie das Gerät verwenden.
• Schalten Sie vor jeder Montage die Stromversorgung aus
• Schließen Sie das Kabel zuerst an die Erdung an
• Entsorgen Sie am Ende des Lebenszyklus keine LED-Leuchten.
Folgen Sie den Anweisungen auf www.recylum.fr
SICHERHEITSHINWEIS
FICHE MODE DYNAMIQUE / DYNAMIC MODE SHEET / HOJA DE MODOF DINAMICO
SCHEDA DELLA MODALITA / DYNAMISCHES MODUSBLATT
2. Instruction du contrôle à distance
Remarque : Compatible avec la télécommande ci-dessous (vendu séparément).
Synchroniser et Désynchroniser (télécommande 7649)
Synchroniser : Éteignez le courant et rallumez-le passé 5 secondes, appuyez trois
fois sur la touche «I» pendant 3 secondes, la lumière clignotera 3 fois, le projecteur
sera alors prêt à fonctionner.
Désynchroniser : Éteindre et rallumer le courant passé 5 secondes, appuyer 5 fois
sur «I» en 3 secondes, la lumière clignotera 10 fois, alors le projecteur sera
désynchronisé
Control below (sold separately).
Synchronize and Desynchronize (remote control 7649)
Synchronize: Turn off the power and tur n it back on for 5 seconds, press the "I" key
three times for 3 seconds, the light will blink 3 times, the projector will be ready for
operation,
Out of sync: Power off and on again 5 seconds, press 5 times "I" in 3 seconds, the
light will flash 10 times, then the projector will be out of sync.
2. Remote control instruction
Nota: Compatible con el control remoto a continuación (se vende por separado).
Sincronizar y Desincronizar (control remoto 7649)
Sincronizar: apague la unidad y vuelva a encenderla durante 5 segundos, presione la
tecla "I" tres veces durante 3 segundos, la luz parpadeará 3 veces, el proyector estará
listo para funcionar.
Sin sincronización: apague y vuelva a encender 5 segundos, presione 5 veces "I" en 3
segundos, la luz parpadeará 10 veces y el proyector no estará sincronizado.
2. Instrucción de control remoto Nota: compatibile con il telecomando in basso (venduto separatamente).
Sincronizza e De-sincronizza (controllo remoto 7649)
Sincronizzazione: spegnere e riaccendere l'unità per 5 secondi, premere il tasto "I"
tre volte per 3 secondi, la luce lampeggerà 3 volte, il proiettore sarà pronto per il
funzionamento.
Nessuna sincronizzazione: spegnere e riaccendere 5 secondi, premere 5 volte "I"
in 3 secondi, la luce lampeggerà 10 volte e il proiettore non sarà sincronizzato.
2. Istruzioni per il controllo remoto
Hinweis: Kompatibel mit der Fernbedienung (separat erhältlich).
Synchronisieren und Desynchronisieren (Fernbedienung 7649)
Synchronisieren: Schalten Sie das Gerät aus und wieder an, und schalten Sie es für 5 Sekunden ein. Drücken Sie dreimal die Taste "I" für 3 Sekunden, das Licht blinkt 3 Mal,
der Projektor ist betriebsbereit.
Nicht synchron: Aus- und wieder einschalten Sekunden, drücken Sie 5 Mal "I" in 3 Sekunden, das Licht blinkt 10 Mal, dann wird der Projektor nicht mehr synchron sein.
2. Fernsteuerungsanweisung
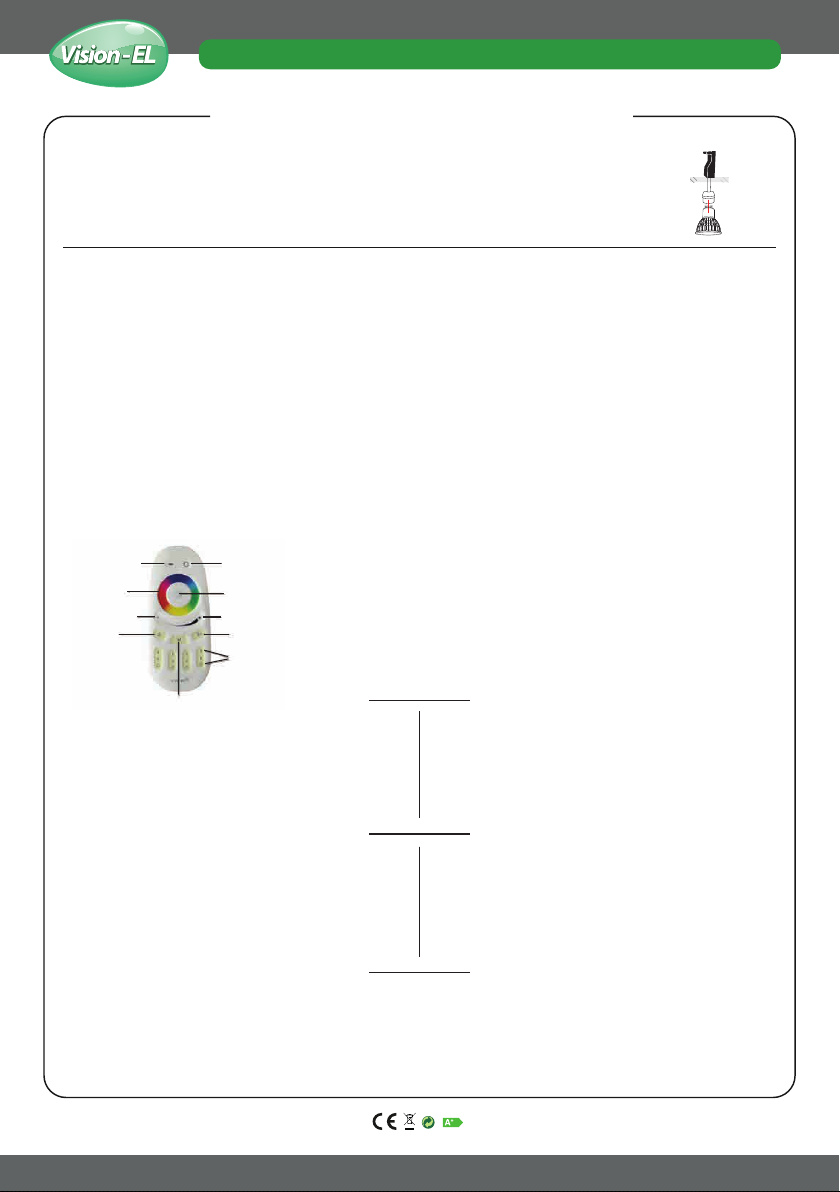
a
c
e
g
j
i
h
f
d
ba. Tout allumer / Launch / Enciende todo / Accendi tutto / Schalten sie alles ein
b. Tout éteindre / Turn everything off / Apagar todo / Spegni tutto / Schalten sie alles aus
c. Anneau de couleur sensitif / sensitive color ring / Anillo de color sensible / Anello de color sensible
Empfindlicher farbring
d. Témoin / Witness / Testigo / Testimone / Zeuge
e. Luminosité - / Brightness - / Brillo - / Luminosità - / Helligkeit -
f. Luminosité + / Brightness + / Brillo + / Luminosità + / Helligkeit +
g. Vitesse - / Speed - / Velocidad - / Velocidà - / Geschwindigkeit -
h. Vitesse + / Speed + / Velocidad + / Velocidà + / Geschwindigkeit +
i. Marche-arrêt par zone / On-Off / Encendido-apagado / On-Off / An-aus von zonne
j. Programmes / Programs / Programmas / Programmi / Programm
Enlace: Primer apagado, luego encendido, dentro de los 3 segundos, toque cualquiera de los botones Zone-ON
una vez, el enlace se realizará cuando vea que la luz parpadea 3 veces con color verde; de lo contrario, intente de
nuevo más tarde.
Desvincular: Primero apague, luego encienda, dentro de 3 segundos toque el botón Zone-ON vinculado o el
botón Master-ON, el desenlace se hace cuando ve que la luz parpadea 10 veces con color rojo, de lo contrario
intente de nuevo más tarde.
1. Mantenga presionado "Master OFF" o "Zone OFF" en el modo de luz nocturna.
2. Mantenga presionado "Master ON" o "Zone ON" en el modo de luz blanca (100% de brillo).
3. Toca "Color Ring" para cambiar los colores.
4. En el modo de luz blanca, toque "Velocidad +" y "Velocidad-" para cambiar la temperatura del color.
5. En el modo de luz de color, toque "Velocidad +" y "Velocidad-" para cambiar la saturación del color en blanco.
6. En modo dinámico, toque "Velocidad +" y "Velocidad-" para cambiar la velocidad.
Link: prima o, poi on, entro 3 secondi, tocca uno dei pulsanti Zone-ON una volta, il link sarà fatto quando vedrai
che la luce lampeggia 3 volte con il verde; altrimenti, riprova più tardi.
Scollega: prima spegni, poi accendi, entro 3 secondi tocca il pulsante Zone-ON collegato o il pulsante Master-ON,
la conclusione è fatta quando vedi che la luce lampeggia 10 volte con il colore rosso, altrimenti riprova più tardi .
1. Tenere premuto "Master OFF" o "Zone OFF" in modalità Nightlight.
2. Tenere premuto "Master ON" o "Zone ON" in modalità luce bianca (luminosità al 100%).
3. Toccare "Anello colorato" per cambiare i colori.
4. In modalità luce bianca, toccare "Velocità +" e "Velocità-" per modicare la temperatura del colore.
5. Nella modalità luce colorata, toccare "Velocità +" e "Velocità-" per modicare la saturazione del colore in
bianco.
6. In modalità dinamica, toccare "Velocità +" e "Velocità-" per modicare la velocità.
Link: Zuerst, schalten Sie aus, und dann, innerhalb von 3 Sekunden, drücken Sie eine Zone-ON-Taste kurz, die Verbindung ist abgeschlossen, wenn Sie sehen, dass das Licht 3 mal mit der grünen
Farbe blinkt, ansonsten versuchen Sie es erneut später.
Verknüpfung aufheben: Schalten Sie zuerst aus und dann innerhalb von 3 Sekunden auf die Zone-ON-Taste oder die Master-ON-Taste. DieVerbindung wird unterbrochen, wenn das Licht 10
mal rot blinkt. Andernfalls versuchen Sie es später erneut .
1. Drücken Sie im Nachtlichtmodus lange auf "Master OFF" oder "OFF Zone".
2. Drücken Sie lange auf "Master ON" oder "Zone ON" im Weißlichtmodus (100% Helligkeit).
3. Berühren Sie "Farbring", um die Farben zu ändern.
4. Berühren Sie im Weißlichtmodus "Speed +" und "Speed-", um die Farbtemperatur zu ändern.
5. Drücken Sie im Farblichtmodus "Speed +" und "Speed-", um die Farbsättigung zu ändern.
6. Im dynamischen Modus berühren Sie "Speed +" und "Speed-", um die Gänge zu wechseln.
Lier : Tout d'abord, éteignez, puis allumez, dans un délai de 3 secondes, appuyez brièvement sur n'importe quel
bouton Zone-ON, le lien est terminé lorsque vous voyez la lumière clignoter 3 fois avec la couleur verte, sinon
réessayez plus tard.
Dissocier : Tout d'abord éteindre, puis allumer, dans les 3 secondes, touchez le bouton Zone-ON ou le bouton
Master-ON, le lien est coupé quand vous voyez la lumière clignoter 10 fois avec la couleur rouge, sinon réessayez
plus tard.
Link: First power o, then power on, within 3 seconds touch any of the Zone-ON button one times shortly, the link
is done when you see the light blinks 3 times with green color, otherwise try again later.
Unlink: First power o, then power on, within 3 seconds long touch the linked Zone-ON button or the Master-ON
button ,the unlink is done when you see the light blinks 10 times with red color, otherwise try again later.
1. Appuyez longuement sur "Master OFF" ou "OFF Zone" sur le mode veilleuse.
2. Appuyez longuement sur "Master ON" ou "Zone ON" en mode lumière blanche (100% de luminosité).
3. Touchez "Bague de couleur" pour changer les couleurs.
4. En mode lumière blanche, touchez "Vitesse +" et "Vitesse -" pour changer la température de couleur.
5. En mode d'éclairage couleur, appuyez sur "Vitesse +" et "Vitesse -" pour modier la saturation des couleurs en
blanc.
6. En mode dynamique, touchez "Vitesse +" et "Vitesse -" pour changer de vitesse.
1. Long press“Master OFF”or “Zone OFF”to night light mode.
2. Long press“Master ON” or “Zone ON”to white light mode(100% brightness).
3. Touch “Color Ring” to change the colors.
4. Under white light mode, touch“Speed+” and “Speed-”to change color temperature.
5. Under color light mode, touch“Speed+” and “Speed-”to change color saturation in white.
6. Under Dynamic mode, touch“Speed+” and“Speed-”to change speed.
®
NOTICE - INSTRUCTIONS - INSTRUCCIONES - AVVISO - BEKANNTMACHUNG
Ref : 78390 - 78391
Ce produit est garanti contre tout défaut de fabrication pendant une durée de 2 ans.
/ This product is guaranteed against any manufacturing defect for a period of 2 years. / Este producto está garantizado contra cualquier defecto de fabricación por un período de 2 años.
/ Questo prodotto è garantito contro qualsiasi difetto di fabbricazione per un periodo di 2 anni. / Dieses Produkt wird für einen Zeitraum von 2 Jahren gegen Herstellungsfehler garantiert.
MIIDEX LIGHTING - 1 rue Isaac Newton 31830 Plaisance du Touch - www.miidex.com
INSTRUCTIONS / INSTRUCCIONES / ISTRUZIONI / ANWEISUNGEN
1 Instruction d'installation / Installation instructions /
Instrucciones de instalación / Istruzioni per l'installazione /
Installationsanweisungen
Clipser l’ampoule à la douille.
Clip the bulb at the socket.
Sujeta la bombilla en el zócalo.
Aggancia la lampadina alla presa.
Clip die Birne an die Steckdose.
This manual suits for next models
1
Table of contents
Other Vision-EL Lighting Equipment manuals


