VisionNet 480400 User manual

DVB-T VisionNet
~ 1 ~
Contents
Contents.................................................................................................................................................... 1
Safety Information.................................................................................................................................... 2
1. Summarization ................................................................................................................................... 3
1.1. Preface..............................................................................................................................................................3
1.2. Main Features...................................................................................................................................................3
2. Hardware............................................................................................................................................. 4
2.1. Front Panel.......................................................................................................................................................4
2.2. Rear Panel ........................................................................................................................................................5
2.3. Remote Control................................................................................................................................................6
3. System Connection ........................................................................................................................... 7
4. Quick Installation Guide.................................................................................................................... 8
5. Functions.......................................................................................................................................... 10
5.1. Main Menu ......................................................................................................................................................10
5.2. TV ....................................................................................................................................................................10
5.2.1. Main Menu and EPG..........................................................................................................................10
5.2.2. TV Menu.............................................................................................................................................10
5.2.3. Change Channels...............................................................................................................................10
5.2.4. Program List....................................................................................................................................... 11
5.2.5. Program Search................................................................................................................................. 11
5.2.6. Volume............................................................................................................................................... 11
5.2.7. Program Lock..................................................................................................................................... 11
5.2.8. Audio.................................................................................................................................................. 11
5.2.9. Screen Ratio ......................................................................................................................................12
5.2.10. Program Info..................................................................................................................................12
5.2.11. Program Audit................................................................................................................................12
5.3. Information News...........................................................................................................................................15
5.4. Browser...........................................................................................................................................................15
5.5. Application .....................................................................................................................................................16
5.6. Text Input........................................................................................................................................................17
5.7.Internet Function...............................................................................................................................................17
5.6.1. Web Surfing........................................................................................................................................18
5.8. System Setup .................................................................................................................................................18
5.8.1. Wireless & Internet.............................................................................................................................18
5.8.2. Ethernet Settings ................................................................................................................................19
5.8.3 Phone Remote ...................................................................................................................................20
5.8.4 Sound Setup........................................................................................................................................20
5.8.5 Display Setup.......................................................................................................................................20
5.8.6 Storage Device..................................................................................................................................20
5.8.7. Applications.........................................................................................................................................20
5.8.8. Personal Settings................................................................................................................................21
5.7.9. System Update...................................................................................................................................21
5.9. TV Setup ...........................................................................................................................................................22
5.9.1. General Settings.................................................................................................................................22
5.9.2. Parent Lock.........................................................................................................................................22
5.9.3. Video & Audio .....................................................................................................................................23
5.9.4 Restore Factory Default.......................................................................................................................23
5.10.DLNA................................................................................................................................................................24
5.10.1DNLA Menu........................................................................................................................................24
5.10.2DLNA Functions .................................................................................................................................24
5.10.3Play Shared Content..........................................................................................................................24
5.11 Phone Remote Control..................................................................................................................................25
5.11.1 Preparations.......................................................................................................................................25
5.11.2 Sever Side Use ..................................................................................................................................26
5.11.3 Client Client Use ................................................................................................................................26
6Abnormal phenomenon and ruled out........................................................................................... 29

DVB-T VisionNet
~ 2 ~
Safety Information
1. Please do read user manual before you operate this machine.
2. Please don’t open the case of the machine by yourself in case of
electric shock and damage to the machine, unless you are professional.
3. Please keep the machine power off when not working, don’t use
damaged power line.
4.Don’t touch the power line with wet hands. When liquid permeated in
the box by accidental , please shut down power immediately, at the same
time get contact with our after sale service to repair it.
5. Please keep the machine away from heat source, a ventilate place will better.
6. Please keep the machine in horizontal.
7.When move machine into another place where the temperature varies a lot,
please don’t turn on at once until 1-2 hours later.
8. Please pay attention to putting the machine in certain place that should be:
ventilate, appropriate temperature; avoiding under sunshine, water penetrating,
and severe vibrating.
9. Please don’t put heavy stuff onto the machine.
10. Please don’t make water splash on the machine, and put the container filled
with water away from this machine, e.g. vase, wine, drinks.
11. When the main plug or appliance connector are detachable device, please
keep it under easy operate situation
Notice
:
The USB electrostatic discharge is C Level, when
electrostatic discharge, it may lead USB storage device can’t work
properly. If so, you need to pull out USB device or reboot the
machine.

DVB-T VisionNet
~ 3 ~
1. Summarization
1.1. Preface
Thanks for choosing our Android TV box.
This Android TV Box is based on Android 4.0 version, with CPU A9-1GHz and GPU Mail-400 that can
fluently run all Android 2D/3D application. Fully support HD H.264 decoding and HDMI high definition
digital video output, giving you the cinema–class audio and visual enjoyment. This Android TV BOX also
enables you easy to use user interface to surf the internet and experience a variety of Android software
application.
This user manual will give you specific guidance on installation, use, and maintenance. To ensure you
can fully enjoy every feature of this machine, please read this manual carefully before using.
Disclaimer
:
The original company reserves the right to
improve the content. If there has discrepancy between
pictures and text, please subject to the final in-kind
operation.
1.2. Main Features
Android 4.0 OS
Support Google Play
Support MPEG-4/H.264 DVB-T Standard
Support NTSC、PAL、PAL_M、PAL_NC and SECAM TV system
Support 4:3 and 16:9 resolution
Support 1920*1080 HD output
Support wireless mouse and 2.4 G devices
Support USB, SD card for software update and application installation
Support 2D/3D games
Support picture, music and videos multimedia files playback
Support built-in Wifi and cable internet connection
Support Browser
Support Skype, E-mail, Facebook and so on
Support online videos Youtube
Support PVR and EPG

DVB-T VisionNet
~ 4 ~
2.Hardware
2.1. Front Panel
P 2-1
STANDBY
VOL+
VOL-
CH+
CH-
Menu
OK

DVB-T VisionNet
~ 5 ~
2.2. Rear Panel
P 2-2
ANT IN
LNB OUT:
ETHERNET
USB
HDMI
YPbPr
CVBS
AUDIO L/R
TF Card
DC IN
WIFI ANTENNA

DVB-T VisionNet
~ 6 ~
2.3. Remote Control
POWER
MUTE:
Special functions
STOP
FB:Fast Backward
PUASE
FF:Fast Forward
V.RATIO: 16:9,4:3 switch
RECORD
PVR:Enter PVR menu
RECALL: Return to last program
SUBT:Subtitle
AUDIO:Switch to left/right audio track
TEXT: Teletext
TIMER:Switch to PVR menu
MENU
EXIT
Left/Right:Move or change the volume
OK:Show program list
Up/Down:Move or change the channels
EPG: Show EPG
INFO :Show information of present
program
VOL-/+:Adjust volume
HOME:Return to main menu
PAGE-/+ : Switch channels
FAV:Show favorite channels list
0-9:input numbers
TV/RADIO: Switch between TV and Radio
:delete button
P 2-3

DVB-T VisionNet
~ 7 ~
3.System Connection
Please connect with your power, TV set, and other related devices according to the picture shows below,
if you need to connect with more devices, please contact with your local operator.
P 3-0

DVB-T VisionNet
~ 8 ~
4.Quick Installation Guide
Step 1:Check system connection
Please make sure antenna, TV, STB connected correctly, you can take a reference on system
connection picture.
Step 2 :Switch TV into Video Status
Make sure all the port in rear panel connect properly, turn on the TV, and switch the TV into Video
Status.
Step 3:Plug the power line of Android box, turn on the box.
After power line connected, press POWER button to power on the BOX, the indicator LED light in front
of panel will on.
Step 4:Standby and Standby Recovery
When machines in turned on ,press standby button ,machine will in standby mode ,and Standby
indicator light will on, the box will in low power consumption status .Press standby button again will end
standby mode and recover to normal working mode .
Step 5:Power off
After powered off, please pull up the power line.
Note: All features can be achieved through your remote control buttons, also you can achieve
parts of functions through the buttons in front panel of the box, if you have difficulty on using
this unit, please refer to the instructions in the relevant chapters. If you still can not resolve the
problems encountered, please contact the operator to find a solution.

DVB-T VisionNet
~ 9 ~

DVB-T ANDROID VISIONNET
~ 10 ~
5.Functions
5.1. Main Menu
When turn on, the receiver will show below pictures,
please press 【/】on the remote control to
choose.
P 5-1-
5.2. TV
Choose TV icon and press OK to go to TV playing
interface.
P 5-2
When you are watching TV, you can make below
operations.
5.2.1. Main Menu and EPG
1、Pressing 【EXIT】can return to main menu
2、Pressing 【EPG】can go to EPG menu, P5-2-2:
P 5-2-1
5.2.2. TV Menu
1、Pressing【MENU】when watching program can show
below picture for TV audit.
P 5-2-2
5.2.3. Change Channels
1、Press【OK】or【FAV】to show program list and press
【OK】to play selected channels.
2、Press【CH +/-】to view channels
3、Press number keys on remote to show channels
directly.

DVB-T ANDROID VISIONNET
~ 11 ~
P 5-2-3
5.2.4. Program List
1、Press【OK】or【FAV】to show the program list.
P 5-2-4
5.2.5. Program Search
1、Press【OK】or【FAV】to show program list
2、Press red button on remote control to make
program Search, P 5-2-5-1.
P 5-2-5-1
2、Type in channel name and press 【OK】to
Search the program as P 5-2-5-2
P 5-2-5-2
5.2.6. Volume
1、Press【Vol+/- 】to adjust volume
2、Press 【MUTE】to turn off sound
P 5-2-6
5.2.7. Program Lock
This function can set password for program.
P 5-2-7
5.2.8. Audio
Press【AUDIO】, and use【/】to change audio track and

DVB-T ANDROID VISIONNET
~ 12 ~
press【OK】to confirm
P 5-2-8
5.2.9. Screen Ratio
Press【V.RATIO】and use【/】to adjust the
screen ratio to 4:3 or 16:9.
P 5-2-9
5.2.10.Program Info
Press【INFO】to show the program information
P 5-2-10-1
Press【INFO】again to show the detailed program
information.
P 5-2-10-2
Press【INFO】the third time to show signal quality of the
program
P 5-2-10-3
5.2.11.Program Audit
Program Scan
Press【MENU】when watching program to
Show the TV menu, click 【Search】to make
Program Scan:
P 5-2-11-1
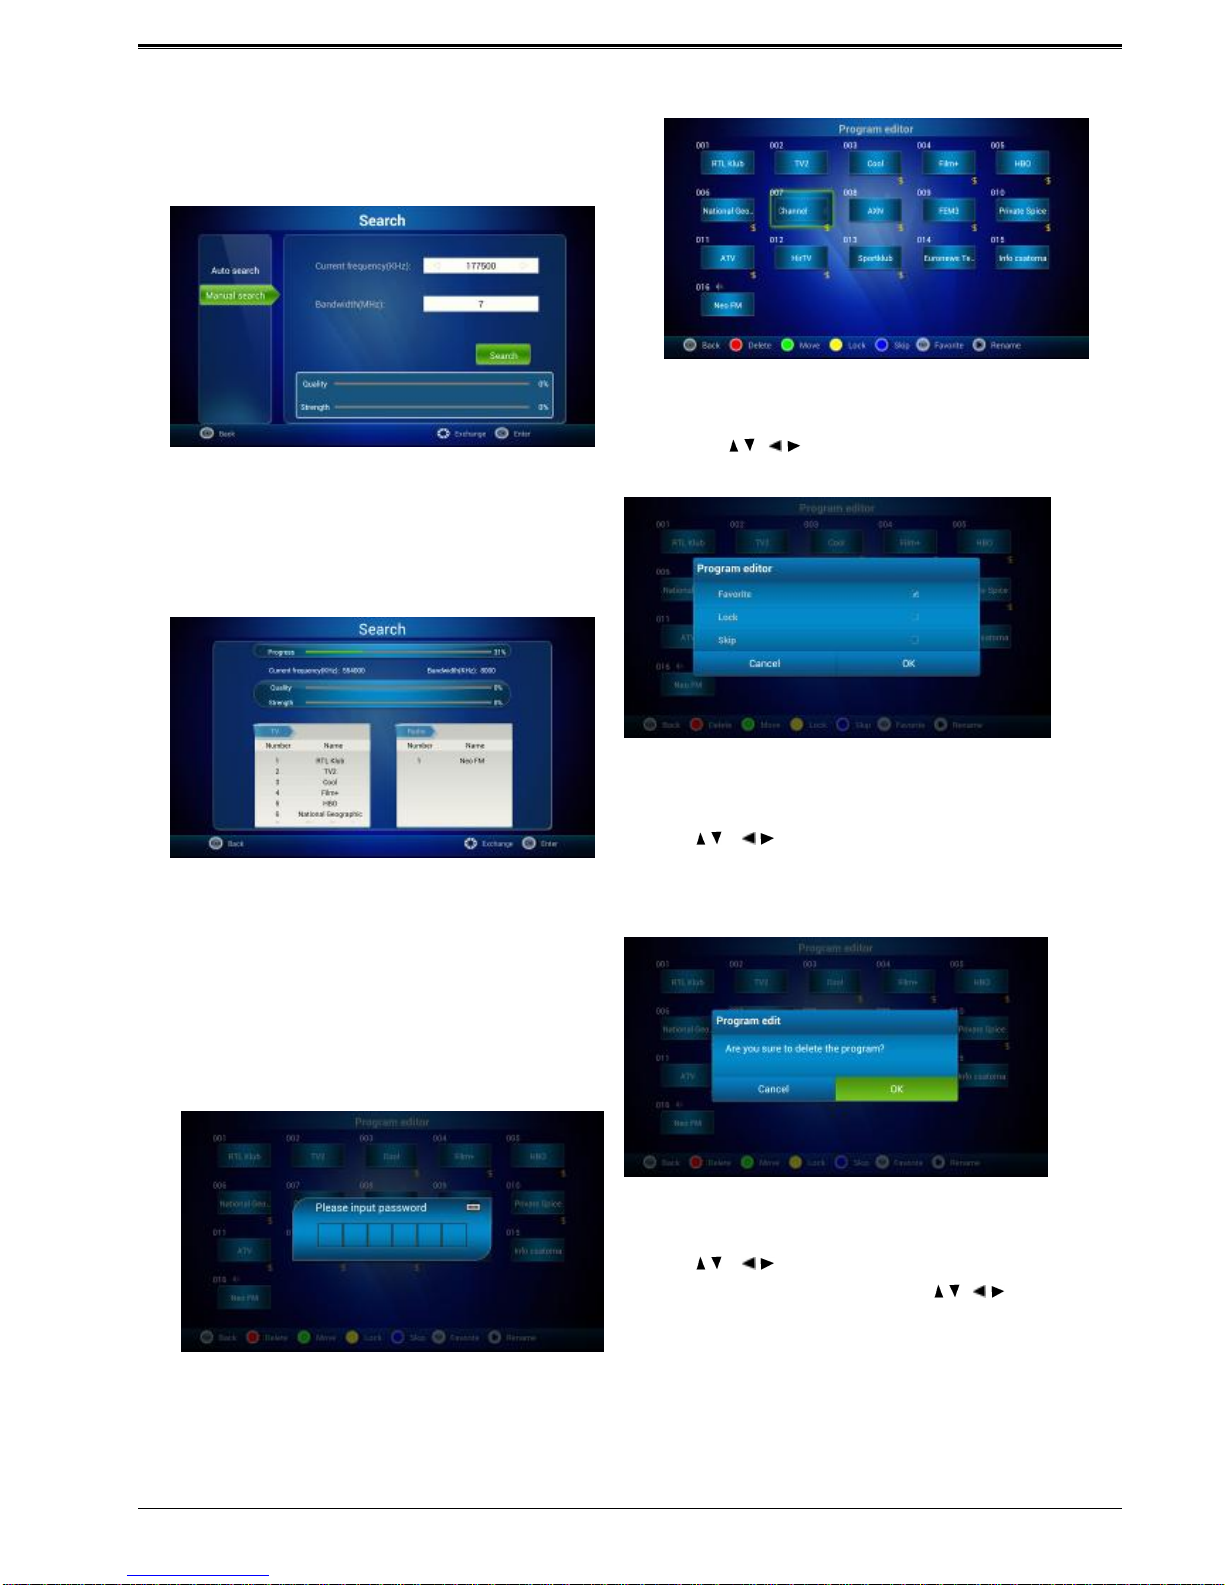
1)You can use 【Auto Search】and 【Manual Search】
to make program search.
DVB-T ANDROID VISIONNET
~ 13 ~
2)You can set the Frequency and Symbol rate
when making Manual Scan
P 5-2-11-2
6)Press 【OK】to make multi-frequency program
search and click the program on right corner to
play.
P 5-2-11-3
Program Audit
Program Lock and FAV Program
1)Press 【MENU】button when watching TV,
and select 【Program Audit】to enter. Set an
initial password to enter:
P 5-2-11-4
2)After entering correct password, you can audit
the program, P 5-2-11-5:
P 5-2-11-5
3)Press【/、/】to move the censor and press color
button to audit program:
P 5-2-11-6
Delete
Press【/、/】to select the program, press 【Red】
to delete. Press【EXIT】to quit.
P 5-2-11-7
Program move
Press【/、/】to move cursor to the program; press
【GREEN】to choose. Then press【/、/】to move the
program to the desired place. Press 【EXIT】to quit .
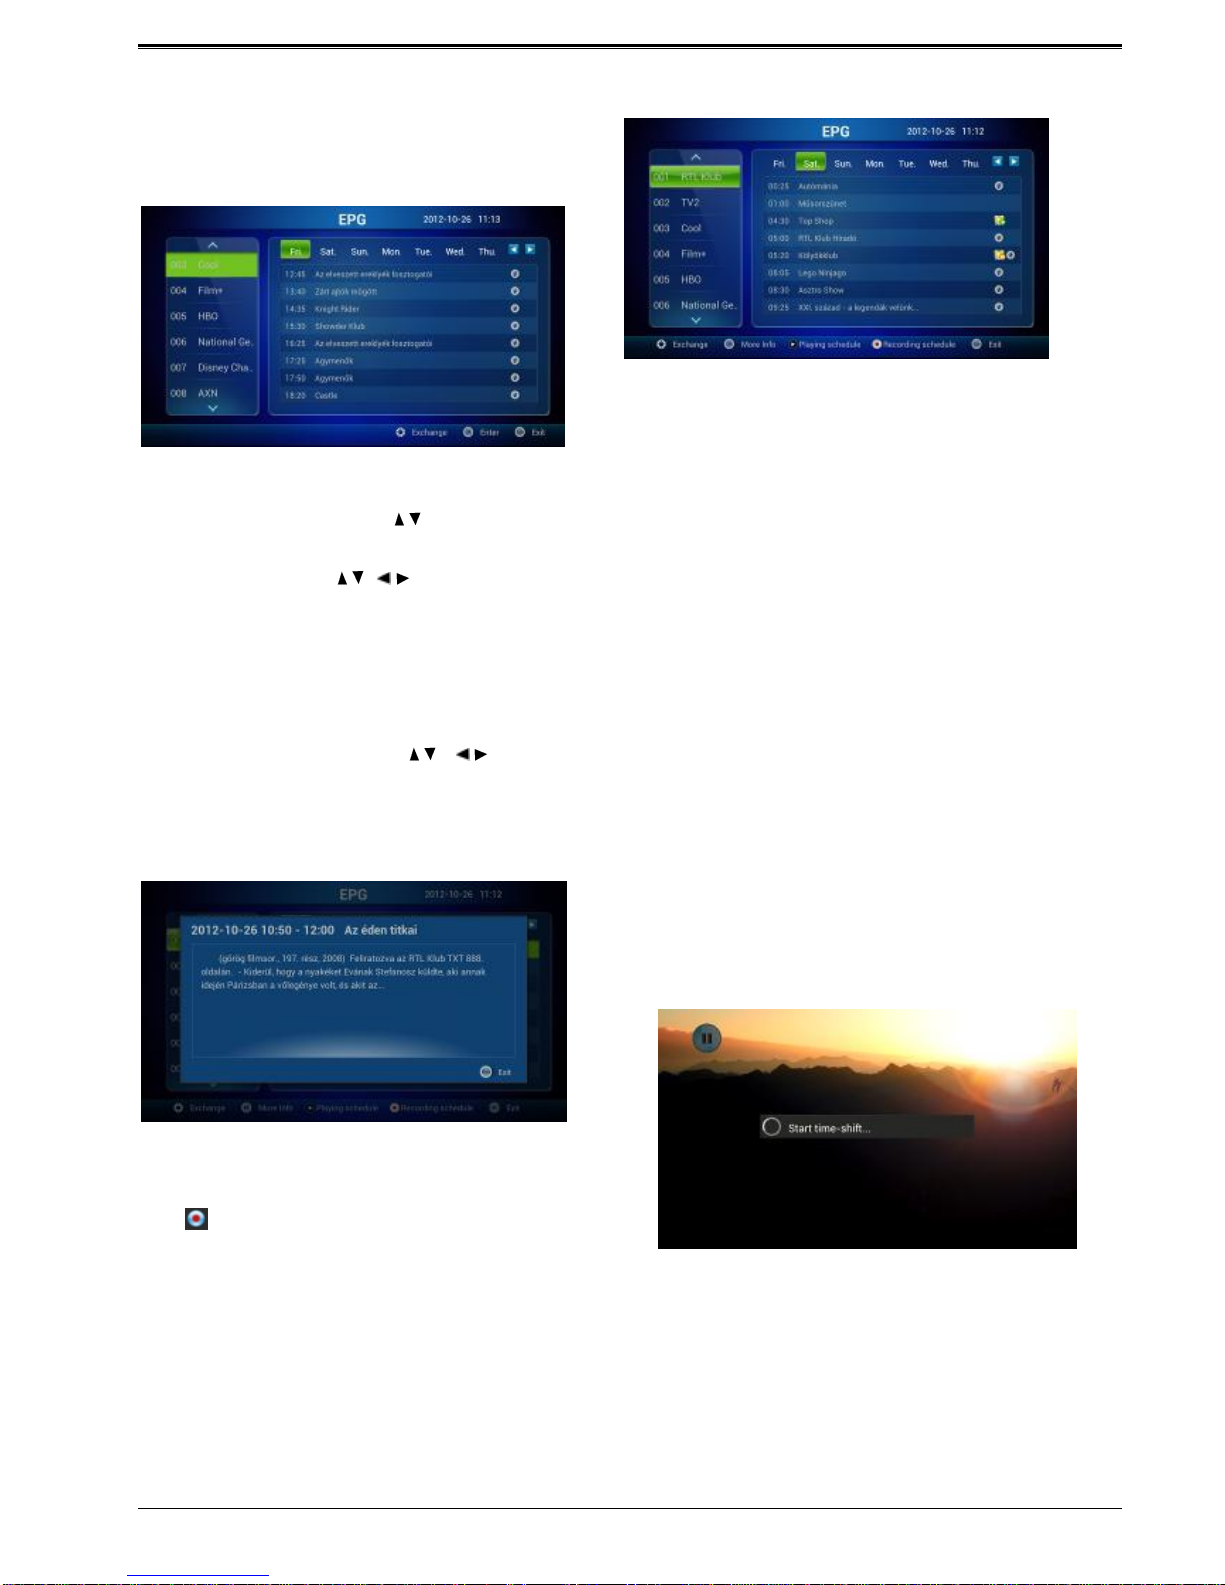
EPG
The box provides 7 days EPG, convenient for you to get
the details of all the programs from Monday to Sunday.
DVB-T ANDROID VISIONNET
~ 14 ~
1)Press 【EPG】to enter into EPG main menu as
figure 5-2-24:
P 5-2-11-8
Select program:Press【/】to select program.
EPG info:Press【/、/】to see the EPG info
of each time.
Time and date:Press【RED】and【GREEN】
to adjust the time and date.
2)In EPG interface, press【/、/】to get the
program info; press【OK】to operate the current
program.
P 5-2-11-9
When booking the program, then it will be marked
with :
P 5-2-11-10
3)On EPG interface, press【EXIT】back to the last
interface.
PVR
This machine offers convenient PVR program
recording function. You can press 【PVR】key or select
"PVR" on the main menu to jump to PVR interface.
1) Time shift: Press【PAUSE】to suspend the real-time
broadcasting program. Press【PAUSE】again to replay
from the stopped point. Press【STOP】to recover
real-time televising and stop time shift function. By
pressing【FF】and 【FB】can realize forward and
backward functions in time shift.
P 5-2-11-11

DVB-T ANDROID VISIONNET
~ 15 ~
P 5-2-11-12
2) Recording function:
Press【MENU】,and then press 【/、/】move
the cursor to "PVR" and click it to jump to PVR
interface. The recorded program can be checked in
play list. Press【OK】to confirm.
Press 【/、/】to select the file, press 【OK】
to play. (press【EXIT】to stop)
P 5-2-11-13
Hold【OK】for selecting operate menu.
P 5-2-11-14
Set record: Press【/】to show task list and pres
red button to create record options, press OK to
start the
recording
P 5-2-11-15
You can view the task list and press【/、/】to
select and audit.
P 5-2-11-16
5.3. Information News
End users can view the local information and news by
the function News
5.4. Browser
In Browser, connecting Google by default. If you want to
log in other website, please use remote control or fly
mouse to type the website address you want, for detailed
information please take a reference on Internet Function
part.

DVB-T ANDROID VISIONNET
~ 16 ~
5.5. Application
Press【/、/】and【OK】to enter in application
interface as shown in P
P 5-5-1
Clarification Introduction:You can see all the
applications here by different clarifications.
Add:Press red button or to
add a new clarification as P 5-5-2
P 5-5-2
Delete: Move the censor to the defined
clarification and press【MENU】or hold【OK】
to delete the selection as P 5-5-3:
P 5-5-3
New Name: Move the censor to a clarification,
and press【MENU】or hold【OK】to show the
type-in box, and input a new name then press OK to
confirm as P 5-5-4
P 5-5-4
Move: Move the censor to the clarification and
press 【MENU】or hold 【OK】to show the menu,
and select COPY or MOVE to move the clarification
P5-5-5:
P 5-5-5
Delete APK:Move the censor to the clarification
and press 【MENU】or hold 【OK】to show the
menu, and select DELTE, and press OK to confirm.
Press【INFO】button to show the help information P
5-5-6:
P 5-5-6
Main APK application function introduce:
Browser:IE Browser, connecting Google by default.

DVB-T ANDROID VISIONNET
~ 17 ~
If you want to log in other website, please use
remote control or fly mouse to input the website
address you want, for detailed information
please take a reference on Internet Function
part.
Email: Built-in email software, send and
receive emails at any time. Input correct Email
address and password, click NEXT and log in.
Video player: Play all the videos from storage
device, including SD card, USB, etc, support
various mode of AVI、WMV、MPEG.
Music player: Support various formats of
music, play your favorite song at any time.
Picture browser: Clear picture browsing
modes help you browse local pictures quickly.
Installation: Read the installation file from the
storage device, click to install the software you
want. As picture 5-5-7 shows.
P5-5-7
1) Press【/、/】and【OK】to choose the app to
be installed, then click "install". Click "cancel" or
【EXIT】button to quit installation., as P5-5-8。
P 5-5-8
2)If the application is already existed, press【OK】
to uninstall the application, press OK to confirm,
and press 【EXIT】to cancel. P 5-5-9:
P 5-5-9
3)You can also add the new applications to the
clarifications that you want to add it into.
Setting:All settings of this machine including
internet setting, display, storage device
management, etc
Other application: including games, Internet video,
communication, etc.
Games:“Fruit Ninja” and “Angry Birds”. “3D plane
race”
Internet video:Most frequently used video website
includes BBC, Youku, and Youtobe.
Communication Tools: Mostly used chatting
software includes MSN, SKYPE, Facebook, Twitter,
Flicker, Picasa.
5.6. Text Input
Next introduce how to use the remote control to input
text.
Android keyboard input method,as P 5-6 showing:
P 5-6
use direction keys to select character.
5.7.Internet Function
This machine provides full variety of Internet

DVB-T ANDROID VISIONNET
~ 18 ~
function. You can surf the internet as that using
your own PC, investing in stocks, inquiring the map,
online chat, etc, For detailed information, please
check the information below.
5.6.1. Web Surfing
Press【/、/】and【OK】to enter in web browser.
You will log in homepage of Google, if you want to
log in other website ,please enter the address of the
website you want to enter .For detailed
steps ,please check the following steps .
Step 1: Use Fly mouse or direction keys to move
cursor ito the website address bar .Like shown in
picture 5-7-1:
P 5-6-1
Step 2: In the red address bar, click【OK】to enter
input interface. Like shown in picture 5-7-2:
P 5-6-2
Step3: input address, you can use the letter
below.
Step4: move cursor to the button of begin. Press
【OK】to enter the website you want.
Step5: On the browsing web, click【Menu】button or
the picture on the top right corner with mouse, in
this way, web can be set, including new window,
bookmark and so on, as the picture 5-7-3 showing.
P 5-6-3
Step 6: To speak of, in the choice of “settings”, click “set
browse mode”and set it, the modes include Android,
Desktop, iphone, iPad and so on. Starting up mode is
ipad mode. Like the picture 5-6-4 showing.
P 5-6-4
If you want to play Flash Video, you should have a
specific setting after installing Flash plug-in, click “set
browse mode” to choose Android mode.
5.8. System Setup
Press【/、/】and【OK】to enter in “System Setup”.
Then you can use the same way to enter in from main
UI.
P 5-8
Detailed setting method will be explained as following.
5.8.1. Wireless & Internet
Press【/】and【OK】to to enter in “Settings”, like5-8-2
showing.

DVB-T ANDROID VISIONNET
~ 19 ~
P 5-8-1-1
Wi-Fi:Turn on or turn off WLAN function
Choose upper right "BLUE" button, then press
【OK】button. WIFI is open when it shows
“ON”.
Wi-Fi Setting:Setup and manage wireless
access point.
System will auto search Wi-Fi Internet when Wi-Fi
is open and display the result on Interface. If no
internet is searched, you can add WLAN access
point by hand.
Adding WLAN access point by hand:
Following options are in Wi-Fi list:
Scanning:Automatically scan WIFI
wireless internet
Add network: Press【OK】button, the
dialog box pops up, as shown in picture
5-7-1-2
P 5-8-1-2
Advanced setup Interface is as below:
Choose Static state IP:Choose whether to use
Static state IP mode.
If choose static state IP mode, the IP address, Gateway,
Netmask and DNS become available, you need to setup
this parameter correctly. If not, all these settings are
invalid.
5.8.2. Ethernet Settings
Ethernet :Click this option , press【OK】button to
turn on or off Ethernet
Ethernet configuration:Set Internet IP and other
parameters ,Click this option, entering Ethernet
configuration interface.
P 5-8-2
In the interface of Ethernet configuration:
Ethernet Equipment:Currently can be applied
Ethernet equipment "eth0" acquiescently.
Connecting mode:
1) DHCP Mode:Auto obtain IP address mode.
2) Static state IP:Static IP mode
When choose Static state IP mode, you need to setup all
IP parameters correctly and save it.

DVB-T ANDROID VISIONNET
~ 20 ~
5.8.3 Phone Remote
P 5-8-3
Phone Remote:Turn on/off Mobile Remote
function
Boot:Set it whether start when receiver boot
5.8.4 Sound Setup
Press【OK】button to enter in "Sound".
P 5-8-4
Volume: Set the system volume;
Sound Output Mode : Choose PCM or RAW
model.
5.8.5 Display Setup
Press【OK】to enter in "Display".
P 5-8-5
Output mode:Set TV output mode, including 720p,
1080p, etc.
Double Output mode:Set double Output mode
Display position: Set TV representation rate to
adjust screen size.
Font Size: Set system font size.
5.8.6 Storage Device
Show SD card and storage device and internal memory
information, and operations of unloading, installation and
formatting.
P 5-8-6
Note: Please unload it safely before formatting
Hard Disk.
5.8.7. Applications
Choose "Apps" and press【OK】to enter in, like Picture
5-8-7 shows:
Table of contents


