vissari Superior Series Installation instructions

VISSARI SUPERIOR SERIES
SE INLINE FAN
www.vissari.co.nz
INSTALLATION & OPERATING MANUAL

VISSARI SUPERIOR SERIES
INSTALLATION AND OPERATING MANUAL
03 Introduction
04 Models
04 Installation
05 Installation Soffit Option - VSD200
06 Installation Twin Soffit Option - VSDT150
07 Installation Wall Option - VWD200
08 Installation Roof Option - VRD200
09 Order Codes
10 Parts List
12 Wiring Diagram & Dimensions
13 Performance Parameters
14 Rating Labels
15 Warranty
CONTENTS
02 VISSARI SUPERIOR SERIES
INSTALLATION AND OPERATING MANUAL

INTRODUCTION
Thank you for choosing a Vissari Superior Series Rangehood.
You are moments away from your silent cooking experience.
We are a New Zealand owned and operated rangehood supply company now offering
our Vissari Superior Series Range.
Why Superior…
Superior Silence
Unlike any standard onboard type rangehood, we have removed the fan/motor from
the actual rangehood at kitchen level, a powerful inline fan is installed in your ceiling
space away from you and your kitchen area. This creates a quiet and pleasant cooking
experience for you and your family.
Superior Airow
With the removal of noise from your kitchen we have certainly not reduced any of our
rangehoods airflow performance, in fact we have enhanced it.
Our remote inline fans come in two excellent airflow sizes 1030m3/hr & 1800m3/hr.
We have ensured that whichever your cooking style you will be more than satisfied
with these powerful extraction levels.
Superior silence and superior airflow, let your Vissari cooking experience begin.
Superior Style
With the following Superior series rangehood models to choose from we are confident
that your rangehood design and style preference are covered.
03

VISSARI SUPERIOR SERIES
INSTALLATION AND OPERATING MANUAL
MODELS
04
Vissari Superior Series Rangehood models
VISBCS900/SS
VISBC900/SS
VISC900/SS
VISC900B/SS
VISPP750D/SS
VISPP900S/SS
Inline Fan options – Steam Eater
SE1030m3/hr
SE1800m3/hr
INSTALLATION
Please check your Vissari rangehood and inline fan motor for any damages prior to
installation, do not install any damaged rangehood or inline fan motor.
Please contact Vissari Rangehoods in the event of a damaged rangehood or inline fan motor
at installation time.
Vissari superior series rangehoods must be installed to the specifications below using only
Vissari ducting and ducting components. Vissari is not responsible for any substandard
installation that is carried out differently to the installation guidelines below.
Please contact Vissari for a list of recommended trained installers.
05
Carefully unpack your Vissari inline
fan motor, either the 1030m3/hr or
1800m3/hr.
Connect the two reducer/expander
fittings (315mm/200mm or 250mm
/200mm) to the inline fan motor, please
note the inline fans airflow direction.
Connect 6m x 200mm flexible ducting
to the rangehood (air in-take) end of
the inline fan.
Connect 3m x 200mm semi rigid ducting to the (air out-take) end of the inline fan.
Choose a suitable inline fan hanging installation position within your accessible ceiling area,
recommended and optimum installations use the whole 6m x 200mm flexible ducting length
between the inline fan motor and the actual rangehood at kitchen level.
The inline fan motor must not be installed in a position where it is touching any other form
of timber, ceiling, or pipework etc. The inline fan motor must hang freely to absorb all
operating fan motor noise.
Screw a threaded eye screw to a suitable roof truss or specially installed solid timber
support position.
Thread the adjustable pull tie down through the two hanging points on the inline fan motor.
While supporting the inline fan, now thread the pull tie down through the pre-installed
hanging eyelet, adjust to the finished suitable hanging height.
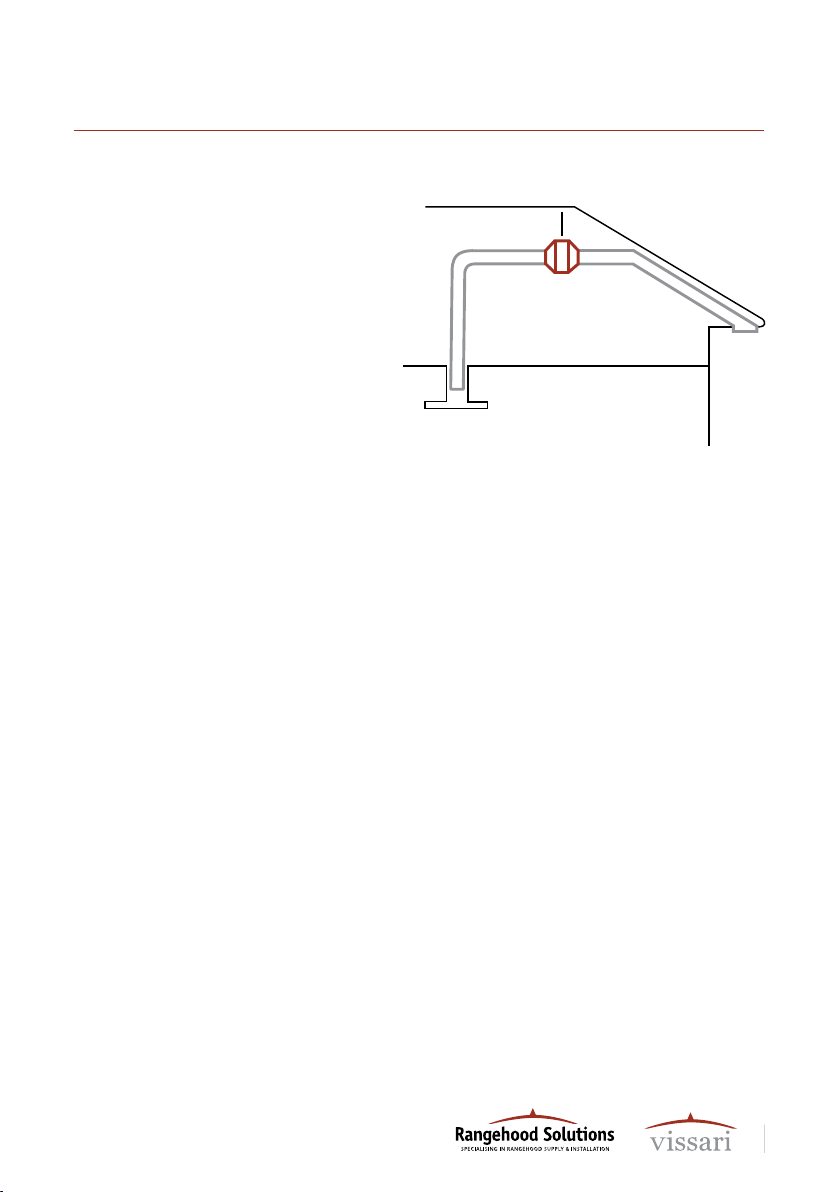
Run the 200mm semi rigid ducting into the soffit area, cut out a 210mm hole in the soffit and
connect the semi rigid ducting to the 200mm soffit grill. Do not reduce ducting size.
Run the 6m x 200mm flexible ducting back to the Vissari rangehood at kitchen level, connect
neatly using cable ties and tape. Do not reduce ducting size.
Run the inline fans power cable back to the Vissari rangehood at kitchen level and plug into
the female plug.
Plug in your Vissari rangehood to the power supply at kitchen level, test the rangehood and
inline fan motor.
Warning - your quiet cooking experience starts here.
INSTALLATION SOFFIT OPTION
VSD200 - 200mm Ducting
VISSARI SUPERIOR SERIES
INSTALLATION AND OPERATING MANUAL
06
Carefully unpack your Vissari inline
fan motor, either the 1030m3/hr or
1800m3/hr.
Connect the two reducer/expander
fittings (315mm/200mm or 250mm
/200mm) to the inline fan motor, please
note inline fans airflow direction.
Connect 6m x 200mm flexible ducting
to the rangehood (air in-take) end of
the inline fan.
Connect 3m x 200mm semi rigid ducting to the (air out-take) end of the inline fan.
Choose a suitable inline fan hanging installation position within your accessible ceiling area,
recommended and optimum installations use the whole 6m x 200mm flexible ducting length
between the inline fan motor and the actual rangehood at kitchen level.
The inline fan motor must not be installed in a position where it is touching any other form
of timber, ceiling, or pipework etc. The inline fan motor must hang freely to absorb all
operating fan motor noise.
Screw a threaded eye screw to a suitable roof truss or specially installed solid timber
support position.
Thread the adjustable pull tie down through the two hanging points on the inline fan motor.
While supporting the inline fan, now thread the pull tie down through the pre-installed
hanging eyelet, adjust to the finished suitable hanging height.
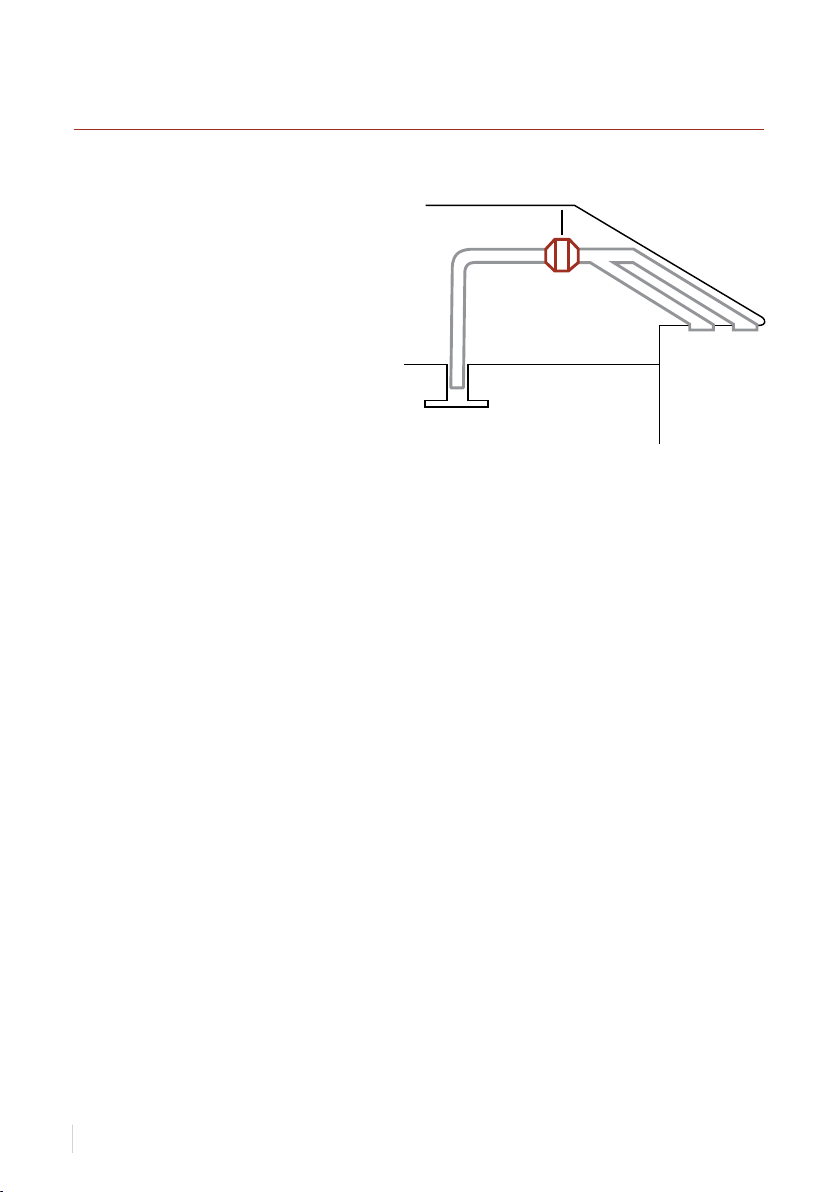
Run the twin 150mm semi rigid ducts into the soffit area, cut out two 160mm holes in the soffit
and connect the semi rigid ducting to the 150mm soffit grills. Do not reduce ducting size.
Run the 6m x 200mm flexible ducting back to the Vissari rangehood at kitchen level, connect
neatly using cable ties and tape. Do not reduce ducting size.
Run the inline fans power cable back to the Vissari rangehood at kitchen level and plug into
the female plug.
Plug in your Vissari rangehood to the power supply at kitchen level, test the rangehood and
inline fan motor.
Warning - your quiet cooking experience starts here.
INSTALLATION TWIN SOFFIT OPTION
VSDT150 - 150mm Ducting

07
Carefully unpack your Vissari inline
fan motor, either the 1030m3/hr or
1800m3/hr.
Connect the two reducer/expander
fittings (315mm/200mm or 250mm
/200mm) to the inline fan motor, please
note inline fan airflow direction.
Connect 6m x 200mm flexible ducting
to the rangehood (air in-take) end of
the inline fan.
Connect 3m x 200mm semi rigid ducting to the (air out-take) end of the inline fan.
Choose a suitable inline fan hanging installation position within your accessible ceiling area,
recommended and optimum installations use the whole 6m x 200mm flexible ducting length
between the inline fan motor and the actual rangehood at kitchen level.
The inline fan motor must not be installed in a position where it is touching any other form
of timber, ceiling, or pipework etc. The inline fan motor must hang freely to absorb all
operating fan motor noise.
Screw a threaded eye screw to a suitable roof truss or specially installed solid timber
support position.
Thread the adjustable pull tie down through the two hanging points on the inline fan motor.
9 While supporting the inline fan, now thread the pull tie down through the pre-installed
hanging eyelet, adjust to the finished suitable hanging height.
Run the 200mm semi rigid ducting to the chosen wall vent location, cut out a 210mm hole in
the wall cladding, install a 200mm trade seal to the building wrap to seal and protect your
homes weatherproof envelope when and where possible, and connect the semi rigid ducting
to the 200mm wall vent. Do not reduce ducting size.
Run the 6m x 200mm flexible ducting back to the Vissari rangehood at kitchen level, connect
neatly using cable ties and tape. Do not reduce ducting size.
Run the inline fans power cable back to the Vissari rangehood at kitchen level and plug into
the female plug.
Plug in your Vissari rangehood to the power supply at kitchen level, test the rangehood and
inline fan motor.
Warning - your quiet cooking experience starts here.
INSTALLATION WALL OPTION
VWD200 - 200mm Ducting
VISSARI SUPERIOR SERIES
INSTALLATION AND OPERATING MANUAL
08
Carefully unpack your Vissari inline
fan motor, either the 1030m3/hr or
1800m3/hr.
Connect the two reducer/expander
fittings (315mm/200mm or 250mm
/200mm) to the inline fan motor, please
note inline fan airflow direction.
Connect 6m x 200mm flexible ducting
to the rangehood (air in-take) end of
the inline fan.
Connect 3m x 200mm semi rigid ducting to the (air out-take) end of the inline fan.
Choose a suitable inline fan hanging installation position within your accessible ceiling area,
recommended and optimum installations use the whole 6m x 200mm flexible ducting length
between the inline fan motor and the actual rangehood at kitchen level.
The inline fan motor must not be installed in a position where it is touching any other form
of timber, ceiling, or pipework etc. The inline fan motor must hang freely to absorb all
operating fan motor noise.
Screw a threaded eye screw to a suitable roof truss or specially installed solid timber
support position.
Thread the adjustable pull tie down through the two hanging points on the inline fan motor.
While supporting the inline fan, now thread the pull tie down through the pre-installed
hanging eyelet, adjust to the finished suitable hanging height.
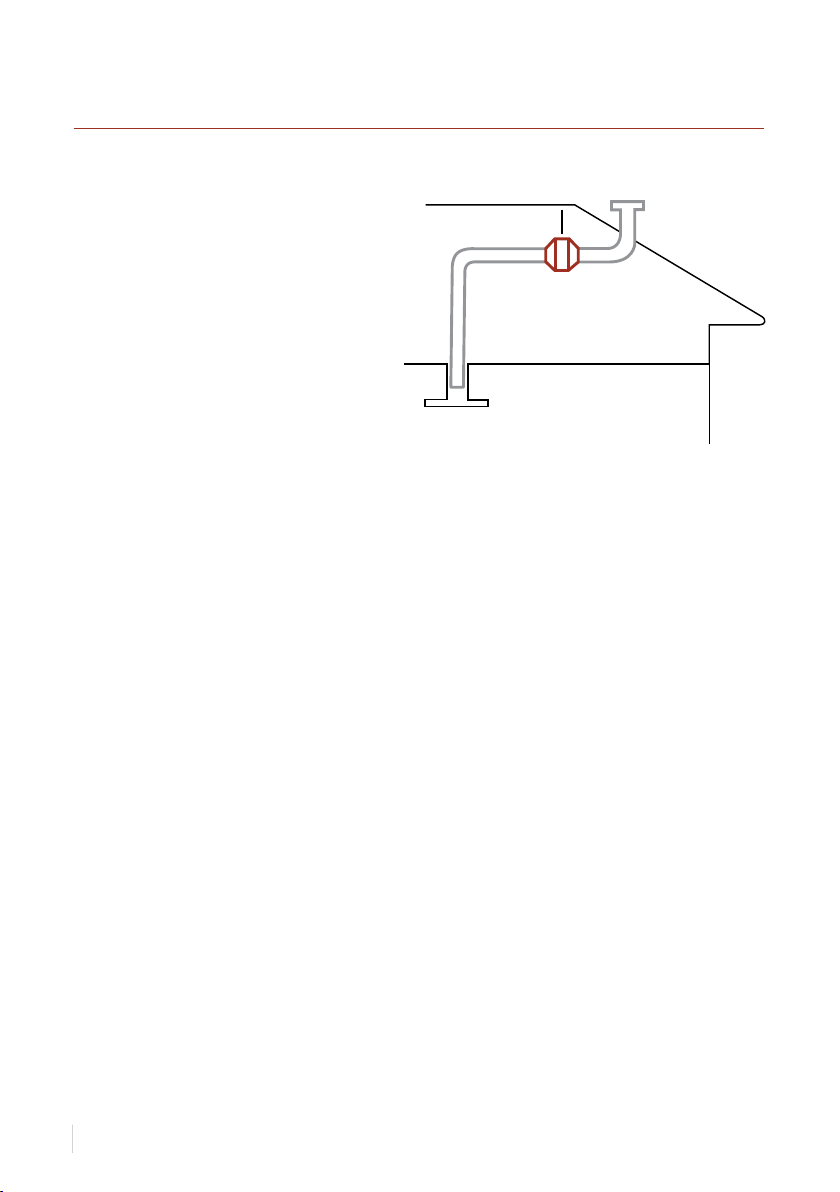
Run the 200mm semi rigid ducting to the chosen roof vent location. Do not reduce ducting size.
Penetrate and flash the roof in accordance with all council regulations, we advise you
engage a plumbing or roofing professional to ensure all installation standards are met.
Run the 6m x 200mm flexible ducting back to the Vissari rangehood at kitchen level, connect
neatly using cable ties and tape. Do not reduce ducting size.
Run the inline fans power cable back to the Vissari rangehood at kitchen level and plug into
the female plug.
Plug in your Vissari rangehood to the power supply at kitchen level, test the rangehood and
inline fan motor.
Warning - your quiet cooking experience starts here.
INSTALLATION ROOF OPTION
VRD200 - 200mm Ducting

09
VSD200 – SE1030 Vissari Soffit Duct 200mm
VSD200 – SE1800 Vissari Soffit Duct 200mm
VSDT150 – SE1030 Vissari Soffit Duct Twin 150mm
VSDT150 – SE1800 Vissari Soffit Duct Twin 150mm
VWD200 – SE1030 Vissari Wall Duct 200mm
VWD200 – SE1800 Vissari Wall Duct 200mm
VRD200 – SE1030 Vissari Roof Duct 200mm
VRD200 – SE1800 Vissari Roof Duct 200mm
ORDER CODES
VISSARI SUPERIOR SERIES
INSTALLATION AND OPERATING MANUAL
10
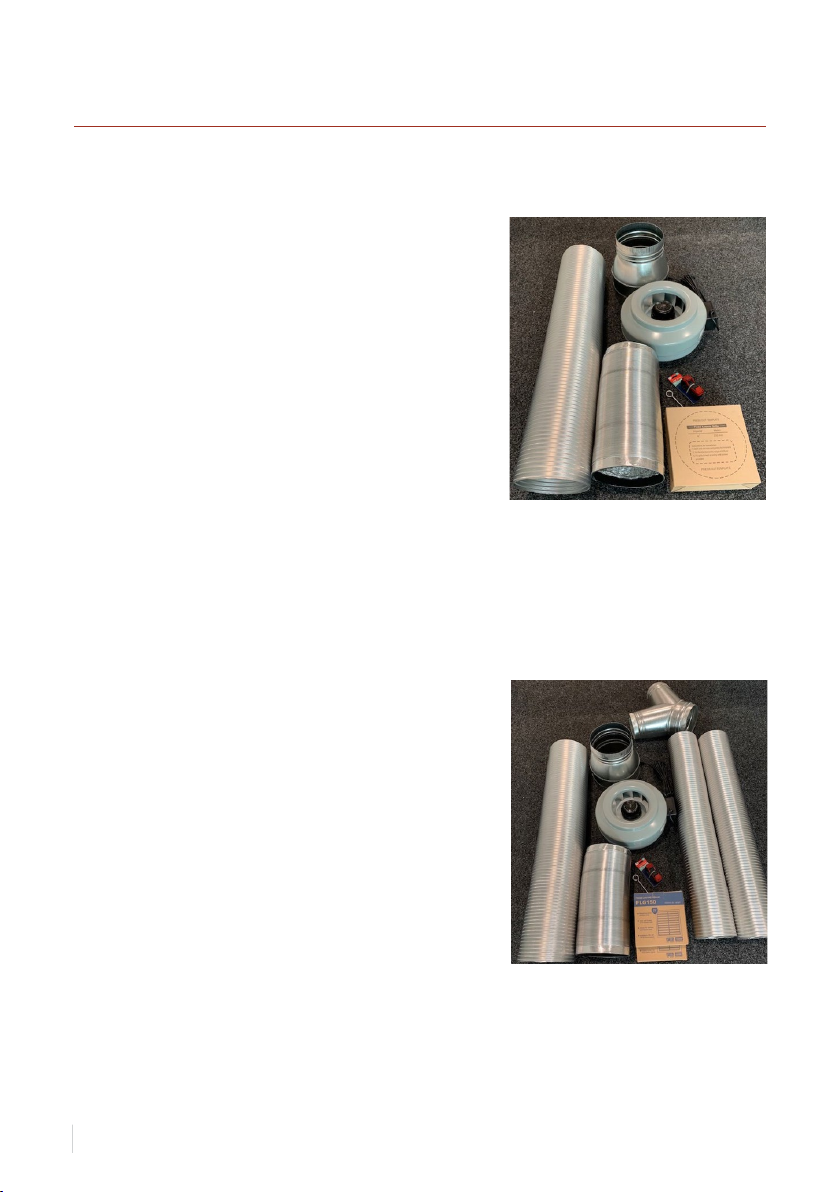
1 x Vissari Steam Eater Inline Fan 1030m3/hr
2 x 250mm/200mm Galvanised Reducer Expander
1 x Pull Tie Down
1 x Thread Eye Screw
1 x 6m x 200mm Flexi Ducting
1 x 3m x 200mm Semi Rigid Ducting
2 x 150mm Soffit Grills
2 x 150mm 2.5m Semi Rigid Ducts
1 x 200mm x 150mm x 150mm Y Branch Junction
1 x Vissari Steam Eater Inline Fan 1030m3/hr
2 x 250mm/200mm Galvanised Reducer Expander
1 x Pull Tie Down
1 x Thread Eye Screw
1 x 6m x 200mm Flexi Ducting
1 x 3m x 200mm Semi Rigid Ducting
1 x 200mm Soffit Grill
PARTS LIST
VSD200 – SE1030 / SE1800
VSDT150 – SE1030 / SE1800

11
1 x Vissari Steam Eater Inline Fan 1030m3/hr
2 x 250mm/200mm Galvanised Reducer Expander
1 x Pull Tie Down
1 x Thread Eye Screw
1 x 6m x 200mm Flexi Ducting
1 x 3m x 200mm Semi Rigid Ducting
1 x 200mm Weatherproof Wall Vent
1 x Vissari Steam Eater Inline Fan 1030m3/hr
2 x 250mm/200mm Galvanised Reducer Expander
1 x Pull Tie Down
1 x Thread Eye Screw
1 x 6m x 200mm Flexi Ducting
1 x 3m x 200mm Semi Rigid Ducting
Actual roof flashing is special order or supplied
by installer
VWD200 – SE1030 / SE1800
VRD200 – SE1030 / SE1800

VISSARI SUPERIOR SERIES
INSTALLATION AND OPERATING MANUAL
Schematic Wiring Diagram
Single-speed centrfugal Circular Duct Fan wiring
12
WIRING DIAGRAM & DIMENSIONS
Model SE1030 SE1800
A 250 315
B 333 402
C 206 258
D 27 25
E 42 42
External Dimensions
Motor
yellow-green
brown
black
blue
C
L
N
D
AB
D
A
C
E

13
PERFORMANCE PARAMETERS
Model SE1030 SE1800
Voltage (V-) 220-230 220-230
Frequency (Hz) 50 50
Airflow (CMH) 1030 1800
Static Pressure (pa) 560 700
Noise (dB) 68 70
Speed (r.p.m) 2410 2490
Power (W) 190 280
Current (A) 0.86 1.22
Weight (kg) 5.5 6.8

VISSARI SUPERIOR SERIES
INSTALLATION AND OPERATING MANUAL
RATING LABELS
Vissari Superior Series Inline Fan SE1800
Model: DJT31U - 66M
Voltage: 220 - 240v - 50Hz
Air Movement: 1800m3
Rated Power: 280W
14
Vissari Superior Series Inline Fan SE1030
Model: DJT25U - 66M
Voltage: 220 - 240v - 50Hz
Air Movement: 1030m3
Rated Power: 190W

Vissari Rangehoods Superior Series Warranty
This Warranty is provided by Rangehood Solutions Ltd – Distributor for Vissari Rangehoods.
This warranty covers the following Vissari Superior Series Rangehoods and SE inline fans
used and installed in domestic and household applications.
VISBCS900/SS VISBC900/SS VISC900/SS
VISC900B/SS VISPP750D/SS VISPP900S/SS
SE1030 SE1800
Vissari Superior Series rangehoods are covered with a 5 year warranty from the original
date of purchase, this is applicable for only the original purchaser.
Vissari Superior Series inline fans are covered with a 10 year warranty from the original date
of purchase, this is applicable for only the original purchaser.
This warranty applies in New Zealand only.
The customer must produce the original invoice to make any warranty claim.
The inline fan warranty is a changeover warranty, the purchaser is responsible for any
associated change over labour costs.
Warranty Exclusions
The warranty does not apply were, in Vissari Rangehoods opinion:
The product has been repaired or serviced by an unauthorised appliance service agent.
The Rangehood and was not installed in accordance with our instructions.
The Rangehood/Product was not cared for in accordance with our instructions.
The defect is caused by misuse, wear and tear, dirt, fire or accidental damage.
LED Light replacements are not covered.
Service agents call out costs, if the rangehood is found to be in normal working order.
The customer must provide the original invoice as proof of the original purchase date.
Costs incurred on installation or removal of a product, or any reinstallation or any associated
costs are not covered by this warranty.
The repairs relate to the replacement of consumable parts such as fuses in plugs.
Damage of defects have not been reported within 48 hours of delivery, otherwise no claim
will be recognised.
The breakdown occurs after the expiry of the warranty period.
How to make a claim
You may make a claim under this warranty by emailing us at: info@rangehoodsolutions.co.nz
Please email a copy of your original invoice as proof of purchase.
15
WARRANTY

SHOWROOMS
Auckland – East Tamaki
Bay Of Plenty – Mount Maunganui
Waikato – Te Rapa
P0800 RANGEHOODS / Einfo@rangehoodsolutions.co.nz / www.vissari.co.nz
This manual suits for next models
6
Table of contents
Other vissari Ventilation Hood manuals


Popular Ventilation Hood manuals by other brands


Lamona
Lamona LAM2404 User's installation guide

Faber
Faber STEELMAX EV8 BK/X A55 manual

Zanussi
Zanussi CWH 9065X Instruction booklet

KitchenAid
KitchenAid KWCS100WSS Installation Instructions and Use & Care Guide

Miele
Miele DA 6690 D installation instructions

Bosch
Bosch DWK98PR60/02 Instructions for installation and use

Silverline
Silverline 4207 instructions

Electrolux
Electrolux EFC 9408 EFC 6404 Operating and installation instructions

Hanseatic
Hanseatic SY-3388A2-P1-C81-L22-600 user manual

Baumatic
Baumatic Pythagora P25SS instruction manual

Grundig
Grundig GDKP2474BBSC user manual

Franke
Franke FBI 522 XS-CH installation manual