Vista BDI 9960 User manual

VistaTM
Assembly Instructions 2006
HIGH PERFORMANCE
FURNITURE FOR YOUR
HOME THEATER

FF - Front & FB - Back
Cover Panels
x 1 each
Vista™Home Theater Furniture
Your Vista™Home Theater Furniture
is engineered for easy assembly.
Carefully follow this procedure to
prevent any damage.
Placement and Maintenance
Vista™Home Theater Furniture is
designed for indoor use on level
floors. Clean glass with glass cleaner,
and steel parts with a moist cloth.
Designed by Louis A. Lara
Protected by U.S. Patent #D474047.
‘Vista’ is a trademark of Becker Designed, Inc.
All rights reserved. ©2006 Becker Designed, Inc.
N - Shelf Brackets
2 Left +2 Right with 9960
Large Hex
Wrench
Figure 1
Start Here!
1. Unpack and identify the parts listed above.
The assembly workspace should be a non-marring surface such
as carpet. If any parts are missing or damaged contact BDI
other concerns please contact your local BDI Retailer.
2. Attach Glides. Thread adjustable glides (B) into holes on
underside of base (A) (Fig. 1).
B - Adjustable
Glides x 5
E x 4
I - 5/16 x .75” Pan
Head Screw x 16
Screen Brackets
O - Glass Shelf
x 2 with Model 9960
B - Adjustable Glides
x 5
G - Silver
Phillips Head Screw
x 3
E - 3/8 x 1.25” Flat
Head Screw
x 4
A - Base
Wire Management Strap & Plastic
Fastening Pin x 3
M - Nut x 4
L - Washer x 4
Q
R
A - Base
D - Spine
Small Hex
Wrench
P - M8 x 1.5” Flat
Head Screw
x 4 with 9960
3. Attach Spine (D) to Base (A) using 4 - 3/8 x 1.25”
flat head screws (E) and large hex wrench provided
(Figure 1).
4. Install Front Cover Panel (F) to front of spine using
5/8” long Phillips head screw (G) as shown (Figure 2).
Bottom end of cover panel is attached with hook and loop
pads. Note: The front cover panel has a flatter curve. Back
panel has a notch at the bottom.
G x 1
FF - Front Panel
x 1
D - Spine
x 1
FF FB
Horizontal Mounting Bars x 2
HTL HTR
HBL HBR
T - Small Spacers
x 4
U - Large Spacers
x 4 V - Phillips Head Mounting
Screws (various thread
sizes) x 32
Figure 2
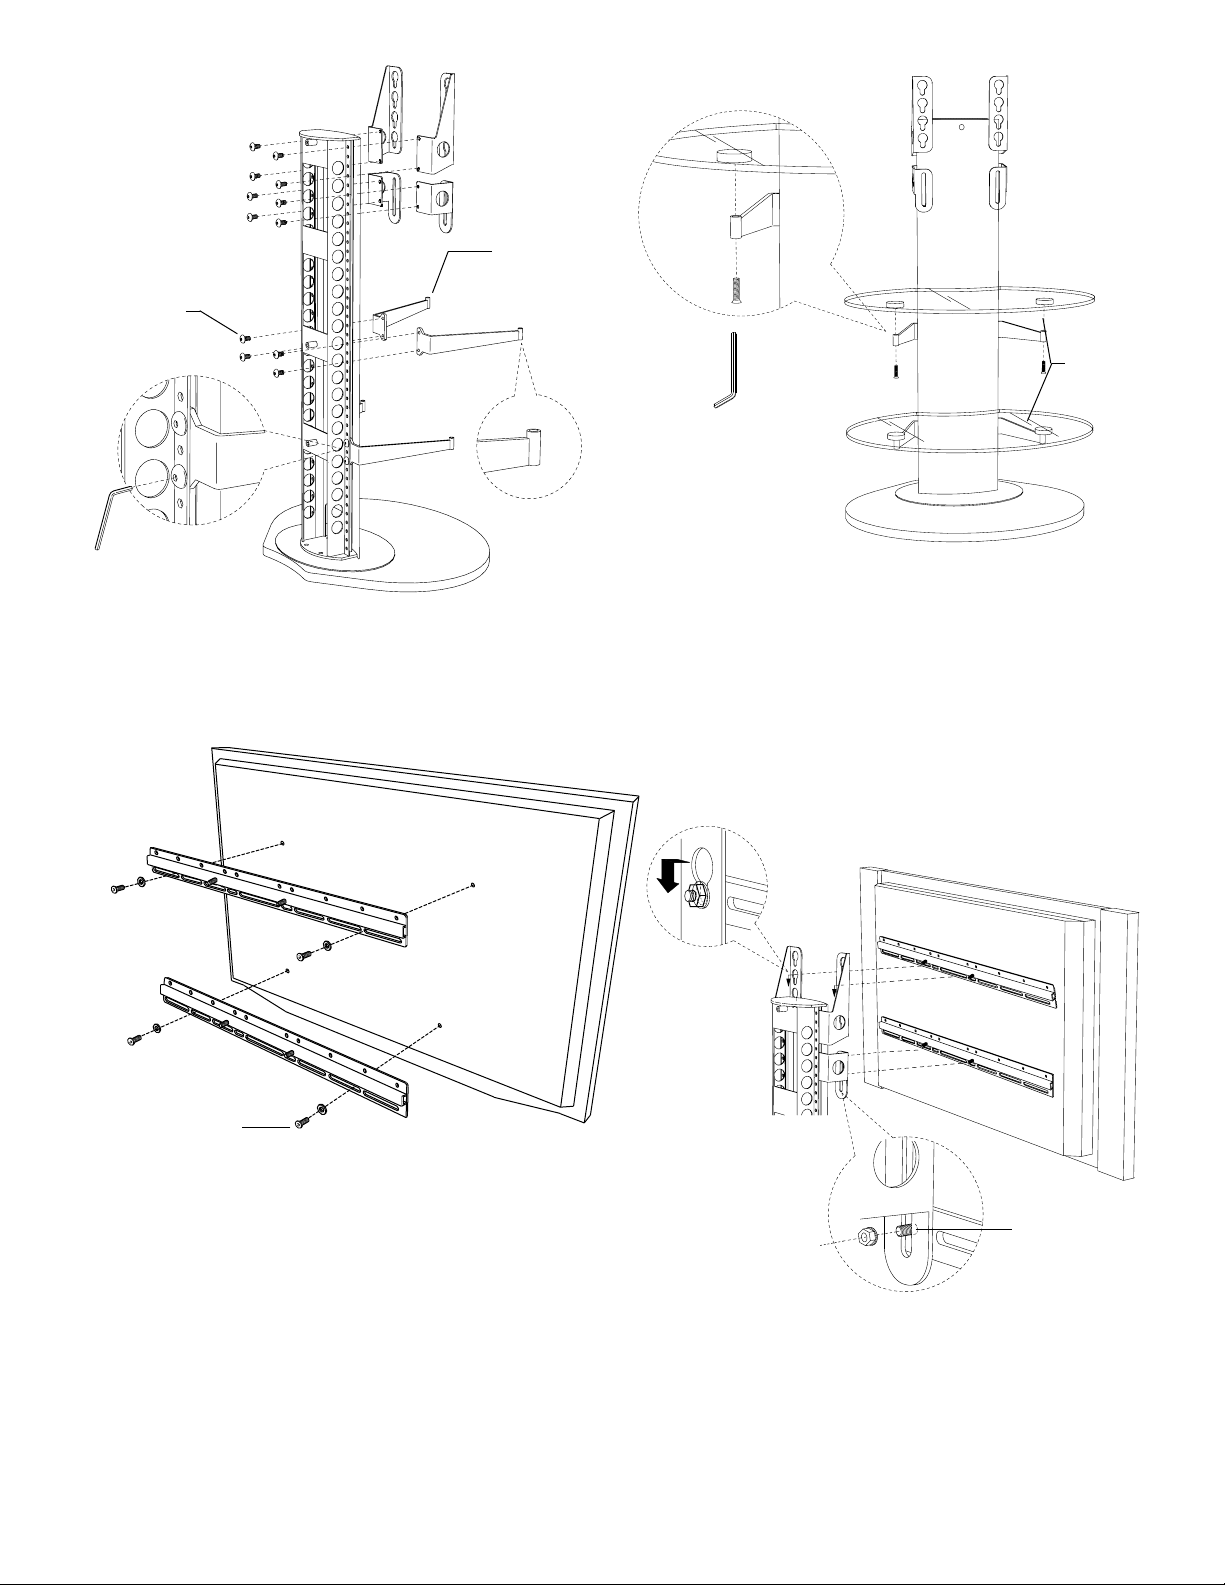
Figure 3
Figure 4
5. Attach Shelf & Screen Brackets as shown with 3/4”
pan head screws (I) (Fig. 3) using large hex wrench. Slots
on the face of the screen brackets should face forward.
Screen brackets may need to be adjusted up or down to
align with horizontal bars.
7. Install Horizontal Mounting Bars. Find mounting
screws that came with your flat screen TV. If screws are not
available, find the short Phillips head mounting screws
provided with Vista that thread cleanly into the mounting
holes in the back of your TV. The following thread
sizes are included: M5, M6, M8, 10-32 &1/4-28. Attach
both horizontal mounting bar to TV as shown (Fig. 5) using
washers and Phillips driver. Note: If back of TV has a curved
surface, or, if bars do not sit flat, use spacers (T or U) and
long mounting screws provided. Make sure bars are
centered left to right! Button hooks should be on top and
threaded studs on bottom. Fully tighten bars to TV!
I x 16
6. Install glass shelves. First, position glass shelf (O) so
that discs are resting on the ends of the shelf brackets (N).
Keeping one hand on the shelf, pick up one M8 x 1.5” flat
head socket screw (P) and thread up through the bottom of
the cylinder into the hole on the bottom of the glass mount-
ing disc. Thread second screw into second disc. Using
small hex wrench, fully tighten both left and right discs.
Note: Each shelf will support up to 50 lbs (23 kg).
O - Shelves
x 2
HTL
N - Shelf
Brackets
2 Left &
2 Right P x 4
HBL
HTR
HBR
Threaded
stud
Pre-threaded nut (M)
to upper UMB bar.
Figure 6
Flat Screen TV
(back view)
Short Mounting
Screws (V)
Washers (L)
Nut (M)
8. Attach flat screen TV. Carefully “hook” TV onto
screen brackets as shown (Fig. 6). Make sure both
pre-threaded nuts drop into key hole slot and that threaded
studs go into slot on bottom screen brackets (HBL & HBR).
Tighten nuts (M) using wrench. Note: Vista will support flat
screens up to 225lbs (102kg). Note: Vista is NOT designed to
support televsions greater than 6” in depth.

9. Install Wire Management Straps. Wire management
straps (Q) attach to the perforated metal panel inside the
Vista spine simply by pushing the plastic pin (R) into the
hole in the center of the strap and into one of the holes on
the panel (Fig. 7). Wrap straps around cords as shown
(Fig. 8). Straps may be relocated simply by pulling out and
pushing plastic pin into another hole.
Figure 8
Figure 7
Q - Wire Management strap x 3 R - Plastic Pin
VistaTM
10. Install back cover panel. When all wires are in
place and secured, install back cover panel using 2
remaining 5/8” long Phillips head screws (G).
Carefully, move Vista into place by pulling and lifting on
lower shelf bracket elbows. Adjust glides if necessary.
To learn more about BDI’s complete line of home theater
furniture, visit us on the web at www.bdiusa.com.
Enjoy!
Other Vista Indoor Furnishing manuals


Popular Indoor Furnishing manuals by other brands

Regency
Regency LWMS3015 Assembly instructions

Furniture of America
Furniture of America CM7751C Assembly instructions

Safavieh Furniture
Safavieh Furniture Estella CNS5731 manual

PLACES OF STYLE
PLACES OF STYLE Ovalfuss Assembly instruction

Trasman
Trasman 1138 Bo1 Assembly manual

Costway
Costway JV10856 manual


