VISTEON R 340G User manual

Composition Touch (R 340G)
Radio
Composition Touch (R 340G):
Radio
Stand: 06.01.2017 | BAN - OP: XXXXXX
Englisch: 04.2017
Artikel-Nr.: 181.5L6.R34.20
C
M
Y
CM
MY
CY
CMY
K

Description of symbols
Refers to a section within a chapter which
contains important information and safety
notes. Such reference must always be
observed.
MEDIA A button with blue uppercase letters repre-
sent printed radio buttons visible on the
device.
Config. A button with black upper/lower case writ-
ing or a button with a symbol, individually
or in combination, represent function sur-
faces on the display and will only be visible
when the radio is turned on. For better vis-
ualization in the tables the function surfa-
ces may be represented without the button
but with the symbol enlarged.
Indicates that the section is continued on
the next page.
Indicates the end of a section.
Indicates situations in which the vehicle
must be stopped as quickly as possible.
®These symbols indicate a trade mark. How-
ever, the absence of this symbol does not
constitute a waiver of the rights concerning
any term.
™
→ Symbols of this type reference warnings
within the same section or page, indicating
potential risks of accidents and injuries, as
well as how they can be avoided.
→
→
→ Cross reference to information about possi-
ble damage to your vehicle within the same
section or on a given page.
DANGER
Texts with this symbol indicate extremely danger-
ous situations, which may lead to fatal or severe
injuries if you do not observe the warning.
WARNING
Texts with this symbol indicate dangerous situa-
tions which will lead to fatal or severe injuries if
you do not observe the warning.
CAUTION
Texts with this symbol indicate dangerous situa-
tions, which may lead to light or severe injuries if
you do not observe the warning.
NOTICE
Texts with this symbol indicate situations, which
may lead to damages to the vehicle or its equipment
if not observed.
Texts with this symbol are environment pres-
ervation recommendations.
Texts with this symbol contain additional in-
formation.
Volkswagen Brazil works continuously to develop
and improve all its vehicles. Please understand that
we must therefore reserve the right to alter any part
of the vehicle and its equipment or technical specifi-
cations at any time. The data provided concerning
scope of delivery, appearance, performance, dimen-
sions, weights, fuel consumption, standards and ve-
hicle functions are all correct at the time of going to
print. Some of the equipment described might not
yet be available in a particular vehicle (information
can be provided by your local Volkswagen Dealer-
ship), and some equipment may not be available in
certain countries. No legal commitment may be in-
ferred from the information, illustrations or descrip-
tions in this manual.
No part of this manual may be entirely or partially
reprinted, reproduced or translated without the
written permission of Volkswagen do Brasil.
All rights under the copyright laws are expressly re-
served by Volkswagen do Brasil. Subject to altera-
tion and amendment.
Printed in Brazil.
© 2017 Volkswagen do Brasil
Manual printed in paper bleached without the
use of chlorine.

Table of Contents
About this manual 2
Introduction
Before using the unit for the first time 3
Other applicable documents 3
Overview of the convenience consumers 3
Safety recommendations 3
Instructions for use 5
Device overview 5
Selector button 8
SD card slot 8
Basic command information 8
App-Connect
Overall information and safety guidelines 11
App-Connect settings 12
Apple CarPlay™ 12
Android Auto™ 13
Mirror Link™ 14
Audio operation
Radio operation (RADIO) 15
Media mode 19
Wired or wireless connections 23
Phone controls (PHONE)
Introduction to phone controls 26
Phone control description 29
Settings
Menu and System SETUP) settings 35
Sound and volume settings 35
Abbreviations 37
Index 38
Table of Contents 1
181.5L6.R34.20
1815L6R3420

About this manual
Read this instruction before operating the radio.
All versions and models are described without being
identified as special versions or model variations.
Therefore, this manual may describe equipment not
available in your specific vehicle model. Please refer
to a Volkswagen Dealership for additional informa-
tion.
All details provided in this manual correspond to the
information available at the time this manual was
printed, and apply only to factory-fitted equipment.
Due to continuous technical improvement of the ve-
hicle, actual vehicle features and equipment may
differ from the indications provided in this manual.
No claims may be derived from the differing details,
illustrations or descriptions.
In case you lend or sell the vehicle to a third-party,
ensure that this manual is included and that all data
and files saved in the unit are deleted.
–An alphabetical index is included at the end of
this manual.
–A list of abbreviations detailing technical terms
and acronyms can be found at the end of the
manual.
–Directions and positionssuch as left, right, front
and rear are normally relative to the vehicle's di-
rection of travel, unless otherwise indicated.
–Illustrations assist with orientation and should be
regarded as schematic representations.
Composition Touch (R 340G)2

Introduction
Before using the unit for the
first time
Control list
Before first use, following steps should be execu-
ted to safely operate the radio and make full use
of its features:
Observe basic safety notes → page 3.
Get familiar with the operation of the radio.
In
System Configurations
, reset the radio to its
factory settings → page 35.
Use appropriate data storage units for media
operation → page 19.
Other applicable documents
Apart from this manual for the use of this radio
and its components please also see the following
documents:
–Operating Manual and, if the case, posterior
records in the service wallet.
–Operating Manual of the mobile telephone
system.
–Operating Manual of the external multimedia
units.
–Instructions for a retrofitted accessory.
Overview of the convenience
consumers
The radio may be factory equipped with the fol-
lowing components1), in part as optional equip-
ment:
Loudspeakers, installed in different fitting loca-
tions and output levels (Watt).
Multifunction steering wheel with its controls.
Media units.
1) the type and quantity of the cited compo-
nents are country and device specific and may
vary in a model series and, in addition, be differ-
ent in a special model.
The radio may be factory equipped with the fol-
lowing components1), in part as optional equip-
ment:
Cable connections to the external multimedia
units.
Wireless connection for external multimedia de-
vices.
Mobile phone interface.
Audio system, in part, subwoofer.
1) the type and quantity of the cited compo-
nents are country and device specific and may
vary in a model series and, in addition, be differ-
ent in a special model.
Safety recommendations
Prior to first use of the device, read and follow
the safety instructions listed below to detect and
prevent possible hazards to yourself and others:
–Read this instruction with attention:
–Some function areas may contain links to third
party web pages. Volkswagen does not take
ownership of third party web pages accessible
through links and is not responsible for their
content.
–Some function areas may contain third party
information, originated by other suppliers.
Volkswagen does not take responsibility for
the accuracy, actualization or integrity for third
party information and does not infringe third
party rights.
–The radio stations or the owners of data sour-
ces are responsible for the broadcast content.
–Covered parking places, tunnels, tall buildings,
mountains or additionally operated electric
equipment, such as battery chargers, may also
interfere with the radio reception.
–Metal-coated stickers or films may hinder re-
ception in vehicles with window aerials.
WARNING
Accidents and injuries can occur if the driver is
distracted. Operating the radio may distract
drivers from the traffic.
●Always drive carefully and responsibly.
●Adjust sound volume settings to allow the
driver to hear external warnings and sounds
(e.g. emergency service sirens)
Introduction 3
181.5L6.R34.20

●Excessively high volumes may compromise
hearing. This also occurs when vehicle occu-
pants' hearing is submitted to high volumes,
even if briefly.
WARNING
Sudden volume variations may occur when
switching or connecting an audio source.
●Reduce the master volume before connect-
ing or switching audio sources.
WARNING
Connecting, inserting, or removing data storage
units while driving may distract the driver from
his/her surroundings and cause accidents.
WARNING
External device connection cables could hinder
the driver's movement.
●Arrange connection cables so that they do
not obstruct the driver.
WARNING
Loose or unsecured external devices may be
flung through the vehicle interior and cause in-
juries in case of sudden evasive or breaking ma-
noeuvres or in the event of accidents.
●Never place or attach external devices on
doors, windscreen, on or near areas marked
with “AIRBAG” on the steering wheel, dash-
board, seat backrests, or between these
areas and vehicle occupant himself. External
devices may cause severe injuries in the
event of accidents, especially if the airbags
are triggered.
WARNING
An armrest could restrict the movement of the
driver's arms and lead to severe accidents and
injuries.
●Always keep the armrest closed while driv-
ing.
WARNING
In explosion prone places, turn mobile tele-
phones off!
WARNING
Unfavourable light conditions and a damaged
or dirty display may cause information and indi-
cations not able to be read or be correctly read
on the display.
●Indications or information on the display
must never be a reason to run a safety risk.
The display is not in condition to replace the
drivers attention.
WARNING
Radio stations may broadcast danger and cat-
astrophe warnings. The following conditions
prevent radio stations from being received:
●If your current location is in a region of poor
or no reception. Such region includes tun-
nels, urban canyons, parking garages, under-
ground passageways, mountains and valleys.
●If, in areas with sufficient signal strength,
the the bandwidths of the radio stations
present interferences or are unavailable
●When the necessary vehicle components re-
quired for radio signal reception are dam-
aged, inoperative or without sufficient elec-
tric power.
NOTICE
In environments with special prescriptions and
when the use of mobile phones is forbidden, the
mobile phone must always be turned off. The ra-
diation generated by mobile phones may cause
interference with sensitive medical devices and
technical equipment, which may result in their
failure or damage.
NOTICE
The vehicle's loudspeakers may be damaged if
the volume is too high or the sound is distorted.
NOTICE
Introduction of objects, incorrect placing and in-
troduction of data storage units of different
shapes and sizes may damage the media readers
and the radio.
●Ensure correct insertion position when insert-
ing a data storage unit .
●Insert only adequate data storage units into
the respective media reading units.
●Excessive pressure could break the SD card
slot lock.
Composition Touch (R 340G)4

NOTICE
Foreign matter and liquids adhering to a data
storage device may damage the media reading
unit and the radio.
●Do not attach stickers or similar materials to
data storage units. Stickers may peel off and
damage the media reading unit.
●Do not use data storage units with printable
data. Residues and stickers may peel off and
damage the media reading unit.
●Use only dry, clean, adequate and non-dam-
aged SD cards.
Instructions for use
–When using the radio, follow the specific na-
tional recommendations and legal determina-
tions.
–To operate the radio a light touch on the but-
ton or screen suffices.
–To make the best of the radio's features and
optimal operation it is important that the date
and time be correctly set.
–Some of the function surfaces and modes de-
tailed herein may not be available due to vary-
ing market-specific unit software available.
The absence of a button or function surface is
not a defect of the radio.
–Depending on the country, some functions of
the radio are no longer selectable on the dis-
play as of a certain speed threshold. This is not
a functional fault, but rather a legal obligation.
–In certain countries there may be restrictions
regarding the use of Bluetooth®1) devices. Ad-
ditional information may be obtained from lo-
cal authorities.
–The display of all indications and the execution
of the functions are only available after the
complete start up of the radio. The start up
time of the system depends on the scope of
the radio function and can last more than usu-
al especially at low and high temperatures.
–After a disconnection of the vehicle battery,
turn the ignition on before switching on the
radio.
–Upon changing the settings, displays may vary
and the unit may behave in a partially different
way from the described in this manual.
–The radio is connected to the vehicle. The sys-
tem cannot be operated through a different
vehicle.
–In order not to impair its operation, repairs and
modifications to the radio may only be per-
formed by a specialized company.
–The use of a mobile phone in the vehicle may
cause noises in the vehicle's loudspeakers.
–With the engine turned off and low battery
charge, the radio is automatically turned off.
–High speeds, poor weather and road condi-
tions, as well as a high noise level (also outside
the vehicle) and the the network quality may
impair a phone call in the vehicle.
–In some vehicles equipped with Park Pilot, the
current audio source volume is automatically
reduced when the reverse gear is selected. The
volume reduction can be configured in the ve-
hicle → Booklet Operating Manual, chap-
ter Park Pilot menu.
–Information on the radio's software and li-
cense conditions are stored in the radio:
MENU Config. Copyright .
Device overview
Introduction
The radio is supplied in different versions of the
device which are distinguished from each other
by its group of functionalities, inscriptions and
button functions as well as by the lay out of the
controls.
Power management
When, with the ignition turned off and the device
on, the battery power falls below the minimum
voltage of the electrical network, an acoustic sig-
nal sounds and the message
LOW BATTERY
is dis-
played. In this case, the unit must be switched
off.
1) Bluetooth®is a registered trademark of Bluetooth ®SIG, Inc.
Introduction 5
181.5L6.R34.20

Overview
Fig. 1 Control overview.
The unit is supplied in different variations, distin-
guished by the unit's button functions and letter-
ings → Fig. 1 2.
Turn and touch button→ page 7:
–Press to turn the unit on or off.
–Turn to adjust the base volume of the cor-
responding active source.
Radio buttons: press to access a function
surface → page 7.
Display: touchscreen → page 8.
Settings button: the function is conditioned
to the respective operating condition.
–In all radio modes, turn to open the list of
stations, and press to start/stop the SCAN
feature → page 15.
–In media mode, turn to open the playlist
→ page 19.
–Turn to select menu options in long lists
and press to access the selected entry (e.g.
selecting a station from a list of stations).
1
2
3
4
USB port: to connect external data storage
units → page 19.
AUX-IN multimedia port: to connect external
audio sources → page 19.
SD card slot: to insert SD cards → page 8.
5
6
7
Composition Touch (R 340G)6

Rotary and push knob
Rotary/push knobs
The rotary and push button → Fig. 1 1is re-
ferred to as volume control or on/off button.
The right turn and push button→ Fig. 1 4is re-
ferred to as control.
Turning the radio manually on or off
Press the on/off button briefly → Fig. 1 1.
Turn the radio on or off automatically
According to its version, the unit is automatically
turned off when the engine is turned off or the
ignition key is removed from the ignition lock. If
the radio is manually switched on again, it will be
automatically switched off after approximately
30 minutes (timeout).
Volume increase ore decrease
Once on, the radio starts to operate at the last
adjusted volume level, as long as the maximum
pre defined turn on volume is not surpassed
→ page 35.
–Turn the volume control (right or clockwise
to turn up and left or counter clockwise to turn
down)
Some volume adjustments can be preset
→ page 35.
Mute
When in mute mode, the active audio source is
interrupted or muted The indication can be seen
on the display screen
.
–Turn the volume control button counter
clockwise until audio can no longer be heard.
Anti-theft coding
The unit is protected against theft and unauthor-
ized use by a security code (anti-theft coding) .
After its first being entered, the anti theft code is
saved to the memory of the vehicle (convenience
coding of the radio) If the anti-theft coding has
to be manually deactivated, e.g. when installing
the unit in another vehicle, please contact a
Volkswagen Dealership.
If the vehicle battery has been disconnected,
switch the ignition on before switching the unit
on.
Radio buttons
To operate the radio buttons→ Fig. 1 2press
them shortly or protractedly.
RADIO : turn on in radio mode and then change
the frequency band → page 15.
MEDIA : change to media mode and from there
select the media source → page 19.
PHONE : access the telephone interface. If there is
no telephone interface installed, the current au-
dio source is muted→ page 33.
APP : access the interface with App-Connect
→ page 11.
SETUP : press to show additional functions related
to the current mode (radio, media, etc.).
→ page 35.
Display
Clean the display
To clean, turn the radio off.
To clean the display, use a soft and clean cloth,
lightly humidified with clean water or a cleaning
cloth that may be obtained at a Volkswagen
dealership → .
Soften resistant dirt with a humidified cloth, tak-
ing care not to damage the radio.
NOTICE
Do not dry clean the display. Doing so may cause
scratches that cannot be removed.
●Do not use aggressive or solvent-based clean-
ing products. Such cleaning products may
damage the radio and leave the display “mis-
ty”.
●Exert only a light pressure when cleaning the
display.
Introduction 7
181.5L6.R34.20
Selector button
The selector button → Fig. 1 4can be turned or
pressed. When turned, lists are searched or radio
station lists or of media titles are opened. When
pressed marked records are accessed, configura-
tions are set and functions started or interrupted.
SD card slot
Only 32 mm x 24 mm x 2,1 mm (1,26 x 0,94 x
0,083 inch) or 32 mm x 24 mm x 1,4 mm (1,26 x
0,94 x 0,055 inch) SD cards can be inserted into
the SD card slot → Fig. 1 7.
Only supported audio files are shown
→ page 19. Other file types are ignored.
Inserting an SD card
Insert the SD card carefully into the SD card slot
with the chamfered edge up and the inscriptions
to the left (contact surfaces downward).
If the SD card cannot be inserted, check the in-
sertion position and the SD card.
Ejecting the SD card
To prevent data loss, an inserted SD card must be
prepared for ejection by the following procedure:
SETUP Safely remove. SD card .
Next, press the inserted SD card. The SD card
“jumps” into ejection position and can be re-
moved.
Unreadable SD card
When a memory card with unreadable data is in-
serted, a corresponding message is shown on the
radio's display.
Volkswagen is not responsible for SD cards
and same are not offered together with the
radio. It is necessary to have an SD card to use it
on the radio.
Do not use any SD card adapter.
An SD card with navigation data cannot be
used as storage for other files, the saved
files are not recognized by the radio.
Basic command information
Introduction
Function surface and display
controls
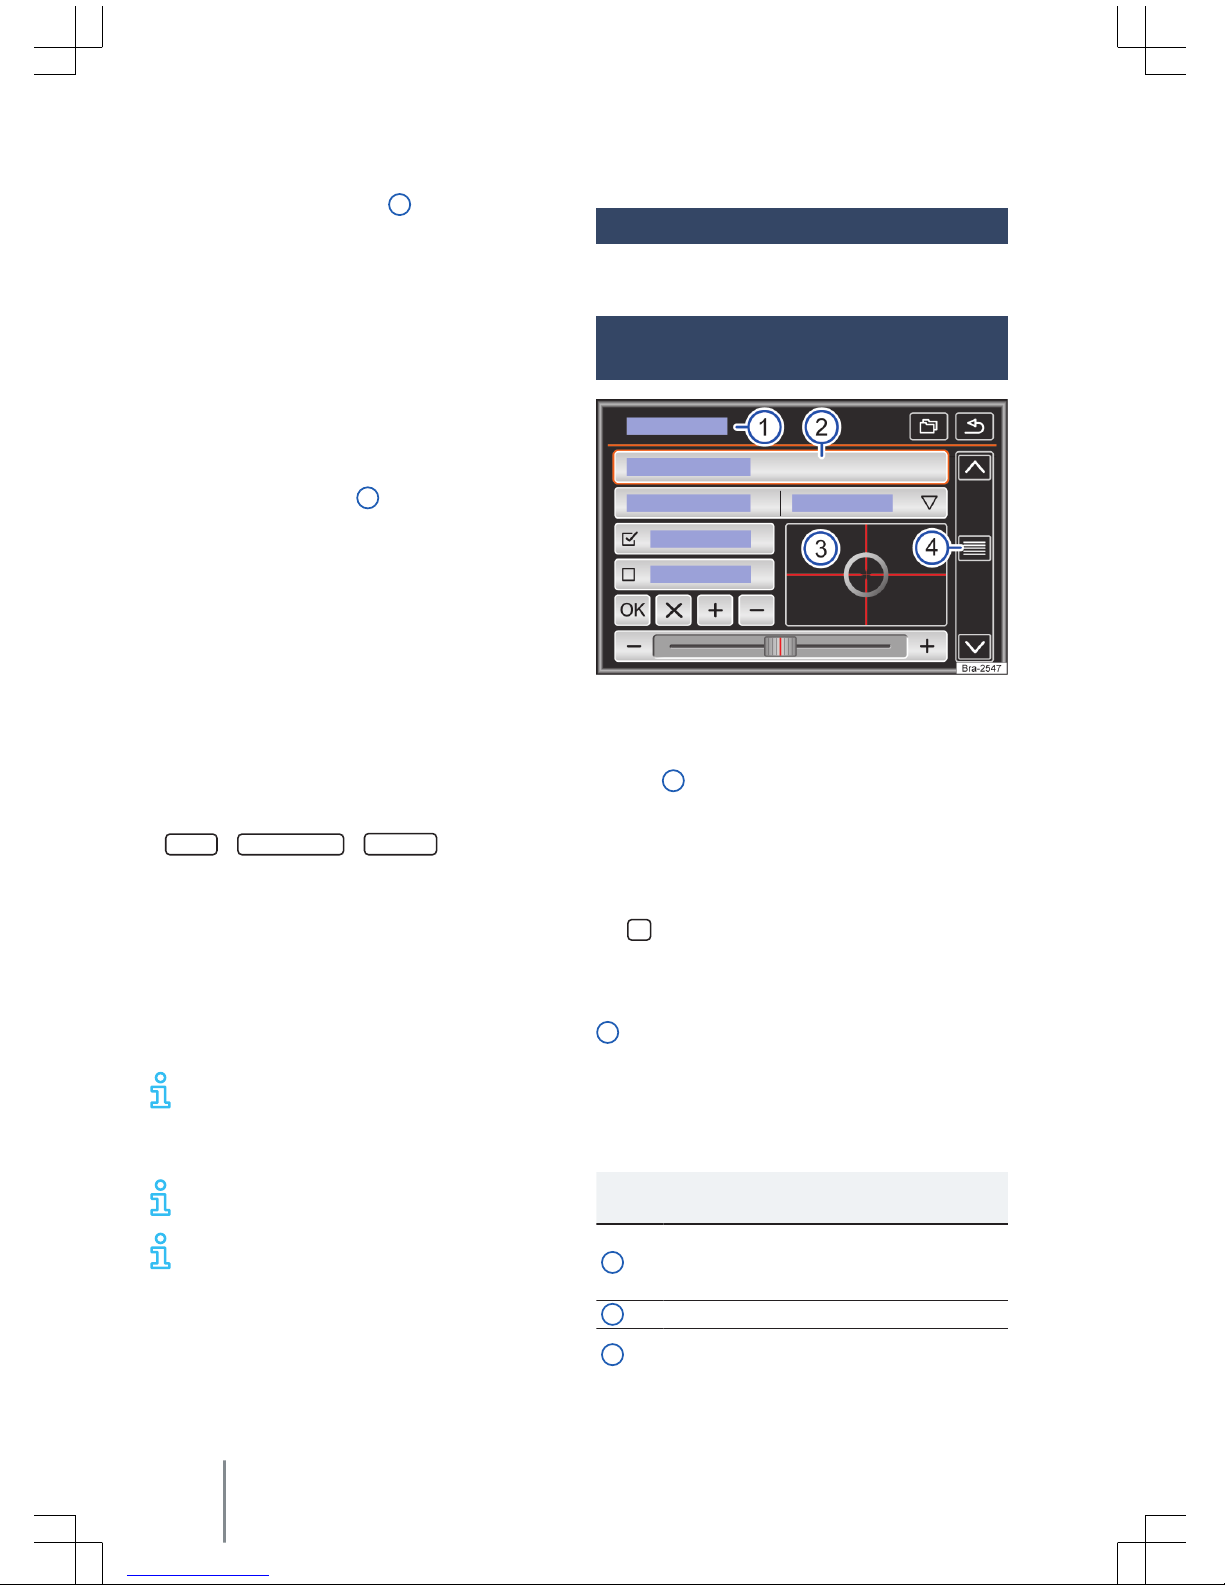
Fig. 2 Schematic representation: overview of possi-
ble function surfaces on the display.
The device is equipped with a touchscreen
→ Fig. 1 3.
Active display areas with recorded functions are
referred to as “function surfaces” and operated
by brief touches or extended touches on the dis-
play. Function surfaces are described herein by
the word “function surface” and the button sym-
bol .
Function surfaces start specific functions or open
other submenus. The currently selected menu is
indicated on the title line of submenus → Fig. 2
1.
Inactive function surfaces (grey) cannot be cur-
rently selected.
Overview of possible function surfaces and
displays
Function surfaces and displays: action and ef-
fect
1
The title line indicates the currently se-
lected menu and, eventually, other
function surfaces.
2Touch to open a different menu.
3Gently press to move the target over
the display in a single move.
Composition Touch (R 340G)8

Function surfaces and displays: action and ef-
fect
OR: touch the desired display position
to move the target to such position.
4
Gently press to move the scroll bar over
the display in a single move, and scroll
through the lists → page 9.
Touch to gradually close some lists one
level above.
Touch to gradually close submenus until
returning to the main menu or to undo
previous entries.
Touch to open a pop-up window con-
taining additional settings.
/
Some functions or displays are selected
through a checkbox and activated or
deactivated through touch.
OK Touch to confirm an entry or selection.
Touch to close a pop-up window or en-
try mask.
+/ -Touch to gradually change settings.
Gently press to move the scroll bar over
the display in a single move.
Access list entries and search lists
Fig. 3 Schematic representation: list entries, set-
tings menu.
List entries can be accessed by directly touching
the screen or with the selector button → Fig. 1
4.
Selecting and accessing list entries with the
control button
Turn the control button to sequentially select
list entries through a checkbox and search the
list.
Press the control button to access the selected
list entry.
If the available entries on a list do not fit the dis-
play, function surfaces or a scrollbar are shown
on the right-hand side to scroll through entries
→ Fig. 3 1.
Search lists (scroll)
Search by list
line
Briefly touch the function sur-
face or .
Search by list
page
Briefly touch the top or bottom
of the scroll bar.
Quick search
by list page
Touch and hold the top or bot-
tom of the scroll bar.
Quick search
in long lists
Place finger over the scroll bar
indicator and move it up or
down in a single move. Remove
the finger from the screen after
reaching the desired position.
Entry masks with display keypad
Fig. 4 Representation: entry mask with display key-
pad.
Entry masks with display keypads are used to en-
ter memory names or search terms in long lists,
among other functions.
The function surfaces listed herein are not availa-
ble in all countries or topic areas.
The following chapters detail only the functions
not covered in this representation.
Introduction 9
181.5L6.R34.20
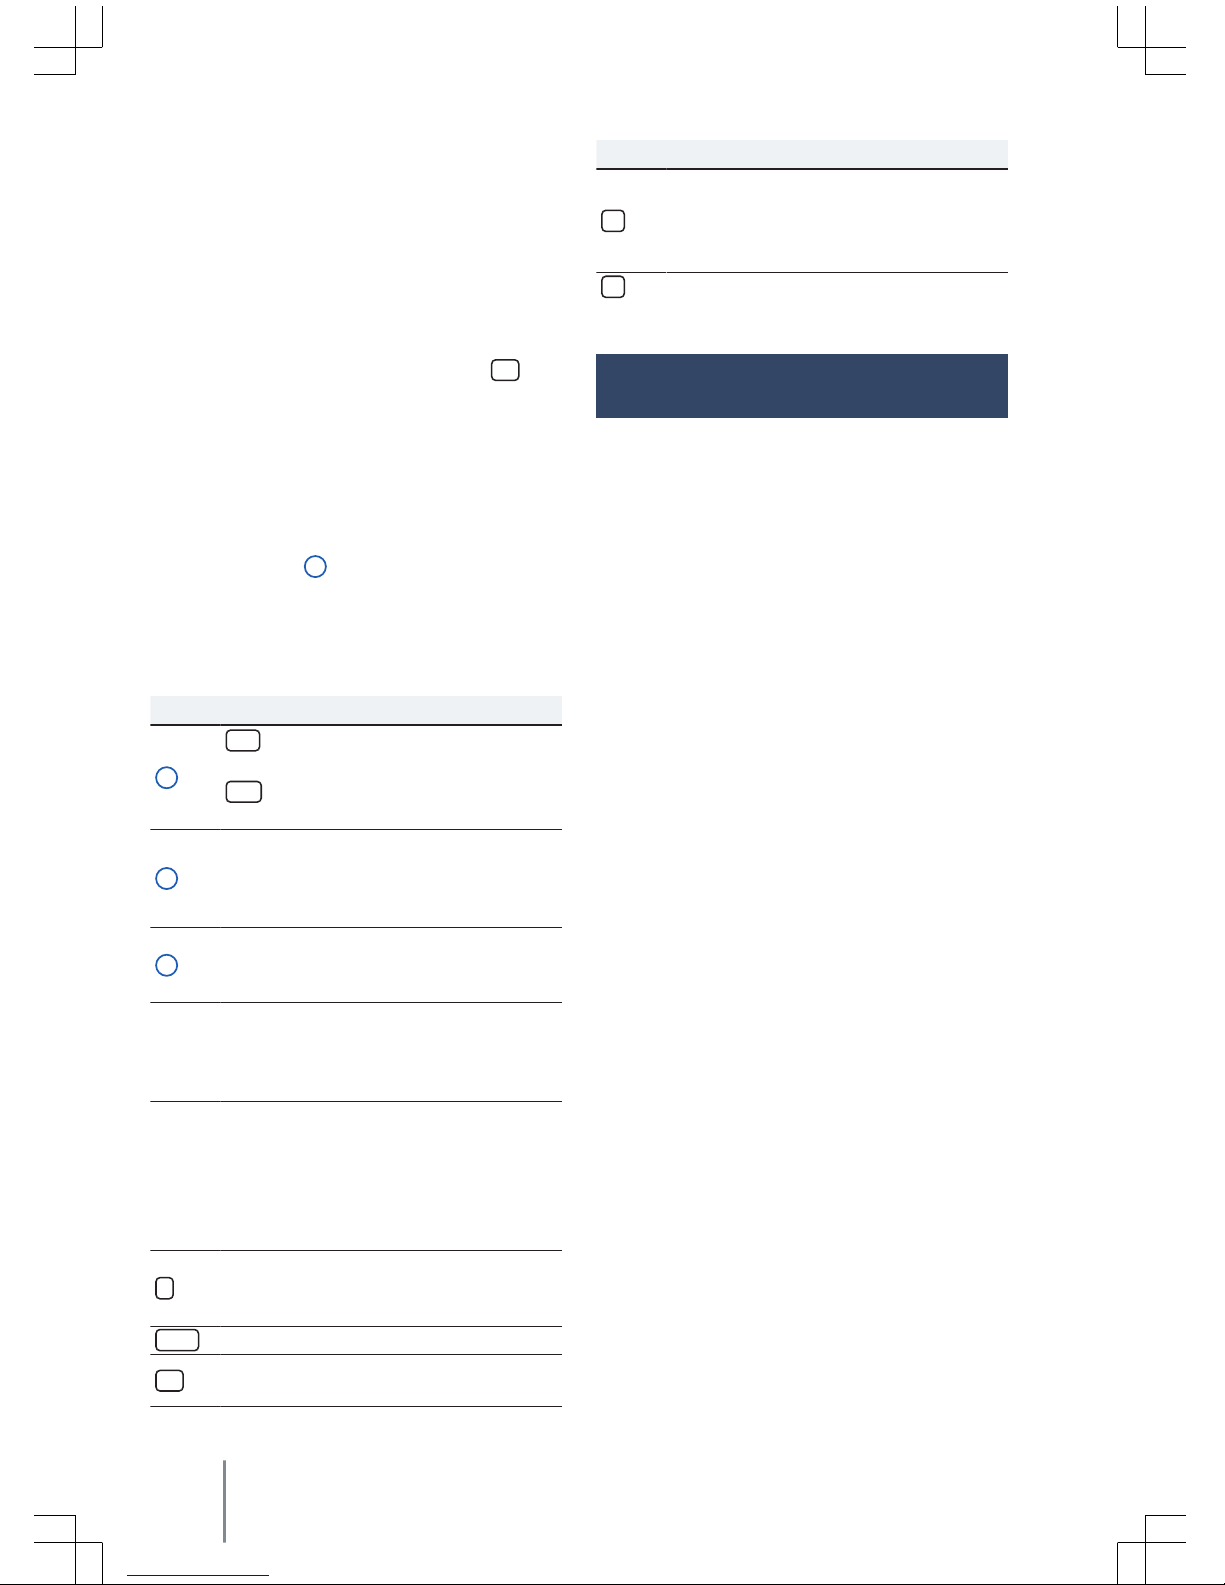
The entry line with symbol entry mask (cursor) is
located on the upper left display line. All entries
are displayed in this area.
Entry masks to “enter text”
Letters, characters and special symbols can be
selected in any combination to enter free texts in
entry masks.
The currently displayed sequence of symbols is
applied by touching the function surface OK .
Entry masks to select stored entries
Only combinations of letters, characters and spe-
cial symbols corresponding to a stored entry can
be selected for the introduction mask.
If less than 99 entries can be selected, the num-
ber of remaining entries is shown through the
entry line → Fig. 4 3. Touching this function sur-
face will display all remaining entries in a list. If
less than 5 entries can be selected, the list is au-
tomatically opened.
Overview of function surfaces
Function surface: action and effect
1
123 : touch to open the entry mask for
special symbols and numbers.
ABC : touch to switch to the letter entry
mask.
2
Touch to switch to a different keypad
language. The keypad language can be
selected through the
System settings
menu.
3
Shows the quantity and opens the list
of entries corresponding to selectable
presets.
Let-
ters /
num-
bers
Touch to apply the entry line.
Letters
and
Press and hold to open a pop-up win-
dow with special symbols based on the
letters.
Select the desired characters via touch.
Some special signs can also be transcri-
bed (e.g. “AE” to “Ä”).
Touch to switch between upper case
and lower case, as well as numbers and
special characters.
Touch to insert a blank space.
OK Touch to apply the introduction line
suggestion and close the entry mask.
Function surface: action and effect
Touch to delete symbols on the entry
line, from right to left.
Press and hold to delete multiple sym-
bols.
Touch to close the entry mask.
Additional displays and display
options
Display indications may vary from those descri-
bed herein, depending on the settings.
The time can be shown on the display status line.
All displays can only be shown after a complete
start-up process of the radio.
Composition Touch (R 340G)10

App-Connect
Overall information and safety
guidelines
Introduction
The following interfaces are available in the App-
Connect menu:
–Apple CarPlay™1)
–Android Auto™2)
–MirrorLink™3)
To prevent the driver from distraction only spe-
cial applications may be used while driving → .
According to the mobile device used, a connec-
tion is established through the respective inter-
face.
Thereby it is possible that the functions and the
contents displayed on the mobile devices are dis-
played and controlled on the radio display.
WARNING
The use of applications while driving may dis-
tract from the surrounding traffic. Accidents
and injuries can occur if the driver is distracted.
●Always drive carefully and responsibly.
WARNING
Loose or unsecured mobile phones may be
flung through the interior and cause injuries in
case of sudden evasive or breaking manoeuvres
or in the event of accidents.
●While the vehicle is in motion, always secure
mobile devices properly outside the airbag
deployment zones or stow them away safely.
WARNING
Inadequately or inappropriately designed appli-
cations may cause damages to the vehicle, ac-
cidents and serious injuries.
●Volkswagen recommends to use only appli-
cations offered by Volkswagen for the spe-
cific vehicle.
●Protect the mobile device with its applica-
tions from misuse.
●Never alter the applications.
●Follow the owner's manual of the mobile de-
vice.
NOTICE
Mobile devices must always be turned off in lo-
cations where their use is not allowed. The radia-
tion generated by mobile devices may cause in-
terference with delicate medical and technical
equipment, which may impair or damage such
devices.
NOTICE
Volkswagen does not take responsibility for dam-
ages caused to the vehicle due to the use of low
quality or defective applications, insufficient pro-
gramming of the applications, insufficient net-
work, for loss of data during transmission or mis-
use of mobile devices.
Information on the technical conditions, the
compatible end devices, the applicable ap-
plications and availability is available through
www.vw.com.br/conectividade or the
Volkswagen dealerships.
●Or for for further information consult the mo-
bile device's owners manual or the brand's on-
line shops/sites.
1) Apple CarPlay™ is an Apple Inc. trademark.
2) Android Auto™ is a Google Inc. trademark
3) MirrorLink™ and the Mirror Link logo are Car Connectivity Consortium LLC. trademarks
App-Connect 11
181.5L6.R34.20

App-Connect settings
App-Connect main menu
Fig. 5 App-Connect main menu.
Info : display of further information.
Config. :
App-Connect settings
.
Open the
App-Connect settings
menu
In the
App-Connect
main menu, touch the
Config.function surface.
Function surface: effect
Activate data transmission to VW Apps : the trans-
mission of data to the Volkswagen applications
is activated.
MirrorLink™
Display alignment : select display alignment.
180 degrees rotation : touch to rotate the screen
display by 180°.
Prefer radio keypad a): key entries will effected
over the radio keypad display and not over the
mobile device keys.
a) This function depends on the device used.
Information on the technical conditions, the
compatible end devices, the applicable ap-
plications and availability is available through
www.vw.com.br/conectividade or the
Volkswagen dealerships.
●Or for for further information consult the mo-
bile device's owners manual or the brand's on-
line shops/sites.
1
2
Apple CarPlay™
MenuApple CarPlay™
Fig. 6 Selection of the mobile device.
Fig. 7 Apple CarPlay™ menu.
Conditions Apple CarPlay™
Control list
The following conditions are required to use
Apple CarPlay™:
The mobile device must support Apple
CarPlay™.
The mobile device must be connected by a
USB cable to the radio.
Establish connection
When a mobile device is connected for the first
time follow the instructions on the radio display
and on the display of the mobile device.
–The conditions for use of the Apple CarPlay™
must be met → page 12.
–Press the MENU button.
Composition Touch (R 340G)
12

–Touch the App-Connect function surface.
–Select your connected mobile device pressing
on the corresponding icon.
Disconnect connection
–During operation of the Apple CarPlay™, touch
function surface → Fig. 7 1to access
App-Con-
nect
from the main menu.
–Touch function surface → Fig. 6 1to turn the
active connection off.
Particularities
During an active Apple CarPlay™ connection, the
following features are valid:
–Bluetooth connection among mobile devices
and the radio are not possible.
–An active Bluetooth connection is automatical-
ly finalized.
–Telephone functions are only possible via
Apple CarPlay™. The radio functions described
in this manual are not available.
–The connected device cannot be used as a me-
dia device on the Media menu.
Voice command
–On the multifunction steering wheel or on the
mobile phone press VOICE or briefly to
start the device's voice command feature.
–On the multifunction steering wheel or on the
mobile phone press VOICE or for a few sec-
onds to start the connected device's voice
command feature.
Information on the technical conditions, the
compatible end devices, the applicable ap-
plications and availability is available through
www.vw.com.br/conectividade or the
Volkswagen dealerships.
●Or for for further information consult the mo-
bile device's owners manual or the brand's on-
line shops/sites.
Android Auto™
Android Auto™ Menu
Fig. 8 Selection of the mobile device.
Fig. 9 Android Auto™ Menu
Conditions Android Auto™
Control list
The following conditions must be met to use
Android Auto™:
The mobile device must support Android
Auto™.
The mobile device must be connected by a
USB cable to the radio.
Depending on the mobile device used, an ad-
equate application must be installed to be
able to use Android Auto™ on the device.
Activate connection
When a mobile device is connected for the first
time follow the instructions on the radio display
and on the display of the mobile device.
–The conditions for use of Android Auto™ must
be met → page 13.
–Press the MENU button.
App-Connect 13
181.5L6.R34.20

–Touch the App-Connect function surface.
–Select your connected mobile device pressing
on the corresponding icon.
Deactivate connection
–When operating Android Auto™, touch func-
tion surface → Fig. 9 1.
–Select the
Return to Volkswagen
function to ac-
cess the
App-Connect
main menu.
–Touch function surface → Fig. 6 1to turn the
active connection off.
Particularities
During an active Android Auto™ connection, the
following features are valid:
–An active Android Auto™ device may be simul-
taneously connected to the radio via Blue-
tooth.
–Bluetooth connection among other mobile de-
vices and the radio are not possible.
–Telephone functions are possible via Android
Auto™. When the Android Auto™ device is si-
multaneously connected via Bluetooth to the
device, the phone function can also be used.
–Simultaneous phone calls via Android Auto™
and via the radio are not possible.
–An active Android Auto™ device cannot be
used as a media device on the Media menu.
Voice commands
–On the multifunction steering wheel or on the
mobile phone press VOICE or briefly to
start the device's voice command feature.
–On the multifunction steering wheel or on the
mobile phone press VOICE or for a few sec-
onds to start the connected device's voice
command feature.
Information on the technical conditions, the
compatible end devices, the applicable ap-
plications and availability is available through
www.vw.com.br/conectividade or the
Volkswagen dealerships.
●Or for for further information consult the mo-
bile device's owners manual or the brand's on-
line shops/sites.
Mirror Link™
MirrorLink™ Menu
Fig. 10 Function surfaces on the compatible appli-
cations overview.
Fig. 11 Other Mirror Link™ function surfaces.
Conditions MirrorLink™
Control list
The following conditions must be met to use
Mirror Link™:
The mobile device must support MirrorLink™.
The mobile device must be connected by a
USB cable to the radio.
Depending on the mobile device used, an ad-
equate application must be installed to be
able to use MirrorLink™ on the device.
Establish a connection
–The conditions for use of MirrorLink™ must be
met → page 14.
–Press the MENU button.
–Touch the App-Connect function surface.
–Select your connected mobile device pressing
on the corresponding icon.
Composition Touch (R 340G)
14

Possible function surfaces and displays
Function / display surfaces: effect / meaning
APP
Returns to the App-Connect dis-
play → Fig. 5. The MirrorLink™
connection can be broken off on
the display.
Touch to close open applications.
Then touch the applications that
are to be closed or touch the
Close all function surface to close
all open applications.
Touch to visualize the mobile de-
vice's display on the vehicle's dis-
play.
Open the MirrorLink™ → Fig. 10
settings.
1
Touch to exhibit the function
surfaces on the top border of the
display.
2Touch to return to the main
menu.
Information on the technical conditions, the
compatible end devices, the applicable ap-
plications and availability is available through
www.vw.com.br/conectividade or the
Volkswagen dealerships.
●Or for for further information consult the mo-
bile device's owners manual or the brand's on-
line shops/sites.
Audio operation
Radio operation (RADIO)
Introduction
Follow the national rules and legal provisions
when using the radio.
Other additional electric devices connected to
the vehicle may interfere with the receipt of the
broadcast radio signal and cause noises in the
speakers.
Parking lots, tunnels, tall buildings or
mountains may interfere with unit signal
reception.
Metal-coated stickers or films may hinder
reception in vehicles with windscreen aer-
ials.
Establish radio mode
After the factory settings have been reset, press
the RADIO button on the device. Select the inten-
ded frequency band pressing the RADIO button.
Radio main menu
Fig. 12 RADIO main menu.
Audio operation 15
181.5L6.R34.20

Fig. 13 Radio operation: station list.
With the radio turned on, press the radio button
RADIO → page 7. Radio mode turns on.
To exit the main menu, press the RADIO button
again (return to the previous main menu) or press
another radio button.
The following options are available:
–return to the memorized radio station.
–Seek next station.
–Memorize the tuned broadcasting stations.
The currently tuned in radio station is displayed
in the center of the display. For stations with RDS
the station's name can be displayed instead of its
frequency, such as
RADIO 21
, in case of good re-
ception.
Function surfaces in the FM/AM main menu
Function surface: effect
1Change the displayed station button
group by touching the function surface.
FM/AM Select the desired frequency band.
Opens the list of radio stations currently
available → page 17.
Opens the adjusted frequency scale
(frequency band) → page 17.
Opens the current frequency band set-
tings menu → page 19, Settings (FM,
AM).
</ >
Change between stored or available
stations.
Arrow button settings in menu
→ page 19, Settings (FM, AM).
1to
12
Station buttons to store stations
→ page 16.
Update the frequency band station list
(AM) → page 17.
Function surface: effect
SCAN
Function surface that only becomes
visible with the SCAN function is selec-
ted → page 18.
Press the control button → Fig. 1 4to
start the SCAN function.
Possible symbols and displays
Display: meaning
AStation frequency display.
Radio stations are stored in station but-
tons.
Station buttons
Fig. 14 RADIO main menu.
In the RADIO main menu, the currently selected
frequency band stations can be stored in 15
numbered frequency tracks. These function sur-
faces are referred to as “Station buttons”.
Station button functions → Fig. 14
Access stations
through sta-
tion buttons
Touch the station button corre-
sponding to the desired sta-
tion.
Stored stations can only be
touched after accessing
through station buttons and
when available in the current
location.
Change the
station button
group
With finger swipe over the dis-
play in the station buttons
area→ Fig. 14 1, from right to
left or from left to right.
Composition Touch (R 340G)16

Station button functions → Fig. 14
The station buttons are dis-
played in groups of respectively
5 function surfaces ( 1to 5, 6
to 10 , and 11 to 15 ).
Store stations
in station but-
tons
See: storing stations
→ page 18.
Specific radio indications, menus
and symbols
Fig. 15 RADIO main menu.
Fig. 16 Radio operation: radio station list with up-
date possibility (AM).
Function button areas and respective meaning
on the main menu RADIO → Fig. 15 and
→ Fig. 16:
Select the sta-
tion using the
arrow buttons
</ >
Touch the function surface <
or >→ Fig. 15.
Depending on the arrow button
settings, the function switches
between stored and available
Function button areas and respective meaning
on the main menu RADIO → Fig. 15 and
→ Fig. 16:
stations. Arrow button settings
in the
Settings (FM, AM)
→ page 19 menu.
Select a station
from the radio
station list.
Touch the function surface
→ Fig. 15 to open the station
list.
Search list and touch to select
the desired station.
Touch the function surface
→ Fig. 16 to close the station
list. If no action is made, the
radio station list automatically
closes after a while.
Update the ra-
dio station list
The FM frequency band station
list updates automatically.
The AM frequency band station
list can also be manually upda-
ted through the function sur-
face → Fig. 16.
Manually set the station frequency
Introduce the
frequency
band
Touch the function surface
→ Fig. 15.
Step-by-step
instructions to
change the fre-
quency
Turn the settings knob.
OR: touch the right or left fre-
quency band arrow buttons.
Quick scan
through the
frequency
band
Touch one of the arrow buttons
on the top display area
→ Fig. 15. The next available
station is automatically selec-
ted.
OR: press and hold one of the
arrow buttons → Fig. 15 on the
top display area. After releas-
ing, the next radio station
available will be automatically
selected.
OR: press and hold the fre-
quency range and slide to move
it.
Hide the fre-
quency band
Briefly press the settings knob.
When a station is selected
through the station button, the
manual frequency selection is
also closed. If no action is
made, the frequency band au-
tomatically closes after a while.
Audio operation 17
181.5L6.R34.20

Store stations
Store the cur-
rent station in-
to a station
button
Press and hold the desired sta-
tion button → Fig. 15 until an
audible warning is heard.
The currently played station
will be stored in this station
button.
Storing sta-
tions from the
station list in
station buttons
Touch the function surface
→ Fig. 15 or turn the settings
knob to open the station list.
Stations stored in station but-
tons are identified in the sta-
tion list by the symbol
→ Fig. 16.
Press and hold the display to
select the desired station.
Touch the desired station but-
ton in which the station must
be stored.
An audible warning is heard
and the station is stored in the
station button. Repeat this pro-
cedure to store other stations
from the station list.
Delete stored
stations
All stations stored in the
FM, AM
Settings
menu can be deleted
separately or all at once
→ page 19.
SCAN
Fig. 17 Radio mode: ongoing SCAN.
By selecting the SCAN function, all stations avail-
able in the current frequency band are played for
approximately 5 seconds. SCAN → Fig. 17 will be
displayed on the screen.
Starting and stopping the scan function
Starting the
scan function
Briefly press the settings knob.
OR: touch the function surface
and select SCAN .
Close the SCAN
function.
Briefly press the settings knob.
OR: touch the function surface
SCAN → Fig. 17 to stop the au-
tomatic scan function in the
current station.
The automatic scan function is
also interrupted whenever a
station is manually selected by
the station buttons.
Rear view camera or Parking sensor
(Park Pilot)
Fig. 18 Rear view camera and parking sensor
The rear view camera and the parking sensor
may not be available on all versions and/or ex-
port markets.
According to the vehicle version the external im-
age is automatically displayed with engaged re-
verse gear. The functions can be adjusted on the
menu.
Functions
Set glare, contrast and brightness.
Park Pilot display.
Composition Touch (R 340G)18
Table of contents
Other VISTEON Car Stereo System manuals


 operating instructions")


