VITINNI JF07520252 User manual

For further assistance, other products and more, join us at:
Website: www.vitinni.co.uk
Instagram: @vitinniuk
Facebook: www.facebook.com/vitinni
Twin Basket Air Fryer
PLEASE READ AND KEEP THESE INSTRUCTIONS FOR FUTURE USE
SAP Code: JF07520252
2
INTRODUCTION
Thank you for choosing our Vitinni Twin Basket Air Fryer. Please read this user
manual carefully before use and keep it for future reference. The manufacturer and
importer do not accept any liability if the information in these operation instructions is
not complied with. If you need any assistance, please contact our customer service
team using the details provided on the back page of this manual. Basic safety
precautions should always be followed when using this appliance.
SAFETY INSTRUCTIONS
This appliance is for indoor use only.
This appliance is for domestic use only and should not be used for commercial
purposes.
Check that the voltage on the rating plate corresponds with that of the local network
before connecting the appliance to the mains power supply.
This appliance can be used by children aged from 8 years and above and persons
with reduced physical, sensory or mental capabilities or lack of experience and
knowledge providing they have been given supervision or instruction concerning use
of the appliance in a safe way and understand the hazards involved. Cleaning and
user maintenance shall not be undertaken by children unless they are older than 8
years and supervised.
This is not a toy - children should be supervised to ensure they do not play with the
appliance. Keep the appliance and its cord out of reach of children less than 8 years.
If the appliance, power supply cord and plug are malfunctioning or they have been
dropped or damaged switch off the appliance and discontinue use immediately.
This appliance contains no user serviceable parts. Repairs should only be
undertaken by the manufacturer, its service agent or a similar qualified person.
If the power supply cord is damaged, it must be replaced by the manufacturer, its
service agent or a similar qualified person in order to avoid a hazard.
Keep the power supply cord away from sharp edges and parts of the appliance that
may become hot during use. Do not allow the power supply cord to overhang the
worktop.
Do not use this appliance with an extension lead or multiple socket adaptor.
Do not use this appliance near an open flame or in moist or damp conditions.
Allow sufficient space around the Air Fryer for ventilation and heat dissipation. Place
on a flat, stable, heat resistant surface a minimum distance of 5 to 10 cm from walls
and other items.
3
Do not leave the appliance unattended whilst connected to the mains power supply.
Switch off the mains power supply and remove the plug by hand.
Always disconnect the appliance from the power supply before assembling,
disassembling or performing cleaning or maintenance.
Do not immerse the Air Fryer, power supply cord or plug in water. Care should be
taken to avoid spillage on the electrical components, power cord and plug. Do not
operate the appliance with wet hands.
Do not use any accessories or attachments with the appliance that have not been
supplied or recommended by the manufacturer.
This appliance is not intended to be operated by means of an external timer or
separate remote control system.
Ensure that the air vents of the Air Fryer are not covered and there is sufficient
space for the warm air exhaust to dissipate.
Extending the recommended cooking times, overfilling or placing food too close to
the heating element could lead to food burning. When it is safe to do so clean any
residual food and oil from the Air Fryer and accessories.
Ensure the grill is clean and dry before using the Air Fryer.
Do not use liquids, plastic dishes, bowls or cling film inside the Air Fryer and do not
fill the tray with oil or fat.
The Air Fryer has a built-in safety switch and will switch to Standby mode if the door
is opened.
Nominal voltage is still present even when the Air Fryer is in Standby mode. To
permanently switch off the hot air fryer, ensure it is turned off at the mains power
supply.
Caution: Misuse of the appliance could cause injury – do not use the appliance for
anything other than its intended use.
In order to avoid a hazard due to inadvertent resetting of the thermal cut-out, this
appliance must not be supplied through an external switching device, such as a
timer, or connected to a circuit that is regularly switched on and off by the utility.
Caution: Hot surface. To avoid injury do not touch the hot or heated
surfaces of the product. The heated surfaces and heating element may contain
residual heat and still be hot after use. Allow the product to cool fully before moving
or handling.
The outer surface and basket cover may become hot when the appliance is
operating.
4
The basket and grill will become hot when the Air Fryer is in use. Only hold the
basket by the handle and allow the grill to cool before removing it from the basket.
CLEANING & MAINTENANCE
The Air Fryer should be cleaned after each use for best performance and to avoid
smoke from excess oil and burn on food.
Unplug the Air Fryer from the mains power supply and allow to cool fully before
performing any cleaning or maintenance.
Do not use strong detergent, sharp objects, brushes or metal objects to clean the
product and accessories as this could cause damage to the non-stick finish.
Remove both Baskets and wipe the Main unit inside and out with a soft, damp cloth
and a small amount of mild detergent. Do not immerse the main unit in water.
The Baskets and Trivets can be cleaned with hot, soapy water and a non-abrasive
sponge.
For stubborn, burnt on food, the baskets can be filled with hot soapy water and left to
soak for 10 minutes before cleaning.
All parts are not dishwasher safe.
STORAGE
Before storing, ensure that the Air Fryer is cool, clean and dry.
Reassemble all of the parts and wrap the power cord loosely around the body of the
Air Fryer. Never wrap the cord tightly to avoid causing damage.
Store in a cool, dry place away from direct sunlight.
TECHNICAL DATA
WEEE INFORMATION
The symbol on this product or its packaging means that this product should
not be treated as household waste. It should be handed to an appropriate collection
point for the recycling of electrical and electronic equipment. Contact your local
council or household waste disposal service for further information.
Do not dispose of electrical appliances as unsorted municipal waste, use separate
collection facilities.
Voltage Wattage Frequency Capacity Temperature
Range Timer
220-240V~ 1700W 50-60Hz 3.8L / basket 60-200°c 1-60 mins
5
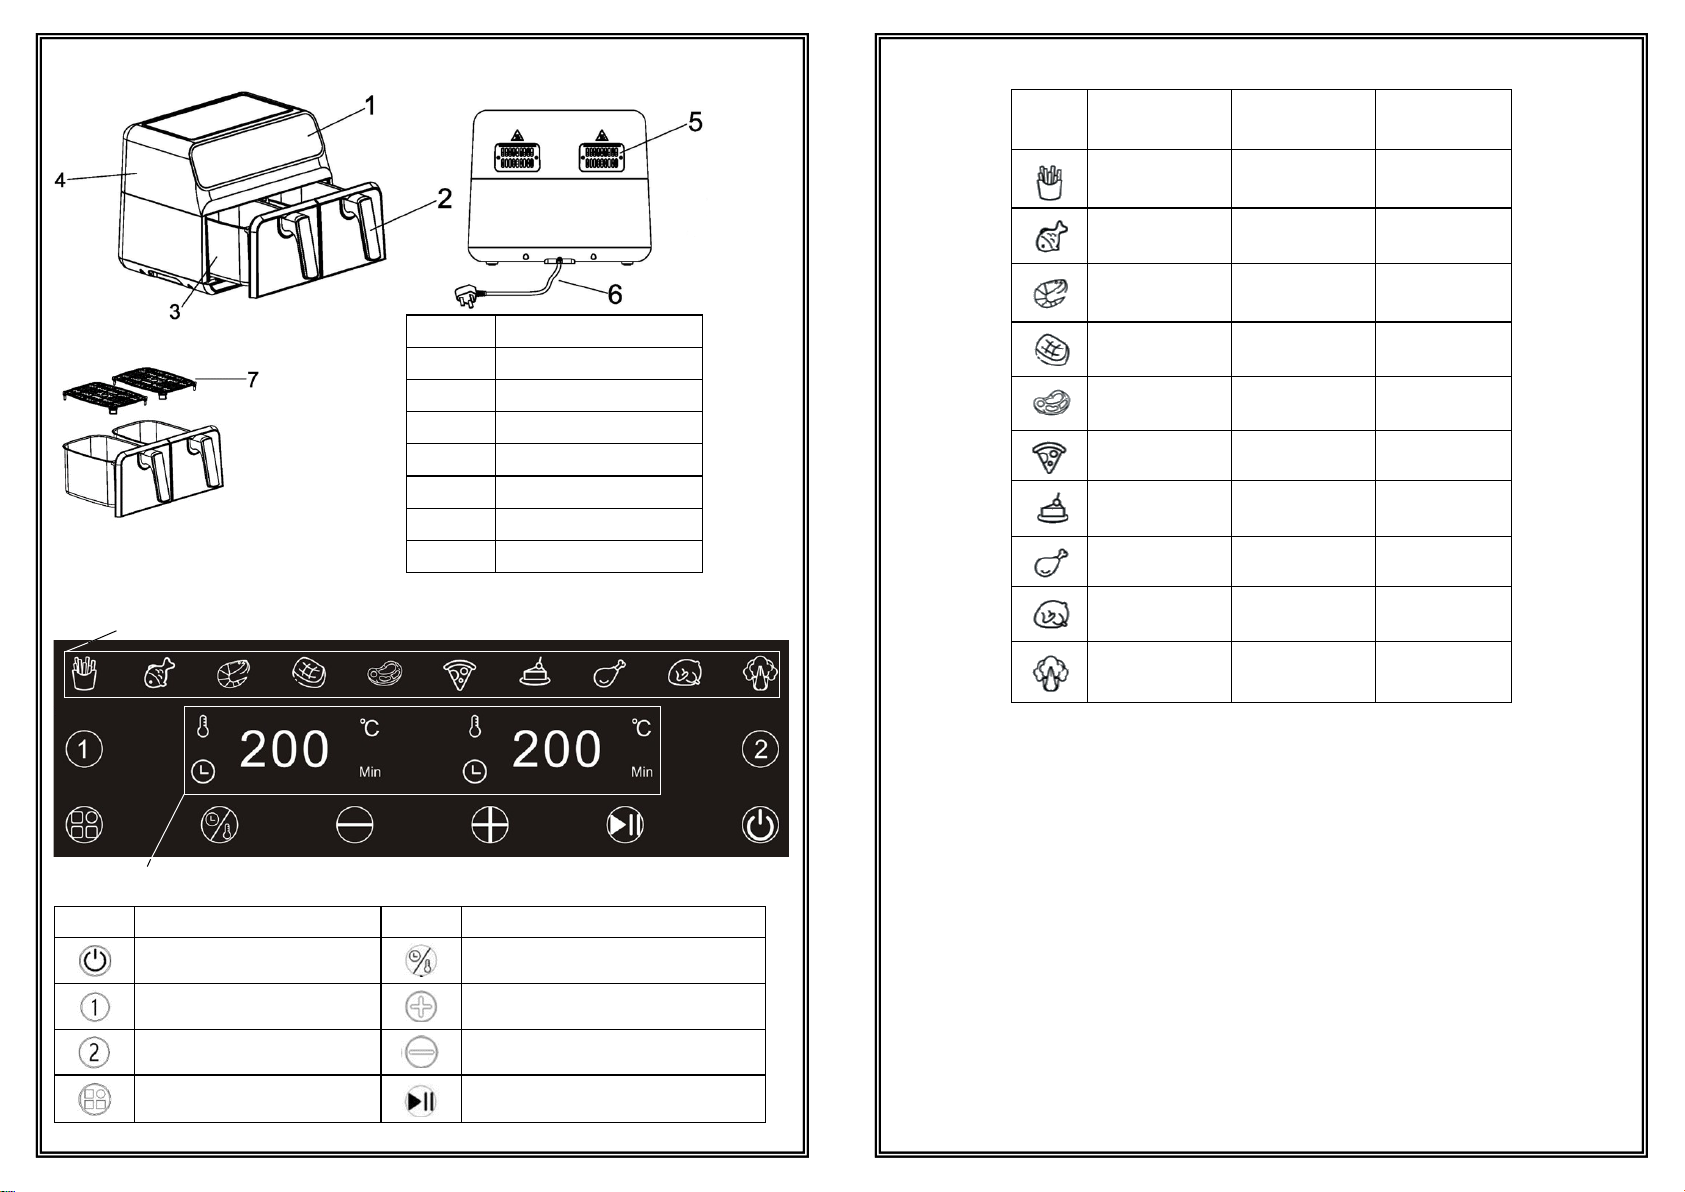
DESCRIPTION OF PARTS
CONTROL PANEL DIGRAM
Symbol Function Symbol Function
On/Off Button Time/Temperature Selector Button
Basket 1 Selector Button Increase Button
Basket 2 Selector Button Decrease Button
Preset Selector Button
Start/Pause Button
Number Part
1. Control Panel
2. Basket Handle
3. Basket
4. Main Unit
5. Exhaust Vent
6. Power Cord and Plug
7. Trivet
Preset Indicator Lights
Time/Temperature Display
6
PRESET SETTINGS
Note: Food will need to be shaken/turned over during the cooking process to
ensure even cooking.
The Preset Settings can be used as a guide. Final cooking times and temperatures
may need adjusting for optimal results and user preference
BEFORE FIRST USE
Before use, remove all packaging materials. Check all accessories are complete and
that the equipment is not damaged. The Air Fryer should be cleaned according to
the instructions in the Cleaning and Maintenance section. The Air Fryer should be
run through an operational cycle before it is used for the first time.
When using the Air Fryer for the first time a slight odour may be emitted. This is
normal and will soon subside.
Icon Description Time
(min)
Temperature
(°c)
Chips 20 200
Fish 18 200
Shrimp 20 180
Meat 20 180
Steak 25 180
Pizza 20 200
Cake 30 160
Chicken
Drumstick 20 200
Chicken
Whole 35 200
Vegetables 17 160

7
INSTRUCTIONS FOR USE
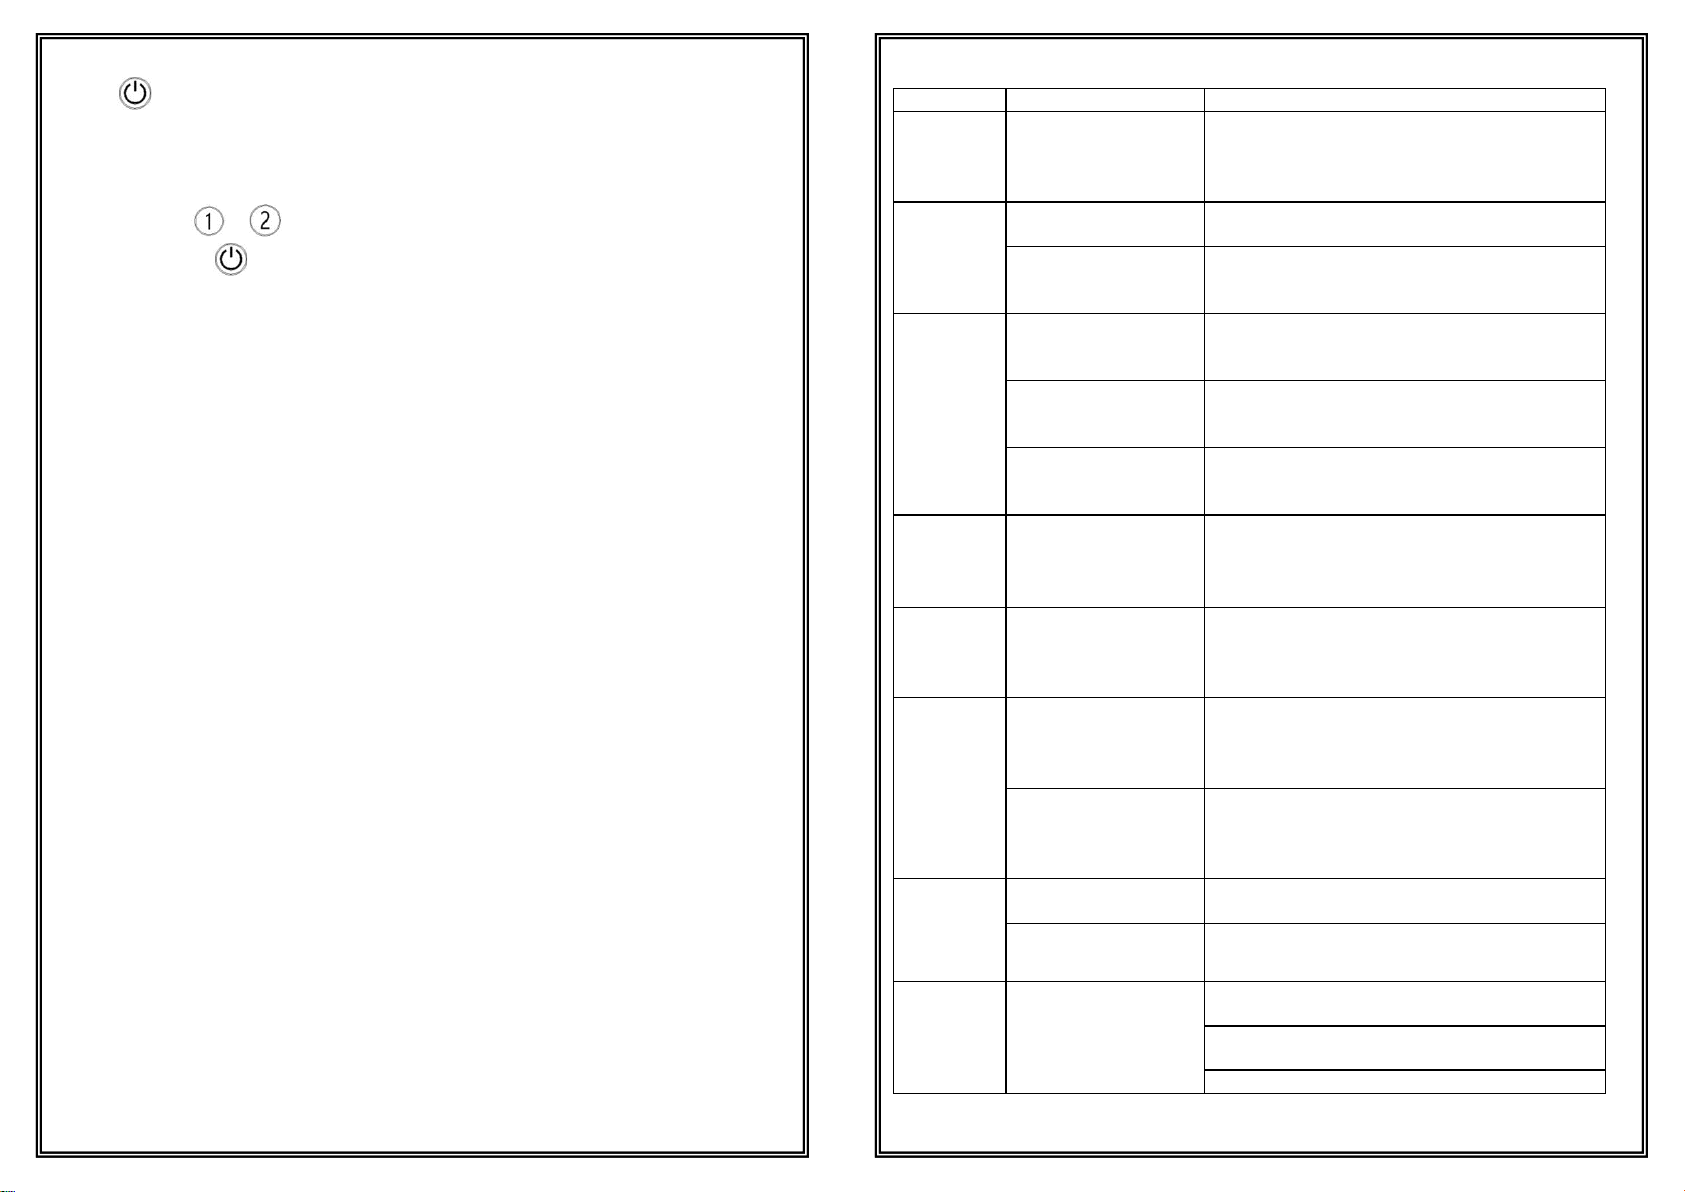
1. Place the Air Fryer onto a flat, stable and heat resistant surface and connect
to the mains power supply. The On/Off Button ( ) will light up when power
is connected.
2. Press the On/Off Button ( ) to turn on the Air Fryer.
Programming the Air Fryer
3. Press the Basket Selector Button ( / ) to select the desired basket
for programming.
4. To choose from one of the Preset Settings, press the Preset Selector Button
( ) to cycle through the options. The chosen Preset Indicator light will
flash and the time and temperature settings will be displayed alternately on
the Time/Temperature Display.
The preset time and temperature can be adjusted if necessary using the
method described in step 5.
To deselect the Preset Settings, press the Preset Selector Button ( ) to
cycle through the options until no preset lights flash.
5. To input specific time and temperature settings instead, press the Time/
Temperature Selector Button ( ) to cycle between the Time and
Temperature settings and then the Increase/Decrease Buttons ( / )
to adjust accordingly.
Time can be adjusted in 1 minute increments from a minimum of 1 minute to a
maximum of 60 minutes.
Temperature can be adjusted in 5°c increments from a minimum of 60°c to a
maximum of 200°c
6. To clear the settings and/or deselect the basket, press and hold the desired
Basket Selector Button ( / ) at any time during the setting process.
Starting the Cooking Process
7. If both baskets are to begin cooking at the same time, input the desired
settings for the remaining basket by repeating steps 3-5 and then press the
Start/Pause Button ( ) to begin the cooking process simultaneously.
8
If only one basket is to be started now, press the Start/Pause Button ( )
to begin the cooking process. The remaining basket can be programmed and
started independently by repeating steps 3-5 and then pressing the
Start/Pause Button ( ).
Once the cooking process has started, only the Start/Pause Button ( ) and the
Off Button ( ) will remain lit. The Time/Temperature Display will alternately show
the set temperature and a countdown of the remaining cooking time .
If one or both baskets have been set to one of the Preset Settings, the relevant
Preset Indicator light/s will also remain lit.
Both the selected icon and the Basket Number will blink every few seconds to show
which preset has been selected for each basket.
NOTE: Steam may be emitted from the Air Fryer door/basket during the
cooking process and when it is opened during or shortly after cooking has finished.
This is a normal part of the cooking process especially when cooking frozen food
and food containing a lot of moisture.
Interrupting, pausing or stopping the cooking process
During the cooking process both baskets can be interrupted, paused or stopped
independently or simultaneously.
7. To interrupt the cooking process, for example: to check progress or to shake
or flip the food, use the handle to remove the desired basket from the air fryer.
Cooking will automatically pause without affecting the other basket. Cooking
will resume as soon as the basket is placed back into the air fryer.
8. To pause the cooking process simultaneously, press the Start/Pause Button
( ) . When cooking is paused the full Control Panel will light up.
Press the Start/Pause Button ( ) again to resume cooking
simultaneously.
8. To pause the cooking process for one basket only, press the Basket Selector
Buttons ( / ) of the desired basket and then the Start/Pause Button (
). Only the selected basket will pause and the full Control Panel will light
up.
Press the Start/Pause Button ( ) again to resume cooking.
9
8. To stop the cooking process simultaneously, press and hold the On/Off Button
( ) until both Time/Temperature Displays show the word “OFF”. The fan
will continue to run for a further 20 seconds to cool the heating element before
shutting down.
9. To stop the cooking process for one basket only, press the Basket Selector
Buttons ( / ) of the desired basket and then press and hold the On/
Off Button ( ) until the Time/Temperature Displays shows the word “OFF”.
The fan will continue to run for a further 20 seconds to cool the heating
element before shutting down.
Finishing the cooking process
10. When the cooking process has finished for one or both of the baskets the
Time/Temperature Display will show the word “OFF”. The fan will continue to
run for a further 20 seconds to cool the heating element before shutting down.
The Air Fryer will also emit a beep alarm to signal that cooking has finished.
11. Remove the basket from the air fryer and empty out the contents onto a plate.
Place the empty basket onto a heatproof mat or back into the air fryer to cool.
HINTS & TIPS
A smaller amount of food usually require a shorter cooking times and a larger
amount of food usually requires a slightly longer cooking time
Shaking and turning food halfway through the cooking time can help prevent
uneven cooking.
Spray some oil onto the food for a crispy result. The optimal amount for crispy
fries is 500 grams per basket.
Food that can be prepared in a oven can also be prepared in the Air fryer
Use pre-made dough to prepare filled snacks quickly and easily.
Place a baking tin or oven dish in the Air fryer basket if you want to bake a
cake or quiche or if you want to fry fragile or filled ingredients
You can also use the Hot-air fryer to reheat food. To reheat ingredients, set
the temperature to 150°c for up to 10 minutes.
10
TROUBLESHOOTING
Problem Possible cause Solution
The touch
screen
does not
respond
The buttons have not
been pressed for long
enough
Ensure fingers are clean and press each button
firmly and hold for longer than normal to ensure
good contact with the display.
The Air
fryer does
not work
The appliance is not
plugged in. Put the mains plug in an earthed wall socket.
The Air Fryer is not
programmed
correctly.
Follow steps 3-6 in the Instructions for Use
section.
The
ingredients
are not
fully
cooked .
The amount of
ingredients in the
basket is too much.
Put smaller batches of ingredients in the
basket. Smaller batches cook more evenly.
The cooking
temperature is too
low.
Increase the cooking temperature using the
instructions in steps 3-6 of the Instructions for
Use section.
The cooking time is
too short.
Increase the cooking time using the
instructions in steps 3-6 of the Instructions for
Use section.
The
ingredients
are cooked
unevenly .
Some foods need to
be shaken or turned
halfway through the
cooking time.
Ingredients that lie on top of or across each
other (e.g. chips) need to be shaken halfway
through the cooking time to ensure they cook
evenly.
Fried food
is not
crispy after
cooking.
The food used is
meant for a traditional
Deep-fat fryer.
Use oven snacks or lightly brush or spray
cooking oil onto the food for a crispier result.
White
smoke
comes out
of the
appliance.
The ingredients used
are greasy.
When greasy foods are cooked, a oil can leak
into the basket. The oil can produce white
smoke and as it is heated. This does not affect
the appliance or the end result.
The basket still
contains grease or
residue from previous
use.
White smoke is caused by grease heating up in
the basket. Make sure the basket is cleaned
properly following the instructions in the care
and maintenance section.
Fresh
chips are
fried
unevenly.
The incorrect type of
Potato was used.
Use fresh potatoes and make sure they stay
firm during frying.
The prepared chips
contain excess starch
Rinse the chips under cold running water to
remove excess starch before cooking.
Fresh
chips are
not crispy
after
The crispiness of the
chips depends on the
amount of oil and
water in the fries.
Make sure you dry the chips properly before
you add the oil.
Cut the chips thinner smaller for a crispier
result.
Add slightly more oil for a crispier result.

Guarantee
Our products are guaranteed for a period of 2 years from the date of purchase.
Products that develop a fault within this period are covered by our warranty and we
will replace defective parts, or where not available the whole product. The warranty
does not apply to any defect in the goods arising from fair wear and tear, wilful
damage, accident, negligence by you or any third party, use otherwise than as
recommended by us, failure to follow our instructions, any alteration or repair carried
out without our approval or has been the subject of commercial use. Your statutory
rights remain unaffected, in particular any rights you have under the Consumer
Rights Act 2015.
If you have a problem with your product within this warranty period please contact
our customer services team.
In the event of changes to the specification of a product and we are not able to
replace parts, we will replace the whole product within the 2 year guarantee period
For products that fall outside of the 2 year guarantee, we will endeavor to provide
spare parts to purchase for as many of the replaceable parts as possible, but cannot
foresee specification changes or upgrades to products or parts outside of the initial 2
year period.
11
Customer Services:
If you would like further advice or information on your product, ensure you have the SAP
code ready and please get in touch with us at Vitinni on the contact options below:
SAP Code: JF07520252
Phone: 0330 002 1202 (Mon – Fri 9am to 5pm)
Email: support@vitinni.co.uk
UK Address: Vitinni, Vale Mill (Rochdale) Ltd, Robinson Street, Rochdale,
OL16 1TA, UK
EU Address: Vitinni, Delu-Ako Minky GmbH, Hauptstraße 103, 53619, Rheinbreitbach,
Germany
Table of contents
Other VITINNI Fryer manuals


Popular Fryer manuals by other brands


HURAKAN
HURAKAN HKN-FT44N manual

Keating Of Chicago
Keating Of Chicago 3424 TS GAS Specification sheet

Klarstein
Klarstein VitAir 10012291 manual

ButterBall
ButterBall 23011114 Operation manual & safety instructions

Continental Refrigerator
Continental Refrigerator CP43279 user manual

Klarstein
Klarstein 10037975 manual