VITINNI AF510T User manual

12LTR DIGITAL AIR FRYER
INSTRUCTION MANUAL
PLEASE READ AND KEEP THESE INSTRUCTIONS FOR FUTURE USE
MODEL NO: AF510T
SAP Code: JF0540001
For further assistance, other products and more, join us at:
Website: www.vitinni.co.uk
Instagram: @vitinniuk
Facebook: www.facebook.com/vitinni

General Safety Instructions
•Read the operating instructions carefully before using the Air Fryer for the first time.
•This Air Fryer is designed for personal use and is not suitable for commercial use.
•Do not use outdoors. Keep away from direct sunlight, heat sources and do not use
with wet hands.
•Before cleaning ensure the Air Fryer is switched off and the plug removed from the
socket.
•Caution
•Do not immerse the power cord, plug or housing in water or under the tap during
cleaning.
•Do not use liquids in the Air Fryer to prevent electric shocks or short-circuit of the
Air Fryer.
•When in use ensure that the air vents of the Air Fryer are not covered.
•When in use the accessories will become hot due to the high cooking temperature
(basket, toast rack, tray, etc.) Please use the cage tong provided when removing
any accessory.
Warning
•Before using, please ensure that your output voltage is the same voltage as stated
on the rating label of the Air Fryer.
•Before use please check the power cord and accessories of the Air Fryer, do not
use if there is any damage.
•Ensure the power cord is not hanging over any sharp edges or overhanging the
worktop.
•Do not plug in or use the Air Fryer with wet hands.
•Do not use the Air Fryer on a tablecloth or near curtains to avoid the risk of burning.
•When in use do not use an external power cord connection.
•When the Air Fryer is in use please do not use plastic dishes, bowls or cling film
inside the unit.
•Failure to follow these instructions can result in damage to the appliance and harm
to the user. No liability is accepted if these instructions are not followed or if
damage results through improper use. Any attempt to alter the appliance or not
follow instructions may result in harm and will also void any warranty.
•The Air Fryer should be placed on a stable surface when in use.
•Do not place the Air Fryer against wall or other appliances; ensure there is at least
10cm of space.

•Do not place anything on the top of the Air Fryer.
•Do not use the Air Fryer for anything other than that specified in the operating
instructions.
•Do not leave the Air Fryer unattended.
•When the Air Fryer is in use, hot steam will exhaust through the air vents .Keep
your hands and face away from the steam and air vents. Also be careful of hot
steam when removing food and accessories from the Air Fryer.
•Once the cooking cycle is completed,the heater component with be very hot, do
not touch it.
•Do not extend the recommended cooking times as this could lead to the food
burning with smoke released from air vent. Unplug the Air Fryer immediately. When
safe to do so clean any residual food and oil from the Air Fryer and accessories.
•After using the Air Fryer, press the power button to turn off, and then remove the
plug from the socket.
•This appliance can be used by children aged from 8 years and above and persons
with reduced physical, sensory or mental capacities or lack of experience or
knowledge only if they have been given supervision or instruction concerning use
of the appliance in a safe way and understand the hazards involved. Children shall
not play with the appliance. Cleaning and user maintenance shall not be made by
children without supervision.
Caution
•Unplug the Air Fryer from the wall socket when not in use or before cleaning.
Before cleaning ensure the Air Fryer as cooled down.
•Do not use any accessories other than those provided.
•Ensure the accessories are clean and dry before putting the food inside.
•The Air Fryer has a built-in safety switch and will switch to standby mode if the door
is opened.
•If the power cord becomes damaged, it must be replaced by the manufacturer, its
service agent or a similarly qualified person.
•Keep the Air Fryer and the power cable out of reach of children.
•The Air Fryer must not be operated by means of an external timer or separate
remote-control system.
•The door and housing unit of the Air Fryer may get hot when in use.
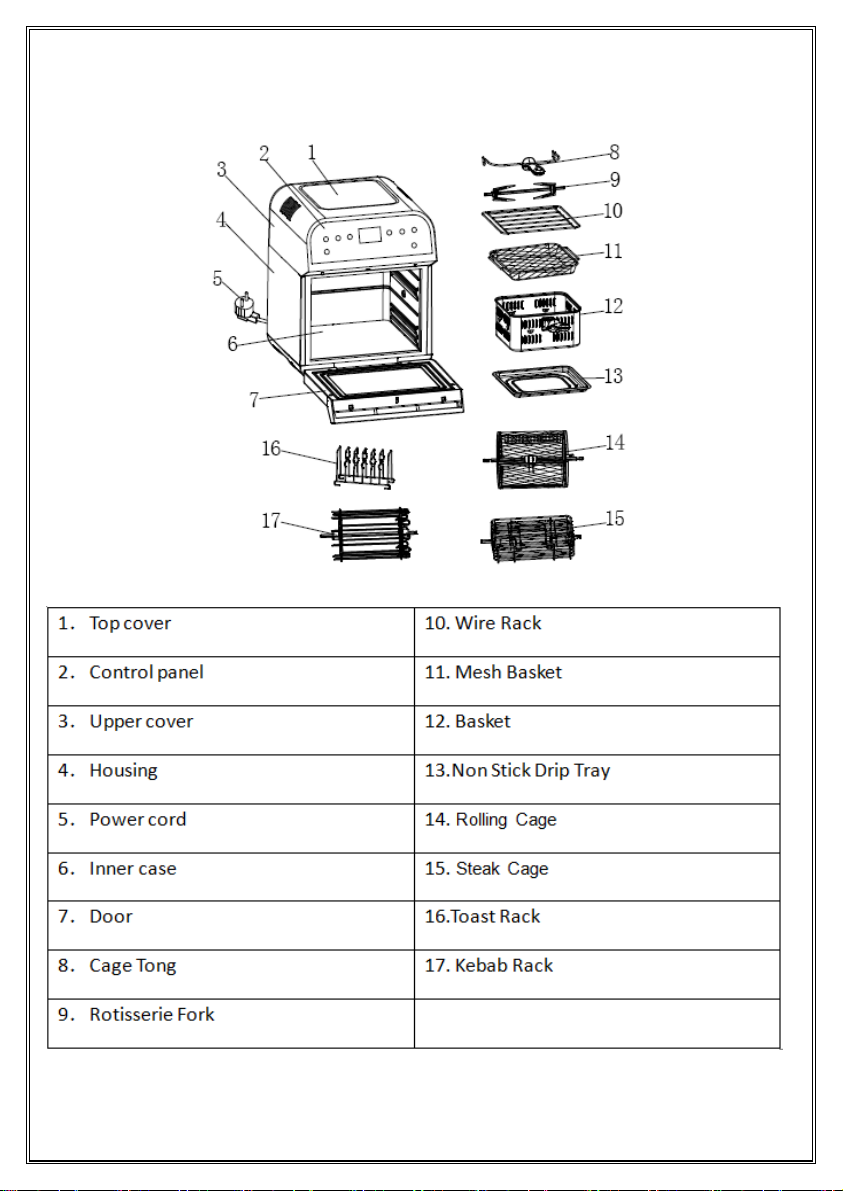
Air Fryer Components
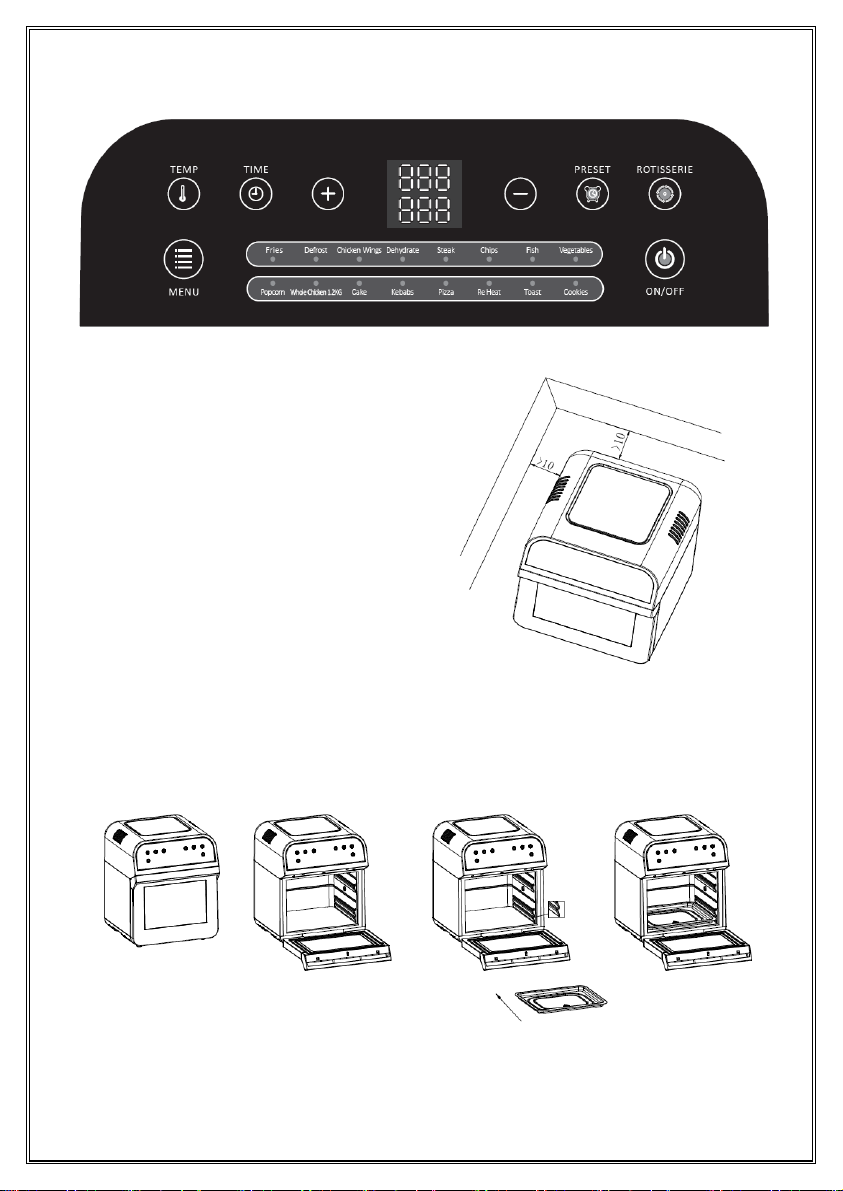
Digital control panel:
▲Product usage instructions for accessories
2. Drip Tray
Open the door and insert the Non Stick Drip Tray into the Air Fryer as shown
1.
Place the Air Fryer on a level
surface.
Ensure a 10cm clearance from the
back and sides.
Do not use the Air Fryer on a
tablecloth or near curtains to
avoid the risk of burning.
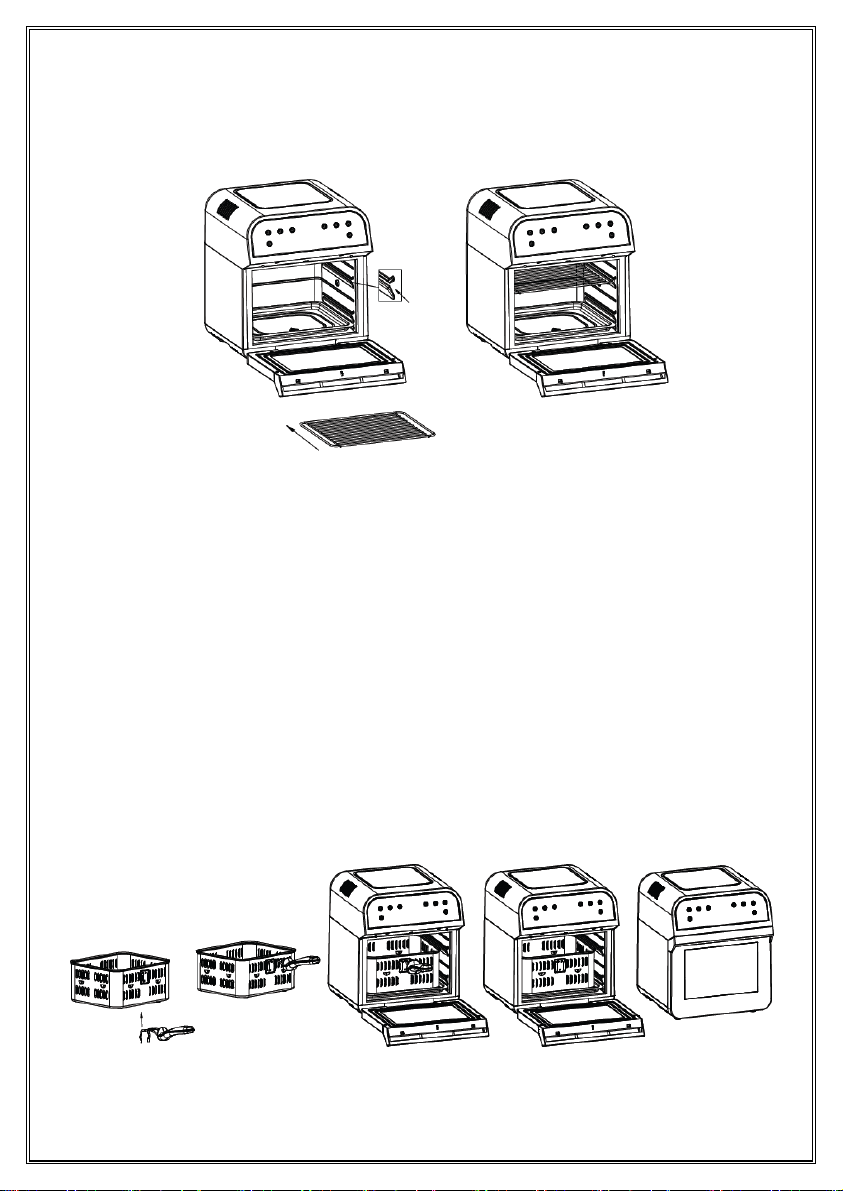
3. Wire Rack
Insert the Wire Rack into the Air Fryer as shown.
Safety
Choose the appropriate accessories for cooking function.
Always use an Oven Glove when taking out the Drip Tray, Wire Rack or any Accessory after
cooking has finished.
4. Cooking Basket with handle
After food has been put into the cooking Basket attach the Handle and insert into the Air
Fryer and then remove the handle from the cooking basket and close the door as shown.
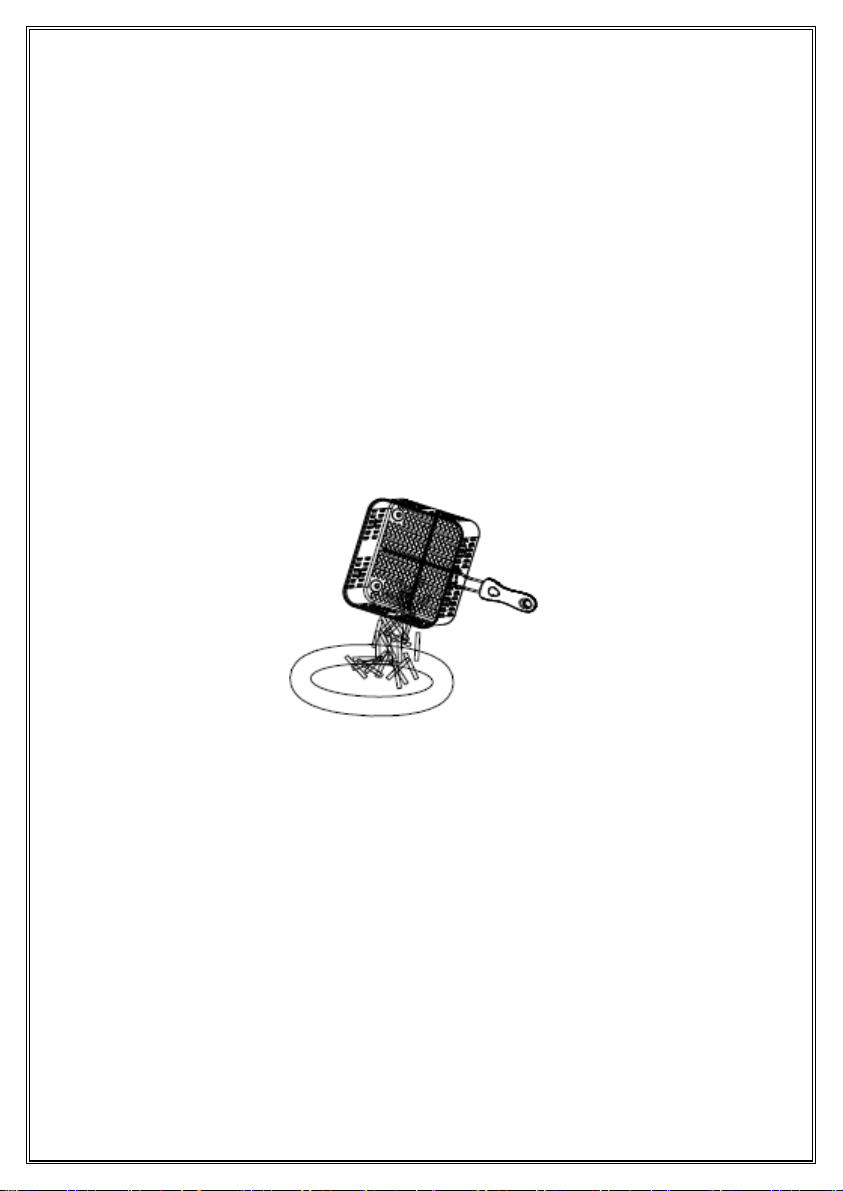
5. Kebab Rack
Fill each Skewer with food then follow steps 1 to 8, insert into The Air Fryer and close the
front door as shown.
6. Rolling Cage

Safety
Always keep the drip tray in the lowest point of the Air Fryer to catch oil from fried food.
Do not let food exceed the MAX Level as the contents may become bigger during cooking.
The Air Fryer is fitted with a Safety switch as shown.
The Air Fryer will only work when the door is closed otherwise an alarm will sound.
When the Start/Stop Button pressed this will commence or end cooking.
Before First Use
1. Remove all packaging materials, stickers and labels.
2. Clean the basket and all other accessories with hot soapy water, using a non-abrasive
sponge.
3. Ensure the inside and outside of the Air Fryer and accessories are completely dry.

Using the Air Fryer
Handle:
Always use this handle when taking out the cooking basket and accessories.
Hold the handle wire inward then clip the handle into the corresponding slot of the basket.
When removing, hold the handle wire in the same way, and then loosen the handle down.
As shown below.

Air Fryer Operating Instructions
1. When the power is turned on, a buzzer rings, and the digital screen flashes with all the
indicator lights.
2. Press the "ON/OFF" button, the indicator light and digital screen light up and place the Air
Fryer into standby mode.
3. In the standby mode with exception of the “ON / OFF “Menu” Preset " key, all other functions
are locked .
4. When in standby mode, if no function is selected then after 60 seconds the Air Fryer will be
shut down automatically.
5 Press "Menu" to enter into the function selection mode, select the function required then
press the "ON/OFF" key. The Air Fryer will then commence cooking.
Menu function selection
1. The Air Fryer is preset with a combination of cooking times and cooking temperatures for
various types of food.
2. Continue to press the "Menu" key until you reach the desired function. Each time the menu
key is pressed, the control panel will light up the corresponding graphic. When the "ON /
OFF" key is pressed the Air Fryer start cooking.
3. Preset menu combinations are as shown. You can also change the cooking time and
temperature according to requirements.
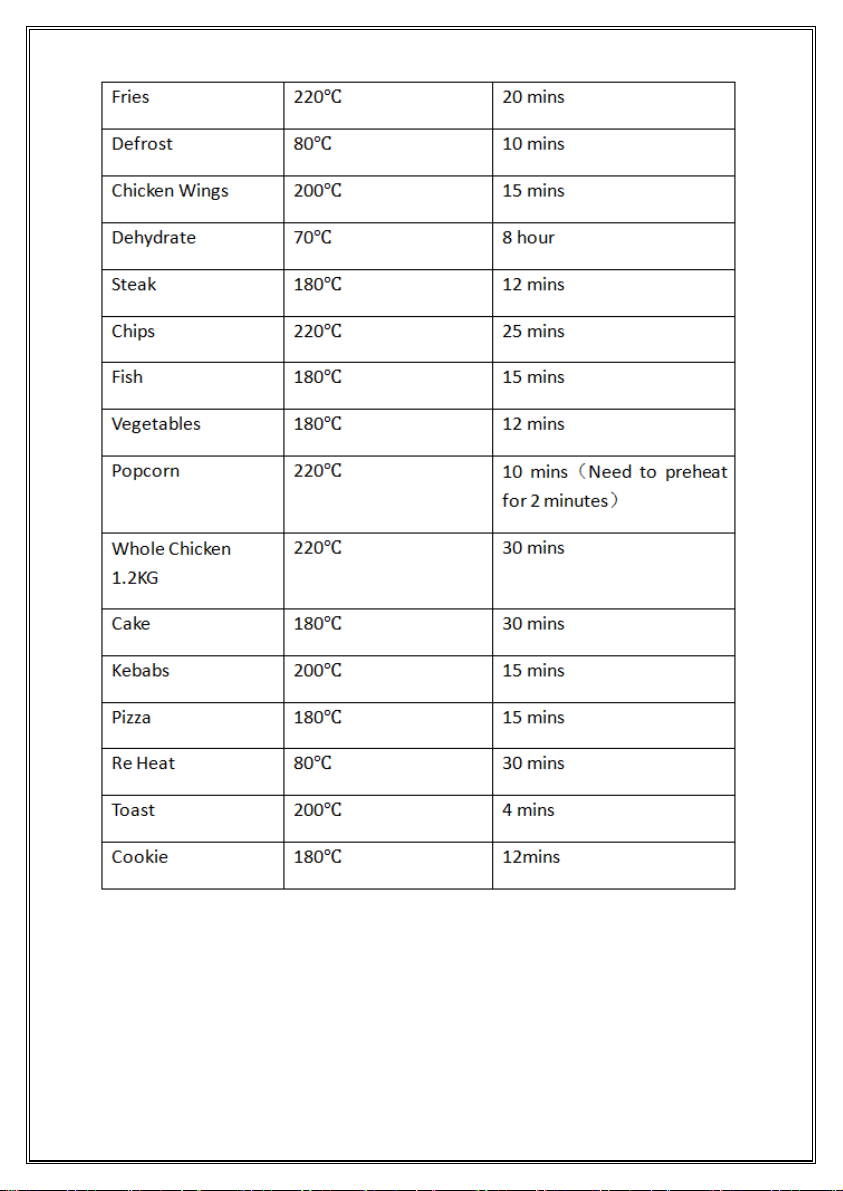
NOTE: For Larger servings of food you may require more time and an
increase in temperature according to what you are cooking.

Setting of cooking time and temperature
1. Once cooking has commenced if you need to reset cooking temperature and/or the time
press "Temp/Time" to change cooking time and cooking temperature.
2. When adjusting the cooking temperature the digital screen will flash, then press “+”
or “-” to increase or decrease the cooking temperature. Each press changes 10℃. If you
hold the key the temperature changes rapidly at 10℃increments.
The temperature adjustable range of the Air Fryer is 50 - 220 ℃.
The range of functional temperature adjustment Dehydrating is 50-70 ℃.
When the icon flashes press “+”or “-” to set the desired cooking time . Every press is
a 1 min change; If you hold the key then the time will change by 10 mins.
The cooking time range of the Air Fryer is 1-60 mins.(Except for the Dehydrate function
which is for 8 hours)
Preset function
Press the "Delay Time" button, and the screen will show the default time of 1 hour.
You can adjust the timed cooking time by "+" or "-". Each press changes the time by 1
minute and by holding the key by 10 minutes.
The preset time range is between 1 minute and 9 hours 59 minutes
Note:
To use this function you need to press the menu key, then press the preset
key to operate.
To change cooking time and temperature, press menu and reset the data.
Press the "ON/OFF" button to confirm the appointment function and the timer will begin.

Pause function
During cooking when you open the door, the Air Fryer will stop automatically
Note:
When opening the door of the Air Fryer to use the pause function the Air Fryer will turn off if
the door is not closed within 10 minutes.
Tip:
During cooking, turn the food regularly to help cook more evenly and cook better.
Note: during cooking, the Cooking Basket, accessories and contents are very hot and
cannot be touched directly by hand.
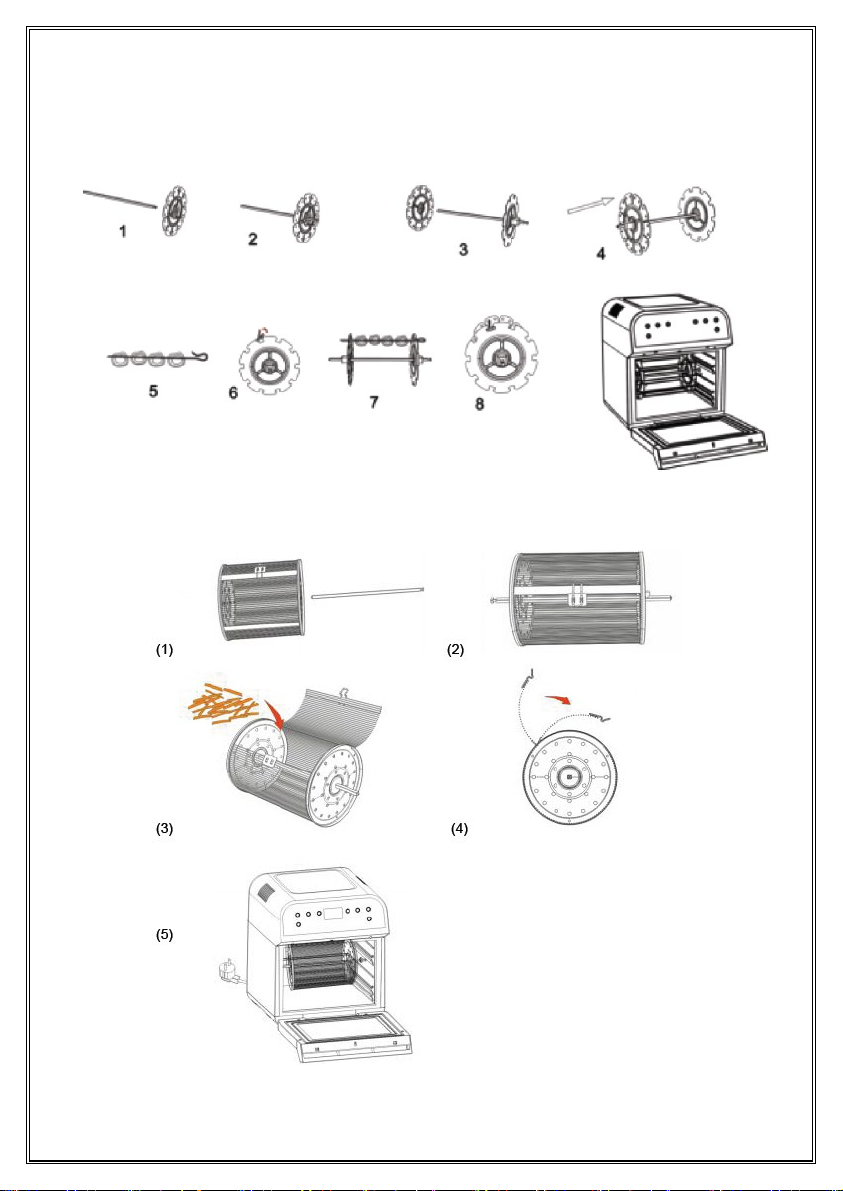
Rotisserie function
1. This function can make food heat more evenly. Press the key on the control to
start the function. Press again to cancel the function.
Use of Rotisserie forks shown
Note:
The total weight of chicken should not exceed 1.2kg, If over 1.2kg then use the basket.
Chicken legs and wings should be tied before cooking.
For best results it is best to pierce the chicken legs before cooking.
Cooking finished
When the Air Fryer has finished cooking you will 5 beeps and the heater will stop working.
The fan continues to operate for 1 minute until the internal temperature drops and will beep
again 5 times.
Open the door, then attach handle to the cooking basket or use cage tong to remove an
accessory.
Note: when removing the basket or accessory from the Air Fryer always use an Oven
Glove. Do not touch the basket or accessory with your hands.
Empty cooked food on a plate or serving bowl as shown.
After cooking press the power button to turn off the power supply and remove the plug from
the wall socket.
Cleaning and maintenance
Note: Ensure the Air Fryer is unplugged before cleaning.
Clean the basket, wire rack, drip tray etc with warm soapy water after using.
Wipe the Air Fryer with soft moist cloth.
Do not immerse the power cord, plug or Air Fryer body into water as this cause damage, fire,
electric shock or injury.
After drying assemble all parts back into the Air Fryer.
Recycle Electricals
This product must not be disposed together with domestic waste. This product has to be
disposed at an authorized place for recycling of electrical and electronic appliances.
By collecting and recycling waste, you help save natural resources, and make sure the
product is disposed in an environmental friendly and health way.
Here at Vitinni we are proud to support your local authority in providing local recycling
facilities for electrical equipment.
Follow the link in the footer of our web page under Recycle Old Electricals to find out more
information. (https://www.vitinni.co.uk/recycle-old-electricals)
In the UK, distributors including retailers must provide a system which allows all customers
buying new electrical equipment the opportunity to recycle their old items free of charge.
As a responsible retailer, we have met the requirements placed on us by financially
supporting the national network of WEEE recycling centres established by local authorities.
This is achieved through membership of the national Distributor Take-back scheme (DTS).

RECIPE
Air Fryer Shortbread Biscuits
Prep Time: 13mins | Cook Time: 12mins | Total Time: 25mins
Ingredients
•68 grams caster sugar
•136 grams all-purpose flour
•170 grams butter
Instructions
1. Preheat your air fryer to 180°C
2. In medium bowl, combine the sugar and flour
3. Add butter and mix in well with the sugar and flour
4. With your hands knead mixture well until it is smooth
5. Use the dough to make portions about 2cm thick, or use a cutter if you have one
6. Set the Air Fryer to the Cookie preset
7. Place the biscuits in the middle shelf and press ON/OFF to start
8. Allow the Shortbread to cool before eating

RECIPE
Chewy Dehydrated Bananas
Prep Time: 15mins | Cook Time: 8hours | Total Time: 8hrs15mins
Ingredients
•2 ripe medium bananas
•½ cup lemon juice
Instructions
1. NOTE: For every five pounds of bananas, use 1/2 cup of lemon juice. Adjust the
amount to suit your needs.
2. Peel the bananas, we recommended putting the peels into a composting bin. It will
be fastest if you can peel them all at once.
3. Slice the bananas 1/4" thick. Place sliced bananas into a bowl or tray with lemon
juice. Toss the sliced bananas in the juice.
4. Spread out the sliced bananas evenly on the mesh dehydrator tray. (Touching
slightly is not a problem.)
5. Place bananas into the Air Fryer and set the Dehydrator preset. Press ON/OFF to
start.
6. Plan to be around to check them around the 6hr mark and turn the slices if needed.

RECIPE
Sweet Potato Fries
Prep Time: 10mins | Cook Time: 20mins | Total Time: 30mins
Ingredients
•1 sweet potatoes, peeled and cut into 1/2 inch wide fries
•1 tablespoon canola oil
•1/2 teaspoon kosher salt
•1/4 teaspoon pepper
•1/8 teaspoon garlic powder
•1/8 teaspoon ground sweet paprika
Instructions
1. Preheat the air fryer to 200°C
2. Combine sweet potato fries and canola oil in a bowl and mix. Season with salt,
pepper, garlic powder, and paprika. Mix until all fries are evenly coated.
3. Place an even layer of sweet potatoes in the fry basket, insert in the air fryer, and
cook until golden, about 20 minutes.
4. NOTE: Using an oven glove, shake the fry basket half way through cooking to make
sure the fries turn out crispy.

RECIPE
Brown Sugar & Cinnamon Glazed Popcorn
Prep Time: 10mins | Cook Time: 15mins | Total Time: 25mins
Ingredients
•50g light brown sugar
•10g butter
•3 tbsp double cream
•A sprinkle of ground cinnamon
•25g popcorn kernels
Instructions
1. Place the popcorn kernels in the rolling cage and set the popcorn preset on the
control panel. Press ON/OFF to start.
2. Put the sugar in a small saucepan with 2 tbsp water and dissolve over a gentle heat.
Bring to the boil, but don’t stir at all. When the sugar is a dark golden caramel colour,
whisk in the butter. Remove from the heat and pour in the double cream (stand back
as it may spit), stir vigorously, then add the ground cinnamon.
3. Carefully remove the cage using an oven glove and place in a large bowl. Pour over
the sugar glaze, tossing the popcorn until evenly coated.
Guarantee
Our products are guaranteed for a period of 2 years from the date of purchase. Products that
develop a fault within this period are covered by our warranty and we will replace defective
parts, or where not available the whole product. The warranty does not apply to any defect in
the goods arising from fair wear and tear, wilful damage, accident, negligence by you or any
third party, use otherwise than as recommended by us, failure to follow our instructions, any
alteration or repair carried out without our approval or has been the subject of commercial
use. Your statutory rights remain unaffected, in particular any rights you have under the
Consumer Rights Act 2015.
If you have a problem with your product within this warranty period please contact our
customer services team.
In the event of changes to the specification of a product and we are not able to replace
parts, we will replace the whole product within the 2 year guarantee period
For products that fall outside of the 2 year guarantee, we will endeavour to provide spare
parts to purchase for as many of the replaceable parts as possible, but cannot foresee
specification changes or upgrades to products or parts outside of the initial 2 year period.
Customer Services:
If you would like further advice or information on your product, ensure you have the
SAP code ready and please get in touch with us at Vitinni on the contact options
below:
SAP Code: JF0540001
Phone: 01706 716 116 (Mon – Fri 9am to 5pm)
Email: support@vitinni.co.uk
Address: Vitinni, Vale Mill (Rochdale) Ltd, Robinson Street, Rochdale, OL16 1TA
Table of contents
Other VITINNI Fryer manuals


