VITINNI JK08014101 User manual

40V Battery Operated Cordless Trimmer
40 V Batteriebetriebener Akku-Trimmer
PLEASE READ AND KEEP THESE INSTRUCTIONS FOR FUTURE USE
SAP Code: JK08014101
For further assistance, other products and more, join us at:
Website: www.vitinni.co.uk
Instagram: @vitinniuk
Facebook: www.facebook.com/vitinni

1
Thank you for choosing our Vitinni Battery Operated Cordless Trimmer. Please read
this user manual carefully and keep it for future reference. If you need any
assistance, please contact our customer service team on the details provided on the
back page of this manual.
Description of the Symbols
Caution! Read the following instructions carefully to familiarize yourself
with the controls and correct use of the grass trimmer. Not using the grass trimmer
in accordance with these instructions can cause serious injury. When using
electrical tools, obey the general safety instructions as well as the following safety
instructions in order to reduce the risks of fire, electric shock and injury.
Read the operator’s manual.
Before any use, refer to the corresponding paragraph in the present manual.
Conforms to European standards.
These symbols indicate the requirement of wearing eye protection, ear protection
and gloves when using the product.
Wear safety boots.

Do not expose to rain.
Keep bystanders away.
Danger of injury from flying parts! Always maintain a sufficiently safe distance.
Beware of thrown objects.
Recycle unwanted materials instead of disposing of them as waste. All tools, hoses
and packaging should be sorted, taken to the local recycling centre and disposed of
in an environmentally safe way.
2

Safety Instructions
IMPORTANT
READ CAREFULLY BEFORE USE. KEEP FOR FUTURE REFERENCE.
WARNING —when using the machine, the safety rules must be followed. For your
own safety and bystanders, please read these instructions before operating the
machine. Please keep the instructions safe for later use.
If the supply cord is damaged, it must be replaced by the manufacturer, its service
agent or similarly qualified persons in order to avoid a hazard.
1. Training
a) Read the instructions carefully. Familiarise yourself with the controls and the
proper use of the machine.
b) Never allow children, persons with reduced physical, sensory or mental
capabilities or lack of experience and knowledge or people unfamiliar with these
instructions to use the machine. Local regulations can restrict the age of the operator.
c) Keep in mind that the operator or user is responsible for accidents or hazards
occurring to other people or their property.
d) Make sure that no persons or animals are close to the working area (minimum
distance of 15m) grass being cut and thrown up may contain foreign objects, such as
stones.
e) Do not use the machine when you are tired or distracted, or your ability to react is
impaired when you are under the influence of alcohol or medication or other drugs.
Inattentiveness may cause serious injuries.
f) Make sure you are standing in a stable and secure position during work. Avoid
moving backwards with the machine due to risk of stumbling. Avoid any unnatural
posture.
g) Children should be supervised to ensure that they do not play with the machine.
h) Check the machine, and its components and guards for damages, or wear and
tear before each use, and have it repaired as necessary. Never make the devices for
protection and safety inoperable. Do not use the machine when damages or signs of
wear become apparent.
3

2. Preparation
a) Before use, check the supply and extension cord for signs of damage or aging. If
the cord becomes damaged during use, disconnect the cord from the supply
immediately.
DO NOT TOUCH THE CORD BEFORE DISCONNECTING THE SUPPLY.
Do not use the appliance if the cord is damaged or worn.
b) Before use, always visually inspect the machine for damage, missing or
misplaced guards or shields.
c) Never operate the machine while people, especially children, or pets are nearby.
d) Always wear substantial footwear and long trousers while operating the
machine.
e) Before using the machine and after any impact, check for signs of wear or
damage and repair as necessary.
3. Operation
a) Keep power and extension cords away from cutting means.
b) Wear eye protection and stout shoes at all times while operating the machine.
c) Do not use the machine in bad weather conditions especially when there is a
risk of lightning.
d) Use the machine only in daylight or good artificial light.
e) Never operate the machine with damaged guards or shields or without guards or
shields in place, or if the cord is damaged or worn.
f) Switch on the motor only when your hands and feet are away from the cutting
means.
g) Always disconnect the machine from the power supply (i.e. remove the plug
from the mains, remove the disabling device or removable battery)
- Whenever the machine is left unattended;
- Before clearing a blockage;
- Before checking, cleaning or working on the machine;
4

- After striking a foreign object to inspect the machine for damage;
- Whenever the machine starts vibrating abnormally, for immediately check.
h) Take care against injury to feet and hands from the cutting means.
i) Always ensure that the ventilation openings are kept clear of debris.
j) Take care against injury from any device fitted for trimming the filament line
length. After extending new cutting line always return the machine to its normal
operating position before switching on.
k) Never fit metal cutting elements.
l) Warning! Cutting elements continue to rotate after the motor is switched off. Do
not touch!
m) Do not overreach and keep your balance at all times, always be sure of your
footing on slopes and walk, never run with the machine.
n) Use only extension cables authorized for outside work and protect from water.
The extension cable must have conductors of at least 1,5 mm2 for a cable length
less than 25 m and 2,5 mm2 if the length exceeds 25 m. before use, always
completely unroll the cable to check that the cable is in good condition.
o) Never replace the non-metallic cutting means with metallic cutting means.
p) In case of accident or breakdown immediately stop the machine.
q) Do not touch moving hazardous parts before the battery is removed.
r) Do not connect a damaged cord to the supply or touch a damaged cord before it
is disconnected from the supply for the reason that damaged cords can lead to
contact with live parts.
s) Keep extension cords away from moving hazardous parts to avoid damages to
the cords which can lead to contact with live parts.
t) In case of abnormal vibrations, switch the machine off immediately, and check it
for damages, if necessary, have it repaired by a qualified person. It is recommended
to wear protective gloves, and to take breaks at regular intervals.
u) Never use replacement parts or accessories not provided or recommended by
the manufacturer.
5

6
4. Maintenance and Storage
a) Remove the battery before carrying out maintenance or cleaning work and when
it is not in use.
b) Use only the manufacturer’s recommended replacement parts and accessories.
c) Inspect and maintain the machine regularly. Have the machine repaired only by
an authorized repairer.
d) When not in use, store the machine out of the reach of children.
e) Always ensure that ventilation openings are kept clear of debris.
f) After use remove the battery and check for damage.
5. Battery tool use and care
a) Recharge only with the charger specified by the manufacturer. A charger
that is suitable for one type of battery pack may create risk of fire when used with
another battery pack.
b) Use power tools only with specifically designated battery packs. Use of any
other battery packs may create a risk of injury and fire.
c) When battery pack is not in use, keep it away from other metal objects, like
paper clips, coins, keys, nails, screws or other small metal objects, that can
make a connection from one terminal to another. Shorting the battery terminals
together may cause burns or a fire.
d) Under abusive conditions, liquid may be ejected from the battery; avoid
contact. If contact accidentally occurs, flush with water. If liquid contacts
eyes, additionally seek medical help. Liquid ejected from the battery may cause
irritation or burns.
e) Do not use a battery pack or tool that is damaged or modified. Damaged or
modified batteries may exhibit unpredictable behaviour resulting in fire, explosion or
risk of injury.
f) Do not expose a battery pack or tool to fire or excessive temperature.
Exposure to fire or temperature above 130 °C may cause explosion.

g) Follow all charging instructions and do not charge the battery pack or tool
outside the temperature range specified in the instructions. Charging
improperly or at temperatures outside the specified range may damage the battery
and increase the risk of fire.
6. Service
a) Have your power tool serviced by a qualified repair person using only identical
replacement parts. This will ensure that the safety of the power tool is maintained.
b) Never service damaged battery packs. Service of battery packs should only be
performed by the manufacturer or authorized service providers.
SAFETY ADVICE FOR RECHARGEABLE BATTERY AND CHARGER
• This appliance can be used by children aged from 8 years and above and
persons with reduced physical, sensory or mental capabilities or lack of experience
and knowledge if they have been given supervision or instruction concerning use of
the appliance in a safe way and understand the hazards involved. Children shall
not play with the appliance. Cleaning and user maintenance shall not be made by
children without supervision.
• For outdoor use only
• Warning! do not recharge non-rechargeable batteries
• This charger should be used only to charge the battery pack for this product.
WARNING! During the use of tools supplied with batteries, the basic safety
measures must be followed in order to reduce fire hazards, electrolyte leakage and
personal injury, including the following precautions:
Ensure that the battery block is suitable for the tool.
Ensure that outside surface of the battery block is clean and dry before connecting
it to the charger.
Ensure that the batteries are charged using the correct charger recommended by
the manufacturer. Incorrect use can create a risk of electric shock, overheating or
the leaking of corrosive liquid from the battery.
7

If there is an electrolyte leak, avoid any contact with the skin. In the event of a leak,
wipe with a rag. If the liquid comes into contact with the skin, rinse abundantly with
water. In the event of a reaction or contact with the eyes or mucous membranes,
consult a doctor.
Ensure that the appliance is properly switched off before inserting the battery into
the appliance. Inserting a battery into an appliance while it is switched on can cause
accidents.
Use the appliance only with the type of battery indicated in the instructions. Using
another type of battery can create a serious risk of injury and cause a fire.
Disposal of Batteries
Ensure that the battery is properly disposed of:
1-Do not throw it away
2-Do not to burn it
3-Do not throw it in a river
4-Dispose of it in the designated collection containers (ask your retailer)
Intended Use
This unit is designed to be used in accordance with the descriptions and safety
instructions indicated in this operating manual
- for private use
- for trimming lawn edges and small inaccessible areas of grass (e.g. under bushes)
Do not use this unit for any other purposes.
The user is liable for all injuries to third parties and damage to their property.
Operate the unit only in the technical condition as stipulated and delivered by the
manufacturer.
Arbitrary changes to the unit will exclude the manufacturer from any liability for
resulting injury and/or damage.
8
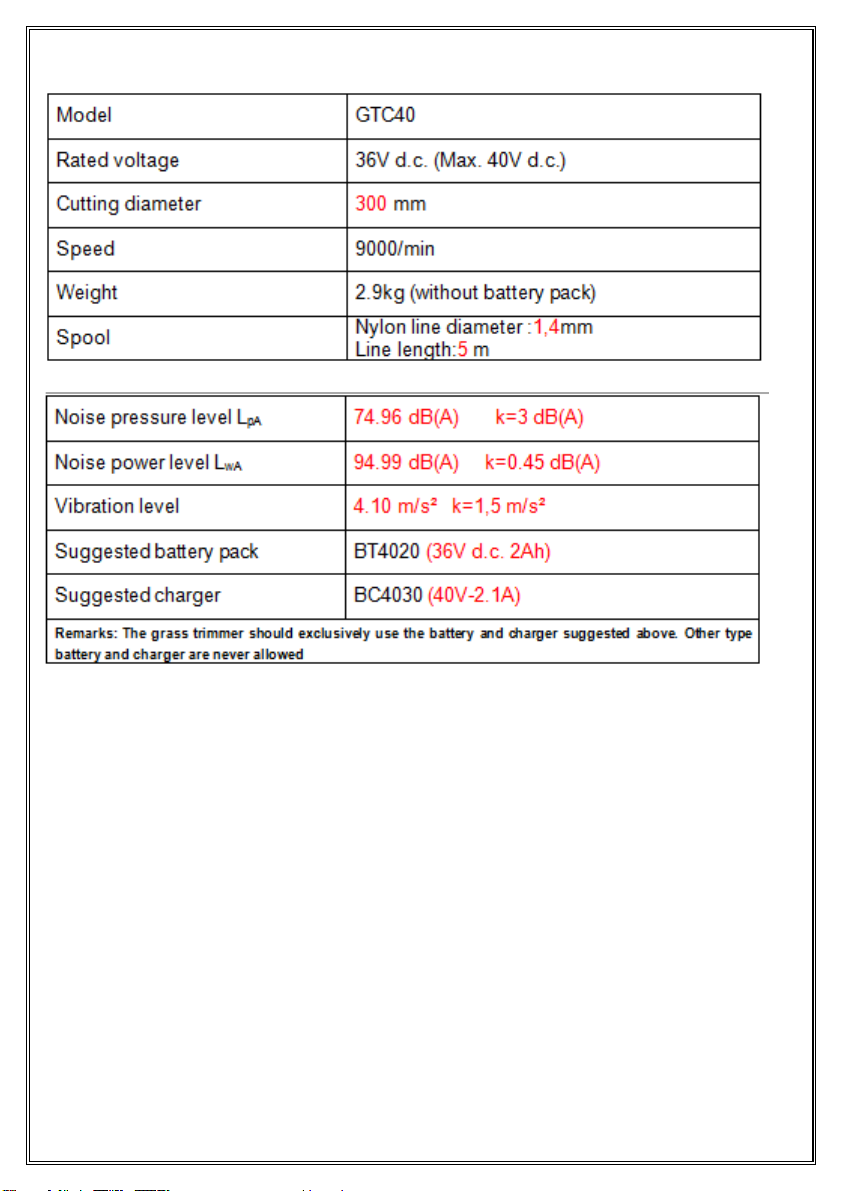
Technical Specification
Noise/Vibration Information
Measured sound values determined according to EN 50636-2-91:2014.
The noise figures quoted are emission levels and are not necessarily safe working
levels. Whilst there is a correlation between the emission and exposure levels, this
cannot be used reliably to determine whether or not further precautions are
required. Factors that influence the actual level of exposure of work-force include
the characteristics of the work room, the other sources of noise, etc. i.e. the number
of machines and other adjacent processes, and the length of time for which an
operator is exposed to the noise. Also the permissible exposure level can vary from
country. This information, however, will enable the user of the machine to make a
better evaluation of the hazard and risk.
Wear hearing protection!
9

Vibration total values (triax vector sum) determined according to EN 50636-2-
91:2014.
The vibration emission level given in this information sheet has been measured in
accordance with a standardized test given in EN 50636-2-91:2014 and may be
used to compare one tool with another.
It may be used for a preliminary assessment of exposure.
The declared vibration emission level represents the main applications of the tool.
However if the tool is used for different applications, with different accessories or
poorly maintained, the vibration emission may differ. This may significantly increase
the exposure level over the total working period.
An estimation of the level of exposure to vibration should also take into account the
times when the tool is switched off or when it is running but not actually doing the
job. This may significantly reduce the exposure level over the total working period.
Identify additional safety measures to protect the operator from the effects of
vibration such as: maintain the tool and the accessories, keep the hands warm,
organization of work patterns.
10
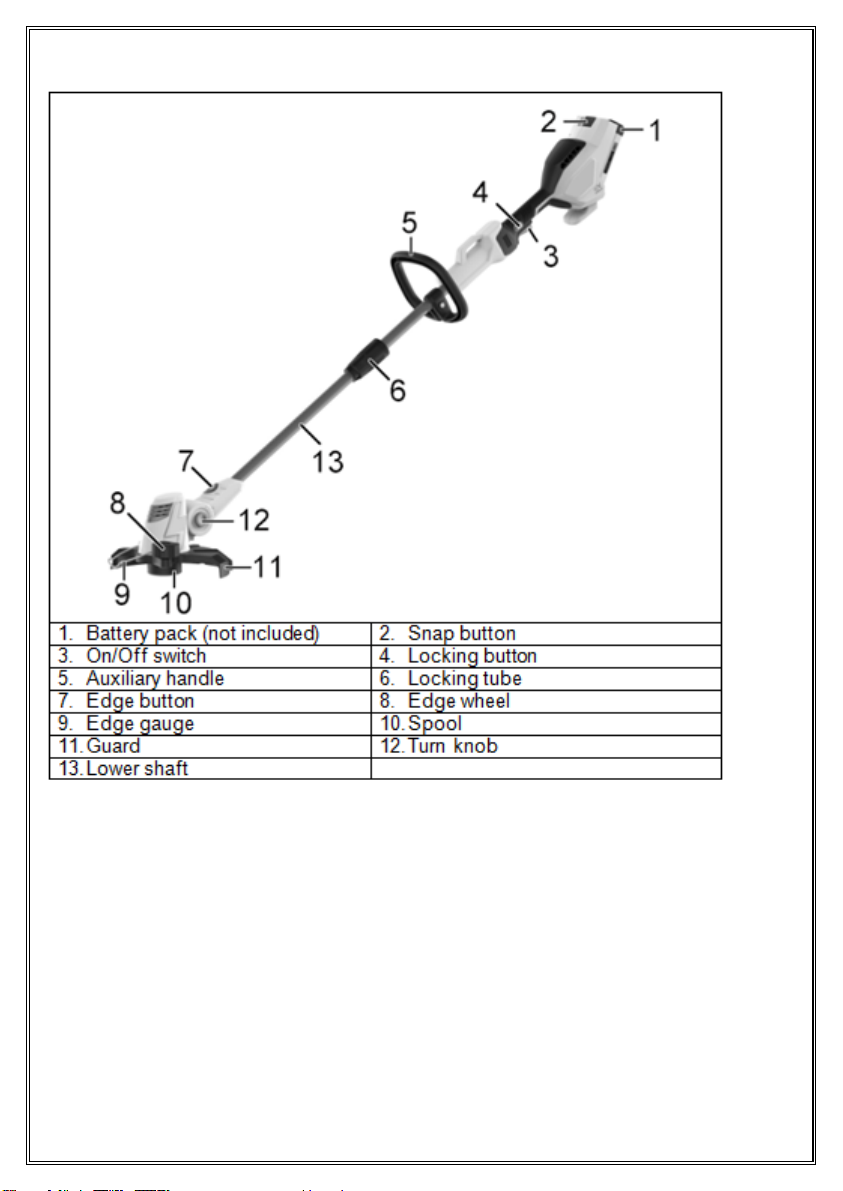
List of Main Parts
Assembly
Charging process
NOTE: Batteries (not suppled) are not fully charged on delivery. Before first use,
fully charge the batteries.
Chargers (not supplied) are only suitable to charge the battery pack- BT4020. Do
not use the charger for any other battery pack.
11
Do not use this product in any other way as stated for normal use. Not observing
general regulations and instructions from this manual does not make the
manufacturer liable for damages.
CAUTION! Use only recommended batteries with the battery charger.
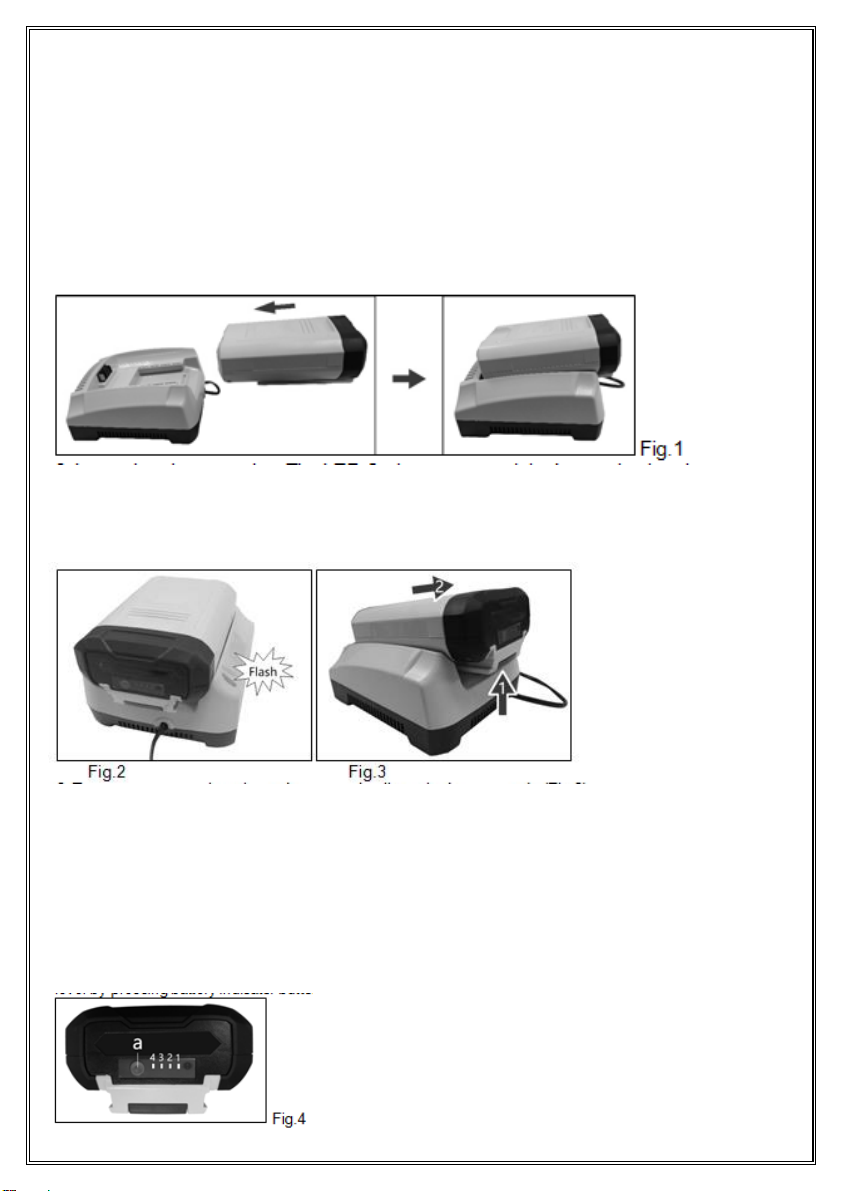
1. Put the battery into the slot of charger,Make sure the battery and charger is
fully connected.(Fig.1)
2. Insert the plug to mains. The LED flashes green and the battery is charging.
When the battery is fully charged, the LED lights green. (Fig.2)
3. To remove, press the release button and pull out the battery pack. (Fig.3)
4. Pull out the mains plug.
Charging indicator
The battery pack is equipped with 4 LED lights that will display the current battery
level by pressing battery indicator button (a).
12
Battery capacity display
4 green LED lights are constantly burning between 75% -100%.
3 green LED lights are constantly burning between 50% -75%.
2 green LED lights constantly burns between 25% -50%
1 green LED lights constantly burning lower than 25%
If no LED lights come on, even after pressing the indicator button, the battery is
defective and needs to be replaced.
For safety reasons, the capacity of the battery can only be checked when the
machine has come to a complete stop.
NOTE: Batteries may become warm while charging. This is normal. If the battery
is hot after continuous use in the tool, allow it to cool down to room temperature
before charging. This will extend the life of your batteries.
WARNING: Always disconnect the battery pack from the tool before any
assembly, adjustments or changing accessories.
Machine Assembly
The grass trimmer is supplied with some components not assembled. To assemble
these proceed as follows:
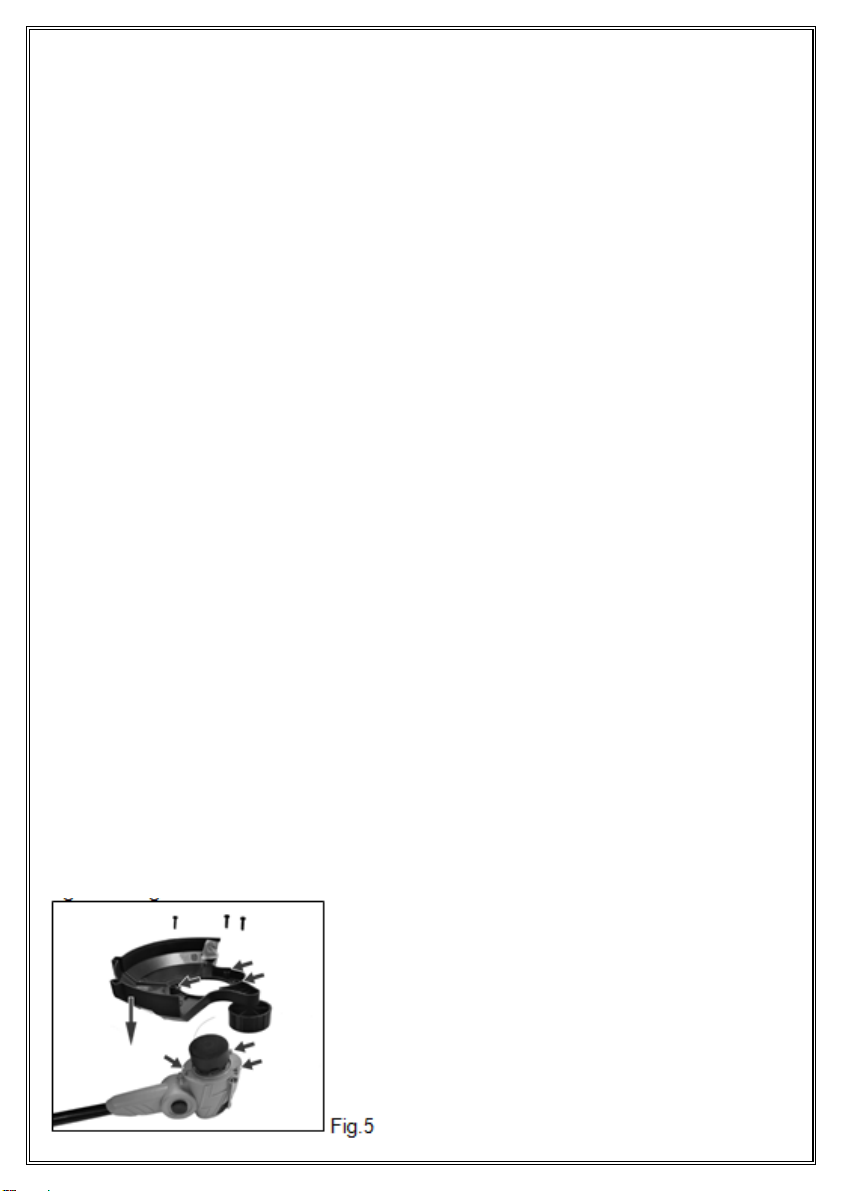
1. Mounting the Guard
Place the guard over the machine as shown in figure 5, align the screw holes on
guard with the screw studs on trimmer head, pass the guard through the spool, then
tighten the guard with 3 screws.
13
Caution! When in use beware of the line.
Caution! Never use the grass trimmer without the guard. It is vital for your and
other peoples’ safety and for the good working order of the trimmer. Failure to
observe this safety regulations is not only dangerous but also voids the guarantee
terms.
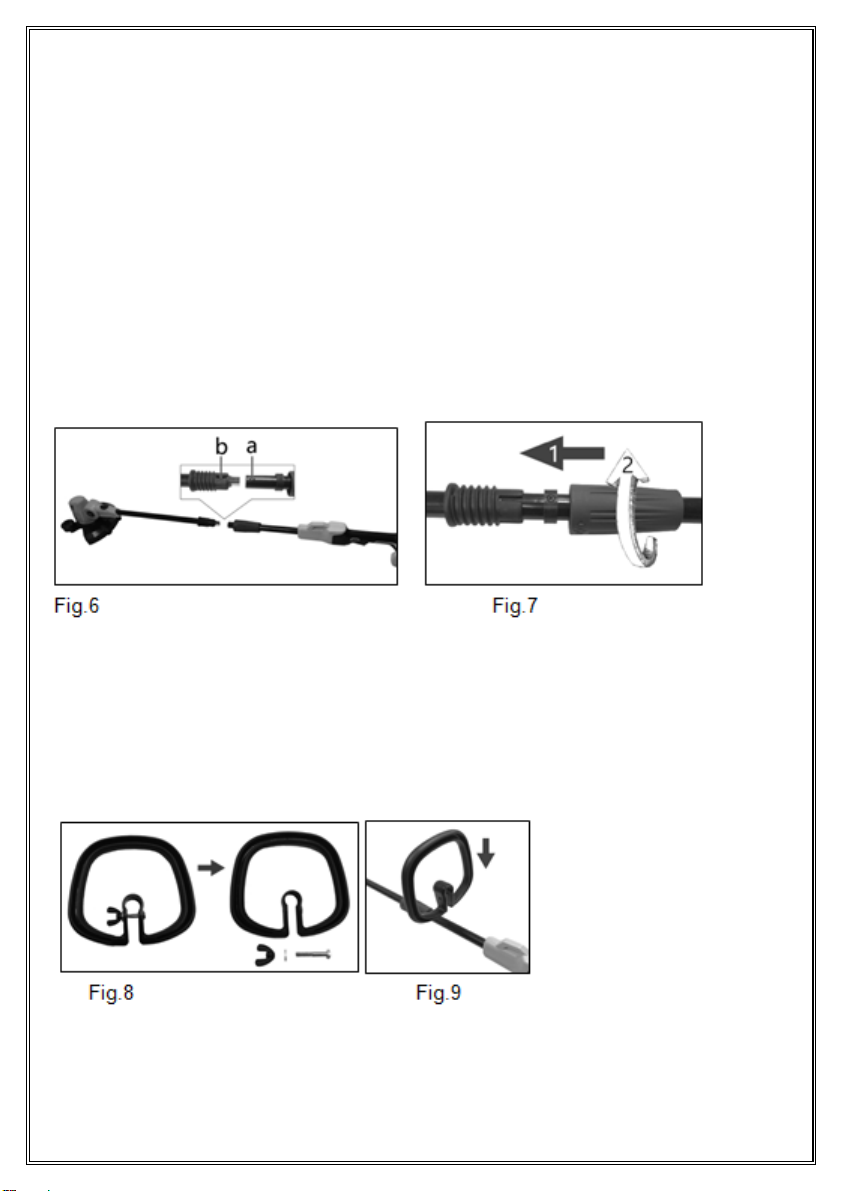
2. Assembly of Shafts
a) Insert lower shaft into the upper shaft, make sure the stud (a) on upper shaft
align with slot (b) on lower shaft. (Fig.6)
b) Move the locking tube to the lower shaft and turn it clockwise to tighten it. (Fig.7)
3. Fitting The Auxiliary Handle
a) Unscrew the nut on auxiliary handle and keep it. (Fig.8)
b) Insert the auxiliary handle on upper shaft then tighten it with bolt, washer and
nut. (Fig.9)
4. Fitting And Removing The Battery Pack (Not Supplied)
To insert the battery pack, place it on the guide track and push it into the housing. It
will audibly snap in.
14

To remove the battery pack, just press the release button (a) and pull it out.
Preparing the trimmer before use
Before carrying out any adjustment, remove the battery pack.
Before use, check that the tool is in good working order and that the length of the
trimmer line is correct, as follows:
1. Ensure the switch is in the off position.
2. Examine the general condition of the tool. Inspect the guard, switch, check for
loose screws, improper mounting, broken parts and any other condition that may
affect its safe operation. If abnormal noise or vibration occurs during operation, turn
the line trimmer off immediately and have the problem corrected by a qualified
repair person.
3. Ensure that you are on a flat surface and have secure footing.
4. Check that the line does not go beyond the guard, otherwise, cut off excessive
extension line, to keep the line extend until it touches the knife.
Edge Function
The machine can be used as an edge trimmer. The Edge feature allows for precise
and comfortable trimming along the lawn edge (Fig.11). To do this, press and hold
the edge button (7) and turn the lower shaft clockwise until hear a click (Fig.12).
15

Adjusting the Working Angle
The trimmer head has 5 positions. Press and hold the turn knob (12) and rotate the
trimmer head to the desired position. (Fig.13)
You can choose the working angle according to the various ground conditions.
(Fig.14-15)
Operation
Before starting work, make sure that the area to be cut is free of stones, debris,
wires and any other objects. Hold the grass trimmer with both hands.
Do not cut damp or wet grass.
1. Push locking button right or left, then activating on/off switch to start the machine.
Then release locking button. To stop the machine, simply release the on/off switch.
(Fig.16)
2. Allow the trimmer to run for a few seconds without touching the work surface in
order to allow the blade on guard to cut the line.
3. While using the trimmer, keep it at an angle of approximately 20° to the ground
(Fig. 17) and move it from side to side. (Fig.18).
16

4. High grass should be cut in layers, always beginning from the top. The cuts
should be short. Do not overload the trimmer, cut small sections, which significantly
improves the effectiveness because it makes it possible to run the trimmer at full
speed. (Fig.19 & Fig.20)
5. While edging allow the tip of the line to make contact. Do not force the line. The
guard helps protect the unit and keeps the unit from contacting the ground. Take
extra caution while edging as objects can be thrown from the trimmer line. (Fig.21)
17

Line Feeding
Line feeding is automatic. When you start the trimmer, the line will automatically cut
to the right length.
Replacement Of The Line Spool
• Push the clips (b) of the spool holder (a) both side down and pull it out.
• Remove the empty spool (c) and clean the inside of the spool holder carefully
removing all dust and grass residues.
• Insert now the new spool in the spool base and push the end of line through the
lateral holes (d).
• Push the spool holder (a) on and fasten it securely.
CAUTION! Under no circumstances wind extra line on the empty spool but
instead replace it with a new one, the same as the original. The use of line
with different characteristics to those of the original can permanently damage
the grass trimmer as well as annulling the terms of the guarantee.
18

Maintenance
Before carrying out any maintenance operations, remove the battery.
• Regular cleaning and maintenance of you grass trimmer will ensure efficiency and
prolong the life of your machine.
• After each cutting operation, take apart and clean out the grass and soil from the
spool and its slot, the whole trimmer and in particular the guard.
• Only use a cloth soaked with hot water and a soft brush to clean the grass
trimmer.
• Do not spray or wet the appliance with water.
• Do not use detergents or solvents as these could damage the trimmer. Plastic
parts can easily be damaged by chemical agents.
• If the line cutting blade no longer cuts or breaks, have this replaced by contacting
an authorized service center.
CAUTION! The blade can give deep cuts.
• For repairs which have not been explained in these instructions, contact an
authorized service center.
Storage
Follow these recommendations for storing your grass trimmer:
• Carry out general cleaning of the grass trimmer and its ancillary parts
• Store it out of the reach of children, in a stable and safe position and in a dry place
where the temperature is not too hot or too cold.
• Store the trimmer away from direct sunlight, if possible in a dark or barely lit place.
• Do not store in a bag as this could encourage the formation of damp patches.
• Do not store the grass trimmer resting on the floor. Hang it by the upper handgrip
instead, so that the guard does not touch anything. The resting of the guard on a
surface could alter its shape and therefore its dimensions and safety characteristics
would be modified.
19
Table of contents
Languages:
Other VITINNI Trimmer manuals


 Handling instructions")

