Viva Comfort ADIME904-03 User manual

WHEELCHAIR SCALE
1000lb Capacity
MEDICAL
USER GUIDE
ADIME904-03

Thank you
for your
purchase.
Viva Comfort maintains a
strong practice of ongoing
development of products and
commercial research.
We recognize that starting and maintaining a medical
practice is expensive. We’ll help make the process cost-
eective and elegant. Additionally, our team of specialists
will ensure everything you need works as eciently as
possible, so you can eectively treat your clients.

Table of Contents
2
3
4
5
6
12
15
15
16
17
Parts List
Hardware List
Assembly Instructions
Interface
Operation Method
Set User Parameter
Maintenance Of The Scale
Malfunction
Specications
Warranty

2
Parts List
A
B
Scale
Handrail
3
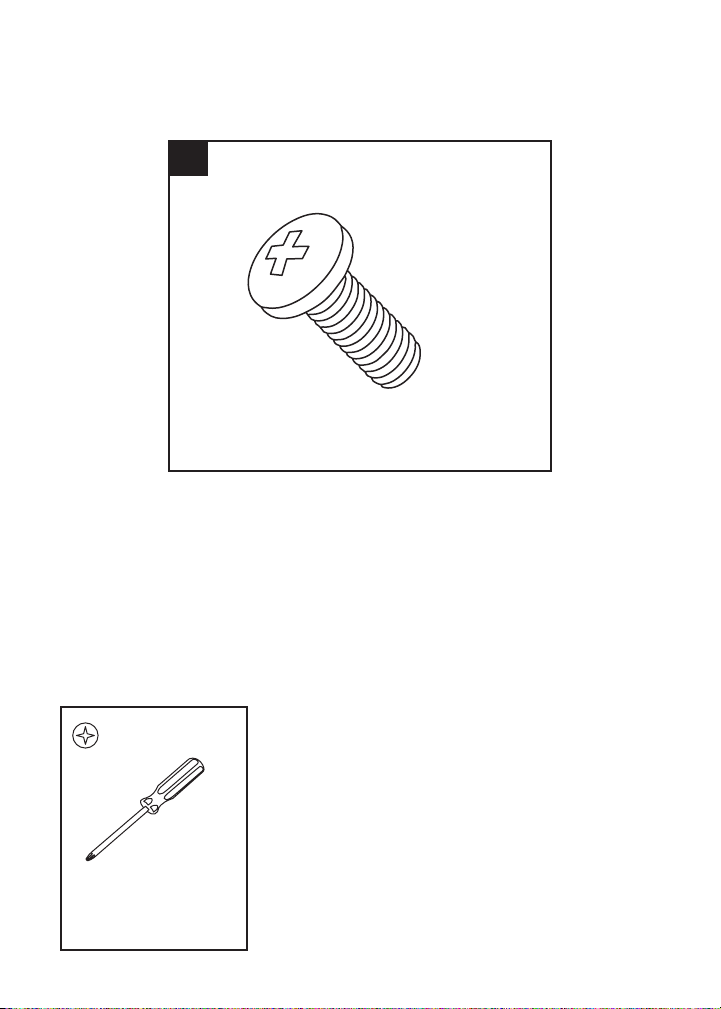
Hardware List
1
M4*6 Philips Screw (x8)
Tools Needed (But Not Included):
Phillips Head
Screwdriver
4
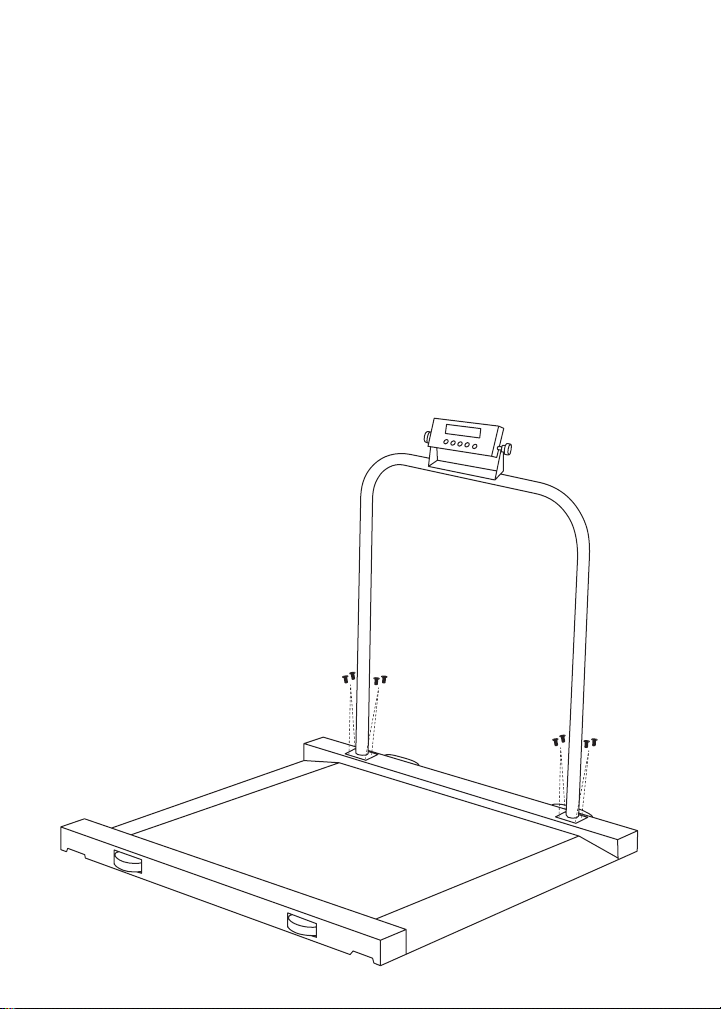
Step 1:
A. To assemble your Scale (A), make sure you have all of the parts
listed above before beginning.
B. Next, lay your Scale (A) on a at, stable surface.
C. Locate the Handrail (B) and the eight M4*6 Philips Screws (1).
D. Line the Handrail (B) up to the two mounting positions located
by the handles for the Scale (A).
E. Afx four M4*6 Philips Screws (1) per side of the Handrail (B).
a. Secure them in place with a Philips head screwdriver.
E. Your Scale (A) is now ready to be used.
Assembly Instructions
5
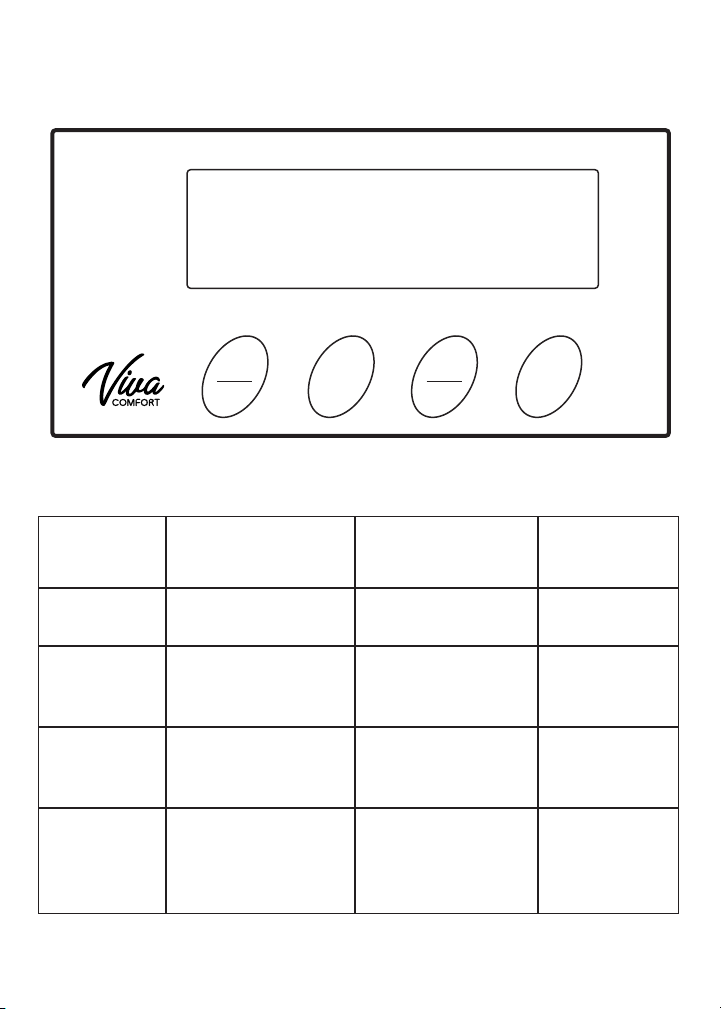
BUTTON FUNCTION:
Interface
ON/OFF
Zero
HOLD
PRINT
UNIT TARE
0000.00
Name Function Menu Function
Serial port
instruction
code
ON/OFF Turns the Scale
on and off Null O
UNIT Switches the unit
from lb to kg
Scroll down
the menu or
parameters
U
HOLD/
PRINT
Hold Function/
output printing
Scroll up
the menu or
parameters
H
TARE Tare
Enter the menu
or conrm
to change
parameter
T

6
Step 1 - Turn On/Power Adapter
Step 2 - Turn On/Battery
Step 3 - Turn Off
A. Locate and insert the included power AC Adapter into the
supply hub.
B. This can be located on the left of the display indicator.
C. Insert the AC Adapter into the AC socket.
A. Open the battery cover located on the right side of the display
indicator.
B. Load four AAA alkaline cells into the cell box.
a. Be mindful of the polarity.
C. Close the battery cover.
D. Make sure nothing is on the platform, press the ON/OFF button
once.
a. It will show the characters, then the version number.
b. After the screen displays “0” you can begin weighing
patients.
A. Press the ON/OFF button to turn the scale off.
Operation Method

7
Step 4 - Weighing
Step 5 - Calibration/Single Point
A. To get the scale ready to weigh a patient, rst press the TARE
button once to make the indicator display “0”.
B. Place the patient on the platform.
C. Once the “kg, lb, or pcs” character stops ashing, you can begin
to read it.
A. Under the condition of weighing, long press the UNIT button until
the window displays “------“.
B. Short press the UNIT button or HOLD button to switch and make
the window display CAL.
C. Short press the TARE button to make sure you enter the
calibration mode.
D. After entering calibration mode, the window will display “LOAD”
and “0.0 kg” alternately.
a. This means the weight “0.0 kg” should be loaded on the
platform.
E. After making sure that there is nothing on the platform, short
press the T button to make the scale begins with “0.0 kg”
calibration.
a. “0.0 kg” will icker rapidly.
F. Keep the platform stable and without other interference factors
that will inuence the weighing performance.
a. If the weighing keeps stable exceeding 2 seconds, the scale
will nish “0.0 kg” calibration automatically and will begin the
next calibration point.
G. If it doesn’t keep stable, the “0.0 kg” will keep ickering while
waiting for stable weight.
a. Repeat steps D. and E., calibrate the half capacity range point
and the full capacity range point orderly, save the calibrated
parameters automatically and return to the weighing mode.

8
Step 6 - Switching The Unit
Step 7 - Hold Function
Step 8 - Exit Holding
A. Press the UNIT button to switch the weighing unit between the
following: “kg”, “lb”, “pcs”.
A. Once you press the HOLD button, the CPU will send the weight
data into a USB or RS232 socket.
a. The weight will remain on the display for 120 seconds after
the item has been removed form the scale so the weight can
be easily read.
B. To begin, place the patient on the scale platform.
C. Wait for the stable weights to be displayed.
D. Press the HOLD key and the “ ” displayed on the indicator.
a. This means the weight “0.0 kg” should be loaded on the
platform.
E. Remove the item from the scale platform
a. The items’ weight will remain on the display for 120 seconds.
A. Once a patient is weighed and the hold unction is enabled.
B. Press the HOLD key again to cancel “ ” hold indicator and return
the scale to weight value.

9
Step 9 - MotionLock Weighing
Step 11 - Counting Sampling
Step 10 - Output Printing Function
A. When the machine is working, press and hold the TARE button
until it displays “OFF” or “ON”, which indicates the open or close
function of the MotionLock weighing.
B. When the action symbol which is above the unit symbol ashes,
it means the current model is the MotionLock model.
C. In that case, once the weighing is locked, it will automatically
remain in the locked weight for about 10 seconds.
A. Under the condition of counting, remove the unrelated “objects/
patients” on the platform, short press the TARE button to back to
zero.
B. Press the UNIT button to switch the units into “pcs”.
a. The window will display “ADD10”.
b. “ADD10” means 10 objects to be weighed should be added
onto the platform.
c. The weight of each sample should be higher than the scale’s
minimum division value otherwise the window will display
wrong cue “NO”.
C. If you want to change the sampling quantity, please press the
HOLD button to change the quantity.
a. If you do not need to sample again, please press the UNIT
button to cancel the sampling, and the scale will adopt the
last sampling value to count.
A. Press and hold the HOLD key for 2 seconds, the buzzer will
sound, and the weight data will be outputted to the computer or
the serial printer.

10
Step 12 - Serial Port Printout
A. Connect the serial port with the scale according to drawing as
below.
a. Baud Rate = 9600, without parity digit, sent stop bit 1.
i. The serial connection diagram is omitted.
D. After conrming the quantity of objects on the platform and the
date displayed on the LCD are the same, short press the TARE
button, then begin to sample and count.
E. During the process of sampling and counting, the screen will
display the sampling data with rapid icker.
a. Keep the platform stable and without other interference
factors which will inuence the weighing performance.
b. If the weighing keeps stable exceeding 2 seconds, the
sampling and counting will be automatically nished, the
parameter will be saved automatically, and the scale will
return to counting mode.
c. If not, the screen will keep ickering the data and waiting for
the stability of measuring.
PS Scale PC or Printer
6
7
8
9
1
2
3
4
5
6
7
8
9
1
2
3
4
5
TxD
RxD
TxD
RxD
GND GND

11
b. Open the serial communication software, for example, “Hyper
Terminal” in windows.
i. Select the connected portal number “COM” and set the
baud rate as 9600 bps, the parity bit as “NONE”, the data
bit as “8Bit”, and the stop bit as “1Bit”.
c. You can select the serial output modes according to your own
needs.
i. The output modes include 3 types: Output by pressing “M”
button, automatic output after the weight keeps stable and
continuous output.
ii. You can set the “OUT” in “Parameter Setting”.
d. Output Data Form: 8 bytes data bit + 3 bytes unit code + 2
bytes ending code.
i. The above mentioned characters are all ASCII codes, and
the unit can be ‘kg”, “lb” or “pcs”.
e. The serial ports order can be found in the Button Function
section.
B. Example of Output Data:
Display Data Bit Unit Code Ending
Code
1 2 3 4 5 6 7 8 9 10 11 12 13
123,45kg Blank Blank 1 2 3. 4 5 k g Blank CR LF
-123,45lb Blank - 1 2 3. 4 5 l b Blank CR LF
123.0pcs Blank Blank Blank 1 2 3. 0 p c s CR LF

12
Step 1 - Setting The User Parameter
A. Under the condition that the scale is off, press the UNIT button
in tandem with the ON/OFF button to turn the scale on.
a. DO NOT release the UNIT button until the screen displays
“------”.
B. Short press the UNIT button or the HOLD button to switch the
menu.
C. Short press the TARE button to enter the display menu.
D. After entering the display menu, short press the UNIT or HOLD
button to select the parameter.
E. Short press the TARE button to conrm the parameter and
return to the menu.
F. After all the parameters have been set, switch the menu into
“-END-“, short press the TARE button to nish the setting and
save the parameters.
a. Then return to the weighing or counting mode.
Set User Parameter

13
Menu Meaning of Menu Selectable
Parameter Meaning of Parameter
1. CODE Check the
internal code Null Check the internal code for
debugging by manufacturer
2. AST Zero tracking
range 0.5/1/2/3d Set automatic zero tracking
range
3. OUT Printout method Key/Auto/
Conti
Key: printout while press the
key
Auto: printout automatically
Conti: printout continuously
4. LED Backlight control
method OFF/Auto/on
OFF: back light is turned off
Auto: back light is automatic
On: back light is turned on
5. OFF
Automatic
shutdown
control
No/3/510/
15/30/60
min
No: no automatic shutdown
3~60min: if there are no any
actions of weighing objects
or pressing buttons, the
instrument will automatically
turn off
6. -LL- Set Lower limit
alarm
xxxx (lower
limit value)
If the lower limit value is set
to “0”, the lower limit alarm
function is canceled
7. -HH- Set upper limit
alarm
xxxx (upper
limit value)
If the upper limit value is set
to “0”, the upper limit alarm
function is canceled
-END-
Finish measuring
and save the
parameters
Null

14
Display
Code Meaning of Code Solution
NO
1. The calibration weight value
is not loaded according to the
display when calibrating
2. The quantity of objects is
not loaded according to the
quantity of sampling
1. Load the weight value
according to the show value
2. Load the quantity according
to the show value
AC The batteries are brownout 1. Use new batteries.
2. Use power adapter.
Err-0
1. Lost the calibration data
2. The load cell or main board
maybe damaged
1. Re-calibrate
2. Change the load cell or main
board
Err-1
1. The weight is over the max
capacity
2. Lost the calibration data
3. The load cell or main board
maybe damaged
1. Remove the objects on the
platform
2. Re-calibrate
3. Change the load cell or main
board
--L-- Lower limit alarm Cancel lower limit alarm
--H-- Upper limit alarm Cancel upper limit alarm
Step 2 - Meaning of Cue Code

15
A. In order to keep the scales in normal operating capacity, the
crust of indicator and the platform of scale should be kept
clean and prevented from corrosion by foreign substance. If
necessary, you should use a piece of cloth with mild washing
agent to clean them. When you do not have to use the scale,
pull out the A/C plug. If the scale will not be used for a long
time, it is recommended to take out the batteries.
Maintenance of The Scale
Malfunction
Phenomenon Reason Solution
No display
The power plug is not
inserted in right place
The batteries are expired
Insert the plug in right place
Use the new batteries
Low-voltage
indication
The power of batteries is
low Use the new batteries
Error in
weighing data-
reading
The scale did not back to
zero before using
The scale is not calibrated
Do not put objects on the
platform, press “TARE”
button, and begin to weigh
objects
Re-calibrate
False
calibration
The calibration weight is
not precise
Use the precise calibration
weight

16
Specications
Model ADIME904-03
Capacity 1000LB
Tare range To capacity by subtraction
Over range capacity Capacity 9d
Stabilization time 2sec
Operation temperature 0~40°C
Power requirements
AC adapter(supplied with balance);
110 or 220V AC, 50/60Hz or 4 AAA
batteries option

17
Warranty
Adir Corp (the “Company” or “Tiger Companies”) warrants to the purchaser that the product
will be free from defects in workmanship and materials for a period of 1 year from the date
of purchase. The warranty period is not extended if we repair, replace, exchange, or provide a
refund for the product (as determined in our sole discretion). We may change the availability
of this limited warranty at our discretion, but any changes will not be retroactive.
These warranties are not assignable or transferable to any other person, including, without
limitation, any subsequent owner or other transferee of the product.
This Warranty does not apply to: (a) damage caused by misuse, tampering, abuse, neglect, or
accident; (b) damage caused by improper installation, modication, or service; (c) alteration
of the serial number; or (d) use that violates the instructions furnished by the Company will
void this warranty.
The sole responsibility of the Company shall be limited to (a) the repair or replacement (in its
sole discretion) of any component of the product which fails to conform to this; (b) a refund
the purchase price of such product (in its sole discretion), at no cost to the purchaser for the
period of the warranty, or (c) an exchange for a similar product, comparable in function and
price.
Contact the Company directly at 1-(800)-805-1790 to obtain service under this warranty. If
it becomes applicable to send a defective product to the Company, a Return Authorization
Number must rst be obtained from the Company. In order to obtain service under this
warranty, purchaser may be required to provide the Company with the following items
(a) proof of purchase, (b) photographs and or videos (of the damage, and (c) a written
testimonial describing the defect.
Products shipped without prior Return Authorization and Return Authorization Number may
not be accepted, and the Company will not be responsible for their disposition and/or cost
of return to the owner.
The Company will not assume any responsibility for any loss or damage incurred in shipping
and or delivery.
The product(s) must be returned within 14 calendar days of receiving the return authorization
from the Company and must include the original proof of purchase for the warranty to be
honored.
Any implied warranties that the purchaser may have are limited to the duration of the
warranties described above. There are no further warranties that extend or apply beyond the
face hereof, and the Company expressly disclaims and excludes any and all warranties of
merchantability or tness for a particular purpose. Some states do not allow limitations on
how long an implied warranty lasts, so the above limitation may not apply to you.
THE REMEDIES DESCRIBED ABOVE ARE YOUR SOLE AND EXCLUSIVE REMEDIES AND
THE COMPANY’S ENTIRE LIABILITY FOR ANY BREACH OF THIS LIMITED WARRANTY. OUR
LIABILITY SHALL UNDER NO CIRCUMSTANCES EXCEED THE ACTUAL AMOUNT PAID BY
YOU FOR THE DEFECTIVE PRODUCT, NOR SHALL WE UNDER ANY CIRCUMSTANCES BE
LIABLE FOR ANY CONSEQUENTIAL, INCIDENTAL, SPECIAL OR PUNITIVE DAMAGES OR
LOSSES, WHETHER DIRECT OR INDIRECT. SOME STATES DO NOT ALLOW THE EXCLUSION
OR LIMITATIONS OF INCIDENTAL OR CONSEQUENTIAL DAMAGES, SO THE LIMITATION
MAY NOT APPLY TO YOU.
This warranty gives you specic legal rights, and you may also have additional rights which
vary from state to state.
1.
2.
3.
4.
5.
6.
7.
8.
9.
10.
11.

ADIME904-03
© 2023 Viva Comfort
vivacomfort.com
Table of contents


