VIVA FITNESS KH64 User manual

Recumbent Bike
USER'S MANUAL
KH64

1.To ensure your safe, reliable and comfortable use of this series of
exercise bikes, please read the following important matters and all
operation instructions before use. The company shall not be liable
for any personal injury or property loss caused by the use of this
product.
2.Consult your doctor before starting a plan or other exercise
program. This is especially important for people over the age of 35
or with pre-existing health conditions.
Considerations:
1. This fitness bike is a fixed fitness equipment suitable for the family and an
aerobic training equipment for improving cardiovascular function;
2. The exercise bike should be placed on the flat ground when in use;
3. Before use, please check whether all bolts, bolts and other parts are properly
installed and locked;
4. please wear appropriate clothes and shoes and socks, please do not wear a
dress or too long blouse, so as not to hook on the exercise car; Strap your feet
firmly;
5. The activity space of this machine should be larger than 120*100*200 cm.
6. Before starting to exercise, please consult your doctor and make a
reasonable training plan according to your condition and exercise goal;
7. If you feel nausea, pain, chest tightness, rapid heartbeat, difficulty in breathing
or loss of balance during exercise, stop exercising immediately and go to see
a doctor;
8. Children should be supervised to ensure that they do not play with utensils.
9. This appliance is not intended for use by persons (including children) who are
physically weak, slow in response or have mental disorders, unless it is safely
used under the guidance or with the help of a person responsible for their
safety.
10. The maximum weight of the user of the machine shall not exceed 100Kg;
11. The braking device of the machine is of non-speed correlation type;
12. The machine is not suitable for medical use.
13. The machine meets the requirements of EN957-5HC class;
14. The machine is suitable for home use
Warning: Violation of the above safety regulations will result in
personal and equipment injuries.
1
EN

Tools and accessories
2
(45) Square Neck Screw M8X75 4pcs
(46) Half-Roundhead Hex bolt M8X20 4pcs
(47) Half-Roundhead Hex bolt M6X40 8pcs
(48) Half-RoundheadHex bolt M8X16 8pcs
(49) Half-Roundhead Hex bolt M8X20 2pcs
(41) Arc washerΦ8 1
4pcs
(58) Spring washer Φ8 14pcs
(63) Cap nut M8 4pcs
(66) L-shaped wrench S=5 1pcs
(65) Multi-function wrench 1pcs

Explosive View
Part list
NO. Description Qty NO. Description Qty
1 Main frame 1 41 ARC washer 14
2 adjustable bracket 1 42 Pull Rod 1
3 Seat cushion adjustable bracket 1 43 adjusting yoke 2
4 Handlebar support 1 44 Adjust slice 2
5 Handlebar support-left 1 45 Square Neck Screw M8X75 4
6 Handlebar support-right 1 46 Half-Roundhead Hex bolt M8X20 4
7 Handlebar support-front 1 47 Half-Roundhead Hex bolt M6X40 8
8 Pressing wheel bracket 1 48 Half-Roundhead Hex bolt M8X16 8
9Ф25 Ball plug 4 49 Half-Roundhead Hex bolt M8X20 2
10 Front Handrail bushing 2 50 Cross Recessed Pan Head Screw M5X35 1
11 plastic cover 1 51 Cross Recessed Pan Head Screw M4X6 1
12 locating sleeve 1 52 Cross head Pan Head Tapping screw
ST4.2X20
2
13 Handrail bushing 2 53 Cross head Pan Head Tapping screw
ST4.0X16
9
14 Cover(Left & Right) 2 54 ross head Pan Head Tapping screw ST4X10 1
15 6V Belt 1 55 Flat Washer Ф10 1
16 Belt wheel 1 56 Flat Washer Ф8
1
1
7Bearing set 1 57 Flat Washer Ф5 1
18 Front bottom tube 1 58 Spring washer Ф8
1
14
9 Rear bottom tube 1 59 Spring washer Ф6 1
20 crank 1 60 Lock Nut M6 2
21 61 Lock Nut M8
2
2
2 Rear foot-cover 2 62 Lock Nut M10 2
23 resistance cable 1 63 Lock Nut M8
2
4
4 8-section tension control 1 64 Cross Recessed Pan Head Screw M5X12 4
25 Pedal(Left & Right) 1 65 Multi-function wrench 1
26 Pressing belt wheel 166 L-shaped wrench S=5 1
27 Meter wire 1
28 Meter 1
29 Heart rate wire 1 1
30 Heart rate wire 2 2
31 heart rate sensor 2
32 Ф50 Pipe Plug 1
33 Ф25 round cap 4
34 Spring knob 1
35 transition sleeve 1
36 Seat cushion 1
37 back cushion 1
38 Flywheel 1
39 Crank spacer sleeve 2
40 Pedal Belt 2
4
Middle foot-cover 2
Front foot cover
67 2

B: Connect handlebar support's(4) meter wire(27) and heart rate wire 2 (30) with main frame's(1) heart rate wire 1(29)
and heart rate wire 2 (30) .

4.a. Connect the electronic meter (No.27) and heart rate wire 1 (No.30) to
the corresponding connector of the electronic meter, and then put the
extra wire plug into the Handlebar support (No.4); Then the convexity of
the electronic watch is set to the welding seam of the forehand connector,
the upper end of the electronic watch is fixed to the Handlebar support
(No.4), and is fixed with the Cross Recessed Pan Head Screw (No.64).
b. Take over by 2 sets of Half-Roundhead Hex Bolt (No.49),
Spring washer (No.58) and ARC washer (No.41) will hand over
Handlebar support-front (No.7) connected to the Handlebar
Support (No.4) tighten. (See Figure4)
6.With 8 sets of Half-Roundhead Hex bolt (No.47) install the Seat cushion (No.36) &Back cushion (No.37) on the Seat
cushion adjustable bracket (No.3) respectively
5.With 4 sets of Half-Roundhead Hex bolt (No.48),
install the Seat cushion adjustable bracket (No.3) on theadjustable bracket
(No.2)
.
7.Connect the heart rate wire 2 (No.31) with heart rate wire 1
(No.30), then put the extra wire plug into the adjustable bracket
(No.2); With 4sets of Half-Roundhead Hex bolt (No.46), spring
washer (No.58) ,ARC washer (No.41) install the Handlebarsupport-
Left( No.5)& Handlebar support-Right(No.6) on the
adjustable bracket (No.2)
6
48
58 41
46
46
41
2
5
6
31
30
58
Figure 4
Figure 5
Figure 6a Figure 6b
Figure 7
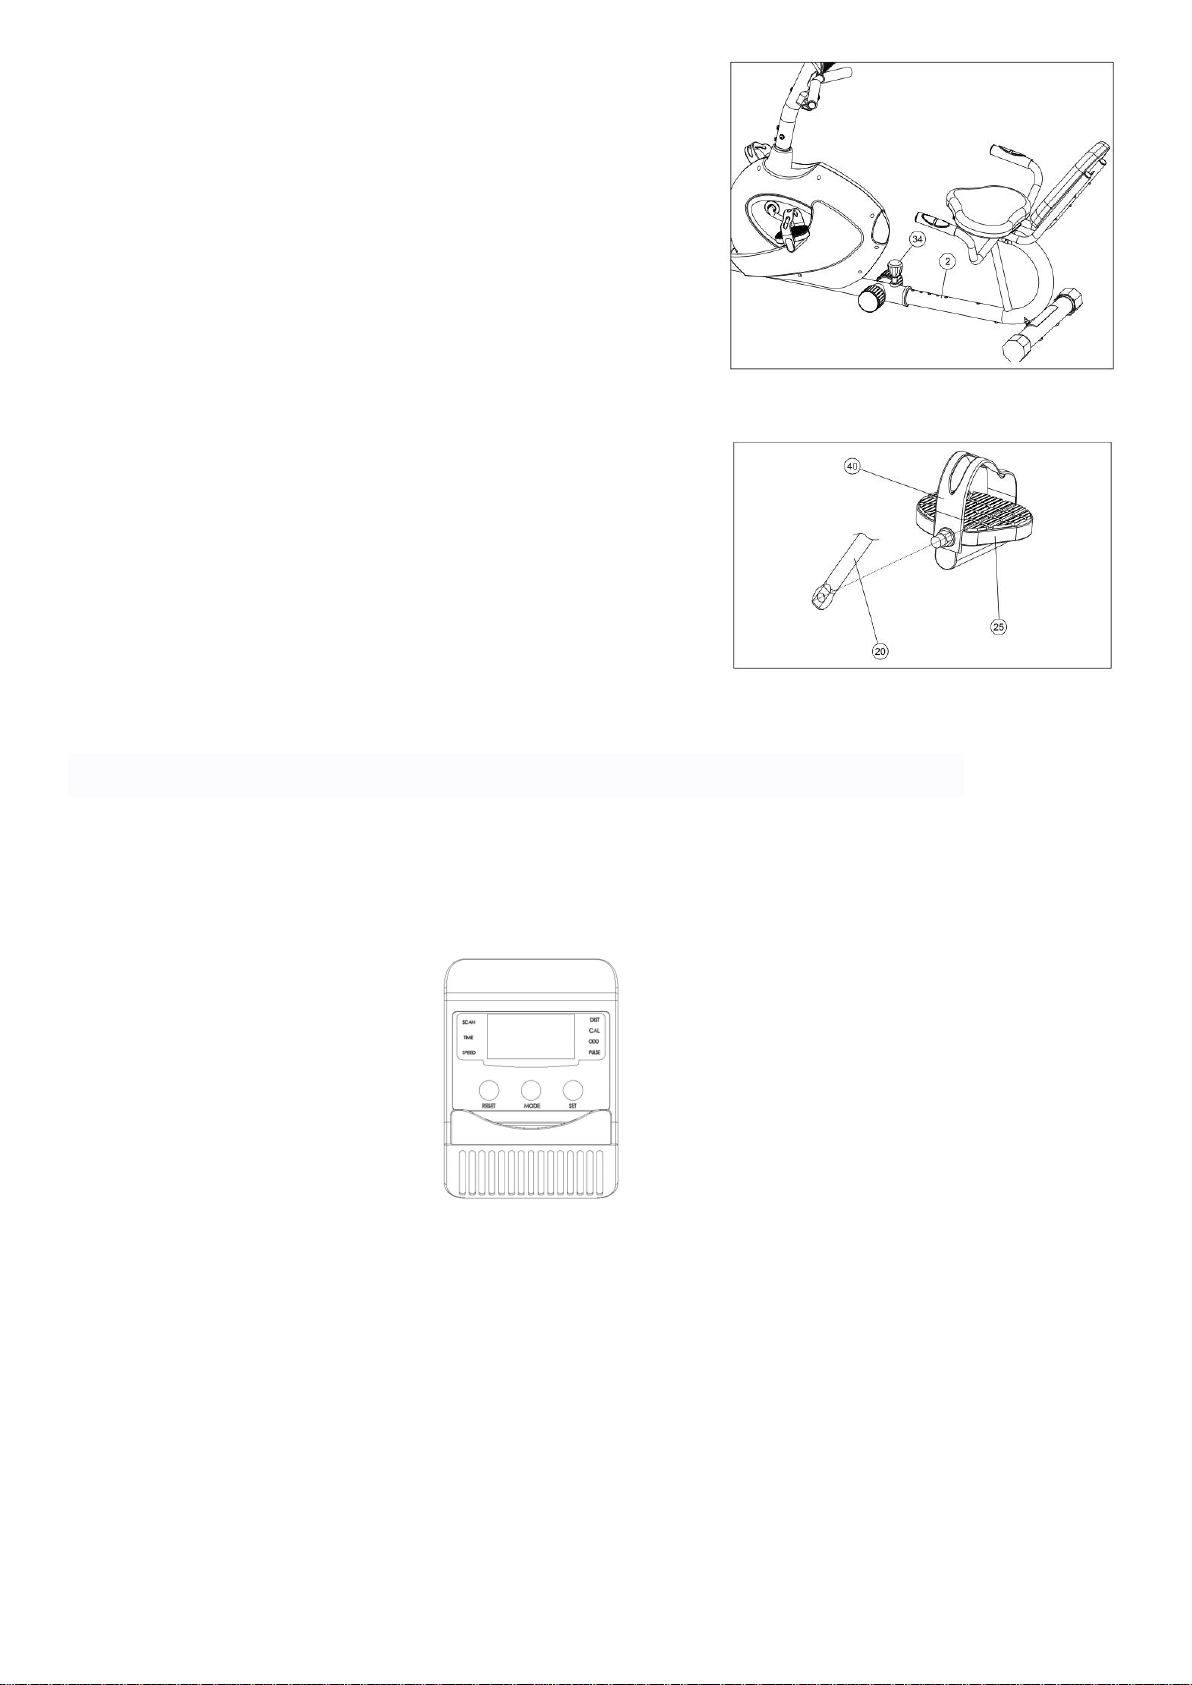
9. Fasten the Belt (No. 40) on the Pedal (No.25) first, then mount them on the
crank (No.20). (see figure 9)
Note: left (L), right (R) are indicated on the foot pedal shaft.
When stamping quickly in one direction, do not immediately kick in the
other to avoid injury
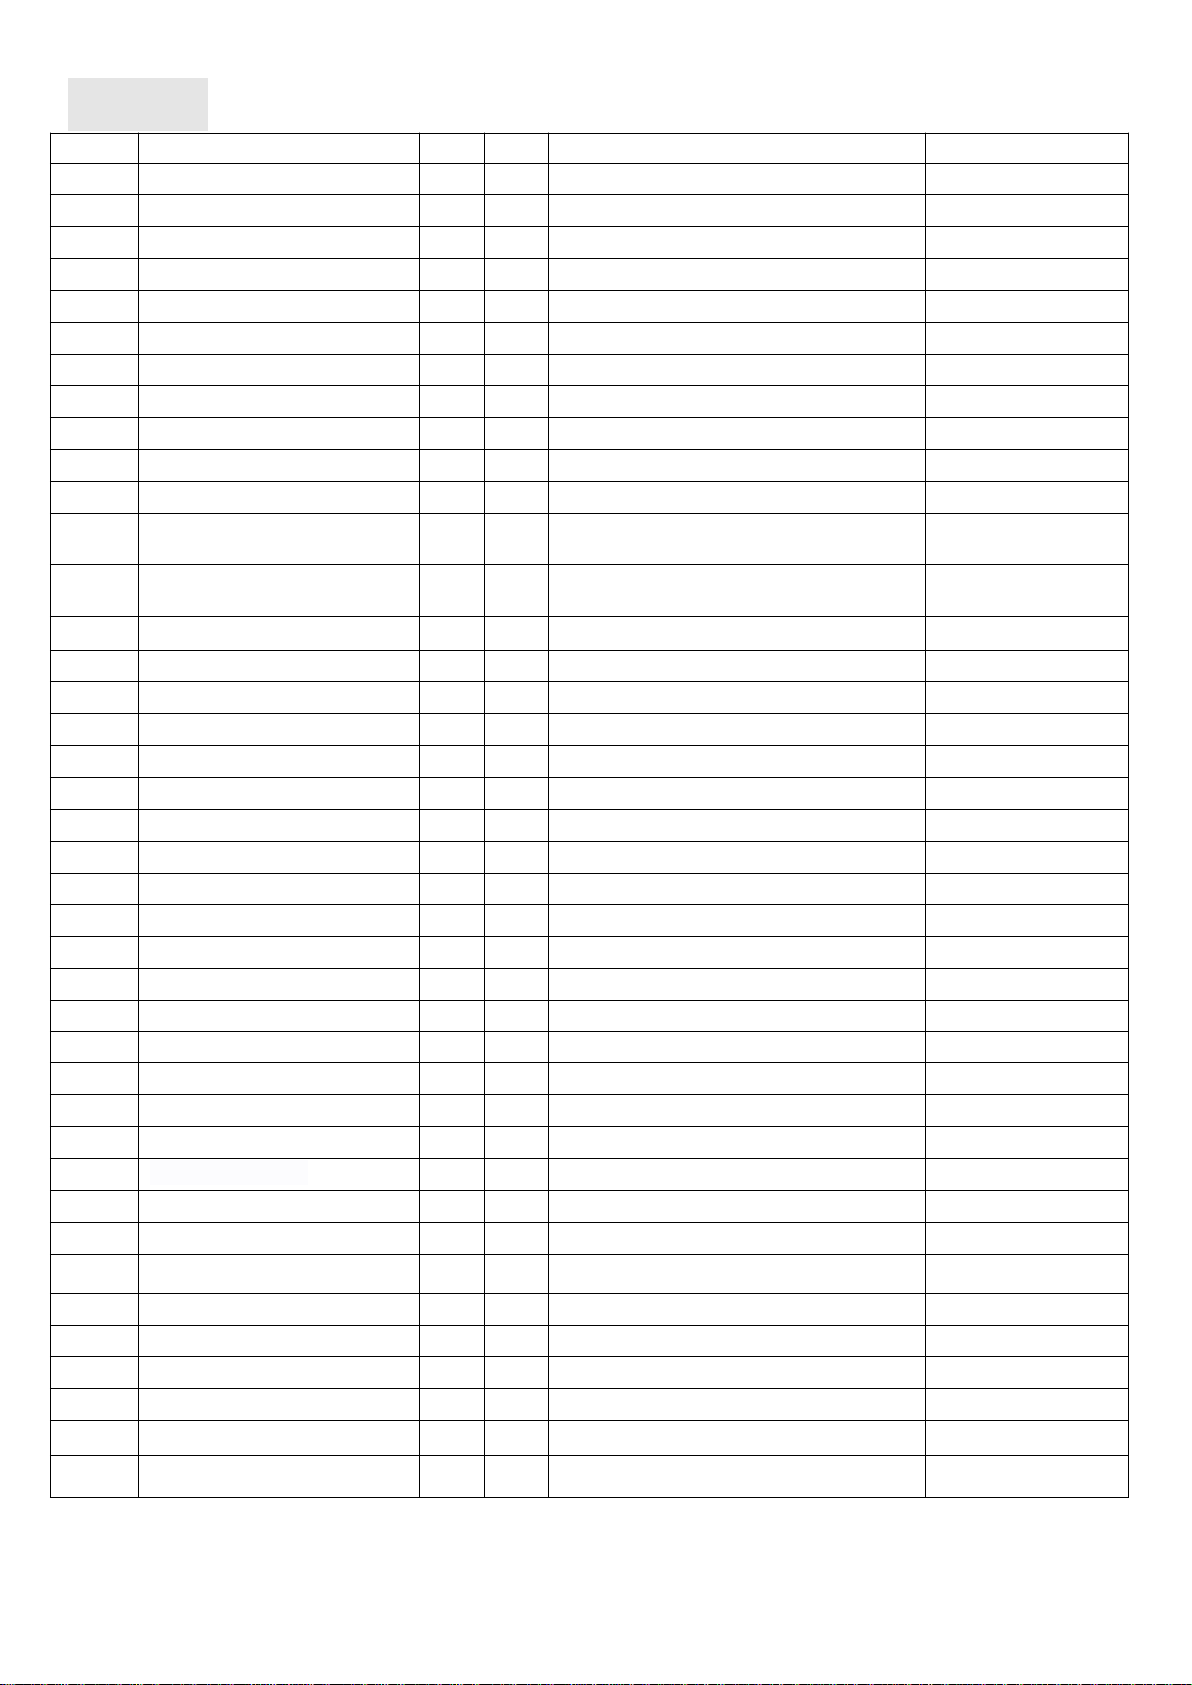
8.To adjust the positions of the seat cushion, just unscrew the seat
cushion to adjust the spring knob (No.34). After adjusting the adjustable
bracket (No.2) to the appropriate position, tighten the spring knob (No.34)
.
Instructions
1. Load adjustment: resistance fine tuning knob, clockwise rotation, resistance increase, according to your
own needs to adjust the level of resistance.
2. When riding a bike, sit on the cushion, fasten the pedal strap and hold the handle with both hands. The
upper body can freely change its position according to the strength of both legs and riding speed.
7
Figure 8
Figure 9


MALFUNCTIONS AND TREATMENT
(1) Maintenance
1.
Regularly check whether the bolts and nuts of each part are fastened, whether the adjusting knob is locked,
whether the rotating part is flexible, and whether there are any worn or damaged parts. Ensure that all parts are
in good condition to ensure the safety of the equipment.
2.
Parts that are worn or damaged should be replaced immediately or sent to the maintenance center for
replacement before use after repair.
3.
Keep the equipment clean, but do not wipe it with acid, alkaline or organic solution.
Troubleshooting
Malfunction Reas
on
Treatment
Base is unstable.
1.
Floor is not flat or there
is small object under the
front or rear stabilizer.
2.
The rear base feet have not
been leveled when assembling.
1.
2
3.
Remove the object.
Relevel the base
A
djust the rear base feet.
Handlebar or seat
cushion is shaking.
The screws and round knob are
loose.
Tighten the screws and round
knob.
Loud noise from the
moving parts.
The interval of the parts is improper
tighten.
Open the covers to adjust.
No resistance when
riding the upright bike.
1.
The interval of the magnetic
resistance increases.
2.
Tension control is damaged.
3.
Running belt is slippery.
1. Open the covers to adjust.
2. Change the tension control.
3. Open the covers to adjust.
9

WEBSITE FACEBOOK INSTAGRAM
Table of contents
Other VIVA FITNESS Exercise Bike manuals

Popular Exercise Bike manuals by other brands


Sunny Health & Fitness
Sunny Health & Fitness SF-B121021 user manual

Monark
Monark 827E instruction manual

Stamina
Stamina 1310 owner's manual

American Fitness
American Fitness SPR-BK1072A owner's manual
 Service manual")
Cateye
Cateye CS-1000 (CYCLO SIMULATOR) Service manual

BH FITNESS
BH FITNESS H9158H Instructions for assembly and use