Vizio M320SL User manual

VIZIO
QUICK
START
GUIDE
FULL USER MANUAL AVAILABLE AT VIZIO.COM
MODELS
nM320SL
nM370SL
FULL HD
SLIM LED
SMART TV

• Whenconnectedtoapoweroutlet,powerisalwaysowingintoyourTV.Tototallydisconnectpower,unplugthepowercord.
• Thelightningashwitharrowheadsymbolwithinanequilateraltriangleisintendedtoalerttheusertothepresenceof
un-isolated,dangerousvoltagewithintheinsideofyourTVthatmaybeofsufcientmagnitudetoconstituteariskofelectric
shocktopersons.
• Donotoverloadpowerstripsandextensioncords.Overloadingcanresultinreorelectricshock.
• ThewallsocketshouldbeinstallednearyourTVandeasilyaccessible.
• OnlypowerofthemarkedvoltagecanbeusedforyourTV.Anyothervoltagethanthespeciedvoltagemaycausereor
electricshock.
• Donottouchthepowercordduringlightning.Toavoidelectricshock,avoidhandlingthepowercordduringelectricalstorms.
• UnplugyourTVduringalightningstormorwhenitwillnotbeusedforlongperiodoftime.ThiswillprotectyourTVfrom
damageduetopowersurges.
• DonotattempttorepairorserviceyourTVyourself.Openingorremovingthebackcovermayexposeyoutohighvoltages,
electricshock,andotherhazards.Ifrepairisrequired,contactyourdealerandreferallservicingtoqualiedservicepersonnel.
• WARNING:KeepyourTVawayfrommoisture.DonotexposeyourTVtorainormoisture.IfwaterpenetratesintoyourTV,unplug
thepowercordandcontactyourdealer.Continuoususeinthiscasemayresultinreorelectricshock.
• DonotuseyourTVifanyabnormalityoccurs.Ifanysmokeorodorbecomesapparent,unplugthepowercordandcontactyour
dealerimmediately.DonottrytorepairyourTVyourself.
• Avoidusingdroppedordamagedappliances.IfyourTVisdroppedandthehousingisdamaged,theinternalcomponentsmay
functionabnormally.Unplugthepowercordimmediatelyandcontactyourdealerforrepair.ContinueduseofyourTVmaycause
reorelectricshock.
• DonotinstallyourTVinanareawithheavydustorhighhumidity.OperatingyourTVinenvironmentswithheavydustorhigh
humiditymaycausereorelectricshock.
• FollowinstructionsformovingyourTV.EnsurethatthepowercordandanyothercablesareunpluggedbeforemovingyourTV.
• WhenunpluggingyourTV,holdtheAC/DCpoweradapter,notthecord.Pullingonthepowercordmaydamagethewiresinside
thecordandcausereorelectricshock.WhenyourTVwillnotbeusedforanextendedperiodoftime,unplugthepowercord.
• Toreduceriskofelectricshock,donottouchtheconnectorwithwethands.
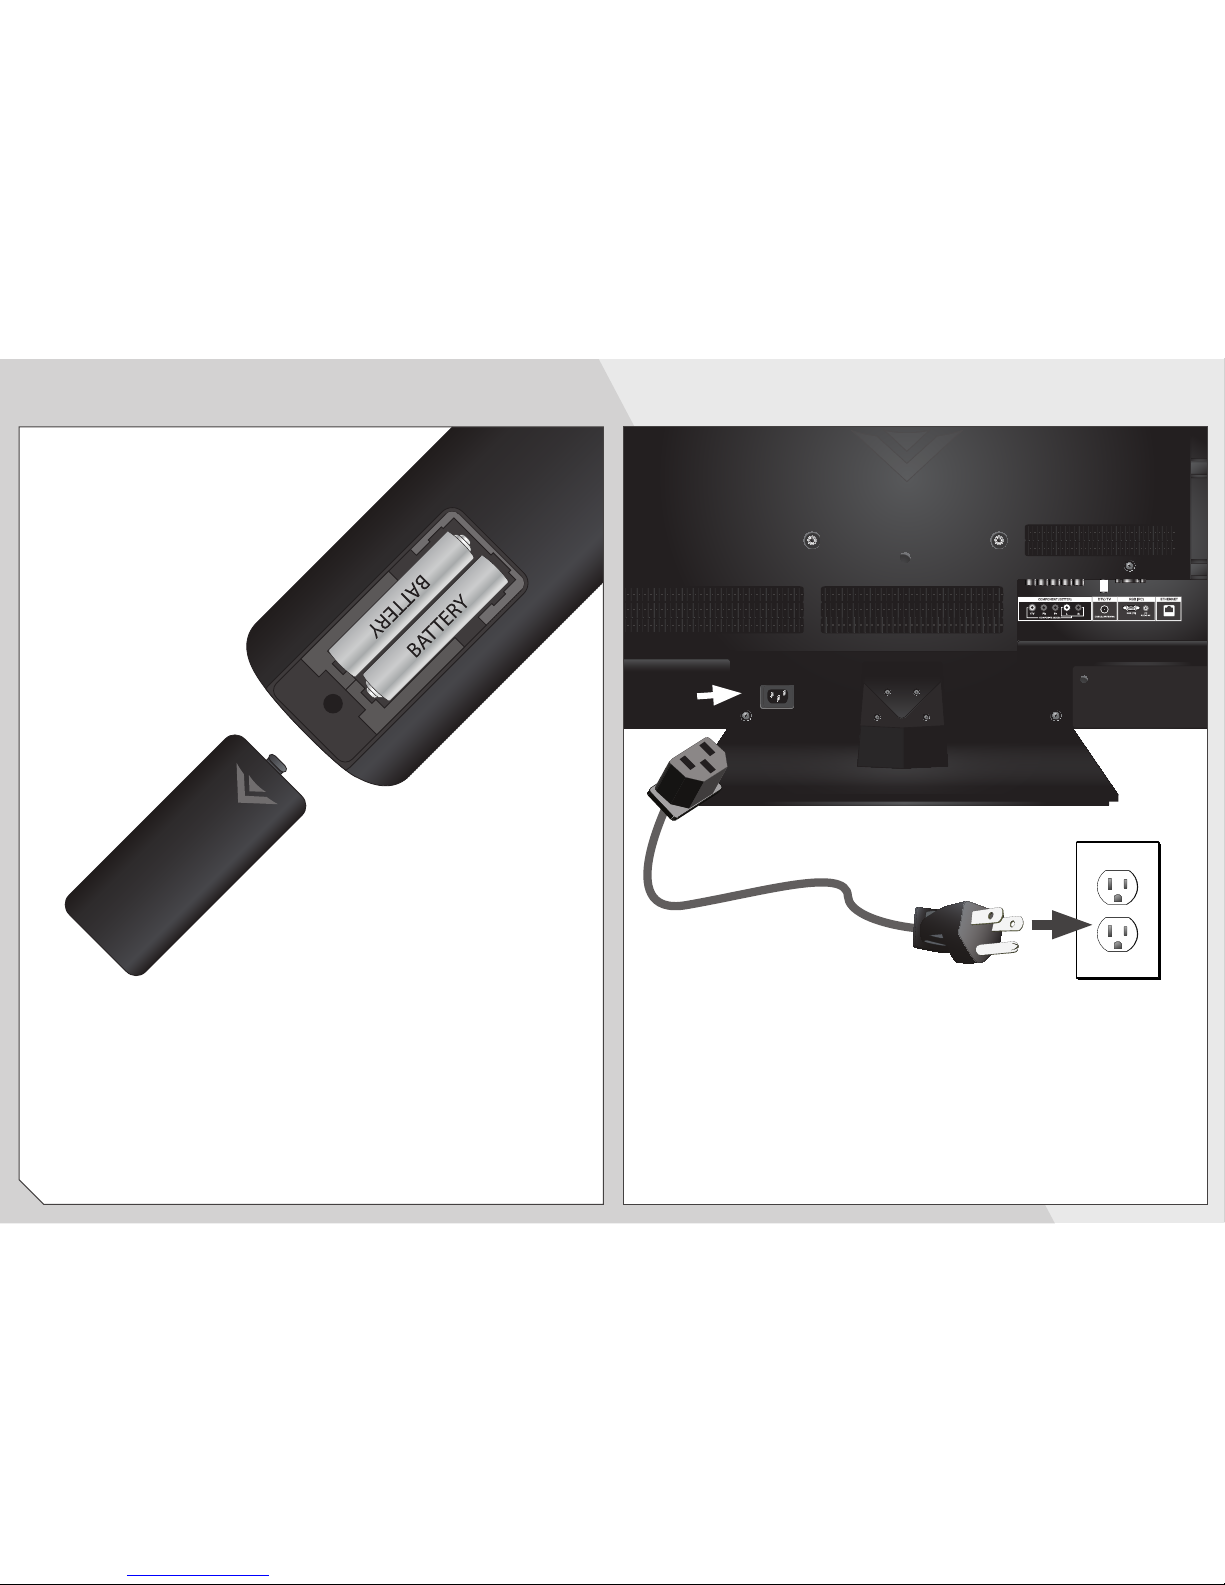
• Insertbatteriesinaccordancewithinstructions.Incorrectpolaritiesmaycausethebatteriestoleakwhichcandamagethe
remotecontrolorinjuretheoperator.Donotexposebatteriestoexcessiveheatsuchassunshine,reorthelike.
• Ifanyofthefollowingoccurs,contactthedealer:
-Thepowercordfailsorfrays.
-LiquidspraysoranyobjectdropsintoyourTV.
-YourTVisexposedtorainorothermoisture.
-YourTVisdroppedordamagedinanyway.
-TheperformanceofyourTVchangessubstantially.
• Thisapparatusshallnotbeexposedtodrippingorsplashingandnoobjectsllwithliquids,suchasvases,shallbeplacedon
theapparatus.
• Themainsplugorappliancecouplerisusedasthedisconnectdevice,thedisconnectdeviceshallremainreadilyoperable.
• CAUTION-Theseservicinginstructionsareforusebyqualiedservicepersonnelonly.Toreducetheriskofelectricshock,do
notperformanyservicingotherthanthatcontainedintheoperatinginstructionsunlessyouarequaliedtodoso.
Thelightningashwitharrowheadsymbolwithinanequilateraltriangleis
intendedtoalerttheusertothepresenceofuninsulatedDANGEROUSVOLTAGE
withintheproduct’senclosurethatmaybeofsufcientmagnitude
toconstituteariskofelectricalshocktopersons.
Theexclamationpointwithinanequilateraltriangleisintendedtoalerttheuser
tothepresenceofimportantoperatingandmaintenance(servicing)instructions
intheliteratureaccompanyingtheproduct.
YourTVisdesignedandmanufacturedtooperatewithindeneddesignlimits.Misusemayresultinelectricshockorre.Toprevent
yourTVfrombeingdamaged,thefollowinginstructionsshouldbeobservedfortheinstallation,use,andmaintenanceofyourTV.
ReadthefollowingsafetyinstructionsbeforeoperatingyourTV.Keeptheseinstructionsinasafeplaceforfuturereference.
Toreducetheriskofelectricshockorcomponentdamage,switchoffthepowerbeforeconnectingothercomponentstoyourTV.
• Readtheseinstructions.
• Keeptheseinstructions.
• Heedallwarnings.
• Followallinstructions.
• Donotusethisapparatusnearwater.
• Cleanonlywithadrycloth.
• Donotblockanyventilationopenings.Installinaccordancewiththemanufacturer’sinstructions.
• Donotinstallnearanyheatsourcessuchasradiators,heatregisters,stoves,orotherapparatus(includingampliers)that
produceheat.
• Donotdefeatthesafetypurposeofthepolarizedorgrounding-typeplug.Apolarizedplughastwobladesandathirdgrounding
prong.Thewidebladeorthethirdprongareprovidedforyoursafety.Iftheprovidedplugdoesnottintoyouroutlet,consultan
electricianforreplacementoftheobsoleteoutlet.
• Protectthepowercordfrombeingwalkedonorpinched,particularlyatplugs,conveniencereceptacles,andthepointwhere
theyexitfromtheapparatus.
• Onlyuseattachments/accessoriesspeciedbythemanufacturer.
• Useonlywiththecart,stand,tripod,bracket,ortablespeciedbythemanufacturer,orsoldwiththeapparatus.
Whenacartisused,usecautionwhenmovingthecart/apparatuscombinationtoavoidinjuryfromtip-over.
• Unplugthisapparatusduringlightningstormsorwhenunusedforlongperiodsoftime.
• Referallservicingtoqualiedservicepersonnel.Servicingisrequiredwhentheapparatushasbeendamagedinanyway,
suchaswhenthepower-supplycordorplugisdamaged,liquidhasbeenspilledorobjectshavefallenintotheapparatus,the
apparatushasbeenexposedtorainormoisture,doesnotoperatenormallyorhasbeendropped.
• UnplugthepowercordbeforecleaningyourTV.
• WhenmovingyourTVfromanareaoflowtemperaturetoanareaofhightemperature,condensationmayforminthehousing.
WaitbeforeturningonyourTVtoavoidcausingre,electricshock,orcomponentdamage.
• AdistanceofatleastthreefeetshouldbemaintainedbetweenyourTVandanyheatsource,suchasaradiator,heater,oven,
amplieretc.DonotinstallyourTVclosetosmoke.OperatingyourTVclosetosmokeormoisturemaycausereorelectric
shock.
• Slotsandopeningsinthebackandbottomofthecabinetareprovidedforventilation.ToensurereliableoperationofyourTV
andtoprotectitfromoverheating,besuretheseopeningsarenotblockedorcovered.DonotplaceyourTVinabookcaseor
cabinetunlessproperventilationisprovided.
• NeverpushanyobjectintotheslotsandopeningsonyourTVcabinet.DonotplaceanyobjectsonthetopofyourTV.Doingso
couldshortcircuitpartscausingareorelectricshock.NeverspillliquidsonyourTV.
• YourTVshouldbeoperatedonlyfromthetypeofpowersourceindicatedonthelabel.Ifyouarenotsureofthetypeofpower
suppliedtoyourhome,consultyourdealerorlocalpowercompany.
• DonotapplypressureorthrowobjectsatyourTV.Thismaycompromisetheintegrityofthedisplay.Themanufacturer’s
warrantydoesnotcoveruserabuseorimproperinstallations.
• Thepowercordmustbereplacedwhenusingdifferentvoltagethanthevoltagespecied.Formoreinformation,contactyour
dealer.
• YourTVisequippedwithathree-prongedgroundedplug(aplugwithathirdgroundingpin).Thisplugwilltonlyintoa
groundedpoweroutlet.Thisisasafetyfeature.Ifyouroutletdoesnotaccommodatethethree-pronged,haveanelectrician
installthecorrectoutlet,oruseanadaptertogroundyourTVsafely.Donotdefeatthesafetypurposeofthegroundedplug.
h
IMPORTANT SAFETY INSTRUCTIONS

DO YOU HAVE QUESTIONS?
LET US HELP!
YOUR PRODUCT INCLUDES FREE LIFETIME TECH SUPPORT
Phone:
Email:
Web:
(877) 878-4946 (TOLL-FREE)
techsupport@VIZIO.com
www.VIZIO.com/support
Hours of operation:
Monday - Friday:
5
am
TO
9
pm
(pST)
Saturday - Sunday:
8
am
TO
4
pm
(pST)
The VIZIO support team is highly trained
and is based in the United States.
We can help with:
•
New Product Setup
•
Connecting Your Devices
•
Technical Problems
•
And More
We speak English • Se habla Español • Nous parlons Français

HELP VIZIO REDUCE PAPER WASTE.
DOWNLOAD THE FULL USER MANUAL AT
VIZIO.COM/SUPPORT
PACKAGE CONTENTS
This Quick Start GuideRemote Control
with Batteries
LED LCD HDTV

USING THE REMOTE
INPUT
Change the currently-displayed input.
ARROW
Navigate the on-screen menu.
EXIT
Close the on-screen menu.
CLOSED CAPTIONS
Open the closed caption menu.
A/V CONTROLS
Control USB media player.
WIDE
Switch the display mode.
MUTE
Turn the audio off or on.
BACK
Go to the previous on-screen menu.
POWER
Turn TV on or off.
MENU
Display the on-screen menu.
INFO
Display the info window.
DASH
Use with number pad to manually
enter a digital sub-channel. (For
example, 18-4 or 18-5.)
CHANNEL UP/DOWN
Change the channel.
GUIDE
Display the info window.
LAST
Return to the channel last viewed.
NUMBER PAD
Manually enter a channel.
VOLUME UP/DOWN
Increase or decrease loudness
of the audio.
OK
Select the highlighted menu option.
V BUTTON
Open the VIA dock.
APP LAUNCHER
Quickly launch the pictured app.

INSTALLING THE BASE
Place the TV face down on a clean, flat surface.
Push the base onto the neck as shown.
Insert and tighten the thumbscrew.
Place the TV on a level, stable surface.
1 2

WALL MOUNTING YOUR HDTV
Wall mount your new HDTV using the VIZIO XMF1000 Quick Install Slim HDTV Mount.* It utilizes a modern,
smart design to support 32” to 55” TVs up to 100 pounds. Installation is fast, easy, and secure, thanks to a
simple crossbar and hook combination. And because the XMF1000 is only 1” thin, your TV will be the center
of attention, not your mount.
This Product Sold Separately

12
FIRST-TIME SETUP
Remove the battery cover by pressing gently on the
arrow and sliding away from the remote.
Insert the included batteries.
Gently slide the battery cover back into place.
Connect the power cord to the back of the TV.
Plug the power cord into an electrical outlet.

3 4
If you have an external antenna or a cable connection
that extends from a wall outlet,
connect it to the TV with an RF/Coaxial cable.
If you have a high-speed internet connection, connect
an Ethernet cable from your modem
or router to the back of the TV as shown.
Turn the TV on by pressing the
Power
button on the
remote.
The
Setup App
is displayed.
Use the Arrow buttons on the remote to highlight
Home Mode Setup and press
OK
.
Back of TV
Coaxial
Cable Ethernet
Cable

5 6
Use the
OK
and
Arrow Up/Down
buttons on the
remote to read and accept the Terms of Service and
Privacy Policy for Yahoo! TV Widgets.
When you are finished, highlight
Next
and press
OK
.
Select the name of your wireless network from the
list of available networks and press
OK
.
Enter your network key using the on-screen keyboard,
then highlight
Connect
and press
OK
.

7 8
Enter your First Name, Last Name, Phone Number,
ZIP Code, and E-mail Address using the on-screen
keyboard.
Highlight Next and press
OK
.
Answer the on-screen questions about your TV
connection using the
Arrow
and
OK
buttons on the
remote.
When you have finished the channel scan, highlight
Exit to Live TV
and press
OK
.
The First-Time Setup is complete.

CONNECTING YOUR DEVICES
Match colored connectors
to colored ports.
BACK OF TV
TV shown is
M370SL. M320SL
has AUDIO OUT
ports on side panel.

Game Consoles
Blu-ray™or DVD Players
Cable or Satellite Boxes
Commonly-connected
devices:
BEST
HDMI CABLE • DIGITAL
• HD VIDEO (1080P)*
• HD AUDIO
GOOD
AV CABLE • ANALOG
• VIDEO (480I)*
• STEREO AUDIO
BETTER
COMPONENT CABLE • ANALOG
• HD VIDEO (1080I)*
• STEREO AUDIO
Match colored connectors
to colored ports.
* Maximum Resolution
Choose ONE connection type for each device.
(Cables are not included.)

Highlighted App
12
Be sure your TV is connected to the Internet.
Use an Ethernet cable or connect wirelessly.
For the best V.I.A. experience, a high-speed
Internet connection is recommended.
The V.I.A Dock is displayed on the bottom of the
screen.
Use the
Arrow
buttons on the remote to highlight an
app, then press
OK
to open it.
GETTING STARTED WITH VIZIO INTERNET APPS
V.I.A.
Press this button to
open the V.I.A. Dock.
Be sure your TV is connected to the Internet.
Use an Ethernet cable or connect wirelessly.
For the best V.I.A. experience, a high-speed
Internet connection is recommended.

3
Your V.I.A Dock has many popular apps pre-loaded, but you can add more at any time.
To discover and add new apps to the Dock, open the
Widget Gallery
app.
Highlight
Categories
and press
OK
. When you’ve found an app you want
to add to the Dock, highlight
Add
Widget
to
My Profile
and press
OK
.
A list of app categories is displayed.
Select a category and browse
through the available apps.

Available at www.VIZIO.com
This Product Sold Separately
The VIZIO Home Theater Sound Bar with Wireless Subwoofer delivers exceptional audio performance in a new
sleeker, slimmer design - a perfect complement for a 40” HDTV and larger. This powerful sound system is also
remarkably versatile. Its wireless subwoofer fits nearly anywhere in your home theater up to 60 ft. away, and the
sound bar offers either a table-stand or wall-mount option.
UPGRADE TO POWERFUL DIGITAL AUDIO

HELP TOPICS
How do I return to the
Setup App?
There is a picture, but
there is no sound.
The TV displays
“No Signal.”
There are black/
gray bars on the top/
bottom/sides of the
screen.
There is no power.
• The on-screen menu has guided setup. Press MENU, then select HELP > Guided Setup.
Select the type of setup you need and press OK. The Setup App will begin.
• To reset the TV to factory defaults, press MENU > HELP > Reset TV Settings. Select Yes.
Remember that all of your settings will be lost!
• Press the VOLUME UP button on the remote or on the side of the TV.
• Press the MUTE button on the remote to ensure that mute is off.
• Press MENU, then select TV Settings > Audio. Be sure TV Speakers is set to ON.
• Be sure your connected devices are turned on.
• Press the INPUT button on the remote and select the input to which your device is
connected (HDMI-1, Composite, Component, etc).
• Note that some television channels add black bars to the picture.
• Set the TV to Wide or Zoom mode. Press MENU, then select Wide. Highlight Wide or
Zoom and press OK.
• Adjust the video settings of your external device
• Be sure the power cord is securely connected to the AC socket on the TV and to a
working electrical outlet.
• Press the POWER button on the remote or on the side of the TV.
• If the above steps do not work, try plugging the power cord into a different outlet.

FCC Class B Radio Interference Statement
NOTE:ThisequipmenthasbeentestedandfoundtocomplywiththelimitsforaClassBdigitaldevice,pursuanttoPart15oftheFCCRules.Theselimitsaredesignedtoprovidereasonable
protectionagainstharmfulinterferenceinaresidentialinstallation.Thisequipmentgenerates,usesandcanradiateradiofrequencyenergy,andifnotinstalledandusedinaccordancewith
theinstructions,maycauseharmfulinterferencetoradiocommunications.However,thereisnoguaranteethatinterferencewillnotoccurinaparticularinstallation.Ifthisequipmentdoes
causeharmfulinterferencetoradioortelevisionreception,whichcanbedeterminedbyturningtheequipmentoffandon,theuserisencouragedtotrytocorrecttheinterferencebyoneor
moreofthefollowingmeasures:
• Reorientorrelocatethereceivingantenna.
• Increasetheseparationbetweentheequipmentandreceiver.
• Connecttheequipmentintoanoutletonacircuitdifferentfromthattowhichthereceiverisconnected.
• Consultthedealeroranexperiencedradio/TVtechnicianforhelp.
ThisdevicecomplieswithPart15oftheFCCRules.Operationissubjecttothefollowingtwoconditions:(1)thisdevicemaynotcauseharmfulinterference,and(2)thisdevicemustaccept
anyinterferencereceived,includinginterferencethatmaycauseundesiredoperation.
Notice
Thechangesormodicationsnotexpresslyapprovedbythepartyresponsibleforcompliancecouldvoidtheuser’sauthoritytooperatetheequipment.
ShieldedinterfacecablesandACpowercord,ifany,mustbeusedinordertocomplywiththeemissionlimits.
ThemanufacturerisnotresponsibleforanyradioorTVinterferencecausedbyunauthorizedmodicationtothisequipment.Itistheresponsibilitiesoftheusertocorrectsuchinterference.
FCC warning
ChangesormodicationsnotexpresslyapprovedbythepartyresponsibleforcompliancewiththeFCCRulescouldvoidtheuser’sauthoritytooperatethisequipment.
Caution
AlwaysuseanAC/DCpoweradapterthatisproperlygrounded.UsetheACcordslistedbelowforeacharea.
USA:UL
Canada:CSA
Germany:VDE
UK:BASE/BS
Japan:ElectricApplianceControlAct
LEGAL
/
COMPLIANCE

ON PARTS AND LABOR
CoversunitspurchasedasnewinUnitedStatesandPuertoRicoOnly.
VIZIO provides a warranty to the original purchaser of a new Product against defects in
materialsandworkmanshipforaperiodofone(1)yearofnon-commercialusageandninety
(90) days of commercial use. If a Product covered by this warranty is determined to be
defectivewithinthewarrantyperiod,VIZIOwilleitherrepairorreplacetheProductatitssole
optionanddiscretion.
Toobtainwarrantyservice,contactVIZIOTechnicalSupportviae-mail:TechSupport@VIZIO.
comorviaphoneat877MYVIZIO(877.698.4946)from6:00AMto9:00PMMondaythrough
Fridayand8:00AMto4:00PMSaturdayandSunday,PacicTime,orvisitwww.VIZIO.com.
PRE-AUTHORIZATION MUST BE OBTAINED BEFORE SENDING ANY PRODUCT TO A VIZIO
SERVICECENTER.Proofofpurchase intheform ofapurchasereceiptorcopythereof is
requiredtoshowthataProductiswithinthewarrantyperiod.
Parts and Labor
Therewillbenochargeforpartsorlaborduringthewarrantyperiod.Replacementpartsand
ProductsmaybeneworrecertiedatVIZIO’soptionandsolediscretion.Replacementparts
andProductsarewarrantedfortheremainingportionoftheoriginalwarrantyorforninety
(90)daysfromwarrantyserviceorreplacement,whicheverisgreater.
Type of Service
Defective Products must be sent to a VIZIO service center to obtain warranty service.
VIZIOisnotresponsiblefortransportationcoststotheservicecenter,butVIZIOwillcover
returnshippingtothecustomer.PRE-AUTHORIZATIONISREQUIREDBEFORESENDINGANY
PRODUCTTOAVIZIOSERVICECENTERFORWARRANTYSERVICE.
Product returns toVIZIO’s service centers must utilize either the original carton box and
shippingmaterialorpackagingthataffordsanequaldegreeofprotection.VIZIOTechnical
SupportwillprovideinstructionsforpackingandshippingthecoveredProducttotheVIZIO
servicecenter.
Limitations and Exclusions
VIZIO’sone-yearlimitedwarrantyonlycoversdefectsinmaterialsandworkmanship.This
warrantydoesnotcover,forexample:cosmeticdamage,normalwearandtear,improper
operation,impropervoltagesupplyorpowersurges,signalissues,damagesfromshipping,
acts of God, any type of customer misuse, modications or adjustments, as well as
installation and set-upissues or any repairs attempted by anyone other than by aVIZIO
authorizedservicecenter.Productswithunreadableorremovedserialnumbers,orrequiring
routinemaintenancearenotcovered.ThisoneyearlimitedwarrantydoesnotcoverProducts
sold“ASIS”,“FACTORYRECERTIFIED”,orbyanon-authorizedreseller.
THERE ARE NO EXPRESS WARRANTIES OTHER THAN THOSE LISTED OR DESCRIBED
ABOVE.ANYIMPLIEDWARRANTIES,INCLUDINGANYIMPLIEDWARRANTYOFMERCHANT-
ABILITY AND FITNESS FOR A PARTICULAR PURPOSE, SHALL BE LIMITED IN DURATION
TOTHE PERIOD OFTIME SET FORTHABOVE.VIZIO’STOTALLIABILITYFORANYANDALL
LOSSESAND DAMAGES RESULTING FROM ANY CAUSEWHATSOEVER INCLUDINGVIZIO’S
NEGLIGENCE, ALLEGED DAMAGE, OR DEFECTIVE GOODS,WHETHER SUCH DEFECTS ARE
DISCOVERABLEOR LATENT,SHALL IN NOEVENT EXCEEDTHE PURCHASEPRICE OFTHE
PRODUCT.VIZIOSHALLNOTBERESPONSIBLEFORLOSSOFUSE,LOSSOFINFORMATION
ORDATA,COMMERCIALLOSS,LOSTREVENUEORLOSTPROFITS,OROTHERINCIDENTAL
ORCONSEQUENTIALDAMAGES.SOMESTATESDONOTALLOWLIMITATIONSONHOWLONG
ANIMPLIEDWARRANTYLASTS ORTHE EXCLUSION OF INCIDENTAL OR CONSEQUENTIAL
DAMAGES, SO THEABOVE LIMITATIONS OR EXCLUSIONS MAY NOTAPPLY TOYOU.THIS
WARRANTYGIVESYOUSPECIFICLEGALRIGHTS,ANDYOUMAYALSOHAVEOTHERRIGHTS,
WHICHVARYFROMSTATETOSTATE.THISWARRANTYISSUBJECTTOCHANGEWITHOUT
NOTICE.
CHECKWWW.VIZIO.COMFORTHEMOSTCURRENTVERSION.
Personal Data
If your VIZIO product is capable of storing personal data and other information, ALL
CONTENTS AND INFORMATION WILL BE DELETED IN THE COURSE OF SOME IN-HOME
ANDALL SHIP-INWARANTYSERVICE.Ifthisoccurs,yourproduct will be restored to you
conguredasoriginallypurchased.Youwillberesponsibleforrestoringallapplicabledata
andpasswords.RecoveryandreinstallationofuserdataisnotcoveredunderthisLimited
Warranty.Inordertoprotectyourpersonalinformation,VIZIOrecommendsthatyoualways
clearallpersonalinformationfromtheunitbeforeitisserviced,regardlessoftheservicer.
Zero Bright Pixel Defect Guarantee
This policy covers“zero bright pixel” defects for the duration of the limited“ONE YEAR
WARRANTY”onselectnewproductpurchases.Todetermineifthisguaranteeappliestoyour
product,refertothe“DETAILS”tab ofthemodel’sproductinformation page(www.VIZIO.
com)orlookforthe“zerobrightpixel”guaranteeonthebox.
LIMITED WARRANTY

VIZIO
QUICK
START
GUIDE
© 2012 VIZIO INC. ALL RIGHTS RESERVED.
111212ST-A
Other manuals for M320SL
1
This manual suits for next models
1
Table of contents
Other Vizio LED TV manuals

Vizio
Vizio E390i-A1 User manual

Vizio
Vizio M501d-A2R User manual

Vizio
Vizio Razor E241i-A1 User manual

Vizio
Vizio M3D460SR User manual

Vizio
Vizio E320-A0 User manual

Vizio
Vizio D43-D2 User manual

Vizio
Vizio E420i-A0 User manual

Vizio
Vizio 47" Class User manual

Vizio
Vizio M501d-A2R User manual

Vizio
Vizio E500i-A0 User manual

Vizio
Vizio M321i-A2 User manual

Vizio
Vizio M801d-A3 User manual

Vizio
Vizio M370SL User manual

Vizio
Vizio E320i-B0 User manual

Vizio
Vizio M3D470KD User manual

Vizio
Vizio M60-C3 User manual

Vizio
Vizio E550i-A0 User manual

Vizio
Vizio M501d-A2R User manual

Vizio
Vizio D32h-F1 User manual

Vizio
Vizio M471i-A2 User manual