VOCO V-Zone+ User manual
Voice Controlled Wireless Media System
V-Zone+ Quick Start Guide Apple
The VOCO V-Zone+ is a wireless music & video receiver. Simply connect the
V-Zone+ to any stereo, powered speakers, Home Theatre System or TV and
stream music & video any time.
You will be able to quickly access music and videos using just your smartphone
or tablet. Simply download the VOCO Controller App from The Apple App
Store®, and you’ll have instant access to YouTube®, media content on your
networked computers (including your iTunes® library), online music services,
and thousands of FREE internet radio stations.
Simply follow the 3 easy steps below and you will be streaming
music & video in only a few moments.

Step 1: Install the VOCO Apple App
Download the VOCO Controller App from the
Apple App Store® onto your Apple device.
Step 2: Setup VOCO V-Zone
OR
WiFi
Step 3: Congure VOCO V-Zone
Ethernet Setup:
If you are connecting your V-Zone+ to Ethernet, it will
setup automatically onto your network. To name your
device, open your VOCO Controller App on your Apple
device and walk through a short setup process to name
your V-Zone+.
To do this tap on the “Preferences” tab in the bottom
right corner, then VZones > vzone-##: > Congure
Player. Then follow the on screen instructions.
Wireless Setup:
If you are setting up your V-Zone+ over Wi please
walk through the following short setup process.
Setup V-Zone+ within range of your Wi network or
connect the V-Zone+ to your internet router using an
Ethernet cable (included). Then locate the antenna
inside the package and securely screw it into the back
of the V-Zone+. Next, connect the power cord to the
back of the V-Zone+ and plug it in. Finally connect
your V-Zone+ to any amplied audio device (stereo,
powered speakers, home theater, etc.) using the
supplied RCA audio cable.
*Important: Please ensure that the supplied RCA audio cable
is used. If alternative cable is used audio will only play out
of one side.
If you want to stream video to your TV using the
V-Zone+, connect the V-Zone+ to your TV using an
HDMI cable (not included), but this is not required to
stream music.

Step 1:
The first thing you need to do is to access the WiFi settings in
your Apple device. You can do this by tapping on the
settings icon and then tap on WiFi. Make sure that WiFi is
selected as “On”.
Step 2:
In this screen you will see a listing of available networks.
Look for the network that is titled “VOCO_CONFIG_00:”
connect your Apple device to that network. You will know
you are connected when there is a check mark next to the
network and you see [WiFi Image] in the very top menu bar
Step 3:
Once you are connected to the network open the VOCO
Controller App and you will be automatically taken to the
“VOCO V-Zone Configuration Wizard” screen. On the
opening screen click Next to continue.

Step 4:
Every VOCO media player that is setup on your network
needs to have a unique name, this makes it easy to identify
which VOCO media player you are currently streaming media
from or other available VOCO players on your network.
In this screen simply name your VOCO media player. You can
name your VOCO media player anything that you would like,
just not the name of an existing VOCO media player on your
network. Once you enter the name press the “Next” button.
Step 5:
In this screen tap on the box that says “Wireless Access
Points” and you will receive a pop-up window listing all of the
available wireless networks you have available.
Just select the wireless network that you want to connect
your VOCO media player to. (For a later example we would
select “NAVVO”) If it is a secure network, you will then need
to enter the network password and tap on the “Next” button.
*Please Note that if you have multiple, available networks,
remember which one that you selected because you will
need to know this later on in the configuration process.
Then follow the rest of the on screen instructions.
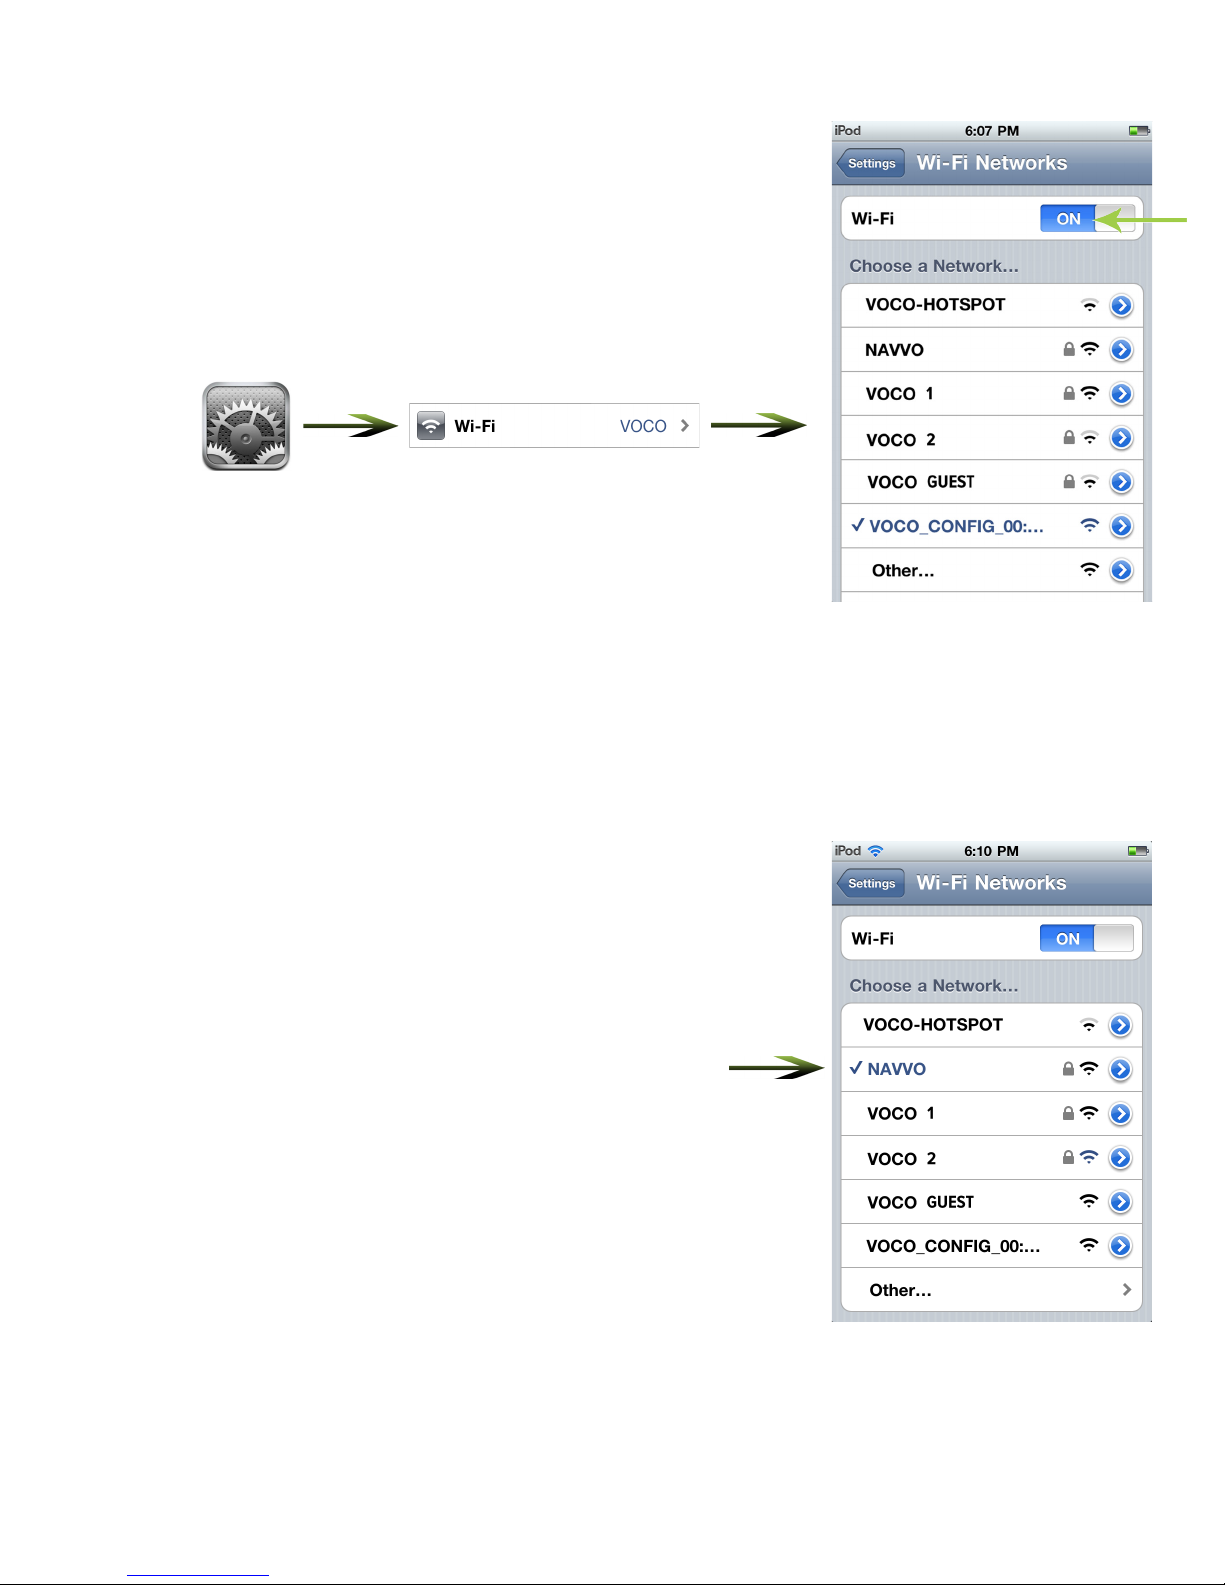
Step 6:
Once you finish the setup process you then need to access
the WiFi settings again as you did in Step 1. You can do this
by tapping on the settings icon and then tap on WiFi. The
network “VOCO_CONFIG_00:” should still be selected. This
time you will want to select the wireless network that you
used in Step 5 to setup your VOCO media player. In that
example we selected “NAVVO”
Step 7:
When you see that the network that you used to setup your
VOCO media player is highlighted in blue, with a check mark,
and indicates that you have a WiFi signal you are finished
setting up your VOCO media player. Now open up the VOCO
Controller App and you are ready to stream music.

Perform a Voice Search
Press and hold the VOCO “Press and Speak”
icon until a pop up window comes up then speak
the name of the Artist, Album, or Song you are
searching for. Release the icon and VOCO will search
your music library and return any matching results.
Simply tap on the returned results and select the
song you want to stream to your V-Zone+.
Optional: Install VOCO Computer Software
To access your music (including iTunes®) stored on your
computer, download VOCO software for either your PC or
Mac. You can do this by going to myvoco.com and clicking on
the support tab.
Get Started With
Support
Congratulations! You are now ready to use your VOCO V-Zone+ to quickly access
and stream music & video using the power of your voice! This includes videos from
YouTube® and thousands of FREE Internet Radio Stations.

Select a Music Source
There are 3 ways to select a music source in the VOCO Apple App
1.) In the bottom menu options tap on the
“Source” icon. A pop-up menu will be displayed
with the available music sources. Simply tap on
the music source that you would like to stream
music from.
Select a “Zone”
All available VOCO devices will be listed in the top
menu tray, when “Zones” is highlighted. Simply tap
on the zone that you would like to control, and it will
highlight in orange.
2.) In the top menu bar tap and hold down on the
name of the V-Zone+ that you are currently
connected to. A pop -up menu will appear with
the available music sources. Select the music
source you would like to stream music from.
3.) Tap on “Preferences”->VZones->Name of your
V-Zone->Music Source->select the music source
for your V-Zone+.
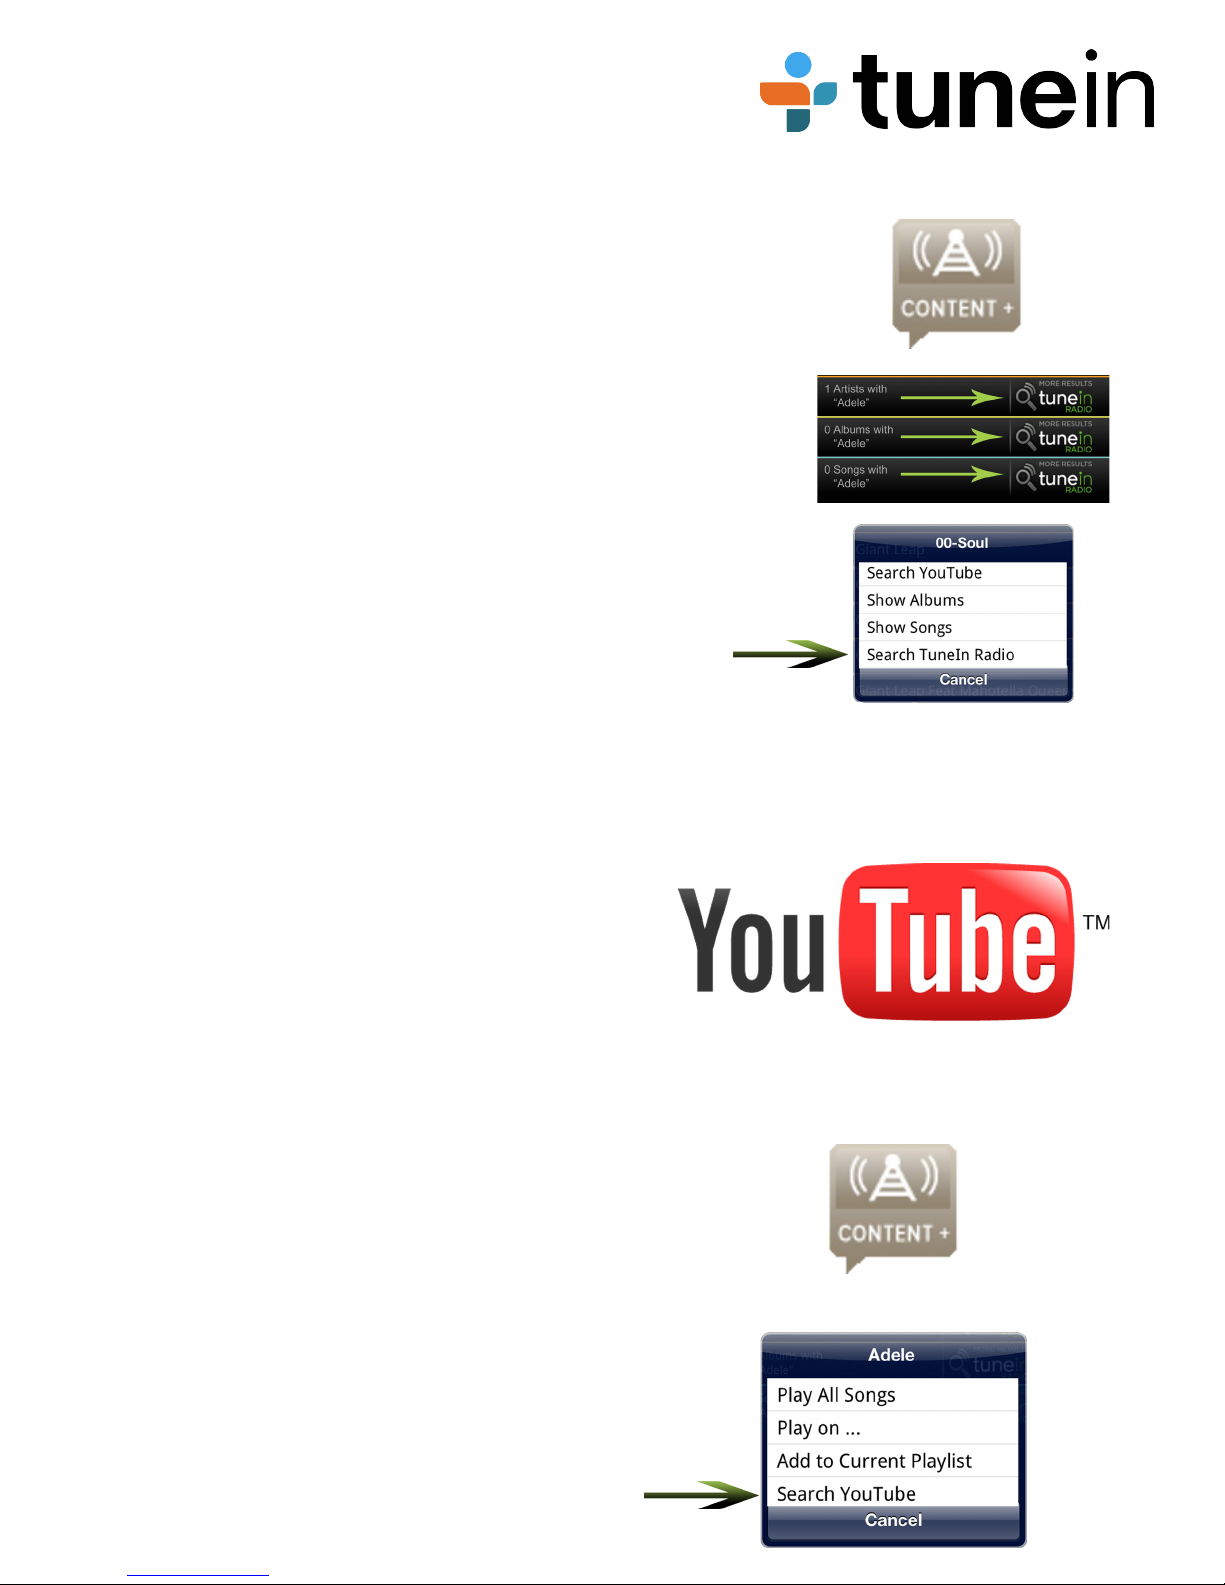
Browse Internet Radio Stations
There are 3 easy ways to use the VOCO Controller App
to easily access thousands of internet radio stations and
stream them to your V-Zone+:
1.) Simply tap on the Content+ Icon at the top of the screen
and select the online station you would like to stream music
from.
2.)Perform a voice search and instead of selecting the Artist,
Album, or Song results, simply tap on the icon to the right of
any of these 3 results.
3.)Simply hold down on any Artist, Album, or Song listing.
A pop-up window will appear. Select the “Search TuneIn
Radio” option.
Stream YouTube® Videos
There are 2 easy ways to use the VOCO Controller
App to stream YouTube® videos to your TV using
your V-Zone+:
1.) Simply tap on the Content+ Icon at the top of the
screen and then tap on the YouTube® Icon.
2.)Simply long press on any Artist, Album, or Song
listing, or on any Artist, Album, or Song search result
and a pop-up window will come up, simply select the
“Search YouTube” option.
The VOCO Voice Controller app also allows you to
use your V-Zone+ to stream YouTube® videos to your
TV.
You can search YouTube® for the music videos of the
songs you currently have in your music collection or
you can simply browse YouTube® and nd the videos
you would like to stream.

Play On Music Feature
The “Play On” feature of the VOCO Voice
Controller App allows you to stream music stored
on your Apple device to your VOCO V-Zone+. To
do this select “This Device” as your Zone, then
press and hold any Artist, Album, or Song. A
window will come up, tap on the option to “Play
on...” and in the next window select the V-Zone+
that you would like to stream the music to.
Front Indicator Lights
The lights on the front of the V-Zone+ provide an
indication of the current status of the V-Zone+. The
dierent colors mean:
RED - Lights solid when booting up, ashes during
conguration. Lights solid and ashes while
updating.
BLUE - Lights solid while streaming music.
Periodically ashes while updating.
ORANGE - The V-Zone+ is connected to Ethernet
Green - Lights solid when connected to a network.
Periodically ashes when starting up and looking for
a network.

To download the latest VOCO User Manual please visit our website at:
www.myvoco.com
If you have any questions please visit the FAQ’s section of our website by clicking on
the Support Tab, and then FAQ’s.
Or contact us at:
Call Us at: 888-879-VOCO (8626)
V-ZONE+
Table of contents
Other VOCO Media Player manuals


Popular Media Player manuals by other brands

Denver
Denver MPG-4054 NR user manual

Pioneer
Pioneer CDJ-900NXS quick start guide
 Authorizing guide")
Sony
Sony NW-HD5 Operating Instructions (English) Authorizing guide

Dune HD
Dune HD TV-303D quick start guide

AudioEngine
AudioEngine B-Fi quick start guide

Seagate
Seagate STCEA101-RK - FreeAgent Theater - Digital AV... Specifications


