Norden NVS-40020111PL User manual

www.nordencommunication.com
1U Multi-channel Media Player
User Manual
with CD/USB/FM/Bluetooth
NVS-40020111PL
About this User Manual
Please keep this User Manual in good custody for future use.
This symbol on the rear panel indicates matters needing
attentions. Please use or operate the product in accordance with
corresponding instructions.
.
About the Manual
The instruction is used from the development completion date of the 1U Multi-channel Media
Player with CD/USB/FM/Bluetooth NVS-40020111PL
. The instruction includes product
introduction, precautions for use, instructions for system connection, instructions for product
use, and technical indicators of the product and other contents of the terminal. Prior to
connection, installation and use, the user shall carefully read the instruction, and conduct
operation according to indication in the instruction.
The in
structions with the label on the rear panel of the machine are the matters to be noticed.
Please conduct use or operation according to these instructions during use.
Please properly keep the instruction in case of need.

About the Manual
installation and use.
NVS-50010508EV (System host)
NVS-50020508EV (Extended host)
NVS-5003PM16EV (Remote paging MIC)
NVS-5007EX16EV (Extended keyboard for remote paging MIC)
NVS-5004FM04EV (Fireman MIC)
Do Not OpenPositioning
Positioning
Connection
When abnormal conditions are realized
Precautions in Operation
Do Not Open
Power source/Power cable
Other Precautions
Warning
Please read the following prior to operation.
The following basic requirements must be strictly observed, to avoid potential personal injury and
equipment or property damages to you or any person nearby. The basic requirements include without
limitation to the following:
•
Please disconnect the device from power source by
pulling the plug other than the power cord. Pulling
the power cord may result in damages.
•
Please keep the power cord away from heat source.
Do not over-bend the power cord or place it
anywhere it can be stepped on or may cause to trip.
•
This is connected to power source via the plug and
any failure or danger occurs, the user can
disconnect the device from power source by pulling
out the plug out from the socket, therefore, it is
required that the power socket should be located
somewhere with easy access.
•
The device is not completely disconnected from
power source when it is switched to “OFF”. For sake
of safety, please disconnect the device from the
socket if it is not in use.
•
Please disconnect the device from power source
immediately in case the power cord is worn or
damaged or if the sound is suddenly cut off or any
abnormal odor or smoke comes out from the
device, and then have the device inspected and
repaired by professional personnel.
•
Please do NOT insert any finger into any gap or
opening of the device.
•
Please prevent foreign objects (paper, plastics or
metal etc.) from being inserted or falling into any
gap or opening of the device. In such case, please
cut off power source immediately.
•
Please do NOT put the body or any heavy object on
the device and do NOT operate the buttons or
switches or connections with excessive force.
•
Please disconnect the device from power source
before relocating the device.
•
For avoiding deformation of panels and damages to
internal components, please do NOT place the
device where there is heavy dust or violent
vibration, or where it is extremely cold or hot.
•
Please keep this device off water drops or splash or
vase filled with water or any other articles of similar
nature.
•
Please disconnect other equipment from power
source before they are connected to this product.
Please tune volume to its minimum level before the
device is powered ON or OFF.
•
All terminals on the device marked with are
dangerous and charged, and should be connected
by trained personal
•
Please do not remove the cover of the equipment,
otherwise you may get an electric shock.
•
Do Not attempt to remove any internal component
from the device, or to modify the equipment in
whatever manner. In case of any abnormal
condition, please stop using the device immediately
and have it inspected and repaired by professional
personnel.
•
Our company shall not be responsible for data loss
or damages due to improper use of unauthorized
modification to the device.
•
The images and screen display in this Manual are
only for description and may be different from
screen images in actual operation. The screen
display depends on the product.
Matters Needing Attention
Positioning

NVS Voice Evacuation System supports timing programming and manual oper
-
-
exhibition halls.
1.2 Features
•Meet the European Voice Alarm Control and Indicating Equipment Standards and 3CF
•
in emergencies;
•
status;
•
•
operation;
•
•
•Support emergency broadcast dual-audio output and background broadcast without
•
•
•
•
system;
•With dry contacts and override plug-in power output to provide trigger signal sources
•
zones
•
•
etc.;
•With 6 external audio inputs and 1 XLR output;
CONTENTS
I.
PRODUCT DESCRIPTION ............................................................................................................................... 1
1.1
INTRODUCTION TO THE DEVICE................................................................................................................ 1
1.2
FEATURES ................................................................................................................................................... 1
II.
APPEARANCE DESCRIPTION ........................................................................................................................ 2
2.1
FRONT PANEL ............................................................................................................................................. 2
2.2
REAR PANEL................................................................................................................................................ 3
III.
CONNECTION DIAGRAME............................................................................................................................. 4
IV.
INSTRUCTIONS............................................................................................................................................. 5
PACKING LIST ..................................................................................................................................................... 8
SPECIFICATION................................................................................................................................................... 9
DIAGRAM..

NORDEN -
Multi-channel Media Player
User Manual
1
2.1 Product display
NVS-50010508EV Host
NVS-50020508EV Extended Host
2.2 Features
•
inemergencies;
•
•
•
•
music playback; 1-channel output to connect extender or backup records;
•
•
•
•8 trigger inputs (dry contacts and electrical level optional); 8 dry contacts trigger
•
record view and impedance testing parameters setting;
CONTENTS
I.
PRODUCT DESCRIPTION ............................................................................................................................... 1
1.1
INTRODUCTION TO THE DEVICE................................................................................................................ 1
1.2
FEATURES ................................................................................................................................................... 1
II.
APPEARANCE DESCRIPTION ........................................................................................................................ 2
2.1
FRONT PANEL ............................................................................................................................................. 2
2.2
REAR PANEL................................................................................................................................................ 3
III.
CONNECTION DIAGRAME............................................................................................................................. 4
IV.
INSTRUCTIONS............................................................................................................................................. 5
PACKING LIST ..................................................................................................................................................... 8
SPECIFICATION................................................................................................................................................... 9
I. PRODUCT DESCRIPTION
1.1 INTRODUCTION TO THE DEVICE
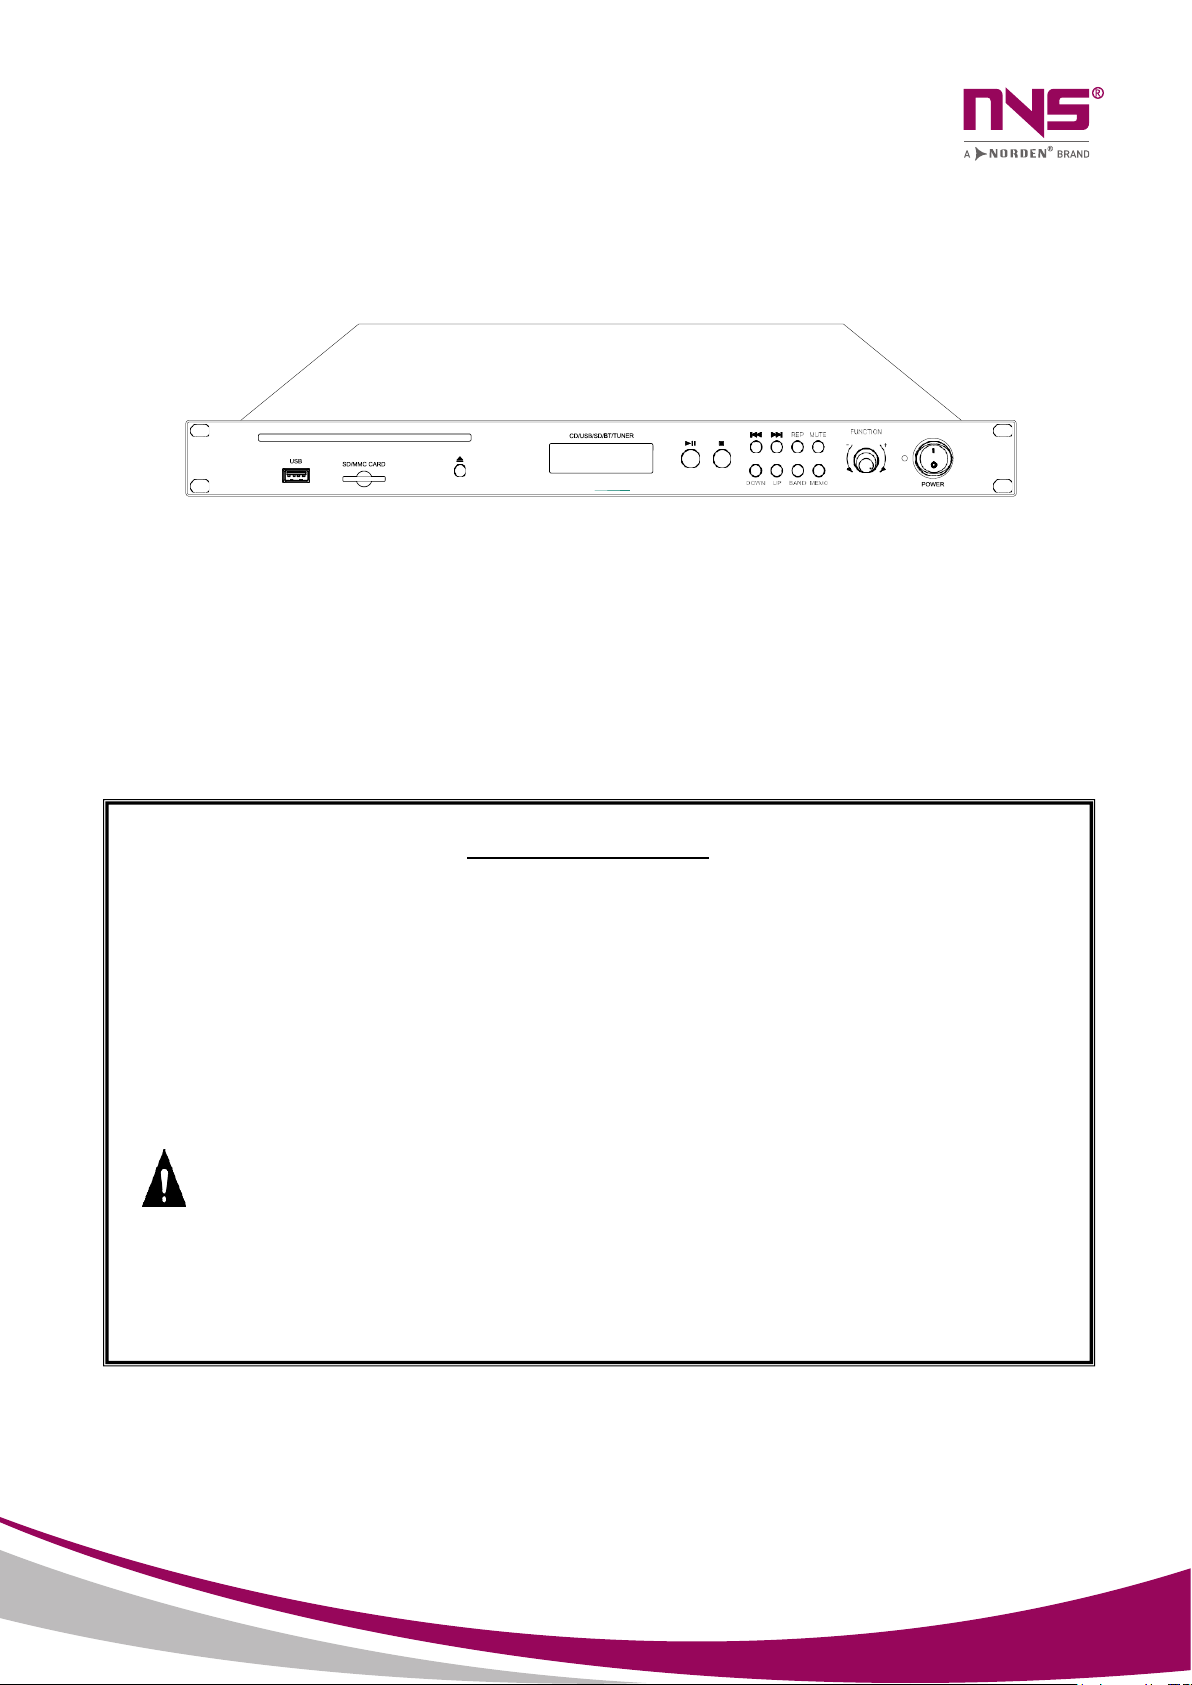
The NVS-40020111PL is an audio player with CD playback, radio and Bluetooth function. It supports a variety
of audio playback, including CD, USB, SD, Bluetooth and radio signals; has full light touch button control and
blue LCD display with high brightness to display clear working status of the audios; has one-way Bluetooth
output, one-way radio signal output, one-way CD/MP3 audio output, and one-way alternative output of
Bluetooth, radio signal or CD/MP3 audios, which meets various requirements in the application scenes.
1.2FEATURES
Full light touch button control, blue LCD display with high brightness and clear screen;
With MP3 player, built-in USB interface, SD slot, CD disc tray;
High-end CD suction movement;
Bluetooth function;
CD/MP3/MP4/VCD/DVD playback function;
Built-in radio function, digital radio module with high sensitivity;
With automatic search radio and storage function, AM/FM radio can store 40 stations respectively;
The radio has a power-off memory function, which can start to work automatically after powered on;
One-way Bluetooth output, one-way radio signal output, and one-way CD/MP3 audio output;
One-way alternative output of Bluetooth, radio signal or CD/MP3 audios.
Support remote control via the IR remote controller.
NORDEN -
Multi-channel Media Player
User Manual 2
2.3 Front panel
•
•
main powersupply;
•
calibration modeling;
•
• Equipment working status display: work/ fault /normal;
• External SD card interface, which can expand 8G storage space; external audio source,
recording, log, built-in EVAC voice, etc.;
• With monitoring function, built-in recording function, built-in timing programming function,
which can regularly program dry contacts to control power sequencer switch ;
• Can output dual audio simultaneously to ensure background playback is not aected by
emergency or business broadcast;
NVS-50010508EV Host
NVS-50020508EV Extended Host
I. PRODUCT DESCRIPTION
1.1 INTRODUCTION TO THE DEVICE
The NVS-40020111PL is an audio player with CD playback, radio and Bluetooth function. It supports a variety
of audio playback, including CD, USB, SD, Bluetooth and radio signals; has full light touch button control and
blue LCD display with high brightness to display clear working status of the audios; has one-way Bluetooth
output, one-way radio signal output, one-way CD/MP3 audio output, and one-way alternative output of
Bluetooth, radio signal or CD/MP3 audios, which meets various requirements in the application scenes.
1.2FEATURES
Full light touch button control, blue LCD display with high brightness and clear screen;
With MP3 player, built-in USB interface, SD slot, CD disc tray;
High-end CD suction movement;
Bluetooth function;
CD/MP3/MP4/VCD/DVD playback function;
Built-in radio function, digital radio module with high sensitivity;
With automatic search radio and storage function, AM/FM radio can store 40 stations respectively;
The radio has a power-off memory function, which can start to work automatically after powered on;
One-way Bluetooth output, one-way radio signal output, and one-way CD/MP3 audio output;
One-way alternative output of Bluetooth, radio signal or CD/MP3 audios.
Support remote control via the IR remote controller.
II. APPEARANCE DESCRIPTION
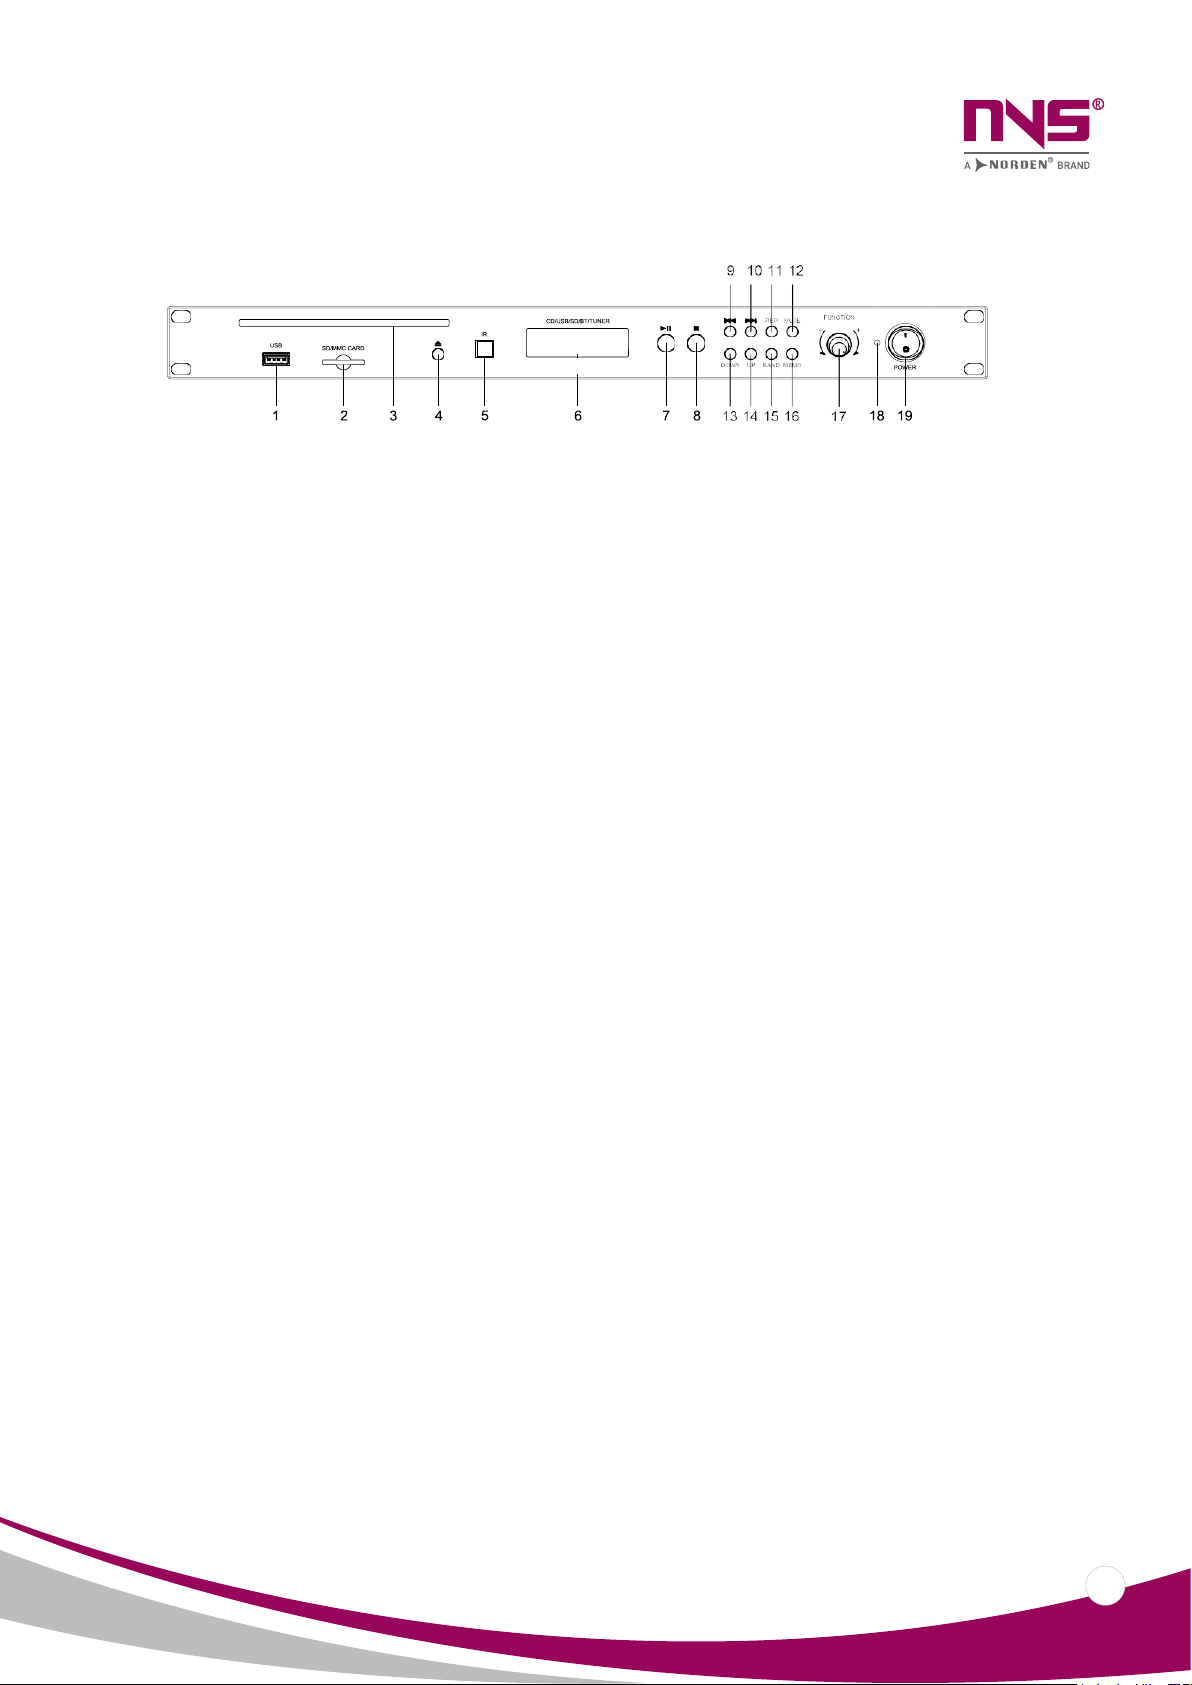
2.1 FRONT PANEL
1.
USB Interface
The USB interface is used to connect a USB flash drive
to provide programs to the device;
Note: The USB interface only supports U disk 2.0, and
the audio file must be placed in the root directory to
be recognized.
2.
SD Card Slot
Insert the SD card here and play the SD card source;
Note: The audio file must be placed in the root
directory to be recognized.
3.
Built-in CD Disc Tray
Put the CD disc here and play the CD audio source.
4.
Disc IN/OUT
Press the button on the right side of the CD disc door
to eject the CD disk tray then you can replace the CD
disc and press the button again to automatically enter
the disc (Note: Please do not use excessive force to
put the CD into the tray to avoid damage to the CD
movement.
5.
IR Remote Control
6.
LCD display
Display the working status and operating status of the
device. If the device is not operated within one minute,
the screen will automatically switch to protection
status.
7.
Play/Pause
In DISC and Bluetooth playback, press this button to
play/pause it.
8.
Stop
In DISC/Bluetooth mode, pressing the STOP button
during playback will stop the playback; in the radio
mode, pressing the STOP button will get into silence.
9.
Previous Song/(Previous Station in AM/FM)
In the U disk, CD, SD card and Bluetooth playback state,
press this button to switch to the “Previous Song”;
In the radio mode, press this button to play the
“Previous Station” of the stored station;
10.
Next Song/(Next Station in AM/FM)
In the U disk, CD, SD card and Bluetooth playback state,
press this button to switch to the “Next Song”;
In the radio mode, press this button to play the “Next
Station” of the stored station;
11.
CD Playback Mode Switch Button
The playback mode switching sequence includes
sequential playback, single loop, loop playback and
single play.
12.
Mute
Press this button to switch between mute and unmute.
13.
Trim Down
Each time you press the button, the receiving
frequency will be reduced by one step. (one step for FM
is 0.1kHz, for AM 9kHz).
If you press and hold this button for 1 second, it will
automatically search for the radio channel from high
frequency to low frequency. Press this button again to
stop the search and automatically stop when you
search for a clear channel.
14.
Trim Up
Each time you press the button, the receiving
frequency will be increased by one step. (one step for
FM is 0.1kHz, for AM 9kHz).
If you press and hold this button for 1 second, it will
automatically search for the radio channel from low
frequency to high frequency. Press this button again to
stop the search and automatically stop when you
search for a clear channel.

NORDEN -
Multi-channel Media Player
User Manual
3
1—Host/extended host AC power indicator;
•Green - indicates the host/extended host AC power isnormal;
•
2—Host/extended host backup power indicator;
• Green- indicates the host/extended host backup power supply is normal;
•
•
3—Host / extended host connection status indicator;
• Green - indicates the equipment is connected properly;
•
with NVS50010508EV;
a. Host: not connected with NVS-5006SW08EV and normally connected with
extended host
b. Extended host: not established a logical or physical connection with the host
• Yellow- indicates the host has not established a logical or physical connection with
extended host;
4—Remote paging mic connection status indicator;
• Green - indicates the equipment is working now;
•
• Yellow- indicates the equipment has not established a logical or physical connection
with the host;
5—System status indicator;
•
•
does not mean that all modules are normal
6—Emergency MIC status indicator;
• Green - indicates the MIC is working;
•
•
remote paging station);
8—Voice evacuation switch;
• Flashing red - indicates the system is currently in emergency mode;
•
• Response status;
be normal ;
II. APPEARANCE DESCRIPTION
2.1 FRONT PANEL
1.
USB Interface
The USB interface is used to connect a USB flash drive
to provide programs to the device;
Note: The USB interface only supports U disk 2.0, and
the audio file must be placed in the root directory to
be recognized.
2.
SD Card Slot
Insert the SD card here and play the SD card source;
Note: The audio file must be placed in the root
directory to be recognized.
3.
Built-in CD Disc Tray
Put the CD disc here and play the CD audio source.
4.
Disc IN/OUT
Press the button on the right side of the CD disc door
to eject the CD disk tray then you can replace the CD
disc and press the button again to automatically enter
the disc (Note: Please do not use excessive force to
put the CD into the tray to avoid damage to the CD
movement.
5.
IR Remote Control
6.
LCD display
Display the working status and operating status of the
device. If the device is not operated within one minute,
the screen will automatically switch to protection
status.
7.
Play/Pause
In DISC and Bluetooth playback, press this button to
play/pause it.
8.
Stop
In DISC/Bluetooth mode, pressing the STOP button
during playback will stop the playback; in the radio
mode, pressing the STOP button will get into silence.
9.
Previous Song/(Previous Station in AM/FM)
In the U disk, CD, SD card and Bluetooth playback state,
press this button to switch to the “Previous Song”;
In the radio mode, press this button to play the
“Previous Station” of the stored station;
10.
Next Song/(Next Station in AM/FM)
In the U disk, CD, SD card and Bluetooth playback state,
press this button to switch to the “Next Song”;
In the radio mode, press this button to play the “Next
Station” of the stored station;
11.
CD Playback Mode Switch Button
The playback mode switching sequence includes
sequential playback, single loop, loop playback and
single play.
12.
Mute
Press this button to switch between mute and unmute.
13.
Trim Down
Each time you press the button, the receiving
frequency will be reduced by one step. (one step for FM
is 0.1kHz, for AM 9kHz).
If you press and hold this button for 1 second, it will
automatically search for the radio channel from high
frequency to low frequency. Press this button again to
stop the search and automatically stop when you
search for a clear channel.
14.
Trim Up
Each time you press the button, the receiving
frequency will be increased by one step. (one step for
FM is 0.1kHz, for AM 9kHz).
If you press and hold this button for 1 second, it will
automatically search for the radio channel from low
frequency to high frequency. Press this button again to
stop the search and automatically stop when you
search for a clear channel.
15.
AM/FM Band Selection
Press the “BAND” button to switch between “AM” and
“FM”.
16.
MEMO
Press the “MEMO” button to store FM/AM station.
17.
Function/Volume
Press this button to switch to Bluetooth status, press
this button again to switch to CD playback status, press
this button again to switch to the radio status.
Rotate the button clockwise to increase the volume
and counterclockwise to decrease the volume
18.
Power Indicator
When the power is turned on, the indicator light is in
steady blue
19.
Power Switch
The switch is off at the “O” position and on at the “I”
position.
Note: The USB/SD/CD/Bluetooth function of this player only has audio outputs, but no video
output function.
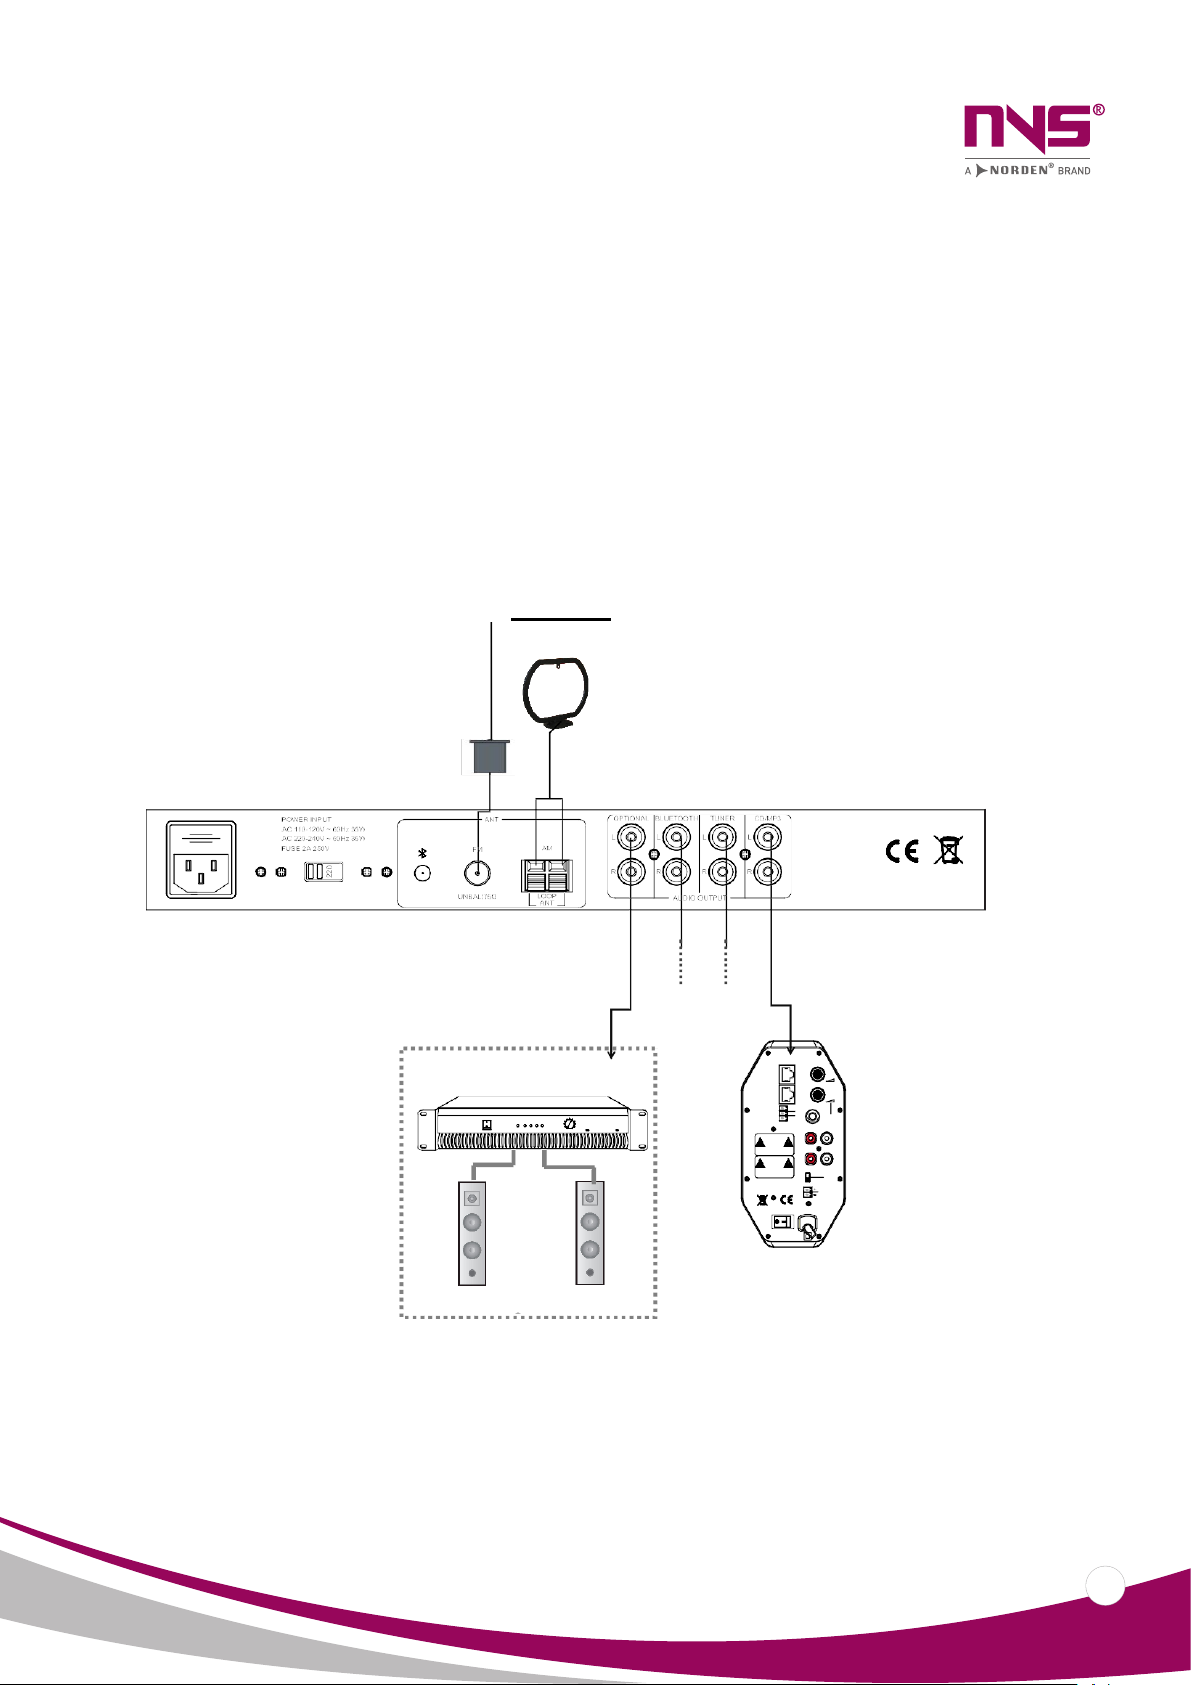
2.2 REAR PANEL
1.
Power outlet
2.
AC110V/220V Option Switch
Used to select the voltage operating state.
3.
Bluetooth Antenna
4.
FM Antenna Input Interface
Use a wire to connect this interface to the outside or to the antenna.
5.
AM Antenna Input Interface
Connected to a wire that can distinguish polarity correctly, and note that the polarity of
both ends should be the same.
6.
Alternative Output Interface
This line can choose to output CD/MP3, Bluetooth or radio signal audios, but does not
support mixing output.
7.
Bluetooth Output Interface
This line outputs the audio sources of Bluetooth device.
NORDEN -
Multi-channel Media Player
User Manual 4
timing point;
10/11—EVAC voice message status indicator;
•
•
•
12/13—Line audio source indicator / selection key;
•
• The MP3 on the host corresponds to the SD card audio on the rear panel; the MP3 on
•
14—Speaker zone status indicator;
•
•
speaker zone modeling;
15—Zone background playback indicator;
16—Zone emergency MIC or remote paging station indicator;
or add new zones;
Instruction: you can manually close zones that do not need to be paged or add new
zones;
18—Zone switch;
Instruction:
Instruction: it is divided into 6 gears
Master volume controller; 22/23—
Treble / Bass controller; 24—
Aviation socket;
25—Emergency MIC sensitivity controller; 26—
Monitor speaker output volume controller;
15.
AM/FM Band Selection
Press the “BAND” button to switch between “AM” and
“FM”.
16.
MEMO
Press the “MEMO” button to store FM/AM station.
17.
Function/Volume
Press this button to switch to Bluetooth status, press
this button again to switch to CD playback status, press
this button again to switch to the radio status.
Rotate the button clockwise to increase the volume
and counterclockwise to decrease the volume
18.
Power Indicator
When the power is turned on, the indicator light is in
steady blue
19.
Power Switch
The switch is off at the “O” position and on at the “I”
position.
Note: The USB/SD/CD/Bluetooth function of this player only has audio outputs, but no video
output function.
2.2 REAR PANEL
1.
Power outlet
2.
AC110V/220V Option Switch
Used to select the voltage operating state.
3.
Bluetooth Antenna
4.
FM Antenna Input Interface
Use a wire to connect this interface to the outside or to the antenna.
5.
AM Antenna Input Interface
Connected to a wire that can distinguish polarity correctly, and note that the polarity of
both ends should be the same.
6.
Alternative Output Interface
This line can choose to output CD/MP3, Bluetooth or radio signal audios, but does not
support mixing output.
7.
Bluetooth Output Interface
This line outputs the audio sources of Bluetooth device.
8.
Radio Signal Output Interface
This line outputs the audio sources of radio signal.
9.
CD/MP3 Output Interface
This line outputs the audio sources of CD/MP3.
III. CONNECTION DIAGRAME
FM antenna
Note: 4-way audio output interfaces can be connected to power amplifiers or active speakers.
AM antenna
NVS-40020111PL Audio
Player
Power
Amplifier
LAN1
VOL
LAN2
MIC
VOL
RS485
GND
B
A
MIC
5
Publ ic Addre ss
Amp lifie r
4
3
8
1
POWERCLIPSIGNAL
PROTTEMP
010 PR OF ESSIO N AL
AMPL IF IE R
VO LU ME
CAUT I ON!
AUX
lN
R
L
RISK OF ELECTRIC
SHO C K
DO NOT OPEN
AU X
OUT
MONOCHANNEL
STEREO
SPEAKE
R
OU TP U T
(4Ω)
POWE R ~220V/50Hz/100W
Active
Speaker
Speake
r
Power
Speaker
Active

NORDEN -
Multi-channel Media Player
User Manual
5
status light is yellow. Pull this switch up and then pull it down to recalibrate the
the zone is closed when calibrating the model;
• extended host:
on the switch is the highest binary bit and "5" is the lowest binary bit. For the
17—XLR input;
• Connects to MIC input signal;
20—Host audio output;
•
1 2 3 4
8.
Radio Signal Output Interface
This line outputs the audio sources of radio signal.
9.
CD/MP3 Output Interface
This line outputs the audio sources of CD/MP3.
III. CONNECTION DIAGRAME
FM antenna
Note: 4-way audio output interfaces can be connected to power amplifiers or active speakers.
AM antenna
NVS-40020111PL Audio
Player
Power
Amplifier
LAN1
VOL
LAN2
MIC
VOL
RS485
GND
B
A
MIC
5
Publ ic Addre ss
Amp lifie r
4
3
8
1
POWERCLIPSIGNAL
PROTTEMP
010 PR OF ESSIO N AL
AMPL IF IE R
VO LU ME
CAUT I ON!
AUX
lN
R
L
RISK OF ELECTRIC
SHO C K
DO NOT OPEN
AU X
OUT
MONOCHANNEL
STEREO
SPEAKE
R
OU TP U T
(4Ω)
POWE R ~220V/50Hz/100W
Active
Speaker
Speake
r
IV. INSTRUCTIONS
This device can play CD, VCD, MP3 and other audio sources. As for this device, the audio
source is provided by CD, VCD, MP3, SD card, USB flash drive, Bluetooth device and radio
station.
1.
Audio playback mode switching: press “FUNCTION” button, the digital screen will display DISC-
FM / AM-BT in sequence; in the DISC state, the CD, SD card and USB interface audio source can be
played. If the device has a sound source connected to a CD, SD card or USB interface, press the
“FUNCTION” button, the digital screen will display CD, SD or USB instead of DISC; in the radio state, the
device can perform AM/FM band radio operation; and in the BT state, the device is in Bluetooth mode.
2.
CD/USB/SD card source priority: in the DISC playback state, CD, SD card and USB interface audio
source can be played, and the audio source will have priority: CD>USB>SD card; whether the interface
has access to the audio source device, the device will read the CD, USB and SD card in the order of the
audio source priority from high to low and play automatically in the DISC playback mode. If the CD has
no audio source, it will continue to read the USB audio source, and so on; to prioritize USB audio
source, you must ensure that the CD player has no audio source device; to prioritize SD card audio
source, you must ensure that the CD player and USB interface have no audio source device (Note:
when playing a USB source, the access CD source will not be read; when playing the SD card source, the
access CD or USB source will not be read).
3.
Bluetooth mode: press the “FUNCTION” button to display the BT text on the digital screen. Please
turn on the Bluetooth device switch of the mobile phone and computer to search the Bluetooth device,
find the “NVS-40020111PL” device name for pairing, and play the sound source of the mobile phone
and computer when the pairing is successful (“Connected!” will be displayed on the digital screen after
the device is successfully paired with the mobile phone and the computer), with excellent wireless
transmission function less than10m.
4.
Play/Pause: when the device is in DISC / BT / audio playback state, press the “ ” button to
play/pause the playback, and the screen displays “PLAYING / PAUSE”. In the radio mode, this button is
invalid.
5.
Stop Platback: in Disc/BT/Radio mode press the button during playback to stop playing screen will
display “Stop” press again and the audio will start playing from the beginning in the radio mode the
radio station will be muted.
6.
Song selection: Press “” or “” button to play the previous or next song.
press the button

NORDEN -
Multi-channel Media Player
User Manual 6
Model NVS-50010508EV NVS-50020508EV
Rated output power 500W 100V
Input
sensitivity
Emergency mic 5mV 600 ——
sensitivity Line 1000mV 10k
Harmonic
distortion
Emergency mic <1% 1kHz ——
distortion Line <1% 1kHz
Freq.
response
Emergency mic 80Hz-15kHz ±3dB ——
response Line 50Hz-18kHz ±3dB
Signal to
noise ratio
Emergency mic >75dB A weighting ——
noise ratio Line >80dB A weighting
Line output
Output voltage 1000mV ——
Line output Frequency range 80Hz-15kHz ±3dB
——
Harmonic distortion <1% 1kHz ——
System
connection
control
contact
output/input
System fault relay output Short circuit, no voltage
System
connection
Emergency mode relay output Short circuit, no voltage
connection
control
Fire reset input Short circuit, t 0.5S, no voltage
control
contact
8 channel dry contact output Short circuit, no voltage
contact
output/input
8 dry
cont act input
Short circuit mode Short circuit input, no voltage
output/input
cont act input
Level mode 3.3V~24V
Voice
message
Data format WAV ——
Voice
message
Storage form SD card ——
message Storage time >10 years ——
Working
power
AC AC 220-240V/50-60Hz
power DC DC 24V/30A
Package size (L*W*H) 550×510×215mm
Machine size (L*W*H) 483×420×132mm
G.W. 14kg 13.3kg
N.W. 12.05kg 11.75kg
This specification is subject to change without notice.
IV. INSTRUCTIONS
This device can play CD, VCD, MP3 and other audio sources. As for this device, the audio
source is provided by CD, VCD, MP3, SD card, USB flash drive, Bluetooth device and radio
station.
1.
Audio playback mode switching: press “FUNCTION” button, the digital screen will display DISC-
FM / AM-BT in sequence; in the DISC state, the CD, SD card and USB interface audio source can be
played. If the device has a sound source connected to a CD, SD card or USB interface, press the
“FUNCTION” button, the digital screen will display CD, SD or USB instead of DISC; in the radio state, the
device can perform AM/FM band radio operation; and in the BT state, the device is in Bluetooth mode.
2.
CD/USB/SD card source priority: in the DISC playback state, CD, SD card and USB interface audio
source can be played, and the audio source will have priority: CD>USB>SD card; whether the interface
has access to the audio source device, the device will read the CD, USB and SD card in the order of the
audio source priority from high to low and play automatically in the DISC playback mode. If the CD has
no audio source, it will continue to read the USB audio source, and so on; to prioritize USB audio
source, you must ensure that the CD player has no audio source device; to prioritize SD card audio
source, you must ensure that the CD player and USB interface have no audio source device (Note:
when playing a USB source, the access CD source will not be read; when playing the SD card source, the
access CD or USB source will not be read).
3.
Bluetooth mode: press the “FUNCTION” button to display the BT text on the digital screen. Please
turn on the Bluetooth device switch of the mobile phone and computer to search the Bluetooth device,
find the “NVS-40020111PL” device name for pairing, and play the sound source of the mobile phone
and computer when the pairing is successful (“Connected!” will be displayed on the digital screen after
the device is successfully paired with the mobile phone and the computer), with excellent wireless
transmission function less than10m.
4.
Play/Pause: when the device is in DISC / BT / audio playback state, press the “ ” button to
play/pause the playback, and the screen displays “PLAYING / PAUSE”. In the radio mode, this button is
invalid.
5.
Stop Platback: in Disc/BT/Radio mode press the button during playback to stop playing screen will
display “Stop” press again and the audio will start playing from the beginning in the radio mode the
radio station will be muted.
6.
Song selection: Press “” or “” button to play the previous or next song.
1
2
7.
Playback mode: the device has the following settings for several playback modes:
Press the REP button in the playback state to set the playback mode. The playback mode switching
sequence is order playback, single loop, loop playback, and single playback.
8.
Station selection: this machine provides two ways of station selection: direct station selection and
storage number invocation.
Direct station selection: press the BAND button to select the received band; press the UP or
DOWN button to search for the radio channel from low frequency to high frequency or from
high frequency to low frequency. Each time you press the button, the receiving frequency
will be increased by one step. (one step for FM is 0.1kHz, for AM 9kHz). The radio frequency
range of the local FM band is 87.00MHz-108.00MHz, and the radio frequency range of the
AM band is 522kHz-1620kHz. If the UP or DOWN button is pressed for more than 1 second,
it will enter the automatic search state, and the receiving frequency will increase or
decrease continuously. If the automatic search has continued for one week (referred to the
frequency value reached is the same as the one when the search is started) without a
station searched, it will stop searching.
Storage number invocation: first press the BAND button to select the received band; press
the MEMO storage button, the screen will display the “CH0 0” character, and the “ ”
button, the screen will display the “CH0 1” character and press this button continuously to
increment and invoke the storage station from 1 to 40, and press the “ ” button, the
screen will display the “CH40” character and press this button continuously to diminish and
invoke storage station from 40 to 1. If the stored station has a signal, it will play
automatically.
9.
Station storage: press the UP or DOWN button to search the radio channel from low frequency to
high frequency or from high frequency to low frequency. When the device receives the radio signal,
press the MEMO storage button, the screen will display “CH0 0” character, and press the “ ”
button screen will display “CH0 1” character, and press this button continuously to increase the
storage number from 1 to 40, and press “ ” button, the screen will display “CH40” character, and
press this button continuously to decrease the number from 40 to 1. After selecting the station
storage number, press the “MEMO” button again to store the currently displayed radio channel, and
the screen will display the “CH” character to indicate that the storage is successful, and the same
station takes the last storage operation as valid storage.

NORDEN -
Multi-channel Media Player
User Manual
7
3.1 Product display
NVS-5003PM16EV Remote pager NVS-5007EX16EV Extended keyboard
3.2 Features
•
•
•
•
•
•
1
2
7.
Playback mode: the device has the following settings for several playback modes:
Press the REP button in the playback state to set the playback mode. The playback mode switching
sequence is order playback, single loop, loop playback, and single playback.
8.
Station selection: this machine provides two ways of station selection: direct station selection and
storage number invocation.
Direct station selection: press the BAND button to select the received band; press the UP or
DOWN button to search for the radio channel from low frequency to high frequency or from
high frequency to low frequency. Each time you press the button, the receiving frequency
will be increased by one step. (one step for FM is 0.1kHz, for AM 9kHz). The radio frequency
range of the local FM band is 87.00MHz-108.00MHz, and the radio frequency range of the
AM band is 522kHz-1620kHz. If the UP or DOWN button is pressed for more than 1 second,
it will enter the automatic search state, and the receiving frequency will increase or
decrease continuously. If the automatic search has continued for one week (referred to the
frequency value reached is the same as the one when the search is started) without a
station searched, it will stop searching.
Storage number invocation: first press the BAND button to select the received band; press
the MEMO storage button, the screen will display the “CH0 0” character, and the “ ”
button, the screen will display the “CH0 1” character and press this button continuously to
increment and invoke the storage station from 1 to 40, and press the “ ” button, the
screen will display the “CH4 0” character and press this button continuously to diminish and
invoke storage station from 40 to 1. If the stored station has a signal, it will play
automatically.
9.
Station storage: press the UP or DOWN button to search the radio channel from low frequency to
high frequency or from high frequency to low frequency. When the device receives the radio signal,
press the MEMO storage button, the screen will display “CH0 0” character, and press the “ ”
button screen will display “CH0 1” character, and press this button continuously to increase the
storage number from 1 to 40, and press “ ” button, the screen will display “CH4 0” character, and
press this button continuously to decrease the number from 40 to 1. After selecting the station
storage number, press the “MEMO” button again to store the currently displayed radio channel, and
the screen will display the “CH” character to indicate that the storage is successful, and the same
station takes the last storage operation as valid storage.
V. Remote Controller
• Mode: Used for switching among radio, DISC and Bluetooth.
• Power: Used to turn on and off the screen.
• EQ button: Used for switching between AM and FM in the
radio mode.
• Previous/Fine-tuning down/Search up: It is the Previous
button in the DISC mode; short press for fine-tuning down
and long press for auto searching in the radio mode.
Play/Pause button: It is used to play or pause the audio in the
DISC mode and Bluetooth mode; ineffective in the radio
mode.
Next/Fine-tuning up/Search down: It is the Next button in the
DISC mode; short press for fine-tuning up and long press for
auto searching in the radio mode.
Volume + / Volume - button: Used to increase/decrease the
volume.
• Mute button: Mute all output audios.
• Play mode button: Used to switch the play mode in the DISC mode, including order play, single
cycle, loop play and single play.
• 0-9 numeric button: Used to select a song in the DISC mode. Press the corresponding number
to select the corresponding track; form a channel selection channel in the radio mode. First
press the number 0 button before selecting channel 1~4 (like 01).
• Exit/Storage button: It is the DSIC Tray out button in the DISC mode; it is the channel storage
button in the FM radio mode. First press the Storage button and press the number 0 button and
the corresponding number button before storing channel 1-4 to save the current frequency as
channel 1-4; first press the Storage button and press the corresponding number button before
storing channel 5 and above to save the channel.
8
NORDEN -
Multi-channel Media Player
User Manual 8
NVS-5003PM16EV Remote pagerr NVS-5007EX16EV Extended keyboardr
3.3 Front panel
1—Power indicator;
• On - indicates the power supply is normal;
•
•
3—MIC rod socket;
• Paging is allowed when the red LED indicator is on;
Note: 4—
Paging start key;
• MIC paging controller;
Instruction:
①
indicator is on);
②
③
otherwise the
④
selected 5—Select all key;
• When MIC is not paging:
①
②
key again to deselect all zones.
• When MIC is paging:
①When working in zone mode:
V. Remote Controller
• Mode: Used for switching among radio, DISC and Bluetooth.
• Power: Used to turn on and off the screen.
• EQ button: Used for switching between AM and FM in the
radio mode.
• Previous/Fine-tuning down/Search up: It is the Previous
button in the DISC mode; short press for fine-tuning down
and long press for auto searching in the radio mode.
Play/Pause button: It is used to play or pause the audio in the
DISC mode and Bluetooth mode; ineffective in the radio
mode.
Next/Fine-tuning up/Search down: It is the Next button in the
DISC mode; short press for fine-tuning up and long press for
auto searching in the radio mode.
Volume + / Volume - button: Used to increase/decrease the
volume.
• Mute button: Mute all output audios.
• Play mode button: Used to switch the play mode in the DISC mode, including order play, single
cycle, loop play and single play.
• 0-9 numeric button: Used to select a song in the DISC mode. Press the corresponding number
to select the corresponding track; form a channel selection channel in the radio mode. First
press the number 0 button before selecting channel 1~4 (like 01).
• Exit/Storage button: It is the DSIC Tray out button in the DISC mode; it is the channel storage
button in the FM radio mode. First press the Storage button and press the number 0 button and
the corresponding number button before storing channel 1-4 to save the current frequency as
channel 1-4; first press the Storage button and press the corresponding number button before
storing channel 5 and above to save the channel.
8
PACKING LIST
No.
List Quantity
1
NVS-40020111PL
1 piece
2
M5*19 whole machine fixing screw
4 pieces
3
SY542 wire (AV terminal audio wire)
1 piece
4
FM antenna
1 piece
5
User manual
1 copy
6
Plastic washer
4 pieces
7
Power cord
1 piece
8
AM antenna and antenna mount
1 set
9
2.4G Bluetooth antenna
1 piece
10 Remote Controller
1 piece

NORDEN -
Multi-channel Media Player
User Manual
9
3.1 Product display
NVS-5003PM16EV Remote pager NVS-5007EX16EV Extended keyboard
3.2 Features
•
•
•
•
•
•
PACKING LIST
No.
List
Quantity
1
NVS-40020111PL
1 piece
2
M5*19 whole machine fixing screw
4 pieces
3
SY542 wire (AV terminal audio wire)
1 piece
4
FM antenna
1 piece
5
User manual
1 copy
6
Plastic washer
4 pieces
7
Power cord
1 piece
8
AM antenna and antenna mount
1 set
9
2.4G Bluetooth antenna
1 piece
10
Remote Controller
1 piece
SPECIFICATION
Model NVS-
40020111PL
Laser Player Maximum output voltage 1KHz
-10dB signal
1000±100mV
Frequency response range
20-19KHz(±1dB)
THD
≤0.3%
Noise
≤0.02mv
USB Maximum output voltage 1000±100mV
Frequency response range
20-19KHz(±1dB)
THD ≤0.3%
Noise ≤0.02mv
SD
Maximum output voltage 1000±100mV
Frequency response range 20-19KHz(±1dB)
THD ≤0.3%
Noise ≤0.02mv
Bluetooth
Maximum output voltage 1KHz
-10dB
1000±100mv
Frequency response range 20-19KHz(±2dB)
THD
≤0.3%
Noise
≤0.06mV
Distance
Best within 10M
Radio
function
(FM/AM)
Maximum output voltage
1200±100mV
Amplitude limiting
sensitivity
-80dB
Frequency response range
40-10KHz(±3dB)
Distortion
≤0.2%
SNR
≥60dB
Store/Memory function 40 pcs
Protection AC fuse
Power supply
AC110-120V/60Hz/35W AC220-240V/50Hz/35W
Outer packing
dimension
(mm)
(L×W×H) 534×350×110
Machine
dimension (mm)
(L×W×H) 483×210×44
Gross weight
4.4kg
Net weight
3.65kg
The performance specifications are subject to changes without notice.

NORDEN -
Multi-channel Media Player
User Manual 10
NVS-5003PM16EV Remote pagerr NVS-5007EX16EV Extended keyboardr
3.3 Front panel
1—Power indicator;
• On - indicates the power supply is normal;
•
•
3—MIC rod socket;
• Paging is allowed when the red LED indicator is on;
Note: 4—
Paging start key;
• MIC paging controller;
Instruction:
①
indicator is on);
②
③
otherwise the
④
selected 5—Select all key;
• When MIC is not paging:
①
②
key again to deselect all zones.
• When MIC is paging:
①When working in zone mode:
SPECIFICATION
Model
NVS-
40020111PL
Laser Player
Maximum output voltage 1KHz
-10dB signal
1000±100mV
Frequency response range
20-19KHz(±1dB)
THD
≤0.3%
Noise
≤0.02mv
USB
Maximum output voltage
1000±100mV
Frequency response range
20-19KHz(±1dB)
THD
≤0.3%
Noise
≤0.02mv
SD
Maximum output voltage
1000±100mV
Frequency response range
20-19KHz(±1dB)
THD
≤0.3%
Noise
≤0.02mv
Bluetooth
Maximum output voltage 1KHz
-10dB
1000±100mv
Frequency response range
20-19KHz(±2dB)
THD
≤0.3%
Noise
≤0.06mV
Distance
Best within 10M
Radio
function
(FM/AM)
Maximum output voltage
1200±100mV
Amplitude limiting
sensitivity
-80dB
Frequency response range
40-10KHz(±3dB)
Distortion
≤0.2%
SNR
≥60dB
Store/Memory function
40 pcs
Protection
AC fuse
Power supply
AC110-120V/60Hz/35W AC220-240V/50Hz/35W
Outer packing
dimension
(mm)
(L×W×H) 534×350×110
Machine
dimension (mm)
(L×W×H) 483×210×44
Gross weight
4.4kg
Net weight
3.65kg
The performance specifications are subject to changes without notice.
Cautions
The device is not completely disconnected from power source when it is switched to “OFF”. For
sake of safety, please disconnect the device from the socket if it is not in use.
The device cannot be subject to water droplets or splashes and any items like vases filled with
water cannot be placed on this device.
Do not open the cover of the machine to prevent the electric shock. If necessary, it shall be
repaired by the professional with the professional certificate.
The terminal marked with a symbol in the device indicates that it is dangerous and charged.
The connecting operation of these terminals shall be performed by the trained staff.
The device is connected to the power grid via the power cord plug, so the connection between
the device and the power grid can be cut off by unplugging the power cord plug in case of any
fault or danger. Therefore, the power outlet is required to be mounted at a place where theplug
of the power cords can be easily unplugged or plugged.

NORDEN -
Multi-channel Media Player
User Manual
11
3.1 Product display
NVS-5003PM16EV Remote pager NVS-5007EX16EV Extended keyboard
3.2 Features
•
•
•
•
•
•
Cautions
The device is not completely disconnected from power source when it is switched to “OFF”. For
sake of safety, please disconnect the device from the socket if it is not in use.
The device cannot be subject to water droplets or splashes and any items like vases filled with
water cannot be placed on this device.
Do not open the cover of the machine to prevent the electric shock. If necessary, it shallbe
repaired by the professional with the professional certificate.
The terminal marked with a symbol in the device indicates that it is dangerous and charged.
The connecting operation of these terminals shall be performed by the trained staff.
The device is connected to the power grid via the power cord plug, so the connection between
the device and the power grid can be cut off by unplugging the power cord plug in case of any
fault or danger. Therefore, the power outlet is required to be mounted at a place where theplug
of the power cords can be easily unplugged or plugged.

Table of contents


