Vocollect SRX User manual
Click here for more information about Bluetooth® wireless technology.
Product notes
Procedures
Specifications
Vocollect part numbers
Product notes
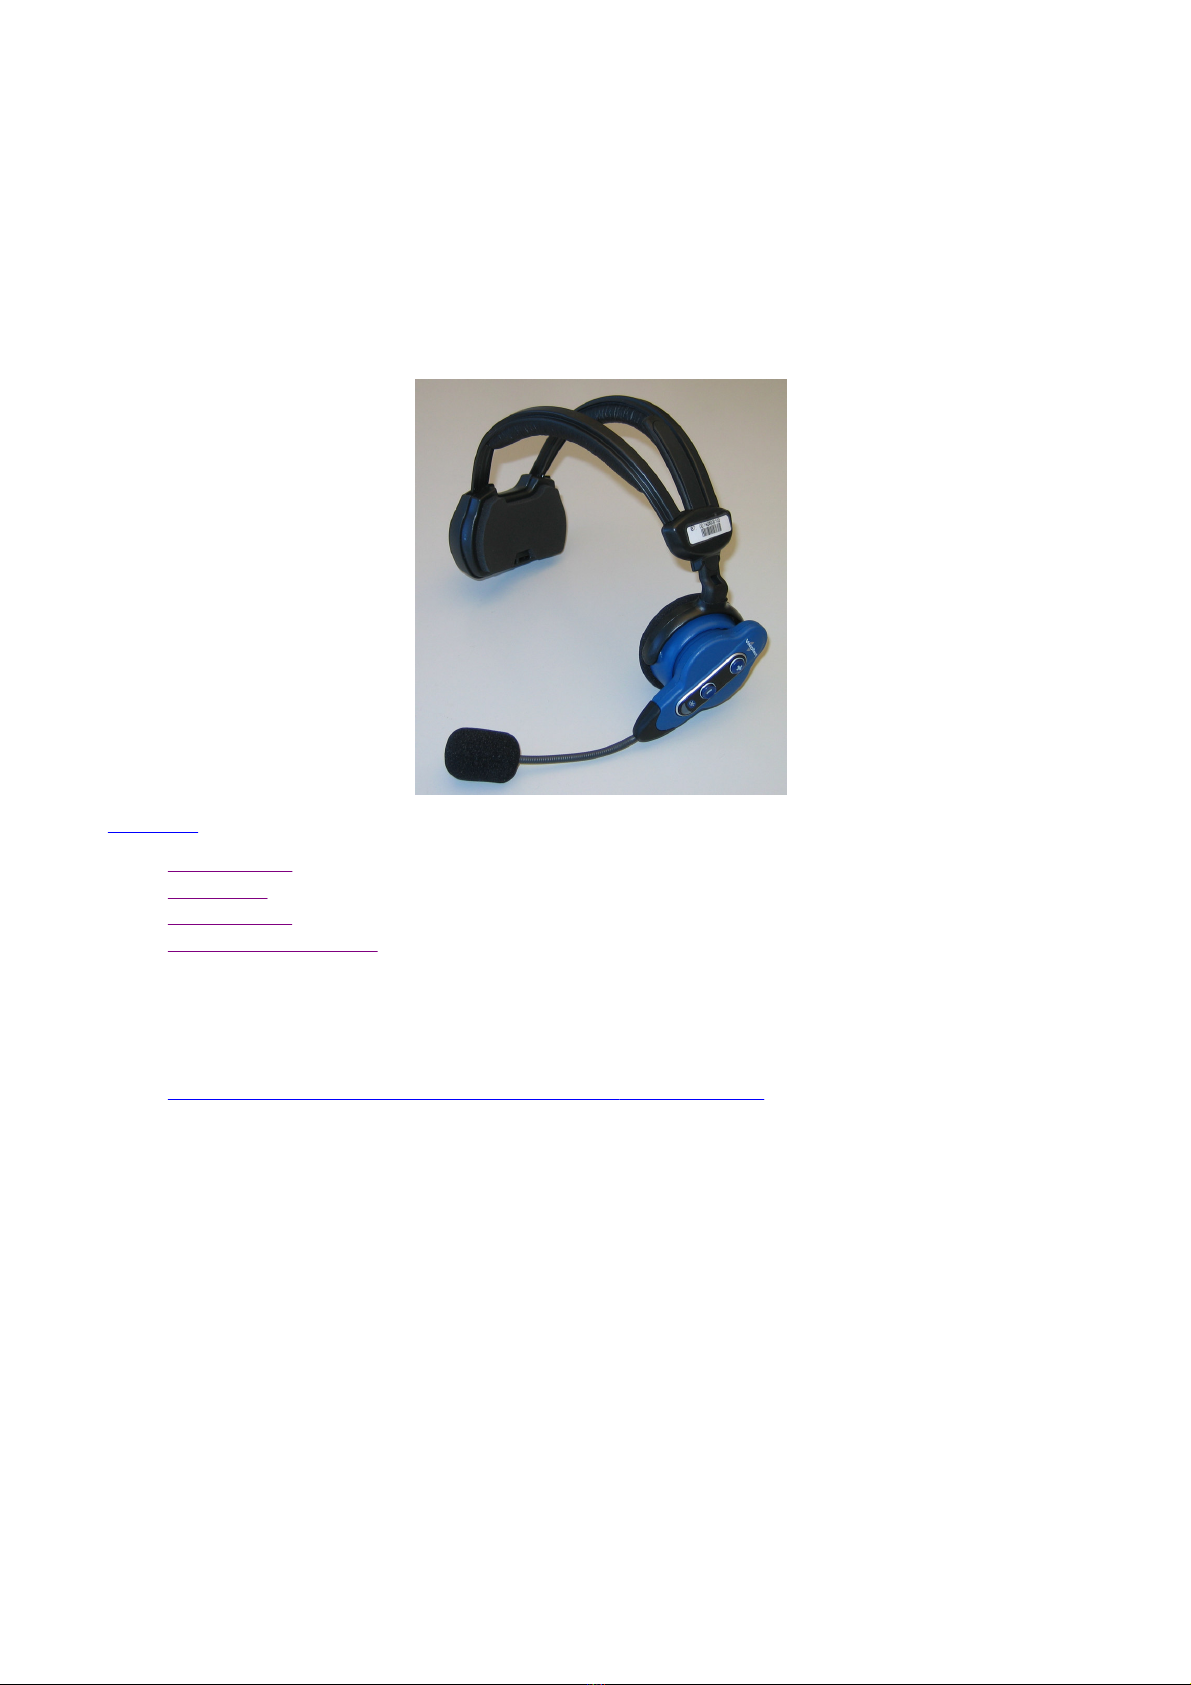
This headset contains a bidirectional noise canceling microphone for optimal noise cancellation.
Click here to iew microphone information for SR-Series headsets.
Headset components are sealed to pre ent corrosion.
Dual strap, padded, stainless steel headbands increase comfort and stability.
The ear cup, designed to pi ot ertically and horizontally, can be worn on either ear.
Foam ear pads are designed for quick replacement.
A padded Velcro® strap fits across the back of the user's head to pro ide extra stability.
A rotating le er on the outside of the earpiece allows the user to mo e the microphone up and down
without causing stress on microphone or boom.
Microphone position is repeatable. A groo e catches the boom, placing it in the proper position when
the boom is swi eled down for operation.
Use the flexible end of the boom to make fine adjustments to microphone itself.
Do not swi el the boom by the flexible end. Use the rotating le er on the outside of the earpiece.
Each headset and microphone unit comes with a windscreen. The microphone has a retention
feature that holds the windscreen in place.
Vocollect
VocollectVocollect
Vocollect®
® ®
® SRX Wireless Headset
SRX Wireless Headset SRX Wireless Headset
SRX Wireless Headset
with Bluetooth
with Bluetoothwith Bluetooth
with Bluetooth®
® ®
® Wireless
Wireless Wireless
Wireless
Technology
TechnologyTechnology
Technology
SRx Wireless Headset
29/8/2007
Note: Vocollect strongly discourages sharing headsets among operators. Assigning one headset to each
operator reduces the likelihood that germs will pass between operators.
Procedures
Wearing and Remo ing the Headset
Pairing
Replacing Ear Pads
Replacing the Headband Pads
Caring for Headsets and Microphones
Specifications
For additional specifications, see SRX Version and Compliance.
Vocollect part numbers
The Bluetooth word mark and logos are owned by the Bluetooth SIG, Inc. and any use of such marks by
Vocollect is under license. Other trademarks and trade names are those of their respecti e owners.
Appro ed for use in the following countries: U.S.A., Canada, and all EU and EFTA member states.
Operating
temperature
0°C to 40°C (32°F to
104
°
F)
Storage
temperature
-40° to 70°C (-40°F to
158
°
F)
Enclosure rating
Meets IP54
Humidity
100% condensing
Headset, Vocollect® SRX Speech
Recognition, with Bluetooth® Wireless
Technology
#HD-800-
1
Stabilizer Strap, Behind-the-Head, SRX
Headset
#MS-800-
1
Maintenance Kit, SRX Wireless Headset
(Contents: 25 foam ear pads, 30 headband
pads & 10 ear pad mounting disks)
#HD-801-
101
Earpads, Foam with Mounting Disks, SRX
Headsets
#HD-800-
105b
22
SRx Wireless Headset
29/8/2007

SRx Wireless Headset
29/8/2007
1517-07-2211
0107899029302751
“Este equipamento opera em caráter secundário,
isto é, não tem direito a proteção contra
interferência prejudicial, mesmo de estações do
mesmo tipo, e não pode causar interferência a
sistemas operando em caráter primário.”
mesmo tipo, e não pode causar interferência a
modelo: HD-800-1
SR-10, 20, 30, and 40-Series Headsets
SRX Wireless Headset
Removing a Headset
Wearing an SR-10, 20, 30, and 40-Series Headset
To wear a headset:
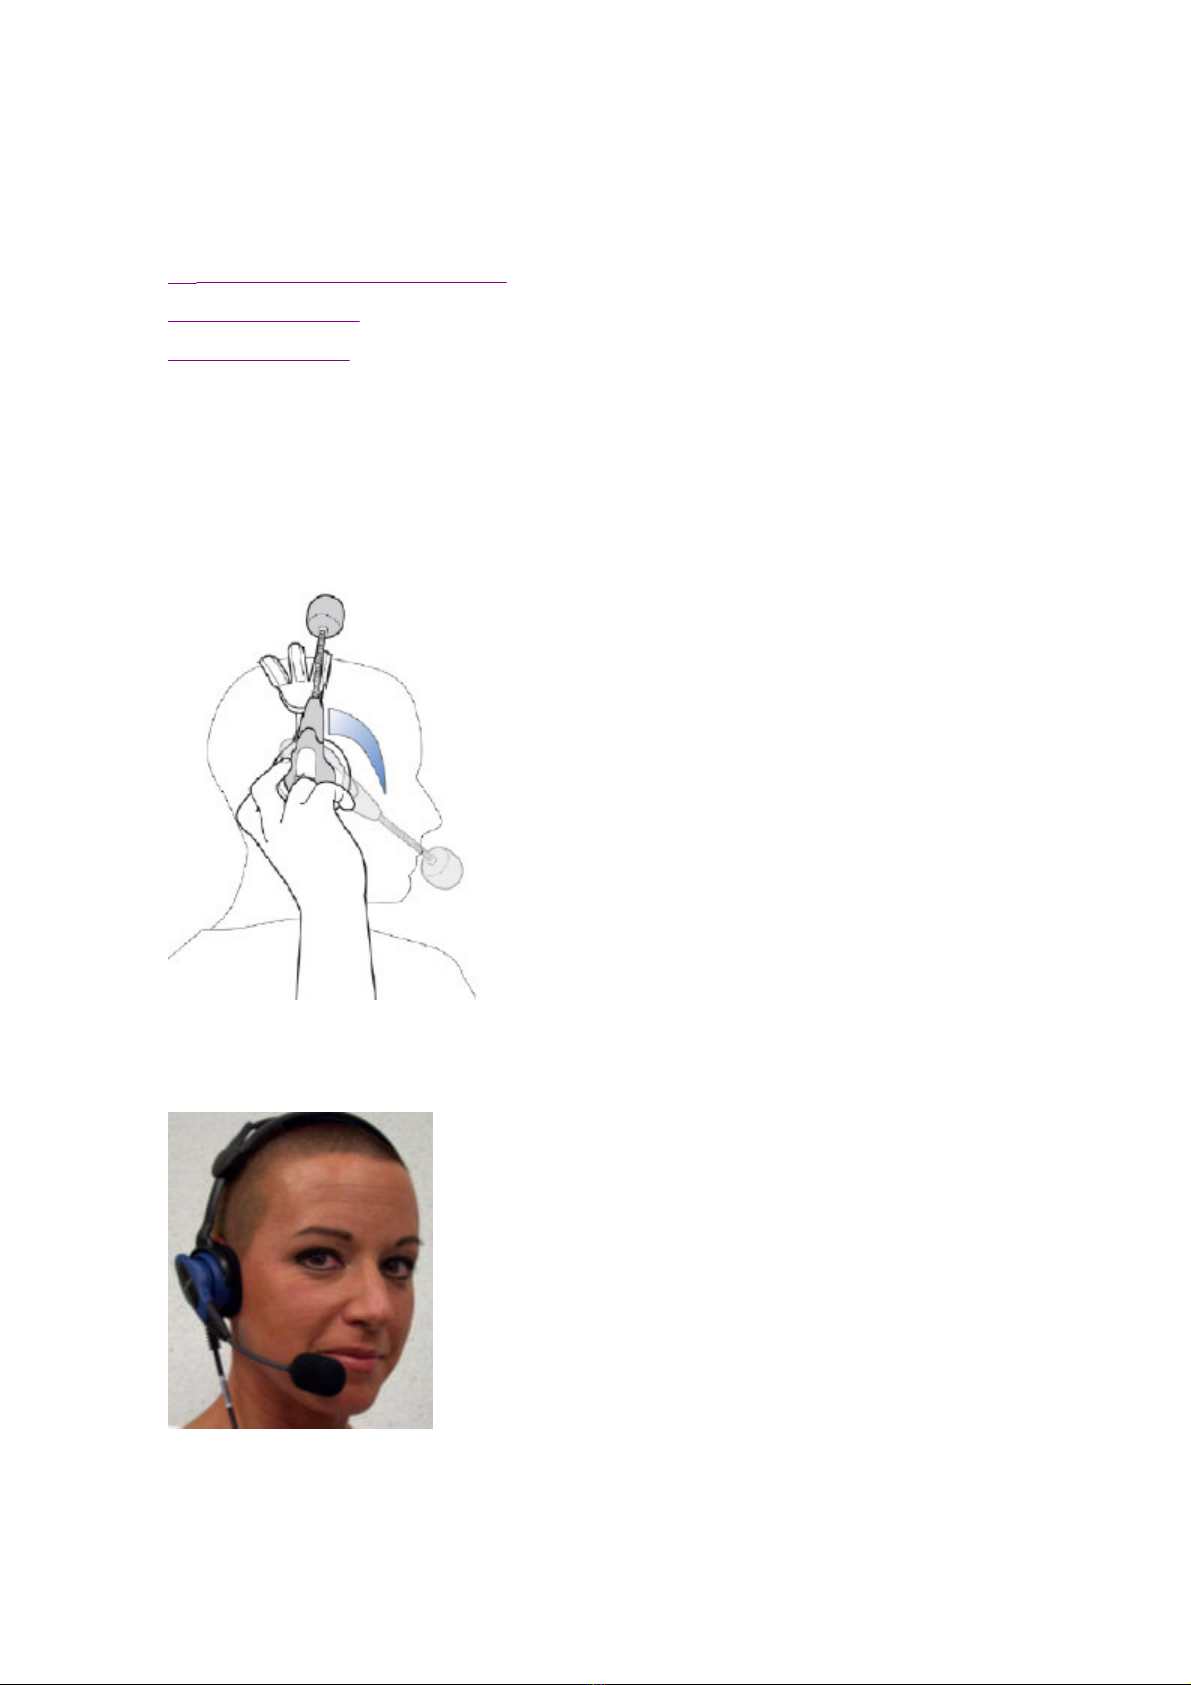
1. Put the headset on and adjust the ear ad to fit snugly over your ear. (For the Hard Hat Headset,
first insert the headset bracket into the left or right slot on the hardhat, then ut on the hardhat.)
2. Swing the micro hone into osition with the rotating lever at the ear iece.
3. Make final adjustments with the flexible boom so that the micro hone is ositioned at the corner of
your mouth, about 1/4" away from your face.
Note: Make sure that there is a windscreen on the microphone. A windscreen improves
performance.
Note: A dot (or the word "talk") on the microphone faces your mouth when the microphone is
positioned properly.
Wearing and Removing SR
Wearing and Removing SRWearing and Removing SR
Wearing and Removing SR-
--
-Series
Series Series
Series
Headsets
HeadsetsHeadsets
Headsets
Page
1
of
4
Wearing and Removing SR
-
Series Headsets
29/8/2007

4. Cli the headset wire to collar and belt.
Let the wire fall down your back, and cli it to the belt near the terminal. When using a terminal
cover, it is recommended that you cli the bottom cli directly onto the cover.
5. Connect the headset to the terminal.
Wearing an SRX Wireless Headset
To wear an S X wireless headset:
1. Loosen the Velcro® stra .
2.
Put the headset on and adjust the ear ad to fit snugly over your ear. Be sure to osition the battery
com artment directly above your other ear.
3.
Adjust the Velcro stra so it fits securely across the back of your head.
Page
2
of
4
Wearing and Removing SR
-
Series Headsets
29/8/2007
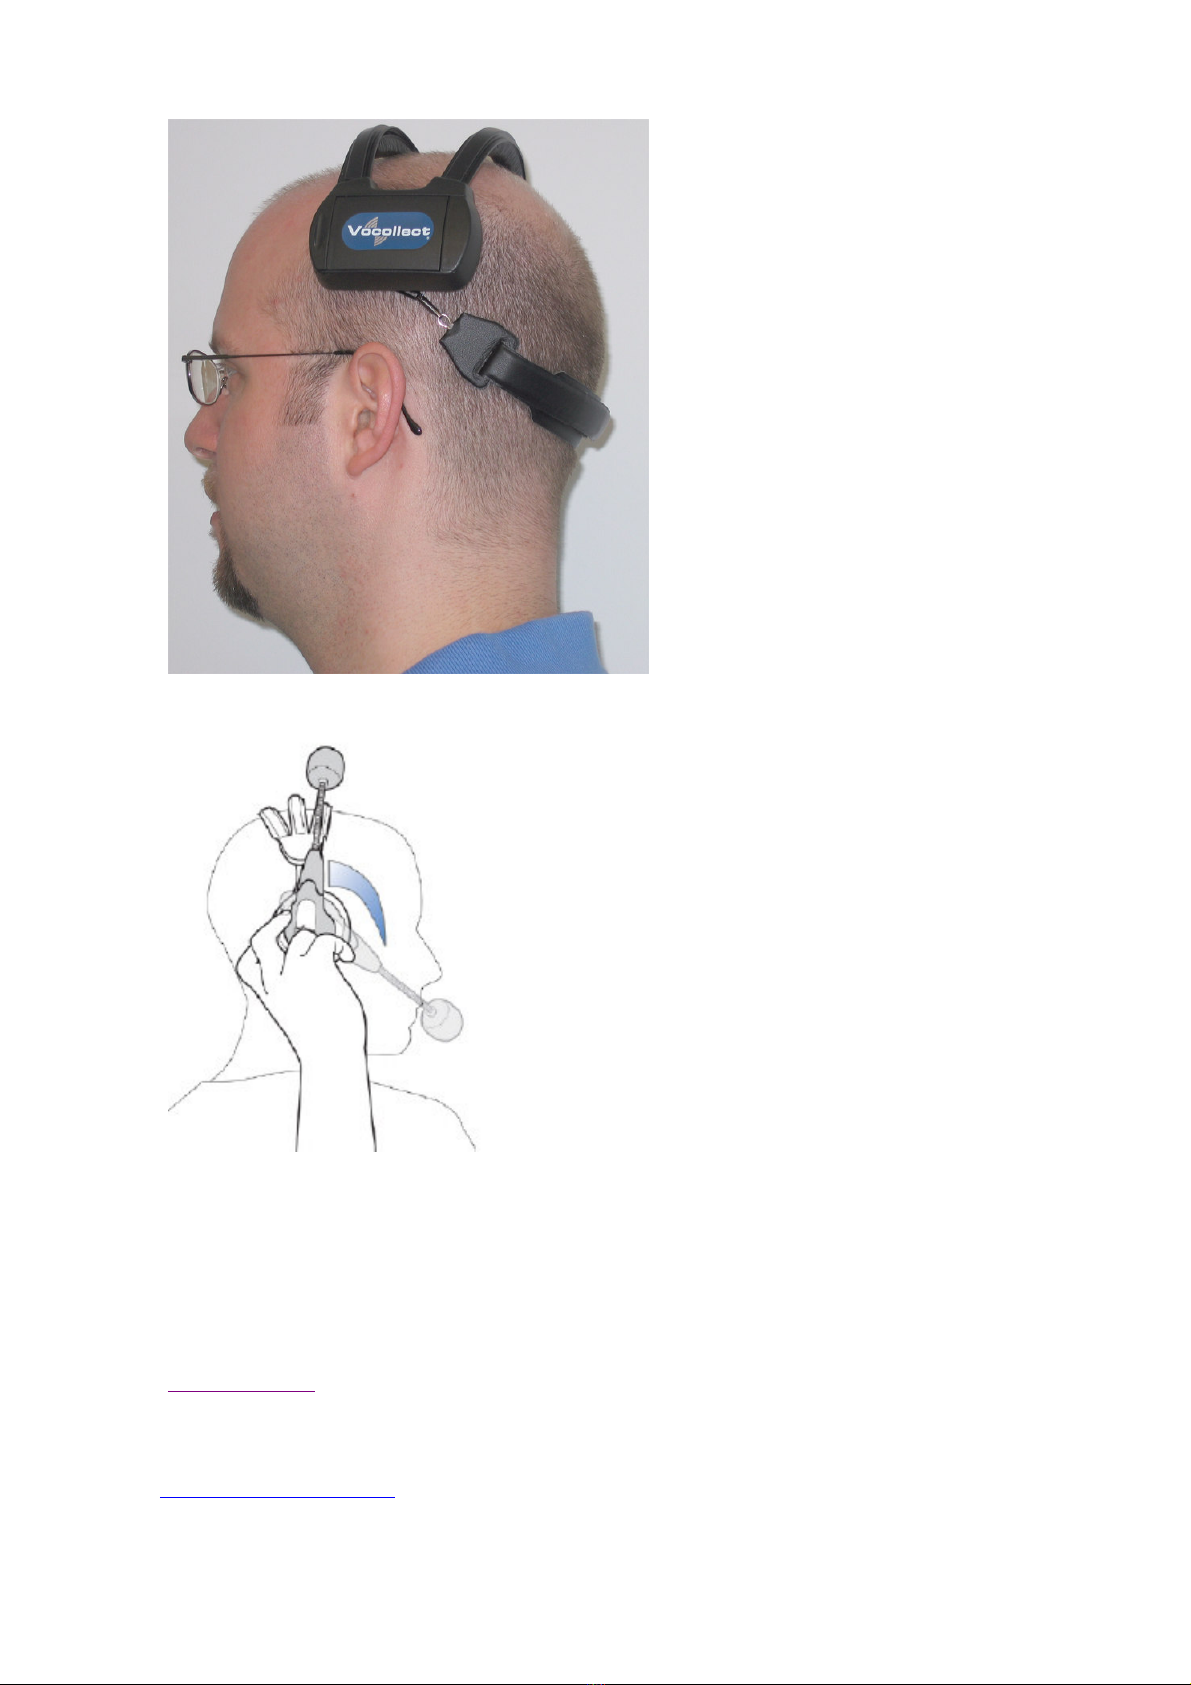
4. Swing the micro hone into osition with the rotating lever at the ear iece.
5. Make final adjustments with the flexible boom so that the micro hone is ositioned at the corner of
your mouth, about 1/4" away from your face.
Notes: Make sure that there is a windscreen on the microphone. A windscreen improves
performance.
A dot (or the word "talk") on the microphone faces your mouth when the microphone is
positioned properly.
6. Pair the headset with the terminal.
To remove a headset, perform the following steps:
After disconnecting the headset,
1. Uncli the headset wire from your collar and belt.
2.
Carefully remove the headset from your head. (For the Hard Hat Headset, remove the hard hat.
Page
3
of
4
Wearing and Removing SR
-
Series Headsets
29/8/2007

Press the release cli to remove the headset unit from the hardhat bracket.)
A roved for use in the following countries: U.S.A., Canada, and all EU and EFTA member states.
Page
4
of
4
Wearing and Removing SR
-
Series Headsets
29/8/2007

Pairing an SRX Headset with a
Pairing an SRX Headset with a Pairing an SRX Headset with a
Pairing an SRX Headset with a
Device Using Bluetooth
Device Using BluetoothDevice Using Bluetooth
Device Using Bluetooth®
® ®
® Wireless
Wireless Wireless
Wireless
Technology
TechnologyTechnology
Technology
Notes: A wireless connection must be made between the SRX headset and a device that uses Bluetooth
wireless technology. This wireless connection allows the SRX headset to communicate with only one T5
wearable computer or handheld device. nce a connection has been established, the headset and
device operate as if there is a wire connecting them. This process is called "pairing."
Your headset and device maintain their pairing association with each other after they enter sleep or
power off states, but Vocollect strongly recommends that you pair your headset and device at the
beginning of every shift.
Using an SRX headset
Pairing an SRX headset with T5
Pairing an SRX headset with a handheld device
Disconnecting a pairing
Understanding headset modes and LED patterns
Notes about pairing
olume control
Using an SRX Headset
At the beginning of a shift:
1. Always begin a shift with a fully-charged battery.
2. Pair your headset with your device.
3. Put the headset on and begin work.
At the end of a shift:
1. To power off the headset, press and hold the Plus and Minus buttons on the headset's earpiece until
the LED indicator turns solid blue (about three seconds).
2. Remove the headset's battery and place it into a charger.
Pairing an SRX Headset
Perform pairing when:
you start a shift
you change SRX headsets or devices during a shift
your device does not respond to your commands
the serial number you hear in your headset does not match the serial number of your T5
To pair an SRX headset with a T5 wearable computer, perform the following steps:
1.
Make sure the headset is powered off.
Page
1
of
5
SRX Proc Using the SRX Headset
29/8/2007
2. Make sure the T5 is in sleep mode and that there is not a wired headset already connected to it.
3.
Simultaneously press and hold the Plus and Minus buttons on the headset's earpiece for four seconds.
The LED indicator on the headset flashes once quickly, pauses, flashes three times quickly, and then
starts flashing slowly (about four times per second).
4. Simultaneously press and hold the Plus and Minus buttons on the T5 for two seconds and then
immediately hold the headset and T5 so they touch each other. The blue LED indicator on the T5
turns on.
5. After about 10-20 seconds, the headset beeps three times and its blue LED indicator flashes less
rapidly. This indicates that pairing has taken place.
Warnings: It is best to pair in an area where you are at least three feet away from someone
else's device. This helps ensure that your headset does not accidentally pair with the wrong
device.
The headset attempts to pair for 60 seconds. If it cannot find a Bluetooth device within that
time, it goes into No Connection mode and waits for the last device it was paired with to come
into range. To exit No Connection mode, power off the headset and begin the pairing procedure
again.
6. Put on the headset. After pairing, the headset repeatedly says the serial number of the T5 to which
it is paired. Look to see that the serial number on your T5 matches the number you hear.
Warning: If you do not hear your T5's serial number, your headset has paired with somebody
else's T5. Power off the headset and begin the pairing procedure again.
7. Press the Play/Pause button on the T5 to verify that your headset is paired with your device and
begin working.
Note: If you have trouble pairing using the steps described above, try pairing in high power
pairing mode. To do this, follow the same procedure, but in Step 3 hold the Plus and Minus
buttons for seven seconds instead of four. Vocollect does not recommend pairing regularly in
this mode because it increases the likelihood of your headset pairing with the wrong device.
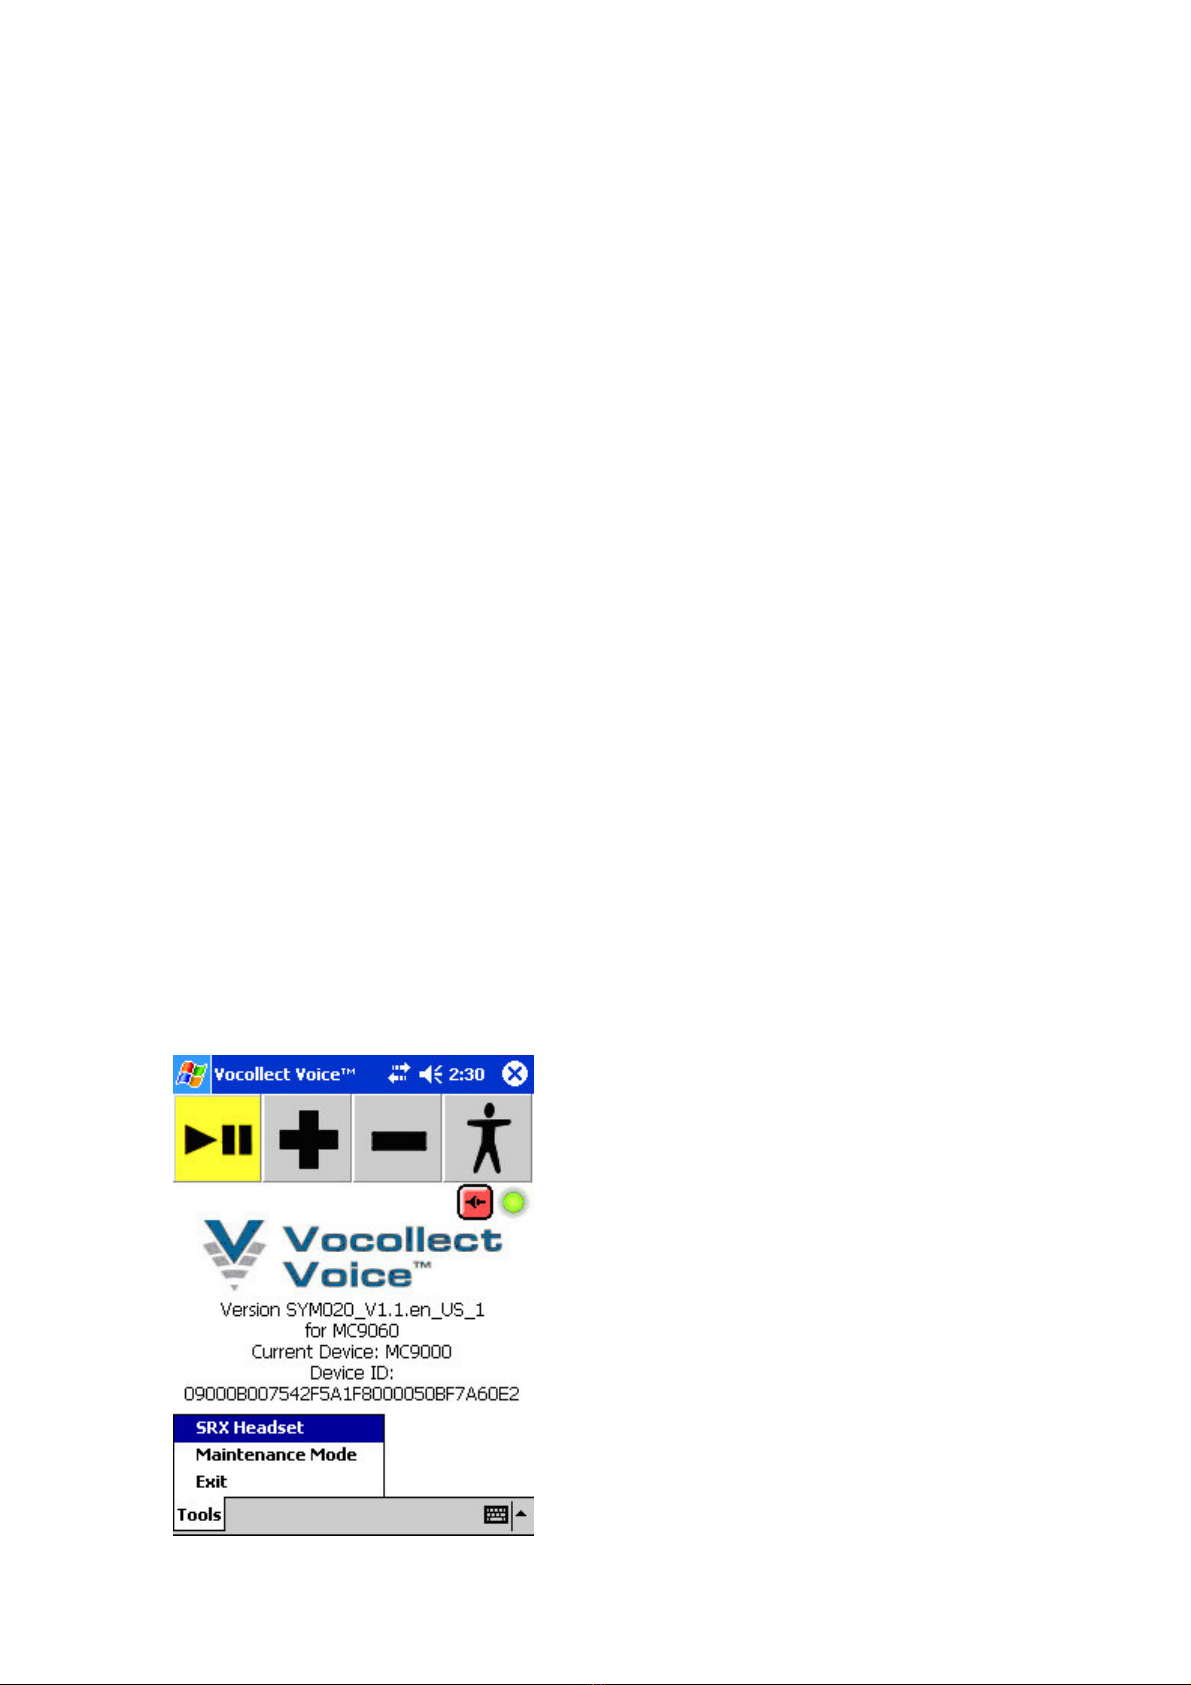
To pair an SRX headset with a Symbol® handheld device, perform the following steps:
1.
Make sure the Symbol device is powered on and there is not a wired headset already connected to it.
2.
Simultaneously press and hold the Plus and Minus buttons on the headset's earpiece for four seconds.
The LED indicator on the headset flashes once quickly, pauses, flashes three times quickly, and then
starts flashing slowly (about four times per second).
3. Tap Tools | SRX Headset on the device screen.
Page
2
of
5
SRX Proc Using the SRX Headset
29/8/2007
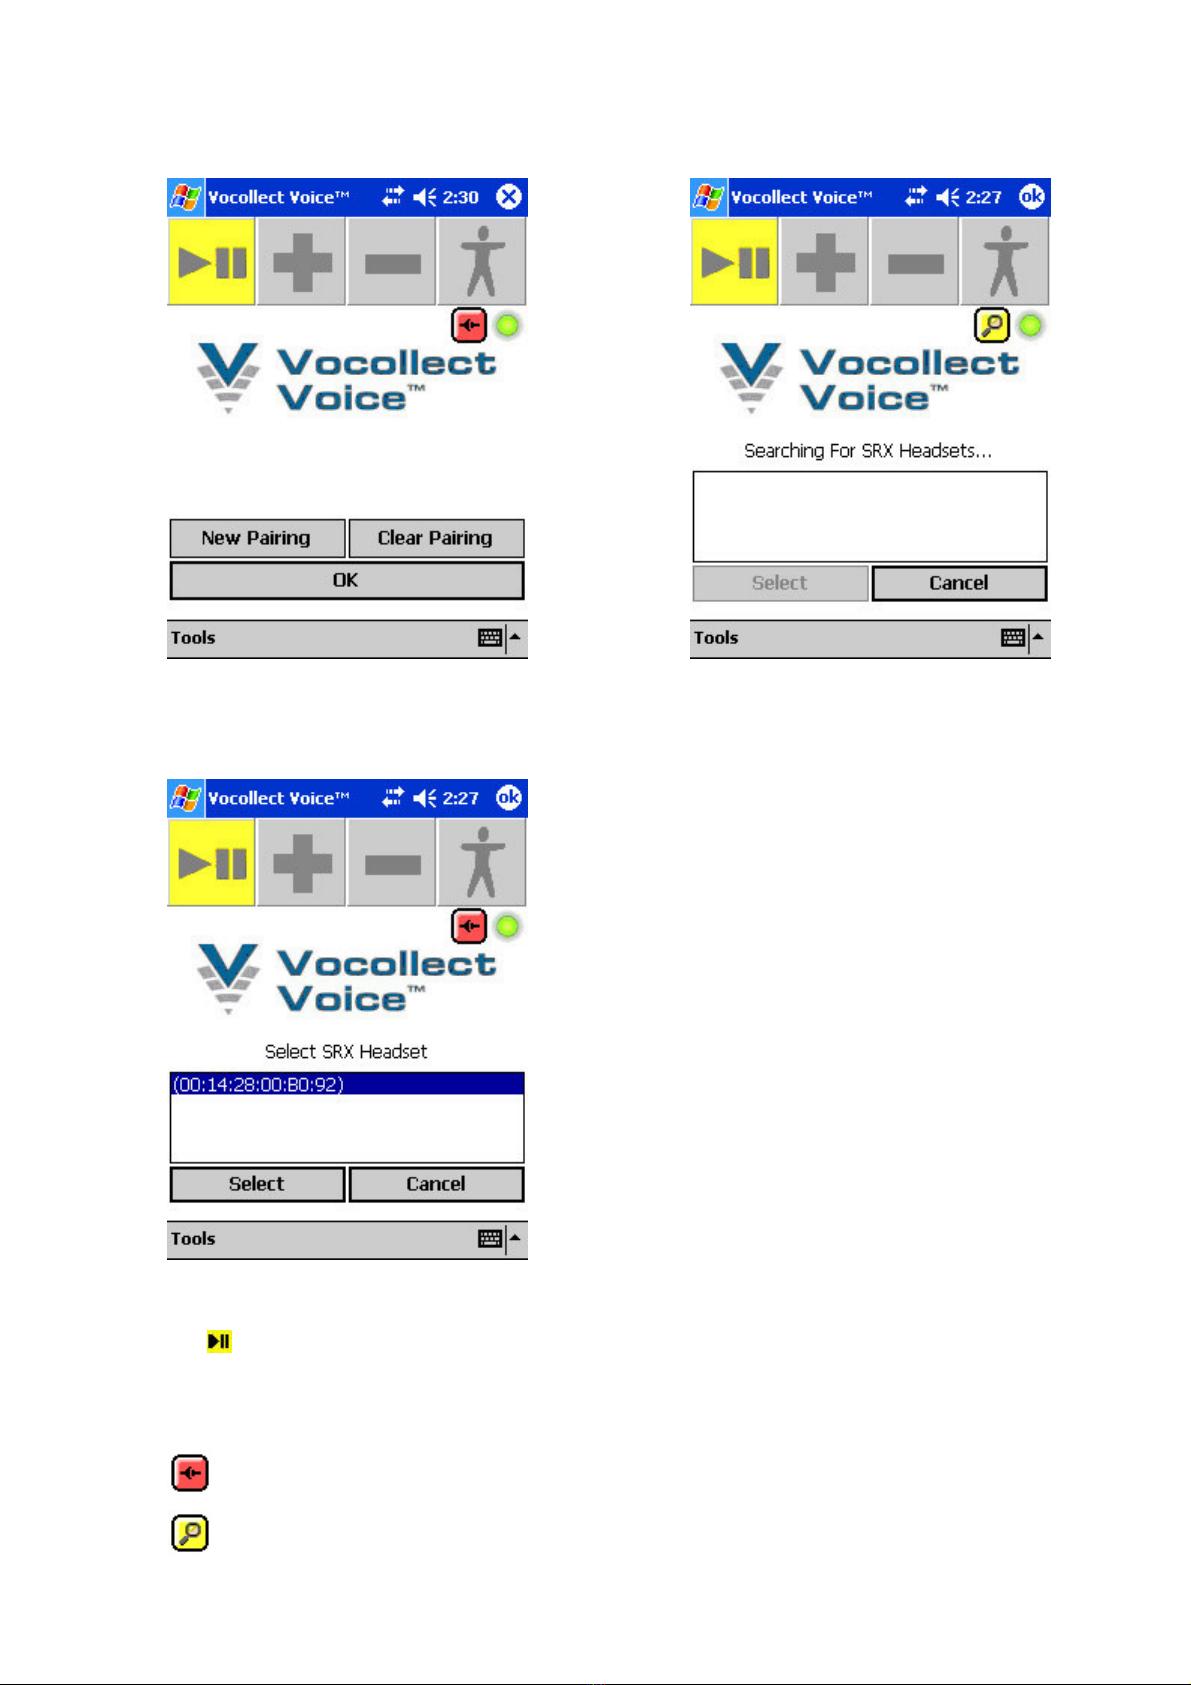
4. Tap New Pairing. The device searches for Bluetooth devices and lists the names or Bluetooth
addresses of all devices it finds within range.
5. More than one Bluetooth device may appear on the handheld device's screen. Check the number on
sticker on your headset to be sure you select the right headset. Tap the number that identifies your
headset and then tap Select. The device may require you to enter the headset's passkey. The
passkey for all SRX headsets is 4444.
6. Put on the headset. After pairing, the headset repeatedly says the serial number of the device to
which it is paired. Look to see that the serial number on your device matches the number you hear.
7. Tap on the device's screen to verify that your headset is paired with your device and begin
working.
Notes: The graphic in the upper right of the device's screen indicates the device's Bluetooth
status. The graphics are as follows:
= No pairing, no connection
= Handheld device is searching for Bluetooth devices
Page
3
of
5
SRX Proc Using the SRX Headset
29/8/2007
Table of contents


