Vogel ULOW-E2 User manual

6 bar max.
max. 60°
230VAC
50Hz
Operating Instructions
ULOW-E2V
Vertical Low-Temperature Radiator
GB
DE
NL
FR

Ulow E2V • 2022-01-01
GB
DE
NL
FR
1
2
TOUCHPAD CONTROL
Function and Control Elements
Electronic actuator with
connecting cable
UP key
DOWN key
Heating/Cooling/
recirculating
air key
Main switch ON/OFF
LED on actuator*
Ventilators
Heating symbol, RED Temperature scale
TOUCHPAD
Cooling symbol, BLUE Boost key
* The LED on the actuator indicates the position of the step motor.
Red: Motor closed • Green: Motor open • Flashing green: Middle position
1 5 9
6 10
7
8 11
2
3
4
4 9 6
537 810
11

Ulow E2V • 2022-01-01
GB
DE
NL
FR
You‘ve made a Good Choice.
Operating Conditions
The low-temperature radiator with E2 technology is a high-
quality product made for you. It meets the latest standards in
terms of energy-efficient low-temperature radiator technology.
In order to avoid malfunctions or damage, it is important to read
and follow these operating instructions carefully. If you have
any questions, please contact your specialised local dealer or
the manufacturer directly.
Enjoy your new low-temperature radiator.
6 bar max.
max. 60°
230VAC
50Hz

Ulow E2V • 2022-01-01
GB
DE
NL
FR
Important Notes
The device may only be mounted by a qualified
expert.
The device must not be mounted directly
underneath a socket outlet.
In bathrooms or shower rooms, the device must be installed
in a way that switches and other control elements cannot be
touched by any person using the bathtub or shower.
If the connecting pipe or the electrical supply cord of
the device is damaged, it may only be replaced by the
manufacturer or service agent.
Caution! In order to prevent overheating,
the radiator must not be covered
completely for technical safety
reasons.
After mounting the device, the socket must remain
accessible.
For ULOW E2, a fused (3A) electrical spur with a
switch having 3 mm separation on all poles must
be provided in an easily accessible position
adjacent to the unit.
The electrical installation must comply with the
local or national wiring regulations.
Type: ULOW E2
max. 15 W ~230 V
ÖVE

Ulow E2V • 2022-01-01
GB
DE
NL
FR
Important Notes
Caution! Some parts of the product may get
very hot and cause burns!
Special caution is advised, if children and persons
in need of protection are present.
Children below the age of 3 must be kept away from the
product, unless they are constantly supervised.
Children from the age of 3 and below 8 may only
switch the device on/off if supervised or
instructed on the safe use of the device and if
they are aware of the resulting danger, given
that the device is placed and installed in its
normal position of use.
Children from the age of 3 and below 8 must not
put the plug into the socket, control the device,
clean the device and/or perform any maintenance
work.
This device may be used by children from the
age of 8 and persons with reduced physical,
sensory or mental capabilities or lack of
experience and knowledge, if supervised or instructed
and fully aware of the safe use of the
device and the resulting risks. Children must not
play with the device. Cleaning and maintenance
work must not be performed by children without
supervision.

Ulow E2V • 2022-01-01
GB
DE
NL
FR
Number of ventilators:
Length 450 mm = 2x3 = 6 ventilators
Length 600 mm = 2x4 = 8 ventilators
Length 750 mm = 2x6 = 12 ventilators
Do not use any scouring detergents or paint thinning!
To ensure the efficiency of the device, regular maintenance
of the ventilators and the radiator by the specialist trade is
recommended.
The following standards must be observed when installing
radiators:
- DIN 55900: Spray area in wet rooms.
- VDI 2035: Avoiding damage in hot water heating systems
- DIN 18017 Part 3: Ventilation of bathrooms and toilets
without windows
- EN 14336: Heating systems in buildings, installation and
acceptance of hot water heating systems
The electric actuator must be mounted on the LEFT side of
the valve body, which is centrally located on the lower edge
of the radiator:
1. Mounting the electric actuator
2. Connecting the ribbon cable of the power box to the ribbon
cable of the touchpad
3. Connecting the Ulow E2 V to the mains supply
Important Notes

Ulow E2V • 2022-01-01
GB
DE
NL
FR
Connecting the Flat Cable
1. Connect the ribbon cable from the right side panel with the
touchpad to the ribbon cable coming out of the radiator on
the right. Be VERY CAREFUL when doing this!
2. Then click the side panel into the radiator.

Ulow E2V • 2022-01-01
GB
DE
NL
FR
Mounting the Electric Actuator
The electric actuator must
be mounted on the LEFT side
of the valve body, which is
centrally located on the lower
edge of the radiator. First
connect the cable and then
mount the electric actuator
on the valve body.
Make sure that the cable
always is located BEHIND
the pipe.
Then connect the cable to the
electric actuator.
Then turn the union nut (M
30 x 1.5 mm) onto the valve
by hand.
Attention: The flat side of the
electric actuator must face
backwards or upwards. If you
turn the flat side downwards,
the cable will come loose.

Ulow E2V • 2022-01-01
GB
DE
NL
FR
Connecting to the Power Network
Example:
Classic power
connection with plug
connection.
Example:
Direct power
connection
with or
without
on/off
switch.
Then connect the E2 to the
mains with a Euro plug or ...
... direct power connection with
open cable ends.
By connecting to the power
network, the actuator will posi-
tion itself automatically.

Ulow E2V • 2022-01-01
GB
DE
NL
FR
Turning on the Radiator Control
The radiator control of the E2 low-temperature radiator is
turned on by pressing the ON/OFF key.
Important in case of first start-up:
During the first start-up, please note that the
radiator control will be in heating mode with a
pre-set target room temperature of 22°C.
Changes in heating operation:
The red heating symbol is lighted. The desired room
temperature can be set from 18°C to 26°C in steps of
0.5°C. Use the UP
6
and DOWN
7
key.
Boost Mode:
In this operating mode, the yellow temperature symbol flashes
8
.
In order to achieve the required room temperature as quickly as
possible, activate the boost mode by pressing the
Boost
key. This will
activate the maximum heating output for a maximum of 120 min. As
soon as the desired room temperature has been achieved, comfort
mode will automatically be re-activated. Boost mode can be
stopped any time by pressing the
Boost
key.
Boost
!

Ulow E2V • 2022-01-01
GB
DE
NL
FR
Changing to Cooling Mode
Press the
Boost
key once. The blue frost symbol
will light up.
The desired room temperature can be set from
18°C to 26°C in steps of 0.5°C. Use the UP
6
and
DOWN
7
key.
To provide the maximum cooling capacity, the
ventilators
11
run at the highest possible speed.
For rooms with very low sound level requirements, the speed
of the fans can be reduced by pressing the
Boost
key once. In
this operating situation, the temperature symbol flashes
8
.
Important notes: This operating mode requires
adaptations in the boiler house. In any case, however,
suitable action must be taken to ensure that the
temperature of the coolant is above the dewing point of
the room air to prevent condensation on the radiator surface.
This “dry cooling” allows reducing very high room temperatu-
res by several degrees. However, this does not allow cooling
to room temperatures of e.g. 22°C.
For effectively operate dry comfort cooling we recommend
exchanging flow and return flow.
Caution: If no exchange is made, performance reductions of
up to 50% must be expected.
!

Ulow E2V • 2022-01-01
GB
DE
NL
FR
Changing to Air Recirculation Mode Only
„Summerbreeze Effect“
Changing to Heating withoutVentilatorSupport
Press the
Boost
key once again, and the blue frost
symbol will blink.
In this operating mode, the ventilators are switched on
irrespective of the temperature. They provide pleasant
air circulation indoors during hot summer days. Ex
works, this operating mode is set to the highest no. of
ventilator revolutions. Changes can be made with the
keys
Boost
and
Boost
.
LED lowest no. of revolutions
LED medium no. of revolutions
LED highest no. of revolutions
Press the
Boost
key once again, and the red heating
symbol will blink.
The desired room temperature can be pre-set between
18°C and 26°C in steps of 0.5°C. Changes are possible
by using the arrow keys
Boost
and
Boost
.
II
IIIIIII

Ulow E2V • 2022-01-01
GB
DE
NL
FR
Changing to the Frost Protection Function
Sleep Mode
Press the
Boost
key and the red and blue symbols
with flash simultaneously.
Ex works, this operating mode is pre-set to 6°C.
Changes are possible by using the arrow keys
Boost
and
Boost
. Repeatedly using the
Boost
key will lead
back to the heating mode.
II
IIIIIII
LED 5 °C
LED 7 °C
LED 9 °C
If the touchpad control panel is not used within 60 seconds, sleep
mode will be activated. In this operating mode, the display lighting
is inactive. Sleep mode can be stopped any time by pressing any
key.
Outside different operating periods, the radiator control unit can
be switched off with the key
Boost
. Repeatedly using the
Boost
key will
lead back to the heating mode.
Ulow E2V • 2022-01-01
GB
DE
NL
FR
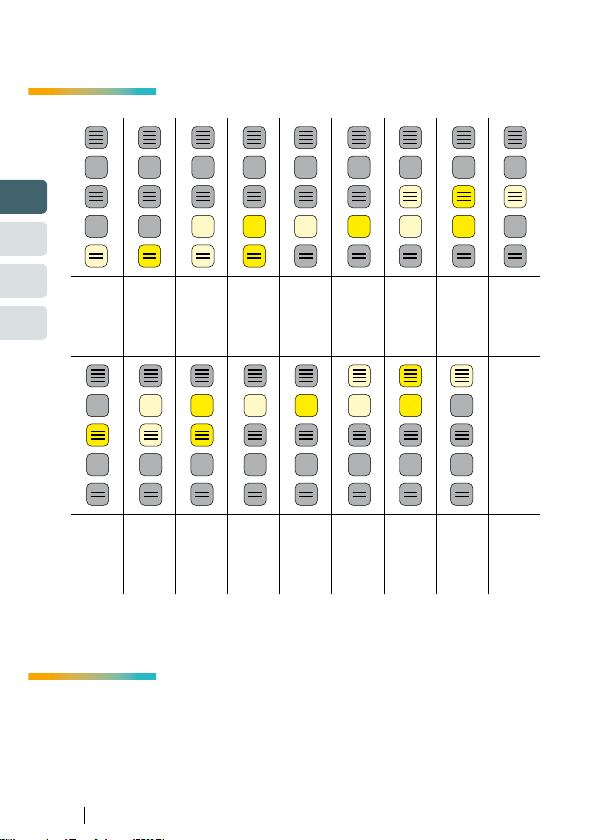
Temperature Setting – Touchpad
Sensor Error Display on theTouchpad Control
18 °C
1st LED
weak
light
18.5 °C
1st LED
strong
light
19 °C
1st and 2nd
LED
weak
light
19.5 °C
1st and 2nd
LED
strong
light
20 °C
2nd LED
weak
light
20.5 °C
2nd LED
strong
light
21 °C
2nd and 3rd
LED
weak
light
21.5 °C
2nd and 3rd
LED
strong
light
22 °C
3rd LED
weak
light
22.5 °C
3rd LED
strong
light
23 °C
3rd and 4th
LED
weak
light
23.5 °C
3rd and 4th
LED
strong
light
24 °C
4th LED
weak
light
24.5 °C
4th LED
strong
light
25 °C
4th and 5th
LED
weak
light
25.5 °C
4th and 5th
LED
strong
light
26 °C
5th LED
weak
light
4 different errors are displayed on the touchpad:

Ulow E2V • 2022-01-01
GB
DE
NL
FR
External Cleaning and Maintenance
Use mild, non-scouring detergents for cleaning radiator surfaces
externally. In order to ensure the efficiency of the ventilator unit,
regular maintenance of the ventilator and the radiator by specialists
is recommended.
Water
sensor
error
Remote
sensor
error
Actuator
sensor
error
Air
sensor
error
Waste Disposal according to the
WEEE Directve (2002/96/EC)
The symbol on the product label indicates that the
product may not be handled as domesticwaste, but must
be sorted separately. When it reaches the end of its
useful life, it shall be returned to a collection facility for
electrical and electronic products. By returning the pro-
duct, you will help if it is disposed of as ordinary domestic
waste. For information about recycling and collection facilities, you
should contact your local authority/municipality or refuse collec-
tion service or the business from which you purchased the product.
Applicable to countries where this directive has been adopted.

Ulow E2V • 2022-01-01
GB
DE
NL
FR
1
2
TOUCHPAD-BEDIENFELD
Funktions- und Regelelemente
elektronischer Stellan-
trieb mit Verbindungs-
kabel
Taste AUF
Taste AB
Heizen/Kühlen/
Umluft-Taste
Hauptschalter EIN/AUS
LED am Stellantrieb*
Ventilatoren
Heizsymbol, ROT Temperaturskala
TOUCHPAD
Kühlsymbol, BLAU Boost Taste
* Die LED am Stellantrieb zeigt die Stellung des Schrittmotors an.
rot: Motor geschlossen • grün: Motor offen • grün blinkend: Zwischenstellung
1 5 9
6 10
7
8 11
2
3
4
4 9 6
537 810
11

Ulow E2V • 2022-01-01
GB
DE
NL
FR
Sie haben eine gute Wahl getroffen
Betriebsbedingungen
Mit dem Tieftemperaturheizkörper
Ulow E2 V
mit E2-Technologie
steht Ihnen ein Qualitätsprodukt zur Verfügung, das dem neu-
esten Stand der energieeffizienten Tieftemperatur-Heizkörper-
technik entspricht. Um Fehlfunktionen oder Beschädigungen zu
vermeiden, ist es sehr wichtig, diese Bedienungsanleitung ge-
nauestens durchzulesen und zu befolgen. Bei Rückfragen wen-
den Sie sich an Ihren Fachberater oder direkt an den Hersteller.
Viel Freude mit Ihrem neuen Tieftemperaturheizkörper.
6 bar max.
max. 60°
230VAC
50Hz

Ulow E2V • 2022-01-01
GB
DE
NL
FR
Wichtige Hinweise
Das Gerät darf nur von einem konzessionierten
Fachmann montiert werden.
Die Montage des Gerätes darf nicht unmittelbar unterhalb
einer Wandsteckdose erfolgen.
In Bade- oder Duschräumen sind die Geräte so zu installieren,
dass Schalter und andere Regel- und Steuereinrichtungen
von einer Person, die gerade das Bad oder die Dusche
benutzt, nicht berührt werden können.
Bei Beschädigung der Anschlussleitung des Gerätes darf
diese nur vom Hersteller ersetzt werden.
Achtung! Um eine Überhitzung zu ver-
meiden, darf der Heizkörper aus
sicherheitstechnischen Gründen nicht
komplett abgedeckt werden.
Nach der Montage des Gerätes muss der Stecker zugänglich
sein.
Bei Geräten ohne eingebautem AUS-EIN Schalter, ist eine
allpolige Trennung vom Netz mit Kontaktöffnungsweite von
mind. 3 mm oder eine Trennung vom Netz mittels Stecker
erforderlich.
Bei der Wahl des Anbringungsortes, sowie bei einer Schuko-
steckdoseninstallation, sind die örtlichen bzw. die nationalen
elektrotechnischen Sicherheitsvorschriften wie ÖVE und VDE zu
beachten.
Type: ULOW E2
max. 15 W ~230 V
ÖVE

Ulow E2V • 2022-01-01
GB
DE
NL
FR
Wichtige Hinweise
Vorsicht – Einige Teile des Produktes können sehr heiß werden
und Verbrennungen verursachen.
Besondere Vorsicht ist geboten, wenn Kinder und schutz-
bedürftige Personen anwesend sind.
Kinder jünger als 3 Jahre sind fernzuhalten, es sei denn, sie
werden ständig überwacht.
Kinder ab 3 Jahren und jünger als 8 Jahre dürfen das Gerät
nur ein- und ausschalten, wenn sie beaufsichtigt werden oder
bezüglich des sicheren Gebrauchs des Gerätes unterwiesen
wurden und die daraus resultierenden Gefahren verstanden
haben, vorausgesetzt, dass das Gerät in seiner normalen
Gebrauchslage platziert oder installiert ist.
Kinder ab 3 Jahren und jünger als 8 Jahre dürfen nicht den
Stecker in die Steckdose stecken, das Gerät nicht regulieren,
das Gerät nicht reinigen und/oder nicht die Wartung durch
den Benutzer durchführen.
Dieses Gerät kann von Kindern ab 8 Jahren und darüber
sowie von Personen mit verringerten physischen,
sensorischen oder mentalen Fähigkeiten oder Mangel
an Erfahrung und Wissen benutzt werden, wenn sie
beaufsichtigt oder bezüglich des sicheren Gebrauchs des
Gerätes unterwiesen wurden und die daraus resultierenden
Gefahren verstehen. Kinder dürfen nicht mit dem Gerät
spielen. Reinigungen und Benutzer-Wartung dürfen von
Kindern ohne Beaufsichtigung nicht durchgeführt werden.

Ulow E2V • 2022-01-01
GB
DE
NL
FR
Anzahl der Ventilatoren:
BL 450 mm = 2x3 = 6 Ventilatoren
BL 600 mm = 2x4 = 8 Ventilatoren
BL 750 mm = 2x6 = 12 Ventilatoren
Für die Gerätereinigung keine scheuernden Putzmittel bzw.
Farbverdünnungen verwenden!
Um den Wirkungsgrad der Gebläseeinheit zu gewährleisten,
wird eine regelmäßige Wartung der Ventilatoren und des
Heizkörpers durch das Fachhandwerk empfohlen.
Bei der Installation von Heizkörpern sind die folgenden
Normen zu beachten:
- DIN 55900: Sprühbereich in Nassräumen
- VDI 2035: Vermeidung von Schäden in Warmwasser-
heizungsanlagen
- DIN 18017 Teil 3: Lüftung von Bädern und Toiletten ohne
Fenster
- EN 14336: Heizungsanlagen in Gebäuden, Installation und
Abnahme von Warmwasserheizungsanlagen
Nach der Montage des Heizkörpers an der Wand und dem
Anschluss der Anschlussarmatur an der Unterseite des
Heizkörpers (siehe Montageanleitung), führen Sie die
folgenden Schritte durch:
1. Montage des elektrischen Stellantriebs
2. Anschluss des Flachbandkabels der Powerbox an das
Flachbandkabel des Touchpads
3. Anschluss des Ulow E2 V an das Stromnetz
Wichtige Hinweise
Table of contents
Languages:
Popular Heater manuals by other brands

Johnson & Starley
Johnson & Starley WARMCAIR C10D Installation, commissioning & servicing instructions

MrHeater
MrHeater BIG Buddy MH18B Operating instructions and owner's manual

Tripp Lite
Tripp Lite WEXT5-SRCOOL12K quick guide

Comfortmaker
Comfortmaker CMHT03 installation instructions

EOS
EOS Invisio Midi Assembly and operating instruction

Timberk
Timberk TCH A9 1000 instruction manual


