19
unless constant supervision is provided.
• WARNING: To reduce the risk of re, keep textiles, curtains, or
any other ammable material a minimum distance of 1 m from the
air outlet.
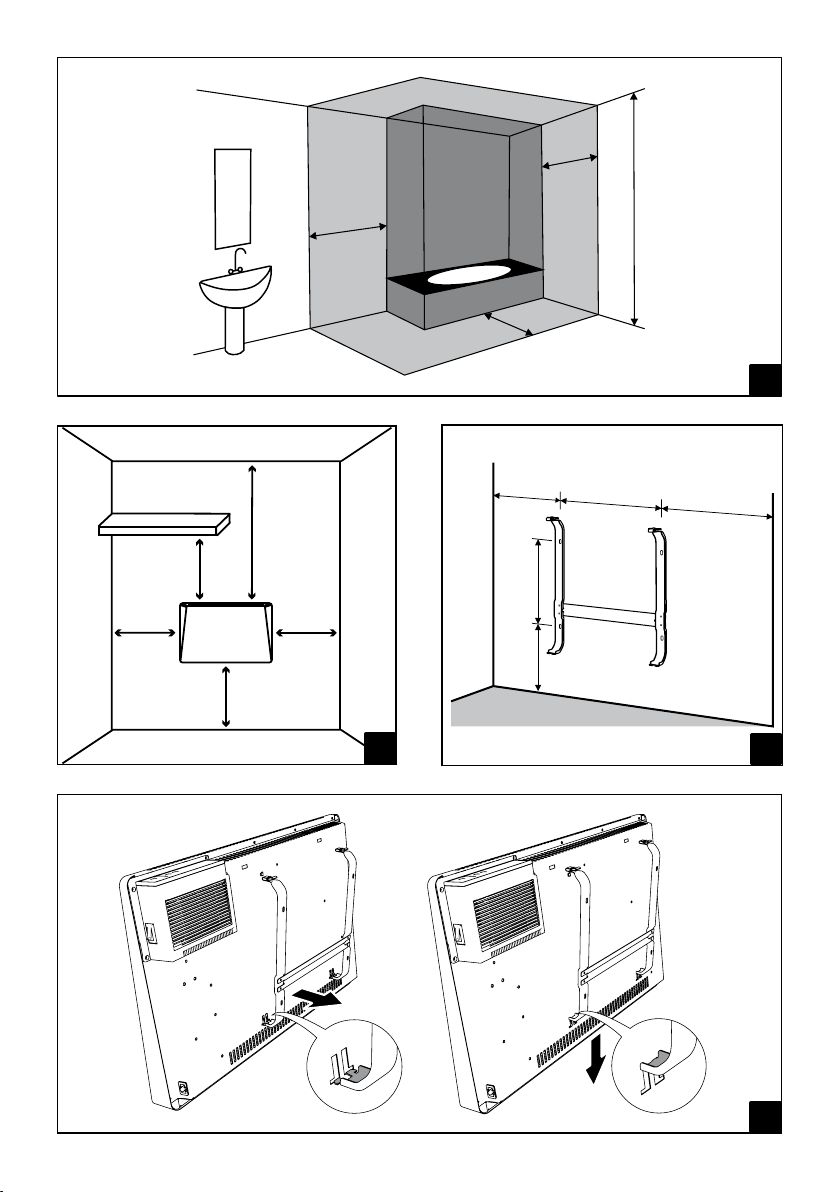
2. Wall Mounting
• Fix the convector in horizontal position with the air outlet grid upward;
• This convector is tted with a double electrical insulation circuit (class II) and therefore does not require earth
connection.
• This heater must be correctly installed in compliance with the regulations in force in the country of installation.
• In wet spaces like bathrooms or kitchens, the connection terminal must be installed at least 25 cm above the
oor. The electrical connection to the power supply must also be tted with a two-pole switch with a minimum
gap between the contacts that allows complete disconnection according to excess voltage III category conditions.
• The device must be wall-mounted respecting the minimum distances from ceiling, oor and side walls shown in
gure 2. The support bracket must be xed to the wall respecting the distances indicated in gure 3 and specied
in the following table. Always observe the minimum distances from walls, furniture and/or objects, as indicated
in picture 3.
• To proceed with the installation:
- Remove the bracket from the product;
- Drill 4 holes in the wall respecting the distances indicated in gure 3 and specied in the following table:
MODEL A B C
SIRIO 5 205mm 180mm 357mm
SIRIO 10 290mm 260mm 400mm
SIRIO 15 270mm 480mm 400mm
SIRIO 20 250mm 700mm 400mm
- Fix the bracket using the wall plugs and screws suitable for the wall type;
- Verify that the minimum distances previously described are satised;
- Approach the product to the bracket until the lower hooks of the bracket are inserted in the slots on the
rear panel as shown in gure 4;
- Rotate the upper part of the product towards the wall until it locks, making sure to snap the 2 upper hooks
of the bracket as shown in gure 5;
- Lock the 2 upper hooks of the bracket using the supplied screws as shown in gure 6.
3. Wheel Fastening (oPtional)
• The convector can also be used as a portable product by purchasing the wheels supplied separately.
• To x the wheels:
- check the correct orientation as shown in gure 7;
- x each of the 2 supports with the wheels using the screws provided as shown in gure 8. The screws can
be xed by hand and do not require any tool.
4. coMMands descriPtion
• The convector is equipped with an on / off button on the right side. When the product is switched off, the internal
electrical components will no longer be under tension.
• The following controls are integrated on the front of the product (gure 10):