VONROC LM507XX User manual

REEL MOWER
LM507XX / LM508XX
EN
Original Instructions 6
DE
Übersetzung Der Originalbetriebsanleitung 9
NL
Vertaling van de oorspronkelijke gebruiksaanwijzing
13
FR
Traduction de la notice originale 17
ES
Traducción del manual original 21
IT
Traduzione delle istruzioni originali 25
SV
Översättning av bruksanvisning ioriginal 29
DA
Oversættelse af den originale brugsanvisning 33
PL
Tłumaczenie instrukcji oryginalnej 36
RO
Traducere ainstruciunilor originale 40
PT
Tradução do manual original 44
HU
Eredeti használati utasítás fordítása 48
CS
Překlad püvodního návodu kpoužívání 51

WWW.VONROC.COM
2
Please read the instruction manual carefully before using it.
Please assemble strictly in accordance with the instruction.
Please double check to the ensure that all parts of the package contents intact.
WARNING
1pc
A
6pcs
E
6pcs
F
1pc
B
2pcs
C
1pc
D
PARTS LIST
1pc
G
1
8
1
5
2
7
3
6
4
5
3
4
1 pc
1 pc1 pc1 pc
1 pc6 pcs6 pcs
2 pcs
Please read the instruction manual carefully before using it.
Please assemble strictly in accordance with the instruction.
Please double check to the ensure that all parts of the package contents intact.
WARNING
1pc
A
6pcs
E
6pcs
F
1pc
B
2pcs
C
1pc
D
PARTS LIST
1pc
G
Please read the instruction manual carefully before using it.
Please assemble strictly in accordance with the instruction.
Please double check to the ensure that all parts of the package contents intact.
WARNING
1pc
A
6pcs
E
6pcs
F
1pc
B
2pcs
C
1pc
D
PARTS LIST
1pc
G
Please read the instruction manual carefully before using it.
Please assemble strictly in accordance with the instruction.
Please double check to the ensure that all parts of the package contents intact.
WARNING
1pc
A
6pcs
E
6pcs
F
1pc
B
2pcs
C
1pc
D
PARTS LIST
1pc
G
Please read the instruction manual carefully before using it.
Please assemble strictly in accordance with the instruction.
Please double check to the ensure that all parts of the package contents intact.
WARNING
1pc
A
6pcs
E
6pcs
F
1pc
B
2pcs
C
1pc
D
PARTS LIST
1pc
G
Please read the instruction manual carefully before using it.
Please assemble strictly in accordance with the instruction.
Please double check to the ensure that all parts of the package contents intact.
WARNING
1pc
A
6pcs
E
6pcs
F
1pc
B
2pcs
C
1pc
D
PARTS LIST
1pc
G
Please read the instruction manual carefully before using it.
Please assemble strictly in accordance with the instruction.
Please double check to the ensure that all parts of the package contents intact.
WARNING
1pc
A
6pcs
E
6pcs
F
1pc
B
2pcs
C
1pc
D
PARTS LIST
1pc
G
Please read the instruction manual carefully before using it.
Please assemble strictly in accordance with the instruction.
Please double check to the ensure that all parts of the package contents intact.
WARNING
1pc
A
6pcs
E
6pcs
F
1pc
B
2pcs
C
1pc
D
PARTS LIST
1pc
G
2
PACKAGE CONTENTS

WWW.VONROC.COM
3
A
B C
7
6
4
4
3
1
7 6 6
6 7
2
7
6
6 2
7
7

WWW.VONROC.COM
4
E
D
ADULT ASSEMBLY REQUIRED
Read all instructions before assembly and use.
Due to the presence of small parts during assembly, keep
out of reach of children untill assembly is complete.
ASSEMBLY INSTRUCTION
The Lawn Mower
!
13 5
14
4
3

WWW.VONROC.COM
5
Never use the mower while people, especially children or pets, are nearby. Always walk never
run.Do not operate the mower when barefoot or wearing open sandals.
Thoroughly inspect the area where the mower is to be used and remove all obiects, which may be
thrown by the machine.
Always be sure of your footing on slopes.Do not mow excessively steep slopes.
Keep all nuts, bolts and screws tightened. Always ensure that the equipment is in a safe working
condition
Replace worn or damaged parts immediately
Keep hands and feet clear of the rotating blades.
Use caution when adjusting the blades.
Loosen the knobs on either side.
of the roller and adjust both sides equally,
in the direction of the arrow,
to obtain the desired cutting height.
Tighten the knobs.
For best results, place the lawnmower on the edge of the lawn and
mow in the forward direction.Then turn at the end of each rurn and
mow in the opposite direction, slightly over-lapping the previously cut
strip.
To ensure long and reliable service.carry out the followina maintenance reqularly:Reaularly check
for obvious defects such as loose. dislodaed or damaged blades, loose fttings and worn or
damaged components. Check that covers and quards are undamaged and correctly fitted.
Clean the exterior of the machine thoroughly using a soft brush and cloth.
Do not use water solvents or polish. Remove all grass and debris.
Turn the machine on it's side and clean the blade area.
If grass cuttings are compacted in the blade area, remove with a wooden or plastic implement.
Store the lawnmower in a safe and dry place out of the reach of children. Do not place other objects
on top of the machine.
SAFETY PRECAUTIONS
ADJUSTING THE CUTTING HEIGHT
MOWING
MAINTENANCE
STORAGE
1
2
3
4
The cutting blade 8 should be adjusted if the grass is not cut
cleanly and evenly. Insert a piece of paper between the cylinder
6 and the fixed blade 8. Turn both adjuster nuts 7 clockwise a
little at a time until the cutting cylinder 6 cuts the paper evenly
across the whole blade length 8Note: The blades act like a
pair of shears.
6
8
7
G H
I J
F-1 F-2
Never use the mower while people, especially children or pets, are nearby. Always walk never
run.Do not operate the mower when barefoot or wearing open sandals.
Thoroughly inspect the area where the mower is to be used and remove all obiects, which may be
thrown by the machine.
Always be sure of your footing on slopes.Do not mow excessively steep slopes.
Keep all nuts, bolts and screws tightened. Always ensure that the equipment is in a safe working
condition
Replace worn or damaged parts immediately
Keep hands and feet clear of the rotating blades.
Use caution when adjusting the blades.
Loosen the knobs on either side.
of the roller and adjust both sides equally,
in the direction of the arrow,
to obtain the desired cutting height.
Tighten the knobs.
For best results, place the lawnmower on the edge of the lawn and
mow in the forward direction.Then turn at the end of each rurn and
mow in the opposite direction, slightly over-lapping the previously cut
strip.
To ensure long and reliable service.carry out the followina maintenance reqularly:Reaularly check
for obvious defects such as loose. dislodaed or damaged blades, loose fttings and worn or
damaged components. Check that covers and quards are undamaged and correctly fitted.
Clean the exterior of the machine thoroughly using a soft brush and cloth.
Do not use water solvents or polish. Remove all grass and debris.
Turn the machine on it's side and clean the blade area.
If grass cuttings are compacted in the blade area, remove with a wooden or plastic implement.
Store the lawnmower in a safe and dry place out of the reach of children. Do not place other objects
on top of the machine.
SAFETY PRECAUTIONS
ADJUSTING THE CUTTING HEIGHT
MOWING
MAINTENANCE
STORAGE
1
2
3
4
The cutting blade 8 should be adjusted if the grass is not cut
cleanly and evenly. Insert a piece of paper between the cylinder
6 and the fixed blade 8. Turn both adjuster nuts 7 clockwise a
little at a time until the cutting cylinder 6 cuts the paper evenly
across the whole blade length 8Note: The blades act like a
pair of shears.
6
8
7
9
9
10
11
12
8

6
EN
WWW.VONROC.COM
1. SAFETY INSTRUCTIONS
Read the enclosed safety warnings, the additional
safety warnings and the instructions. Failure to
follow the safety warnings and the instructions may
result in electric shock, fire and/or serious injury.
Save the safety warnings and the instructions for
future reference.
The following symbols are used in the user manual
or on the product:
Read the user manual.
Denotes risk of personal injury, loss of life
or damage to the tool in case of non-
observance of the instructions in this
manual.
Caution: Do not touch rotating blades.
Sharp blade(s). Beware of severing toes or
fingers. Keep bystanders, especially
children and pets, at adistance greater
than 10m.
Take care when the blades are rotating.
Do not put your hands or feet into openings
when the machine is running.
Do not use in the rain or leave the mower
outdoors while it is raining.
Risk of flying objects.
Keep bystanders away from the work area.
Carefully check the area where the tool is to
be used for wildlife and pets. Wildlife and
pets may be injured while the machine is in
operation. Thoroughly check the working
area and remove any stones, sticks, wires,
bones and foreign objects. When sing the
machine, ensure that no wildlife, pets or
small tree stumps are hidden in the dense
grass.
SPECIFIC SAFETY INSTRUCTIONS
• Adult assembly required. Due to the presence of
small parts during assembly, keep out of reach
of children until assembly is complete.
• Read all instructions before assembly and use.
• Assemble strictly in accordance with the
instruction.
• Double check to the ensure that all parts of the
package contents are intact.
• Never use the mower while people, especially
children or pets, are nearby.
• Do not operate the mower when barefoot or
wearing open sandals. Always walk never run.
• Thoroughly inspect the area where the mower
is to be used and remove all objects, which may
be thrown by the machine.
• Working on banks can be dangerous.
• Always be sure of your footing on slopes. Do not
mow excessively steep slopes. Mow across the
face of slopes, never up and down. Exercise
extreme caution when changing direction on
slopes.
• Use extreme caution when stepping back or
pulling the machine towards you.
• Never mow by pulling the mower towards you.
• Keep all nuts, bolts and screws tightened.
Always ensure that the equipment is in asafe
working condition.
• Replace worn or damaged parts immediately.
• Keep hands and feet clear of the rotating
blades.
• Use caution when adjusting the blades.
2. MACHINE INFORMATION
Intended use
This product is designed for lawnmowing in
domestic environments. The lawn mower is intended
for private gardens at home. The lawn mower may
not be used to trim bushes, hedges or shrubs, to
cut scaling vegetation, planted roofs, or balcony-
grown grass, to clean (vacuum) dirt and debris off
walkways, or to chop up tree or hedge clippings.
Moreover, the lawn mower may not be used as
apower cultivator to level out high areas such as
molehills. The equipment is to be used only for its
prescribed purpose. Any other use is deemed to be
acase of misuse.

EN
7
WWW.VONROC.COM
Model No. LM507XX
Cutting width 300 mm
No. of Cylinder Blades 5
Cutting height 15-25-31-35 mm
Grass box capacity 14 L
Weight 6.0 kg
Model No. LM508XX
Cutting width 400 mm
No. of Cylinder Blades 5
Cutting height 15-25-31-35 mm
Grass box capacity 18 L
Weight 6.9 kg
DESCRIPTION
1. Upper handle
2. Middle handle bar
3. Lower handle
4. Mower
5. Grass catcher
6. Knob
7. Bolt
8. Wall bracket with screws
9. Spring-loaded pin
10.Counterblade adjustment nut
11.Blade
12.Counterblade
13.Roller
14.Belt buckle
3. ASSEMBLY
Study each figure and identify the components
required with reference to the figure ‘package
contents’ and the contents table above.
Attaching the handle (Fig. A, B, C, E)
1. Attach lower handle (3) to the mower (4). First
attach one side of the handle and gently push
the other hole of the lower handle onto the
notch on the mower, as shown on figure A.
2. Mount the middle handle bars (2) to the upper
handle (1), using the bolts (7) and knobs (6), as
shown on figure B.
3. Now mount the assembled upper and middle
handle onto the lower handle, using the bolts
(7) and knobs (6), as shown on figure C.
4. Aproperly assembled lawn mower can be seen
on figure E.
Assembling the grass catcher
1. Ensure the metal bar frame is pre-assembled
properly into the grass catcher (5).
2.
Snap the plastic clamps on the side of the grass
catcher (5) onto the side bars of the metal frame.
3. Snap the plastic clamps on the bottom of the
grass catcher (5) onto the lower bar of the
metal frame.
Attaching the grass catcher to the lawn mower
(Fig. D)
1. Attach the assembled grass catcher (5) to the
roller (13), as shown on figure D.
2. Secure the grass catcher (5) to the mower
by attaching the belt buckle (14) to the lower
handle bar (3), as shown on figure D.
4. OPERATION
Adjusting the cutting height (Fig. F)
The cutting height can be set on respectively 15-
25-31-35 mm height. To adjust the cutting height:
1. Pull the spring-loaded pins (9) outwards on
both sides of the mower (4).
2. Adjust to the desired cutting height, which is
indicated on the mower.
3.
Now release the spring-loaded pins (9), ensuring
that they are properly seated into the destined
holes in the mower housing. Note: both sides
must always be set to the same height.
Re-adjusting the blade mechanism (Fig. G)
Always wear gloves when handling or
working near the sharp blades.
The cutting mechanism is carefully adjusted at
the factory. Readjustment might be required, for
example after prolonged use. Only readjust if one
or more of the following conditions are met:
• The cutting results appear rough and uneven
and some blades of grass are not cut (the
distance between the counter blade and mower
spindle is too large);
• Heavy resistance when pushing the mower or
even impossible to push;
• The mower blade mechanism makes loud
noises or does not rotate because it rubs or
catches against the counter blade.

8
EN
WWW.VONROC.COM
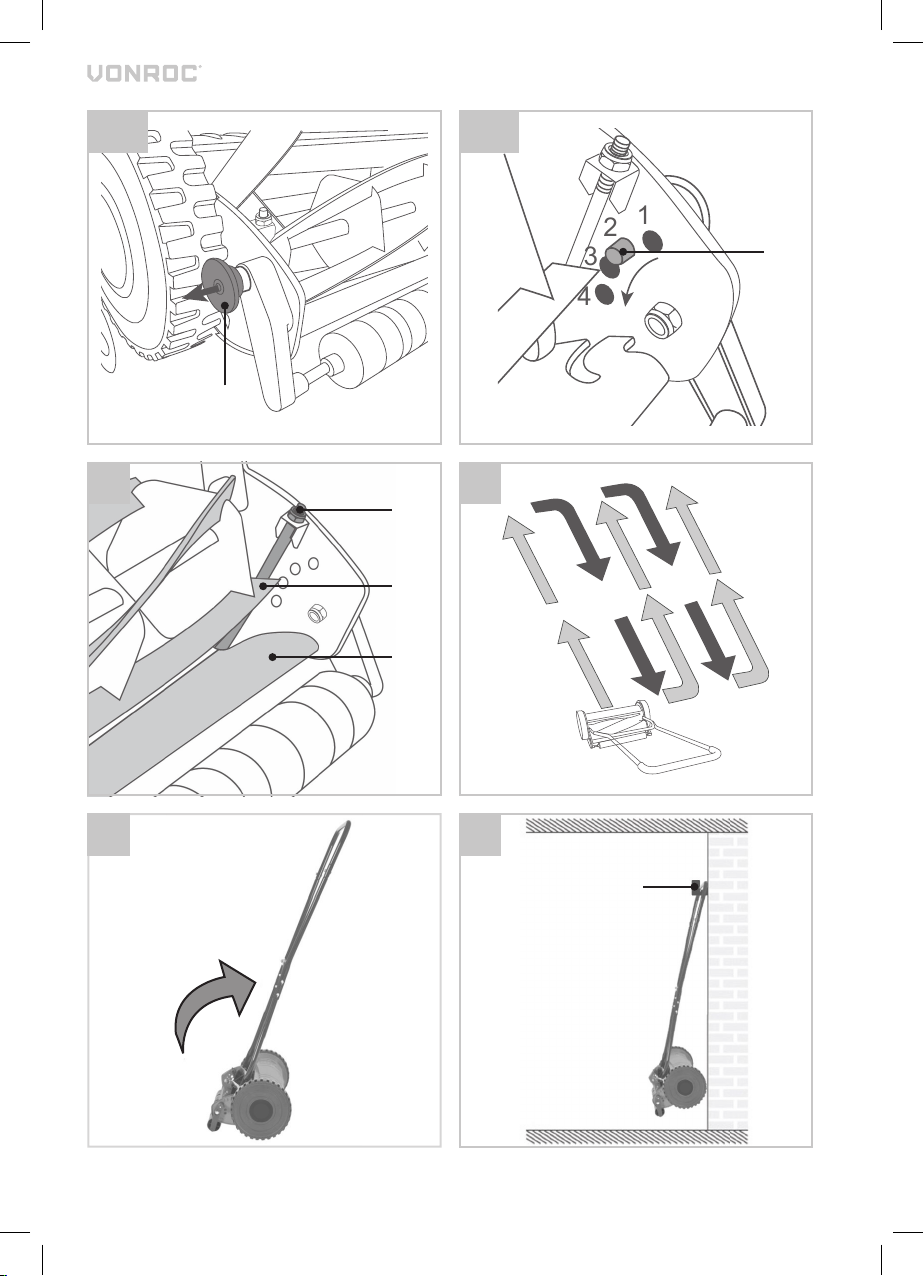
To readjust the blade mechanism:
1. First check the counterblade (12) and mower
blade (11) for notches/dents. It might be
necessary to remove these with agrindstone.
2. To reduce the distance between the
counterblade (12) and the mower blade (11),
turn the counterblade adjustment nut (10)
clockwise. Turn the counterblade adjustment
nut (10) counterclockwise to increase the
distance.
3. Adjust both counterblade adjustment nuts (10)
until the mower blade (11) lightly brushes the
entire length of the counterblade (12).
4.
Insert apiece of paper (e.g. A4 paper) between
the counterblade (12) and the mower blade (11).
5. Now lightly tighten both counterblade
adjustment nuts (10) clockwise alittle at atime
until the mower blade (11) cuts the paper
evenly across the whole blade length.
Note: the blade (11) and counter-blade (12) act like
apair of shears.
Proper use (Fig. H)
• For best results, place the lawnmower on
the edge of the lawn and mow in the forward
direction. Then turn at the end of each run
and mow in the opposite direction, slightly
overlapping the previously cut strip. Also refer
to figure H.
• Make sure that the lawn is clear of stones,
sticks, wire or other objects that could damage
the product or its product.
• Do not cut wet grass because it tends to stick
to the underbody of the product, preventing the
proper discharge of grass clippings, and it could
also cause you to slip and fall.
• Never cut off more than one-third of the total
length of the grass for ahealthy lawn. In the
autumn, lawns should only be cut as long as
there is growth.
• Circle around flower beds. When reaching
aflower bed in the middle of the lawn, cut arow
or two around the circumference of the bed.
• Pay special attention when changing direction.
• Always mow along inclines (not up and down).
You can prevent the lawn mower from slipping
down by holding aposition at an angle up-
wards.
• Select the cutting height according to the
length of the grass. Make several passes to
prevent that too much grass is cut at one time.
• Empty the grass box regularly.
Storage (Fig. I, J)
Store the machine in asecure, dry place out of the
reach of children. Do not place other objects on top
of the machine.
• To store the lawn mower, fold the handle
forwards as shown on figure I.
• Awall bracket (8) is included with the delivery
to mount the folded lawn mower onto awall
when preferred. Use the provided screws to
mount the wall bracket. Use appropriate wall
plugs if necessary.
5. MAINTENANCE
Your mower has been designed to operate
over along period of time with minimum of
maintenance. Continuous satisfactory operation
depends upon proper mower care and regular
cleaning.
• Keep the mower clean and dry.
• Regularly use ablunt scraper to remove grass and
dirt from the mower
• To clean the mower, use only mild soap and
adamp cloth. Never let any liquid get inside the
tool and never immerse any part of the tool into
liquid. Do not use any abrasive or solvent - based
cleaner.
Stop the blade(s) if the machine has to be tilted for
transportation when crossing surfaces other than
grass, and when transporting the machine to and from
the area to be used.
Replace worn or damaged parts for safety. Use only
genuine replacement parts and accessories.
WARRANTY
VONROC products are developed to the highest
quality standards and are guaranteed free of defects
in both materials and workmanship for the period
lawfully stipulated starting from the date of original
purchase. Should the product develop any failure
during this period due to defective material and/or
workmanship then contact VONROC directly.
The following circumstances are excluded from this
guarantee:

DE
9
WWW.VONROC.COM
• Repairs and or alterations have been made
or attempted to the machine by unauthorized
service centers;
• Normal wear and tear;
• The tool has been abused, misused or
improperly maintained;
• Non-original spare parts have been used.
This constitutes the sole warranty made by
company either expressed or implied. There are
no other warranties expressed or implied which
extend beyond the face hereof, herein, including
the implied warranties of merchantability and
fitness for aparticular purpose. In no event
shall VONROC be liable for any incidental or
consequential damages. The dealers remedies
shall be limited to repair or replacement of
nonconforming units or parts.
The product and the user manual are subject to
change. Specifications can be changed without
further notice.
1. SICHERHEITSHINWEISE
Lesen Sie die beigefügten Sicherheitswarnungen,
die zusätzlichen Sicherheitswarnungen und
die Anweisungen. Die Nichteinhaltung der
Sicherheitswarnungen und der Anweisungen
kann in einem Stromschlag, Brand und/oder in
schweren Verletzungen resultieren. Bewahren Sie
die Sicherheitswarnungen und Anweisungen für
künftige Referenzzwecke auf.
Die folgenden Symbole werden im
Benutzerhandbuch oder auf dem Produkt
verwendet:
Lesen Sie das Benutzerhandbuch.
Bedeutet, dass bei Nichtbeachtung der
Anweisungen in dieser Anleitung
Verletzungen, Tod oder Beschädigung des
Werkzeugs die Folge sein können.
Vorsicht! Keine rotierenden Klingen
berühren. Scharfe Klinge(n). Gefahr des
Abtrennens von Zehen oder Fingern.
Zuschauer, insbesondere Kinder und
Haustiere in einem Abstand von mehr als
10 Metern halten.
Vorsicht bei rotierenden Klingen. Keinesfalls
die Hände oder Füße in Öffnungen stecken,
wenn die Maschine läuft.
Nicht im Regen verwenden oder den
Rasenmäher bei Regen draußen lassen.
Risiko von umherfliegenden Objekten.
Zuschauer aus dem Arbeitsbereich
fernhalten.
Überprüfen Sie den Bereich, in dem das
Gerät eingesetzt werden soll, sorgfältig auf
Wildtiere und Haustiere. Wildtiere und
Haustiere können durch den Betrieb des
Geräts verletzt werden. Überprüfen Sie den
Arbeitsbereich gründlich und entfernen Sie
sämtliche Steine, Stöcke, Drähte, Knochen
und anderen Fremdkörper. Achten Sie beim
Einsatz des Geräts darauf, dass keine

10
DE
WWW.VONROC.COM
Wildtiere, Haustiere oder kleine
Baumstümpfe im dichten Gras versteckt
sind.
BESONDERE SICHERHEITSANWEISUNGEN
• Die Montage muss durch eine erwachsene
Person erfolgen. Da bei der Montage Kleinteile
verwendet werden, müssen Kinder bis zum
Abschluss der Montage ferngehalten werden.
• Vor Montage und Gebrauch ist die gesamte
Anleitung zu lesen.
• Die Montage muss unter strikter Beachtung der
Anleitung erfolgen.
• Überprüfen Sie, dass keins der im Paket
enthaltenen Teile beschädigt ist.
• Den Rasenmäher nie verwenden, wenn
Menschen, insbesondere Kinder oder Haustiere
in der Nähe sind.
• Den Rasenmäher nicht barfuß oder mit offenen
Sandalen betreiben. Bei der Arbeit nur gehen,
nicht rennen.
• Der Einsatzbereich des Rasenmähers muss
gründlich abgesucht werden, und alle
Gegenstände, die von ihm weggeschleudert
werden könnten, müssen entfernt werden.
• Die Arbeit an Hängen kann gefährlich sein.
• Achten Sie an Hängen immer auf festen Stand.
Nicht an übermäßig steilen Hängen mähen.
Mähen Sie quer zum Hang, nicht bergauf und
bergab. Bei Richtungsänderungen an Hängen
gilt äußerste Vorsicht.
• Seien Sie äußerst vorsichtig, wenn Sie
rückwärts gehen oder die Maschine in Ihre
Richtung ziehen.
• Beim Mähen den Rasenmäher niemals in
Körperrichtung ziehen.
• Alle Muttern, Bolzen und Schrauben müssen
stets fest angezogen sein. Es ist immer
der sichere Betriebszustand des Geräts zu
gewährleisten.
• Verschlissene oder beschädigte Teile sofort
austauschen.
• Hände und Füße von den rotierenden Klingen
fernhalten.
• Vorsicht beim Einstellen der Klingen.
2. GERÄTEDATEN
Verwendungszweck
Dieses Produkt ist zum Rasenmähen in häuslichen
Umgebungen bestimmt. Der Rasenmäher ist zur
Verwendung in privaten Gärten vorgesehen. Der
Rasenmäher darf nicht zum Schneiden von Büschen,
Hecken oder Sträuchern, zum Schneiden von
Rankgewächsen, von bepflanzten Dächern oder von
Rasen in Balkonkästen, zum Entfernen (Aufsaugen)
von Schmutz von Gehwegen oder zum Zerkleinern
von Baum- oder Heckenschnitt verwendet werden.
Darüber hinaus darf der Rasenmäher nicht als
Motorgrubber zum Ausgleichen von hohen Stellen
wie Maulwurfshügeln verwendet werden. Das
Gerät darf nur für den vorgeschriebenen Zweck
eingesetzt werden. Jede andere Verwendung gilt als
Missbrauch.
Modellnr. LM507XX
Schnittbreite 300 mm
Anz. der Zylinderklingen 5
Schneidhöhe 15-25-31-35 mm
Fassungsvermögen des
Grasfangkorbs 14 L
Gewicht 6,0 kg
Modellnr. LM508XX
Schnittbreite 400 mm
Anz. der Zylinderklingen 5
Schneidhöhe 15-25-31-35 mm
Fassungsvermögen des
Grasfangkorbs 18 L
Gewicht 6,9 kg
BESCHREIBUNG
1. Oberer Griff
2. Mittlere Griffleiste
3. Unterer Griff
4. Rasenmäher
5. Grasfangvorrichtung
6. Knopf
7. Schraube
8. Wandhalterung mit Schrauben
9. Federbelasteter Stift
10.Einstellmutter der Gegenklinge
11.Klinge

DE
11
WWW.VONROC.COM
12.Gegenklinge
13.Rolle
14.Gurtschloss
3. MONTAGE
Betrachten Sie jede Abbildung genau und
identifizieren Sie die benötigten Komponenten mit
Bezug auf die Abbildung „Paketinhalt“ und die
obige Tabelle.
Anbringen des Griffs (Abb. A, B, C, E)
1. Unteren Griff (3) am Rasenmäher (4) befestigen.
Befestigen Sie zunächst eine Seite des Griffs
und drücken Sie das andere Loch des unteren
Griffs vorsichtig auf die Aussparung am
Rasenmäher, wie in AbbildungAdargestellt.
2. Montieren Sie die mittleren Griffleisten (2) mit
Hilfe der Bolzen (7) und Knöpfe (6) am oberen
Griff (1), wie in AbbildungB dargestellt.
3. Montieren Sie die zusammengebaute obere und
mittlere Griffleiste mit Hilfe der Bolzen (7) und
Knöpfe (6) am unteren Griff, wie in AbbildungC
dargestellt.
4. AbbildungE zeigt den korrekt montierten
Rasenmäher.
Montage der Grasfangvorrichtung
1. Achten Sie zunächst darauf, dass der
Metallstangenrahmen ordnungsgemäß in der
Grasfangvorrichtung (5) angebracht wurde.
2. Lassen Sie die Kunststoffklemmen an der Seite
der Grasfangvorrichtung (5) an den seitlichen
Stangen des Metallrahmens einrasten.
3. Lassen Sie die Kunststoffklemmen unten an der
Grasfangvorrichtung (5) an der unteren Stange
des Metallrahmens einrasten.
Anbringen der Grasfangvorrichtung am
Rasenmäher (Abb. D)
1. Bringen Sie die zusammengebaute
Grasfangvorrichtung (5) an der Rolle (13) an,
wie in AbbildungD dargestellt.
2. Sichern Sie die Grasfangvorrichtung (5) am
Rasenmäher, in dem Sie das Gurtschloss (14)
an der unteren Griffleiste (3) befestigen, wie in
AbbildungD dargestellt.
4. BETRIEB
Einstellung der Schneidhöhe (Abb. F)
Die Schneidhöhe kann auf 15-25-31-35 mm
eingestellt werden. Einstellen der Schneidhöhe:
1. Ziehen Sie die federbelasteten Stifte (9) an
beiden Seiten des Rasenmähers (4) nach
außen.
2. Stellen Sie die gewünschte Schneidhöhe ein, die
am Rasenmäher angegeben ist.
3.
Lassen Sie dann die federbelasteten Stifte
(9) los, wobei darauf zu achten ist, dass sie
richtig in den entsprechenden Löchern im
Rasenmähergehäuse sitzen. Hinweis: Beide
Seiten müssen immer auf dieselbe Höhe
eingestellt werden.
Nachjustierung des Klingenmechanismus (Abb. G)
Beim Umgang oder bei der Arbeit mit den
scharfen Klingen immer Handschuhe tragen.
Der Schneidmechanismus wird im Werk sorgfältig
eingestellt. Nach längerer Verwendung kann jedoch
ein Nachjustierung erforderlich sein. Führen Sie nur
dann eine Nachjustierung durch, wenn mindestens
eine der folgenden Bedingungen erfüllt ist:
• Das Mähergebnis wirkt ungleichmäßig und ein
Teil der Grashalme wurde nicht abgeschnitten
(das heißt, dass der Abstand zwischen
Gegenklinge und Mähspindel ist zu groß);
• Starker Widerstand beim Schieben des
Rasenmähers, oder das Schieben ist gar nicht
möglich;
• Der Klingenmechanismus des Rasenmähers
macht laute Geräusche oder die Klingen drehen
sich nicht, weil sie an der Gegenklinge reiben
oder an ihr hängen bleiben.
Nachjustierung des Klingenmechanismus:
1. Überprüfen Sie zuerst die Gegenklinge (12)
und die Rasenmäherklinge (11) auf Kerben/
Einschnitte. Es könnte notwendig sein, diese
mit einem Schleifstein zu entfernen.
2. Zum Verringern des Abstands zwischen
Gegenklinge (12) und Rasenmäherklinge (11)
drehen Sie die Einstellmutter der Gegenklinge
(10) im Uhrzeigersinn. Drehen Sie die
Einstellmutter der Gegenklinge (10) gegen den
Uhrzeigersinn, um den Abstand zu erhöhen.
3. Justieren Sie die Einstellmuttern der
Gegenklinge (10), bis die Rasenmäherklinge

12
DE
WWW.VONROC.COM
(11) die Gegenklinge (12) über ihre gesamte
Länge leicht berührt.
4. Stecken Sie ein Stück Papier (z.B. Größe
A4) zwischen die Gegenklinge (12) und die
Rasenmäherklinge (11).
5. Ziehen Sie nun beide Einstellmuttern der
Gegenklinge (10) im Uhrzeigersinn jeweils leicht
an, bis die Rasenmäherklinge (11) das Papier
über die gesamte Klingenlänge gleichmäßig
zerschneidet.
Hinweis: Die Klinge (11) und die Gegenklinge (12)
wirken wie die Klingen einer Schere.
Richtige Verwendung (Abb. H)
• Um die besten Ergebnisse zu erreichen,
stellen Sie den Rasenmäher an den Rand
der zu mähenden Rasenfläche und mähen in
Vorwärtsrichtung. Drehen Sie am Ende jeder
Bahn um und mähen Sie in Gegenrichtung,
wobei diese Bahn die zuvor gemähte Bahn
etwas überschneiden sollte. Siehe dazu auch
Abbildung H.
• Vergewissern Sie sich, dass der Rasen frei
von Steinen, Stöcken, Draht oder anderen
Gegenständen ist, die das Gerät beschädigen
könnten.
• Schneiden Sie kein nasses Gras, da es am
Unterboden des Geräts haften bleibt und das
ordnungsgemäße Auswerfen des Schnittguts
verhindert. Zudem könnte es dazu führen, dass
Sie ausrutschen und fallen.
• Um einen gesunden Rasen zu erhalten, sollte
nie mehr als ein Drittel der Gesamtlänge des
Grases abgeschnitten werden. Im Herbst sollte
der Rasen nur so lange gemäht werden, wie
noch Wachstum herrscht.
• Umkreisen Sie Blumenbeete. Mähen Sie beim
Erreichen eines Blumenbeets in der Mitte eines
Rasenstücks ein oder zwei Reihen rund um das
Beet herum.
• Seien Sie besonders vorsichtig, wenn Sie die
Richtung ändern.
• Immer entlang von Steigungen mähen (nicht
auf- und abwärts). Sie können das Abrutschen
des Rasenmähers verhindern, indem Sie ihn in
einer schrägen Position nach oben führen.
• Wählen Sie die Schneidhöhe entsprechend der
Graslänge. Machen Sie mehrere Durchgänge,
damit nicht zu viel Gras auf einmal abgemäht
wird.
• Leeren Sie die Grasfangbox regelmäßig.
Aufbewahrung (Abb. I, J)
Bewahren Sie das Gerät an einem sicheren,
trockenen Ort und außerhalb der Reichweite von
Kindern auf. Keine anderen Gegenstände auf dem
Gerät ablegen.
• Um den Rasenmäher aufzubewahren, können
Sie den Griff wie in AbbildungIgezeigt nach
vorne klappen.
• Zum Lieferumfang gehört auch eine
Wandhalterung(8), an der Sie den
zusammengeklappten Rasenmäher aufhängen
können. Die Wandhalterung sollte mit den
mitgelieferten Schrauben befestigt werden.
Eventuell sollten zusätzlich geeignete
Wanddübel verwendet werden.
5. WARTUNG
Ihr Rasenmäher ist darauf ausgelegt, über
einen langen Zeitraum mit einem Minimum an
Wartung betrieben zu werden. Ein fortwährend
zufriedenstellender Betrieb hängt von einer
ordnungsgemäße Mäherpflege und regelmäßiger
Reinigung ab.
• Den Rasenmäher sauber und trocken halten.
• Regelmäßig einen Flachschaber verwenden, um
Gras und Schmutz vom Rasenmäher zu
• Reinigen des Häckslers nur milde Seife und ein
feuchtes Tuch verwenden. Niemals Flüssigkeit in
das Werkzeug gelangen lassen und keine Teile des
Werkzeugs in Flüssigkeit tauchen. Kein scheuer-
oder lösemittelbasiertes Reinigungsmittel
verwenden.
Halten Sie die Klingen an, wenn das Gerät für den
Transport gekippt werden muss, wenn Sie andere
Flächen als Gras überqueren, und wenn Sie das Gerät
zum und vom Einsatzort bringen.
Verschlissene oder beschädigte Teile aus
Sicherheitsgründen austauschen. Nur Original-
Ersatzteile und Zubehör verwenden.
GARANTIE
VONROC-Produkte werden nach den höchsten
Qualitätsstandards entwickelt und sind für den
gesetzlich festgelegten Zeitraum ab dem Datum des
ursprünglichen Kaufs garantiert frei von Material- und
Verarbeitungsfehlern. Sollte das Produkt während

NL
13
WWW.VONROC.COM
dieses Zeitraums aufgrund von Material- und/oder
Verarbeitungsfehlern ausfallen, wenden Sie sich bitte
direkt an VONROC.
Folgende Umstände sind aus der Garantie
ausgeschlossen:
• An dem Gerät wurden von nicht autorisierten
Servicestellen Reparaturen und/oder
Änderungen vorgenommen oder versucht;
• Normaler Verschleiß;
• Das Gerät wurde missbräuchlich oder falsch
verwendet oder unsachgemäß gewartet;
• Es wurden keine Originalersatzteile verwendet.
Dies ist die einzige ausdrückliche oder
stillschweigende Garantie, die das Unternehmen
übernimmt. Es gibt keine weiteren ausdrücklichen
oder stillschweigenden Garantien, die über
die hierin enthaltenen Angaben hinausgehen,
einschließlich der stillschweigenden Garantien
der Gebrauchstauglichkeit und Eignung für einen
bestimmten Zweck. VONROC haftet in keinem
Fall für zufällige Schäden oder Folgeschäden.
Die Rechtsmittel des Händlers beschränken sich
auf die Reparatur oder den Austausch der nicht
konformen Geräte oder Teile.
Das Produkt und die Bedienungsanleitung können
Änderungen unterliegen. Technische Daten können
ohne vorherige Ankündigung geändert werden.
1. VEILIGHEIDSINSTRUCTIES
Lees de bijgesloten veiligheidswaarschuwingen,
de aanvullende veiligheidswaarschuwingen
en de instructies. Geeft ugeen gevolg aan de
veiligheidswaarschuwingen en de instructies
dan kan dat een elektrische schok, brand en/
of ernstig letsel tot gevolg hebben. Bewaar de
veiligheidswaarschuwingen en de instructies zodat
uze later ook nog kunt raadplegen.
De volgende symbolen worden gebruikt in de
gebruiksaanwijzing of op het product:
Lees de gebruiksaanwijzing.
Duidt op risico op persoonlijk letsel, gevaar
van een ongeluk met dodelijke afloop of
beschadiging van het gereedschap als de
instructies in deze handleiding niet worden
opgevolgd.
Voorzichtig: Raak de roterende messen niet
aan. Scherp mes/messen. Wees ubewust
van het feit dat deze messen vingers of
tenen kunnen afsnijden. Houd omstanders,
vooral kinderen en huisdieren, op een
afstand van meer dan 10 m.
Wees voorzichtig wanneer de messen
draaien. Steek uw handen of voeten niet in
de openingen wanneer de machine in
werking is.
Gebruik de gazonmaaier niet in de regen en
laat de machine niet buiten staan wanneer
het regent.
Risico op het wegslingeren van voorwerpen.
Houd omstaanders weg van de werkplek.
Controleer de omgeving waar de machine
wordt gebruikt zorgvuldig op de
aanwezigheid van wilde dieren en
huisdieren. Wilde dieren en huisdieren
kunnen letsel oplopen als de machine in
werking is. Controleer het werkgebied
nauwgezet op de aanwezigheid van stenen,

14
NL
WWW.VONROC.COM
takken, draden/kabels, botten en vreemde
objecten. Als de machine wordt gebruikt,
dient gecontroleerd te worden of geen
wilde dieren, huisdieren of kleine
boomstronken in het dichte gras zijn
verborgen.
SPECIALE VEILIGHEIDSINSTRUCTIES
• Montage door een volwassene vereist. Buiten
bereik van kinderen houden tot de montage
voltooid is, vanwege de aanwezigheid van
kleine onderdelen tijdens montage.
• Lees alle instructies vóór montage en gebruik.
• Nauwgezet monteren volgens de instructie.
• Voer een nieuwe controle uit om te verzekeren
dat alle onderdelen van de inhoud van de
verpakking intact zijn.
• Gebruik de maaier nooit als er mensen, vooral
kinderen of huisdieren, in de buurt zijn.
• Gebruik de maaier niet blootvoets of als uopen
sandalen draagt. Altijd wandelen, nooit lopen.
• Inspecteer het gebied waar de maaier gebruikt
moet worden grondig en verwijder alle
voorwerpen die door de machine weggeslingerd
kunnen worden.
• Het gebruik van het product op oevers kan
gevaarlijk zijn.
• Zorg er altijd voor dat ustevig staat op
hellingen. Zeer steile hellingen niet maaien.
Maai hellingen in de lengterichting, nooit
omhoog en omlaag. Wees uiterst voorzichtig als
uop hellingen van richting gaat veranderen.
• Wees uiterst voorzichtig als uachteruit stapt of
de machine naar utoe trekt.
• Nooit maaien terwijl ude machine naar utoe
trekt.
• Houd alle moeren, bouten en schroeven vast.
Zorg er altijd voor dat de apparatuur in een
veilige werkende staat is.
• Vervang versleten of beschadigde onderdelen
onmiddellijk.
• Houd handen en voeten uit de buurt van
draaiende messen.
• Wees voorzichtig tijdens het aanpassen van de
messen.
2. INFORMATIE OVER HET APPARAAT
Bedoeld gebruik
Dit product is ontworpen voor het maaien van gazons
in woonomgevingen. De gazonmaaier is bedoeld voor
privé tuinen thuis. Met de gazonmaaier mogen geen
struiken, heggen of heesters te knippen, het inkorten
van vegetatie, begroeide daken of gras dat groeit op
terrassen, voor het schoonmaken (stofzuigen) van
vuil en afval van trottoirs, of voor het hakselen van
snoeiafval van bomen of heggen. Bovendien mag
de gazonmaaier niet worden gebruikt als motorisch
aangedreven cultivator van het uitvlakken van hogere
delen, zoals molshopen. De apparatuur mag alleen
worden gebruikt voor het voorgeschreven doel. Alle
andere toepassingen worden beschouwd als onjuist
gebruik.
Modelnr. LM507XX
Snijbreedte 300 mm
Aantal cilindermessen 5
Maaihoogte 15-25-31-35 mm
Inhoud grasopvangbak 14 L
Gewicht 6,0 kg
Modelnr. LM508XX
Snijbreedte 400 mm
Aantal cilindermessen 5
Maaihoogte 15-25-31-35 mm
Inhoud grasopvangbak 18 L
Gewicht 6,9 kg
BESCHRIJVING
1. Bovenste handgreep
2. Middelste handgreep
3. Onderste handgreep
4. Maaier
5. Grasopvangbak
6. Knop
7. Bout
8. Muurbeugel met schroeven
9. Veerbelaste pin
10.Instelmoer counterblad
11.Snijmes
12.Countermes
13.Rol
14.Riemgesp

NL
15
WWW.VONROC.COM
3. MONTAGE
Bekijk elke afbeelding en identificeer de vereiste
onderdelen verwijzend naar de afbeelding 'inhoud
van de verpakking' en bovenstaande inhoudstabel.
De handgreep bevestigen (Afb. A, B, C, E)
1. De onderste handgreep (3) op de maaier (4)
bevestigen. Bevestig eerst een kant van de
handgreep en duw het andere gat van de
onderste handgreep voorzichtig op de inkeping
op de maaier, zoals wordt weergegeven op
afbeelding A.
2. Monteer de middelste handgreep (2) op de
bovenste handgreep (1), met de bouten (7)
en knoppen (6), zoals wordt weergegeven op
afbeelding B.
3. Monteer nu de gemonteerde bovenste
en middelste handgreep op de onderste
handgreep, met de bouten (7) en knoppen (6),
zoals wordt weergegeven op afbeelding C.
4. Een goed gemonteerde grasmaaier kan worden
bekeken op afbeelding E.
De grasopvangbak monteren
1. Verzeker dat het frame met metalen stangen
vooraf goed in de grasopvangbak (5)
gemonteerd is.
2. Klik de plastic klemmen op de zijkant van de
grasopvangbak (5) op de zijstangen van het
metalen frame.
3. Klik de plastic klemmen op de onderkant van
de grasopvangbak (5) op de onderste stang van
het metalen frame.
De grasopvangbak op de gazonmaaier bevestigen
(Afb. D)
1. Bevestig de gemonteerde grasopvangbak (5)
op de roller (13), zoals wordt weergegeven op
afbeelding D.
2. Zet de grasopvangbak (5) vast op de maaier
door de riemgesp (14) te bevestigen aan de
stang van de onderste handgreep (3), zoals
wordt weergegeven op afbeelding D.
4. WERKING
De maaihoogte instellen (Afb. F)
De maaihoogte kan worden ingesteld op een
hoogte van 15-25-31-35 mm. Om de maaihoogte
af te stellen:
1. Trek de veerbelaste pinnen (9) naar buiten, aan
beiden kanten van de maaier (4).
2. Stel de gewenste maaihoogte in, die op de
maaier aangegeven wordt.
3.
Laat nu de veerbelaste pinnen (9) los en
verzeker dat ze goed in de daarvoor bestemde
gaten in de behuizing van de maaier zitten.
Opmerking: beide kanten moeten altijd op
dezelfde hoogte ingesteld worden.
Het mesmechanisme opnieuw instellen (Afb. G)
Draag altijd handschoenen wanneer umet
of in de buurt van de scherpe messen
werkt.
Het snijmechanisme wordt nauwkeurig ingesteld
in de fabriek. Opnieuw instellen kan nodig zijn,
bijvoorbeeld na langdurig gebruik. Stel het alleen
opnieuw in als aan een of meer van volgende
voorwaarden voldaan is:
• De maairesultaten lijken ruw en ongelijk en
sommige stroken gras zijn niet gemaaid (de
afstand tussen het countermes en de as van de
maaier is te groot);
• Zware weerstand tijdens het duwen van de
maaier of zelfs onmogelijk om vooruit te duwen;
• Het mesmechanisme van de maaier maakt
veel geluid of draait niet omdat het tegen het
countermes schuurt of het countermes raakt.
Om het mesmechanisme opnieuw in te stellen:
1. Controleer het countermes (12) en het maaimes
(11) eerst op insnijdingen/deuken. Het kan
nodig zijn om deze te verwijderen met een
slijpsteen.
2. Draai om de afstand tussen het countermes
(12) en het maaimes (11) te verminderen, de
instelmoer van het countermes (10) naar rechts.
Draai de instelmoer van het countermes (10)
naar links om de afstand te verhogen.
3. Pas beide instelmoeren van het countermes
(10) aan tot het maaimes (11) de volledige
lengte van het countermes (12) lichtjes raakt.
4. Steek een stukje papier (bijv. A4 papier) tussen
het countermes (12) en het maaimes (11).
5. Zet beide instelmoeren voor het countermes
(10) nu stapsgewijs lichtjes vast, tot het
maaimes (11) het papier gelijkmatig snijdt over
de volledige meslengte.
Opmerking: het mes (11) en het countermes (12)
werken zoals een schaar.

16
NL
WWW.VONROC.COM
Goed gebruikt (Afb. H)
• Plaats de gazonmaaier op de rand van het
gazon en maai in voorwaartse richting, voor de
beste resultaten. Draai vervolgens op het einde
van elke strook en maai in de tegenovergestelde
richting, met de vorige gemaaide strook lichtjes
overlappend. Raadpleeg ook afbeelding H.
• Controleer of het gazon geen stenen, takken,
draden/kabels of andere vreemde objecten
bevat die het product of componenten daarvan
kunnen beschadigen.
• Geen nat gazon maaien, omdat nat gras de
neiging heeft om aan de onderkant van de
behuizing van de gazonmaaier vast te blijven
kleven, zodat het op de juiste manier afvoeren
van gemaaid gras wordt voorkomen en omdat
dan het risico bestaat dat ukunt uitglijden en
vallen.
• Voor een gezond gazon, mag unooit meer dan
een derde van de totale hoogte van het gras
maaien. In de herfst moeten gazons alleen
worden gemaaid als het gras nog groeit.
• Maak een cirkel rondom bloemperken. Als
een bloemperk in het midden van het gazon
aanwezig is, kunt utwee cirkels rondom het
bloemperk maaien.
• Wees extra alert bij het veranderen van de
richting.
• Maai altijd langs de helling (niet omhoog en
omlaag). Ukunt voorkomen dat de gazonmaaier
omlaag gaat glijden, door een positie aan te
houden die schuin omhoog gaat.
• Stel de maaihoogte in op basis van de hoogte
van het gras. Maai een aantal keren, om te
voorkomen dat in een enkele keer te veel gras
wordt gemaaid.
• Maak de grasopvangbak regelmatig leeg.
Opslag (Afb. I, J)
Bewaar de machine in een veilige, droge ruimte,
buiten het bereik van kinderen. Plaats er geen
andere voorwerpen bovenop de machine.
• Vouw de handgreep vooruit, zoals wordt
weergegeven op afbeelding I, om de maaier op
te bergen.
• Er is een muurbeugel (8) inbegrepen, om
de opgevouwen gazonmaaier tegen een
muur te hangen, als udat wenst. Gebruik de
bijgeleverde schroeven om de muurbeugel te
monteren. Gebruik geschikte pluggen indien
nodig.
5. ONDERHOUD
Uw gazonmaaier is zo ontworpen dat het met een
minimum aan onderhoud lange tijd dienst kan
doen. Voortdurend gebruik naar tevredenheid
is afhankelijk van de juiste verzorging van de
maaimachine en regelmatige reiniging.
• Houd de gazonmaaier schoon en droog.
• Verwijder gras en vuil regelmatig van de
gazonmaaier met een botte schraper
• Maak de maaier schoon met slechts een milde
zeepoplossing en een vochtig doek. Laat nooit
vloeistoffen in het gereedschap doordringen
en dompel nooit een onderdeel van het
gereedschap onder in vloeistof. Gebruik nooit een
schoonmaakmiddel op basis van een oplosmiddel
of een schuurmiddel.
Stop het mes/de messen de machine moet worden
gekanteld voor transport, wanneer uoppervlakken
oversteekt die geen gras zijn, en wanneer ude
machine van en naar het terrein vervoert, waar ude
machine gebruikt.
Vervang voor uw veiligheid versleten of beschadigde
onderdelen. Gebruik alleen oorspronkelijke
vervangende onderdelen en accessoires.
GARANTIE
Producten van VONROC worden op basis van
de hoogste kwaliteitsnormen ontwikkeld en zijn
gegarandeerd vrij van defecten, zowel voor wat
betreft het materiaal als de afwerking, gedurende
de door de wet bepaalde periode, startend vanaf de
datum van de originele aankoop. Mocht het product
gedurende deze periode enige storingen vertonen
als gevolg van gebrekkig materiaal en/of gebrekkige
afwerking, dient direct contact met VONROC
opgenomen te worden.
De volgende omstandigheden zijn uitgesloten van
de garantie:
• Reparaties en/of wijzigingen die door en niet
erkend servicecentrum aan het apparaat
werden aangebracht of waartoe een poging
werd ondernomen;
• Normale slijtage;
• Het gereedschap werd misbruikt, verkeerd werd
gebruikt en/of onjuist werd onderhouden;

FR
17
WWW.VONROC.COM
• Niet-originele reserveonderdelen werden
gebruikt.
Dit betreft de enige garantie die door de
organisatie, impliciet of expliciet, wordt
aangeboden. Geen andere garanties, impliciet
noch expliciet, die verder strekken dan deze
garantie, inclusief de impliciete garanties inzake
de verkoopbaarheid en geschiktheid voor
een specifiek doel. In geen geval zal VONROC
aansprakelijk zijn voor incidentele schade of
gevolgschade. De oplossingen van de dealers
zullen beperkt zijn tot de reparatie of het vervangen
van niet-conforme eenheden of onderdelen.
Het product en de gebruiksaanwijzing kunnen
worden gewijzigd. Specificaties kunnen zonder
voorafgaande kennisgeving worden gewijzigd.
1. CONSIGNES DE SÉCURITÉ
Veillez àbien lire les avertissements de sécurité,
les avertissements supplémentaires de sécurité
ainsi que toutes les instructions jointes. Le
non-respect des avertissements de sécurité et
des consignes peut entraîner des décharges
électriques, des incendies et/ou de graves
blessures. Conservez tous les avertissements et
toutes les instructions liées àla sécurité afin de
pouvoir vous yréférer dans le futur.
Les symboles qui suivent sont utilisés dans la
notice d'utilisation ou sur le produit :
Lisez la notice d'utilisation.
Indique un risque de blessure, de décès ou
de détérioration de l'outil en cas de
non-respect des consignes de cette notice.
Attention : Ne touchez pas les lames
rotatives. Lame(s) tranchante(s). Attention
àne pas vous couper les orteils ou les
doigts. Veillez àmaintenir les personnes
àproximité et notamment les enfants et les
animaux, àplus de 10m de distance.
Faites attention lorsque les lames tournent.
Ne placez pas vos mains ou vos pieds dans
les ouvertures lorsque la machine est en
marche.
N'utilisez pas la tondeuse sous la pluie et
ne la laissez pas dehors par temps pluvieux.
Risque de projection d'objets.
Éloignez les personnes àproximité de la
zone de travail.
Contrôlez soigneusement l'absence
d'animaux, domestiques ou non, dans la
zone où sera utilisée la machine. Les
animaux pourraient être blessés par la
machine en marche. Contrôlez parfaitement
la zone de travail et retirez-en toutes les
pierres, les bâtons, les fils métalliques, les
os et les corps étrangers. En utilisant la
machine, veillez àce qu'il n'yait aucun

18
FR
WWW.VONROC.COM
animal ou petite souche d'arbre cachés
dans les herbes denses.
CONSIGNES DE SÉCURITÉ SPÉCIFIQUES
• L'assemblage doit être réalisé par un adulte.
La présence de petites pièces impose que
les enfants soient maintenus àl'écart avant
l'assemblage complet de la machine.
• Veillez àlire toutes les consignes avant
l'assemblage et l'utilisation.
• Procédez àl'assemblage en respectant
strictement toutes les consignes.
• Contrôlez deux fois que toutes les pièces
contenues dans l'emballage sont intactes.
• N'utilisez jamais la tondeuse si des personnes,
et particulièrement des enfants ou des animaux
sont àproximité.
• Ne faites pas fonctionner la tondeuse si vous
portez des sandales ou si vous êtes pieds nus.
Marchez, ne courrez pas.
• Inspectez soigneusement la zone où la
tondeuse doit être utilisée et retirez tous les
objets qui risqueraient d'être projetés par
machine.
• Travailler sur des talus peut être dangereux.
• Faites toujours attention àvotre posture,
surtout dans les pentes. Ne tondez pas sur
des pentes très raides. Ne tondez jamais face
àune pente, jamais de haut en bas. Soyez
extrêmement prudent aux changements de
direction quand vous êtes en pente.
• Soyez extrêmement prudent quand vous reculez
ou que vous tirez la machine vers vous.
• Ne tondez jamais en tirant la machine vers vous.
•
Veillez àce que tous les écrous, boulons et vis
restent bien serrés. Veillez àce que l'équipement
reste en parfait état de fonctionnement.
• Remplacez les pièces usées ou endommagées
immédiatement.
• Éloignez vos mains et vos pieds des lames
lorsqu'elles tournent.
• Soyez particulièrement vigilant en réglant les
lames.
2. INFORMATIONS SUR LA MACHINE
Utilisation prévue
Ce produit aété conçu pour tondre les
environnements domestiques. La tondeuse àgazon
n'est prévue que pour les jardins des habitations
privées. La tondeuse àgazon ne doit pas être utilisée
pour tailler les buissons, les haies ou les arbustes,
pour couper la végétation dense, les toits végétaux ou
l'herbe des balcons, pour nettoyer (aspirer) la saleté
et les débris des allées ou pour broyer les arbres ou
les débris de haie. De plus, la tondeuse àgazon ne
doit pas être utilisée comme équipement pour tailler
les zones hautes des topiaires. L'équipement ne doit
être utilisé que pour l'usage auquel il aété destiné.
Toute autre utilisation est considérée comme étant
une utilisation non conforme.
N° de modèle LM507XX
Largeur de coupe 300 mm
Nb de lames sur le cylindre 5
Hauteur de coupe 15-25-31-35 mm
Capacité du bac àherbe 14 L
Poids 6,0 kg
N° de modèle LM508XX
Largeur de coupe 400 mm
Nb de lames sur le cylindre 5
Hauteur de coupe 15-25-31-35 mm
Capacité du bac àherbe 18 L
Poids 6,9 kg
PRÉSENTATION
1. Partie supérieure de la poignée
2. Barre centrale de la poignée
3. Partie inférieure de la poignée
4. Tondeuse
5. Bac àherbe
6. Bouton
7. Boulon
8. Fixation murale avec vis
9. Goupille àressort
10.Écrou de réglage de la contre-lame
11.Lame
12.Contre-lame
13.Rouleau
14.Boucle de sangle
3. ASSEMBLAGE
Étudiez chaque image et identifiez les composants
nécessaires en vous reportant àla figure "Contenu
de l’emballage" et au tableau ci-dessus.

FR
19
WWW.VONROC.COM
Installer la poignée (Fig.A, B, C, E)
1. Fixez la partie inférieure de la poignée (3) sur
la tondeuse (4). Fixez d'abord un côté de la
poignée et poussez doucement l'autre trou de
la partie inférieure de la poignée dans l'encoche
sur la tondeuse, comme illustré par la figure A.
2. Installez les barres centrales de la poignée
(2) sur la partie supérieure de la poignée (1),
àl'aide des boulons (7) et des boutons (6),
comme illustré par la figure B.
3. Installez ensuite les parties, supérieure et
centrale, de la poignée sur la partie inférieure
de la poignée, àl'aide des boulons (7) et des
boutons (6), comme illustré par la figure C.
4. Vous pouvez voir une tondeuse correctement
assemblée sur la figure E.
Installer le bac àherbe
1. Veillez àce que le cadre métallique soit
correctement pré-assemblé dans le bac
àherbe (5).
2. Clipsez les attaches en plastique sur le côté
du bac àherbe (5) dans les barres latérales du
cadre métallique.
3. Clipsez les attaches en plastique au bas du bac
àherbe (5) dans la barre inférieure du cadre
métallique.
Installer le bac àherbe sur la tondeuse (Fig. D)
1. Fixez le bac àherbe assemblé (5) sur le rouleau
(13), comme illustré par la figure D.
2. Fixez le bac àherbe (5) sur la tondeuse en
attachant la boucle de sangle (14) sur la barre
de la partie inférieure de la poignée (3), comme
illustré par la figure D.
4. UTILISATION
Régler la hauteur de coupe (Fig. F)
Il est possible de régler la hauteur de coupe à
15-25-31-35 mm. Pour régler la hauteur de coupe :
1. Tirez les goupilles àressort (9) vers l'extérieur
des deux côtés de la tondeuse (4).
2. Réglez la hauteur de coupe voulue, àl'aide des
indicateurs sur la tondeuse.
3.
Relâchez alors les goupilles àressort (9),
en veillant àce qu'elles soient correctement
insérées dans les trous prévus sur le corps de
la tondeuse. Remarque : les deux côtés doivent
toujours être réglés àla même hauteur.
Réajuster le mécanisme de la lame (Fig. G)
Veillez àtoujours porter des gants quand
vous manipulez les lames ou que vous
intervenez àproximité.
Le mécanisme de coupe aété soigneusement
ajusté en usine. Il se peut qu'un réajustage soit
nécessaire, après un certain temps. Ne procédez
au réajustage que si une ou plusieurs des
conditions suivantes se présentent :
• La tonte n'est pas nette et certains brins
d'herbe ne sont pas coupés (la distance entre
la contre-lame et l'arbre de la tondeuse est trop
importante) ;
• La tondeuse est très difficile, voire impossible
àpousser ;
• Le mécanisme de la lame est bruyant ou il ne
tourne pas car il touche ou mord la contre-lame.
Pour réajuster le mécanisme de la lame :
1. Contrôlez d'abord que la contre-lame (12)
et la lame de la tondeuse (11) pour détecter
d'éventuelles entailles ou bosses. Il se peut que
ces défauts doivent être corrigés àl'aide d'une
meule.
2. Afin de diminuer la distance entre la contre-
lame (12) et la lame de la tondeuse (11),
tournez l'écrou de réglage de la contre-lame
(10) dans le sens des aiguilles d'une montre.
Tournez l'écrou de réglage de la contre-lame
(10) dans le sens inverse des aiguilles d'une
montre pour augmenter cette distance.
3. Réglez les écrous de réglage de la contre-lame
(10) jusqu'àce que la lame de la tondeuse
(11) brosse légèrement toute la longueur de la
contre-lame (12).
4. Insérez une feuille de papier (A4) entre la
contre-lame (12) et la lame de la tondeuse (11).
5.
Serrez alors les deux écrous de réglage de la
contre-lame (10) dans le sens des aiguilles d'une
montre, un petit peu àla fois, jusqu'àce que
la lame de la tondeuse (11) coupe le papier de
façon uniforme sur toute la longueur de la lame.
Remarque : la lame (11) et la contre-lame (12)
agissent comme une paire de ciseaux.
Utilisation correcte (Fig. H)
• Pour obtenir les meilleurs résultats possible,
placez la tondeuse au bord de la pelouse et
tondez vers l'avant. Tournez ensuite àla fin de
chaque rangée et tondez dans l'autre sens, en

20
FR
WWW.VONROC.COM
chevauchant légèrement la rangée déjà tondue.
Consultez également la figure H.
• Veillez àce que la pelouse ne contienne pas de
pierres, de bâtons, de fils métalliques ou tout
autre objet qui pourrait endommager le produit.
• Ne tondez pas d'herbe mouillée car elle
atendance às'agglutiner sous le produit et
àempêcher la bonne évacuation des déchets de
tonte, en plus de risquer de vous faire glisser ou
tomber.
• Pour la bonne santé de votre pelouse, veillez
àne jamais la tondre àplus d'un tiers de sa
hauteur totale. En automne, les pelouses ne
doivent être tondues qu'au fur et àmesure de
leur pousse.
• Cercle autour des massifs de fleurs. Si vous
atteignez un massif de fleurs au milieu de la
pelouse, tondez une rangée ou deux autour du
massif.
• Soyez particulièrement vigilant en changeant de
direction.
• Veillez àtoujours tondre le long des pentes (et
pas de haut en bas). Vous pouvez empêcher la
tondeuse de glisser vers le bas en la gardant
inclinée vers le haut.
• Choisissez la hauteur de coupe en fonction de
la hauteur de la pelouse. Effectuez plusieurs
passages afin de ne pas tondre trop d'herbe àla
fois.
• Videz le bac àherbe régulièrement.
Rangement (Fig.I, J)
Rangez la machine dans un endroit sûr, au sec et
hors de portée des enfants. Ne posez aucun autre
objet sur le dessus de la machine.
• Pour pouvoir ranger la tondeuse, repliez la
poignée vers l'avant, comme illustré par la
figure I.
• Une fixation murale (8) est livrée avec la
tondeuse pour pouvoir ranger la tondeuse
repliée sur un mur si vous le souhaitez. Utilisez
les vis fournies pour installer la fixation murale.
Utilisez des chevilles si nécessaire.
5. MAINTENANCE
Votre outil aété conçu pour fonctionner longtemps
avec un minimum d'entretien. Le fonctionnement
satisfaisant continu dépend d’un entretien correct
de la tondeuse et d’un nettoyage régulier.
• Veillez àgarder la tondeuse propre et sèche.
• Utilisez régulièrement un racloir souple pour retirer
l’herbe et les saletés
• Pour nettoyer la tondeuse, veillez àn'utiliser que
du savon doux et un chiffon humide. Ne laissez
jamais aucun liquide pénétrer àl'intérieur de l'outil
et ne plongez aucune de ses pièces dans aucun
liquide. N'utilisez pas de détergents abrasifs ou
àbase de solvants.
Arrêtez la/les lame(s) si la machine doit être penchée
pour la transporter sur des surfaces autres que de
l'herbe et pour la transporter d'une zone d'utilisation
àune autre.
Pour des raisons de sécurité, veillez àremplacer
toutes les pièces usées ou endommagées. N'utilisez
que des pièces détachées et des accessoires d'origine.
GARANTIE
Les produits VONROC sont développés avec les
normes de qualité les plus hautes et ils sont garantis
pour être exempts de défaut de pièces et de main
d'œuvre pour la durée stipulée par la loi et àcompter
de la date d'achat initiale. Si, au cours de cette
période, le produit devait rencontrer une quelconque
panne due àun défaut de pièce ou de main d'œuvre,
contactez VONROC directement.
Les conditions suivantes sont exclues de la
garantie :
• Réparations ou modifications sur la machine,
faites ou tentées par des réparateurs non
agréés ;
• Usure normale ;
• Utilisation abusive ou incorrecte ou
maintenance incorrecte de l'appareil ;
• Utilisation de pièces détachées non d'origine.
Ceci représente l'unique garantie, explicite ou
implicite, proposée par la société. Il n'existe
aucune autre garantie, explicite ou implicite,
qui puisse dépasser le cadre de la présente
garantie, ycompris les garanties implicites de
qualité marchande et d'adaptation àun usage
particulier. En aucun cas, VONROC ne saurait être
tenu responsable pour les dommages accidentels
ou consécutifs. Les recours des revendeurs sont
limités àla réparation ou au remplacement des
équipements ou des pièces non conformes.
This manual suits for next models
1
Table of contents
Languages:
Other VONROC Lawn Mower manuals
Popular Lawn Mower manuals by other brands

Husqvarna
Husqvarna LB 248S Operator's manual

Black & Decker
Black & Decker Lawn Hog MM575 instruction manual

Craftsman
Craftsman 917.255441 owner's manual

Villager
Villager FALCON 6111 H-MATIC Original instructions for use

Yard-Man
Yard-Man 2380-1 Operating manual and parts list

Poulan Pro
Poulan Pro 194632 Operator's manual