Voyage Audio Spatial Mic User manual

Spatial Mic
User Guide
Version 1.4

Voyage Audio Spatial Mic
User Guide
Package Contents 4
Introduction 4
Requirements 5
Background 5
Getting To Know Spatial Mic 8
Mounting 8
Powering 8
Outputs 9
Controls 10
USB Audio Recording 11
Mac OSX 11
Windows 10 15
Mobile Devices 20
iOS 20
Android 23
USB Notes & Troubleshooting: 25
Using Your Microphone 26
Positioning 26
Recording Tips 26
Care & Maintenance 27
Spatial Mic Converter 28
Overview 28
Usage 28
Controls & Interface 29
Controls 29
Interface 30
Installation 31
Spatial Mic Control 32
Overview 32
Usage 32
Controls & Interface 32
Controls 32
2

Voyage Audio Spatial Mic
User Guide
Package Contents
● Spatial Mic
● Your choice between USB C to C or USB C to A cable, 3 meter, black nylon braided
● ¼-20 to ⅝’’ mini swivel ball hard-mount
● Foam windscreen
● Quick-start guide
● For Download: Spatial Mic Converter VST® plugin (Mac OSX & Windows) and AAX (Mac
OSX)
● For Download: Spatial Mic Control standalone app (Mac OSX & Windows)
● For Download: User Manual
Introduction
Thank you for purchasing Spatial Mic! With 8 high-quality capsules, digital connectivity, live
monitoring and a dedicated DAW plugin for output conversion, Spatial Mic helps you capture
immersive 3D audio, surround sound, rotatable stereo and beyond.
Spatial Mic records the entire sound-field with precision. Signals from 8 capsules, encoded
with
Spatial Mic Converter plugin result in a second order ambisonics representation of your audio
4

Voyage Audio Spatial Mic
User Guide
scene. This allows for stunning spatial resolution, engaging listeners as immersive sound moves
around their heads.
Designed for audio engineers, producers for AR/VR, game sound-designers and 3D audio
pioneers, Spatial Mic is a next generation 360 microphone. Spatial Mic and the included Spatial
Mic Converter plugin (VST and AAX) offer substantial improvements over existing solutions:
● Enhanced spatial resolution, pattern decoding, directivity & optimal listening area vs first
order microphones and less phase issues than with spaced arrays.
● Future-proof output — may be decoded to any listening format live or in post and is not
locked to one specific configuration like 2-channel binaural microphones.
● Output may be head-tracked and used natively with content delivery tools from
YouTube, Facebook and Google Resonance SDK.
Streamlining the recording workflow when dealing with multi-channel microphone arrays was a
top priority during the development of Spatial Mic. With built-in USB and ADAT connectivity, no
external mic preamps, multi-channel cables carrying analog signals or converters are needed.
Along with purity of signal, an individual calibration profile stored within each mic ensure
consistent quality.
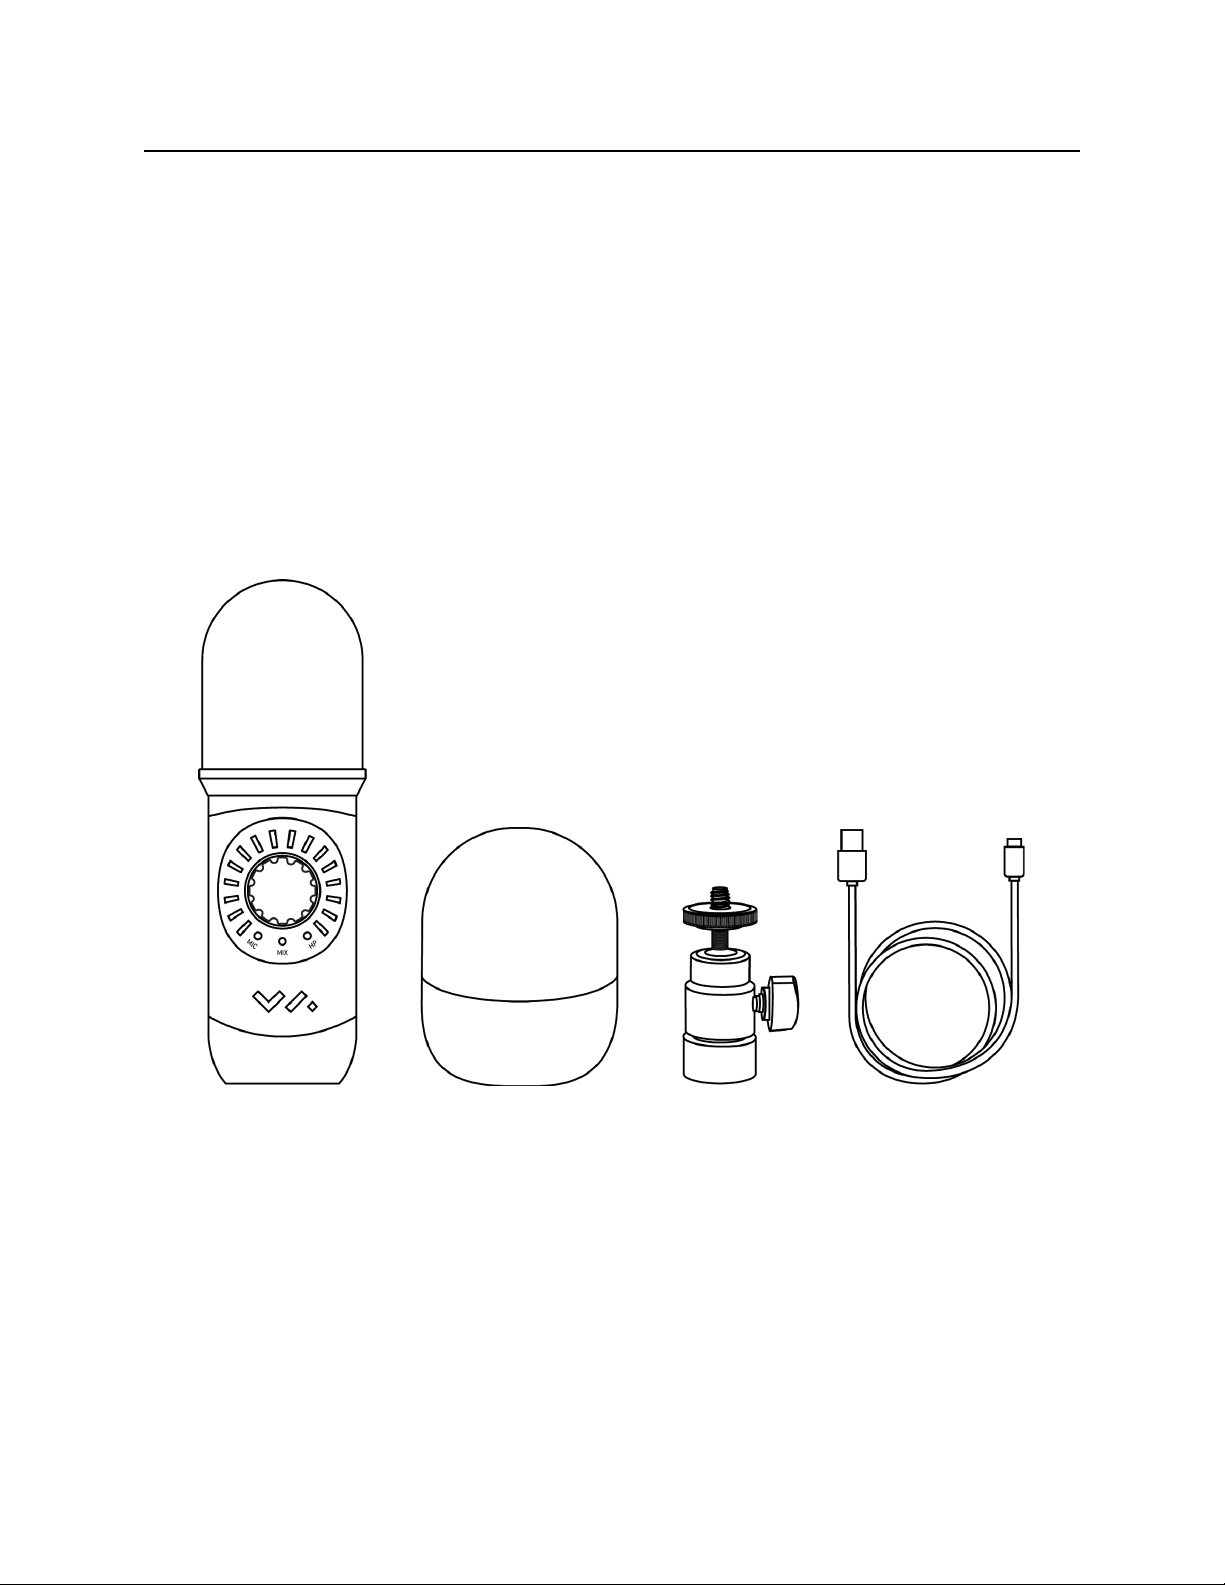
We are excited for you to start recording with Spatial Mic. Please read this user manual and get
to know everything this microphone package has to offer. Happy recording!
Requirements
● Host device supporting multichannel USB Audio 2.0 or ADAT lightpipe input.
● USB bus power via USB-C jack or external 5v / 500mA source via micro-USB.
● DAW supporting multi-channel audio tracks like Reaper, Pro Tools or Nuendo.
● Spatial Mic Converter plugin and Spatial Mic Control app have been tested to work on
Mac OSX 10.11 and higher or Windows 10.
Background
When we record the signal from a traditional microphone, we put this on a track and assign it to
a playback channel. We can play this back on one speaker and call it mono, or send it to two
speakers, pan it left, right or center and call it stereo. We can also expand this to a larger 5.1 or
even 22.1 surround system. In all of these cases we are relying on a channel based system to
record and playback audio.
Channel based systems require the same number and configuration of loudspeakers to be used
in production and playback. Ambisonics enables audio production and playback without using
5

Voyage Audio Spatial Mic
User Guide
a channel based methodology, thus enabling reproduction on any number of speakers in
varying configurations. The advantage of using ambisonics vs channel-based audio (i.e. mono,
stereo, 5.1, etc) is that the signals are not related to speaker feeds. Because of this, ambisonics
is a future-proof way of recording.
Ambisonics was first developed in the 1960’s and ‘70’s by passionate researchers as a way to
encode
a 3D sound field. To do this, the sound-field is decomposed into a series of spherical
harmonics. While a spherical harmonic series goes indefinitely, we are most interested in the
first few “orders”, which will give us enough spatial resolution to encode a realistic sounding
representation of a soundfield. The encoded audio on DAW tracks will represent these spherical
harmonics, instead of speaker feeds.
In the figure below, you can see that, as order increases, more spherical harmonics are needed.
For example, a second order spherical harmonic representation of a sound field contains 9
components - all of the harmonics from the zeroth and first order, plus 5 more.
At the zeroth order, you can see that a single, omni-directional microphone capsule is capable
of recording this harmonic. But what about the first and second order? To create these
harmonics, the sound field must be sampled by a microphone array and then encoded. For first
order, the traditional way is to use crossed figure-eight microphone capsules and was first
pioneered by Michael Gerzon and Peter Craven in the 1970’s. The 8 microphone capsules in
the Spatial Mic array are encoded by the Spatial Mic Converter plugin to create the 9 spatial
harmonics needed to represent a soundfield as second order. Any ambisonic soundfield
representation greater than one is referred to as Higher Order Ambisonics (HOA).
6

Voyage Audio Spatial Mic
User Guide
When working with ambisonics, sometimes the raw capsule signals, pre-encode, are collectively
called A-Format, while encoded signals are called B-Format. Ambisonics encoders, decoders
and processors vary in the expected sequencing of the spatial harmonics and their encoded
level (sometimes called weighting). The two most common are AmbiX and FuMa. Make sure
the expected format for a given ambisonic processor matches the audio being sent to it.
Spatial Mic Converter encodes the raw capsule signals from Spatial mic to second order (9
channels) B-Format. Once in B-Format, audio can be sent to numerous sound crafting plugins.
Here are some that work with Higher Order Ambisonics:
●SSA
●Blue Ripple Sound
●Nosiemakers
●IEM Plugin Suite
●SPARTA
Ambisonics may be decoded
to almost any format desired (including channel-based) and
stored in formats like MPEG-H. The most common decoding method for ambisonics is called
binaural, which is played back on stereo headphones. When decoding to binaural a Head
Related Transfer Function (HRTF) is used to approximate how human anatomy affects spatial
perception. For example, how does the frequency response of a single sound source change as
you rotate your head in front of it? An HRTF aims to take this into account.
Ambisonics moves us beyond what has been possible with channel based formats, enabling
applications in Augmented and Virtual Reality, music production, broadcasting and immersive
environments. While ambisonics can be used in nearly any type of audio production, adoption is
becoming more widespread. Here are some useful resources:
●Reaper Ambisonics User Forum
●Oculus - Spatial Audio How-To
●YouTube 360
●Facebook 360 Spatial Workstation (also check out how to livestream)
●Resonance Audio - Spatial Audio SDK for Unity, Unreal, FMOD, Wwise, Web,
Android and iOS
●Ambisonics in Pro Tools
7

Voyage Audio Spatial Mic
User Guide
Getting To Know Spatial Mic
Mounting
A ¼-20 thread mount on the back of the mic allows for hard-mounting to a standard microphone
stand. Screw the included ¼-20 to ⅝’’ mini swivel ball hard-mount into the ¼-20 threads on the
back of Spatial Mic. Screw the other end into your microphone stand. Note that this method
does not provide acoustic isolation from the mic stand.
For acoustic isolation, use a Rycote InVision shockmount (sold separately). Place Spatial Mic in
the shockmount so bottom of mic is flush with inner shockmount ring and tighten screws around
the mic. Ensure microphone cannot slip out of shockmount and knob can be accessed.
Powering
Spatial Mic can be bus powered through the same USB-C jack used for data transfer. Operation
with a hub is not guaranteed (and beyond the scope of this user manual) due to the number and
variety available. If attempting to use Spatial Mic with a hub, please ensure that it is
self-powered and can provide 500mA to the mic.
When using the ADAT lightpipe digital output, power to Spatial Mic must be applied via USB-C
jack or micro-USB.
8

Voyage Audio Spatial Mic
User Guide
Some mobile devices connected via USB may require power to be applied through the
micro-USB jack. Using a USB battery or 5V AC adapter will also help to extend the battery life of
your mobile device while recording.
Outputs
ADAT Lightpipe
The ADAT Lightpipe output provides 8 channels of digital 24-bit / 48kHz uncompressed audio
over a fiber optic cable. Connect a TOSLINK optical cable to the ADAT receptacle on the
bottom of Spatial Mic and the other end to an ADAT lightpipe input. Follow the setup instructions
for the connected device to receive 8 channels of audio from Spatial Mic.
USB
Connecting Spatial Mic via a USB cable offers single wire connectivity to Windows, Mac OSX or
mobile USB Audio 2.0 compatible host devices. Connect a cable with a USB-C plug into Spatial
Mic and the other end into a USB port on the host device.
Headphones
Plug headphones into the ⅛-inch (3.5mm) stereo jack on the bottom of the microphone to
monitor capsule array in binaural (using Google Resonance HRTFs) and host device playback
in stereo. Note that the live headphone output uses a frequency independent first order
ambisonics matrix and is intended for confidence monitoring only. For full fidelity, the
microphone output should be encoded with the Spatial Mic Converter Plugin in a DAW.
9

Voyage Audio Spatial Mic
User Guide
Controls
Knob
The anodized aluminum knob on the front of Spatial Mic indicates the front of the microphone
and is used to change various aspects of the recording and monitoring configuration.
●Push the knob to cycle through modes:
METERING ➜ MIC GAIN ➜ MIX ➜ HP LEVEL.
●Rotate the knob to adjust selected mode.
●Push & Hold knob to mute or unmute capsule signals.
Metering Mode
When powering up Spatial Mic for the first time, the LED display will show a turn-on sequence
and then default to metering mode showing individual capsule level. Default metering mode may
be changed with the Spatial Mic Control app. The metering modes that may be selected are:
● Off - no metering or LEDs on
●Monitor - LEDs display stereo L-R mix of Live binaural monitoring and host device
playback.
● Capsule - LEDs display signal level for the 8 capsules. If audio from a capsule clips, it’s
corresponding LED will turn red for 3 seconds. This is an indication that you may need to
decrease capsule gain.
Mic Gain
Push the knob while in metering mode to enter Mic Gain mode as shown by the blue LED.
Current Mic Gain will now be displayed and can be adjusted by rotating the knob. Mic Gain
10

Voyage Audio Spatial Mic
User Guide
adjusts the gain of capsules before analog to digital conversion. Optimize mic gain so that the
capsule signal is not clipping.
Turning the mic gain to the lowest position enables ‘pad mode’. In this mode, the microphone
can record greater than 120dB — useful for recording loud sound sources.
Mix
Push the knob while in mic gain mode to enter mix mode as shown by the blue LED. Current
mix balance will now be displayed and can be adjusted by rotating the knob. Rotating the knob
to the left increases the amount of live capsule signal in the mix, while rotating the knob to the
right increases the amount of stereo host playback in the mix. This adjustment only affects the
stereo audio signal sent to the headphone output.
HP Level
Push the knob while in mix mode to enter HP level mode as shown by the blue LED. Current
headphone level will now be displayed and can be adjusted by rotating the knob.
While in HP mode, pushing the knob will cycle back to metering mode.
USB Audio Recording
While various Digital Audio WorkStations (DAW) like Reaper , Pro Tools or Nuendo may be
used with Spatial Mic and Spatial Mic Converter plugin, we will focus on showing how to use
Spatial Mic with Reaper on Mac OSX and Windows 10.
Mac OSX
1. Plug the free end of the USB cable to the USB port on your host device. Spatial Mic will
go through an LED start-up sequence to indicate the device is receiving power. Your
Mac OSX computer will automatically recognize the USB device.
2. Download and install the 64-bit version of Reaper for Mac OSX.
3. Open Reaper and create a new project.
4. Press Command + , or open Options ► Preferences… and select the Device tab.
11

Voyage Audio Spatial Mic
User Guide
5. Select SpatialMic USB 2.0 from the Audio Device dropdown as shown.
6. Press Command + t to create a new track and label it Spatial Audio.
7. Open the track Routing as shown, change Track Channels to 8 and de-select Master
Send.
12

Voyage Audio Spatial Mic
User Guide
8. Right click on the Record Arm/Disarm button and select Input:8 channel ► Spatial
Mic 1...Spatial Mic 8[8 chan] as shown.
9. Enable recording by clicking the red Record Arm/Disarm button. The meter on the
track should now be showing signal from Spatial Mic.
10. Create another track by pressing Command + t and label it Mic Out.
11. Open the track Routing as shown, change Track Channels to 10 and select 1: Spatial
Audio from the Receives drop down as shown. For the receive, make sure 1-8 is
selected under Multichannel Source from the audio dropdown menu as shown.
12. Click the FX button on the Mic Out Track and insert the Spatial Mic Converter Plugin
(plugin installation and use is explained later in the user manual). Your screen should
13

Voyage Audio Spatial Mic
User Guide
now look similar to this:
13. Next, click Add and insert the FB360 Converter plugin (available for download here).
To listen to mic playback in binaural stereo, setup plugin as shown (note that after
closing and reopening a session, check to make sure the correct output is still selected
14

Voyage Audio Spatial Mic
User Guide
in this plugin):
14. You may now press the record button or press command + r to begin recording audio.
Press the space-bar stop and press the space-bar again to playback.
Windows 10
1. First, download ASIO4ALL drivers from http://www.asio4all.org/ and run the Setup
Wizard to install.
2. Plug the free end of the USB cable to the USB port on your host device. Spatial Mic will
go through an LED start-up sequence to indicate the device is receiving power.
3. Windows may install audio drivers, which is fine, however for these instructions we will
be using the ASIO4ALL drivers.
4. In the Windows Sound control panel, double click on Spatial Mic in the Playback tab
and make sure “Allow applications to take exclusive control of this device” is unchecked
as shown. Do this for Spatial Mic in the Recording tab also.
15

Voyage Audio Spatial Mic
User Guide
5. Download and install the 64-bit version of Reaper for Windows.
6. Open Reaper and create a new project.
7. Press Ctrl + P or open Options ► Preferences… and select the Device tab.
8. Select ASIO from the Device dropdown as shown and make sure ASIO4ALL is selected
as the ASIO Driver and that the first and last inputs correspond to all 8 channels
coming from Spatial Mic. A sample ASIO Configuration screen is also shown.
16

Voyage Audio Spatial Mic
User Guide
9. Press Ctrl + t to create a new track and label it Spatial Audio.
10. Open the track Routing as shown, change Track Channels to 8 and de-select Master
Send.
17

Voyage Audio Spatial Mic
User Guide
11. Right click on the Record Arm/Disarm button and select Input:8 channel ► Spatial
Mic 1...Spatial Mic 8[8 chan] as shown.
12. Enable recording by clicking the red Record Arm/Disarm button on the Spatial Audio
track. The meter on the track should now be showing signal from Spatial Mic.
13. Create another track by pressing Ctrl + t and label it Mic Out.
14. Open the track Routing as shown, change Track Channels to 10 and select 1: Spatial
Audio from the Receives drop down as shown. For the receive, make sure 1-8 is
18

Voyage Audio Spatial Mic
User Guide
selected under Multichannel Source from the audio dropdown menu as shown.
15. Click the FX button on the Mic Out Track and insert the Spatial Mic Converter Plugin
(plugin installation and use is explained later in the user manual). Your screen should
now look similar to this:
19

Voyage Audio Spatial Mic
User Guide
16. Next Click Add and insert the FB360 Converter plugin (available for download here).
To listen to mic playback in binaural stereo, setup plugin as shown:
17. You may now press the record button or press command + r to begin recording audio.
Press the space-bar stop and press the space-bar again to playback.
Mobile Devices
iOS
Spatial Mic has been tested to work with iOS by means of the Lightning to USB 3 Camera
Adapter. While several recording apps exist for iOS like Auria and Audio Evolution Mobile, we
will focus on using multiTrack DAW.
1. Plug the free end of the Lightning to USB 3 Camera Adapter into your iOS device.
2. Plug a USB battery or power adapter into the lightning receptacle on the Lightning to
USB 3 Camera Adapter.
20
Table of contents
Other Voyage Audio Microphone manuals