WAC Lighting Fuego EIR3SF User manual

INSTALLATION INSTRUCTIONS
FUEGO
MODEL:EIR3SF
WAC Lighting Headquarters WAC Lighting(Hongkong) WAC Lighting (Shanghai)
44 Harbor Park Drive Room A2 15/F United Center 14 Lane 299, Bi Sheng Road
Port Washington, NY 11050 95 Queensway HK, 999077 Shanghai 201204
www.waclighting.com www.waclighting.hk www.waclighting.com.cn 1/ 4
WAC Lighting retains the right to modify the design of our products at any time as part of the company's continuous improvement program.
INSTALLATION STATEMENT:
1. Read all instructions before installing.
2. System is intended for installation by a qualified electrician.
3. To reduce the risk of fire, electrical shock and injuries to persons,
turn off power at main switch before installing or modifying the system.
4. In accordance with the National Electric Code and local regulations.
5. Suitable for both indoor and outdoor environment use.
6. Retain instructions for future maintenance reference.
FIXTURE ACCESSORY (included in box)
Hex Key Qty: 1pcs
CONCRETE POUR INSTALLATION:
1. Install wiring and conduit (use 1/2” NPT) with Concrete Pour
Canister at desired position, plug all un-used holes (Fig. 1)
Secure the canister to the bottom of the application ground
by using screws. 1)
Note: For proper alignment, make sure the flat edge of the
canister is parallel to the wall. (Fig. 2)
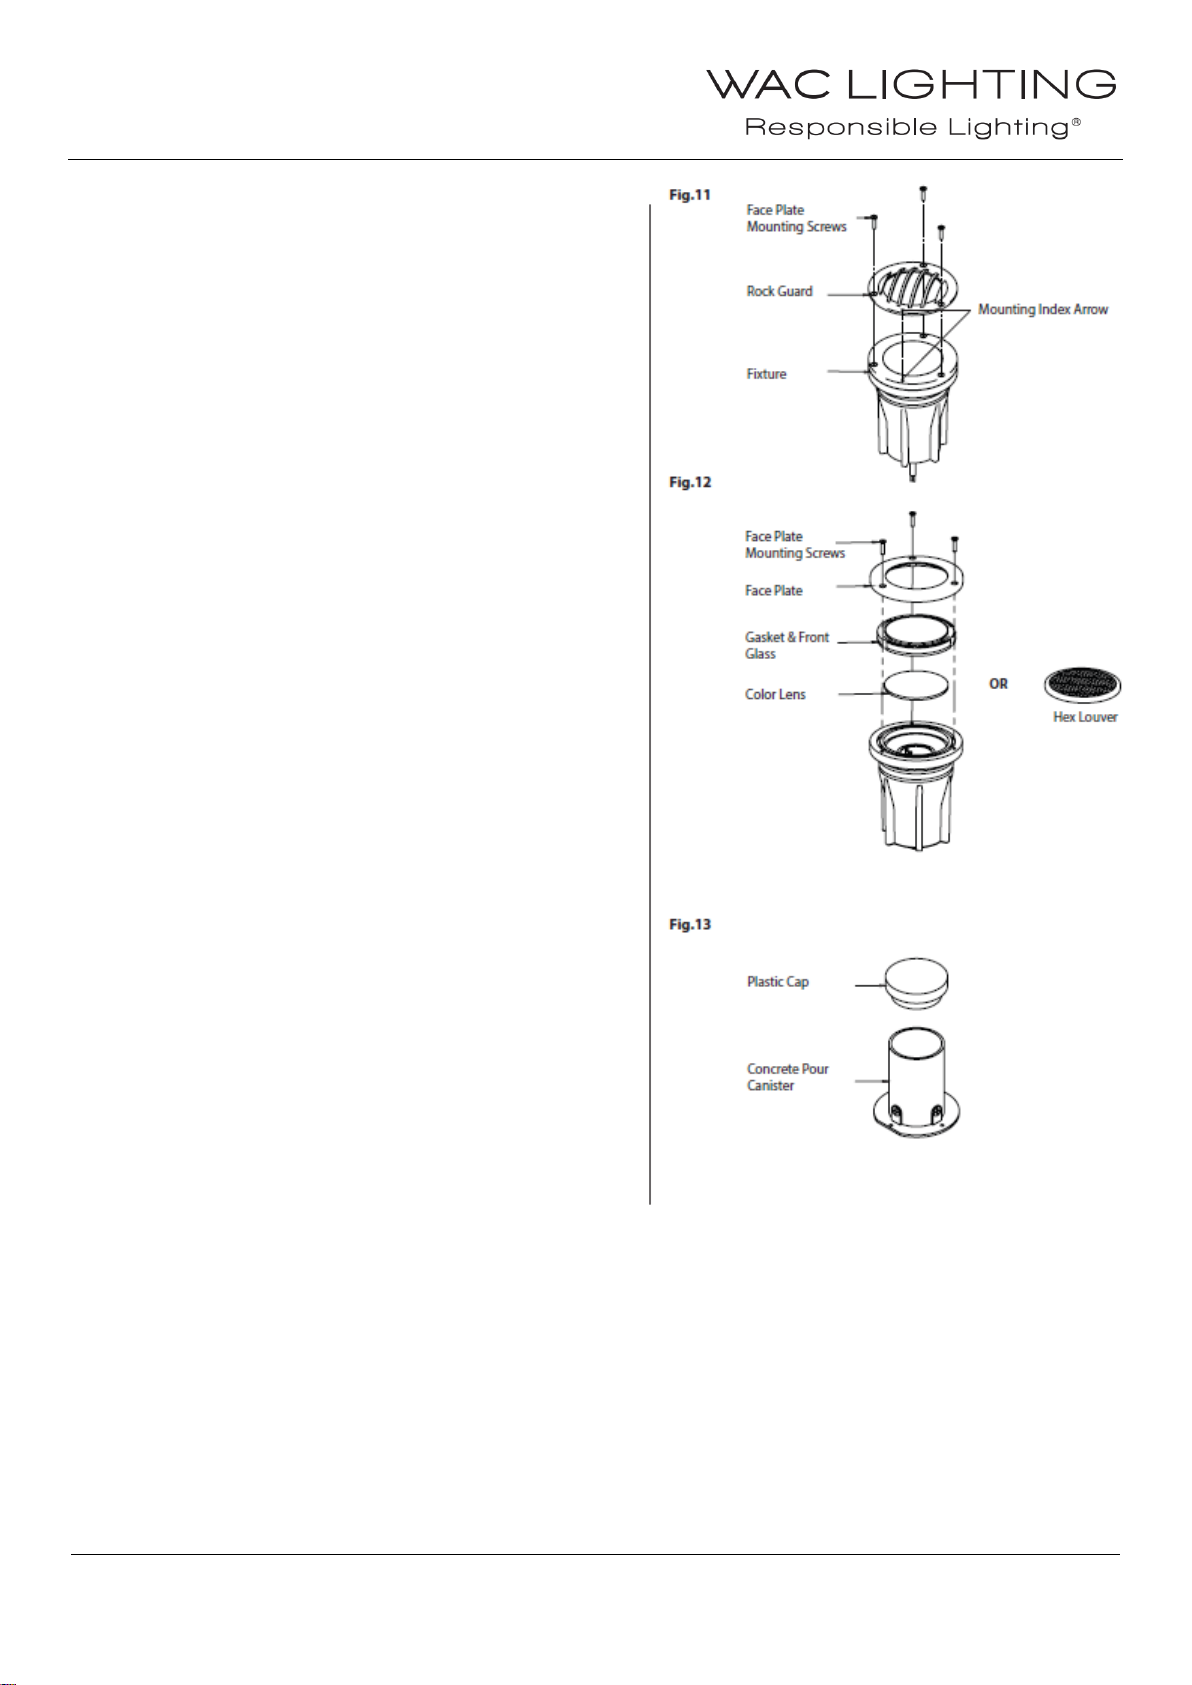
2. Insert Plastic Cap into Concrete Pour Canister (Fig. 1)
3. Pour concrete until it’s flushed with the Plastic Cap. (Fig. 3)
NOTE: NO CONCRETE ENTERS THE BOX. USE SAND OR
GRAVEL FOR PROPER DRAINAGE.
4. After concrete has cured, crack concrete and remove Plastic
Cap using a corkscrew or similar tool. (Fig. 4)
5. Connect fixture leads to box wiring using supplied outdoor
Rated wire nuts. Make sure all power is off while wiring LED
fixture.
6. Apply a smear of plumber’s silicone to O-rings. Insert LED
fixture into flange with a twisting motion. Make sure the trim
is flushed with the top of the poured concrete.
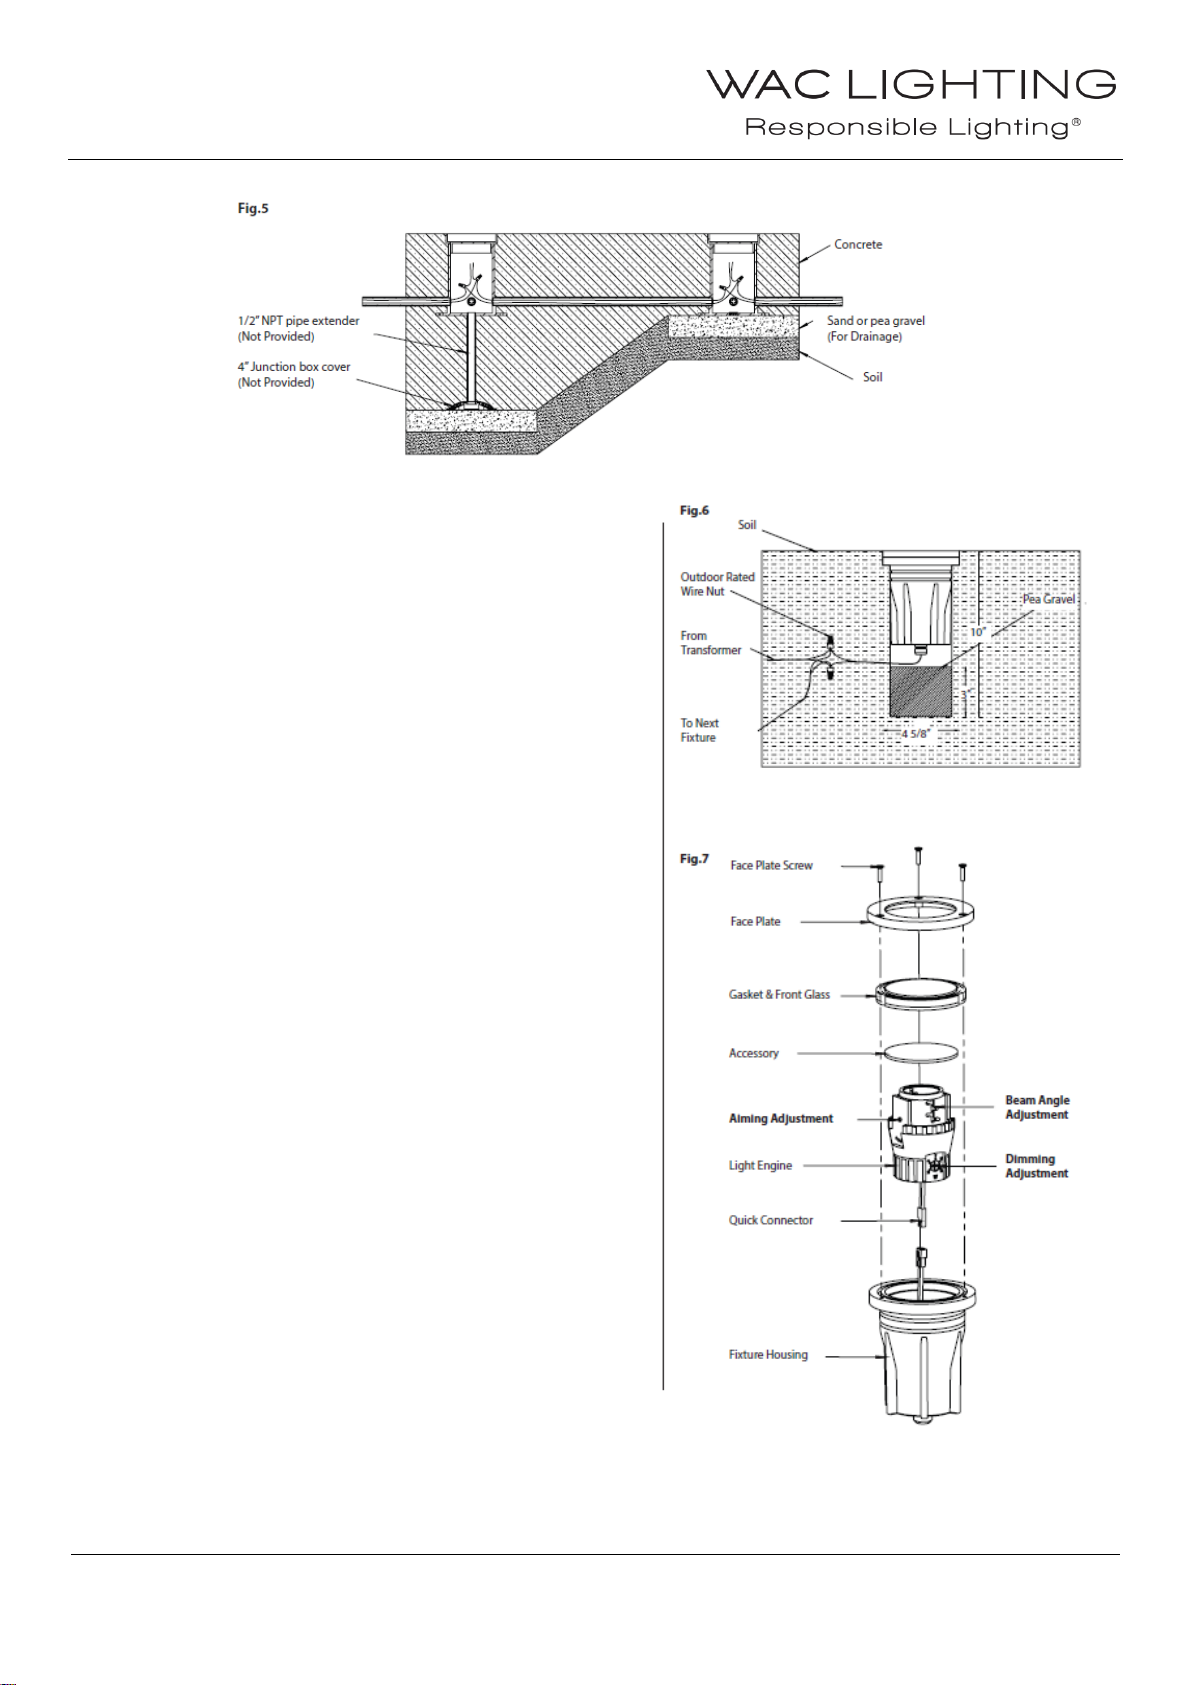
7. To match different height requirements, use extenders and
cover plates. (Fig. 5)

INSTALLATION INSTRUCTIONS
FUEGO
MODEL:EIR3SF
WAC Lighting Headquarters WAC Lighting(Hongkong) WAC Lighting (Shanghai)
44 Harbor Park Drive Room A2 15/F United Center 14 Lane 299, Bi Sheng Road
Port Washington, NY 11050 95 Queensway HK, 999077 Shanghai 201204
www.waclighting.com www.waclighting.hk www.waclighting.com.cn 2/ 4
WAC Lighting retains the right to modify the design of our products at any time as part of the company's continuous improvement program.
SOFTSCAPE INSTALLATION:
1. Dig a hole at the point of application. Make sure the hole
measures at least 118MM in diameter and 254MM in
depth. (Fig.6)
2. Place a layer of pea gravel (76MM) at the base of the hole
to help with drainage.
3. Connect the fixture wires to landscape wires coming from
the transformer using the outdoor rated direct burial wire
nuts provided.
4. Place the fixture in the hole and repack the soil to hold it in
place. Make sure the trim is flush with the ground.
CUSTOMIZE SETTING:
This fixture is equipped with three customizable settings:
Dimming Adjustment, Beam Angle Adjustment, and Beam
Aiming Adjustment. It can be pre-set into desired settings by
taking the light engine assembly out from the fixture housing.
(Fig. 7)
1. Unscrew Face Plate Screws .
2. Take out the Face Plate, Gasket, Front Glass and
accessory lens (if any)
3. Pull the Light Engine out of the Fixture housing.
Note: Light Engine can be taken out remotely by disconnecting
the Quick Connector. Users can later reconnect it back into the
housing after all desired settings are been made.
To ensure IP67 rating of the fixture, use a minimum force of
2.5 N*M to tighten the screws of the face plate.

INSTALLATION INSTRUCTIONS
FUEGO
MODEL:EIR3SF
WAC Lighting Headquarters WAC Lighting(Hongkong) WAC Lighting (Shanghai)
44 Harbor Park Drive Room A2 15/F United Center 14 Lane 299, Bi Sheng Road
Port Washington, NY 11050 95 Queensway HK, 999077 Shanghai 201204
www.waclighting.com www.waclighting.hk www.waclighting.com.cn 3/ 4
WAC Lighting retains the right to modify the design of our products at any time as part of the company's continuous improvement program.
DIMMING ADJUSTMENT:
1. Use a Philips head screw driver to adjust the dimming dial.
(Fig. 8)
2. Rotate until the arrow on the dial is pointed at the desired
wattage. The wattage may be adjusted to the pre-existing
tabs or any value in between.
3. The lower the wattage, the dimmer the fixture will be
(Fig. 8, 9 for EIR3SF-12ET wattage reference)
* For EIR3SF-15EL wattage reference
BEAM ANGLE ADJUSTMENT:
1. Twist the Lens Holder to the middle vertical slot.
2. Move the Lens Holder Up/Down to any Beam Changing
Slots for desired beam angle.
3. Twist the Lens Holder into the desired Beam Angle
Changing Slot.
Note: Beam angle is pre-set to be 60°, 45°, 30°, and 15°
from bottom up.
AIMING ADJUSTMENT (MODEL EIR3SF-12ET ONLY):
1. Hold the Lens Assembly with two fingers and tilt it left or
right as required. (Fig. 10)
2. Lens Assembly will be fixed by a spring mechanism to the
desired angle full stop.
Note: Aiming adjustment applies for Model EIR3SF-12ET only,
EIR3SF-15EL is fixed at 0°

INSTALLATION INSTRUCTIONS
FUEGO
MODEL:EIR3SF
WAC Lighting Headquarters WAC Lighting(Hongkong) WAC Lighting (Shanghai)
44 Harbor Park Drive Room A2 15/F United Center 14 Lane 299, Bi Sheng Road
Port Washington, NY 11050 95 Queensway HK, 999077 Shanghai 201204
www.waclighting.com www.waclighting.hk www.waclighting.com.cn 4/ 4
WAC Lighting retains the right to modify the design of our products at any time as part of the company's continuous improvement program.
ACCESSORIES:
• Rock Guard EIR3SF-RG001-BK–Protects fixture front
glass from large falling objects.
To Install (Fig. 11):
1. Unscrew the Face Plate Mounting Screws.
2. Put the Rock Guard on top of the fixture face plate,
make sure to match up the mounting index arrow on the
fixture and rock guard.
3. Use the same Face Plate Mounting Screws to mount the
Rock Guard onto the fixture.
• Color Lens –Not provide (Fig. 12)
• Hex Louver EIR3SF-HCL001–Uses to reduce the glare of
the fixture and control peripheral light.
To Install (Fig. 12):
1. Unscrew the Face Plate Mounting Screws.
2. Take out the Face Plate, Gasket & Front Glass.
3. Drop the Color Lens/Hex Louver into the fixture housing.
4. Put everything from Step 2 back to the fixture housing
and tighten the screws.
• Concrete Pour Canister & Cap EIR3SF-RC001 –used to
install fixture in concrete pour applications.
To install (Fig. 13):
Please visit the previous Concrete Pour Installation instructions.
Table of contents
Other WAC Lighting Landscape Lighting manuals
Popular Landscape Lighting manuals by other brands

AMP Lighting
AMP Lighting ONE ControlPro AAL-1813IR-40-BBZ Installation & maintenance guide

Holm
Holm rPollux-13 Installation notes

Orbit
Orbit Well Lights 5300S installation instructions

XanLite
XanLite BOFE40WNW manual

Sistemalux
Sistemalux MINI LOOK Installation sheet

LIGMAN
LIGMAN MACARON 1 installation manual

SLV Elektronik
SLV Elektronik DASAR 115 LED operating manual

Vista
Vista 2205 installation instructions

Sistemalux
Sistemalux KUBE instruction sheet

Cooper Lighting
Cooper Lighting Lumiere Aspen 1900-AA Specification sheet

Sunforce
Sunforce SOLAR INDUSTRIAL GARAGE LIGHT user manual

LIGMAN
LIGMAN NATURE SOURCE 1 installation manual