manuals.online logo
Brands
  1. Home
  2. •
  3. Brands
  4. •
  5. Wampler
  6. •
  7. Music Pedal
  8. •
  9. Wampler Faux Spring Reverb User manual

Wampler Faux Spring Reverb User manual

The Faux Spring Reverb oers a sound from a time when amps were rst starting to
add features that guitarists would want, a time when, for example, Fender® released
their dedicated spring reverb head in 1963, but had the bright idea to stick that mojo
in an amp and see how it works!
Of course, we know now that it works really, really well, but there's a tone to the
classic designs that's hard to come by in many amps these days, especially if your amp
is one of the modern "retro-style" amps with a pristine signal path and none of the
extras larger companies have picked up along the way, on purpose! What's happened
in the meantime? So many dierent varieties of digital simulations of reverb have
come and gone (with a few sticking around as studio favorites, commanding high
prices), oering sounds that are supposed to emulate an amp in a hallway, or an amp
in a concert room, or an amp in a closet, or a plate reverb, or a reverse plate reverb, or
any combination of the above, hey, why not throw the kitchen sink at it?
Why not give you so many possible options that you don't pay too much attention to
how any one option sounds? If you've got quantity, what else do you need, right? We
don't think so.
Studio units might be exible, but most of the time, they're not oering you the
sound.
Many guitarists intuitively appreciate the sensitive, touch-responsive, beautifully
detailed nature of spring reverbs. Many guitarists, however, don't have access to that
classic sound, either because their amp doesn't feature reverb, or it has reverb with a
not-so-great imitation of prior designs.
Enter the Faux Spring Reverb, a pedal designed with exactly one goal in mind: emulate the sound of a classic spring reverb head, as
true as can be done without having a giant spring tank with tubes feeding its input (and all the noise and issues that come along
for THAT ride). It may sound like a modest goal, but every eort has been made to keep the dry signal pure, the wet signal authen-
tic, and the overall result simple, easy to adjust, and beautiful to play and hear.
To get the most out of your new pedal, you'll want to become very familiar with the controls. The Faux Spring Reverb features an
accessible control setup, with three straightforward knobs that work together to allow you to dial in precisely your sort of reverb
tone: Level, Tone, and Depth. The Faux Spring Reverb features an all-analog dry signal path, so your base signal remains completely
unaected. As with all Wampler Pedals products, the Faux Spring Reverb includes high-quality true-bypass switching which takes it
completely out of the signal path when bypassed. Experiment and enjoy!
Bypass Switch – A true-bypass footswitch ensures solid, mechanical removal of the circuit when it isn't wanted, meaning you don't
lose any tone when the pedal is o.
Level – This control adjusts the amount of wet signal present. Sometimes you want a subtle, gentle undertone of reverb; some-
times you want a brash, wet, springy goodness. The pedal works best going into your amp, and it is very important to consider that
as you raise the gain on your amp, especially if it begins to overdrive/distort, the sound of the reverb will raise dramatically because
of the natural compression introduced by amp drive. To keep the amount of reverb where you want it, make sure you adjust the
Level control carefully when you're at your desired amp volume. Using pedals in front of the Faux Spring Reverb does not require
this adjustment, because they are playing into the simulated spring reverb sound. It's only if the Faux Spring Reverb's signal goes
into something that creates overdrive or distortion that you need to be careful in adjusting the Level control to ensure that you
don't get more reverb than you intended. This knob, used in conjunction with the Tone and Depth knobs, also allows you to dial in
a really interesting undertone to the general sound, which you can play over for a lot of texture. I'll make sure to include a preset
that demonstrates that usage.
Shade – Like a tone knob, this adjusts the Faux Spring Reverb's sound
to be lighter or darker. Useful in dialing in precisely the sort of spring
tone you want, at higher settings you can get some serious "sproing"
sounds going on as you play, while at lower settings, all the way down
to fully counter-clockwise, the sound has a darker, more restrained
quality. Adjusting this control will necessarily involve adjusting the
Depth control, since those two parameters have a huge impact on the
overall sound of the Faux Spring Reverb. Tone shaping is vital in order
to dial it in for your guitar, pedals, and amp setup, and Brian was
careful to include all of the adjustment range you need in order to
achieve a great reverb sound regardless of your surrounding gear.
Depth – Depth controls the length of time that the Faux Spring
Reverb's simulated spring reverb extends. Higher Depth settings can
give you a huge wash of sound that only long and looser reverb tanks
oer, while shorter Depth settings are great for simulating smaller
spring reverb tanks. Adjust in conjunction with Shade to dial in the
perfect desired reverb tone, and then set how forward or in the
background you want it to be with Level. Three knobs, immaculate
control, and tons of tone!
Note: This equipment has been tested and found to comply with the limits for a Class B digital device, pursuant to part 15 of the
FCC Rules. These limits are designed to provide reasonable protection against harmful interference in a residential installation.
This equipment generates, uses and can radiate radio frequency energy and, if not installed and used in accordance with the
instructions, may cause harmful interference to radio communications. However, there is no guarantee that interference will not
occur in a particular installation. If this equipment does cause harmful interference to radio or television reception, which can be
determined by turning the equipment o and on, the user is encouraged to try to correct the interference by one or more of the
following measures:
— Reorient or relocate the receiving antenna.
— Increase the separation between the equipment and receiver.
— Connect the equipment into an outlet on a circuit dierent from that to which the receiver is connected.
— Consult the dealer or an experienced radio/TV technician for help.
Changes or modications not expressly approved by the party responsible for compliance could void the user's authority to
operate the equipment.
Power Requirements.
The power needed for this pedal is 9v DC. This can only come from a regulated, center pin negative suitable power supply. The
pedal can be safely powered by a suitable multi supply also. THIS PEDAL CANNOT BE POWERED BY A 9v BATTERY. This pedal was
designed explicitly around the usage of a 9v DC power source, and its intended sound is best at 9v. To avoid damage, do NOT
deviate from the above requirements and do NOT use AC power as using an incorrect power supply can lead to damage not
covered by the warranty. This pedal draws approximately 78mA.
Return and Warranty Policy
For direct sales, there is a 14-day“no questions asked”period where you may return the pedal for any reason, provided that it is in its original condition. Please retain
all packaging within this period in case you decide to return it! We only require that you pay shipping back. The 14 days start when you receive the pedal. This does
not apply to dealer or retailer sales – see their individual return policies for specic information.
All Wampler Pedals, Inc. pedals carry a 5-year, fully transferable warranty that covers defects due to parts and labor. The warranty begins at the point of purchase.
Please remember to register your pedal as soon as possible after purchase at the following web page to ensure quicker service if you should ever need to make a
warranty claim: www.wamplerpedals.com/warranty_registration
For warranty repairs or questions, please feel free to contact us at www.wamplerpedals.com/contact_us.html
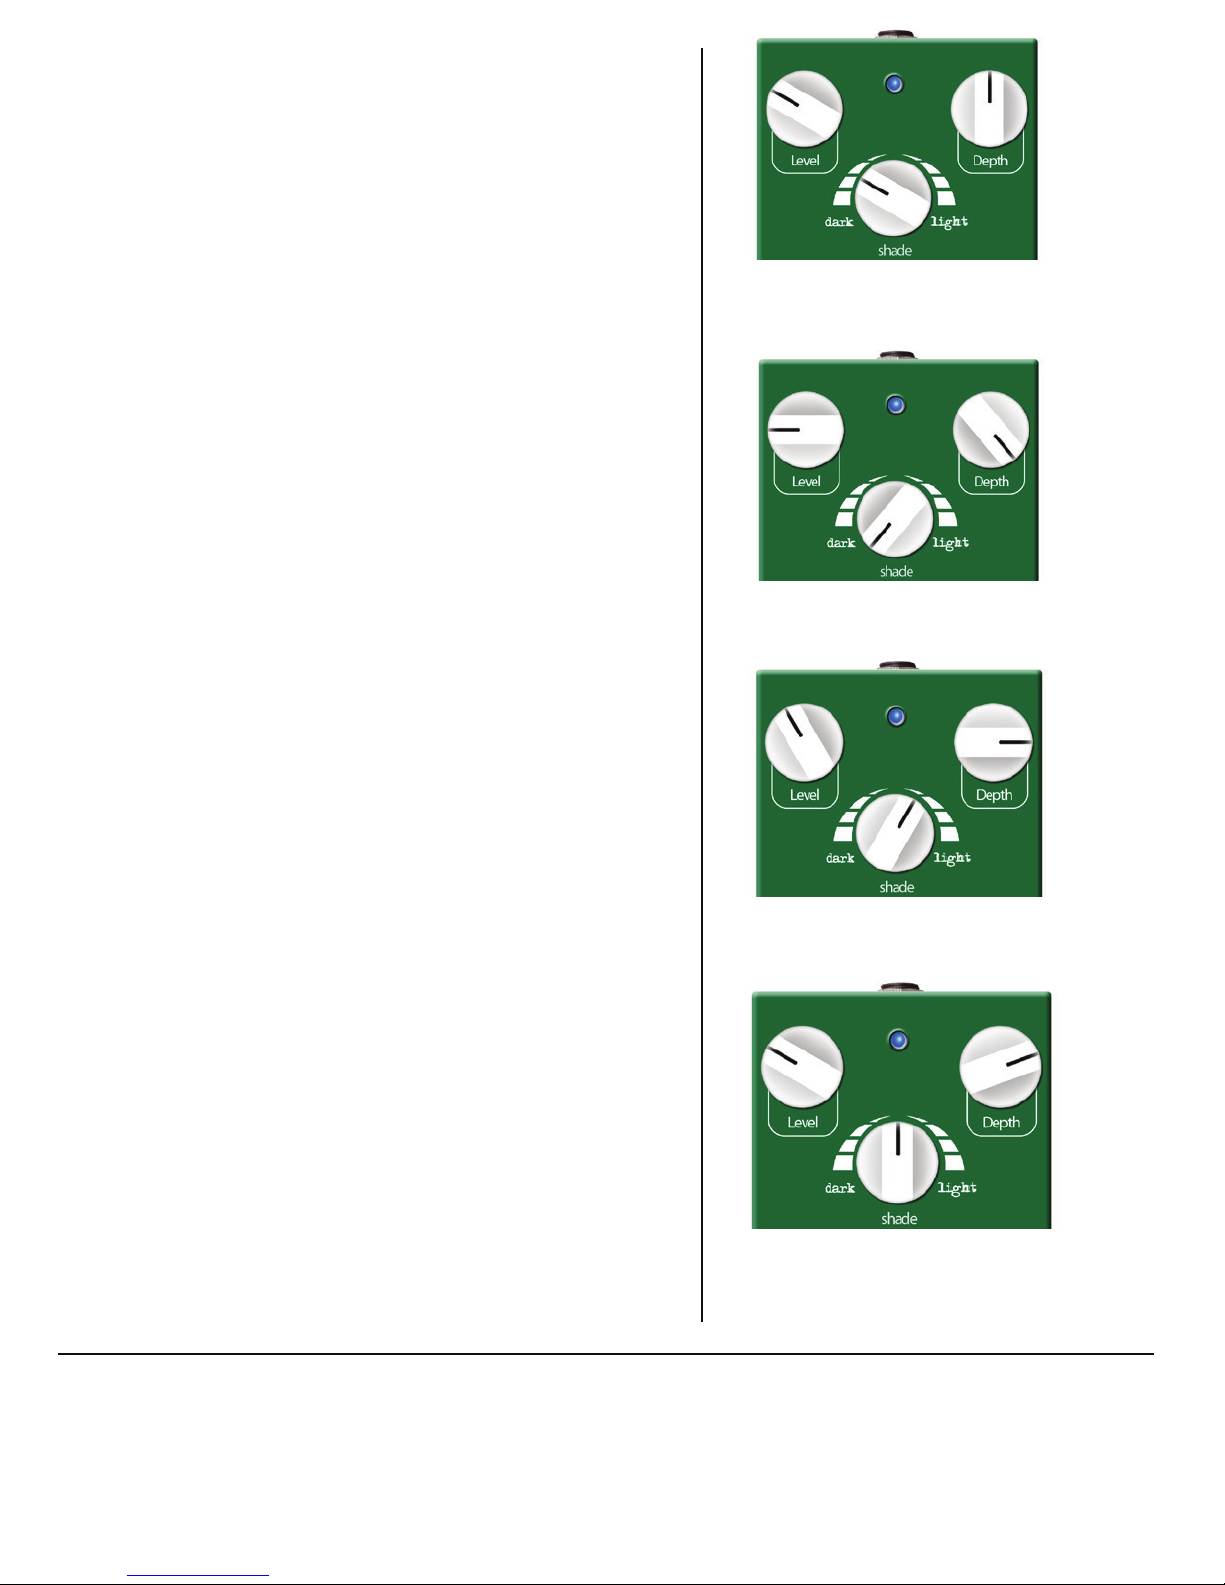
Level at 10 o'clock, Depth at Noon, Shade at 10 o'clock
Classic Spring
Level at 9 o'clock, Depth fully clockwise, Shade fully counter-
clockwise
Ambient Texture (Sounds Amazing With Faux Tape Echo!)
Level at 11 o'clock, Depth at 9 o'clock, Shade at 1-2
o'clock
Small Tank Splashy
Long Springs, High Tension
Level at 10 o'clock, Depth at 2-3 o'clock, Shade at Noon-1
o'clock
Suggested Settings
Any trademarks attributed that are not owned by Wampler Pedals, Inc. are for
demonstrative purposes only, and are property of their respective owners

Other Wampler Music Pedal manuals

Wampler The Paisley Drive User manual

Wampler

Wampler The Paisley Drive User manual

Wampler Collective Triumph Overdrive User manual

Wampler

Wampler Collective Triumph Overdrive User manual

Wampler TERRAFORM User manual

Wampler

Wampler TERRAFORM User manual

Wampler Faux AnalogEcho User manual

Wampler

Wampler Faux AnalogEcho User manual

Wampler WONG User manual

Wampler

Wampler WONG User manual

Wampler Tweed '57 Original Tone User manual

Wampler

Wampler Tweed '57 Original Tone User manual

Wampler the paisley drive User manual

Wampler

Wampler the paisley drive User manual

Wampler Dracarys User manual

Wampler

Wampler Dracarys User manual

Wampler Clarksdale Delta Overdrive User manual

Wampler

Wampler Clarksdale Delta Overdrive User manual

Wampler SLOstortion User manual

Wampler

Wampler SLOstortion User manual

Wampler Triple Wreck User manual

Wampler

Wampler Triple Wreck User manual

Wampler decibel+ User manual

Wampler

Wampler decibel+ User manual

Wampler METAVERSE User manual

Wampler

Wampler METAVERSE User manual

Wampler Ethereal User manual

Wampler

Wampler Ethereal User manual

Wampler Velvet Fuzz User manual

Wampler

Wampler Velvet Fuzz User manual

Wampler PANTHEON DELUXE User manual

Wampler

Wampler PANTHEON DELUXE User manual

Wampler Velvet Fuzz User manual

Wampler

Wampler Velvet Fuzz User manual

Wampler Pinnacle User manual

Wampler

Wampler Pinnacle User manual

Wampler Faux Tape Echo User manual

Wampler

Wampler Faux Tape Echo User manual

Wampler PANTHEON DELUXE User manual

Wampler

Wampler PANTHEON DELUXE User manual

Wampler Germanium Tumnus User manual

Wampler

Wampler Germanium Tumnus User manual

Wampler Clarksdale User manual

Wampler

Wampler Clarksdale User manual

Wampler Black '65 Vintage Overdrive User manual

Wampler

Wampler Black '65 Vintage Overdrive User manual

Wampler Plextortion. Distortion User manual

Wampler

Wampler Plextortion. Distortion User manual

Popular Music Pedal manuals by other brands

BOSSCO ME-20 owner's manual

BOSSCO

BOSSCO ME-20 owner's manual

Hard Wire SP-7 owner's manual

Hard Wire

Hard Wire SP-7 owner's manual

digi-tech PDS2700 owner's manual

digi-tech

digi-tech PDS2700 owner's manual

tech21 Boost R.V.B. owner's manual

tech21

tech21 Boost R.V.B. owner's manual

digi-tech RP100A user guide

digi-tech

digi-tech RP100A user guide

BOSSCO DD-7 Digital Delay user manual

BOSSCO

BOSSCO DD-7 Digital Delay user manual

digi-tech HOTHEAD manual

digi-tech

digi-tech HOTHEAD manual

BOSSCO IR-200 owner's manual

BOSSCO

BOSSCO IR-200 owner's manual

TREX Image Loo manual

TREX

TREX Image Loo manual

BOSSCO WAZA CRAFT Delay user manual

BOSSCO

BOSSCO WAZA CRAFT Delay user manual

BOSSCO GT-6 Setup guide

BOSSCO

BOSSCO GT-6 Setup guide

digi-tech BASS MULTI CHORUS manual

digi-tech

digi-tech BASS MULTI CHORUS manual

digi-tech BASS MULTI CHORUS manual

digi-tech

digi-tech BASS MULTI CHORUS manual

BOSSCO GT-1000CORE Parameter guide

BOSSCO

BOSSCO GT-1000CORE Parameter guide

BOSSCO RC-50 Workshop guide

BOSSCO

BOSSCO RC-50 Workshop guide

One Control Purple Plexifier user manual

One Control

One Control Purple Plexifier user manual

BOSSCO PH-3 Phase Shifter owner's manual

BOSSCO

BOSSCO PH-3 Phase Shifter owner's manual

digi-tech CROSSROADS manual

digi-tech

digi-tech CROSSROADS manual

manuals.online logo
manuals.online logoBrands
  • About & Mission
  • Contact us
  • Privacy Policy
  • Terms and Conditions

Copyright 2025 Manuals.Online. All Rights Reserved.