Wasserstein Wi-Fi Solar Light User manual

Wi-Fi Solar Light
User Manual

Table of Contents
Page - 02
Package Includes 3
Safety Information 3
Features 3
LED Indicator Satatus 4
Mounting the Wi-Fi Solar Light 4
App Pairing 4
Parameter Settings 6
Motion Detection Indicator 6
Battery Level 6
Light Button 6
Brightness Setting 7
Motion Sensor Threshold 7
Light On Duration 7
History 7
Time 7
Test 7
Alexa & Google Assistant Integration 8
Groupings 9
Best Practices to Optimize Motion Detection 9
Important Tips 10
FAQ 10
Specications 11

Page - 03
Package Includes
Safety Information
Features
• 1 x Wi-Fi Solar Light
• 2 x Screws
• 2 x Anchors
• 1 x User Manual
• Keep the Wi-Fi Solar Light away from high temperature locations to avoid leakage or
combustion of the internal battery. Do not mount near chimneys, exhausts, air
conditioners, open-ame grills, boilers, or furnaces.
• Disassembling the Wi-Fi Solar Light is not recommended as it may cause damage to
internal components. The Wi-Fi Solar Light may not function properly after disassembly.
• Make sure the Wi-Fi Solar Light is properly installed onto the wall mount with screws to
prevent damage by animals, rain and wind.
Solar-Powered Waterproof, Heatproof
and Durable
Day and Night
Sensor
600 Lumens of Light

Page - 04
LED Indicator Status
Mounting the Wi-Fi Solar Light
App Pairing
Normal Setup Mode / Signal Transmission Indicator Blinks Rapidly
(2 ashes per second)
AP Mode Indicator Blinks Slowly
(1 ash every 2 seconds)
Device Powered ON Indicator Turns On
(ON for 5 seconds)
1. Unscrew the wall mount from the Wi-Fi Solar Light.
2. Install the wall mount onto the wall using the provided screws and anchors. Ensure that the mount is
perpendicular to the wall and parallel to the ground to prevent damage to the Wi-Fi Solar Light.
3. After securely installing the wall mount, slide the Wi-Fi Solar Light onto the mount downwards.
4. Secure the Wi-Fi Solar Light to the wall mount by inserting the screw in the hole located at the
bottom-center of the wall mount.
1. 2. 3. 4.
Step 1: Download“Wstein”from the App Store, Google Play Store,
or simply scan this QR code for installation.
Step 2: Connect your mobile device to your home Wi-Fi network.
• The Wstein app is the central hub for your smart home
devices.
• Control all your Wasserstein smart devices from one app.
• Make sure your mobile device is connected to a 2.4 Ghz
Wi-Fi network.

Step 3: Open the app and create a Wstein Account.
Step 4: Connect the Wasserstein Wi-Fi Solar Light to the Wstein app.
1. Open the Wstein app, select “Register” - “Agree”.
2. Type in your email address or mobile number and follow the steps to complete the process.
1. Press “Add Device” or “+”on the upper right corner.
2. Press “Add Manually” - “Lighting (Wi-Fi)”, or simply press “Auto Scan”.
3. Remove the Wi-Fi Solar Light from the wall mount. Press and hold the “sync
button” located at the bottom-rear side of the device, beside the ON/OFF
switch, for ve seconds until the red indicator light starts blinking rapidly.
4. Press “Conrm indicator rapidly blink” on your mobile app and input your
Wi-Fi network name and password.
5. Press “Conrm” and wait for the Wi-Fi Solar Light to connect to your mobile
app.
6. After successful pairing, you can rename the device accordingly. Press “Done”
to complete the setup process.
Page - 05
Sync Button

Parameter Settings
Wi- Solar Light
1. Motion Detection Indicator
2. Battery Level
3. Light Button
• The “Motion Detection” indicator shows the current status of your Wi-Fi Solar Light’s PIR Sensor.
• It will be automatically “Disabled” during daytime and “Enabled” during nighttime.
• The battery icon will turn red when the battery level is low.
• Replace the batteries as soon as possible to ensure your device functions properly.
• The Light button manually overrides the PIR Motion Sensor to turn the LED light on or o.
• The button will turn yellow when the LED light is on and black when the LED light is o.
• You can turn the LED light on by pressing the button once and turn the LED light o by pressing the
button again.
• When motion is detected and the LED light is triggered, you can manually turn the light o by pressing
the button.
12
3
4
5
7
6
8
9
Disabled Motion Sensor is OFF
Enabled Motion Sensor is ON
Page - 06
Wi- Solar Light Wi- Solar Light

Page - 07
4. Brightness Setting
5. Motion Sensor Threshold
6. Light On Duration
7. History
8. Time
9. Test
• The LED light has three brightness levels (Low, MID, High) and can be adjusted using this button.
• The Motion Sensor has three distance thresholds (Low - 13 ft, MID - 23 ft, High - 33 ft) and can be
adjusted using this button.
• The threshold is the motion sensor’s maximum detection distance. Adjust it based on the mounting
location and environment of the Wi-Fi Solar Light.
• These threshold measurements are based on the assumption that the device is mounted at least 7 ft
above the ground with an ambient temperature of 59°F (15°C).
• The LED light has four light-on durations (15 sec., 30 sec., 1 min., 3 min.) and can be adjusted using
this button.
• The duration is the time the LED light will stay on after movement is detected at nighttime.
• The date and time of every motion detection event is recorded on this list.
• You can use this list to monitor the nighttime movements around your home.
• You can create custom schedules for your Wi-Fi Solar Light by setting the time, day and PIR sensor state
accordingly.
• Use this when you want to turn the motion sensor on or o at certain times.
• The PIR_state indicates whether the motion sensor is enabled or disabled. (ON - Enabled, OFF - Disabled).
• You can turn the schedule On or O anytime after setup.
• You can test that the motion sensor and LED light are functioning using this test mode.
• Press “TEST” - “Testing” to begin the test mode.
• The LED light will turn on for two seconds then turn o. You need to move your hand over the motion
sensor to complete testing mode.
• After motion is detected, the LED light will turn on for three seconds at low brightness, three seconds at
MID brightness, and three seconds at high brightness.
• Once completed, the LED light will turn o and a notication will appear on your app.
Wi- Solar Light

Page - 08
Alexa & Google Assistant Integration
Wi- Solar Light
1. Make sure you have paired the Wi-Fi Solar Light to the“Wstein” app.
2. Rename the Wi-Fi Solar Light as you desire. This will be the name used with your Amazon Alexa or
Google Home commands.
3. Download “Amazon Alexa” or “Google Home”from the App Store or Google Play Store.
4. In the “Wstein” app, press the button on the upper right corner, then press “Alexa” or “Google Assistant”
accordingly.
5. Follow the instructions shown on the “Wstein” app to complete the integration with your smart home
device.
6. You can now use the Wi-Fi Solar Light with your Amazon Alexa or Google Home using the
following commands (<light> is the name of your Wi-Fi Solar Light):
Wi- Solar Light
Wi- Solar Light
Turn ON Light Turn OFF Light
“Turn ON <light>” “Turn OFF <light>”
“Turn <light> ON” “Turn <light> OFF”
“Set ON <light>” “Set OFF <light>”
“Set <light> ON” “Set <light> OFF”

Groupings
Best Practices to Optimize Motion Detection
1. You can group multiple Wi-Fi Solar Lights together to have simultaneous access and control over them.
2. In the “Wstein” app, press the button on the upper right corner, then press “Create Group”.
3. Select your chosen Wi-Fi Solar Lights from the list and press“Save”.
4. Rename the group as you desire and press “Save”.
5. You can now control all the Wi-Fi Solar Lights in your group simultaneously.
1. Position the Wi-Fi Solar Light so that the motion sensor is pointing towards the general area you want to
monitor.
2. Mount the Wi-Fi Solar Light at least 7 ft (2 m) above the ground and aim it slightly downward (at least 15°
downward) for the most eective results.
3. Make sure there are no unwanted side-to-side movements, such as passing cars, that cross the detection
zone regularly. The motion sensor is much more sensitive to side-to-side movements across its eld of
view than to movements directly toward or away from the Wi-Fi Solar Light.
4. The best range for motion detection is 5 to 20 ft (1.5 to 6 m) from the Wi-Fi Solar Light’s position.
Page - 09
Wi- Solar Light
Wi- Solar Light Wi- Solar Light

Page - 10
Important Tips
FAQ
1. Assess where intruders are most likely to enter and the path they would take. Most intruders enter the
home through a back door, patio door, or garage door. Hence it is advisable to place the Wi-Fi Solar Light
near entrances to your home.
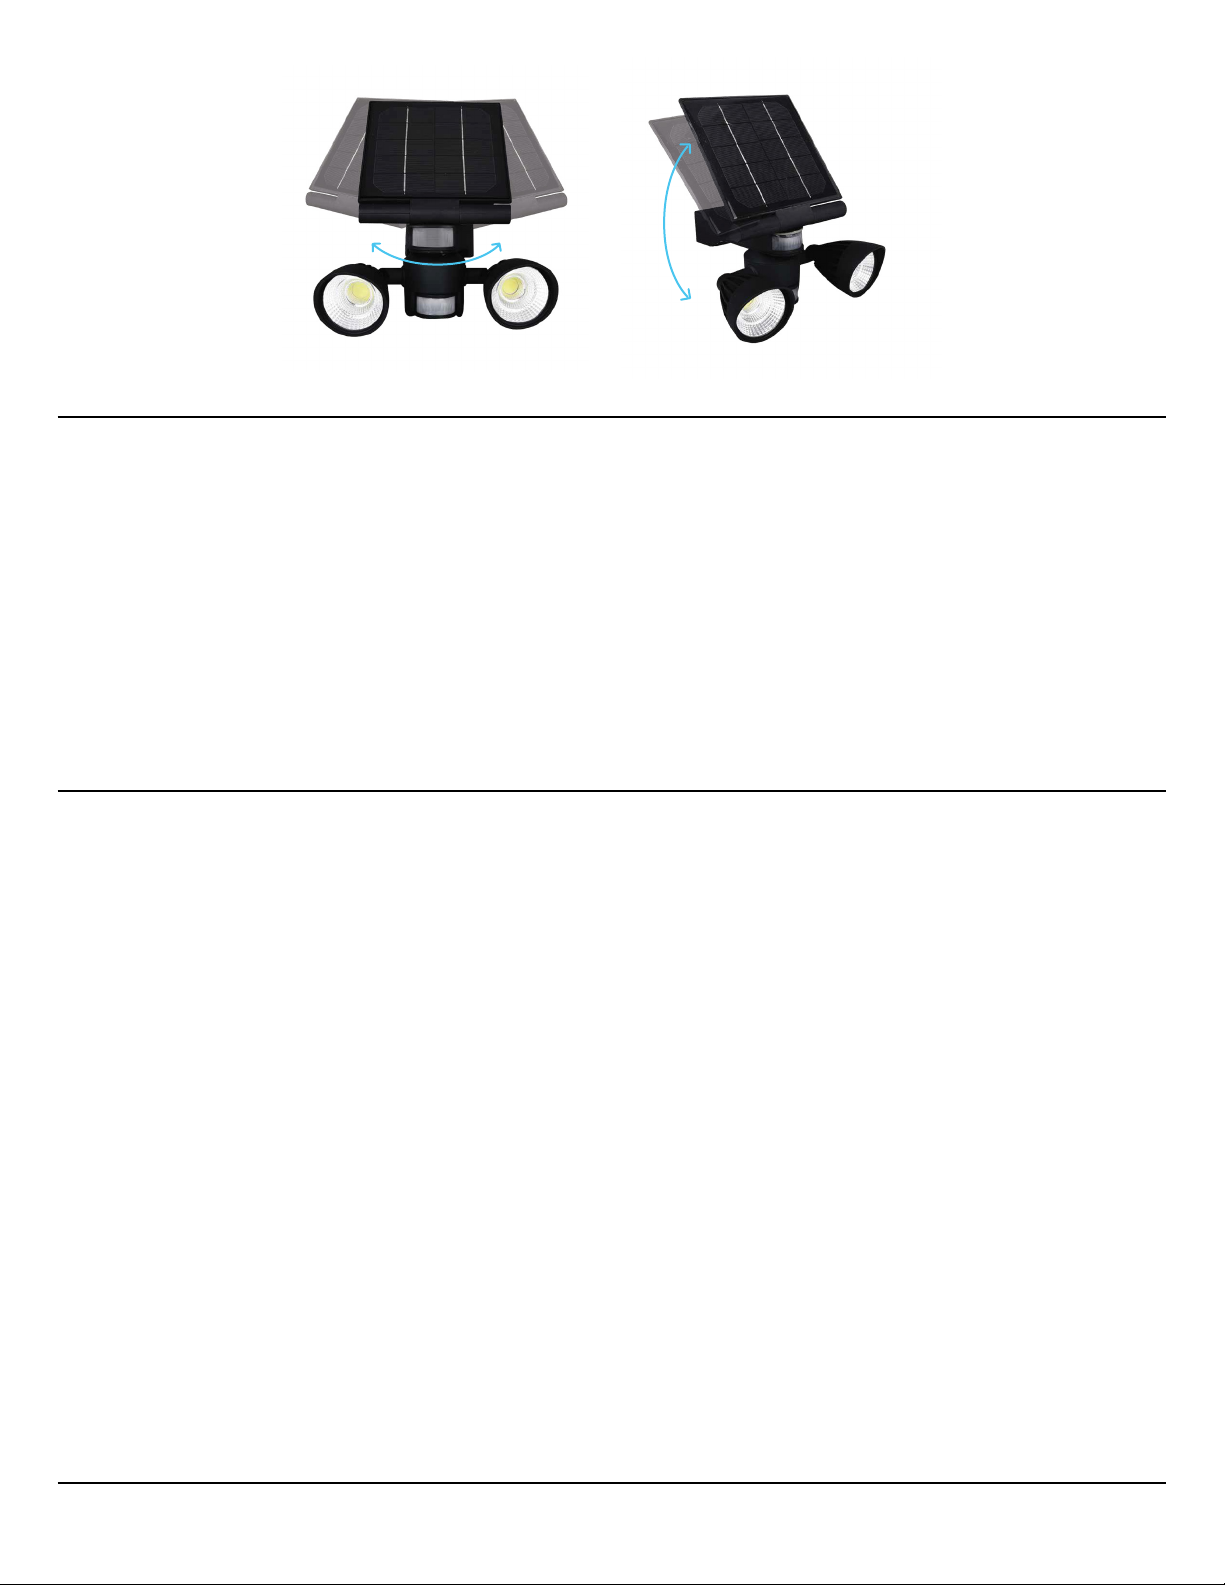
2. Mount the Wi-Fi Solar Light on walls that an intruder would walk alongside, such as a narrow pathway.
The motion sensor works best when movements are detected parallel to the spotlight, not towards it.
3. You can also mount the Wi-Fi Solar Light beside your security cameras to illuminate the camera’s vision at
night.
4. Although the Wi-Fi Solar Light is weatherproof, it is advisable to mount it to a wall shaded from the rain
and sunlight to maximize battery life.
Q: What if the Wi-Fi Solar Light is not responding or fails to connect with the Wstein app?
Q: What if I still cannot connect to the Wstein app?
• Make sure the Wi-Fi Solar Light is powered on with sucient battery level. If the battery is low, charge
your Wi-Fi Solar Light by placing it under the sun for 24 hours.
• Make sure you are connected to a 2.4 Ghz Wi-Fi network. The pairing will not work with a 5 Ghz Wi-Fi
network.
• Keep the Wstein app open for about three minutes and try reconnecting the Wi-Fi Solar Light.
• Place your smartphone next to the Wi-Fi Solar Light and make sure both devices are connected to the
same Wi-Fi network. Try opening a webpage to check whether the Wi-Fi network is online.
1. Unpair your Wi-Fi Solar Light from the Wstein app by pressing “Remove Device” and follow the
instructions in the “App Pairing” section of the user manual.
2. If the problem persists, try reconnecting the Wi-Fi Solar Light using the AP mode. The pairing
process must be completed within three minutes after the device is in AP mode. See steps below:
a. Power o the Wi-Fi Solar Light by turning OFF the ON/OFF switch. After 10 seconds, turn the switch
ON.
b. Press and hold the sync button for ve seconds until the red indicator light starts blinking rapidly.
c. Press and hold the sync button again for ve seconds until the red indicator light starts blinking
slowly.
d. Press “Add Device” or “+”on the upper right corner of the Wstein app.
e. Press “Add Manually” - “Lighting (Wi-Fi)”. Then press “Other Mode” - “AP Mode” on the upper right
corner of the app.

Page - 11
f. Press “Conrm indicator slowly blink” on the app and input your Wi-Fi network name and
password.
g. Press “Conrm” and go to your Wi-Fi setting. Connect to “SmartLife-XXXX”.
h. Wait for the Wi-Fi Solar Light to connect to your mobile app.
i. After successful pairing, you can rename the device accordingly. Press “Done” to complete the setup
process.
j. You can now reconnect to your internet-enabled Wi-Fi network and disconnect from
“SmartLife-XXXX”.
Sync Button
Q: What if I have problems nding “SmartLife-XXXX”?
• You can nd “Unidentied-XXXX”or other similarly named networks in your Wi-Fi list. These networks are
not password protected.
Plastic Material ABS + Polycarbonate
Battery Rating 3.7 V, Lithium Ion
Battery Capacity 4000 mAh
LED Power Output 10 W
Max LED Light Intensity 600 Lumens
Sensor Distance Thresholds 13 to 33 ft (4 to 10 m)
Illuminated Area 645 sq ft (60 sq m)
Specications
For more information, please visit:
www.wasserstein-home.com
Table of contents
Other Wasserstein Inverter manuals
Popular Inverter manuals by other brands

YASKAWA
YASKAWA VS mini C Series instruction manual

SEW-Eurodrive
SEW-Eurodrive MOVITRAC B operating instructions

Sigineer Power
Sigineer Power MS6048D user manual

Growatt
Growatt MID 33-50KTL3-X2 quick guide

Mastervolt
Mastervolt Whisper 6 installation manual

Central Machinery
Central Machinery 95105 Set up and operating instructions

909
909 52299 user manual

enphase
enphase IQ 7+ Installation and operation manual

Dometic
Dometic TEC 40D Operation Operation, maintenance and installation manual

Mule Lighting
Mule Lighting LPS Series Installation & operation instructions

Kollmorgen Seidel
Kollmorgen Seidel 67WKS-M240/3-PB installation manual

Goodwe
Goodwe SBP SERIES user manual