water source Water Softener User manual

Water Softener
Operating Manual

watersource watersource
Water Softener Operating Manual
Water Softener Operating Manual
Contents:
1. Introduction
2. Installation Instructions
3. Settings
4. Controller Features
5. Trouble Shooting
1. Introduction
Thank you for choosing a Water Softener meticulously produced for
you by Watersource. We take great care to ensure that you receive
this product in the same perfect condition that it left us. An extensive
testing program has been employed to guarantee the performance
and reliability that you would expect from an appliance costing many
times more.
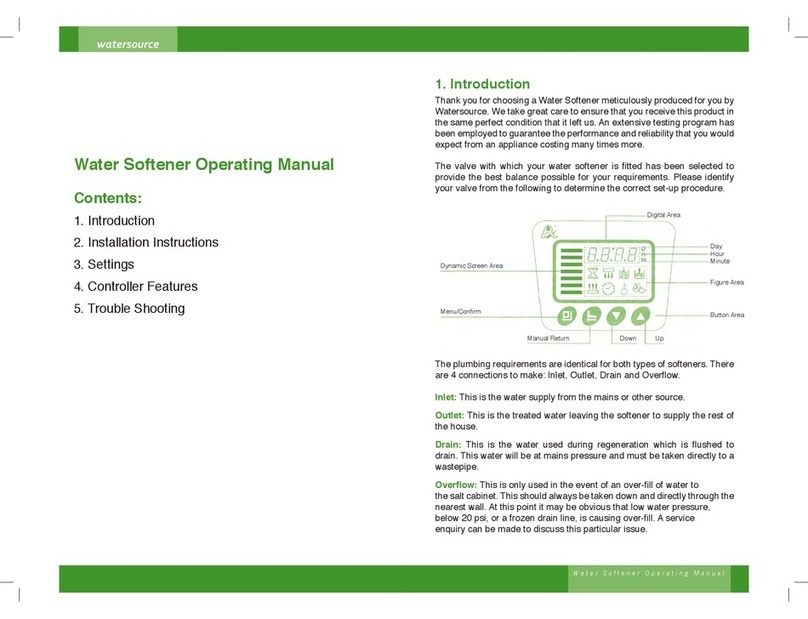
The valve with which your water softener is fitted has been selected
to provide the best balance possible for your requirements. Please
identify your valve from the following to determine the correct set-up
procedure.
Time controlled (T.C.) Meter controlled (V)
The plumbing requirements are identical for both types of softeners.
There are 4 connections to make: Inlet, Outlet, Drain and Overflow.
Inlet: This is the water supply from the mains or other source.
Outlet: This is the treated water leaving the softener to supply the
rest of the house.
Drain: This is the water used during regeneration which is flushed to
drain. This water will be at mains pressure and must be taken directly
to a wastepipe.
Overflow: This is only used in the event of an over-fill of water to
the salt cabinet. This should always be taken directly through the
nearest wall to a point where it may be obvious low water pressure
below 20 psi, or a frozen drain line, is causing over-fill. A service
enquiry can be made to discuss this particular issue.

watersource watersource
Water Softener Operating Manual
2. Installation Instructions
A water softener is no more difficult than a dishwasher or washing
machine to install. However, it is advisable for the installation to be
carried out by either a plumber or a competent D.I.Y. person.
Firstly, determine where the water enters the house (usually under
the Kitchen Sink).
Secondly, check to see that the water softerer will fit the space
available. Remember to leave sufficient space for connections to be
made at the back. In some kitchens it may be necessary to remove
part of the cupboard base to ensure sufficient head-room. In other
cases it may make more sense to locate the Water Softener in an
outside cabinet to maintain the space under the sink.
As the ion exchange process used to soften water results in a slight
increase in the sodium level of the water, it is often suggested to
provide a lower sodium source of water for infant feeds, aquaria, etc.
Irish law & EU directives do not set regulations for low sodium pipe
feeds within private households. Softened water is often half of the
200 mg/L sodium EU limit.
There are a number of ways to achieve this:
Fit a Reverse Osmosis unit teed off a treated water line. This has1.
the benefit of giving a soft water feed (free of Limescale) with
low sodium and excludes virtually all undesireable contaminants,
such as: fluoride, chlorine, aluminium, viruses, cysts (such as
cryptosporidium), phosphates, pesticides, heavy metals and
many more to 99.9 %.
Fit an extra tap to the sink with either filtered or unfiltered raw2.
water. This water has not been treated and as such has only
background Sodium levels.
Leave the cold tap at the kitchen sink untreated.3.
Once the above decisions have been made it is time to familliarise
yourself with the hoses and fittings required to complete the
installation.
The Water Softener has been designed to operate at between 1.7 and
5 Bar pressure. If your pressure falls outside these parameters it may
be necessary to fit a booster pump or a Pressure Reduction Valve to
prevent damage to the unit. The temperature range of the appliance
is 0*C and 49*C.
The Installation
The rising main is usually found under the sink. Once the stop-cock
has been shut, open the cold water tap at the kitchen sink. This will
release the pressure in the line. At this point, the pipe can be cut to
allow fitment of the non-return valve and the “T” complete with shut-
off valve. The next stage is to fit the by-pass valve and the outlet “T”
for the return flow.
The two washing machine valves provide the threaded connections
for the washing machine hoses, which in turn connect to the inlet and
outlet ports of the valve. The drain line also has a 3/4” bsp thread to
allow a third washing machine hose to take the flow to drain.
The overflow fitting must be connected to a hose dropping straight
down and passing through the wall. This hose should always be visible
to identify any discharge which would require a service call.
Connect the power supply and turn on.
With the machine powered-up, press the “Regen” button, or in the
case of a T.C. Valve, press the “up” and “down” buttons and hold until
you hear the motor.
When the motor stops, open the inlet valve slowly to allow the softener
to fill. At this point the softener is running to drain. This allows the
resin to wash out any colour that may be there.
The motor will engage again after a set period and move on to the
next stage. When it stops, “toggle” it to the next stage by pressing the
“Regen” button in the case of a metered unit, or by pressing the “up”
arrow on the T.C. Unit. Continue this until the “C4” ( T.C. ) or “Rinse”
appears on the screen.
Leave the unit to “Rinse” and “Fill”, approximately 8 minutes in total.
Now you can see the water level and fill with salt. When you fill with
salt the water will be displaced and will appear to be higher in the
cabinet.

watersource watersource
Water Softener Operating Manual
At this point the Water Softener is ready to give soft water. Regenerations
will be triggered on the basis of water used or time elapsed depending
on the model.
Connecting To The System
To allow for connection to your plumbing system your new water
softener is supplied with quick connect fittings for the inlet and outlet.
These have an o’ring seal to ensure leak-free connection time after
time. The end connections are ¾” Bsp male, as is the drain line. This
means connections may be made with washing machine type hoses,
or by hard plumbing in either ½” or preferably, ¾” pipe. The quick
connect fittings will allow for easy connection, whichever means you
choose. Always remember with pex piping always use inserts when
using compression fittings.
3.Settings
Metered or Volumetric
Press “Set Clock” until display stops flashing.1.
Press the “Set Clock” button, hours will flash. Use up & down2.
buttons to set hour.
Press “Next” button, repeat above to adjust minutes.3.
Press “Next” and “Up” buttons together and hold until screen4.
changes.
Set “Hardness” then press “Next” button to scroll to “Regen5.
Time”
Adjust as above and press “Set Clock” to exit menu. Set-up is now6.
complete.
Time Controlled (T.C.)
Press “Set Hour” until display stops flashing.1.
Press “Set Hour”, adjust current time with arrows (hours only).2.
Press “Set Hour” and up arrow together and hold.3.
“Regen Hour” will show. Adjust using arrows.4.
Press “Set Hour” and “Days to Regen” will flash. Adjust with5.
arrows.
Press “Set Hour” until current time is shown. Set-up is now6.
complete.
4. Controller Features
Metered or Volumetric
While in the service position, pressing the next button will “toggle”
between the time, current flow rate in litres and the capacity
remaining.
To force a regeneration a single press on the Regen button will cause
the softener to regenerate at the set time the following morning.
Press and hold to force an immediate regeneration. When the valve is
regenerating it will show a countdown clock for each stage.
Outlet valve
shown open
Outlet from
softner
By-pass valve
shown closed
Inlet valve
shown open
Inlet
from
mains
Inlet to softner
Non-return
valve
Inlet Outlet
Overflow
Drain Line

watersource watersource
Water Softener Operating Manual
5. Trouble Shooting
PROBLEM: WATER STILL REMAINS HARD
1. Is there a minimum of 6 inches of salt in the Brine Cabinet?
Solution: Fill the cabinet with salt.
2. Is the bypass valve closed, and the inlet and outlet valves open?
Solution: Close the bypass valve and open the inlet and outlet valves.
3. Is the power on?
Solution: Switch the power on and check the connections.
4. Is the hardness setting correct?
Solution: Reset the hardness if required.
NOTE: If any of the above requires action, add 5 litres of water to the salt
and initiate a REG (Regeneration).
PROBLEM: NO WATER
1. Is the water mains open?
Solution: Open the water mains.
2. Are the inlet and outlet valves open?
Solution: Open the inlet and outlet valves.
PROBLEM: UNIT REGENERATES AT THE INCORRECT TIME OF DAY
1. Is the present time correct?
Solution: Reset the present time.
2. Is the recharge time correct?
Solution: Reset the recharge time.
3. Has there been a powercut?
Solution: No action required if the time is correct.
PROBLEM: NO REGEN, OR LITTLE OR NO SALT USAGE
1. Is the water soft?
Solution: If yes no action is required.
2. Is the water level in the brine cabinet high?
Solution: If yes, check the drain line is not frozen or blocked. Initiate an
immediate regeneration and check the progress of the cycle. If the water
level approaches the overflow level, shut off inlet and arrange a service call.
3. Press “Next” button to check remaining Capacity.
Solution: If capacity remaining is still larger than 25% of full capacity press
“Regen” button to force a regeneration.
PROBLEM: EXCESSIVE SALT USAGE
1. Check the hardness.
Solution: Reduce the hardness setting if incorrect.
PROBLEM: NO WATER IN THE BRINE CABINET
1. Depending on the salt level you may not see the water. This is quite
normal. Only a few inches of water are used.”
Solution: No action required.
PROBLEM: HIGH WATER LEVEL IN THE BRINE CABINET
1. Is the water level in the brine cabinet high?
Solution: Initiate an immediate regeneration. If the problem does not
return, further action is not required.
PROBLEM: WATER IS RUNNING FROM THE OVERFLOW
1. Is the water level in the brine cabinet approaching the height of the over-
flow pipe?
Solution: If yes, bypass the water softener and call for service.
PROBLEM: WATER IS RUNNING FROM THE DRAIN CONSTANTLY
1. Is the unit in recharge mode?
Solution: If yes, wait until it finishes, check the present time and recharge
time settings, adjust if necessary?
2. Does an error code appear? e.g. Err I?
Solution: Check all the connections are secure. Turn the power off for 10
seconds then turn back on.
PROBLEM: DISPLAY FAILURE
1. Is the display blank?
Solution: Check the power supply is turned on and that all electrical
connections are secure.

watersource
Water Softener Operating Manual
watersource
Warranty
This product is guaranteed for the period of one year from the date of
purchase against mechanical and/or electrical defects. This guarantee
is only valid if the unit has been installed and used in accordance with
the manufacturers instructions.
An extended 2 year warranty is available when online registration is
completed.
Attic Installations
It is not recommended to install any water softener in an attic. Should
you have no choice but to locate the appliance in an attic, then the
following should be put in place as a minimum: Ensure that the attic
space is insulated so as to protect the softener from frost damage.
Any water softener should be placed inside a tank or other container
to ensure that any escape of water is caught and taken directly out
of the roof space. Check with your insurance company to ensure
compliance with their terms and conditions.
For more information and to register for your
free extended warranty please visit:
www.watersource.ie
Notes:

Morette Castle, Emo, Co. Laois
Tel: 00 353 1 44 27 888, Fax: 00 353 1 84 14 889
Email: info@watersource.ie
www.watersource.ie
Table of contents
Other water source Water Dispenser manuals
Popular Water Dispenser manuals by other brands
Hendi
Hendi 230268 user manual
Halsey Taylor
Halsey Taylor VRCTL8 1D Series Installation, care & use manual
GE
GE GXOF18K Owner's manual & installation guide
Norcold
Norcold Water Dispenser Installation and owner's instructions
GE
GE GNSF18Z01 owner's manual

Culligan
Culligan 60K Installation, Operation, and Service Instructions with Parts Lists
