water source WSWB User manual

BATTERY OPERATED UTILITY PUMP
MODEL: WSWB
Questions, problems, missing parts? Before returning to your retailer, call our customer
service department at 1-800-346-7611, 8 a.m. –5 p.m., EST, Monday –Friday.
WARNING: Failure to follow all instructions could result in death and/or serious personal injury.
Read, understand, and follow all safety warnings and instructions provided with this product. Failure
to follow the warnings and instructions could result in death or serious injury. Save all warnings and
instructions for future reference.
GENERAL INFORMATION
WARNING: This pump has a maximum discharge height (head) of 36 in. (3 ft.). If you must pump
higher than this level, please purchase a larger, electric powered pump.
WARNING: Always make sure the pump is turned off as soon as water is no longer being
pumped.
WARNING: Do not pump flammable or explosive liquids such as oil, gasoline, kerosene, ethanol,
etc. Do not use in the presence of flammable or explosive vapors. Using this pump with or near
flammable liquids can cause anexplosion or fire, resultingin property damage, serious personal injury
and/or death.
WARNING: Always remove batteries from the pump before inspection.
WARNING: Do not disassemble the motor. This pump has NO repairable internal parts.
CAUTION: This submersible utility pump is designed for portable applications. It can drain or
remove water from the following: small fish tanks, pits, sinks, window wells, swimming pool covers,
boats, or other small, flooded areas. This pump has not been tested or approved for use in swimming
pools or in saltwater marine areas.
CAUTION: Before using the pump, check the hose for holes or excess wear, which could cause
leaks, and ensure the hose is not kinked or making sharp angles.Astraight hose allows the pump to
move the greatest amount of water quickly.
CAUTION: Check that all hose connections are tight to minimize leaks.

2
BATTERY INSTALLATION
1. Installing batteries:
a. To install new batteries, remove the top cover (1) of the
pump (A) by turning the handle counterclockwise.
b. Remove the battery compartment (2).
c. Insert three alkaline “D” cell batteries (3; not included) in
position as indicated on the battery compartment (2).
d. Replace the battery compartment (2) and lock the top
cover (1) back on top of the pump (A) by turning
clockwise.
Note: Lubricate the black O-ring (4) at the top of the pump (A)
with petroleum jelly (sold separately) to make it easier to put
the cover (1) back on.
OPERATING INSTRUCTIONS
CAUTION: Do not run the pump dry. Operating the pump without water will cause damage to
seals and will cause the pump to fail, thereby voiding the pump’s warranty.
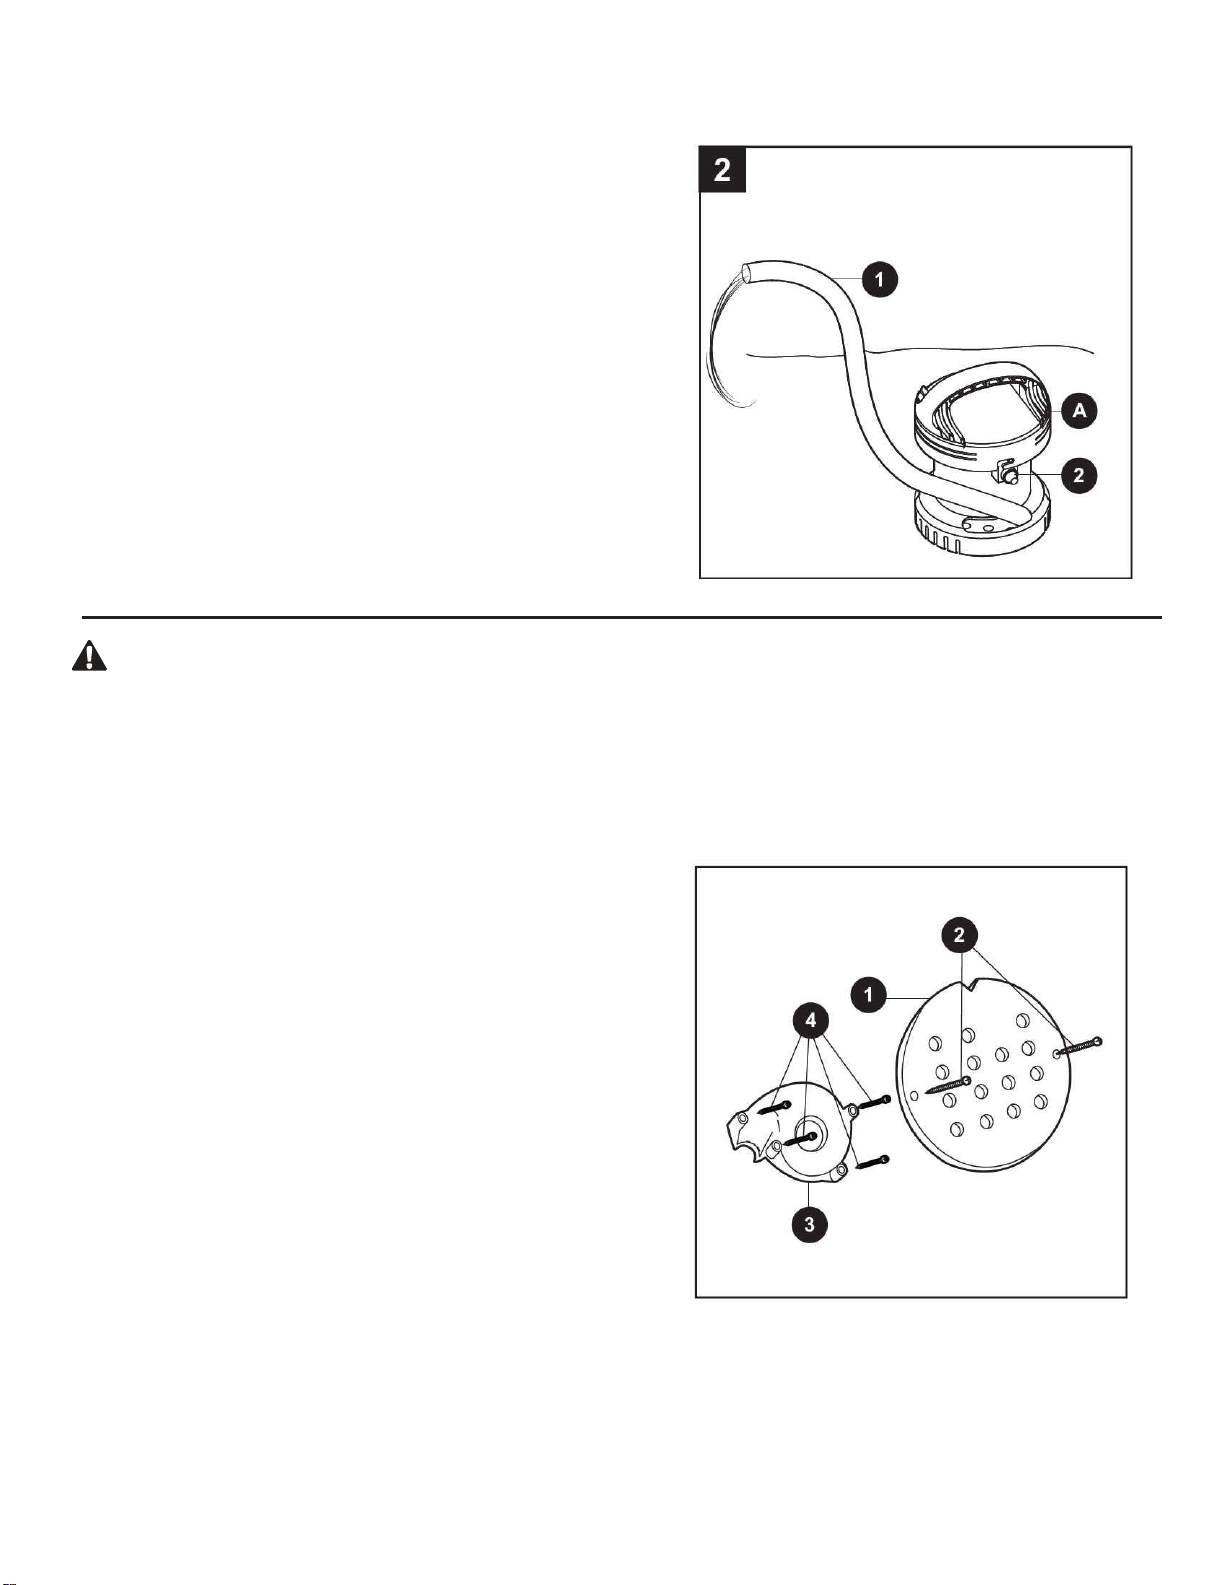
Notice: Make certain you unwind the hose (1)
completely. Kinks in the hose will restrict the pump,
preventing it from priming, which is the first step to
pumping water.The water level must be at 1-1/4 in. for
the pump to prime and operate.
1. Place the pump (A) in the water you wish to pump
out and position the hose (1) so that it is free of
kinks. Ensure the pump (A) is in an area that is
free from debris to prevent clogging.
CAUTION: To avoid airlock (flow stoppage), place
the pump in water before turning on. If the pump must
be turned on before being submerged, it may take 10 -
30 seconds for the water to begin to flow (allowing the
pump to clear airlock).
Note: If you want the pump (A) to float, remove the filter screen (2) on the bottom of the pump.
The pump will then float in an upright position. This is ideal for pumping water out of an area that
has debris at the bottom or areas where the depth to be pumped is longer than the hose length.
Note: The maximum discharge height (head) is 36 in. (3 ft.).
3
Note: Agarden hose (not included) can be threaded onto the discharge hose if water needs to be
pumped further away.
2. Running the pump:
a. Press the power switch (2) on the pump (A) to turn
the pump on.
b. Hold the pump (A) until water starts to flow from
the hose (1) and ensure the pump (A) is free from
debris.
c. Once the pump (A) is no longer removing water,
turn the pump off by pressing the power switch (2).
d. Remove the pump (A) and hose (1) when finished
pumping.
e. Flush the pump (A) thoroughly with fresh, clean
water when finished.
CARE AND MAINTENANCE
WARNING: Periodically inspect the pump and system components to ensure the pump inletsare
free of debris. Always ensure the pump is off before performing any maintenance tasks.
Note: Remove batteries from the pump when they are discharged or if the pump will be stored for an
extended period. Discharged batteries occasionally leak, which will destroy the electrical circuit of
the pump.
1. Cleaning debris from the pump:
a. Turn the pump upside down and remove the
filter screen (1) by removing the filter screen
screws (2) with a Phillips screwdriver (not
included).
b. Remove any debris.
c. If there is additional debris, remove the
impeller chamber cap (3) by removing the
impeller chamber cap screws (4) and remove
the debris.
d. Replace the impeller chamber cap (3),
impeller chamber cap screws (4), filter screen
(1), and filter screen screws (2).

4
TROUBLESHOOTING
PROBLEM
POSSIBLE CAUSE
CORRECTIVE ACTION
The pump
does not
start or run.
1. The batteries need to be
replaced.
2. There is water inside the pump.
1. Replace the batteries.
2. Remove the pump cover and batteries and dry
the inside of the pump. Allow the pump to be
completely dry before re-installing batteries.
The pump
cannot pump
water out.
1. The screen is blocked.
2. The hose is kinked, bent, or
coiled.
3. The pump is airlocked.
4. The discharge height is too
high.
5. Additional garden hose is not
sloping downhill away from the
pump.
1. Clean the screen or impeller.
2. Straighten the hose.
3. Allow 10 - 30 seconds of the pump running to
clear airlock. If this does not work, turn off the
pump, remove any additional hoses, remove
water, place back in the water, and turn on.
4. The maximum discharge height is only
36 in. (3 ft.). Reduce the maximum discharge
height.
5. When using long sections of additional garden
hose, the hose must slope away from the
pump so that gravity can help the water flow.
Slope the garden hose downhill.
WARRANTY
This product is warranted against manufacturing defects for a period of 12 months from the date of
purchase. Any misuse, abuse, or modification automatically voids this warranty. The distributor will
repair or replace the pump if, in its sole determination, the pump failed due to defects in materials or
workmanship.
WARRANTY EXCLUSIONS
1. Neither the distributor nor the store that sold this pump shall in any event be liable for any labor or
similar expenses incurred in removing or repairing this pump.
2. The distributor specifically disclaims any implied warranties of merchantability and fitness for
a particular purpose.
3. In no event shall the distributor be liable for consequential, incidental, or special damages resulting
from or related in any manner to any distributor components or accessories.
4. The distributor disclaims all liability for improper installation or improper use of this product.
Some states do not allow the exclusion or limitation of incidental or consequential damages.
The above limitations and exclusions may not apply to you. In addition to the rights given
you by this warranty, you may also have other rights which vary from state to state. For
warranty claims, DO NOT RETURN PUMP TO THE STORE!
Call our customer service department at: 1-800-346-7611, Monday –Friday, 8:00 a.m. –5:00
p.m., E.S.T.
Table of contents
Other water source Water Pump manuals


Popular Water Pump manuals by other brands

SOLIDSVAC
SOLIDSVAC SV200-SPDK-CF Operation manual

Lumax
Lumax LX-1322 quick start guide

Commercial Electric
Commercial Electric PBC-350 instruction manual

Grundfos
Grundfos NB Installation and operating instructions

Liberty Pumps
Liberty Pumps K002012 installation instructions

Graco
Graco Husky 1590 Instructions and parts list

ARO
ARO TWO-BALL PUMP Series Operator's manual

Grindex
Grindex 8120.280 Sandy Inox Installation, operation and maintenance manual

Crane
Crane OGP2022CO Series installation manual

MP PUMPS
MP PUMPS FLOMAX 8 Operator's manual

Gast
Gast DOA-P704 Operation & maintenance manual

Danfoss
Danfoss H1 45 Repair instructions


