Waterbird XL User manual

Copyright © 2021 Waterbird Systems GmbH
www.waterbird.at
Multi Slider XL
User Manual
Version 1.0

Copyright © 2021 Waterbird Systems GmbH
www.waterbird.at
Table of Contents
1. Introduction.................................................................................................................................- 1 -
2. System Overview and Components ............................................................................................ - 2 -
3. Technical Data .............................................................................................................................- 3 -
3.1 Carriage ...................................................................................................................................- 3 -
3.2 Chain Segments....................................................................................................................... - 3 -
3.3 End Parts..................................................................................................................................- 4 -
3.4 Belt...........................................................................................................................................- 4 -
4. Setup............................................................................................................................................ - 5 -
4.1 Assembling the Track ..............................................................................................................- 5 -
4.2 Mounting the Track................................................................................................................. - 7 -
4.2.1 Mounting the Track to Tripods............................................................................................- 8 -
4.2.2 Mounting the Track to ground plates ................................................................................. - 9 -
4.3 Slide in the Rails.....................................................................................................................- 10 -
4.4 Installing the carriage............................................................................................................- 10 -
4.5 Mounting the belt .................................................................................................................- 12 -
4.6 Connecting the Cables...........................................................................................................- 13 -
4.6.1 Supply ................................................................................................................................- 13 -
4.6.2 Control line........................................................................................................................- 13 -
4.6.3 HMI Control Unit with Joystick or food pedals..................................................................- 14 -
5. Operation ..................................................................................................................................- 15 -
5.1 Initialization of the slider via HMI Control Unit.....................................................................- 15 -
5.2 Operating the slider via HMI Control Unit.............................................................................- 16 -
6. Handling and Safety Instructions ..............................................................................................- 17 -
6.1 Regulatory Hints................................................................................................................- 18 -

Multi Slider –User Manual
Copyright © 2021 Waterbird Systems GmbH
www.waterbird.at - 1 -
1. Introduction
The Multi Slider XL is a bendable camera slider for professional use. Developed by
professional cameramen, the Multi Slider XL enables linear and curved camera tracks with
one device. Within seconds the Multi Slider XL can be changed from a linear to a curved
slider at any desired radius.

Multi Slider –User Manual
Copyright © 2021 Waterbird Systems GmbH
www.waterbird.at - 2 -
2. System Overview and Components
The Multi Slider XL is a flexible system with multiple components and segments. Due to this
flexibility the system can be ordered in length up to 100m.
All Multi Slider XL systems include:
•Segments that are connected to each other and build the track.
•End parts that finish the track ends and holding the belt in place
•Rails that are shifted into the track and allows the carriage to move
•Belt that is tightened between the end parts and allows the drive of the carriage
•Carriage that moves on the rails and includes the drive with motor and control unit.
•XL Control Unit –Controls the System with Sensors, Motor and User Inputs –see
separate manual for details for the XL Control Unit
•Power Supply –Supplies the motor and control unit of the MSXL
Optional:
•Tripods that allow to mount the track elevated above the ground level
•Battery pack: Rechargeable lithium-ion battery allows the System to be operated
without the need for a power supply cable and in locations where no power supply is
available
•HMI Unit with joystick or foot pedals allows to control the MSXL via manual control

Multi Slider –User Manual
Copyright © 2021 Waterbird Systems GmbH
www.waterbird.at - 3 -
3. Technical Data
3.1 Carriage
Dimensions:
439 x 215 x 170 ( L x W x H ) [mm]
Weight:
5,6 kg
Material:
Aluminum black anodized surface finish
3.2 Chain Segments
Dimensions:
228 x 187 x 78 ( L x W x H ) [mm]
Axis to Axis
distance:
150 mm
Weight:
0.67 kg
Material:
Glass fiber reinforced Polyamide + stainless steel inlays
Multi Slider –User Manual
Copyright © 2021 Waterbird Systems GmbH
www.waterbird.at - 4 -
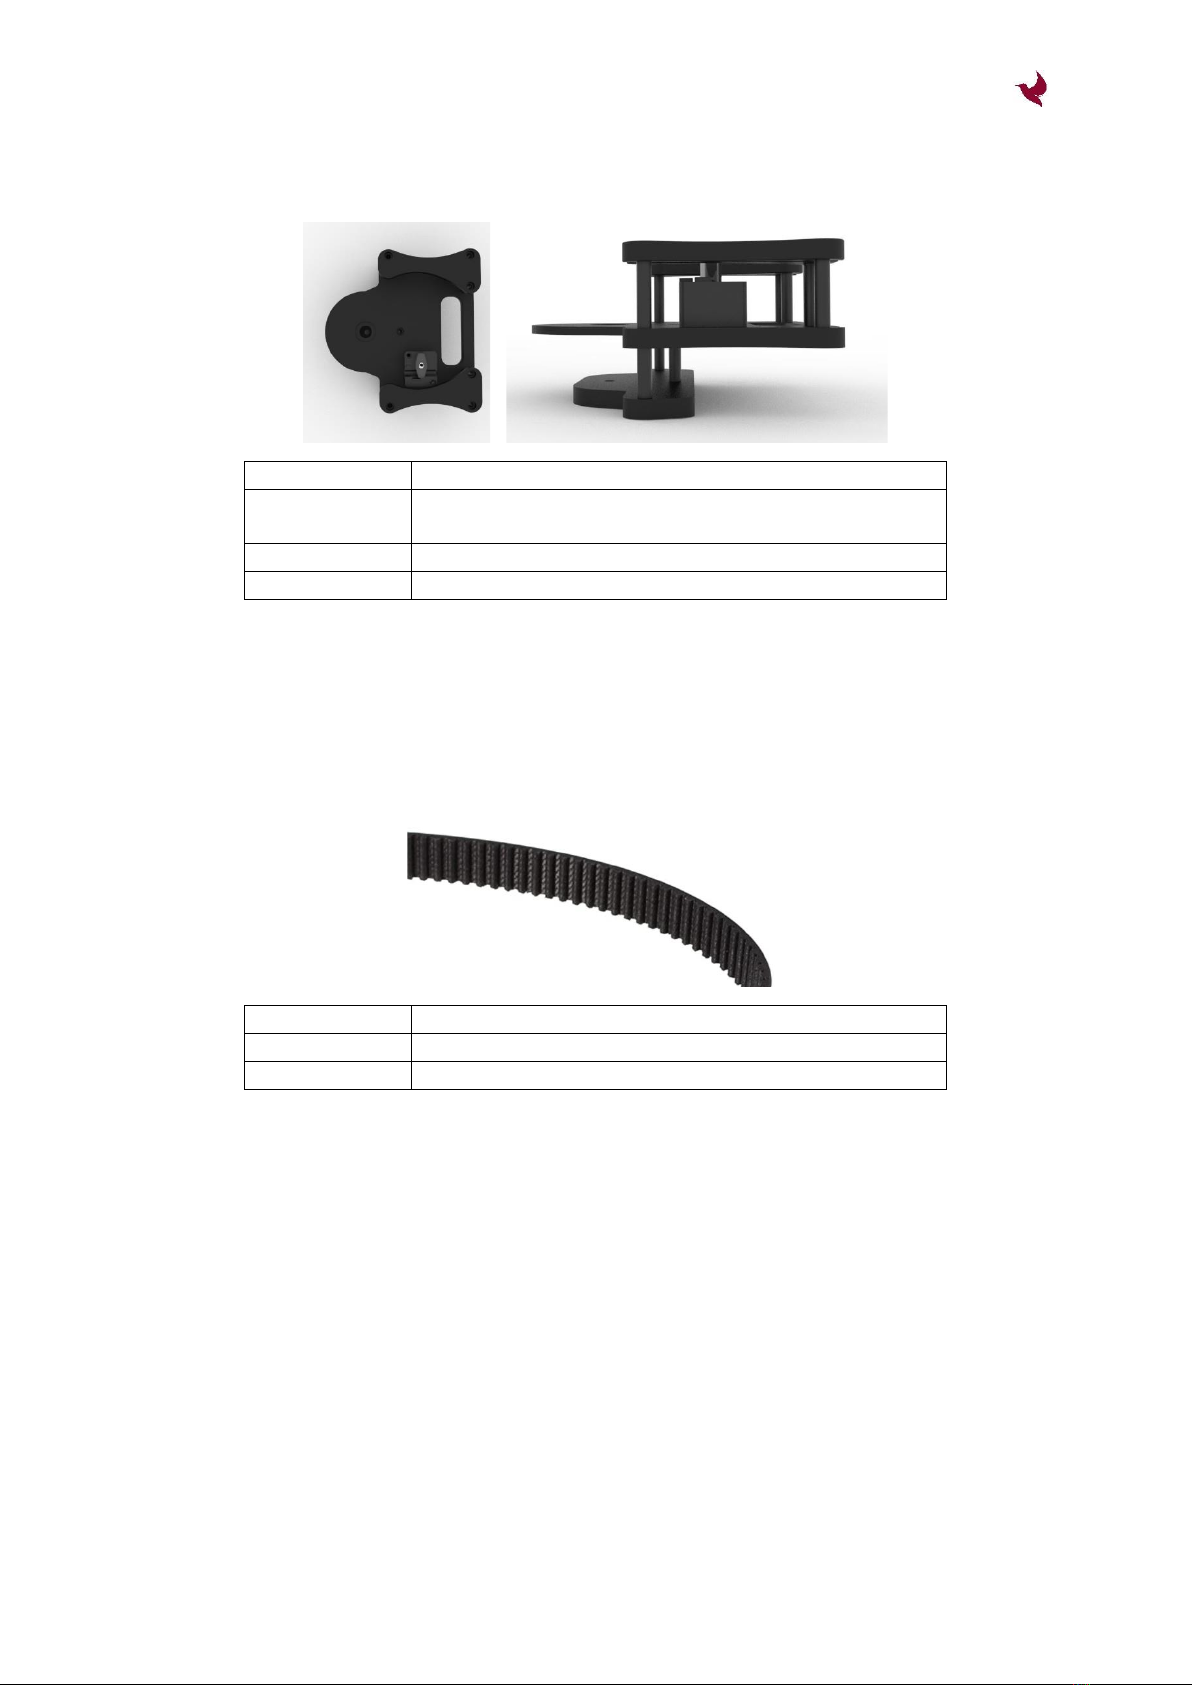
3.3 End Parts
Dimensions:
160 x 186 x 78.5 ( L x W x H ) [mm]
Axis to Axis
distance:
150 mm
Weight:
1,1 kg
Material:
Aluminum black anodized surface finish
3.4 Belt
Length:
depending on the ordered slider length
With:
9 mm
Type:
HTD 3M 9 mm

Multi Slider –User Manual
Copyright © 2021 Waterbird Systems GmbH
www.waterbird.at - 5 -
4. Setup
4.1 Assembling the Track
Segments are put together and fixed with the axis-screws.

Multi Slider –User Manual
Copyright © 2021 Waterbird Systems GmbH
www.waterbird.at - 6 -
The screw shall be turned until it is flat with the segments surface.
The track can be adjusted to the desired radius and shape before fixing the track by tightening
the screws.

Multi Slider –User Manual
Copyright © 2021 Waterbird Systems GmbH
www.waterbird.at - 7 -
4.2 Mounting the Track
The track has different options for mounting. One is to use the 3/8” UNC thread to mount the
track on tripods or fixed poles. The two 4,2mm holes can be used to fix the track to
undergrounds via 4mm screws from top or via self-tapping M5 screws from behind an
underground plate.

Multi Slider –User Manual
Copyright © 2021 Waterbird Systems GmbH
www.waterbird.at - 8 -
4.2.1 Mounting the Track to Tripods
First mount the tripod adapter plate by screw to the middle thread of segments (spigot
adapter plate ensures high stability and comes with waterbird tripods or can be ordered
separately)
It is recommended to have a support tripod or pole every 5-6 segments for lightweight loads
like PTZ cameras or every 3 segments for heavy loads.
Finally connect the track to the tripods by sliding in the adapter plates into the tripods and fix
it with tripod locking screw.
Multi Slider –User Manual
Copyright © 2021 Waterbird Systems GmbH
www.waterbird.at - 9 -
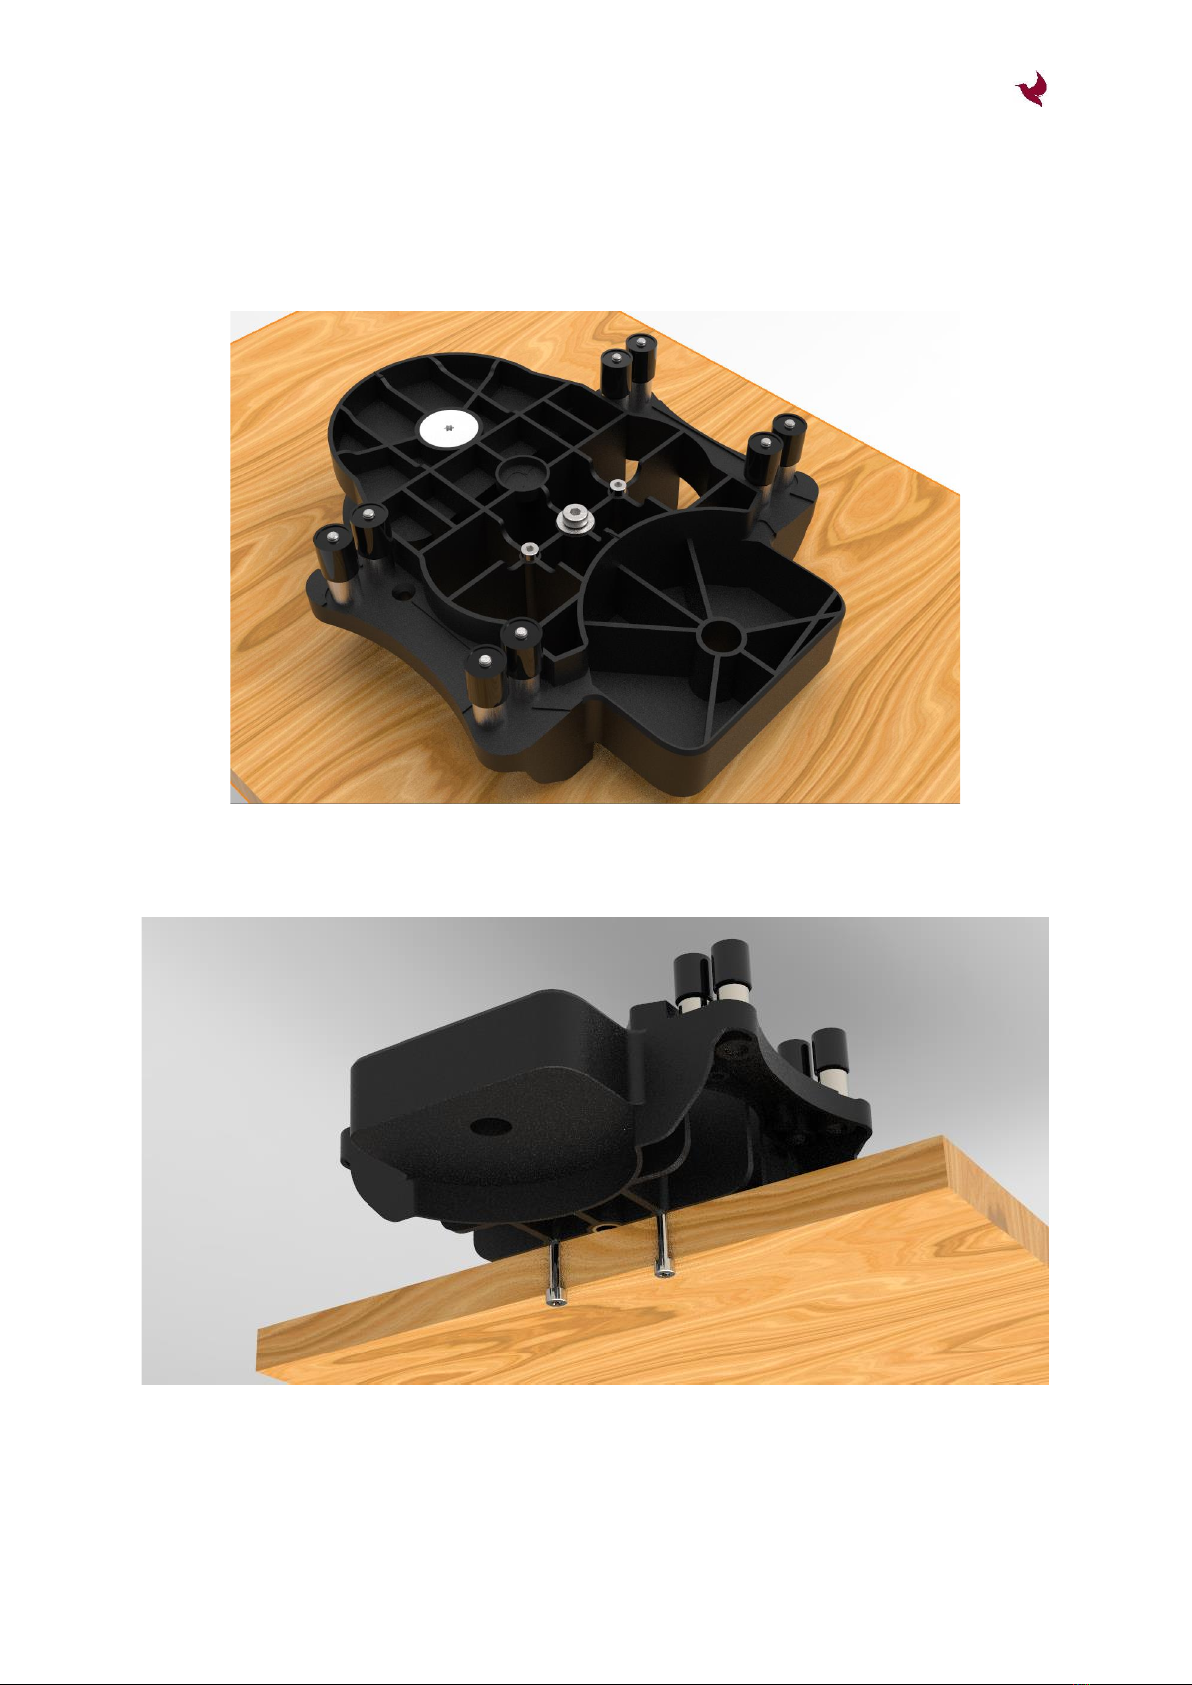
4.2.2 Mounting the Track to ground plates
Mounting the segments to ground plate from top.
Mounting to ground plate from back.
Multi Slider –User Manual
Copyright © 2021 Waterbird Systems GmbH
www.waterbird.at - 10 -
4.3 Slide in the Rails
After the segments and the end pieces has been put together the rails can be slided in. For
this the rails are pushed in from one end segment through the whole track.
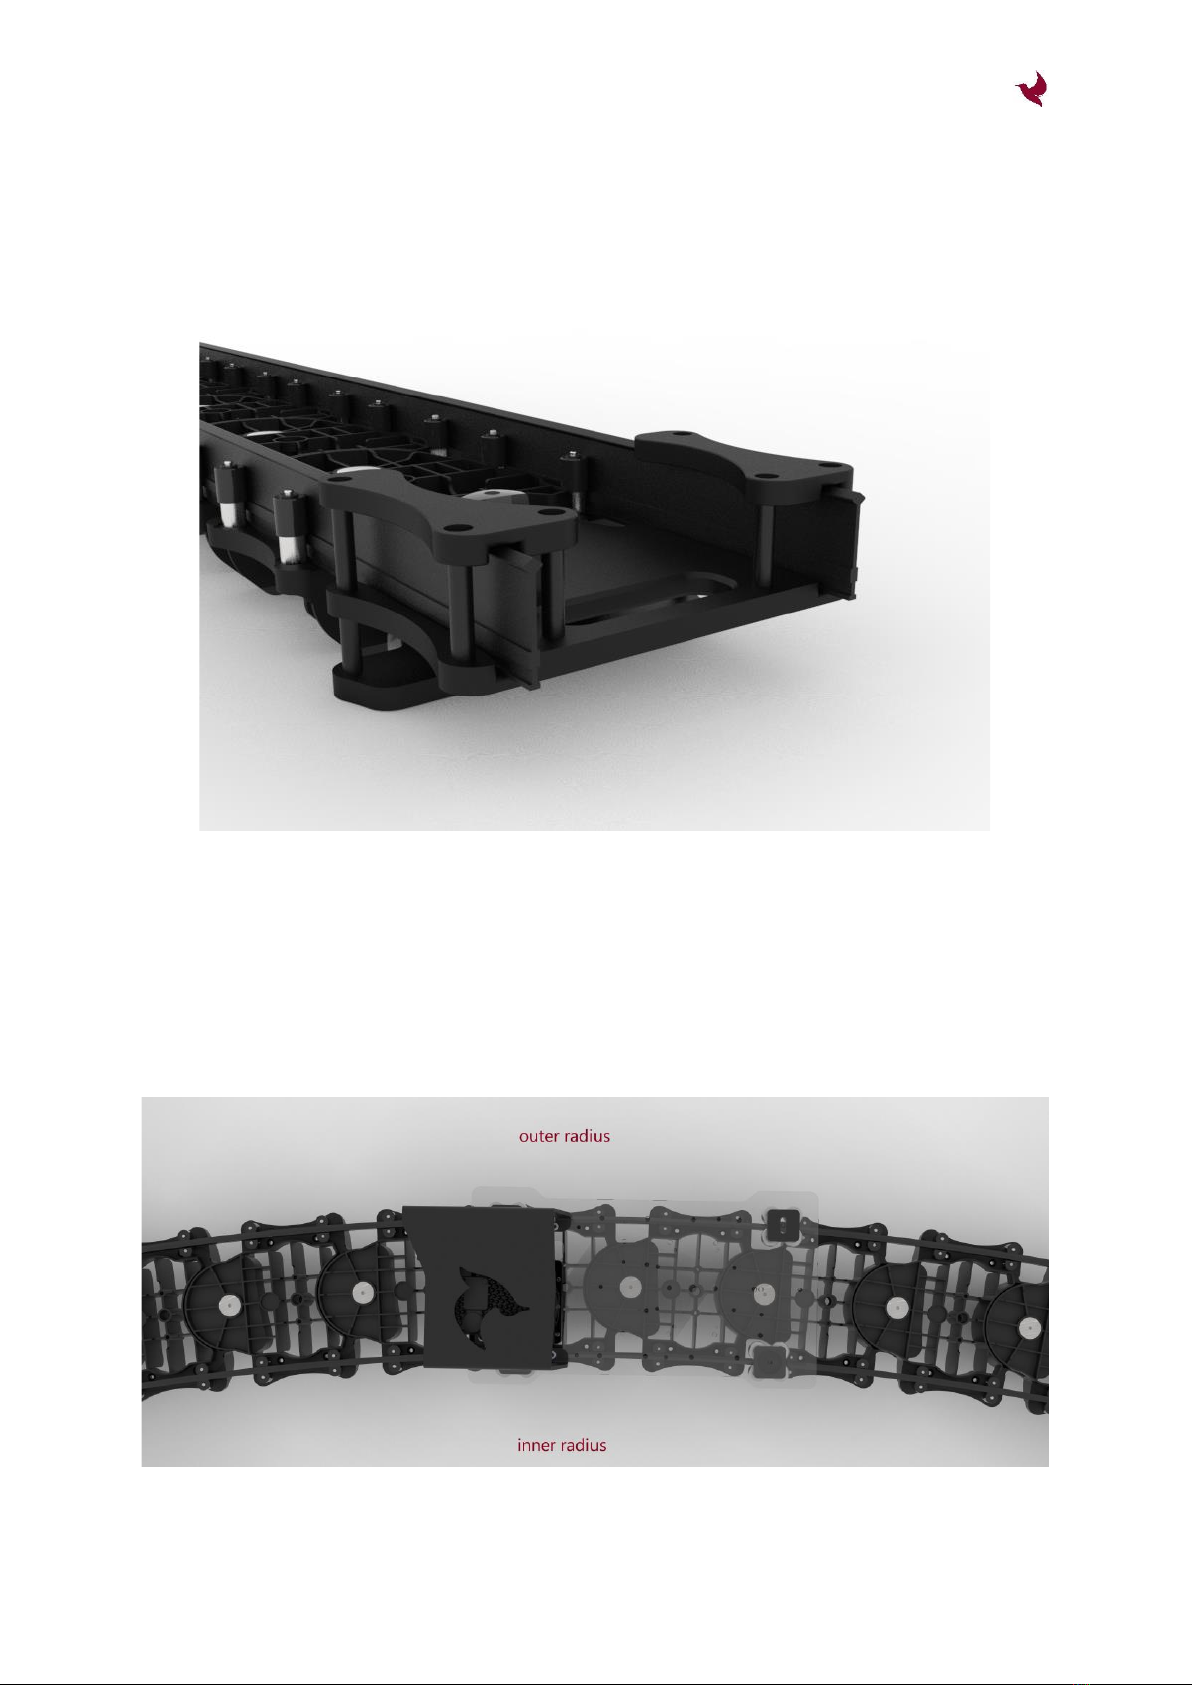
4.4 Installing the carriage
Before the rails are slid in completely, they shall be stopped approximately 50cm before
reaching the other end segment to allow the installation of the carriage.
The carriage needs to be mounted in the right direction as shown in the image below.
When looking to the carriage from the inner radius the motor must be on the left side of the
carriage.

Multi Slider –User Manual
Copyright © 2021 Waterbird Systems GmbH
www.waterbird.at - 11 -
Be carefully to lead through the belt to the other track end when putting the carriage on the
rails.
After the carriage has been put on the rails, the rails can be pushed in completely in the
other end piece.

Multi Slider –User Manual
Copyright © 2021 Waterbird Systems GmbH
www.waterbird.at - 12 -
4.5 Mounting the belt
After the carriage is on the track the segments are locked in desired position and the
complete slider is in desired shape, the belt needs to be mounted at the end pieces.
Make sure the belt is straight and has no torsion along the way. The belt is locked according
the picture below at the end pieces. The belt tense shall be tight for a smooth movement of
the slider.

Multi Slider –User Manual
Copyright © 2021 Waterbird Systems GmbH
www.waterbird.at - 13 -
4.6 Connecting the Cables
4.6.1 Supply
Connect white connector of the sliders power supply to the power cable that comes with your
slider. The other end of the power cable shall be connected to the D-Tap connector on the
carriage.
For strain relief use the included cable bracket and mount the power supply cable via a hook-
and-loop tape or cable tie.
After connecting the DC-side of the power supply the AC side can be connected to the mains
supply.
For this use a standard IEC 60320 C14 cable and connect it to a properly grounded wall socket.
4.6.2 Control line
The Multi Slider XL comes with the XL Motion Controller. This controller allows to control the
slider movements via standard DMX 512 protocol or via Ethernet.
For details of the XL Motion Controller and its capabilities, please see the separate XL Motion
Controller User Manual available in the support section of www.waterbird.at
Depending on your chosen way of control connect the DMX or RJ45 cable to the XL Motion
Controller mounted on the carriage and strain relief with the included cable bracket alongside
with the power cable.
Multi Slider –User Manual
Copyright © 2021 Waterbird Systems GmbH
www.waterbird.at - 14 -
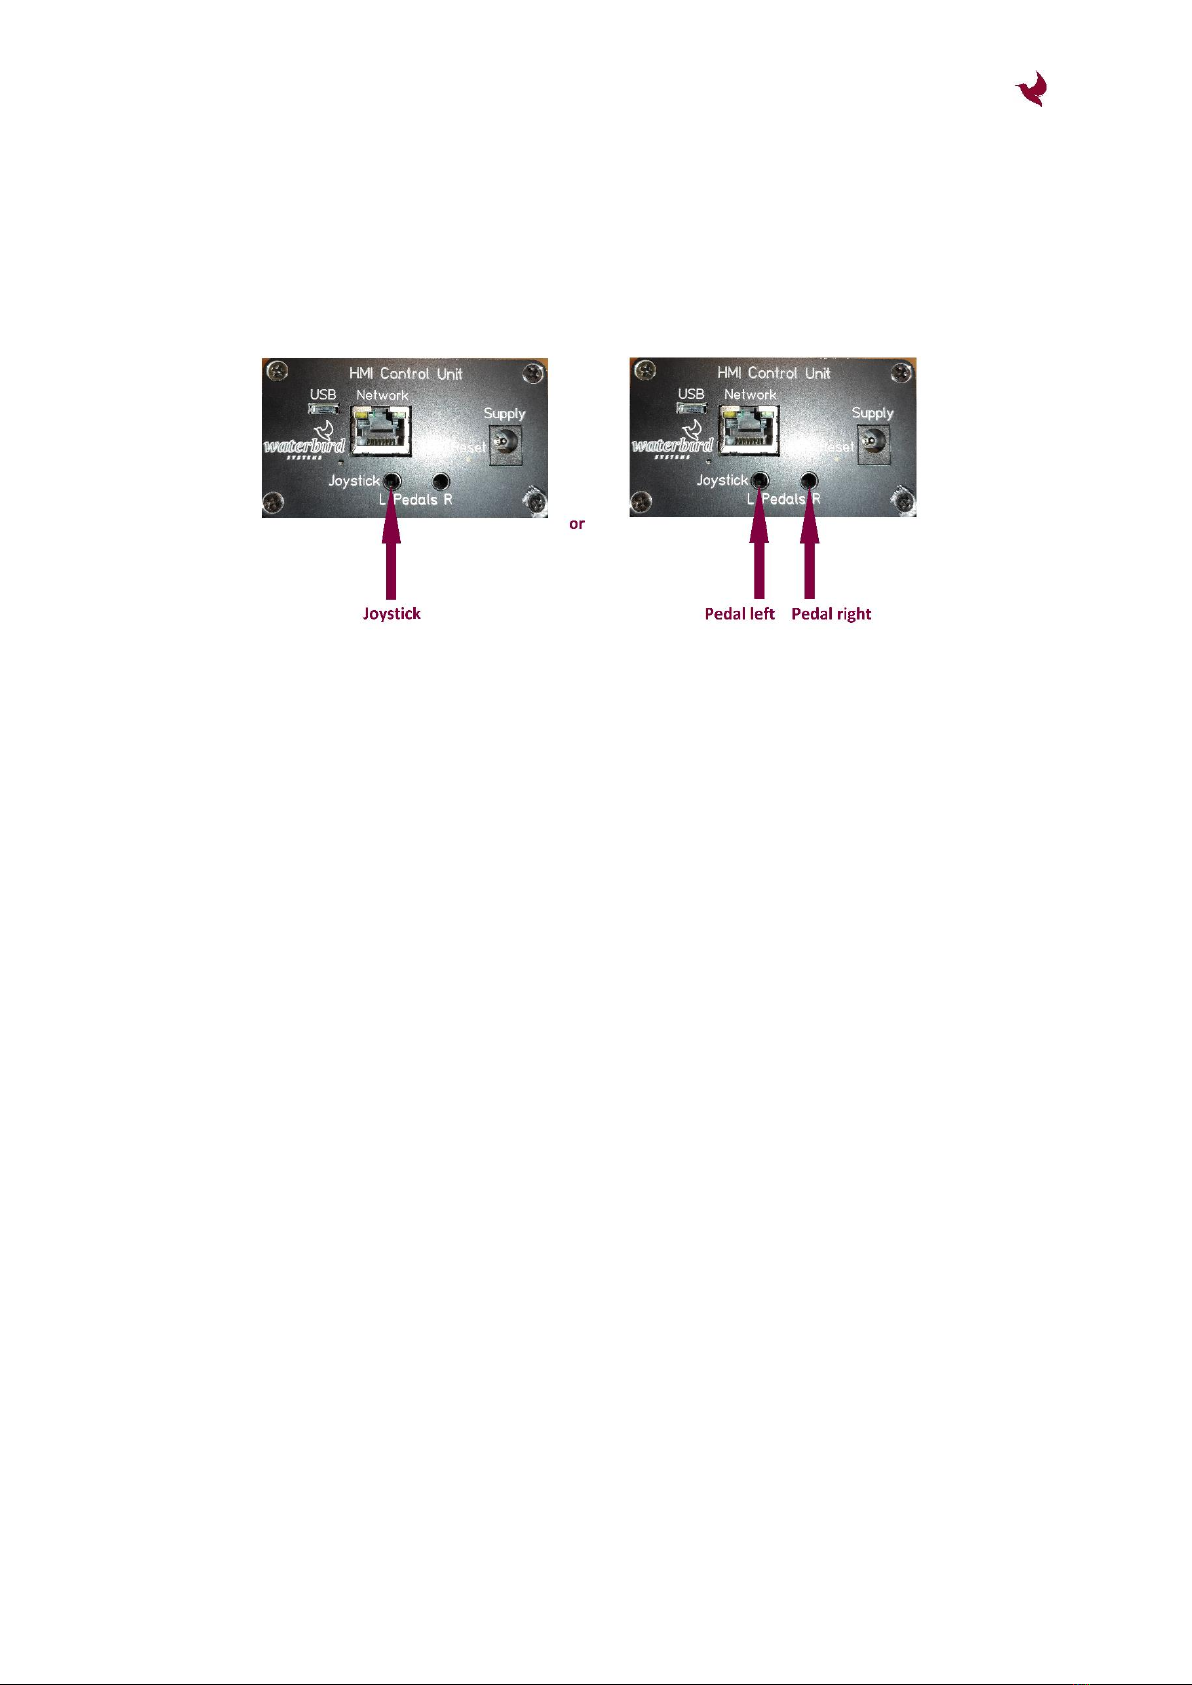
4.6.3 HMI Control Unit with Joystick or food pedals
For manual control of the slider the optional available HMI control unit needs to be connected
to the DMX cable.
Next the joystick or food pedals need to be connected to the HMI unit:
After DMX cable and Joystick or food pedals have been connected put the included HMI power
supply on the Supply Jack of the HMI Unit and use a standard IEC 60320 C14 cable to connect
the power supply to a properly grounded wall socket
Multi Slider –User Manual
Copyright © 2021 Waterbird Systems GmbH
www.waterbird.at - 15 -
5. Operation
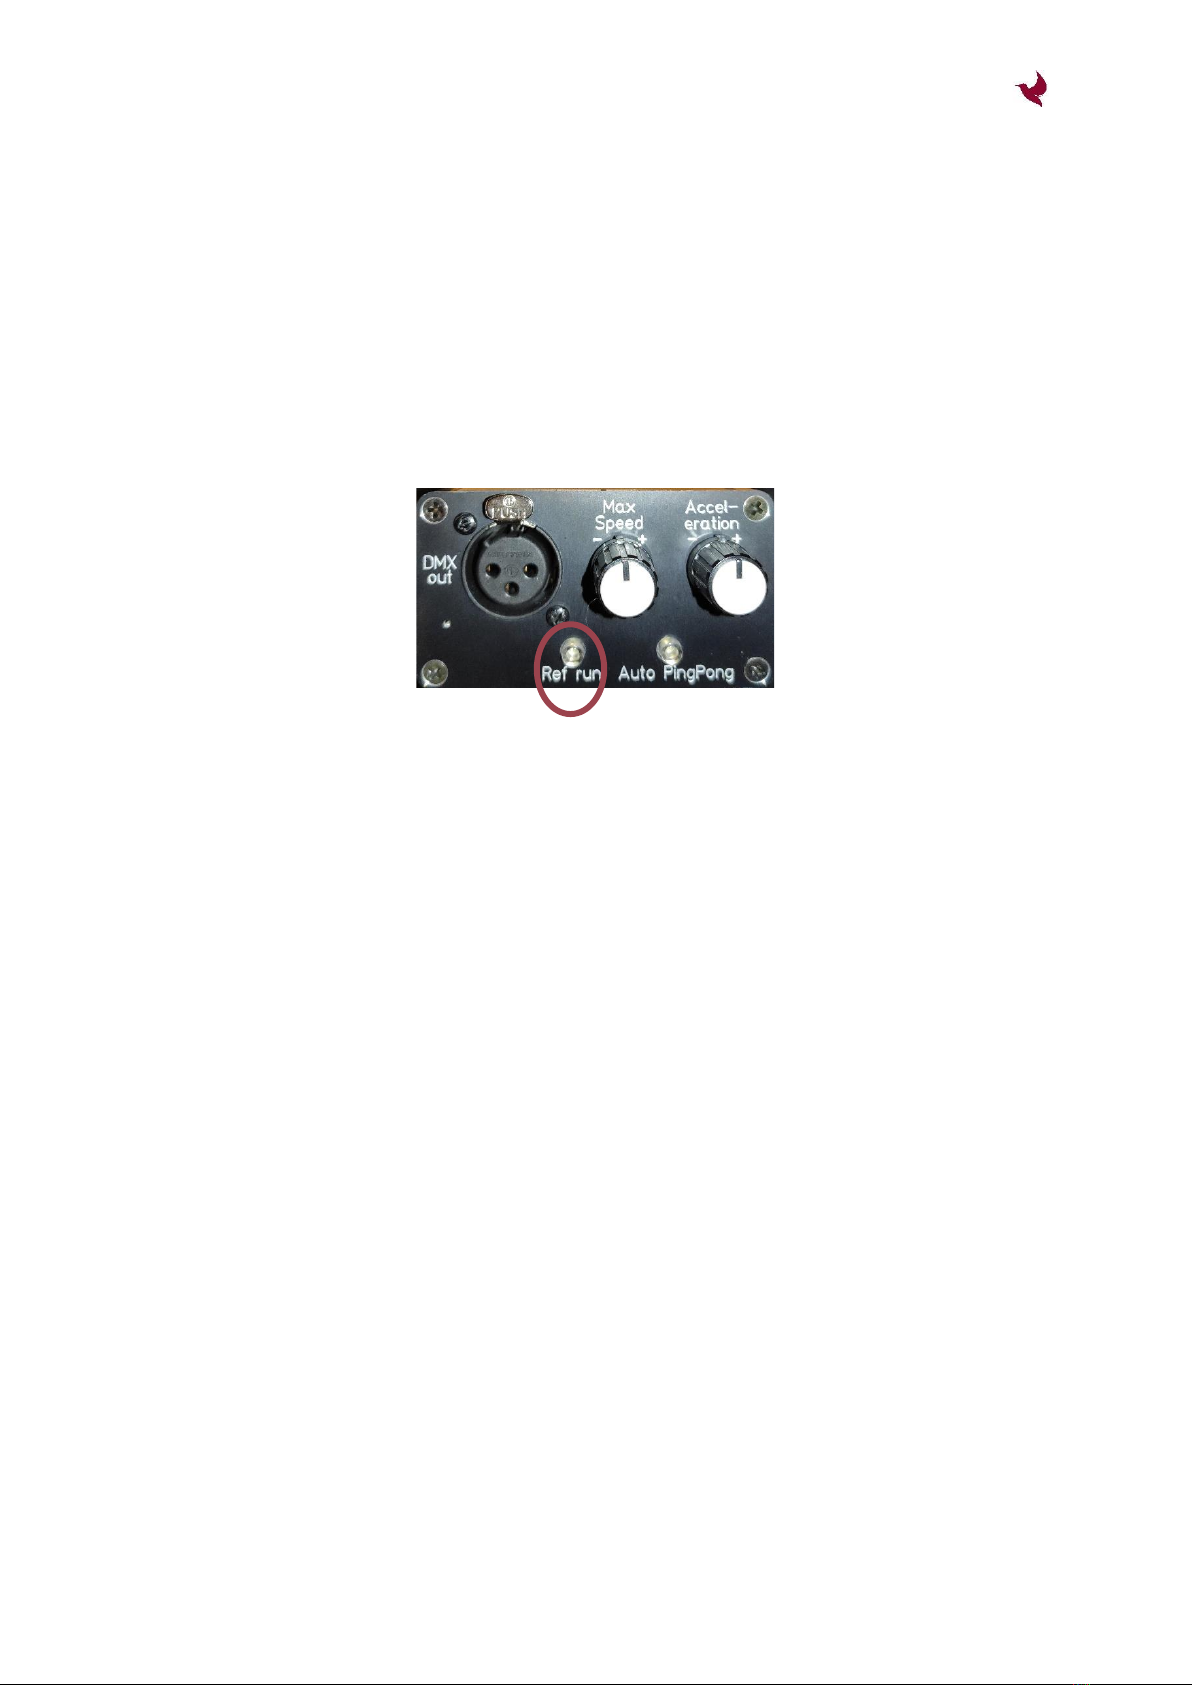
5.1 Initialization of the slider via HMI Control Unit
After connecting all cables and powering up the system the slider does not respond to
commands from the joystick or food pedals. This is because it needs to be referenced first.
For this hold down the “Ref run” button for longer than 3 seconds. The “Ref run” button will
light up for one second and the slider begins to move and automatically references via the
magnets on each end of the slider.
After the refence run is finished the motor stops and the control via Joystick or food pedals is
possible.
You can de-initialize the slider anytime by pressing the “Ref run” button for shorter than 3
seconds. This will suddenly stop the motor and should only be done when the motor is not
moving or in the need for an emergency stop.
At deinitialization the controller un-powers the motor and invalidates the current position.
Therefore, a new initialization run is necessary after each deinitialization.

Multi Slider –User Manual
Copyright © 2021 Waterbird Systems GmbH
www.waterbird.at - 16 -
5.2 Operating the slider via HMI Control Unit
After the slider is initialized you can move the Joystick / Food Pedals to get the slider in motion.
The Max speed knob on the HMI Unit can be used to set the maximal speed that is used when
moving the Joystick to the full left or right position or fully pressing the food pedal.
The Acceleration knob on the HMI Unit sets the ramp of how the carriage is accelerated when
moving the Joystick/pressing the Food pedals. A lower value means a softer start, a higher
value results in faster accelerations.
Maximum speed and acceleration shall be aligned to the application and payload.
The “Auto PingPong” button can be pressed to activate the automatic movement from one
end of the slider to the other continuously. This can by a useful feature for situations you have
no operator for the slider but want to have some movement in your pictures like at interviews,
live casting, or event recordings.
While the PingPong function is on, the “Auto PingPong” button lights up and the inputs of the
Joystick/Food pedals is ignored. Also, during the PingPong function you can control the sliders
speed and acceleration behavior via the Max Speed and Acceleration knobs.
For deactivating the PingPong function press again onto the “Auto PingPong” button.

Multi Slider –User Manual
Copyright © 2021 Waterbird Systems GmbH
www.waterbird.at - 17 -
6. Handling and Safety Instructions
Do not use the product in wet or humid environment like rain, snow, spray or waterfalls
without extra protection against humidity intrusion into the carriage.
Do not install this Unit near a heater, inflammable material or oily or dusty location or in a
location continuously exposed to direct sunlight or in a location where gas may leak.
Remove all foreign substances such as dust or water from the product with a dry cloth on a
regular basis. - Clean it with a dry cloth without alcohol or other solvents.
Do not pull or excessively bend the cables. Do not twist or tie the cables. Do not hook the
cables over a metal object or place a heavy object on the cables. Do not pull the cables, when
unplugging. Pull out the cable only by holding the plug. Do not put force on the cables in any
direction when connected to the Control Unit or Motor, this can damage the Control Unit or
Motor and connectors.
Before switching on the power to the product ensure that the Motors can spin freely and no
harm to humans, animals or objects is possible in case the connected motors start moving.
Do not use the product if it is damaged, the isolation on the cables is damaged or it shows any
abnormality like excessive heat dissipation.
It is normal that the Control Unit and Motor gets warm during operation. To avoid overheating
do not cover the Control Unit or Motor with thermally insulating material and allow free
airflow.

Multi Slider –User Manual
Copyright © 2021 Waterbird Systems GmbH
www.waterbird.at - 18 -
6.1 Regulatory Hints
INSTRUCTION ABOUT THE WEEE MARK
Correct Disposal of This Product (Waste Electrical & Electronic Equipment)
(Applicable in countries with separate collection systems) This marking on the
product, accessories or literature indicates that the product and its electronic
accessories (cables, adapters,..) should not be disposed of with other household
waste at the end of their working life. To prevent possible harm to the environment or human
health from uncontrolled waste disposal, please separate these items from other types of
waste and recycle them responsibly to promote the sustainable reuse of material resources.
Household users should contact either the retailer where they purchased this product, or their
local government office, for details of where and how they can take these items for
environmentally safe recycling. Business users should contact their supplier and check the
terms and conditions of the purchase contract. This product and its electronic accessories
should not be mixed with other commercial wastes for disposal.
USA:
Table of contents


