WaterCop SmartConnect User manual

The smart way to get
remote mobile control and access
to your WaterCop automatic
shut-o system.
WIFI
COMPATIBLE
DIRECT
ETHERNET
NOTIFICATION
ALERTS
MOBILE
APPS
REMOTE WATER
CONTROL
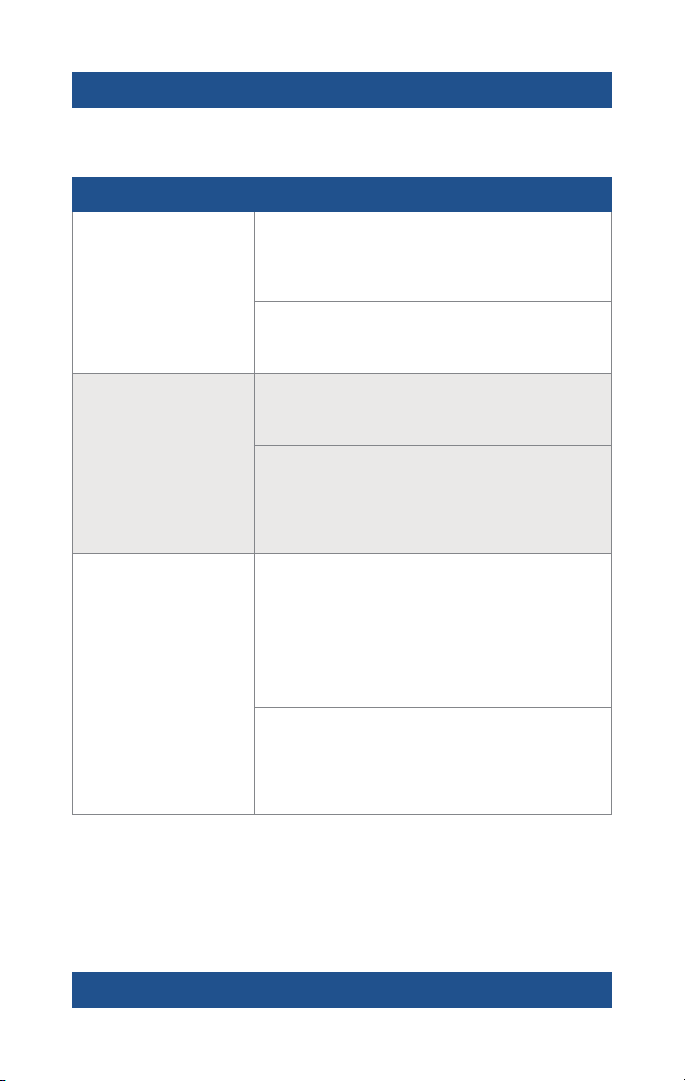
Troubleshooting
Problem Solutions
Cannot see or
connect to device at
“Add” screen
Turn o your mobile device’s Bluetooth feature for a
few seconds and then turn it back on again to see if
the SmartConnect’s connection is restored.
Remove the CAT5 cable or power supply from
the SmartConnect and reconnect to cycle power.
No connection, buttons
gray after configuring
Wi-Fi network
Verify network name and password are correct,
app will not notify of incorrect name or password.
Loss of power or network connection to the
WaterCop SmartConnect, check system to verify
Wi-Fi connection and power to the WaterCop
SmartConnect.
Valve “CONNECTION
LOST” message
While adding and setting up device, if 30 seconds
pass before connecting to a network, it will send
the “CONNECTION LOST” message.
Once connected to a network, the message can be
deleted and won’t return unless there’s a power or
Internet outage.
Loss of power or network connection to the
WaterCop system, check system to verify Wi-Fi
connection and power to the WaterCop
SmartConnect.
192616 REV A
FCC Information
This equipment has been tested and found to comply with the limits for a Class B
digital device, pursuant to part 15 of the FCC Rules. These limits are designed to
provide reasonable protection against harmful interference in a residential installation.
This equipment generates, uses, and can radiate radio frequency energy and if not
installed and used in accordance with the instructions, may cause harmful interference
to radio communications. However, there is no guarantee that interference will not
occur in a particular installation. If this equipment does cause harmful interference to
radio or television reception, which can be determined by turning the equipment o
and on, the user is encouraged to try to correct the interference by one or more of the
following measures:
•Reorient or relocate the receiver.
•Increase the separation between the equipment and receiver.
•Connect the equipment into an outlet on a circuit dierent from that to which the
receiver is connected.
•Consult the dealer for help.
The user is cautioned that changes and modifications made to the equipment without
the approval of manufacturer could void the user’s authority to operate this equipment.
Operation is subject to the following two conditions:
1. This device may not cause interference
2. This device must accept any interference, including interference that may cause
undesired operation of the device
Limited Warranty
DynaQuip® Controls Corporation warrants the electrical components of the WaterCop®
SmartConnect to be free from defects in material and workmanship under normal
use and if properly installed for a period of three years from the date of purchase. If
found to be defective as mentioned above, it will be replaced or repaired if returned
prepaid along with proof of date of purchase. This shall constitute the sole remedy
of the purchaser and the sole liability of DynaQuip® Controls Corporation. To the
extent permitted by law, the forgoing is exclusive and in lieu of all other warranties
or representations whether expressed or implied, including any implied warranty of
merchantability or fitness. In no event shall DynaQuip® Controls Corporation be liable
for special or consequential damages.
If you are unable to resolve any of the troubles noted above or experiencing other
issues, please contact your Installer directly or WaterCop Customer Service for
assistance at 800-545-3636.

System Requirements
•Smart Phone or tablet with the following:
°Android Version 5.0 or higher/ iOS –
10.3 or higher
°SIM card or Wi-Fi connectivity
•2.4 GHz Router with Protected Wi-Fi
(with a password)
•Bluetooth 4.1 or above
•WCACT1, WPMS and WPMSH require
additional power supply, ACA100
(sold separately)
System and Account Setup
NOTE: Before setup on the WaterCop SmartConnect, verify whether the device will be connected
to the Internet via wireless or ethernet cable. If using wireless, verify signal strength before
choosing the location of the SmartConnect device. When running cable from the actuator or
control panel to the SmartConnect, use CAT5 or CAT6, and keep the maximum cable length
50' or less. Use the supplied short cable if signal is adequate.
Setup:
1. Remove WaterCop SmartConnect from box.
2. Mount WaterCop SmartConnect with the supplied wall anchors or other methods to suit
the location.
3. Once mounted, run a CAT5 or CAT6 cable from the WaterCop to the WaterCop SmartConnect
port marked “CONNECT TO VALVE ACTUATOR”. Power is supplied through the CAT5 or CAT6
cable. If installed on a WCACT1, WPMS and WPMSH, the optional power supply, ACA100
(sold separately), is required to power the SmartConnect.
4. Download the WaterCop SmartConnect App from the Google Play Store on your Android
device or from the App Store on your iOS device. Make sure Bluetooth and Location Services
are turned on prior to set up and have adequate cellular or Wi-Fi connection.
5. Open the WaterCop SmartConnect App from your smart device and click on “Create account”.
6. Enter all information and click “Create”.
7. Open the WaterCop SmartConnect App and login, if not still logged in.
System Description
The WaterCop® SmartConnect is designed to work alongside a WaterCop® System to
deliver real time notifications of leaks in your plumbing system and remotely control the
WaterCop valve to shut o the water supply using an app on your smartphone or tablet.
The SmartConnect unit is powered by the WaterCop AUX I/0 port through a CAT5 or CAT6
cable. The SmartConnect can be connected with up to 50' CAT5 or CAT6.
NOTE: WaterCop systems WCACT1, WPMS, and WPMSH units will need an external power
supply, ACA100 (sold separately).
Included in this box:
•WaterCop SmartConnect device
• Wall mount fasteners/anchors
• Interconnect cable
• Owner’s Manual
Read Instructions before any installation is attempted. All sections of this manual should be
read and completely understood.
How the System Works
The SmartConnect unit receives the valve status from the WaterCop AUX I/0 output. The
information goes to a cloud server and out to the SmartConnect App on your smartphone
or tablet. If a leak is detected, the SmartConnect App notifies you of the potential issue. You
can also open and close your WaterCop valve through the app for complete control of your
water supply. The app will also notify you if there’s a signal loss from the SmartConnect to
the cloud service which may indicate a loss of power or a loss of internet connection.
SmartConnect
OR
8. On the My WaterCop Devices screen, click the blue “Add” button in the top right corner
while physically near the WaterCop SmartConnect. After the default name “WaterCop
GW” pops up, verify the MAC address matches with the label on the WaterCop
SmartConnect and carton, click the box to select it.
9. Enter the Unit ID from the carton or WaterCop SmartConnect, then click “OK”.
10. Click on the unit to configure the settings, once loaded click the settings icon at the
top right.
11. Next to the MAC address, change the name of the device to the name of the client,
building or address that makes sense for identification on the app.
12. If a Wi-Fi connection is desired, click the toggle button on the Wi-Fi line then manually
enter the Wi-Fi network and password and click “Done”.
13. If Wi-Fi is unavailable or hard-wired connection is preferred, run a network cable
from the router/modem to the port on the WaterCop SmartConnect marked
“ETHERNET CONNECTION”. Make sure “Ethernet” is selected on the app.
14. Press “GET” on the location line under “Wi-Fi”.
15. Enter the physical address of the WaterCop SmartConnect. It will be displayed on
the device screen.
16. Click “SAVE”. If it fails, try clicking “SAVE” again. It may take a few tries at times.
17. Click the “<” at the top left of the screen to go back to the device screen.
Setup Contacts and Testing Notifications
1. Click the “>” icon on the Contacts line under the address to view, enter and
save contacts.
2. Click the “Add Contact” at the bottom right and enter the contact info including the
country code. Click “Done”.
3. Use the “>” icon to go back and check that the contacts are showing.
(example: 1 emails, 1 SMS)
4. Once saved and connected, cycle the valve open and closed from the app to ensure
the SmartConnect is connected, operating and sending notifications.
INSTALLER NOTE: If the contact persons aren’t on-site to confirm notification receipt,
add your contact information to test then delete when testing is complete.
The smart way to get
remote mobile control and access
to your WaterCop automatic
shut-o system.
WIFI
COMPATIBLE
DIRECT
ETHERNET
NOTIFICATION
ALERTS
MOBILE
APPS
REMOTE WATER
CONTROL
Troubleshooting
Problem Solutions
Cannot see or
connect to device at
“Add” screen
Turn o your mobile device’s Bluetooth feature for a
few seconds and then turn it back on again to see if
the SmartConnect’s connection is restored.
Remove the CAT5 cable or power supply from
the SmartConnect and reconnect to cycle power.
No connection, buttons
gray after configuring
Wi-Fi network
Verify network name and password are correct,
app will not notify of incorrect name or password.
Loss of power or network connection to the
WaterCop SmartConnect, check system to verify
Wi-Fi connection and power to the WaterCop
SmartConnect.
Valve “CONNECTION
LOST” message
While adding and setting up device, if 30 seconds
pass before connecting to a network, it will send
the “CONNECTION LOST” message.
Once connected to a network, the message can be
deleted and won’t return unless there’s a power or
Internet outage.
Loss of power or network connection to the
WaterCop system, check system to verify Wi-Fi
connection and power to the WaterCop
SmartConnect.
192616 REV A
FCC Information
This equipment has been tested and found to comply with the limits for a Class B
digital device, pursuant to part 15 of the FCC Rules. These limits are designed to
provide reasonable protection against harmful interference in a residential installation.
This equipment generates, uses, and can radiate radio frequency energy and if not
installed and used in accordance with the instructions, may cause harmful interference
to radio communications. However, there is no guarantee that interference will not
occur in a particular installation. If this equipment does cause harmful interference to
radio or television reception, which can be determined by turning the equipment o
and on, the user is encouraged to try to correct the interference by one or more of the
following measures:
•Reorient or relocate the receiver.
•Increase the separation between the equipment and receiver.
•Connect the equipment into an outlet on a circuit dierent from that to which the
receiver is connected.
•Consult the dealer for help.
The user is cautioned that changes and modifications made to the equipment without
the approval of manufacturer could void the user’s authority to operate this equipment.
Operation is subject to the following two conditions:
1. This device may not cause interference
2. This device must accept any interference, including interference that may cause
undesired operation of the device
Limited Warranty
DynaQuip® Controls Corporation warrants the electrical components of the WaterCop®
SmartConnect to be free from defects in material and workmanship under normal
use and if properly installed for a period of three years from the date of purchase. If
found to be defective as mentioned above, it will be replaced or repaired if returned
prepaid along with proof of date of purchase. This shall constitute the sole remedy
of the purchaser and the sole liability of DynaQuip® Controls Corporation. To the
extent permitted by law, the forgoing is exclusive and in lieu of all other warranties
or representations whether expressed or implied, including any implied warranty of
merchantability or fitness. In no event shall DynaQuip® Controls Corporation be liable
for special or consequential damages.
If you are unable to resolve any of the troubles noted above or experiencing other
issues, please contact your Installer directly or WaterCop Customer Service for
assistance at 800-545-3636.
Table of contents
Popular Lawn And Garden Equipment manuals by other brands


BCP
BCP SKY6598 instruction manual

Alice's Garden
Alice's Garden Penne Safety and installation instructions

Homelite
Homelite 24683 Instructions-parts list

AquaCraft
AquaCraft TOP SPEED3 manual

Charley's Greenhouse & Garden
Charley's Greenhouse & Garden ARBORIA V8757 installation instructions

Emil Lux
Emil Lux 105232 Assembly instructions


