WaterMAXX WWD224W-2 User manual
CAUTION: Before using the
water dispenser, read this
manual and follow all safety rules
and operating instructions.
MISE EN GARDE: Avant
d'employer votre distributeur
d'eau, lisez ce manuel et suivez
toutes les règles de sécurité et
les consignes d'utilisation.
PRECAUCIÓN: Antes de usar
el dosificador de agua, lea este
manual y siga todas las reglas
de seguridad e instrucciones
de funcionamiento.
Room and Cold
WATER DISPENSER
DISTRIbuTEuR
D'EAu
ambiant et froid
DoSIfIcADoR
DE AguA
ambiente y fría
REV02
save These InsTrucTIons
conserver ces InsTrucTIons
guarde esTas InsTruccIones
Use & Care Guide
Guide d’utilisation et d’entretien
Manual d uso y cuidado
WWD224W-2

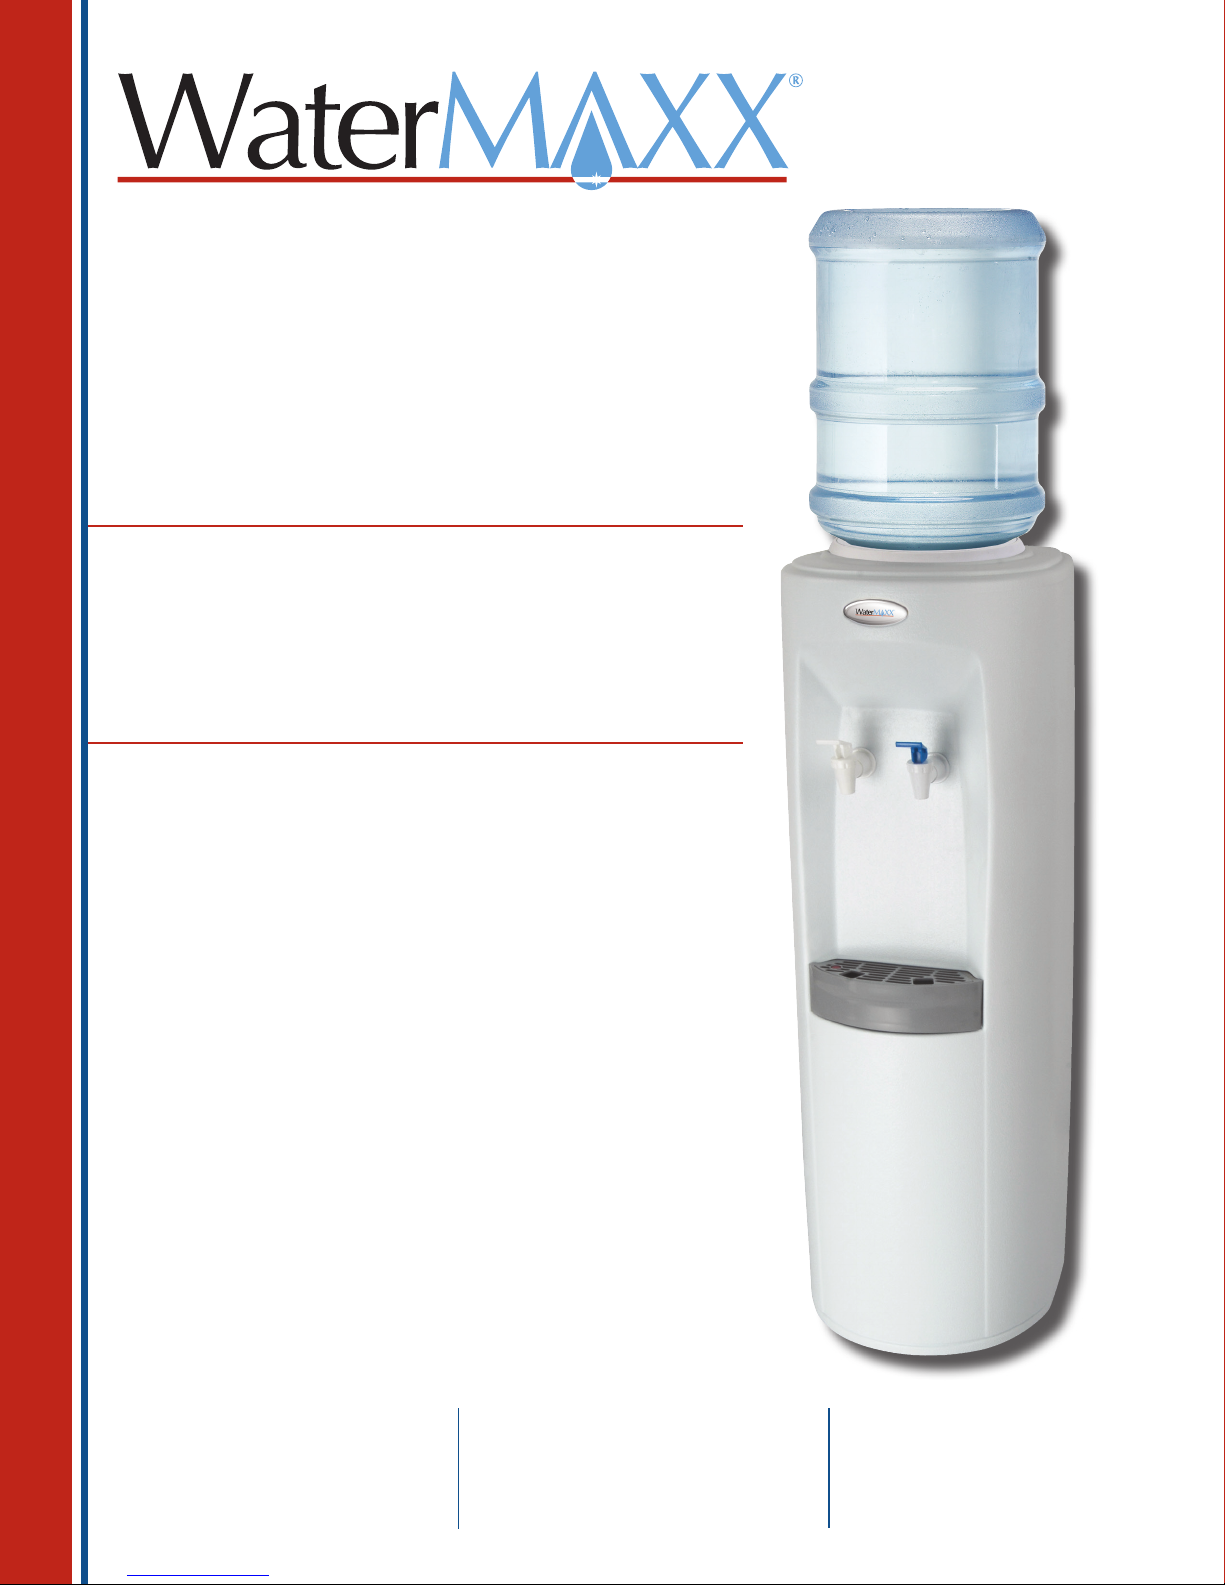
Thank you for purchasing a WaterMAXX® Water Dispenser. Please read the enclosed operating instructions carefully
and retain this booklet for future reference. We have carefully engineered your WaterMAXX® Water Dispenser to give you
years of enjoyment and trouble free operation.
IMPORTANT SAFEGUARDS
•Neverturnthedispenserupsidedownortiltmorethan45degrees.Ifunithasbeenrestingonitssideforan
extended period of time, place the water dispenser in the upright position for approximately 12 hours before
turning on.
•Forusewith3or5gallon(12or19liter)waterbottlesandmostwaterltrationsystems,(notincluded).
•Neverusethisdispenserwithwaterthatisunsafetodrinkorisfromanunknownsource.
•Neveruseanyotherliquidinthedispenserotherthanknownandmicrobiologicallysafebottledwater.
•Thiswaterdispenserisequippedwithagroundedpowercordplugforyoursafety(seeGroundingInstructions).
• Donotuseanextensioncordwithyourwaterdispenser.
•Keepyourwaterdispenserinadryplaceawayfromdirectsunlight.
•Neverputanythingammableclosetothedispenser.
•Leaveaminimumof2”(5cm)aroundthebackandsidesofthedispenserforproperventilation.
•Alwaysinstallyourwaterdispenseronaleveloor.Wait3minutesbeforerestartingmachineaftershuttingdown.
•Alwaysunplugthewaterdispenserbeforeservicingorcleaning.
• Regularcleaningofyourwaterdispenserisrequiredforyourwarranty.
Please follow cleaning instructions outlined in this manual and clean the
dispenserevery4months.
To avoid water overflow when cleaning your dispenser, always remove the
bottle support collar before pouring water or cleaning solution into the
reservoir.
GROUNDING INSTRUCTIONS
•Improperuseofthegroundingplugcanresultinariskofelectricshockcausingseriousinjury,evendeath.
•Thisappliancemustbegrounded.Intheeventofanelectricalshortcircuit,groundingreducestheriskofelectric
shock by providing an escape wire for the electric current.
•Thisapplianceisequippedwithapowercordhavingagroundingwirewithagroundingplugandmustbe
connectedintoaproperlygroundedpolarizedoutlet.Consultaqualiedelectricianifthegroundinginstructions
arenotcompletelyunderstood,orifdoubtexistsastowhethertheapplianceisproperlygrounded.Ifthewalloutlet
is a standard 2 prong outlet, it is your personal responsibility and obligation to have it replaced with a properly
grounded3-prongwalloutlet.
• Donotunderanycircumstancescutorremovethethird(ground)prongfromthepowercordplug.
•Donotuseanadapterplugwiththisappliance.
• Donotuseanextensioncordwiththisappliance.Ifthepowercordistooshort,haveaqualiedelectricianinstall
an electrical outlet near the appliance.
1
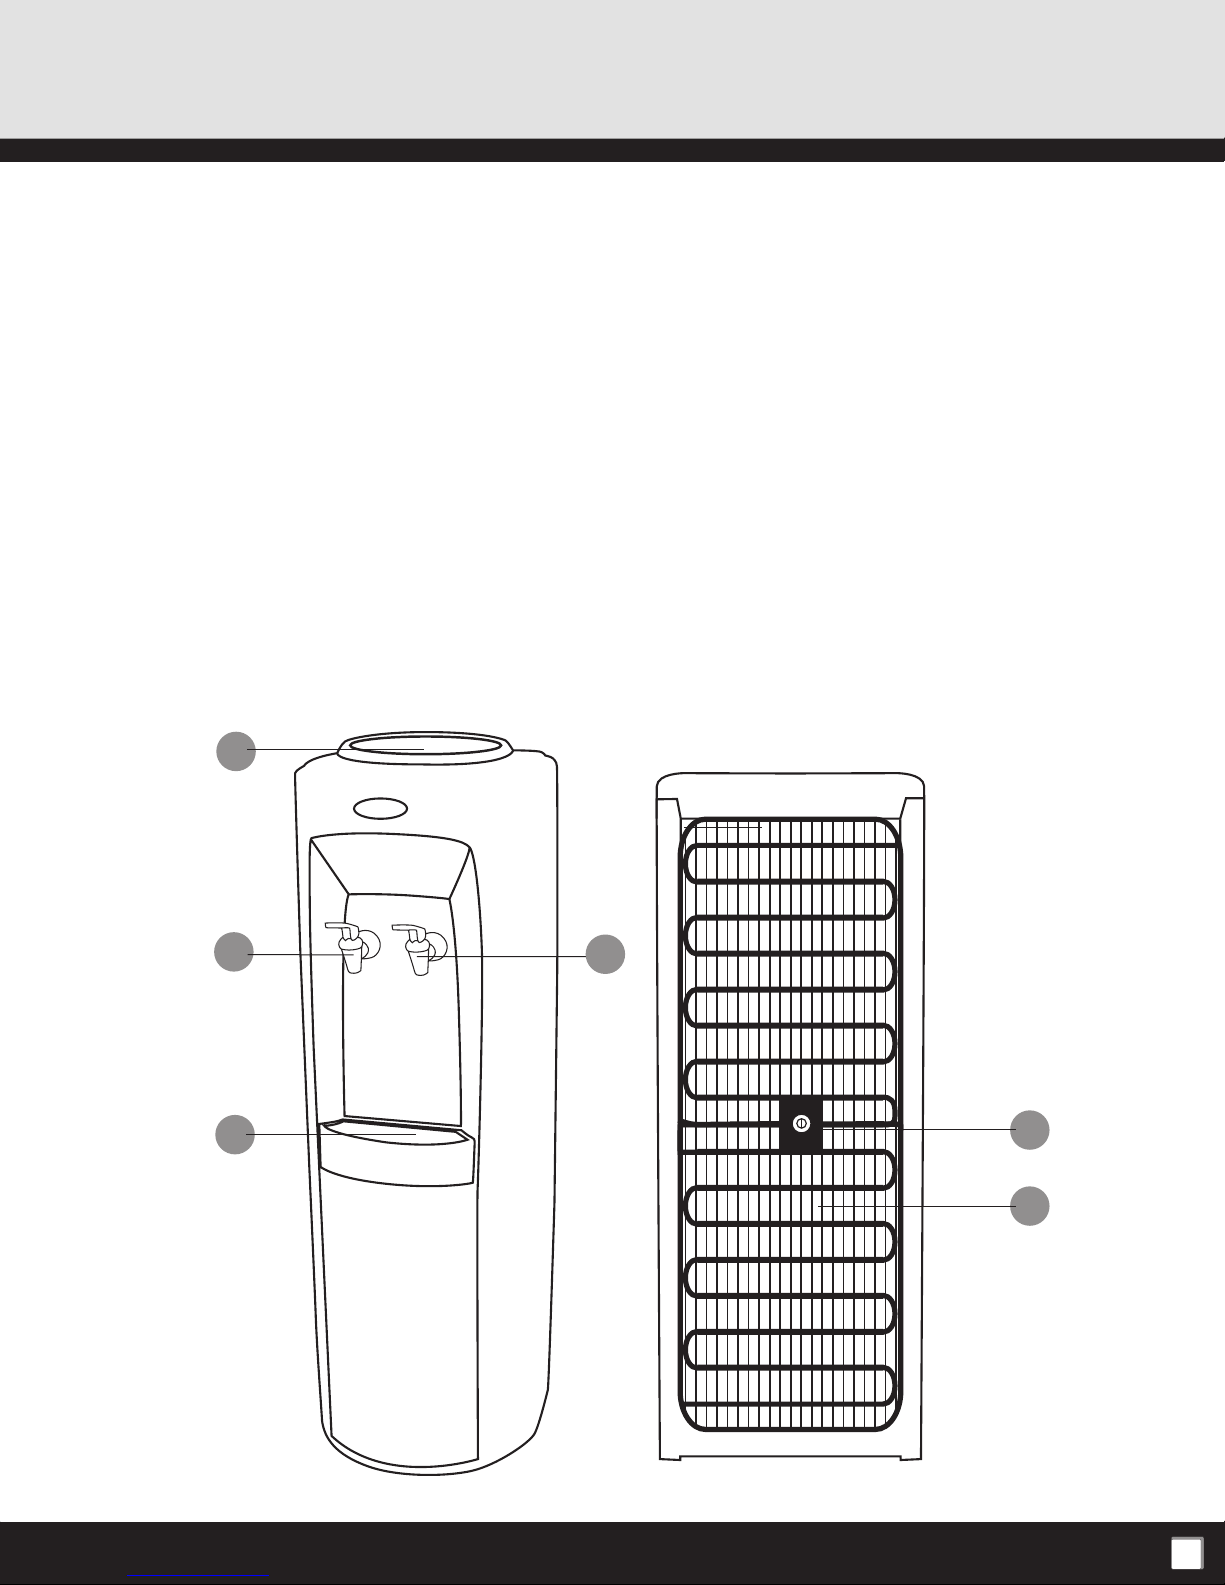
YOUR WATERMAXX® WATER DISPENSER
1. Bottle support collar
2.Roomtemperaturewatertap
3. Cold water tap
4.Removabledriptrayandredoatindicator(notshown).
Servesasaremindertoemptythedriptraywhentheredoatpenetratesthroughthedriptraygrill.
5. Adjustablecoldwaterthermostat(rearofdispenser)
6. Condensercoils(rearofdispenser)
2
1
4
5
6
2
3
OPERATING INSTRUCTIONS
Initial Product Cleaning Procedure
Likemostappliances,yourwaterdispenserrequiresperiodicmaintenancefor
maximumefciencyandperformanceandmustbecleanedonaregularbasis
(i.e.every4months).Tomaintainahygienicenvironmentwithinyourwater
dispenserandpreventpotentialformation(growth)ofbacteria,westrongly
recommend regular cleaning. A cleaning kit is available through our Customer
Service Department at 1-866-253-0447 or can be ordered on line at www.
greenwayhp.com.
1. Make sure the unit is unplugged.
2. Removethebottlesupportcollar,saturateacleanclothwithavitapur®
water dispenser cleaner or vinegar and wipe the inside of the reservoir.
3. Pourthewaterdispensercleaneroramixtureof4cups/1Lofvinegar
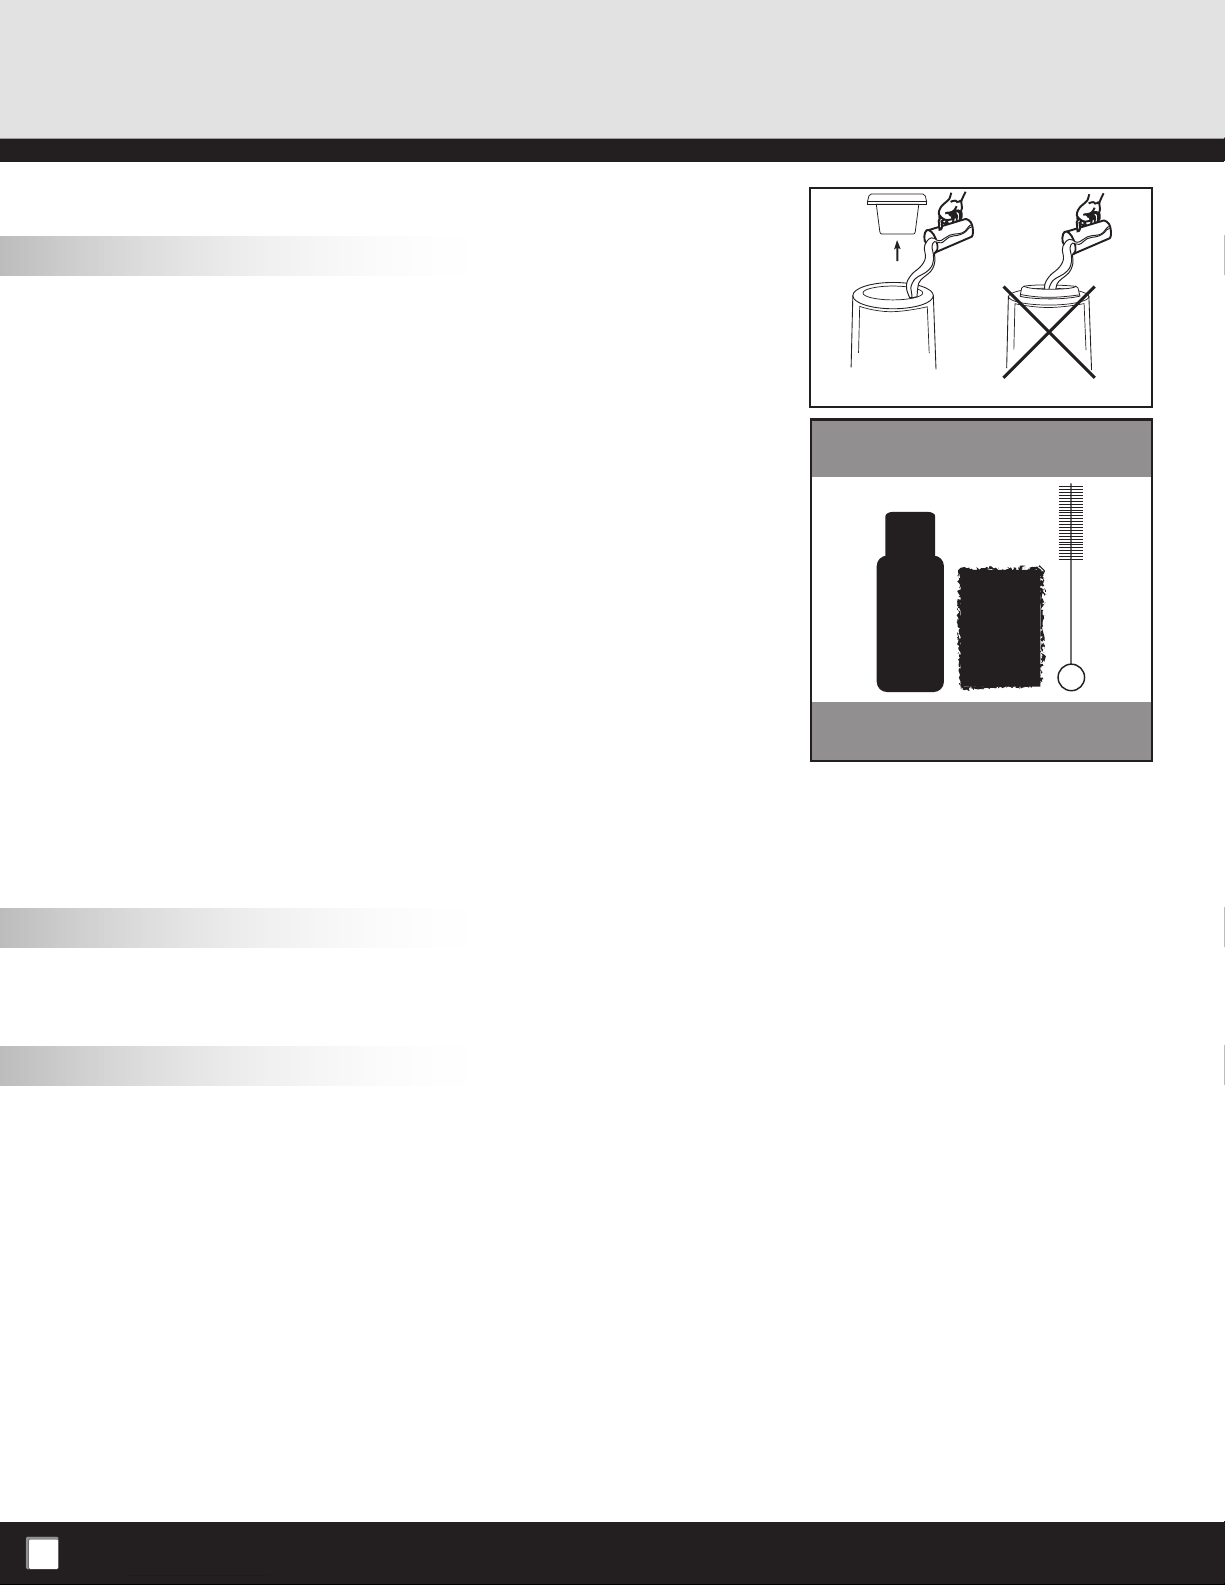
with4cups/1Lofhotwaterintothereservoirandwait20minutes.
IMPORTANT: To avoid water overflow while cleaning the dispenser,
always remove the bottle support collar before pouring water or a
cleaning solution into the reservoir (see Figure A).
4. Press both dispensing taps until water no longer comes out.
5. Rinseagainwithcleanwater.
6. Place bottle support collar back on top of dispenser.
Maintaining Your Water Dispenser
Likemostappliances,yournewwaterdispenserrequiresregularcleaningtooperateefciently.Yourwaterdispenser
mustbecleanedevery4months(see procedure on pg. 5).
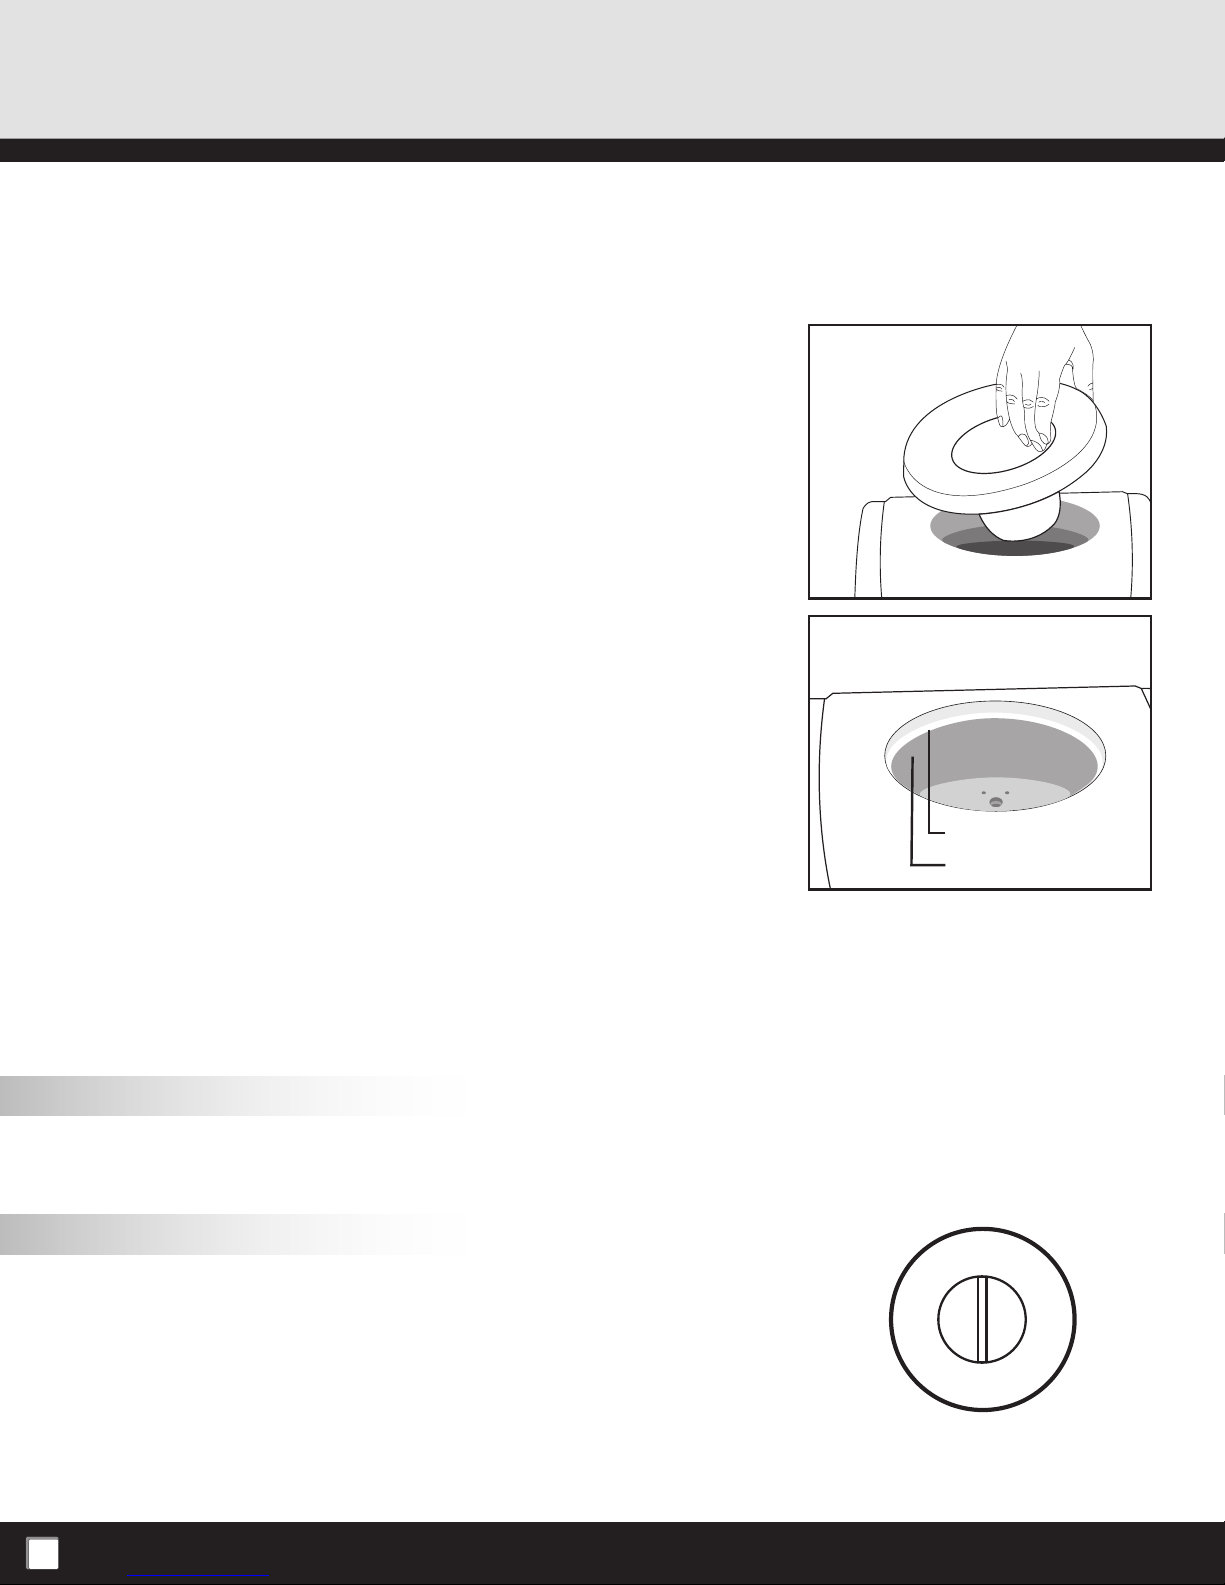
Installing the Water Bottle
IMPORTANT: Always wash your hands first! Clean the top (neck) of the bottle with a clean cloth and do not touch
the part of the unit that the water touches. Make sure the unit is unplugged and the power switch is in the OFF
position. The water bottle can be purchased from your local retailer.
1.Removetheprotectivecapfromtheendofthewaterbottleunlessthebottlehasapuncturablecaporsticker.
2. Liftandturnthebottleupsidedown,placingitsecurelyonthebottlesupportcollar.
3.Pressandholdbothdispensertapsuntilwaterowsfromthedispenser.Drainabout4cups/1Lofwaterbefore
initial use. This does not need to be repeated with replacement bottles.
4. Plug in the water dispenser.
5. Itmaytakeapproximately1hourbeforethecoldwaterreachesoptimumtemperature.Tochangethewater
temperatureseeadjustingthetemperature-coldwateronly.
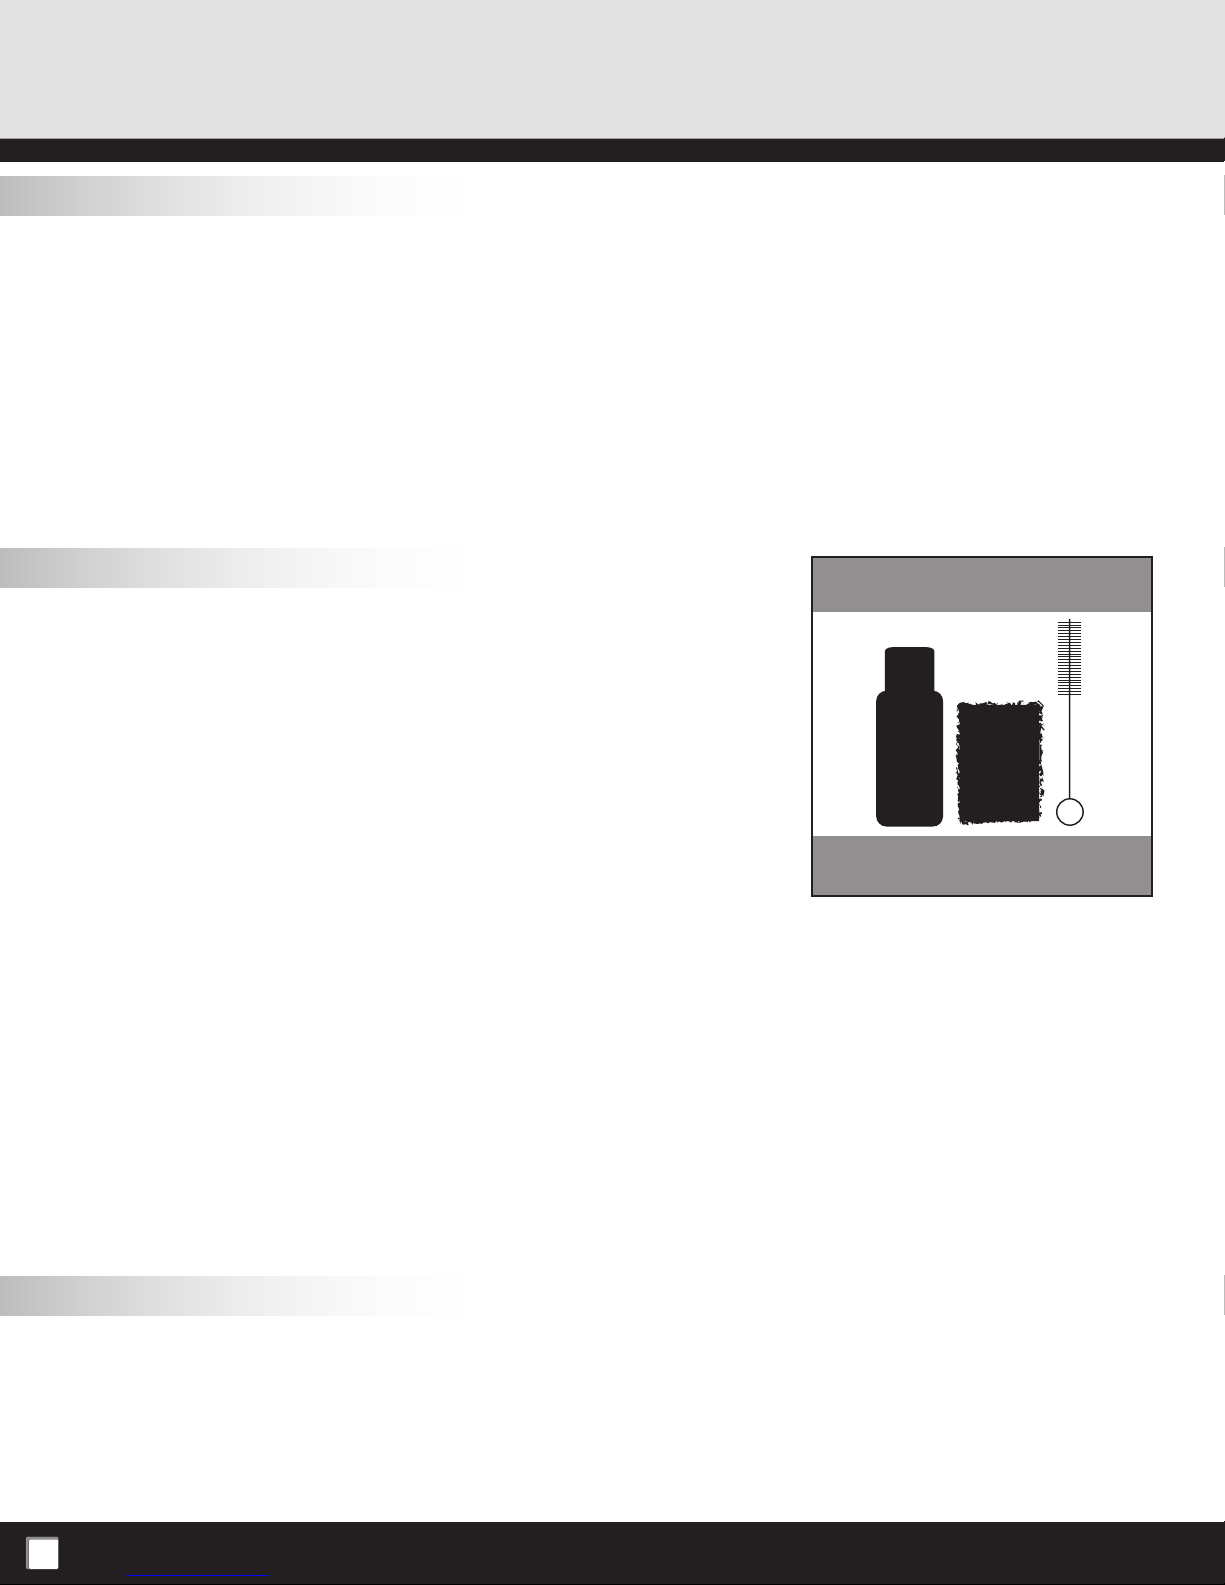
Cleaning Kit
Available online at
www.greenwayhp.com
Figure A
3
IMPORTANT NOTICE ABOUT LEAKING BOTTLES
Ifyoundthatyourdispenserisleaking,checkthewaterbottlerst!
Almostall3and5gallonwaterbottlesarerecycled,andhandledextensively
duringcleaning,lling,andshipping.Asaresulttheyareveryproneto
developingpinholesorsmallcracksthatcancauseanoverow(orleak)when
placed on top of a water dispenser.
Mostoften,thereisnothingwrongwithyourwaterdispenser.Ifyouare
experiencing a leak, this simple test will allow you to determine whether your
water bottle or dispenser is the source of the problem.
1. Unplug the unit and remove the water bottle.
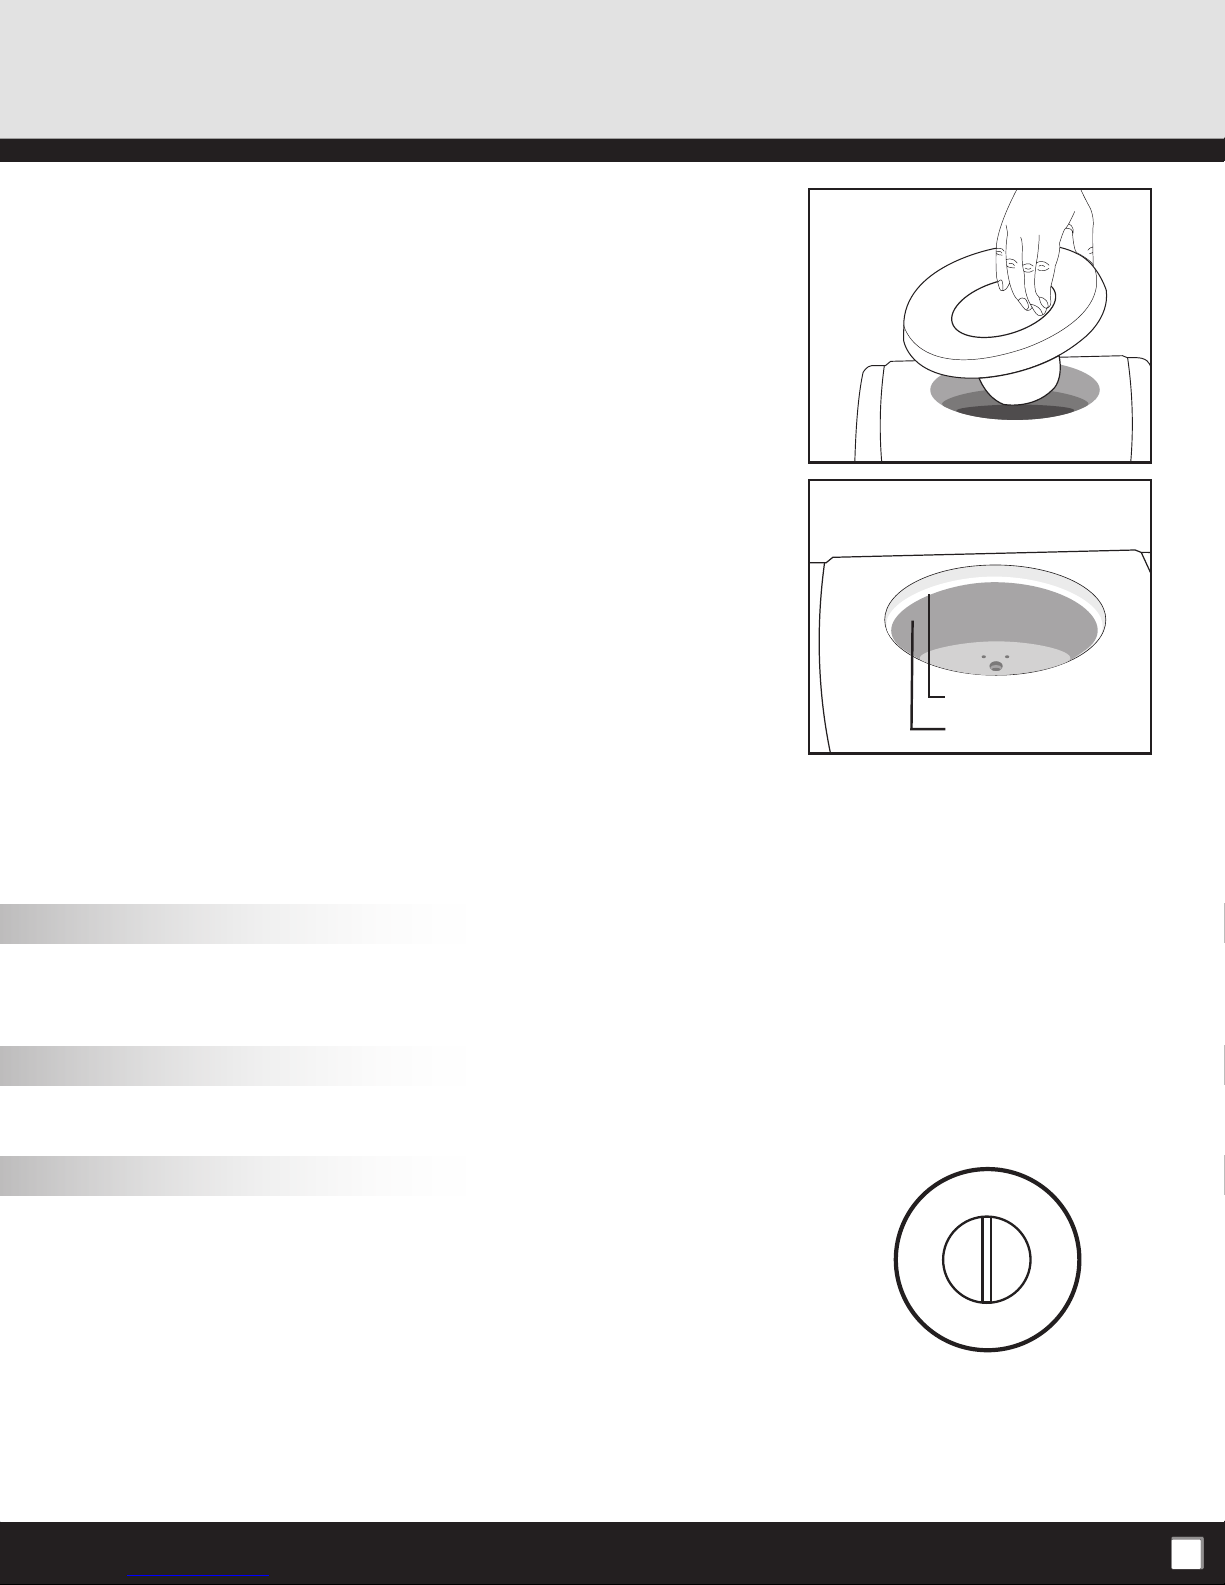
2. a)Removethebottlesupportcollarandcheckthewaterlevelinsidethe
reservoir–itshouldbeatroughlythree-quartersfull.
b)Pleaseaddordrainafewglassesofwatertoachievetherequired
lllevel.
3. Closelymonitorthewaterlevelinsidethereservoir,(1-2hours)ifthe
water level drops, immediately drain the remaining water from the unit and
call customer service at 1-866-253-0447.Ifthewaterlevelremains
constant it is the water bottle not the dispenser that is leaking. Please
contact your water supplier for a replacement bottle.
Please visit us at www.greenwayhp.com for water dispenser accessories and helpful use and care tips.
Dispensing Room Temperature Water
Placeaglassunderthetap.Pressthe(whitehandle)tapdownwarduntilthedesiredamountofwaterisdispensed(for
cold water, see Dispensing Cold Water).
Dispensing Cold Water
Placeaglassunderthetap.Pressthe(bluehandle)tapdownwarduntilthedesiredamountofwaterisdispensed.
Adjusting the Temperature (Cold water only)
By turning the thermostat at the back of the unit, the temperature can be
adjusted.Turn(rotate)thedialbetweenthe"High"and"Low"settingsuntil
the desired temperature is reached. To change the water temperature, adjust
(rotate)thermostatcontrollocatedattherearoftheunit.Rotatecontrol
"clockwise"forcoldertemperature.Rotatecontrol"counter-clockwise"for
warmer temperature.
Ifthewaterdispenserisnotdispensingwater,therecouldbeapossibleice
buildupduetothethermostatbeingsettoocold.Ifthishappens,unplugthedispenserovernightandchangethe
thermostatsetting.Setthermostatto"High",slowlydecreasebasedonyouruseandneedforcoldwater.
Min Max
Med
Low High
2.a
Reservoir Lip
Water Level
2.b
4
CLEANING AND MAINTENANCE
Likemostappliances,yourwaterdispenserrequiresperiodicmaintenanceformaximumefciencyandperformanceand
mustbecleanedonaregularbasis(i.e.every4months).Tomaintainahygienicenvironmentwithinyourwaterdispenser
andpreventpotentialformation(growth)ofbacteria,westronglyrecommendregularcleaning.Acleaningkitisavailable
through our Customer Service Department at 1-866-253-0447 or can be ordered on line at www.greenwayhp.com.
Failuretoproperlymaintainyourdispenserwillvoidyourwarranty.
Cleaning Your Water Dispenser
IMPORTANT: Always unplug the dispenser before performing any of the following cleaning procedures.
Cleaning the Outside of the Water Dispenser
Theoutsideofthedispensercanbewipedcleanwithanon-abrasivecleaneroramildsoapandwatermixture.Never
useharshchemicalsorabrasivecleaners.Rinsethoroughlywithcleanwaterandthendrysurfaces.
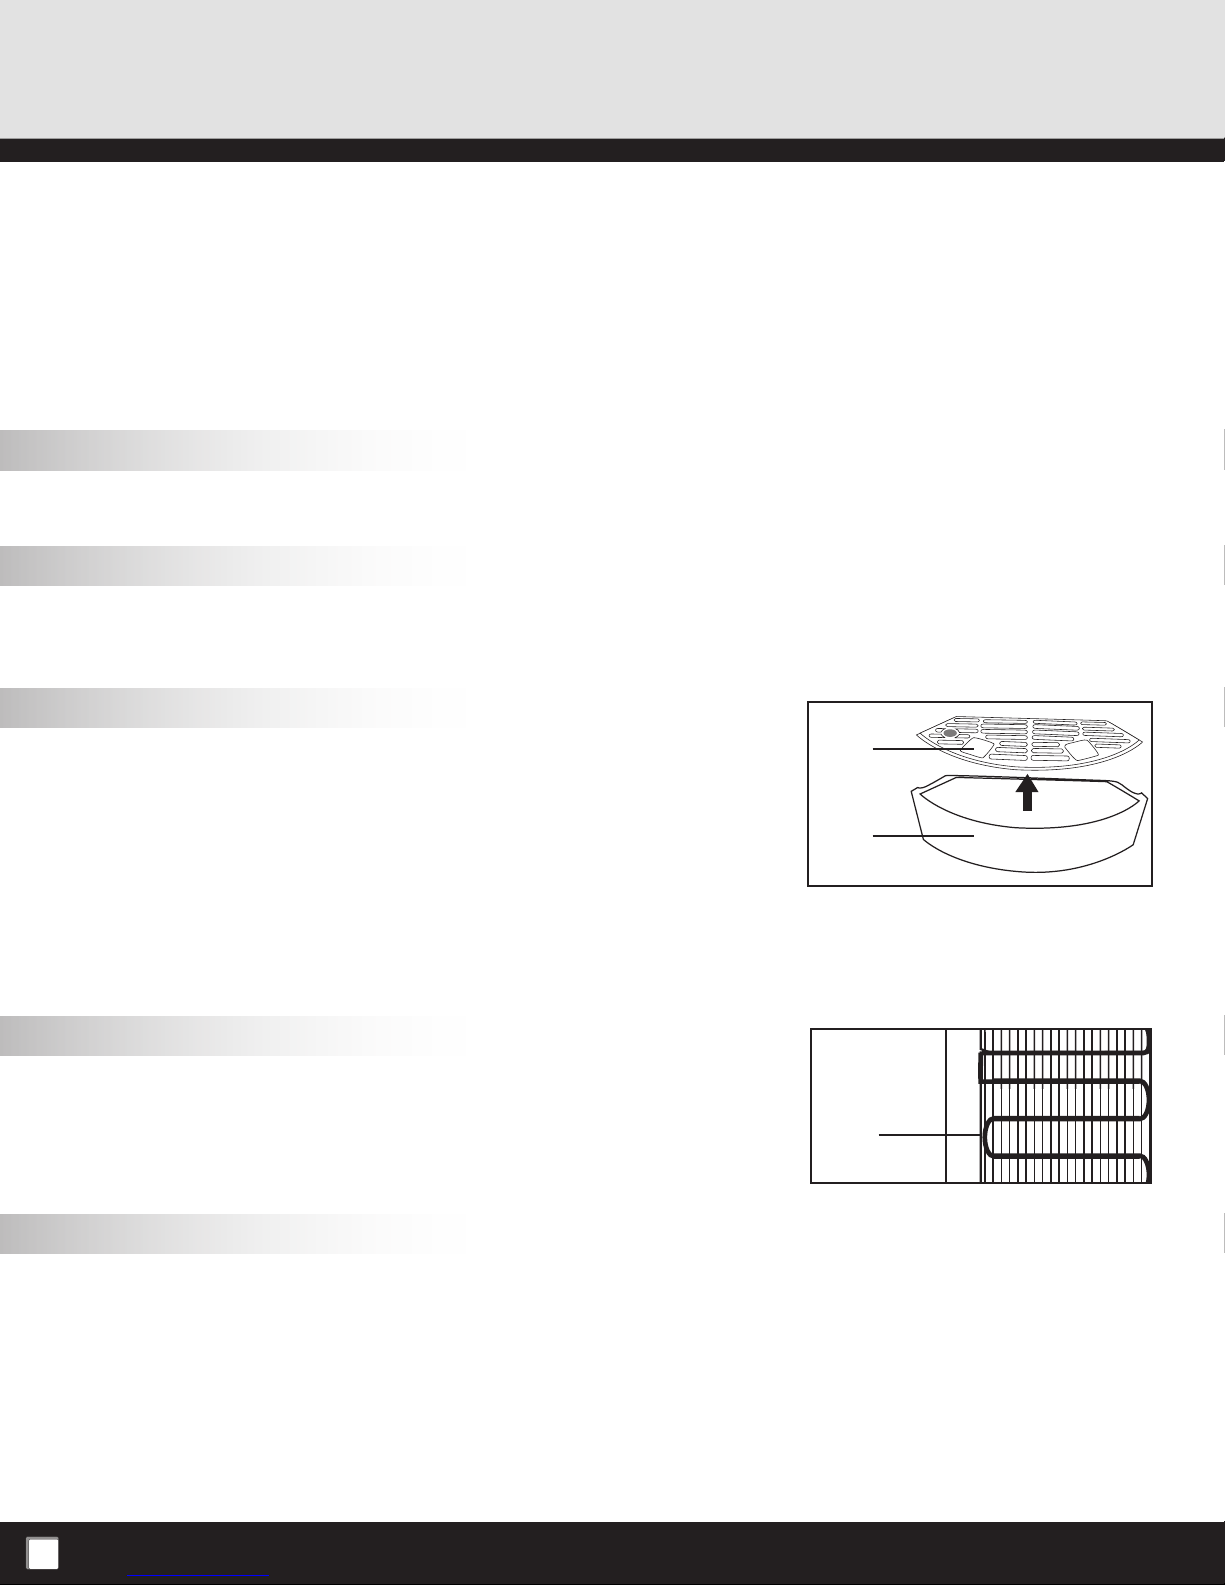
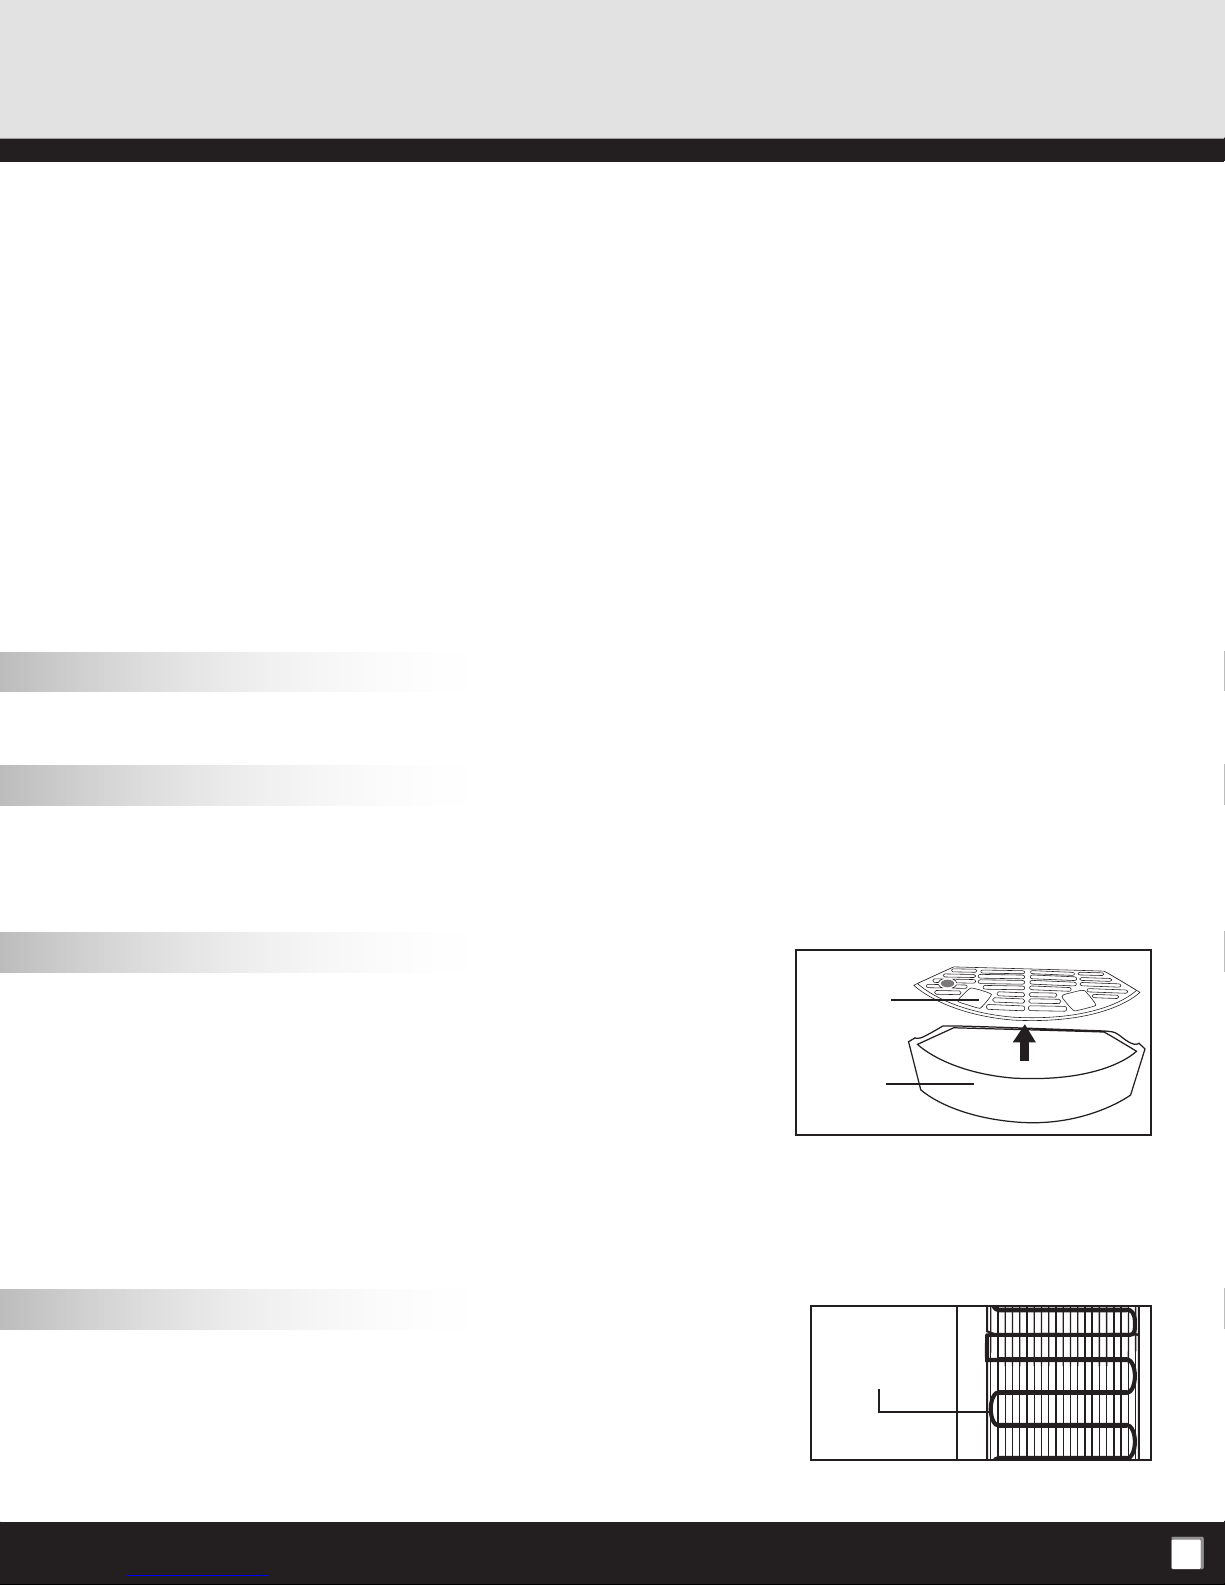
Cleaning the Drip Tray
Toremove,takethegrilloffthetrayandrmlyliftthetrayup,dislodgingitfrom
the guides. Drain and clean.
The drip tray should be emptied and cleaned regularly to remove spotting and
any mineral deposits. Clean with a water dispenser cleaning solution or a mild
soapandwatermixture.Fortoughdeposits,addvinegarandletitsoakuntilthe
depositscomeloose.Thenwash,rinseanddrythoroughly(notdishwashersafe).
To replace, put the grill back on the tray and slide the tray onto the guides.
Cleaning the Condenser
Vacuum or sweep away the dust from the condenser coils at the back of the
dispenser.Forbestresults,youcanpurchaseabrushdesignedspecically
for this purpose from your local appliance store. This will improve cooling and
efciency.
Draining the Reservoir
Drain the reservoir before and after cleaning, when going on long vacations or if not using the dispenser for long periods
of time.
IMPORTANT! Always unplug the dispenser before performing this procedure.
1. Removethewaterbottle.
2. Press both dispensing taps until water no longer comes out.
Condenser
coils
Grill
Drip
Tray
5

IMPORTANT:Collectthewaterinacontainer,notthedriptray.Replacethedraincapandhandtightenonly.
3. Replacethewaterbottle(see Installing the Water Bottle on pg. 3).
Cleaning the Inside of the Dispenser
Topreventmineraldepositsthatcanaffectthetasteandowofthewater,and
to ensure proper product performance, your water dispenser must be cleaned
every4months.
1. Unplug the power cord.
2. Removethewaterbottleandbottlesupportcollar.
3. Drain the reservoir (see Draining the Reservoir on pg. 5).
4. Pouravitapur®waterdispensercleaneroramixture4cups/1Lof
vinegarwith4cups/1Lofhotwaterintothereservoirandwait20
minutes.Ifusingawaterdispensercleaningsolution,pleasefollowthe
manufacturer's instructions.
IMPORTANT: To avoid water overflow while cleaning the dispenser,
always remove the bottle support collar before pouring water or a cleaning
solution into the reservoir (see Figure A on pg. 3).
5. Press both dispensing taps until water no longer comes out.
IMPORTANT: Collect the water into a container, not the drip tray.
6. Rinsewithcleanwateranddrain(seedrainingthereservoir).
7. Replacethebottlesupportcollarandthewaterbottle(see Installing the Water Bottle on pg. 3).
IMPORTANT: Drain approximately 4 glasses of water from each tap before initial use. This does not need to be
done with replacement bottles.
Going Away on Vacation
When not using the dispenser for long periods of time or when going on vacation, unplug the dispenser and drain the
reservoir (see Draining the Reservoir on pg. 5).FollowInitialProductCleaningProceduresuponreturnandstartupof
the dispenser.
SPECIFICATIONS
Cleaning Kit
Available online at
www.greenwayhp.com
6
WWD224W-2
Output per hr: Cold 0.5gal/2.0L
InternalTank: Cold 0.8gal/3.2L
CoolingTemp(approx.): 8°C/46°F
Power Consumption: Cold 80W

TROUBLESHOOTING TIPS
Attention: Do not return this product to the store. For questions on operation, assembly or parts, please contact
us at www.greenwayhp.com or 1-866-253-0447.
Problem Possible Cause Suggested Solution
Water dispenser or
dispensing tap is leaking
Smallpinholeorcrackinthebottle,(common
withrecycledwaterbottles).
Conduct water bottle leak test outlined
on pg. 4.
Water was poured directly into bottle support
collarandoverowed.
Drain by pressing dispenser taps.
Possible air pocket. Press tap several times to relieve air pocket and
releasetore-setvalve.
Water is not cold enough All the water in the tank has been used. Replacewithfullbottleandwait30-60
minutes for the water to cool.
The unit is unplugged. Plug unit into outlet.
The circuit breaker in your home is tripped or
the fuse has blown.
Resetthebreakerorreplacethefuse.
Temperature limit tripped. Wait10minutesforthetemperaturelimitswitch
tore-setautomatically.
Thermostat needs to be adjusted colder. Adjustthermostattoalower(cold)settingto
achieve desired temperature.
Water dispenser is not
dispensing water
Empty water bottle. Replacewithfullbottle.
Mineral deposits clogging tank. SeeCleaningtheInsideoftheDispenser.
Possible air pocket. Push down on the dispenser taps to prime the
unit.
Possible ice build up due to thermostat set too
cold.
Unplug overnight. Set thermostat to higher
setting, slowly increasing based on your use
and need for cold water.
Water dispenser is noisy Bottlemakingagurglingnoiseasitlls
the tank.
This is normal.
Water dispenser is uneven. Make sure the dispenser is on an even surface
that can support its full weight.
7

FREQUENTLY ASKED QUESTIONS
Q: Why is my water dispenser leaking?
A: Ifyouareexperiencingaleakwithyourwaterdispenserpleasedothefollowingtoseeifthewaterbottleorthe
dispenser is leaking.
1. Unplug the power cord and remove the bottle.
2.Removethebottlesupportcollarandcheckthewaterlevelinsidethereservoir–itshouldbeatroughly
three-quartersfull.
3.Closelymonitorthewaterlevelinsidethereservoir,(1-2hours)ifthewaterleveldrops,immediatelydrainthe
remaining water from the unit and call customer service at 1-866-253-0447.Ifthewaterlevelremainsconstantitis
the water bottle not the dispenser that is leaking. Please contact your water supplier for a replacement bottle.
Q: Why do I get a plastic taste from my dispenser?
A: Aswithmostnewappliancessuchascoffeemakersandkettles,thereisoftenaplastictasteuponinitialstart-upof
theunit.Toremovethistaste,simplyfollowthecleaninginstructionsoutlinedinCleaningtheInsideofthe
Dispenser.
Q: What is the spike that goes into the bottle?
A: WaterMAXX®waterdispensersfeaturea“piercingvalve”aspartofthebottlesupportcollar,providingadded
convenience for water bottle installation. Depending on the water bottle supplier, a small opening may or may
notbepresentinthebottlecapforthisspecicpurpose.Ifthepiercingvalveopeningisnotpresent,theentire
bottlecapmustthenberemovedtoeliminatepossibledamagetothepiercingvalve.Iftheopeningispresent,
remove the protective seal prior to installing the bottle.
8

Retailer: ModelNumber:
SerialNumber: DateCode:
Purchase Date:
Warranty DO NOT RETURN THIS PRODUCT TO THE STORE:
GreenwayHomeProductswarrantsyourwaterdispensertobefreefrommanufacturer’sdefectsinworkmanshipormaterialundernormal
operatingconditionsforone(1)yearfromtheoriginaldateofpurchase.Thiswarrantyappliesonlyinthecountryinwhichitissold,andis
availabletotheoriginalpurchaseronly.Thiswarrantyisnon-transferable.
ThiswarrantyandtheCSAInternationallistingforthiswaterdispenserarevoidifthewaterdispenserisaltered,modified,orcombined
withanyothermachineordevice.Alterationofthiswaterdispensermaycauseseriousfloodingand/orhazardouselectricalshockorfire.
The provisions of this warranty shall not apply to the following:
• Waterbottles.
• Servicetripstoyourhometoteachyouhowtousetheproduct.
• Improperinstallation,delivery,ormaintenance(failuretomaintaintheproductaccordingtotheinstructionsoutlinedintheproduct
manualwillautomaticallyvoidthewarranty).
• Failureoftheproductifitisabused,misused,altered,usedcommercially,orusedforotherthantheintendedpurpose.
• Productsthatareusedoutsidearesidentialorofficeenvironment.
• Replacementofhousefusesorresettingofcircuitbreakers.
• Useofthisproductwherewaterismicrobiologicallyunsafeorofunknownquality.
• Damagetotheproductifusedtodispenseanythingotherthanwater.
• Damagetotheproductcausedbyaccident,fire,floods,oractsofGod.
• Anyservicetotheproductbyunauthorizedpersonnel.
• Incidentalorconsequentialdamagecausedbypossibledefectswiththisappliance,itsinstallationorrepair.
ThiswarrantyshallbefulfilledatanauthorizedGreenwayRepairFacility.Allwarrantyrepairsmustbepre-authorizedbyGreenwayHome
Products.Greenwaywill,atitsoption,repairorreplacefreeofchargeanydefectivepart,wherethePurchaserhasnotifiedtheirRetaileror
GreenwayHomeProductswithinthewarrantyperiod.TheobligationofGreenwayHomeProductsunderthiswarrantyisexpresslylimited
to such repairs or replacement. This warranty does not cover the freight costs to and from the authorized repair facility.
Exceptassetforthhereinorrequiredbylaw,theManufacturermakesnootherwarranty,guarantee,oragreement,express,implied,
or statutory including any implied warranty of merchantability or fitness for a particular purpose. The manufacturer does not assume or
authorizeanypersontoassumeanyobligationsofliabilityinconnectionwiththiswaterdispenser.Innoeventwillthemanufacturerbe
liableforindirect,special,orconsequentialdamages(including,withoutlimitation,economicloss)orforanydelayintheperformanceof
this agreement due to causes beyond its control.
Some states or provinces do not allow limitations on how long an implied warranty lasts, so the above limitation may not apply to you.
Somestatesorprovincesdonotallowtheexclusionorlimitationofincidentalorconsequentialdamages,sotheabovelimitationor
exclusion may not apply to you. This warranty gives you specific legal rights, and you may also have other rights which vary from state to
state or from province to province.
Ifyourequireservice,pleasefirstseethe“Troubleshooting”sectionofthismanual.Additionalassistancecanbefoundbycheckingour
website at www.greenwayhp.com, or by calling our customer service line at 1-866-253-0447,MondaytoThursdayfrom8:30AMto5:00
PM(EST),Fridayfrom8:30AMto4:00PM(EST),orwrite:GreenwayHomeProducts,CustomerServiceCenter,400SouthgateDrive,
Guelph,ON,CanadaN1G4P5orGreenwayHomeProducts,1270FlagshipDrive,Perrysburg,OH,USA43551.
Keepthismanualandyoursalessliptogetherforfuturereference.Youmustprovideproofofpurchaseforin-warrantyservice.
Writedownthefollowinginformationaboutyourwatercoolertobetterhelpyouobtainassistanceorserviceifyoureverneedit.Youwill
needtoknowyourcompletemodelnumberandserialnumber.Youcanfindthisinformationonthebackofthewaterdispenser.

Mercid'avoirachetéundistributeurd'eauWaterMAXX®.Lisezavecsoinlesconsignesd'utilisationquiaccompagnent
votreappareiletconservezcelivretpourvousyréférer.Nousavonsconçuavecsoinvotredistributeurd'eau
WaterMAXX® pour vous donner plusieurs années de service plaisant et de fonctionnement sans panne.
PRÉCAUTIONS IMPORTANTES
•Neretournezjamaisledistributeurd’eauetnel’inclinezpasàplusde45degrés.Sil’appareilestrestésurlecôté
pendantunlongmoment,placezledistributeurd’eauàlaverticalependant12heuresenvironavantdelebrancher.
•Doitêtreutiliséavecdesbouteillesd’eaude3oude5gallons(12ou19litres)etlaplupartdessystèmesdeltration
(noncompris).
•N'employezjamaiscedistributeuravecuneeauquin’estpeut-êtrepaspotableouquiprovientd'unesourceinconnue.
•N'employezjamaisdansledistributeurd’autresliquidesquedel’eauenbouteilleconnueetmicrobiologiquementsûre.
•Pourassurervotresécurité,ledistributeurd'eauestéquipéd'uncordond'alimentationmisàlaterre(voyez la
section Instructions de mise à la terre).
• Nepasemployerunecordedeprolongationavecvotredistributeurd'eau
•Cedistributeurd'eauauneprised’alimentationélectriqueavecmiseàlaterrepourassurervotresécurité.Laprise
doitêtrebranchéedansuneprisedecourantmuralemiseàlaterre.N'employezpasderallongeélectriqueavec
votredistributeurd’eau.
•Conservezvotredistributeurd’eauàunendroitsecetnonexposéauxrayonssolairesdirects.
•Neplacezjamaisdematièreinammableàproximitédudistributeur.
•Laissezaumoins2po(5centimètres)derrièreledistributeuretsurlescôtéspouravoiruneventilationappropriée.
•Installeztoujoursledistributeurd’eausurleplancherauniveau.Attendez3minutesavantderemettrel’appareilen
marche si vous le débranchez.
•Débrancheztoujoursledistributeurd’eauavantd’enfairel'entretienoule
nettoyage.
• Unnettoyagerégulierdevotredistributeurd’eauestnécessairepourque
la garantie soit applicable. Veuillez suivre les instructions de nettoyage de
cemanueletnettoyerledistributeurtousles4mois.
Pour éviter les débordements d’eau lorsque vous nettoyez votre
distributeur, enlevez toujours le collier de soutien de la bouteille avant de
verser l'eau ou la solution de nettoyage dans le réservoir.
INSTRUCTIONS DE MISE À LA TERRE
•Uneutilisationinadéquatedelachedemiseàlaterrepeutentraînerdeschocsélectriques,pouvantainsicauser
des blessures graves, voire la mort.
•Cetappareildoitêtremisàlaterre.Encasdecourt-circuit,lamiseàlaterreréduitlesrisquesdechocsélectriques
en procurant un chemin d'évacuation du courant.
•Cetappareilestdotéd'uncordond'alimentationmunid'unconducteurdemiseàlaterreetd'unechemiseà
laterre,etdoitêtreraccordéàuneprisepolariséecorrectementmiseàlaterre.Faitesappelàunélectricienqualié
sivousnecomprenezpasparfaitementlesinstructionsdemiseàlaterreousivousavezdesdoutessurlamise
àlaterreadéquatedevotreappareil.Silaprisedecourantmuraleestuneprisestandardàdeuxbroches,ilvous
incombedelaremplacerparunepriseàtroisbrochesmiseàlaterredefaçonadéquate.
• Necoupezetneretirezjamaislabrochedemiseàlaterreducordond'alimentation.
•N'utilisezpasunadaptateurdebranchementaveccetappareil.
• N'utilisezaucunerallongeaveccetappareil.Silecordond'alimentationesttropcourt,demandezàunélectricien
qualiéd'installeruneprisedecourantàproximitédel'appareil.
1

VOTRE DISTRIBUTEUR D’EAU WATERMAXX®
1. Collier de soutien de la bouteille
2.Robinetpourl’eauàlatempératureambiant
3.Robinetpourl’eaufroide
4.Plateaudémontabled'égouttementetindicateurrougedeotteur(nonmontrés).Sertderappelpourviderle
plateaud'égouttementquandleotteurrougepénètreparlegrildeplateaud'égouttement.
5. Thermostatréglablepourl’eaufroide(àl’arrièredudistributeur)
6. Serpentinducondensateur(àl’arrièredudistributeur)
2
1
4
5
6
2
3

CONSIGNES D'UTILISATION
Nettoyage initial de produit
À l'instar de la plupart des appareils, votre distributeur d'eau exige un entretien
périodiquepourassurersonefcacitéetsonrendement,etdoitêtrenettoyé
àintervallerégulier(c'est-à-direàtousles4mois).Andeproterd'un
distributeurd'eausécuritaireetd'empêcherlaproliférationdesbactéries,nous
vous recommandons fortement de le nettoyer régulièrement. Vous pouvez
obtenirunnécessairedenettoyageencommuniquantavecleserviceàla
clientèle au 1-866-253-0447;vouspouvezégalementlecommanderenligneà
l'adresse www.greenwayhp.com.
1. Assurez-vousquel’appareilestdébranché.
2. Retirezlecollierdesoutiendelabouteille,imbibezunchiffonpropreavec
leproduitdenettoyagevitapur®dudistributeurd’eauouduvinaigreet
essuyez l'intérieur du réservoir.
3. Versezleproduitdenettoyagedudistributeurd’eauouunmélange
contenant4tasses/1Ldevinaigreet4tasses/1Ld’eauchaudedansle
réservoiretattendez20minutes.
IMPORTANT: Pour éviter tout débordement d'eau pendant le nettoyage du
distributeur, retirez le collier de soutien de la bouteille avant de verser l'eau ou la solution de nettoyage dans le
réservoir (voir la figure A).
4. Appuyezsurtouslesrobinetsdedistributionjusqu'àcequel'eaunesorteplus.
5. Rincezl’appareilencoreunefoisavecdel’eaupropre.
6. Remettezlecollierdesoutiendelabouteillesurledistributeur.
Entretien du distributeur d’eau
Commelaplupartdesappareils,votrenouveaudistributeurd’eaunécessiteunnettoyagerégulierpourfonctionner
efcacement.Votredistributeurd’eaudoitêtrenettoyétousles4mois(voir la procédure à la pg. 5).
Mise en place de la bouteille d’eau
IMPORTANT: Lavez toujours vos mains en premier ! Nettoyez le dessus (col) de la bouteille avec un chiffon
propre et ne touchez pas aux composants de l’appareil qui sont en contact avec l’eau. Assurez-vous que
l'appareil est débranché et que tous les interrupteurs sont en position «OFF». La bouteille d’eau peut être achetée
chez votre détaillant local.
1. Enlevezlecapuchonprotecteurdudessusdelabouteilled’eau,saufsilabouteilleauncapuchonouunautocollant
àperforer.
2. Soulevezettournezlabouteillesensdessusdessousetplacez-labienencontactaveclecollierdesoutiende
la bouteille.
3. Appuyezsurtouslesrobinetsdudistributeurjusqu'àcequel'eaucouledudistributeur.Vidangezenviron4tasses
/1Ld’eauavantd’utiliservotreappareilpourlapremièrefois.Iln’estpasnécessairederépétercettefonction
Figure A
Cleaning Kit
Available online at
www.greenwayhp.com
Tr ousse de nettoyage
Accessible en ligne à
www.greenwayhp.com
Juego de limpieza
Disponible en línea en
www.greenwayhp.com
3
chaquefoisquevousinstallezunenouvellebouteille.
4. Branchezledistributeurd’eau.
5. Ilpeutprendreapproximativementpendant1heureavantquel'eaufroideatteintlatempératureoptimale.
Pour changer la température d ' eau (voir Réglage de la température - Eau froide seulement à la pg. 5).
AVIS IMPORTANT DE FUIR DE BOUTEILLES
Sivotredistributeurd'eaucoule,Premierementvériezlabouteilled'eau!
Presquetouteslesbouteillesd'eaude3et5gallonssontrecyclées;deplus,
elles sont manipulées intensivement pendant le nettoyage, le remplissage et
l'expédition.Ainsi,trèssouvent,ilarrivequedestrousoudepetitesfentes
sedévelope,pouvantcauserdesfuiteslorsqu'onplacelabouteillesurle
distributeur d'eau.
Danslaplupartdescas,cen'estpasledistributeurd'eauquiestdéfectueux.
En cas de fuite d'eau, ce simple test vous permettra d'établir si la bouteille
d'eauouledistributeurestàlasourceduproblème.
1. Débranchez l'appareil et retirez la bouteille d'eau.
2. a)Retirezlecolletdesoutiendelabouteilleetvériezleniveaud'eauà
l'intérieurduréservoir–ildevraitêtreenvironauxtroisquartsplein.
b)Ajoutezouvidezquelquesverresd'eaupouratteindreleniveaude
remplissagerequis.
3. Laissezl'eaureposerpendantenviron2heures.Siledistributeurne
fuitpas,c'estlabouteilled'eauquifuit(petitesfentesoutrous).
Communiquezalorsaveclefournisseurd'eaupourobtenirune
bouteille de rechange.
Voustrouverezdesaccessoirespourvotredistributeurd'eauetdesconseilsd'utilisationetd'entretienutilesàl'adresse
www.greenwayhp.com
Distribution d 'eau de température ambiante
Mettezunverresouslebonrobinet.Pourdel'eaufroide,appuyezsurlerobinetbleujusqu'àobtentiondelaquantité
voulue.Pourdel'eauàtempératureambiante,appuyezsurlerobinetblancjusqu'àobtentiondelaquantitévoulue.
Distribution d'eau froide
Placerunverresouslerobinet.Appuyezlerobinet(depoignéebleue)en
basjusqu'àcequelaquantitéd'eaudésiréesoitdistribuée.Réglage de la
température (Eau froide seulement)
Entournantlethermostatàl'arrièredel'unité,latempératurepeutêtre
ajustée.Tournerlecadranentrele"High"et"Low"jusqu'àlatempérature
désiréeestatteints.Pourchangerlatempératuredel'eau,ajuster(tourner)le
boutondecommandedethermostatsituéàl'arrièredel'unité.Tournerlede
2.a
Bord du réservoir
Niveau d'eau
2.b
Min Max
Med
Low High
4
bouton de commande vers la droite pour la température plus froide. Tourner le bouton de commande vers la gauche
pour la température plus chaude.
Sil'eaunecoulepas,ilestpossiblequel'oricesoitbouchépardelaglacequis'estforméeparcequelethermostatest
réglétrophaut.Siceciseproduit,débrancherledistributeurdurantlanuitetchangerlapositionduthermostat.Réglez
lethermostatà"Haut",etdiminutéprogressivementceréglage,enfonctiondevosbesoinsenmatièred'eaufroide.
NETTOYAGE ET ENTRETIEN
Àl'instardelaplupartdesappareils,votredistributeurd'eauexigeunentretienpériodiquepourassurersonefcacitéet
sonrendement,etdoitêtrenettoyéàintervallerégulier(c'est-à-direàtousles4mois).Andeproterd'undistributeur
d'eausécuritaireetd'empêcherlaproliférationdesbactéries,nousvousrecommandonsfortementdelenettoyer
régulièrement.Vouspouvezobtenirunnécessairedenettoyageencommuniquantavecleserviceàlaclientèleau
1-866-253-0447;vouspouvezégalementlecommanderenligneàl'adressewww.greenwayhp.com.
Lemanquedemaintenircorrectementvotredistributeuranulleravotregarantie.
Nettoyage de votre distributeur d’eau
IMPORTANT: Toujours débranchez le distributeur avant d’exécuter les étapes de nettoyage suivantes.
Nettoyage de l'extérieur du distributeur d’eau
L'extérieurdudistributeurpeutêtreessuyéavecunproduitdenettoyagenon-abrasifouunmélangedesavondouxet
del’eau.N'employezjamaisdeproduitchimiquepuissantoudeproduitdenettoyageabrasif.Rincezcomplètementavec
de l'eau propre et asséchez les surfaces.
Nettoyage du bac
Pourretirerlecontenant,retirezlegrillageetsoulevezlebacfermementàla
verticalepourledélogerdesesguides.Vidangezl’eauetnettoyezlebac.
Lebacdevraitêtrevidéetnettoyérégulièrementpourenleverlestaches
etlesdépôtsdeminéraux.Nettoyezlebacaveclasolutiondenettoyage
dudistributeurd’eauouunsavondouxetdel’eau.Pourlesdépôtsbien
incrustés,ajoutezduvinaigreetlaissez-lereposerjusqu'àcequelesdépôtssedétachent.
Lavez,rincezetséchezcomplètementlebac(nevapasaulave-vaisselle).
Pour remettre le bac en place, remettez la grille sur le bac et insérez ce dernier sur les guides.
Nettoyage du condensateur
Passezl’aspirateuroulebalaipourenleverlapoussièreduserpentindu
condensateursituéàl’arrièredudistributeur.
Pouravoirlesmeilleursrésultatspossibles,achetezunpinceauconçu
spéciquementàcettenàvotremagasinlocal
d'électroménagers.Celaamélioreralerefroidissementetl'efcacité.
Grillage
Lebac
5
Serpentin du
condensateur
Vidange du réservoir
Vidangezleréservoiravantetaprèslenettoyage,lorsquevouspartezenvacancespendantlongtempsoulorsquevous
n’utilisezpasledistributeurpendantunelonguepériode.
IMPORTANT! Toujours débranchez le distributeur avant d'entamer cette procédure.
1. Enlevezlabouteilled’eau.
2. Appuyezsurtouslesrobinetsdudistributeurjusqu'àcequ’aucuneeaunes’écoule.
IMPORTANT: Recueillez l'eau dans un récipient et non dans le trop-plein.
3. Remplacezlabouteilled’eau(voir les instructions sur la Mise en place de la bouteille d’eau à la pg. 3).
Nettoyage de l’intérieur du distributeur
And’empêcherlesdépôtsdeminérauxquipeuventaffectervotredistributeur
d’eau,etandegarantiruneperformancecorrecteduproduit,celui-cidoitêtre
nettoyétousles4mois.
1. Débranchez le cordon de secteur.
2. Enlevezlabouteilled’eauetlecollierdesoutiendelabouteille.
3. Vidangezleréservoir(voirlesinstructionsdeVidangeduréservoir).
4. Versezleproduitdenettoyagevitapur®dudistributeurd’eauouun
mélange4tasses/1Ldevinaigreet4tasses/1Ld’eauchaudedansle
réservoiretattendez20minutes.Sivousutilisezlasolutiondenettoyage
dedistributeurd’eau,suivezlesinstructionsdufabricant.
IMPORTANT: Pour éviter les débordements d'eau lors du nettoyage du distributeur, enlevez toujours le collier de
soutien de la bouteille avant de verser l'eau ou la solution de nettoyage dans le réservoir (voir la Figure A á la pg. 3).
5. Appuyezsurtouslesrobinetsdedistributionjusqu'àcequ’aucuneeaunesorte.
IMPORTANT: Recueillez l'eau dans un récipient et non dans le bac.
6. Rinçeravecdel'eaupropreetvidanger (voir vidanger le réservoir).
7. Remettezlecollierdesoutiendelabouteilleenplaceetréinstallezlabouteilled’eau(voir les instructions sur la
Mise en place de la bouteille d’eau à la pg. 3).
IMPORTANT: Laissez écouler environ quatre verres d’eau à chaque bouton avant d’utiliser le distributeur de nouveau.
Vacances
Si vous n'utilisez pas le distributeur d'eau pendant de longues périodes, ou si vous partez en vacances, débranchez
ledistributeuretvidezlesréservoirs(voirVidangeduréservoir).Àvotreretour,suivezlesétapesdunettoyageinitialet
remettez votre distributeur en marche.
Cleaning Kit
Available online at
www.greenwayhp.com
Tr ousse de nettoyage
Accessible en ligne à
www.greenwayhp.com
Juego de limpieza
Disponible en línea en
www.greenwayhp.com
6
FICHE TECHNIQUE
CONSEILS DE DÉPANNAGE
WWD224W-2
Capacité/heure: Froide 0.5gal/2.0L
Réservoirinterne: Froide 0.8gal/3.2L
Températurederefroidissement(env.): 8°C/46°F
Consommationd’électricité: Froide 80W
Problème Cause possible Solution suggérée
Le distributeur d'eau
ou le robinet coule
Petittrououfentedanslabouteille(fréquent
aveclesbouteillesd'eaurecyclées).
Effectuer le test de fuite de la bouteille d'eau
indiquéàlapg.4.
L'eauaétéverséedirectementdanslecollier
de soutien de la bouteille et elle a débordé
Vidangez le distributeur en appuyant sur les
robinets du distributeur.
Ilestpossiblequ'ilyaitunebulled'air. Appuyez sur les robinets plusieurs fois pour
dégager la bulle d'air et lâchez pour éinitialiser
la vanne.
L'eau n'est pas assez froide Vousavezutilisétoutel’eauduréservoir. Installezunebouteillepleineetattendez30-60
minutespourquel'eaurefroidisse.
L’appareilestdébranché. Branchez-le.
Ledisjoncteurdevotremaisonestdéclenché
ou le fusible a grillé.
Réarmezledisjoncteurouremplacezlefusible.
Lalimitethermiqueestdéclenché. Attendez10minutespourlecommutateur
de limite de la température se remise
automatiquement
Lethermostatdoitêtrerégléàunetempérature
plus froide.
Réglezlethermostatentre«min»(frais)et
«max»(froid)jusqu’àcequevousparveniezàla
température désirée.
Le distributeur d’eau ne
distribue pas d'eau
Labouteilled’eauestvide. Remplacezlabouteilled’eau.
Dépôtsdeminérauxobstruantlesréservoirs. VoyezlesinstructionssurleNettoyagede
l’intérieurdudistributeur.
Poche d'air possible. Appuyez sur les robinets pour amorcer
l’appareil.
Accumulationpossibledeglacedueàun
réglage trop élevé du thermostat.
Débranchez le distributeur pendant la nuit et
rebranchez-lelematin.Réglezlethermostatà
MIN,etaugmentezprogressivementce
réglage, en fonction de vos besoins en matière
d'eau froide.
7

Attention: Ne renvoyez pas ce produit au magasin. Si vous avez des questions sur son fonctionnement, son
assemblage ou sur les pièces, communiquez avec nous à l’adresse www.greenwayhp.com ou au 1-866-253-0447.
QUESTIONS FRÉQUEMMENT POSÉES
Q: Pourquoi mon distributeur d’eau fuit-il ?
R: Sivousconstatezunefuited’eauauniveaudevotredistributeurd’eau,faiteslavéricationsuivantepourvoirsila
fuiteprovientdelabouteilleoududistributeurd’eau.
1. Débranchez l'appareil et retirez la bouteille d'eau.
2. Retirezlecolletdesoutiendelabouteilleetvériezleniveaud'eauàl'intérieurduréservoir–ildevraitêtreenviron
auxtroisquartsplein.
3. Laissezl'eaureposerpendant2heures.Siledistributeurd’eaunefuitpas,lafuiteprovientdelabouteilleenraison
d’unepetitessureoud’uneperforationetilfautlaremplacer.Siledistributeurfuit,communiquezavecGreenway
HomeProductsàsupport@greenwayhp.com ou au 1-866-253-0447.
Q: Pourquoi y a-t-il un goût en plastique de mon distributeur ?
R:Commeaveclaplupartdesnouveauxappareils,commelescafetièresetlesbouilloires,ilyasouventungoûtde
plastiqueaumomentdelamiseenserviceinitialedel’appareil.Pourenlevercegoût,suivezsimplementles
instructionsdécritespourleNettoyagedel’intérieurdudistributeur.
Q: Quelle est la pointe qui entre dans la bouteille ?
R:Lesdistributeursd’eauWaterMAXX®ontune«valvedeperforation»quifaitpartieducollierdesoutiendela
bouteille;c’estégalementpluscommodepourinstallerlabouteilled’eau.Suivantlefournisseurdelabouteille
d’eau,unepetiteouverturepeutounonêtreprésentedanslecapuchondanscebutparticulier.S’iln’yapasde
valvedeperforation,lecapuchonentierdoitêtreenlevépournepasendommagerlavalvedeperforation.S’ilya
une ouverture, enlevez le scellement protecteur avant d'installer la bouteille.
Le distributeur d’eau Labouteillefaitunbruitdeglouglouquand
est bruyant je remplis le réservoir.
C'est normal.
Ladistributiond’eauestinégale. Assurez-vousqueledistributeurestplacésur
unesurfaceauniveauquipeutsoutenirtout
son poids.
8

Revendeur: Numérodemodèle:
Numérodesérie: Codedatedefabrication:
Dated’achat:
Garantie NE PAS RETOURNER CE SYSTÈME AU MAGASIN:
VeuillezjoindreleServiceàlaclientèleau1-866-253-0447ouenvoyeruncourrielà[email protected]
GreenwayHomeProductsgarantitvotredistributeurd’eaupourlesvicesdefabricationlorsqueleproduitfonctionnedansdesconditions
normalespendantun(1)anàcompterdeladated’achatoriginale.Cettegaranties’appliqueseulementdanslepaysdanslequelle
produitestvenduetestvalablepourl’acheteurd’origineseulement.Cettegarantieestnonnégociable.
CettegarantieetleréférencementCSAInternationalconcernantcedistributeurd’eaudeviendrontnulssiledistributeurd’eauestaltéré,
modifiéoucombinéavectouteautremachineouappareil.Unealtérationdecedistributeurd’eaupeutcauserdesinondationsgraveset/
ouungravedangerdechocélectriqueoud’incendie.
Lesdispositionsdecettegarantienes’appliquerontpasà:
• Bouteillesd’eau.
• Trajetsdesinterventionsàvotredomicilepourvousapprendreàutiliserleproduit.
• Mauvaiseinstallation,livraison,ouentretien(lenon-respectdel’entretienduproduitconformémentauxinstructionsdumanueldu
produitannuleraautomatiquementlagarantie).
• Défaillanceduproduitencasdemauvaisusage,modification,usagecommercialouusageàdesfinsautresquel’utilisationprévue.
• Produitsutilisésàl’extérieurdel’environnementrésidentieloudubureau.
• Remplacementdesfusiblesdudomicileouréamorçagedesdisjoncteurs.
• Utilisationdeceproduitavecdel’eaumicrobiologiquementdangereuseoudequalitéinconnue.
• Dommagescausésauproduitencasd’utilisationpourladistributionautrequecelledel’eau.
• Dommagescausésauproduitparaccident,incendie,inondationsouactesdeDieu.
• Toutserviceauproduitparunpersonnelnonautorisé.
• Dommagesindirectsoufortuitsdécoulantdepossiblesvicesdecetappareil,desoninstallationoudesaréparation.
CettegarantiedevraêtreexécutéedansunétablissementderéparationautoriséparGreenway.Touteslesréparationssousgarantie
doiventêtreautoriséesaupréalableparGreenwayHomeProducts.Greenwaychoisiraàsadiscrétionderéparerouremplacer
gratuitementtoutepiècedéfectueuselorsquel’AcheteuraurainformésonrevendeurouGreenwayHomeProductsdurantlapériode
garantie.L’obligationdeGreenwayHomeProductssouscettegarantieselimiteexpressémentàcesréparationsouremplacements.
Cettegarantienecouvrepaslesfraisdetransportversl’établissementderéparationautorisé,nipourleretour.
Àl’exceptiondesconditionsdéfiniesci-aprèsouexigéesparlaloi,leFabricantn’engageaucuneautregarantie,ouacceptationexpresse,
impliciteougarantieparlaloiincluanttoutegarantieimplicitedequalitémarchandeoudeconditiond’usageparticulier.LeFabricant
n’assumepasetn’autorisepersonneàassumerdesobligationsderesponsabilitéenrapportaveccedistributeurd’eau.Enaucuncas
lefabricantnepourraêtretenuresponsabledesdommagesindirects,particuliersoufortuits(ycompris,sanslimitations,pourdes
préjudicesfinanciers)oudesdélaisdusàdescausesindépendantesdesavolontélorsdel’exécutiondecetaccord.
CertainsÉtatsouprovincesn’appliquentpasdelimitationsconcernantladuréedelagarantieimplicite,desortequelalimitationénoncée
ci-dessuspeutnepass’appliquerdansvotrecas.CertainsÉtatsouprovincesn’autorisentpasl’exclusionoulalimitationdedommages
fortuitsouindirects,desortequeleslimitationsetexclusionsénoncéesci-dessuspeuventnepass’appliquerdansvotrecas.Cette
garantievousconfèredesdroitsjuridiquesspécifiques;vouspouvezégalementbénéficierd’autresdroitsquipeuventvarierd’unÉtatà
l’autreoud’uneprovinceàl’autre.
Sivousavezbesoindeservice,voird’abordlasection“Dépannage”decemanuel.Del’aidesupplémentairepeutêtretrouvéeen
consultantnotresiteWebàwww.greenwayhp.com,ouenappelantnotreserviceàlaclientèleau1-866-253-0447, Du lundi au jeudi,
de8h30à17h(HNE),levendredi,de8h30à16h(HNE),ouécrivezà:GreenwayHomeProducts,CustomerServiceCenter,400
SouthgateDrive,Guelph,ON,CanadaN1G4P5.
Conservezcemanueletvotrereçudeventepourréférenceultérieure.Vousdevezprésenterunepreuved’achatpourleservicesous
garantie.
Inscrivezlesrenseignementssuivantsausujetdevotrerafraîchisseurd’eaupourmieuxvousaideràobtenirassistanceouserviceencas
debesoin.Vousdevrezconnaîtrelenumérodemodèleetlenumérodesérieaucomplet.Voustrouverezcetteinformationàl'arrièredu
distributeur d'eau.

GraciasporcomprarundosicadordeaguaWaterMAXX®.Porfavorleaconcuidadolasinstruccionesdefuncionamiento
incluidasyconserveestefolletoparafuturareferencia.Hemosdiseñadocuidadosamentesudosicadordeagua
WaterMAXX®paradarleañosdefuncionamientoplacenteroysinproblemas.
SALVAGUARDIAS IMPORTANTES
•Noponganuncaeldosicadorbocaabajoniloinclinemásde45grados.Silaunidadhaestadoapoyadasobre
uncostadoduranteunperiodoprolongadodetiempo,coloqueeldosicadordeaguaenlaposiciónvertical
durante aproximadamente 12 horas antes de encenderlo.
•Paraelusoconbotellonesdeaguade3ó5galones(12ó19litros)ylamayorpartedesistemasdeltración(no
incluidos)
•Nuncauseestedosicadorconaguaqueesinseguraparabeberoqueprovienedeunafuentedesconocida.
•Nuncauseningúnotrolíquidoeneldosicador,salvoelaguaembotelladaconocidaymicrobiológicamentesegura.
•Parasuseguridad,estedosicadordeaguaestáequipadoconuncabledealimentaciónconectadoatierra.Debe
conectarseauntomacorrienteconectadoatierra.Nouseuncabledeextensiónconsudosicadordeagua.
•Parasuseguridad,estedispensadordeaguaestáequipadoconcabledealimentaciónconectadoatierra
(consultarInstruccionesdepuestaatierra).
• Nouseuncabledeextensiónconsudispensadordeagua.
• Conservesudosicadordeaguaenunlugarsecoyalejadodelaluzdelsoldirecta.
•Nuncaponganadainamablecercadeldosicador.
•Dejeunmínimode2”(5cm)alrededordelapartetraseraylosladosdeldosicadorparaunaventilaciónapropiada.
•Siempreinstaleeldosicadordeaguasobreunpisonivelado.Espere3minutosantesdereactivarlamáquina
después de haberla apagado.
•Siempredesenchufeeldosicadordeaguaantesdedarleservicioolimpieza.
• Senecesitaunalimpiezaperiódicadeldosicadordeaguaparala
garantía.Sigalasinstruccionesdelimpiezaseñaladasenestemanual,y
limpieeldosicadorcada4meses.
Para evitar el desbordamiento de agua mientras limpia su dosificador,
siempre retire el collarín de soporte del botellón antes de verter el agua o el
líquido limpiador en el depósito.
INSTRUCCIONES DE PUESTA A TIERRA
•Elusoinadecuadodelaconexióndepuestaatierrapuedetraeraparejadasdescargaseléctricas,causarlesionese
incluso la muerte.
•Elpresenteelectrodomésticodebeestarconectadoatierra.Encasodecortocircuito,laconexióndepuestaatierra
disminuyeelriesgodedescargaseléctricasyaquetieneuncabledeescapeparalacorrienteeléctrica.
•Elpresenteelectrodomésticotieneuncabledealimentaciónquecuentaconunenchufedepuestaatierray
debe estar conectado a un tomacorriente polarizado con la puesta a tierra correspondiente. Consulte a un
electricistacalicadosinocomprende,ensutotalidad,lasinstruccionesdeconexióndepuestaatierra,ositiene
dudasacercadelaconexiónatierradelelectrodoméstico.Sieltomacorrienteesde2patas,essuresponsabilidad
yobligacióncambiarloporunode3patasdebidamentepuestoatierra.
• Bajoningunacircunstanciacorteoretirelatercerapata(deconexiónatierra)delcabledealimentación.
•Noutiliceunadaptadorconelpresenteelectrodoméstico.
• Noutiliceuncabledealargueconelpresenteelectrodoméstico.Sielcabledealimentaciónesdemasiadocorto,
pídaleaunelectricistacalicadoqueinstaleuntomacorrientecercadelelectrodoméstico.
1
Table of contents
Languages:
Other WaterMAXX Water Dispenser manuals


