WaterTech Pool Blaster User manual

CONGRATULATIONS on your purchase of a top-quality Water Tech product which has been thoroughly tested
to meet our exacting quality control standards.
State of the art Nickel-Metal Hydride batteries power this cleaner. The batteries and motor in the cleaner are
long lasting and proper care will help to prolong the life of your appliance.
The guidelines and safeguards listed herein help insure that your new cleaner operates effectively. Please
read all instructions carefully before using your
cleaner
. Please take a few moments to review the following
IMPORTANT INFORMATION before using this tool.
Battery Powered
Swimming Pool Cleaner
Battery Powered

Service Information
WARNING: Any repairs requiring disassembly should be performed by a Water Tech Authorized Service Center. For the repair
center nearest you call us toll free at 1-800-298-8800.
WARNING: To reduce the risk of re, electrical shock, injury, or damage to your machine:
Do not use if unit is damaged in any way.
Use this product only for its intended use as described in this manual. Use only Water Tech accessories and lters.
Never leave your battery pack plugged in for long term storage.
Never leave your cleaner in water when it is off or has run out of battery power.
Do not use the cleaner for pool openings; the cleaner is designed for general maintenance of pools or spas.
If any parts are missing, do not operate until the missing parts are replaced. Failure to do so could result in serious injury.
The cleaner is designed for underwater use only. Do not attempt to use your cleaner to clean anything other than your pool or spa. It is
not intended for use as an all-purpose vacuum cleaner.
Close supervision is necessary when used near children. Do not allow this vacuum cleaner to be used as a toy.
This vacuum creates suction. Keep hair, loose clothing, ngers, and all parts of body away from openings and moving parts.
Unit must be submerged in water to operate properly.
When not in use, store the cleaner indoors in a clean, dry place. Do not leave underwater, in direct sunlight, or exposed to extreme
temperatures.
You can operate the cleaner without its vacuum head attachment, but when using the vacuum head attachment, make sure that either
the supplied wheels or brushes are inserted in place.
Do not use without lter bag/seal ring and nose cap in place.
Replace damaged lter bag/seal ring promptly.
Avoid picking up hard, sharp objects with the vacuum. They may damage the vacuum and the lter bag.
Do not use to pick up toxic substances, ammable or combustible liquids such as gasoline, or operate in the presence of explosive or
ammable fumes.
Never insert or drop any object into any opening on the device. Keep all openings free of leaves, rocks, or anything that may reduce
water ow.
Do not use on or near hot surfaces.
Make sure the battery pack has been removed from the cleaner and the cleaner is turned “off” before cleaning the lter bag or perform-
ing any other routine maintenance.
While battery is charging, do not handle with wet hands or without shoes.
Only use the charger supplied to recharge this vacuum. Do not use the supplied charger with any other appliance.
To protect against risk of electrical shock, do not put charger in water or other liquid.
To avoid damage to the charger and cord, never carry the charger by the cord or yank to disconnect from an outlet. Instead, rmly grasp
the charger body and pull to disconnect. Do not pull cord around sharp edges or corners.
Do not allow the cord to hang over the edge of a table or counter or touch hot surfaces.
Do not operate with a damaged cord or charger.
Do not use or store charger outdoors. Charge your cleaner indoors in a clean, dry place. Do not expose charger to rain, or extreme
temperatures.
For best results, operate the charger in a location where the temperature is more than 50 degrees F but less than 100 degrees F.
Disconnect charger from power supply when not in use, and before any routine cleaning or maintenance.
The use of extension cords is not recommended. Plug the charger into a properly grounded standard electrical outlet (120v/60Hz US, 240
volts, 50Hz International) only.
If vacuum cleaner is not working as it should, or has been dropped or damaged in any way, return it to a service center before using.
Call 1-800-298-8800 for a center nearest you.
This product contains a sealed nickel-metal hydride battery. Do not incinerate battery as it will explode at high temperatures. Always
dispose of the battery in accordance with your state law.
Leaks from a battery cell can occur under extreme conditions. If the battery liquid gets on the skin, wash immediately with
water. If it gets in your eyes, immediately flush your eyes with water for 15 minutes and seek medical attention.

ITEM No. DESCRIPTION PART No. QTY.
1 Vacuum Head PROA006 1
2 Vacuum Head Brushes PROW049 6
3 Vacuum Head Wheels PROW050 11
4 Nose Cap PROA002 1
5 All Purpose Filter Bag/Seal Ring PROW022AP 1
6 Pool Blaster PRO PROA005 1
7 Battery Charger PROA099* 1
8 Spring Clip PROW041 1
9 Battery Pack PROA007 1
10 Motor Box Cap PROA015 1
11 Sand and Silt Bag (not shown) PROW022SS 1
12 Multi Layer Micro lter Bag (not shown) PROWO22MF 1
13 Sholder Strap (not shown) PROW070 1
Product Speci cations
VACUUM UNIT BATTERY
Motor 12 Volt, DC Charger Rating 120V, 60 Hz AC only (US)
240 volts. 50Hz AC only (International)
Charger Voltage 16.8 V
ADDITIONAL PARTS AVAILABLE:
Shallow Water Hose Attachment (part No. PROASHA)
* U.S. Charger (part No. PROA099)
* European 230V Charger (part No. PROA099EU)
To purchase, contact your retailer or call us at (800)298-8800
WARNING:
The Battery Charger is for indoor use only.
WARNING:
Do not expose charger to excessive moisture or extreme heat or cold. Charge battery only with the battery charger provided.
CHARGING BATTERIES
BATTERY LIFE
•
Your battery pack should give you many hours of use. If your motor, batteries, or charger stop working, take the cleaner to an authorized service center.
• NEVER leave your battery plugged in for long term storage.
• The Battery Pack should be charged at least once a month when not in regular use.
4
5
6
7
8
9
1. Remove the battery pack from the rear of the cleaner.
2. Attach the Battery to the Battery Charger.
3. Plug the Battery Charger to any standard 115V/60Hz electrical
outlet.
The battery pack for your cleaner has been shipped in
a low voltage condition. It should be charged for 12
Hours prior to initial use.
When the charge has been exhausted, recharge the
battery for 10 - 12 Hours.
10
1 2 3

Your cleaner has a unique patented vacuum head which has been supplied from the factory with all eleven (11) wheels and all six (6) brushes in-
stalled. This conguration should function well to clean most pools. The vacuum head can be adapted for specic pool surface situations varying
the number and placement of wheels and brushes..
NOTE: Inserting the wheels into the vacuum head may require a good deal of force. If you have trouble, you may nd it easier to insert them by
placing on a hard surface and pushing down on the head.
Wheels and/or Brushes must be installed prior to use. Water Tech is NOT responsible for damages to pool surfaces if neither the
wheels nor brushes are installed in the vacuum head before use.
Installing the Filter Bag
Please follow these instructions carefully:
• Place the cleaner on its end on a stable and secure surface.
• Place the lter bag/seal ring (part no.PROW022AP) into the cleaner. Make sure the rubber seal ring sits on the funnel. All of the lter bag
must be inside the funnel to ensure the head closes fully.
• Put the nose cap (part no.PROA002) on the funnel.
• Close the latch, squeezing the lter bag/seal ring in between.
NOTE: You should not need to apply excessive force in order to close the latch. If you have trouble, make sure the lter bag is not trapped in
between the seal and the nose cap or funnel and there are no other obstructions such as sand or debris.
Installing the Battery Pack
• Remove the Motor Box Cap
• Line up the guides on the Battery Pack and on the switch plate. Apply gently pressure until the Battery Pack is seated properly. If you
encounter resistance, Remove the battery Pack, check alignment of the guides and apply gentle pressure again until battery is in place.
• Replace the Motor Box Cap. Please note that the Motor Box Cap is designed to be installed in one orientation.
Once your cleaner is set-up for use, you may put it in your pool or spa.
• Bring your cleaner to the side of the Pool or Spa and turn it “ON”
by twisting the Motor Box Cap clockwise.
• This appliance is designed to be in water only when in the “ON” position
and has battery power. Never leave your cleaner in the water when it is off.
NOTE: Lift the cleaner from pool with the nose facing up to allow the water to escape from the back and sides while trapping debris inside the unit.
Preparing the Cleaner for Use
Setting up the Vacuum Head
Vacuum Head (Standard Assembly)
OFF ON

CAUTION: This cleaner is designed for underwater use only. Do not attempt to use your cleaner to clean anything
other than a pool or spa. It is not intended for use as an all-purpose vacuum cleaner. Unit must be submerged in water to operate properly.
Maximum operating temperature is between +5DEGC (41˚F) and +40DEGC (104˚F). Maximum operating depth is 4 meters (15 ft)
Your cleaner is designed for use in 4 different ways to vacuum your pool or spa:
1. Vacuum using the handle and the vacuum head removed.
2. Vacuum using the handle and attached vacuum head, with either wheel or brush attachments depending on pool type.
3. Vacuum using a standard vacuum pole (not supplied) with the attached vacuum head.
4. Vacuum using the handle with the Head and Hose Attachment
WARNING:
Never use your
cleaner
without the lter bag/seal ring and nose cap properly in place. Doing so will VOID the warranty.
Using a standard pole
The pole attachment on your cleaner is designed to accommodate any standard
1.25” diameter pole. To attach a pole, simply press down on the alignment pins
on the pole retaining spring clip. Aligning the holes, slide the pole onto the
cleaner and release the clip.
WARNING: Do not lean on pole or use pole to support weight.
Cleaning Your Cleaner
For maximum cleaning efciency the lter bag/seal ring should be checked, emptied, and cleaned after each use or whenever you notice that the
performance of your cleaner is declining.
To clean the lter bag/seal ring
• Place the cleaner on its end (remove the vacuum pole, if attached).
• Unlatch the Nosecap.
• Remove the lter bag/seal ring by pulling it out of the funnel .
• Invert the lter bag/seal ring and rinse with a garden hose or in a sink.
Note: Do not clean in a washing machine or with detergent.
• Re-insert the lter bag when nished.
• Note: Your reusable lter bag should be replaced if the seal ring is worn or if
the bag is torn.
WARNING: Keep away from children. Failure to comply with these warnings could result in re and/or serious injury.
WARNING: When servicing user serviceable parts, use only identical Water Tech replacement parts. Use of any other parts may
create a hazard or cause product damage.

Important Tips:
• Store your cleaner in a clean, dry place when not in use. Do not leave it underwater, in direct sunlight, or exposed to extreme heat or
cold.
• You may clean the cleaner body with soap and water. Avoid using solvents when cleaning plastic parts. Most plastics are susceptible to
damage from various types of commercial solvents and may be damaged by their use. Use clean cloths to remove dirt, dust, oil, grease
etc.
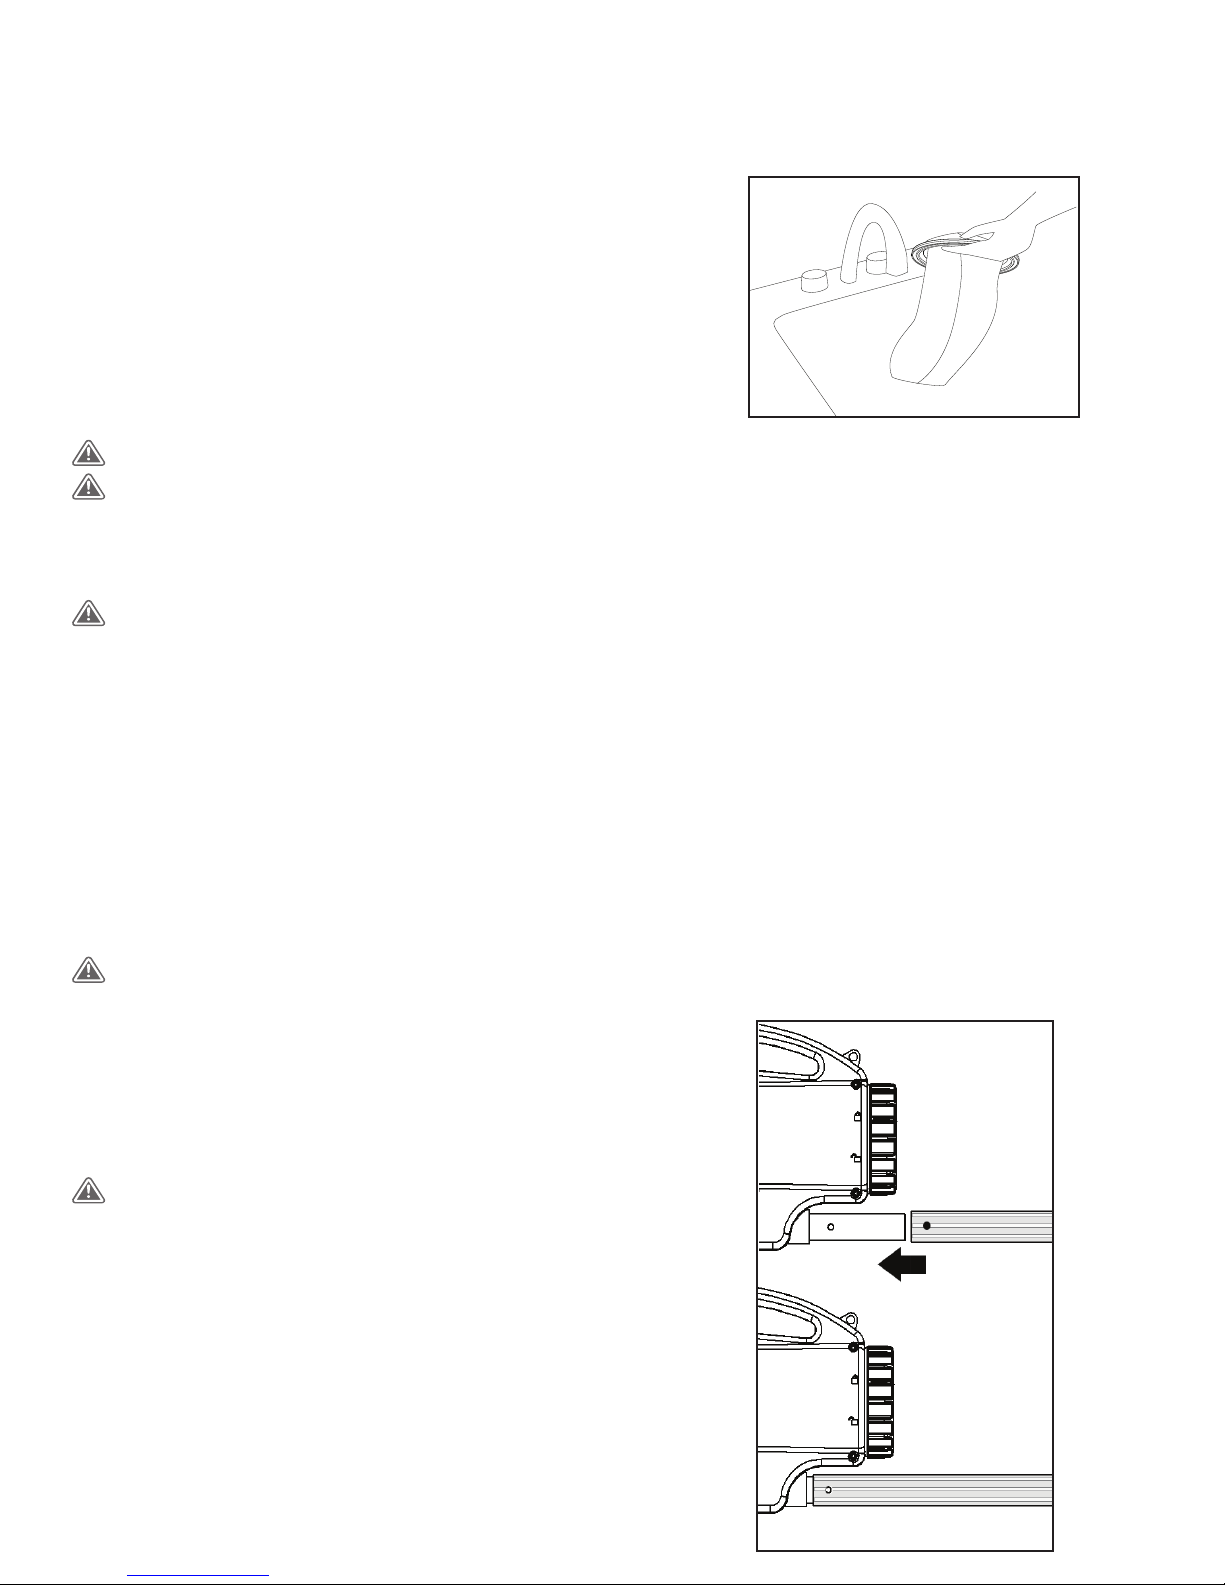
• The Motor Box Gasket should be periodically lubricated with a silicon-based grease
• General maintenance of your cleaner requires you occasionally clean off the gasket on the Motor Box Cap and add silicone lubricant/seal-
ant. This will ensure easier turning and a water-tight seal. This lubricant is available at your local pool & spa retailer.
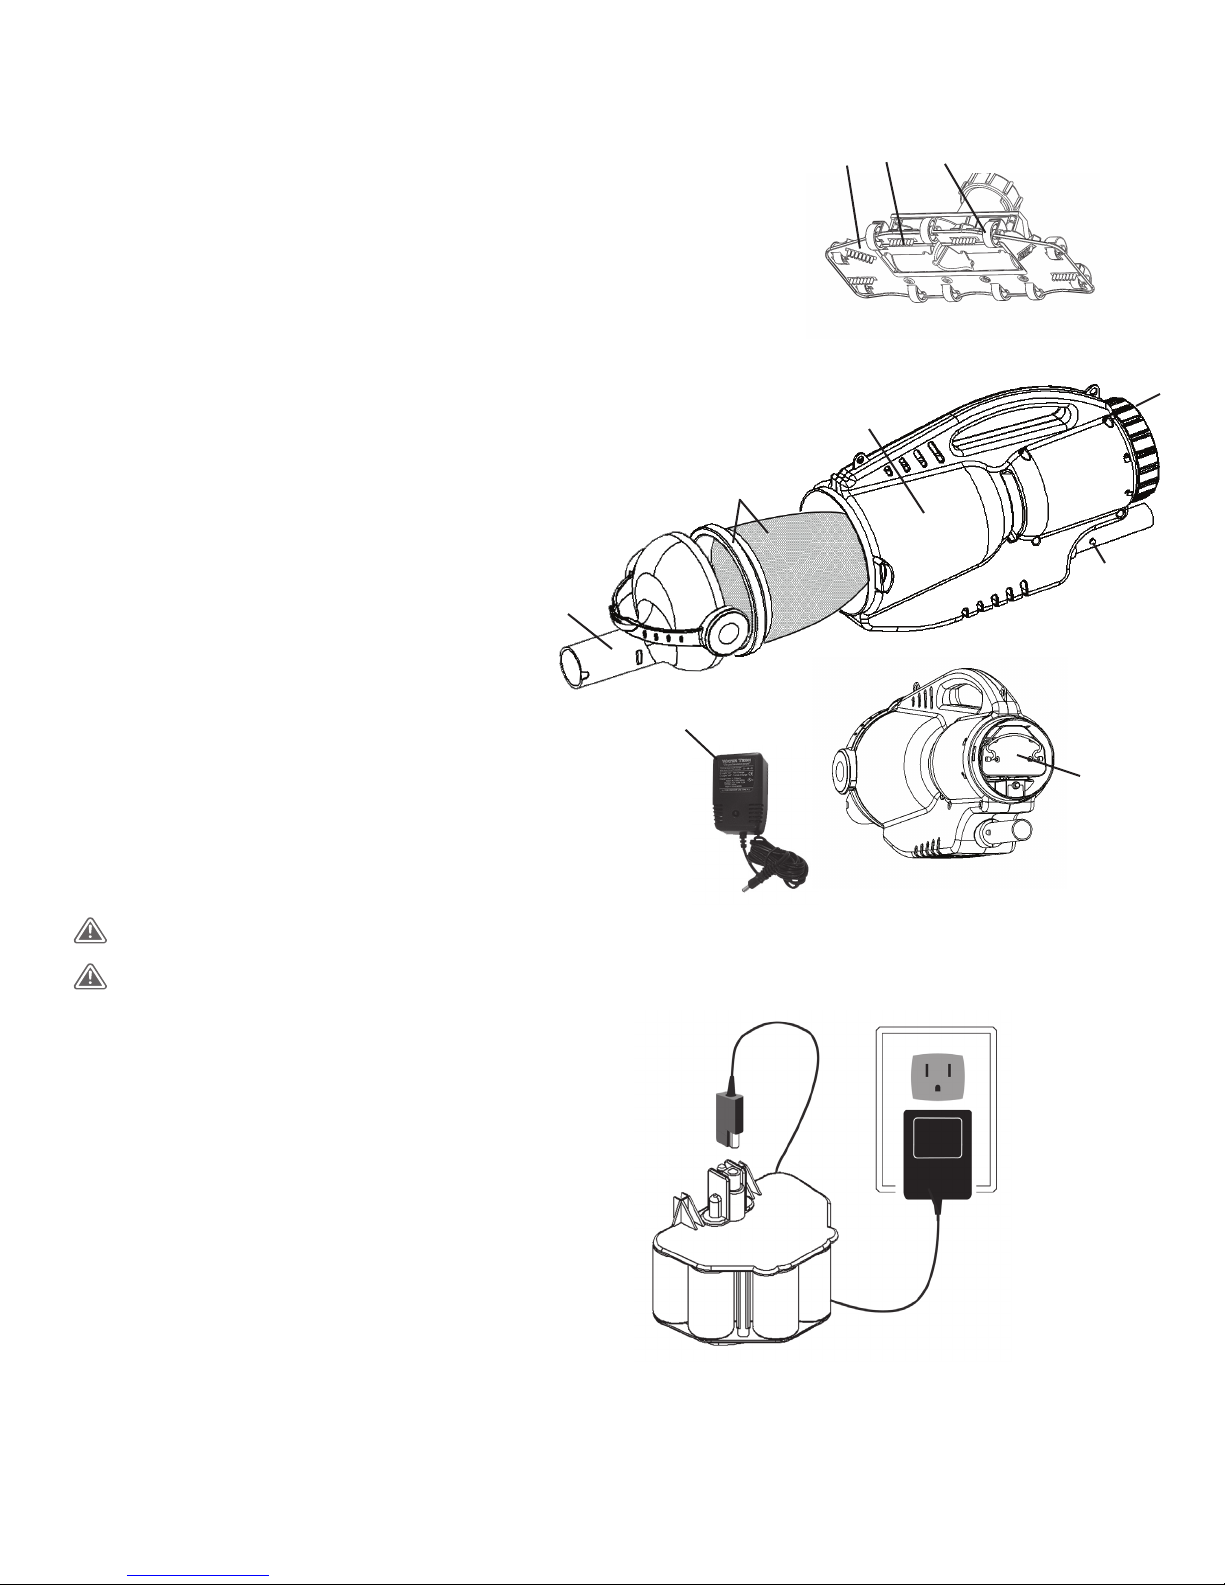
• In the Nose Cap (Part No. PROA002) there is a Flapper Valve. To keep the Nose Cap Flapper Valve moving freely, clean the valve after
every use. This will help to keep dirt inside the cleaner after the cleaner is removed from the poo
CAUTION: Do not at any time let brake uids, gasoline, petroleum-based products, penetrating oils, etc. come in contact with plastic parts.
They contain chemicals that can damage, weaken, or destroy plastic.
WARNING: Do not attempt to modify this tool or create accessories not approved for use with this tool. Any such alteration or modication
is misuse and could result in a hazardous condition leading to possible serious injury. Do not attempt in any way to destroy or disassemble motor
box or any of its components. Instead, take your cleaner to an authorized service center. Failure to follow these instructions may void your warranty
agreement.
Service Information
NOTE: Any repairs requiring disassembly must be performed by a Water Tech Authorized Service Center. For the repair center nearest you call us
toll free at 1-800-298-8800. Unauthorized repairs will void the warranty.
Storing the Cleaner
NOTE: State of the art Nickel-Metal Hydride batteries power the cleaner. In order to properly ventilate and cool the batteries and drive system a
certain amount of space is left open in the cleaner body. As a result, from time to time, water may enter the unit. In order to allow for any water to be
drained you should remove the Motor Box Cap after each use, turn the machine on end so the opening is towards the oor and tilt side to side in all
directions. The amount of water may be very small or not noticed at all. Water entering the cleaner body presents no safety hazard and should be
drained to avoid any chance of long-term corrosion. The batteries and motor in the cleaner are long lasting and proper care will help to prolong the
life of your appliance.
NOTE: Remove Battery Pack from the charger before storage.
When not in use, your cleaner should be stored indoors, in a clean dry location sheltered from direct sunlight, extreme temperatures and rain. Do
not store the cleaner in a garage or anywhere the unit could freeze. Storing the cleaner in areas of high humidity can affect battery performance over
time.
Long Term Storage
Follow the above storage instructions and unplug the charger from the electrical outlet.
When charging for the rst time after long-term storage, your cleaner may take 2-3 uses before full time is achieved.
Warning
This device complies with Part 15 of the FCC Rules. Operation is subject to the following two conditions: (1) This
device may not cause harmful interference, and (2) this device must accept any interference received, including inter-
ference that may cause undesired operation.
NOTE: This equipment has been tested and found to comply with the limits for a Class B digital device, pursuant to
Part 15 of the FCC Rules. These limits are designed to provide reasonable protection against harmful interference
in a residential installation. This equipment generates, uses and can radiate radio frequency energy and, if not used
in accordance with the instructions, may cause harmful interference to radio communications. However, there is no
guarantee that interference will not occur in a particular installation, If this equipment does cause harmful interference
to radio or television reception, which can be determined by turning the equipment off and on, the user is encouraged
to try and correct the interference by one or more of the following measures:
- Reorient or relocated the receiving antenna.
- Increase the separation between the equipment and receiver.
- Connect the equipment into an outlet on a circuit different than that to which the receiver is connected.
- Consult the dealer or an experienced radio/TV technician for help.
NOTE: Changes or modications not expressly approved by the party responsible for compliance could void the user’s
authority to operate the equipment.

Frequently Asked Questions
Q: Can my cleaner be run out of water?
A: Yes, for a short period of time when you turn it on before submering into your pool or spa.
Q: When I am cleaning my pool how do I know when the cleaner is out of battery power?
A: Most people can feel the cleaner is running through vibration in the vacuum pole or handle. To be sure you can lift it out of the water to hear if it is
running or not.
Q: How often should I clean out my cleaner’s lter bag?
A: You can clean your lter bag as often as you like with no ill effects. The lter bag can then be turned inside out and rinsed with a hose or in
a sink. Do not wash it in a washing machine or with detergent. For more detailed instructions, see “Cleaning Your Cleaner” instructions in this
manual. For best results, do this after each use, or whenever you notice the performance of your cleaner declining.
Q: Is it normal for me to hear air escaping out of the cleaner when I open the Motor Box Cap?
A: Yes, the powerful motors heat the air in the motor box, which then expands, creating the air sound.
Q: How can I stop dirt from coming out of the nozzle when I take the cleaner out of the water?
A: There are two ways to remove the unit from the pool when done cleaning:
WHEN USING HANDLE: Lift from pool with the nose facing up to allow the water to escape from the back and sides.
WHEN USING A VACUUM POLE: Remove the unit from the pool with the bottom facing upwards and the handle facing down. This will allow the
water to escape and keep the dirt inside.
Q: How can I Prevent sand and silt from escaping through the lter bag?
A: This cleaner comes standard with an all-purpose lter bag. A Sand and Silt bag (Part No. PROW022SS) is available. To purchase contact your
retailer or call us at 1-800-298-8800.
Q: What if I put the cleaner in the pool without the Motor Box Cap in place?
A: Do not operate your cleaner if water gets inside the machine. Drain all unit from the cleaner. Do not use for at least 24 hours. You can speed the
drying process with a blow dryer set on the “low heat” setting.. To avoid serious injury or damage, do not replace the Motor Box Cap or attempt to
charge or operate your cleaner until it is completely dry.
Q: Can I leave my cleaner’s battery pack on the charger all the time?
A: After charging is complete, the Battery Pack and charger should be removed from the outlet. This will prevent overcharging and prolong the life of
your battery pack. IMPORTANT: Disconnect the charger before storing your cleaner.
Q: Where can I buy replacement parts?
A: Look for original Water Tech replacement parts at your local retailer or call 1-800-298-8800 for more details.
Q: Will my pool chemicals hurt the cleaner?
A: This cleaner is designed to withstand pool chemicals during its usage period. However, it should be rinsed off with fresh water after it is removed
from the pool. This will increase the life of the lter bag/seal ring.
Q: Can I leave the cleaner in the pool when not in use?
A: No. The cleaner should be removed from the pool and stored in a clean, dry place when not in use. This will increase the life of your cleaner and
its accessories.
Q: What do I do if my cleaner does not vacuum?
A: Make sure your cleaner is completely submerged in the water and the air is out of the clear funnel. The cleaner is only designed to vacuum water
and will not vacuum air. If that does not resolve your situation please check the following:
• Make sure the lter bag is clear of debris that may be obstructing the ow.
• Make sure the Motor Box Cap has been installed correctly.
• Charge your cleaner for at least 24 hours.
If none of the above help resolve the situation, please call our Customer Service Division at 1-800-298-8800.

LIMITED WARRANTY
Water Tech Corp (“WT”) warrants this product, including supplied accessories against defects in material or workmanship for the time periods as set
forth below. Pursuant to this Limited Warranty WT will, at its option (i) repair the product to the original specications or (ii) replace the product with a
new or refurbished product. In the event of a defect, these are your exclusive remedies. For purposes of this Limited Warranty, “refurbished,” means
a product or part that has been return to its original specications.
All Pool Blaster Battery Powered Pool & Spa Vacuums. For a period of one (1) year from the original date of purchase of the product, WT will, at its
option, repair or replace with new or refurbished product or parts, any product or parts determined to be defective.
Accessories. Included accessories are covered by this Limited Warranty for a period of 90 Days.
Instructions. Please retain the original box and internal packaging materials. To obtain warranty service, you must comply with the following requisite
instructions:
(1) Visit Water Tech Corp’s Customer Support Department via email at www.wtrma.com. You will be guided through the correct process on how
to obtain the required RMA# (Return Merchandise Authorization Number.) All customers must obtain an RMA number before any product will be
accepted for warranty service. If you need additional assistance please contact us by telephone: (800-298-8800) or email: customerservice@waterte
chcorp.com.
(2) Package the unit with all accessories properly and securely in the original box.
(3) Attach your RMA number and Bar-Code you received from the website to the outside of the package. If you could not print the RMA number and
bar-code from the website you must write your RMA number in thick black indelible marker on two sides of the box.
(4) Send the package by USPS or express courier of choice to: Water Tech Corp. 44 West Ferris Street, East Brunswick, New Jersey 08816; (WT
suggests you insure the contents of your package.) WT is not responsible for lost, stolen or damaged property in transit to WT.
Repair/Replacement Warranty. This Limited Warranty shall apply to any repair, replacement part or replacement product for the remainder of the
original Limited Warranty period or for ninety (90) days, whichever is longer. Any parts or products replaced shall become the property of WT.
This Limited Warranty covers only product issues caused by defects in material or workmanship during ordinary consumer use; it does not cover
product issues caused by any other reasons, including but not limited to product issues caused by commercial use, acts of God, misuse, abuse,
limitations in technology, or modication of or to any part of the WT product. This Limited Warranty does not cover WT products sold AS IS or WITH
ALL FAULTS or consumables (such as batteries). This Limited Warranty is invalid if the factory-applied serial number has been altered or removed
from the product. This Limited Warranty is valid only in the United States and Canada.
EXPRESS LIMITATION: THIS LIMITED WARRANTY ONLY APPLIES IF THE PRODUCT WAS PURCHASED FROM AN AUTHORIZED
WATER TECH DEALER; THIS WARRANTY IS NOT TRANSFERABLE. THE WARRANTY OBLIGATIONS OF WT SHALL BE LIMITED TO REPAIR
OR REPLACEMENT OF THE PRODUCT. WT SHALL NOT BE LIABLE OR RESPONSIBLE UNDER ANY CIRCUMSTANCES OR IN ANY AMOUNT
FOR CONSEQUENTIAL OR INCIDENTAL DAMAGES, OR FOR INJURY OR DAMAGES TO PERSONS OR PROPERTY USING OR USED IN
CONNECTION WITH THE PRODUCT, OR FOR LOSS OF PROFITS OR OTHER COSTS OR EXPENSES OF ANY KIND OR CHARACTER.
LIMITATION ON DAMAGES. WT WILL NOT BE LIABLE FOR ANY INCIDENTAIL OR CONSEQUENTIAL DAMAGES FOR BREACH OF EXPRESS
OR IMPLIED WARRANTY ON THIS PRODUCT.
DURATION OF IMPLIED WARRANTIES. EXCEPT TO THE EXTENT PROHIBITED BY LAW APPLICABLE LAW, ANY IMPLIED WARRANTY OF
MERCHANTABILITY OR FITNESS FOR A PARTICULAR PURPOSE ON THIS PRODUCT IS LIMITED IN DURATION OF THIS WARRANTY.
Some states do not allow the exclusion or limitation of incidental or consequential damages, or allow limitations or how long an implied warranty
lasts, so the above limitations or exclusions may not apply to you. This Limited Warranty gives you specic legal rights and you may have other
rights, which vary from state to state.
Other manuals for Pool Blaster
5
Table of contents
Popular Swimming Pool Filter manuals by other brands

Hayward
Hayward SwimClear owner's manual

CTX PROFESSIONAL
CTX PROFESSIONAL E Series Installation and operating instructions

Pentair Pool Products
Pentair Pool Products Filter CFW Series owner's manual

Hamma
Hamma RAPID 4 Operating instruction

AquaStar
AquaStar Flowstar SKR1 Series Installation, operation & parts

Hayward
Hayward S210SV owner's guide