Waterwise REMOTE FAUCET PUMP SYSTEM User manual

Use & Care Guide
REMOTE FAUCET PUMP SYSTEM
See Important
Safeguards
on Page 2
An exclamation point within
an equilateral triangle is
intended to alert user to the
presence of important operating
and maintenance (servicing)
instructions in the literature
accompanying the appliance.

WATERWISE
2
IMPORTANT SAFEGUARDS
SAVE THESE INSTRUCTIONS
When using this appliance always adhere to basic safety precautions including the
following:
1. READ ALL INSTRUCTIONS BEFORE USE.
2. For use with Waterwise Model 7000 Distiller. Only recommended for 8- and
12-gallon reservoir oor models.
3. Plug into a 120-Volt AC grounded electric outlet ONLY. e Distiller with
pump should be on a separate electrical circuit rated at least 15 amps.
4. e cord has a three-pronged plug which mates with a standard three-
pronged grounded outlet. DO NOT cut or remove third prong from plug.
If an adapter is used, be sure adapter wire and wall outlet are grounded.
If there is any doubt as to whether the outlet is properly grounded, check
with a qualied electrician.
5. DO NOT use with an extension cord.
6. Receptacle on pump box is for the Distiller only. DO NOT plug an electrical
tool or appliance into this receptacle.
7. Unplug from wall outlet when not in use and before cleaning or servicing.
8. Protect pump and tubing from freezing. Failure to do so may result in crack-
ing and water leakage.
9. All local plumbing and electrical codes apply and should be followed.
10. For INDOOR use only.
11. DO NOT use pump for other than intended use.
IMPORTANT: DO NOT use copper or PVC tubing as they will trans-
fer a color, taste and/or odor to distilled water.

REMOTE FAUCET PUMP SYSTEM USE & CARE GUIDE
3
e Remote Faucet Pump System is designed to conveniently deliver pure distilled water
from a remotely located Waterwise 7000 distiller/reservoir to a gooseneck faucet at
your kitchen sink and to your refrigerator dispenser and icemaker for crystal clear ice
cubes. Additional faucets and icemaker hookup kits can be purchased for those also
wanting delicious pure water at a wet bar, bathroom sink, second refrigerator, etc.
At the heart of the system is a demand pump that is listed by Underwriters
Laboratory (UL) and certied by the National Sanitation Foundation/Ameri-
can National Standards Institute (NSF/ANSI 18) as all parts in contact with the
distilled water are food-grade quality. is durable, long-life pump will deliver
approximately one gallon of distilled water per minute.
e exible food-grade tubing and ttings used to transport the pure water are certi-
ed by the Water Quality Association (WQA) to be NSF/ANSI 58 drinking water
treatment components and NSF/ANSI 372 to be lead-free. e gooseneck faucet is also
made of lead-free brass.
SYSTEM INCLUDES:
• Stainless Steel Housing
9½" W x 9½" L x 5" H
• Self-Priming Demand Pump
w/Fittings
• Chrome Gooseneck Faucet
w/Fitting
• 50' of ⅜" Food-Grade Flexible
Tubing
• Icemaker Hookup Kit includes:
25' of ¼" Food-Grade Flexible
Tubing, ⅜" x ⅜" x ¼" “T” Fitting
and Refrigerator Connector Fitting
Distilled Water to Gooseneck Faucet
at Sink and Refrigerator/Icemaker
Distiller in a Remote
Location: Basement,
Utility Room, Garage,
etc.

WATERWISE
4
INSTALLATION INSTRUCTIONS
IMPORTANT: DO NOT use copper or PVC tubing as they will transfer
a color, taste and/or odor to distilled water.
1. If installed, remove black plastic jam nut from the plug in reservoir. Install
reservoir elbow tting by rst placing stainless steel washer and then black
rubber washer onto threaded end of tting and inserting it into hole in reser-
voir (see Figure A). From INSIDE reservoir securely tighten in place using
black plastic jam nut. DO NOT OVERTIGHTEN.
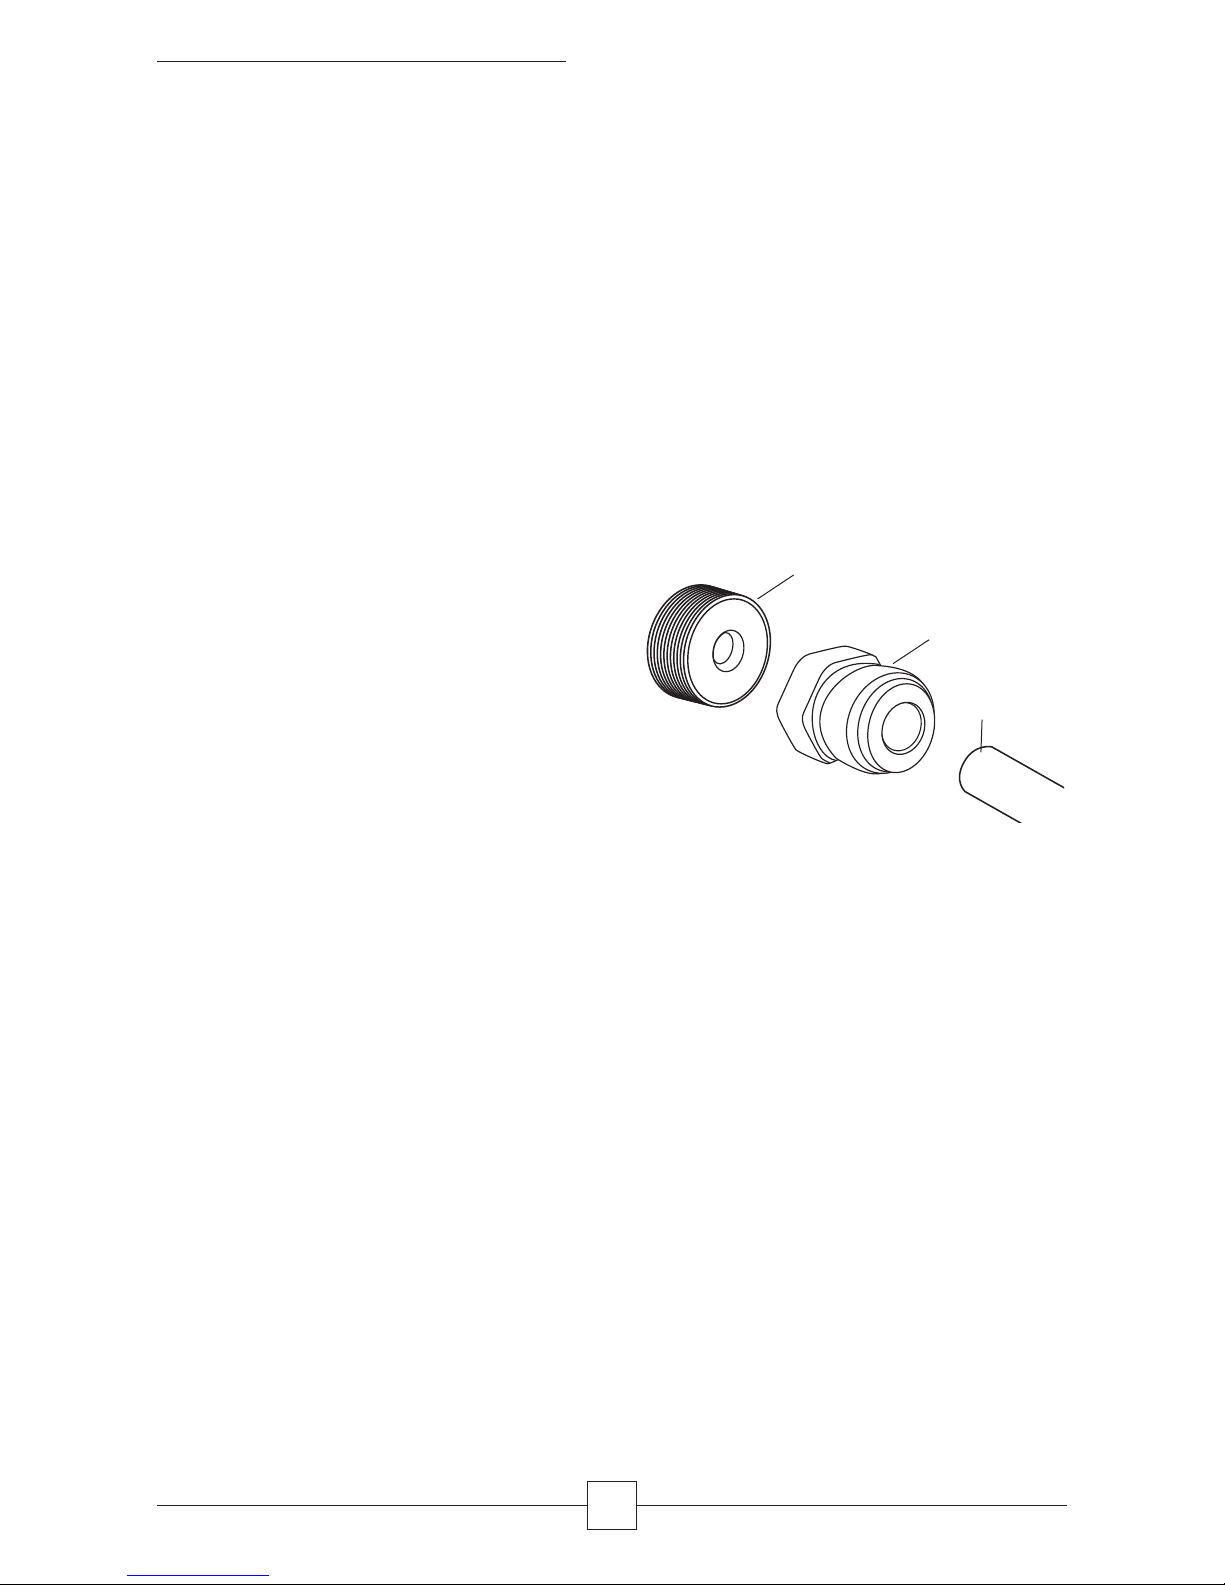
2. Cut a 2-foot length section of ⅜" tubing. Be sure to cut squarely and remove
any burrs. Connect tubing to inlet port on pump (see Figure C) by securely
pushing tubing into inlet port tting (approximately ¾"—see Figure B “Con-
necting Tubing”). Pull gently on tubing to make sure it is secured.
Figure A
Figure B CONNECTING TUBING
Cut tubing
squarely
and feed
into tting.
Push past
o-ring to
the tube
stop.
DISCONNECTING TUBING
Pull collet
against
tting.
Pull tubing out.
Tubing
Collet O-ring Tube
Stop
Tubing Collet
Fitting
Fitting
Black
Plastic
Jam Nut
(inside
reservoir)
Distiller Reservoir Black
Rubber
Washer
Stainless Steel Washer
Reservoir
Elbow Fitting
3/8” Tubing
to Pump
Inlet Port
REMOTE FAUCET PUMP SYSTEM USE & CARE GUIDE
5
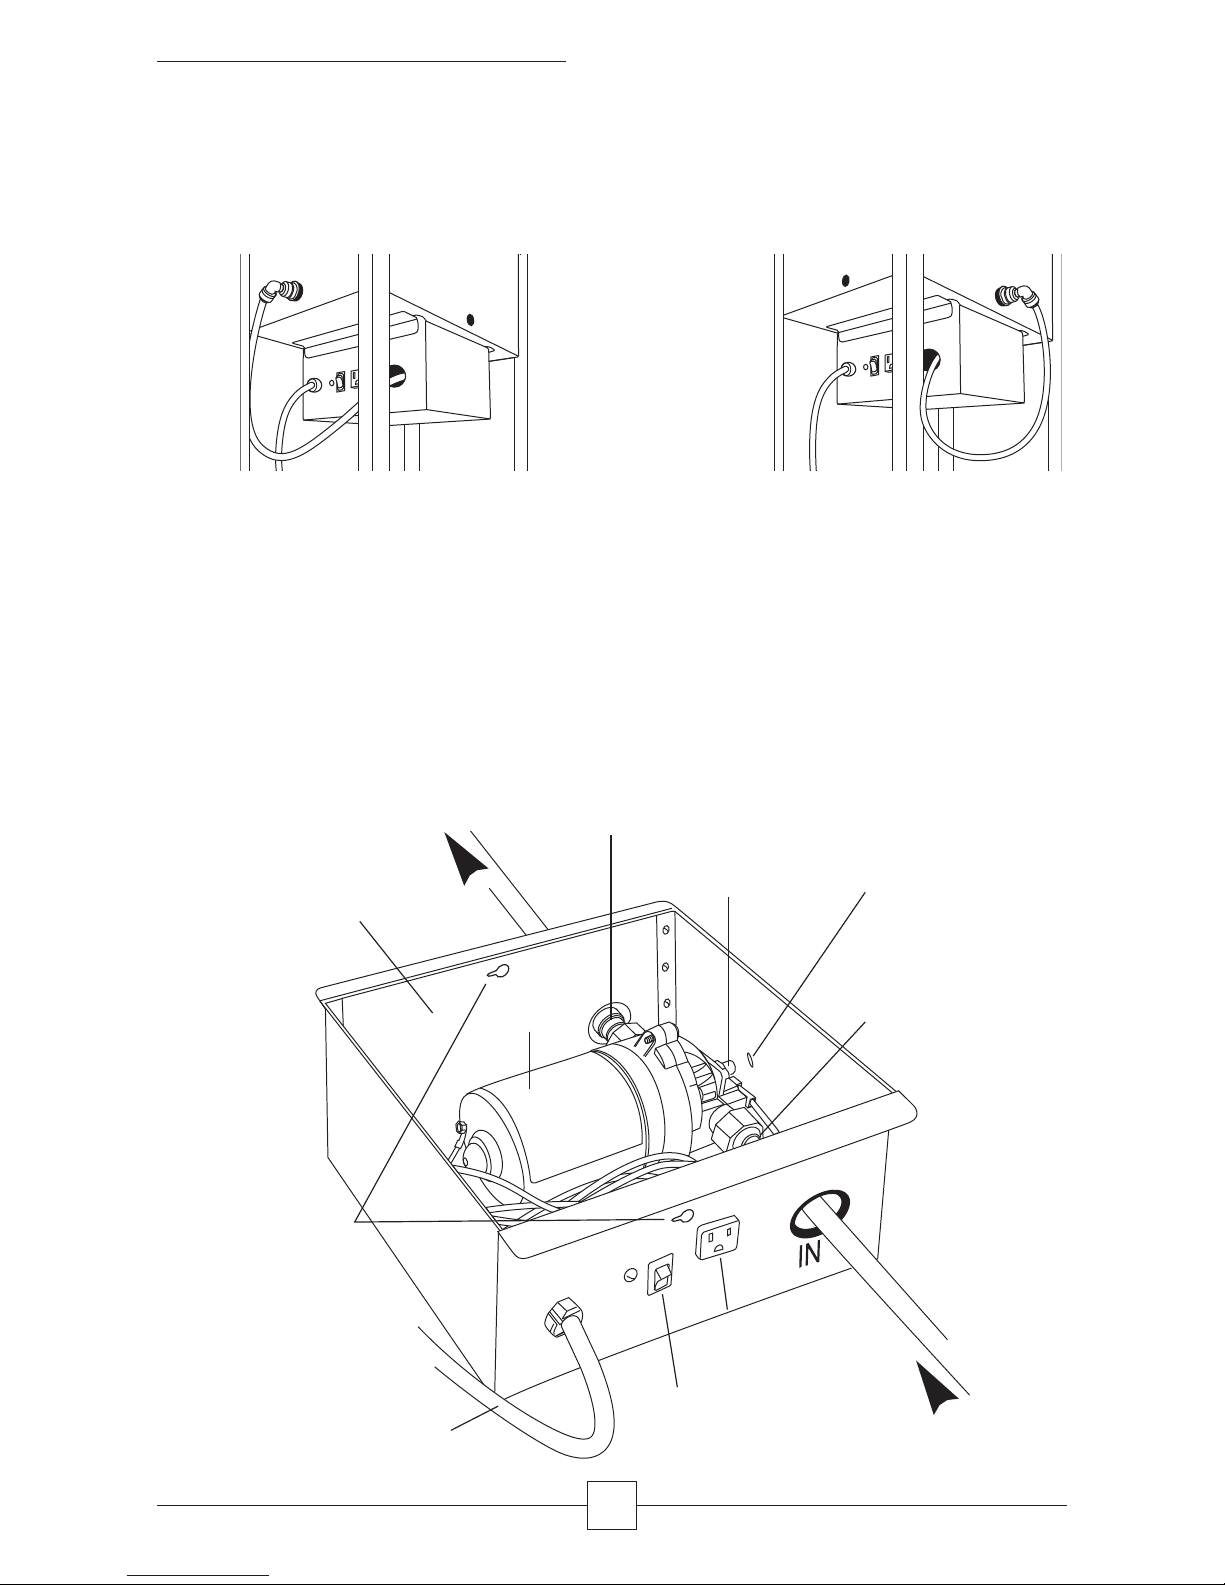
3. Locate the slide rails on bottom of reservoir. Slide the pump box with the
2-foot section of tubing onto rails as shown below. Secure the pump box to
the slide rails with the two screws provided.
4. Connect the tubing from the inlet port tting to the reservoir elbow tting by
securely pushing tubing into reservoir elbow tting (approximately ¾"—see
Figures A & B). Be sure to route the tubing with a gradual bend so that it is
not crimped (see diagram above).
5. Connect tubing going to gooseneck faucet to outlet port on pump (see Figure
C) by securely pushing tubing into outlet port tting (approximately ¾").
Figure C
Outlet
Port
Stainless Steel
Pump Box Housing
" Tubing to
Gooseneck Faucet
" Tubing
from Distiller
Distiller Plug
Receptacle
On/O
Switch
Power Cord
Mounting
Holes
Pump
Adjustment
Screw
Pump
Adjustment
Access
Inlet Port
Pump
Route the "
Tubing to the
Reservoir Elbow
Fitting to either
the Narrow Side
(left) or the Wide
Side (right)

Gooseneck
Faucet
Handle
Small Black
Washer
Chrome Top
Washer
Large Black
Washer
Sink/
Countertop
Plastic Disk
Lock Washer
Nut
Fitting
Collet
3/8" Tubing
from Pump
Outlet
Port
Figure D
WATERWISE
6
IMPORTANT: Route tubing so that it is protected from
possible puncture, excessive heat, direct sunlight or freezing.
Use gradual bends as sharp bends will cause tubing to crimp
and restrict ow.
6. Choose location for gooseneck faucet on sink or
countertop. Route tubing to desired faucet
location.
NOTE: Use sink spray nozzle hole if available. If
drilling is required, use ½" high speed drill bit
suitable for formica top or stainless steel sink.
Porcelain clad iron sinks require drilling
with special Relton cutter.
7. Remove nut from faucet. Place
small black washer, chrome top
washer and large black washer
onto threaded portion of faucet
(see Figure D).
8. Place threaded end of faucet
through hole in sink/countertop
positioning it for desired delivery
ow location. Make sure large black
washer, chrome top washer and small
black washer seat ush against sink/
countertop (see Figure D).
9. From below sink/countertop, secure
faucet with plastic disk, lock washer and
nut. You may use a wrench on the “ats”
of the faucet to hold it in position. Place a
cloth between wrench and “ats” to
prevent damage to faucet nish.
10. Tighten tting onto threaded portion of faucet.
11. Cut ⅜" tubing squarely. Push tubing into tting as far as it will go (approxi-
mately ¾"). Pull gently on tubing to make sure it is secured (see Figure B
“Connecting Tubing”).
7
12. For icemaker hookup, install “T” tting on ⅜" tubing as close to refrigerator
as possible. Connect ⅜" and ¼" tubing to “T” tting by securely pushing
tubing into tting (approximately ¾"—see Figure B “Connecting Tubing”).
Route ¼" tubing to refrigerator water valve, allowing about 5 feet extra for
servicing the refrigerator. If applicable, remove any existing connected
tubing from the water valve. Tighten the refrigerator connector tting onto
threaded portion of water valve. Connect ¼" tubing to refrigerator connector
tting by securely pushing tubing into tting (approximately ¾"). Pull gently
on tubing to make sure it is secured.
13. Plug Distiller into receptacle on pump box housing. Make sure the pump box
power switch is OFF (see Figure C).
14. Plug power cord from pump box
into a properly rated grounded
electric outlet ONLY.
15. DO NOT switch power on pump
box to ON position (red indicator
showing) until reservoir contains at
least 3 inches of distilled water
(approximately 6 hours). Pump
could be damaged if used without
adequate water supply in reservoir.
Distiller WILL operate with pump turned o.
16. When reservoir has at least 3 inches of water, switch pump box ON.
17. For distilled water on tap, simply press handle on gooseneck faucet for
instant ow or li handle for continuous ow. Allow approximately 1 gallon
of water to ow through faucet to clear pump system on initial use.
18. Turn faucet o and check system for leaks. If any leaks occur, turn all
switches OFF, unplug the pump box and correct.
19. If pump “sputters” when pumping water, especially during an icemaker
lling cycle, turn the pump adjustment screw (see Figure C) ⅛ to ¼ turn
CLOCKWISE with a ⁄" Allen wrench (hex key). If pump still sputters
during the next icemaker lling cycle, make another ⅛ to ¼ CLOCKWISE
adjustment. Repeat this procedure until sputtering stops.
CAUTION: Over adjustment will cause pump to run continually.
20. If reservoir is emptied, the pump will continue to run until sucient water
is replaced. is could damage pump. Turn pump box switch OFF whenever
reservoir is emptied.
REMOTE FAUCET PUMP SYSTEM USE & CARE GUIDE
"
Tubing
Refrigerator
Connector Fitting
Refrigerator Water Valve

OWNER’S LIMITED WARRANTY
Waterwise warrants, to the original purchaser, this product against defects in ma-
terials and/or workmanship, for a period of one (1) year from the date of purchase.
Defects or failures due to shipping/handling, incorrect installation, improper use or
maintenance, including abuse or neglect, accidents, alterations or modications, or
unauthorized repair are specically excluded from this warranty. No dealer, distribu-
tor, agent, representative, or other person is authorized to extend or expand this war-
ranty.
Waterwise is not responsible or liable for personal injury, property damage, or in-
cidental or consequential damages arising out of, or in connection with, the use or
performance of the product or other damages with respect to loss of use, or costs of
removal, installation, or reinstallation.
Waterwise will, at its option, replace or repair the defective part(s) without charge,
provided they are returned, transportation prepaid by owner, to an authorized ser-
vice facility or to the address below. Enclose a letter describing the problem, copy of
dated proof of purchase, and your name, address and daytime telephone number.
is limited warranty does not guarantee uninterrupted service. Repair or replace-
ment as provided under this warranty is the exclusive remedy of the purchaser. is
limited warranty is in lieu of all other warranties, expressed or implied, including,
but not limited to, any implied warranty of merchantability or tness for a particular
use or purpose. is warranty gives you specic legal rights and you may also have
other rights which vary from state to state or province to province.
Outside the United States, a dierent warranty may apply. For details, please contact
your authorized Waterwise distibutor.
3608 Parkway Blvd • Leesburg Florida 34748-9399 • (352) 787-5008 • Fax: (352) 787-8123
www.waterwise.com • Email: service@waterwise.com
©1995 Waterwise Inc Printed in USA Form 7551 • Rev 06/16
Table of contents
Popular Water Pump manuals by other brands


FERRITALIA
FERRITALIA papillon GUPPY instruction manual

All-Star Products
All-Star Products RP-40 Series Operating, Service and Maintenance Manual

SOLIDSVAC
SOLIDSVAC SV150-CVCD Operation manual

Grundfos
Grundfos MIXIT Installation and operating instructions

Aquatec
Aquatec AquaPRO HOTLINE 1300 instruction manual

Calpeda
Calpeda SPA Original operating instructions

SPX
SPX Infinity PE45 Series operating instructions

DAB
DAB 4GG-4TW Series Installation and operating instructions

Crane
Crane Barnes 8SHDA Installation and operation manual

Edwards
Edwards XDD 1 115/230 V instruction manual

SPX
SPX Accumulator instruction manual

GORMAN-RUPP PUMPS
GORMAN-RUPP PUMPS JW Series Installation, operation and maintenance manual