watt box WB-800CH1U-IPVM-8 User manual

™
WB-800CH1U-IPVM-8
QUICK START GUIDE

pg.2
WATTBOX™ 800CH1U-IPVM-8 Quick Start Guide
PACKAGE CONTENTS
• (1) WB-800CH1U-IPVM-8
• (4) Screw-in feet and screws
• (1) 2-meter (6-foot) power cord
• (1) Locking clip (to secure IEC power cord)
• (2) Rack mounting brackets
• (8) Mounting bracket screws
• (1) Quick Start Guide
FEATURES
• Circuit breaker rating: 15A
• UL current rating: 12A
• UL power rating: 1440W
• Voltage protection rating: L-N 700V, L-G 600V, N-G 700V
• Joule rating: 3,240 joules
• Load shedding (when connected to WattBox OvrC-enabled UPS)
WATTBOX™ 800CH1U-IPVM-8 Quick Start Guide
pg.3
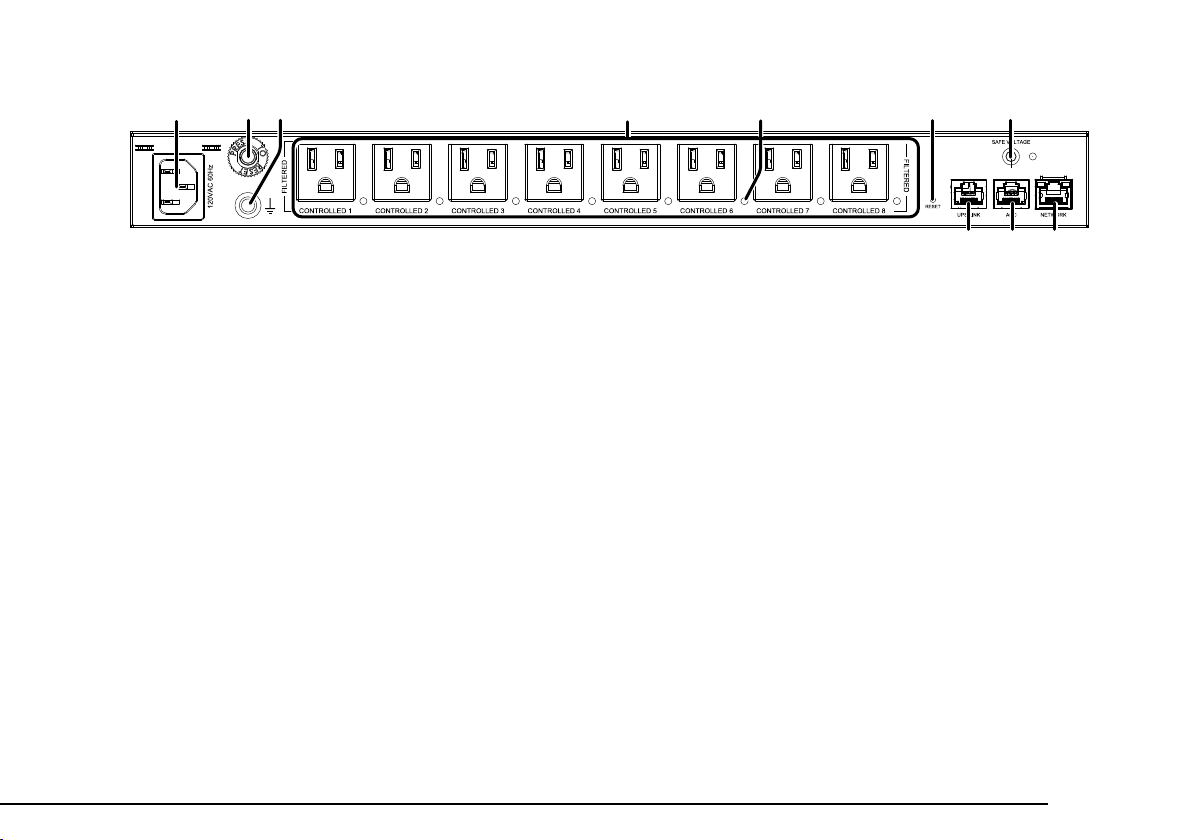
REAR PANEL
1. Power input – Input for 3-prong IEC power cord, with detachable locking clip.
2. Circuit breaker – 15A resettable breaker that trips when over amperage conditions occur. Press to reset.
3. Bonding Point – Post for bonding equipment.
4. Controllable outlets 1-8 – All outlets are individually switchable (IP controlled) and ltered against EMI/RF.
5. Power indicators for outlets 1-8 – Illuminates when power is on (x8 – 1 for each outlet).
6. Reset button – Press and release to restart the network card, press and hold ve seconds to reset network settings,
and press and hold 10 seconds to restore to factory defaults.
7. Safe Voltage button – Toggles the “Safe Voltage” feature on and o. When enabled, Safe Voltage turns o outlets to
protect connected equipment from out-of-range input voltage.
8. UPS Link – For connection to a WattBox OvrC-enabled UPS.
9. ACC port – Accessory port for future use.
10. Network port – Connect to the local area network (LAN) for IP control and monitoring.
11 22 44 6 733 5
8910
pg.4
WATTBOX™ 800CH1U-IPVM-8 Quick Start Guide
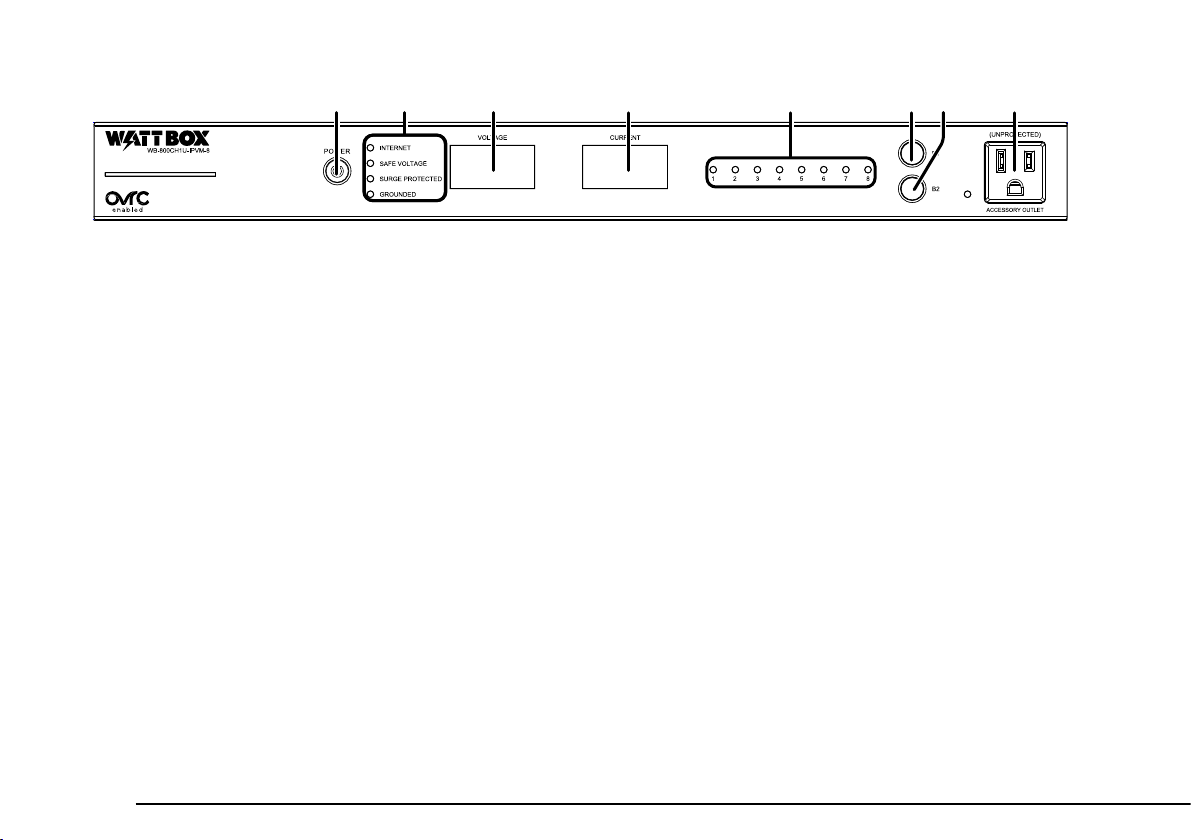
FRONT PANEL
1. AC Power button – Press to manually toggle the outlets on or o. Outlets congured as Disabled or Reset Only are
not aected.
2. LED indicators – See the status of the internet, Safe Voltage, surge protection, and whether the unit is properly
grounded. Refer to “LED Operation” on page 6.
3. Input Voltage display – Displays the input voltage being supplied from the outlet.
4. Output Current display – Displays current draw in amps (A). is gure can be an aggregate of the combined
outlets or a single outlet.
5. Outlet power indicator – Illuminates when the corresponding controlled outlet number is powered.
6. Button 1 – Sequences through outlets 1 through 8 (le to right) displaying the Current for the specied outlet.
Aggregate of all outlets display when clicking past outlet 8. is button is also used to reset individual outlets.
See “How To Manually Reset Individual Outlets From e Faceplate” on page 5.
7. Button 2 – Sequences through outlets 8 through 1 (right to le) displaying the Current for the specied outlet.
Aggregate of all outlets display when clicking past outlet 8. is button is also used to reset individual outlets.
See “How To Manually Reset Individual Outlets From e Faceplate” on page 5.
8. Accessory Outlet (Unprotected) – Always-on, front-facing outlet for service use. Not IP controllable. A solid blue
LED indicates the outlet has power and is working.
11 3 4 822 5 7766

WATTBOX™ 800CH1U-IPVM-8 Quick Start Guide
pg.5
HOW TO SEQUENCE THROUGH INDIVIDUAL OUTLETS
• Tap B1 to sequence through outlets 1-8 (moving le to right).
• Tap B2 to sequence through outlets 8-1 (moving right to le).
As you sequence through the outlets, the corresponding outlet LED ashes to indicate which outlet number you are on.
e displays show the corresponding Current for the outlet specied.
Note: e LED light ashes on the specied outlet for 5 minutes, during this time the display windows show the
Current for the selected outlet. Once the 5 minutes has expired, the WattBox defaults back to displaying the aggregate
total of the entire unit, and all LEDs default back to being illuminated.
HOW TO MANUALLY RESET INDIVIDUAL OUTLETS FROM THE FACEPLATE
1. Tap B1 or B2 to sequence through the outlets.
2. With the outlet number that needs to be reset ashing, press and hold B1 or B2 for 3 seconds. e Current display
shows a rotating 0 as the outlet resets.
HOW TO MANUALLY RESET ALL OUTLETS FROM THE FACEPLATE
To reset all of the outlets, press and hold B1 and B2 at the same time for 3 seconds. e Current display shows a
rotating 0 as the outlets reset.
Note: e reset follows the Power-On delay set in OvrC.
Outlets designated as Disabled in OvrC do not reset.

pg.6
WATTBOX™ 800CH1U-IPVM-8 Quick Start Guide
LED OPERATION
Note: LEDs on the front and back of the WattBox function identically.
Internet Blue (Solid) All host sites/IP addresses are communicating with the WattBox.
Blue (Flashing) Host ping partial fail. At least one host site/IP address ping is communicating
with the WattBox.
Red (Solid) None of the host sites/IP addresses are communicating with the WattBox.
Safe Voltage Blue (Solid) Safe Voltage is enabled and current incoming AC voltage is safe for operation. All
outlets are receiving power.
Blue (Slow Blink) Safe Voltage is enabled, but the incoming voltage is not safe.
O Safe Voltage is disabled.
Surge
Protected
Blue (Solid) e WattBox is powered on and outlets are protected.
O e WattBox is not powered on, or the MOVs have opened, removing power
from the outlets.
Grounded Blue (Solid) Incoming AC outlet is grounded.
O Incoming AC outlet is not grounded and requires inspection by an electrician.

WATTBOX™ 800CH1U-IPVM-8 Quick Start Guide
pg.7
POSITIONING OPTIONS
e WB-800CH1U-IPVM-8 can be placed in a cabinet or mounted to the rack.
Cabinet Placement
Attach supplied feet to the bottom of the WattBox for cabinet placement.
pg.8
WATTBOX™ 800CH1U-IPVM-8 Quick Start Guide
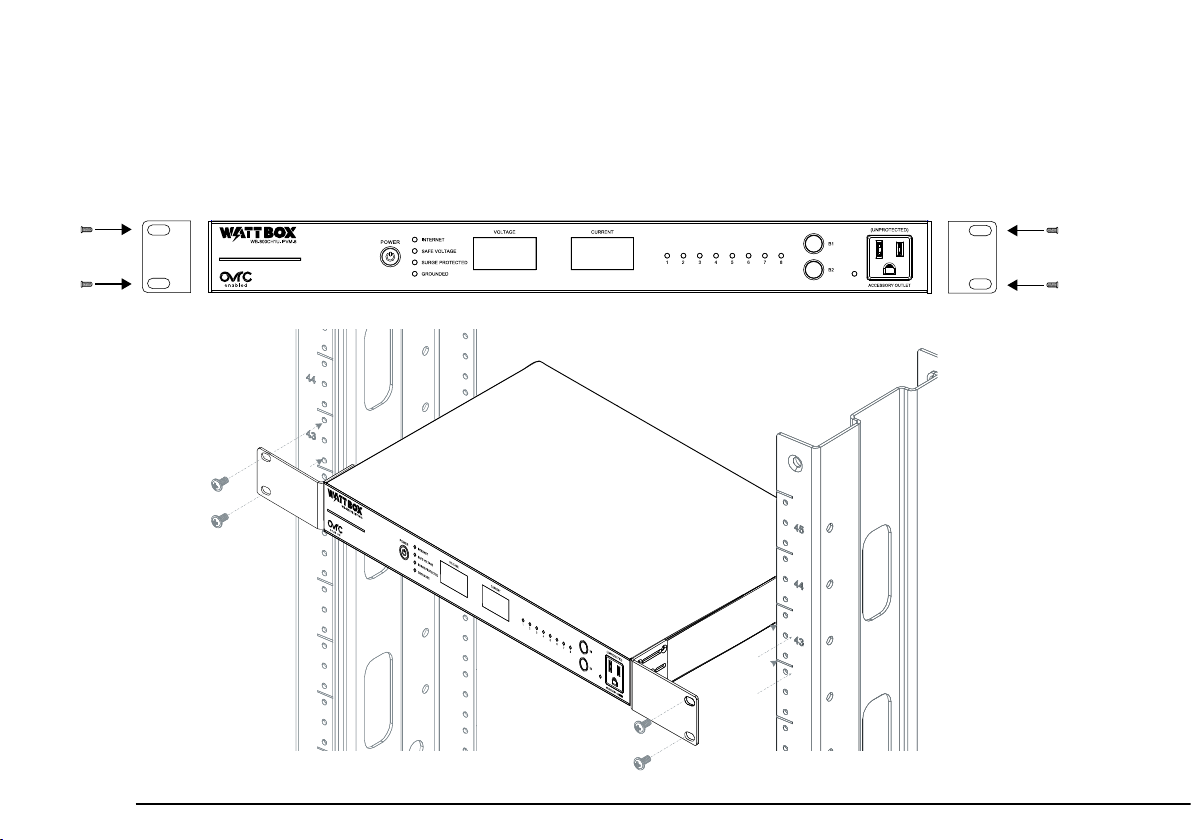
Rack Mounting
Attach mounting brackets to the WattBox using the supplied hardware, then install the WattBox into the rack using
standard rack screws (not included).
WATTBOX™ 800CH1U-IPVM-8 Quick Start Guide
pg.9
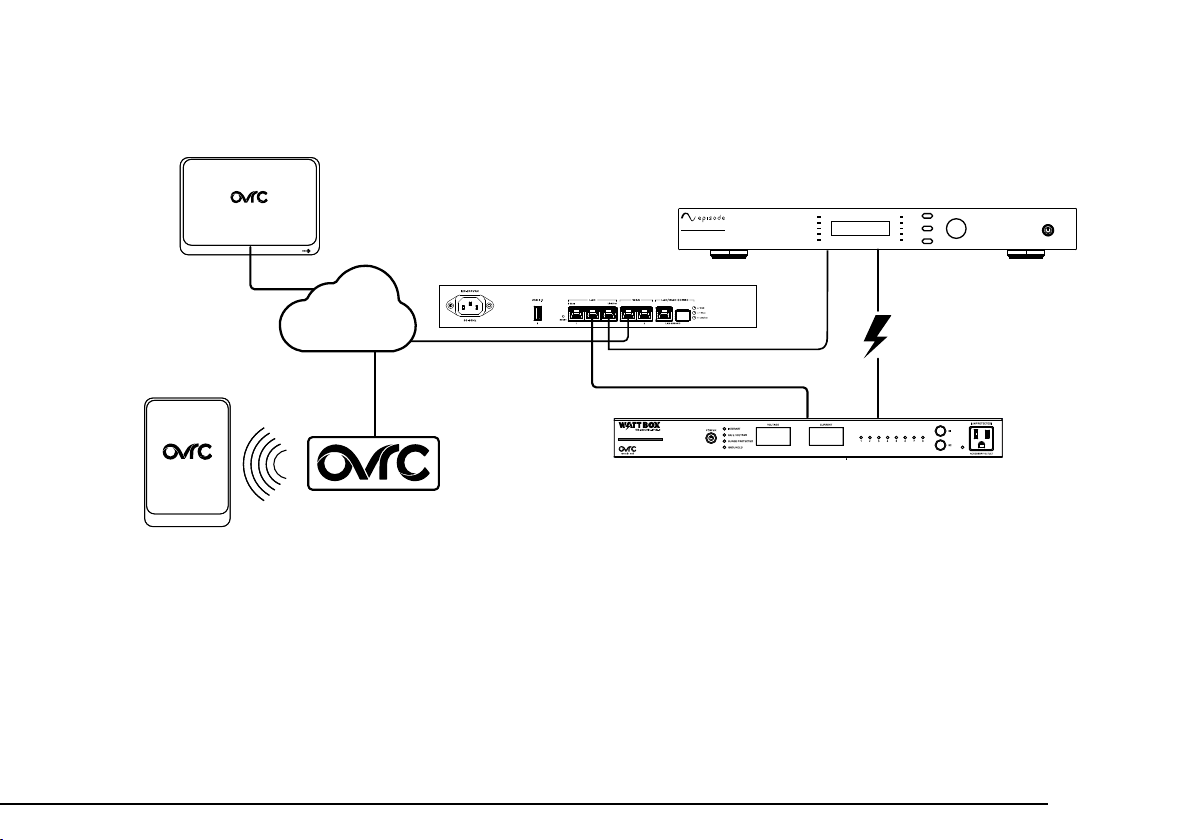
CONNECTIONS AND SETUP
Mobile
Apps
Web Browser
Access
EA-AMP-HYB-2D-1000
CH.SEL
PROTECT
CH2 ADJUST | SET
MENU
BACK
CLIP
-10
-20
SIGNAL
PROTECT
CH1
CLIP
-10
-20
SIGNAL
Router
1. If attaching a WattBox UPS battery pack to the power conditioner, connect an Ethernet cable between the UPS
Link ports on the power conditioner and the UPS.
2. For IP control and OvrC connectivity, connect a network cable from your router or switch into the WB-800
Network port.
3. Connect the IEC power cord to the power conditioner and to the WattBox UPS (if applicable) or a grounded
outlet.
Internet
OvrC Web Server
WB-800CH1U-IPVM-8

pg.10
WATTBOX™ 800CH1U-IPVM-8 Quick Start Guide
CLAIMING THE WATTBOX ON OVRC
e WB-800 has many powerful features that are accessed through OvrC, our award-winning remote
management tool.
If you are not familiar with OvrC, visit OvrC.com. To nd training for OvrC, log in to SnapAV.com, click on
the Training tab, and then launch Snap University.
Finishing Setup with OvrC
1. Ensure the WB-800 is connected to the internet via your router or network switch.
2. Log in to your OvrC account.
3. Add the WB-800 by entering its MAC address and service tag (ST) number.
You can now complete setup through OvrC. Ensure your rmware is up to date, schedule automatic reboots,
set up power-on delays, etc.

WATTBOX™ 800CH1U-IPVM-8 Quick Start Guide
pg.11
IMPORTANT SAFETY INSTRUCTIONS
Read and observe the following safety points at all times.
NOTICE
For indoor use only. Internal components are not sealed from the environment. e device can only be used in a xed
location such as a telecommunication centre, or a dedicated computer room. When you install the device, ensure
that the protective earthing connection of the socket-outlet is veried by a skilled person. Suitable for installation in
Information Technology Rooms in accordance with Article 645 of the National Electrical Code and NFPA 75.
Only use brackets/attachments/accessories specied by the manufacturer.
Do not place the device in an unstable position where it might fall and cause injuries. is equipment is not suitable for
use in locations where children are likely to be present.
Do not cover this device with a cloth. Do not install it on a carpet or rug.
CAUTION – Potential Injury
Do not use this product with extension cords, multioutlet power strips, multioutlet extenders, or UPS devices (other
than a WattBox UPS). e power capacity of these accessories can be overloaded by this product and may result in a
risk of re, or property damage.
WARNING – Lithium Battery
A lithium battery is molded into this device’s real-time clock. e lithium battery is not intended to be replaced; a
lithium battery can explode if it is incorrectly replaced. Do not recharge, disassemble, or incinerate a lithium battery.
Discard used lithium batteries according to local regulations.

pg.12
WATTBOX™ 800CH1U-IPVM-8 Quick Start Guide
WARNING – Power Sources, Grounding, Polarization
is plug is designed to be inserted into a NEMA 5-15 (three-prong grounded) outlet only. Do not force the plug into
an outlet that is not designed to accept it. Never dismantle the plug or to alter the power cord, and do not attempt to
defeat the grounding feature by using a 3-to-2 prong adapter. If you have questions about grounding, consult your local
power company or a qualied electrician.
is WattBox requires a properly grounded outlet for safety. If you’re not sure if your home’s electrical wiring is
properly grounded, have it checked by a qualied electrician.
If a rooop devices such as a satellite dish connects to the WattBox, ensure that the device’s wires are also properly
grounded.
e Bonding Point can be used to provide a common ground to other equipment. is bonding point can
accommodate minimum 12 AWG wire and should be connected using the required hardware specied by the other
bonding point. Please use termination for your equipment in accordance with applicable local agency requirements.
WARNING – Liquid: Avoiding Electrical Shocks
Do not operate the WattBox if liquid of any kind is spilled onto or inside the unit. Do not operate it near rain or water,
even water that is contained (e.g., bathtub or sink).
WARNING – Power Cord Safety
Do not place the power cord near areas with heavy foot trac (e.g., hallways). Do not create a trip hazard with
the power cord.
If the power cord’s protective jacket rips or frays, exposing the internal wiring or shielding, disconnect it from
the power source and replace the power cord immediately. See the warranty section of the owner’s manual for
details.
!

WATTBOX™ 800CH1U-IPVM-8 Quick Start Guide
pg.13
WARNING – No User Serviceable Parts Inside
If the WattBox is not operating properly, do not remove any part of the unit (cover, etc.) for repair. Unplug the unit and
consult the warranty section of the owner’s manual.
CAUTION – Exposure to Heat
Do not expose the WattBox to direct sunlight or place it near wall heaters, space heaters, or in an enclosed space prone
to temperature increase.
Do not use the device in a conned, poorly-ventilated location; this can overheat the unit, possibly even causing a re.
If used in a small space other than an EIA-standard rack, ensure that there is adequate space around the device.
CAUTION – Proper Cleaning
In general, the only cleaning necessary for is a light dusting. Unplug WattBox from the wall outlet before cleaning it.
Do not use liquid or aerosol cleaners.
FCC WARNING
WARNING!! Changes or modications to this unit not expressly approved by the party responsible for compliance
could void the user’s authority to operate the equipment.
is equipment has been tested and found to comply with the limits for a Class B Digital Device, pursuant to Part 15 of
the FCC Rules. ese limits are designed to provide reasonable protection against harmful interference in residential
installation. is equipment generates, uses and can radiate radio frequency energy and, if not installed and used in
accordance with the instruction manual, may cause harmful interference to radio communications. However, there
is no guarantee that interference will not occur in a particular installation. If this equipment does cause harmful
interference to radio or television reception, which can be determined by turning the equipment o and on, the user is
encouraged to try to correct the interference by one or more of the following measures:

pg.14
WATTBOX™ 800CH1U-IPVM-8 Quick Start Guide
• Reorient or relocate the receiving antenna.
• Increase the separation between the equipment and receiver.
• Connect the equipment into an outlet on a circuit dierent from that to which the receiver is connected.
• Consult the dealer or an experienced radio/TV technician for help.
Notice: (1) An unshielded-type power cord is required in order to meet FCC emission limits and also to prevent
interference to the nearby radio and television reception. It is essential that only the supplied power cord by used. (2)
Use only shielded cables to connect I/O devices to this equipment.
Note: THE MANUFACTURER IS NOT RESPONSIBLE FOR ANY RADIO OR TV INTERFERENCE CAUSED BY
UNAUTHORIZED MODIFICATIONS TO THIS EQUIPMENT. SUCH MODIFICATIONS COULD VOID THE
USER’S AUTHORITY TO OPERATE THE EQUIPMENT.
e Class B digital apparatus meets all requirements of the Canadian Interference-Causing Equipment Regulation.
Cet appareil numerique de la class B respecte toutes les exigencies du Reglement sur le materiel brouilleur du
Canada.
WARNING
is product can expose you to chemicals including carbon black, which is known to the State of California to cause
cancer. For more information go to www.P65Warnings.ca.gov.
To reduce the risk of electric shock, use only indoors and in dry locations.
!

WATTBOX™ 800CH1U-IPVM-8 Quick Start Guide
pg.15
TROUBLESHOOTING
Symptom Possible Cause Remedy
WattBox is not
receiving power
(No LEDs are
illuminated).
WattBox is not turned on. If the WattBox power button does not show blue, press it.
No power is being supplied. Make sure the AC power plug is plugged into a properly
grounded 120V (nominal) wall outlet.
Some outlets are controlled by a wall switch. Try ipping the
switches in the room, especially those near the wall outlet. Also
check the location’s circuit breakers.
Too many devices are connected, causing
an overload, tripping the WattBox’s internal
circuit breaker.
Press the circuit breaker reset button. Allow 10 minutes before
attempting to reset; otherwise, the reset will fail.
If the circuit breaker continues to trip, move one or more
components to another WattBox.
A single outlet
is o.
A schedule has turned the outlet o. If the outlet is scheduled to turn o, but should be on, delete
the schedule.
e attached
component is
not receiving
power from the
WattBox.
Component is plugged into a controlled
outlet and the outlet is o.
Log in to the WattBox interface to turn the outlet on.
Factory default the WattBox.
In some instances, a component plugged into
a switched outlet won’t automatically power
itself up when the WattBox is turned on.
Manually turn on the component.
Speakers emit
a humming or
buzzing noise.
WattBox is sharing AC power with
equipment that is not properly grounded.
Connect the WattBox to a dedicated outlet.
Unplug dierent components from the WattBox one at a time
to see if the noise stops.

pg.16
WATTBOX™ 800CH1U-IPVM-8 Quick Start Guide
SPECIFICATIONS
Outlets
Type NEMA 5-15
Number of Outlets 8 Rear, 1 Front
IP Controlled All rear outlets (8)
AC Power
Line Voltage 120V AC, 60 Hz
AC Input Connection IEC C-14
Power Cord Length 6 Feet
Circuit Breaker Rating 15A
UL Power Rating 1440W
UL Current Rating 12A
Voltage Protection Rating L-N: 700V / L-G: 600V / N-G: 700V
Joule Rating 3240 Joules
Surge Component Metal Oxide Varistor (MOV)
Protection Modes L-N, L-G, N-G
Peak Impulse Current 135,000A
Disconnect Circuitry Ye s
ermal Fuse Ye s
EMI / RFI Noise Filtration
Outlet Filter 53 dB, 1 kHz to 1 MHz
Safe Voltage Disconnect
Over Voltage 136V AC +/- 2V AC
Under Voltage 90V AC +/- 2V AC
Operating Temperature Range -10 to +40 °C (14 to 104 °F)
UL Certications UL 62368-1, UL 1449, UL 1283
WATTBOX™ 800CH1U-IPVM-8 Quick Start Guide
pg.17
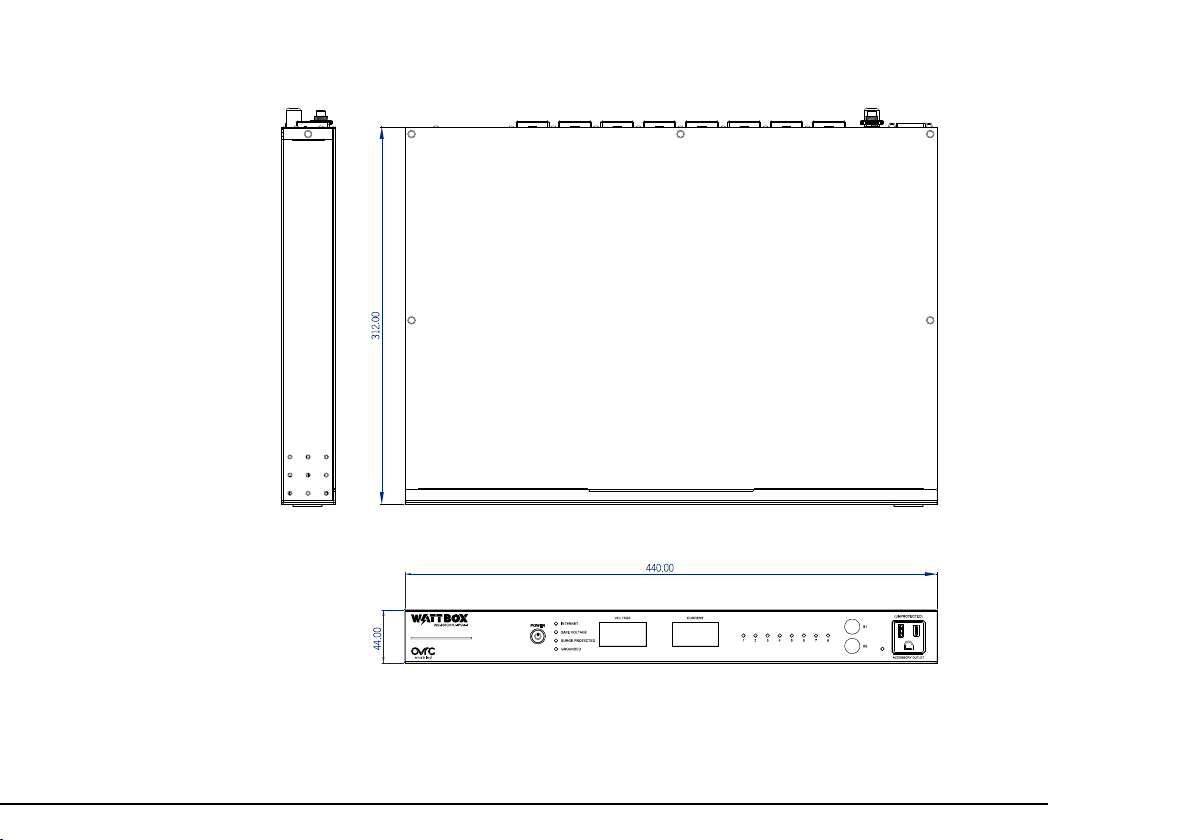
DIMENSIONS

pg.18
WATTBOX™ 800CH1U-IPVM-8 Quick Start Guide
WARRANTY
Limited Warranty
Find details of this product’s Limited Warranty at snapav.com/warranty, or request a paper copy from
Customer Service at (866) 424-4489. Find other legal resources, such as regulatory notices and patent
information, at snapav.com/legal.

Copyright ©2021, Wirepath Home Systems, LLC. All rights reserved. Control4 and Snap AV and their respective logos are registered trademarks or trademarks of Wirepath Home Systems, LLC, dba “Control4” and/or dba
“SnapAV” in the United States and/or other countries. 4Store, 4Sight, Control4 My Home, Snap AV, Araknis, Autonomic, BakPak, Binary, Dragony, Episode, Luma, Mockupancy, Nearus, NEEO, OvrC, Pakedge, Sense, Strong,
SunbriteTV, Triad, Visualint, WattBox, and Wirepath are also registered trademarks or trademarks of Wirepath Home Systems, LLC. Other names and brands may be claimed as the property of their respective owners. All
specications subject to change without notice.
200-WB-800CH1U-001 21-05-04 TW
LOGGING IN TO THE WEB INTERFACE
You need to enter the username and password to access the web interface. e default entries are below; be
sure to change these to maintain proper security (and log them below).
Default Custom
Username wattbox
Password wattbox
Table of contents
Other watt box AC Power Distribution manuals


Popular AC Power Distribution manuals by other brands

Superior Electric
Superior Electric STABILINE CRA141S010 instructions

Ring Powering
Ring Powering RINV500 PowerSource user manual

Furman
Furman RI-1210 instruction sheet

Ametek
Ametek 251RP Series User and programming manual

PS Audio
PS Audio Power Plant P300 operating instructions

INSTEON
INSTEON Hub user guide


